
 industry
Similar presentations:


Service Manual HD2173
1.
电压力煲HD2173
Published by Philips Consumer Lifestyle
1
Printed in China
Copy Right Reserved
Subject to modification
2.
EPC Working PrincipleCover the lid, close the lid and outer pot, and ensure that inner pot and lid are sealed by
sealing ring. Heating plate starts when power is on, and the pressure inside increases as
heat goes up. Pressure switch shuts up at a certain position due to the features of elastic
outer pot. Heating plate stops heating and the pressure inside decreases accordingly.
Heating plate resumes power when pressure switch closes by the features of elastic
outer pot. It recycles likewise.
Fuzzy logic EPC circuit diagram
2
3.
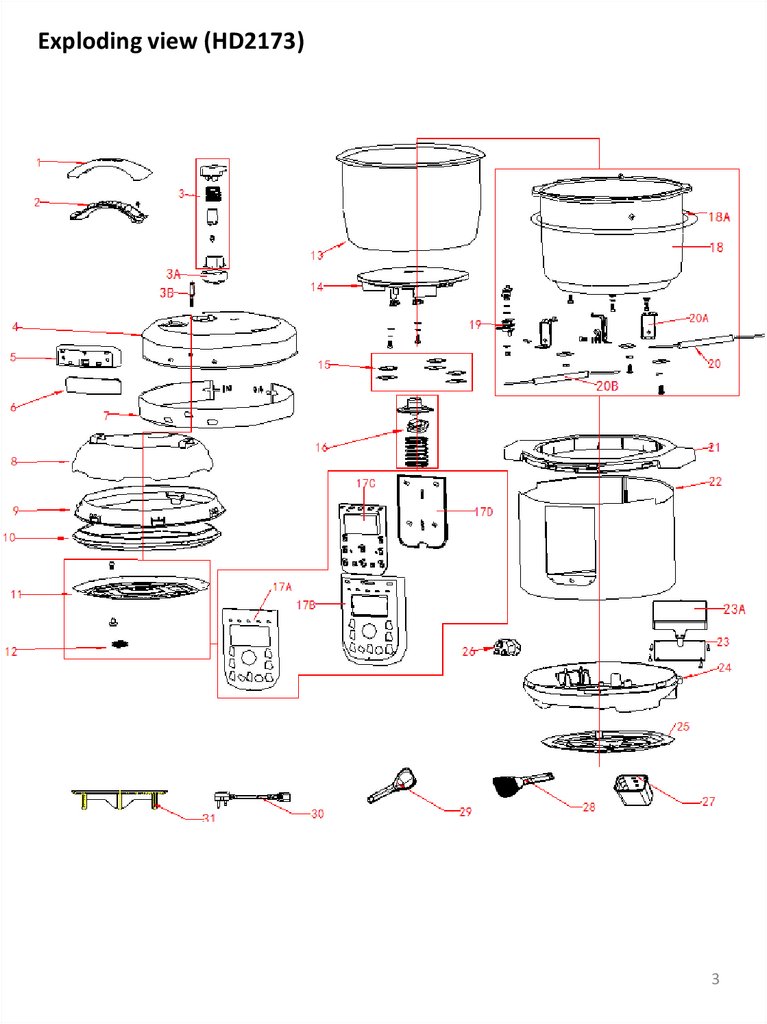
Exploding view (HD2173)3
4.
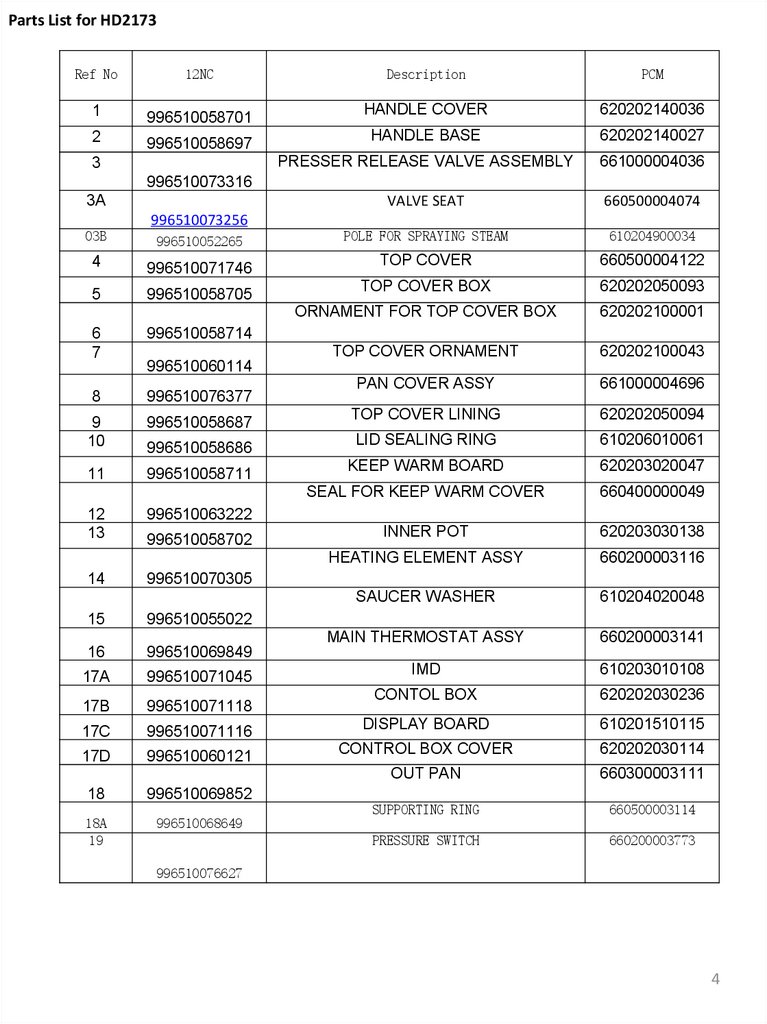
Parts List for HD2173Ref No
12NC
1
996510058701
2
996510058697
3
Description
PCM
HANDLE COVER
620202140036
HANDLE BASE
620202140027
PRESSER RELEASE VALVE ASSEMBLY
661000004036
VALVE SEAT
660500004074
POLE FOR SPRAYING STEAM
610204900034
TOP COVER
660500004122
TOP COVER BOX
620202050093
ORNAMENT FOR TOP COVER BOX
620202100001
TOP COVER ORNAMENT
620202100043
PAN COVER ASSY
661000004696
TOP COVER LINING
620202050094
LID SEALING RING
610206010061
KEEP WARM BOARD
620203020047
SEAL FOR KEEP WARM COVER
660400000049
INNER POT
620203030138
HEATING ELEMENT ASSY
660200003116
SAUCER WASHER
610204020048
MAIN THERMOSTAT ASSY
660200003141
IMD
610203010108
CONTOL BOX
620202030236
996510073316
3A
996510073256
03B
996510052265
4
996510071746
5
996510058705
6
7
996510058714
8
996510076377
9
10
996510058687
11
996510058711
12
13
14
996510060114
996510058686
996510063222
996510058702
996510070305
15
996510055022
16
996510069849
17A
996510071045
17B
996510071118
17C
996510071116
DISPLAY BOARD
610201510115
17D
996510060121
CONTROL BOX COVER
620202030114
OUT PAN
660300003111
SUPPORTING RING
660500003114
PRESSURE SWITCH
660200003773
18
996510069852
18A
19
996510068649
996510076627
4
5.
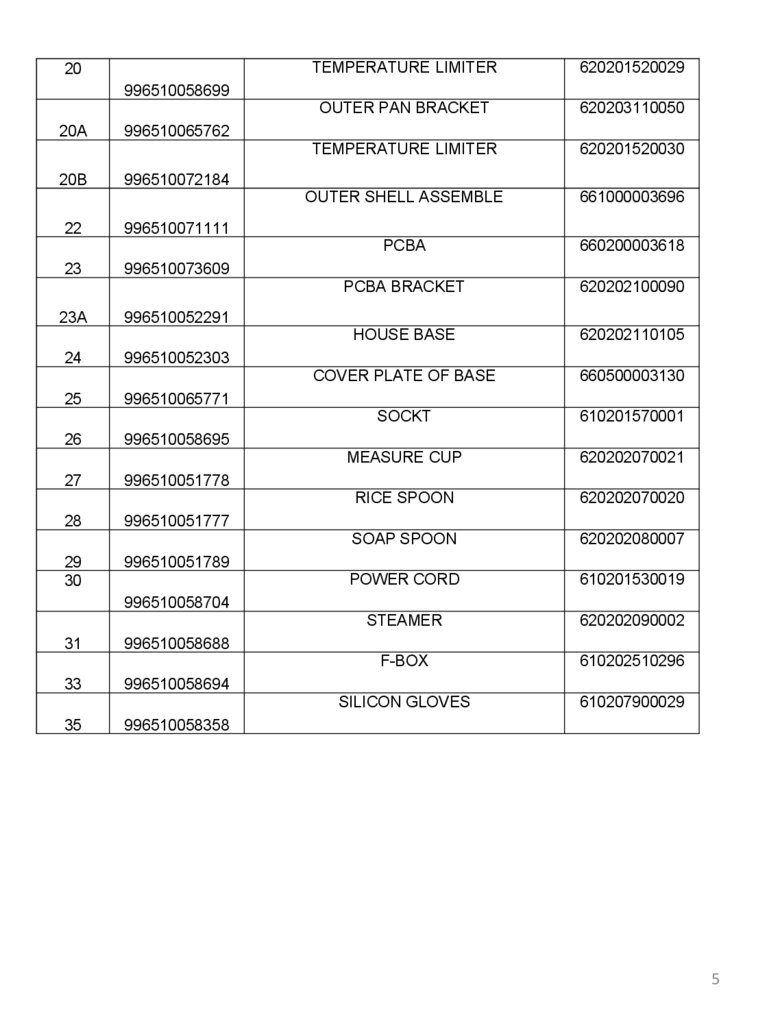
20TEMPERATURE LIMITER
620201520029
OUTER PAN BRACKET
620203110050
TEMPERATURE LIMITER
620201520030
OUTER SHELL ASSEMBLE
661000003696
PCBA
660200003618
PCBA BRACKET
620202100090
HOUSE BASE
620202110105
COVER PLATE OF BASE
660500003130
SOCKT
610201570001
MEASURE CUP
620202070021
RICE SPOON
620202070020
SOAP SPOON
620202080007
POWER CORD
610201530019
STEAMER
620202090002
F-BOX
610202510296
SILICON GLOVES
610207900029
996510058699
20A
20B
22
23
23A
24
25
26
27
28
29
30
996510065762
996510072184
996510071111
996510073609
996510052291
996510052303
996510065771
996510058695
996510051778
996510051777
996510051789
996510058704
31
33
35
996510058688
996510058694
996510058358
5
6.
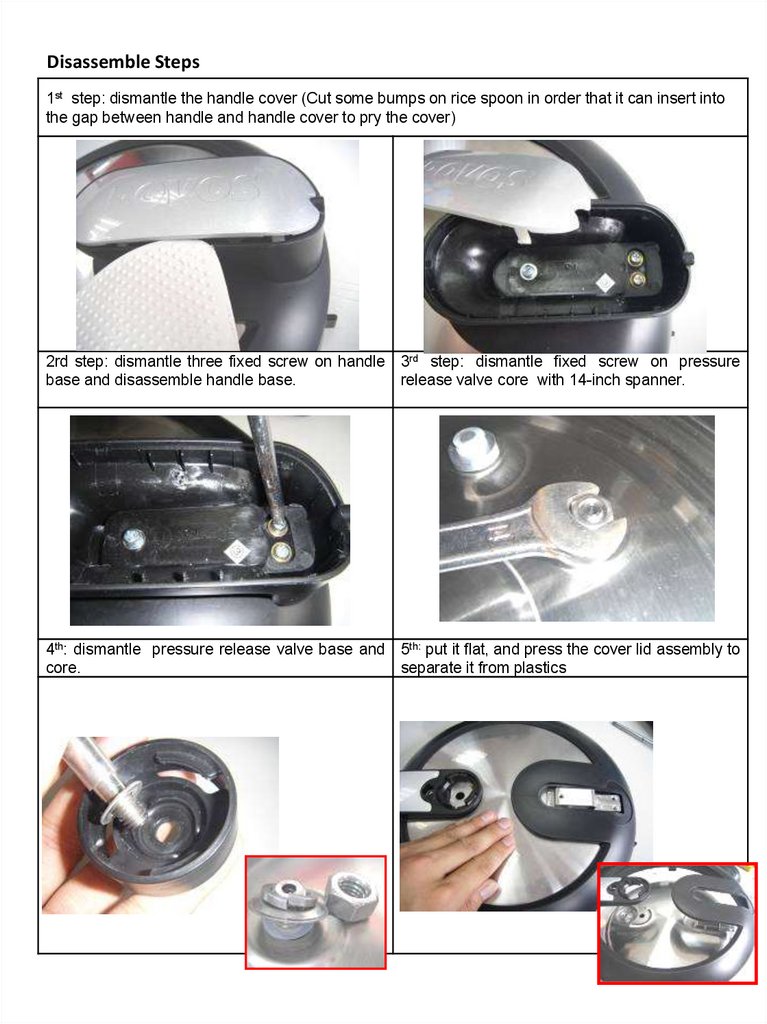
Disassemble Steps1st step: dismantle the handle cover (Cut some bumps on rice spoon in order that it can insert into
the gap between handle and handle cover to pry the cover)
2rd step: dismantle three fixed screw on handle 3rd step: dismantle fixed screw on pressure
base and disassemble handle base.
release valve core with 14-inch spanner.
4th: dismantle pressure release valve base and 5th: put it flat, and press the cover lid assembly to
core.
separate it from plastics
6
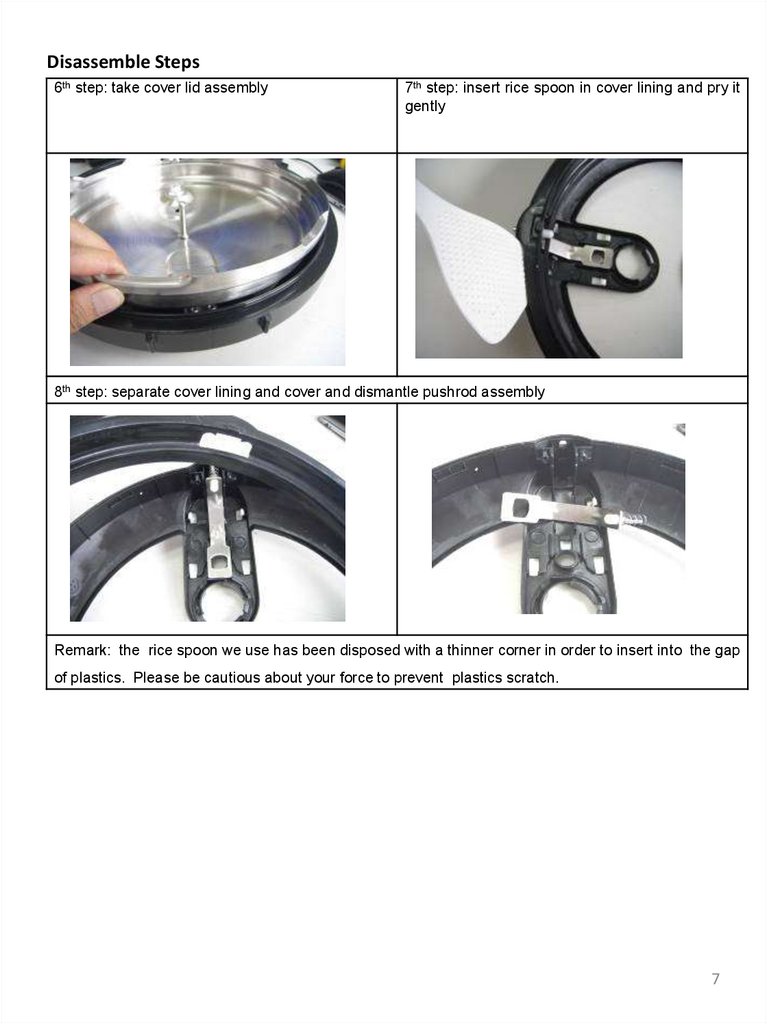
7.
Disassemble Steps6th step: take cover lid assembly
7th step: insert rice spoon in cover lining and pry it
gently
8th step: separate cover lining and cover and dismantle pushrod assembly
Remark: the rice spoon we use has been disposed with a thinner corner in order to insert into the gap
of plastics. Please be cautious about your force to prevent plastics scratch.
7
8.
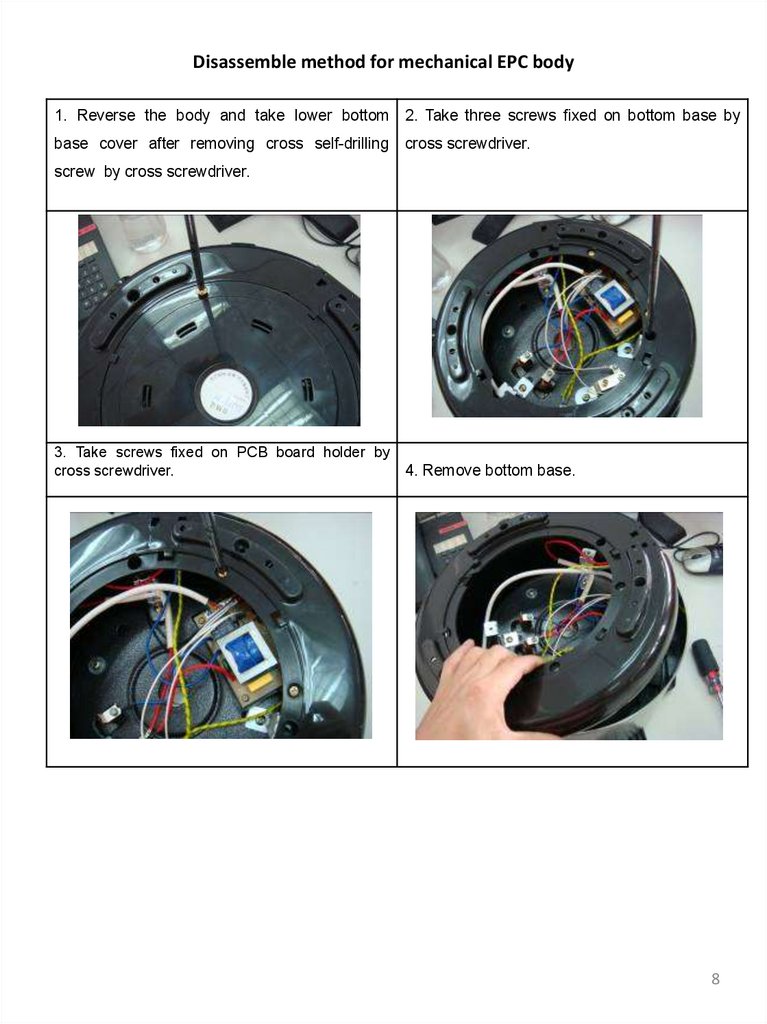
Disassemble method for mechanical EPC body1. Reverse the body and take lower bottom 2. Take three screws fixed on bottom base by
base cover after removing cross self-drilling cross screwdriver.
screw by cross screwdriver.
3. Take screws fixed on PCB board holder by
cross screwdriver.
4. Remove bottom base.
8
9.
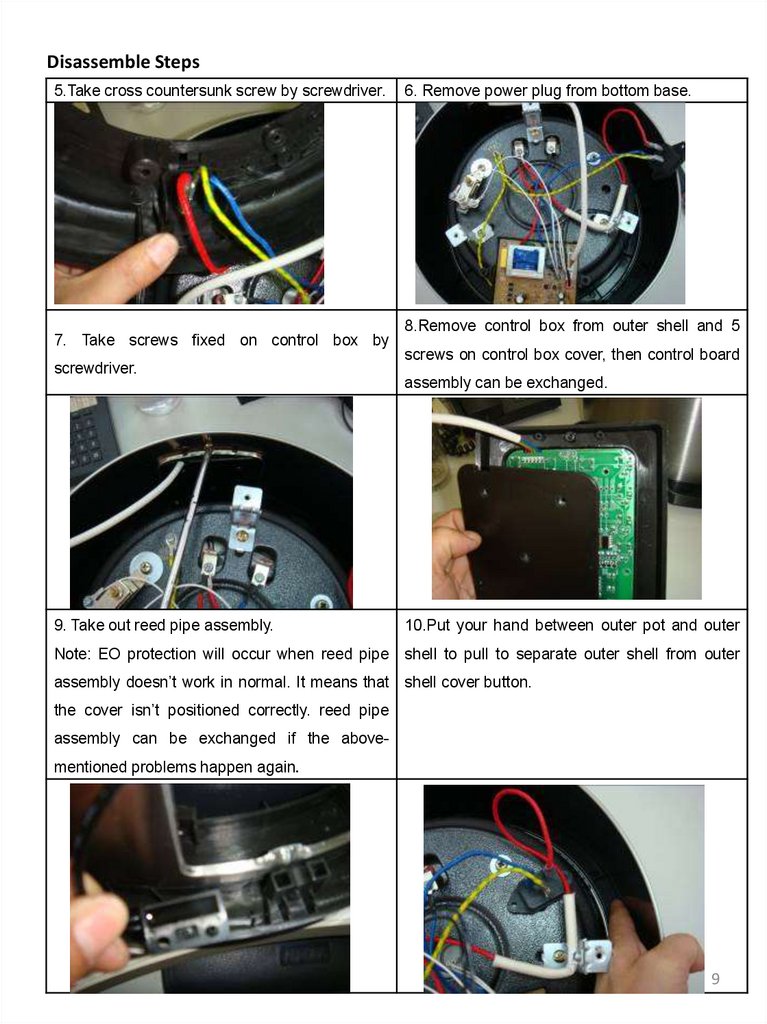
Disassemble Steps5.Take cross countersunk screw by screwdriver.
7. Take screws fixed on control box by
screwdriver.
9. Take out reed pipe assembly.
6. Remove power plug from bottom base.
8.Remove control box from outer shell and 5
screws on control box cover, then control board
assembly can be exchanged.
10.Put your hand between outer pot and outer
Note: EO protection will occur when reed pipe shell to pull to separate outer shell from outer
assembly doesn’t work in normal. It means that shell cover button.
the cover isn’t positioned correctly. reed pipe
assembly can be exchanged if the abovementioned problems happen again.
9
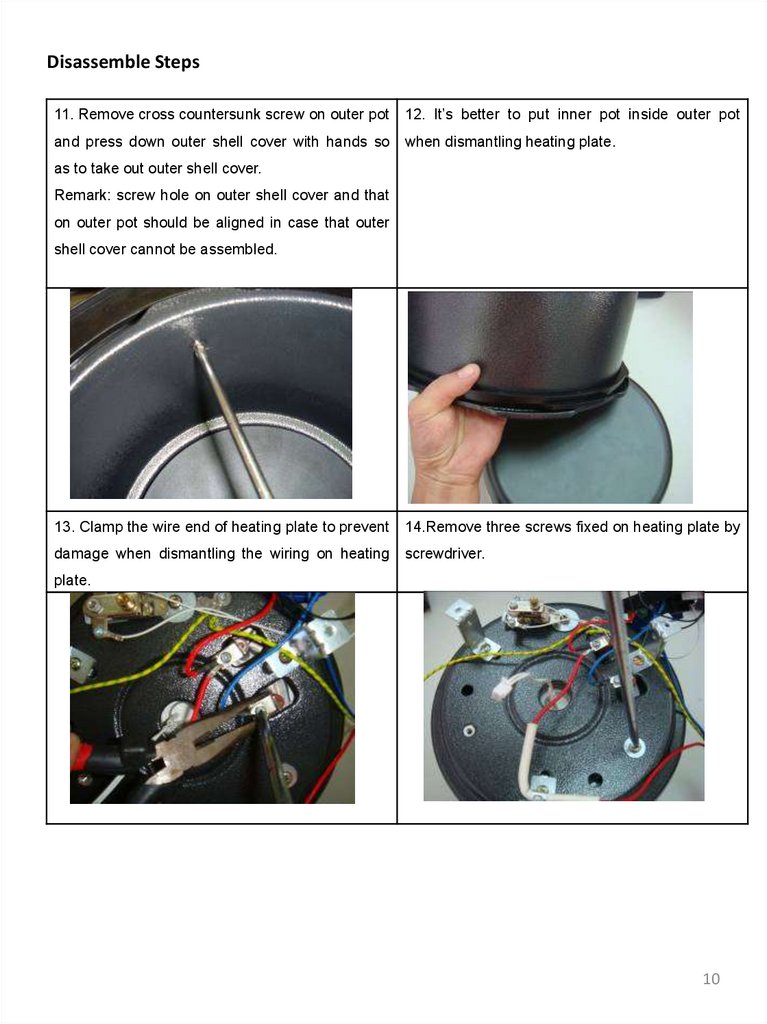
10.
Disassemble Steps11. Remove cross countersunk screw on outer pot
12. It’s better to put inner pot inside outer pot
and press down outer shell cover with hands so
when dismantling heating plate.
as to take out outer shell cover.
Remark: screw hole on outer shell cover and that
on outer pot should be aligned in case that outer
shell cover cannot be assembled.
13. Clamp the wire end of heating plate to prevent
14.Remove three screws fixed on heating plate by
damage when dismantling the wiring on heating
screwdriver.
plate.
10
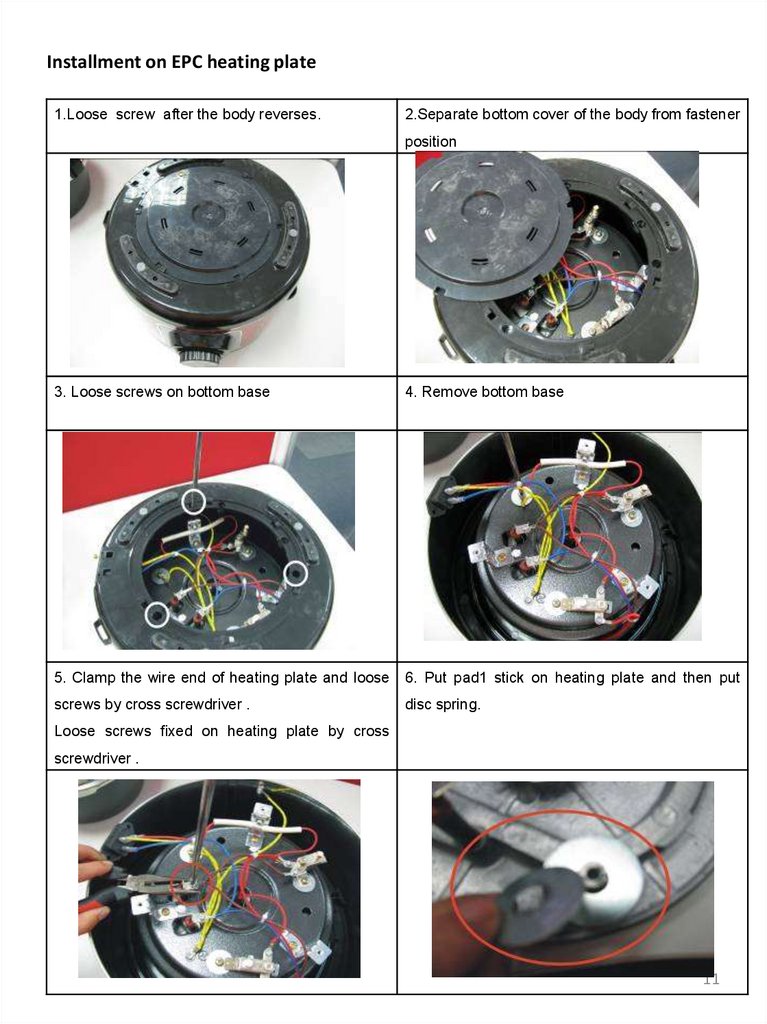
11.
Installment on EPC heating plate1.Loose screw after the body reverses.
2.Separate bottom cover of the body from fastener
position
3. Loose screws on bottom base
4. Remove bottom base
5. Clamp the wire end of heating plate and loose
6. Put pad1 stick on heating plate and then put
screws by cross screwdriver .
disc spring.
Loose screws fixed on heating plate by cross
screwdriver .
11
12.
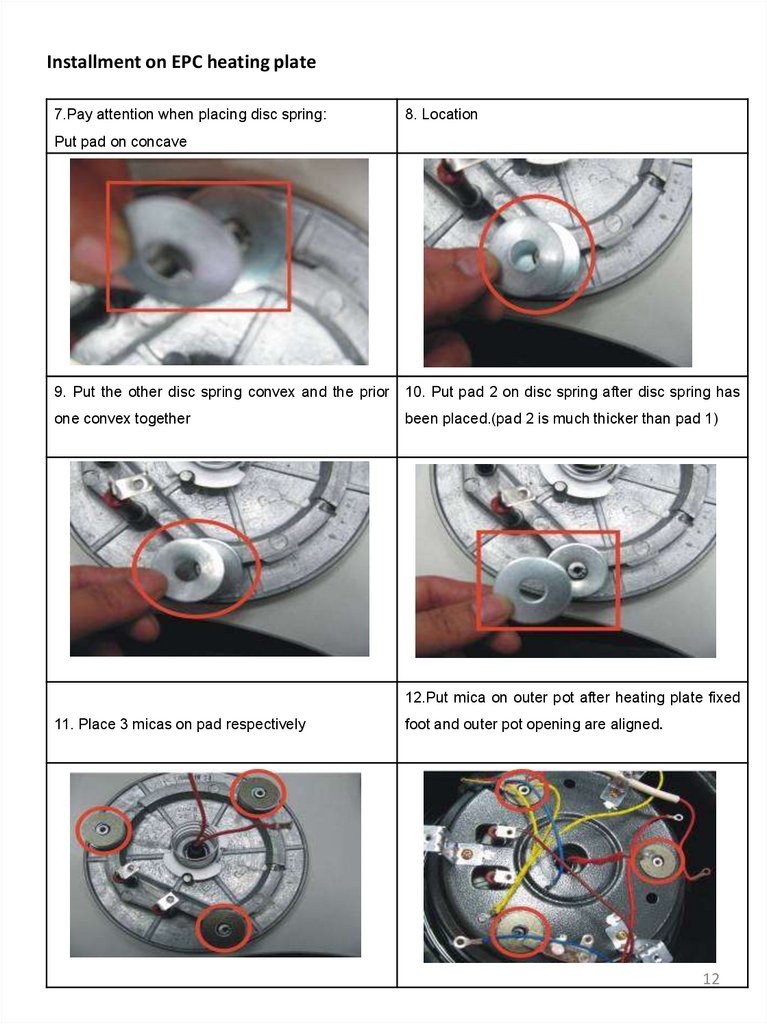
Installment on EPC heating plate7.Pay attention when placing disc spring:
8. Location
Put pad on concave
9. Put the other disc spring convex and the prior
10. Put pad 2 on disc spring after disc spring has
one convex together
been placed.(pad 2 is much thicker than pad 1)
12.Put mica on outer pot after heating plate fixed
11. Place 3 micas on pad respectively
foot and outer pot opening are aligned.
12
13.
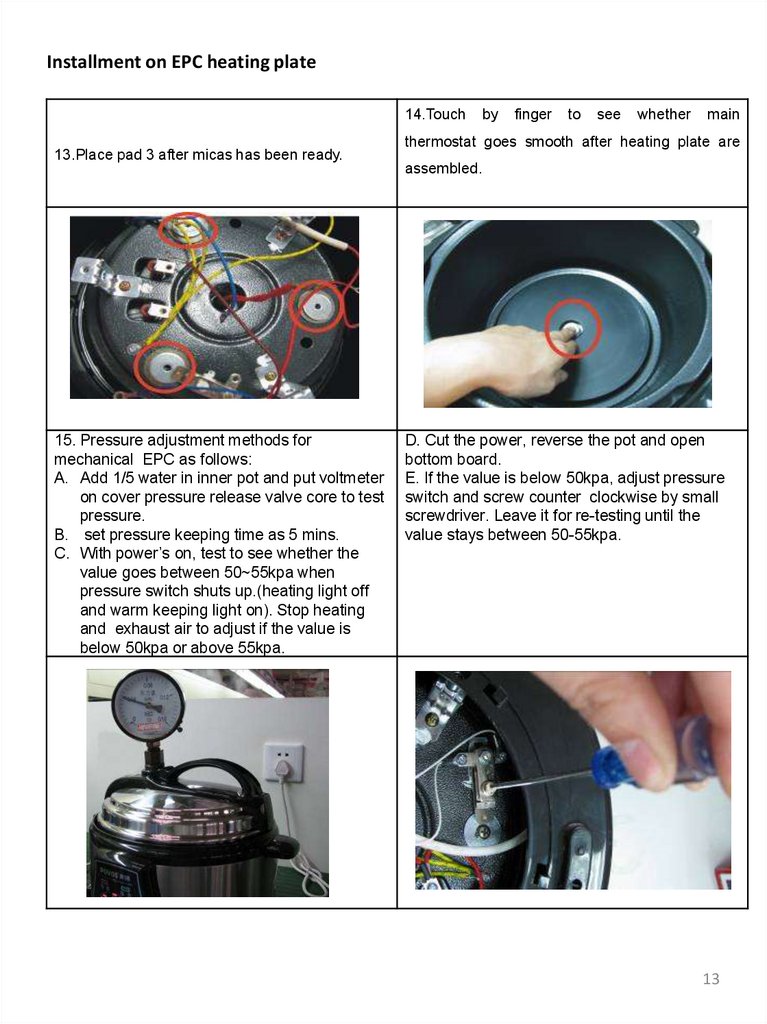
Installment on EPC heating plate14.Touch
13.Place pad 3 after micas has been ready.
15. Pressure adjustment methods for
mechanical EPC as follows:
A. Add 1/5 water in inner pot and put voltmeter
on cover pressure release valve core to test
pressure.
B. set pressure keeping time as 5 mins.
C. With power’s on, test to see whether the
value goes between 50~55kpa when
pressure switch shuts up.(heating light off
and warm keeping light on). Stop heating
and exhaust air to adjust if the value is
below 50kpa or above 55kpa.
by
finger
to
see
whether
main
thermostat goes smooth after heating plate are
assembled.
D. Cut the power, reverse the pot and open
bottom board.
E. If the value is below 50kpa, adjust pressure
switch and screw counter clockwise by small
screwdriver. Leave it for re-testing until the
value stays between 50-55kpa.
13
14.
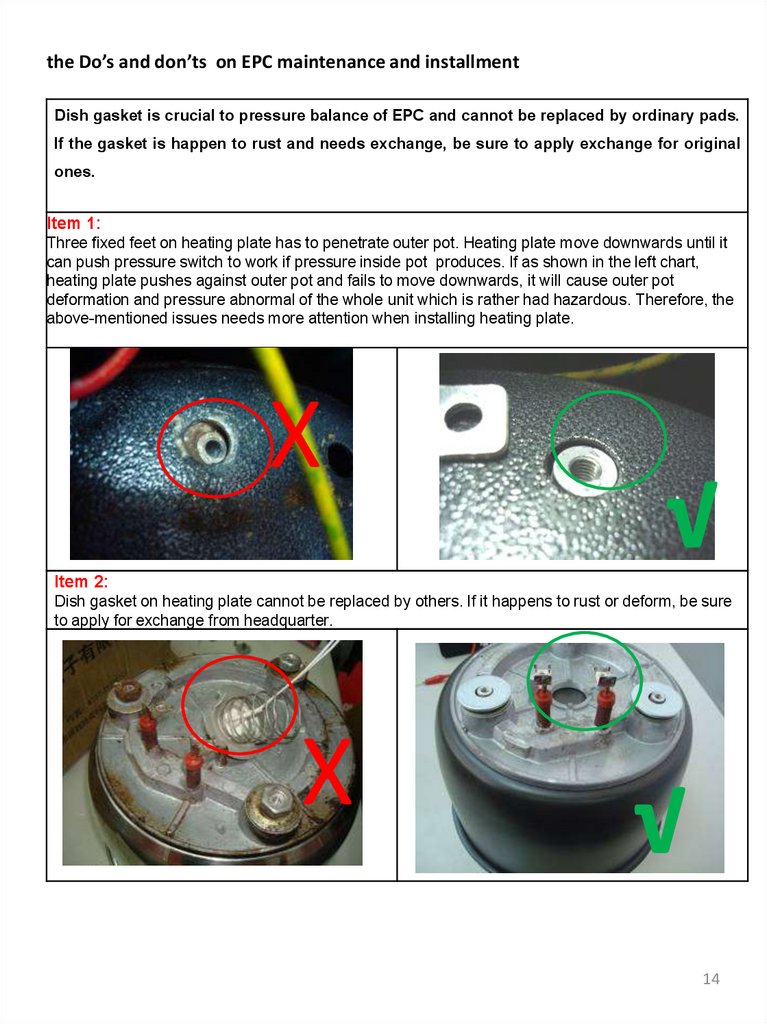
the Do’s and don’ts on EPC maintenance and installmentDish gasket is crucial to pressure balance of EPC and cannot be replaced by ordinary pads.
If the gasket is happen to rust and needs exchange, be sure to apply exchange for original
ones.
Item 1:
Three fixed feet on heating plate has to penetrate outer pot. Heating plate move downwards until it
can push pressure switch to work if pressure inside pot produces. If as shown in the left chart,
heating plate pushes against outer pot and fails to move downwards, it will cause outer pot
deformation and pressure abnormal of the whole unit which is rather had hazardous. Therefore, the
above-mentioned issues needs more attention when installing heating plate.
X
√
Item 2:
Dish gasket on heating plate cannot be replaced by others. If it happens to rust or deform, be sure
to apply for exchange from headquarter.
X
√
14
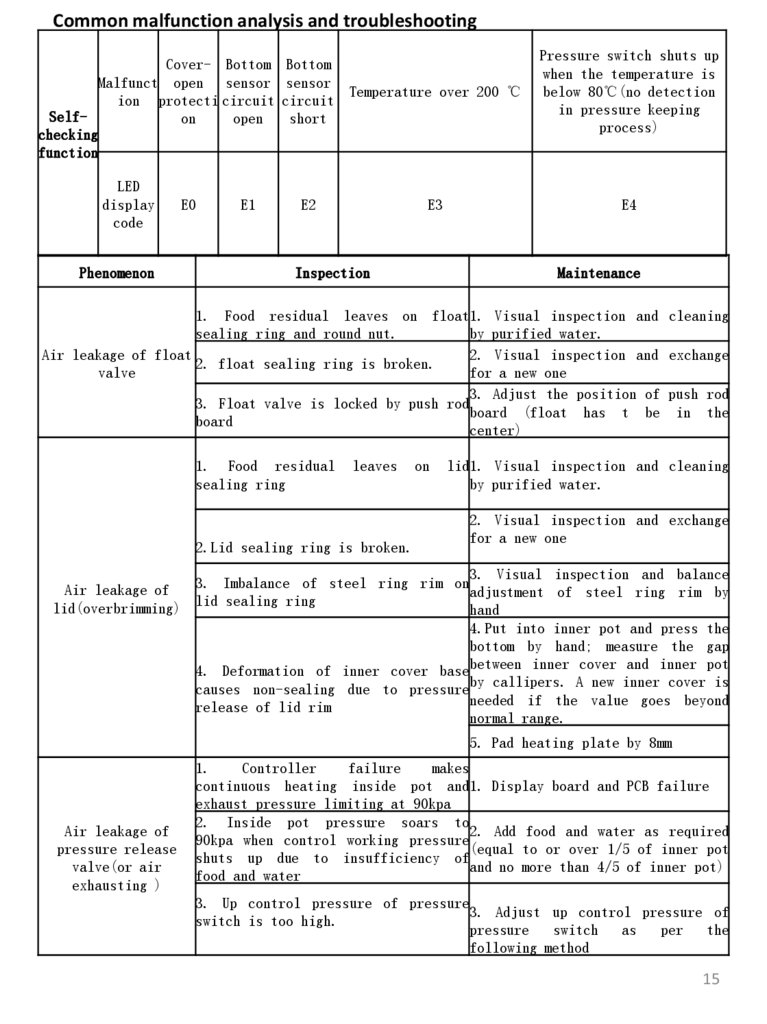
15.
Common malfunction analysis and troubleshootingCover- Bottom
Malfunct open sensor
ion protecti circuit
Selfon
open
checking
function
LED
display
code
Phenomenon
E0
E1
Bottom
sensor
Temperature over 200 ℃
circuit
short
E2
E3
Inspection
Pressure switch shuts up
when the temperature is
below 80℃(no detection
in pressure keeping
process)
E4
Maintenance
1. Food residual leaves on float1. Visual inspection and cleaning
sealing ring and round nut.
by purified water.
Air leakage of float
2. Visual inspection and exchange
2. float sealing ring is broken.
valve
for a new one
3. Adjust the position of push rod
3. Float valve is locked by push rod
board (float has t be in the
board
center)
1. Food residual
sealing ring
leaves
2.Lid sealing ring is broken.
on
lid1. Visual inspection and cleaning
by purified water.
2. Visual inspection and exchange
for a new one
3. Visual inspection and balance
3. Imbalance of steel ring rim on
Air leakage of
adjustment of steel ring rim by
lid(overbrimming) lid sealing ring
hand
4.Put into inner pot and press the
bottom by hand; measure the gap
4. Deformation of inner cover basebetween inner cover and inner pot
causes non-sealing due to pressureby callipers. A new inner cover is
needed if the value goes beyond
release of lid rim
normal range.
5. Pad heating plate by 8mm
Air leakage of
pressure release
valve(or air
exhausting )
1.
Controller
failure
makes
continuous heating inside pot and1. Display board and PCB failure
exhaust pressure limiting at 90kpa
2. Inside pot pressure soars to
2. Add food and water as required
90kpa when control working pressure
(equal to or over 1/5 of inner pot
shuts up due to insufficiency of
and no more than 4/5 of inner pot)
food and water
3. Up control pressure of pressure
3. Adjust up control pressure of
switch is too high.
pressure
switch
as
per
the
following method
15
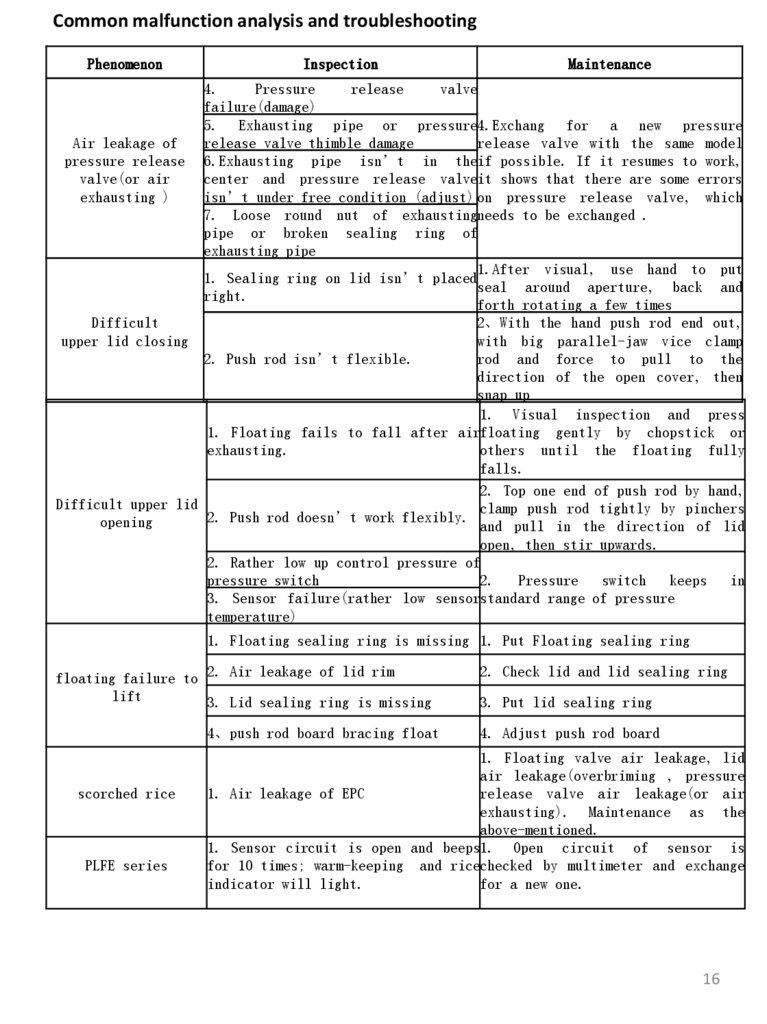
16.
Common malfunction analysis and troubleshootingPhenomenon
Inspection
Maintenance
4.
Pressure
release
valve
failure(damage)
5. Exhausting pipe or pressure4.Exchang for a new pressure
Air leakage of
release valve thimble damage
release valve with the same model
pressure release 6.Exhausting pipe isn’t in theif possible. If it resumes to work,
valve(or air
center and pressure release valveit shows that there are some errors
exhausting )
isn’t under free condition (adjust) on pressure release valve, which
7. Loose round nut of exhaustingneeds to be exchanged .
pipe or broken sealing ring of
exhausting pipe
1.After visual, use hand to put
1. Sealing ring on lid isn’t placed
seal around aperture, back and
right.
forth rotating a few times
Difficult
2、With the hand push rod end out,
upper lid closing
with big parallel-jaw vice clamp
2. Push rod isn’t flexible.
rod and force to pull to the
direction of the open cover, then
snap up
1. Visual inspection and press
1. Floating fails to fall after airfloating gently by chopstick or
exhausting.
others until the floating fully
falls.
2. Top one end of push rod by hand,
Difficult upper lid
clamp push rod tightly by pinchers
2. Push rod doesn’t work flexibly.
opening
and pull in the direction of lid
open, then stir upwards.
2. Rather low up control pressure of
pressure switch
2.
Pressure
switch
keeps
in
3. Sensor failure(rather low sensorstandard range of pressure
temperature)
1. Floating sealing ring is missing 1. Put Floating sealing ring
floating failure to 2. Air leakage of lid rim
lift
3. Lid sealing ring is missing
4、push rod board bracing float
scorched rice
PLFE series
2. Check lid and lid sealing ring
3. Put lid sealing ring
4. Adjust push rod board
1. Floating valve air leakage, lid
air leakage(overbriming , pressure
1. Air leakage of EPC
release valve air leakage(or air
exhausting). Maintenance as the
above-mentioned.
1. Sensor circuit is open and beeps1. Open circuit of sensor is
for 10 times; warm-keeping and ricechecked by multimeter and exchange
indicator will light.
for a new one.
16
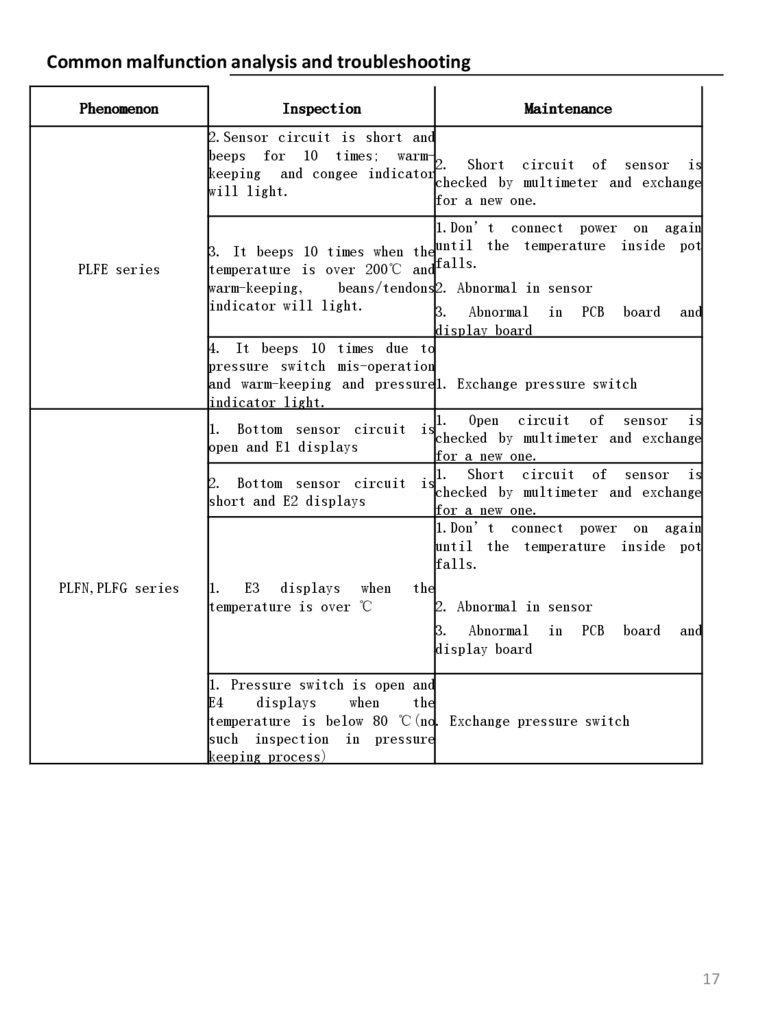
17.
Common malfunction analysis and troubleshootingPhenomenon
Inspection
Maintenance
2.Sensor circuit is short and
beeps for 10 times; warm2. Short circuit of sensor is
keeping and congee indicator
checked by multimeter and exchange
will light.
for a new one.
PLFE series
1.Don’t connect power on again
3. It beeps 10 times when theuntil the temperature inside pot
temperature is over 200℃ andfalls.
warm-keeping,
beans/tendons2. Abnormal in sensor
indicator will light.
3. Abnormal in PCB board and
display board
4. It beeps 10 times due to
pressure switch mis-operation
and warm-keeping and pressure1. Exchange pressure switch
indicator light.
1. Open circuit of sensor is
1. Bottom sensor circuit is
checked by multimeter and exchange
open and E1 displays
for a new one.
1. Short circuit of sensor is
2. Bottom sensor circuit is
checked by multimeter and exchange
short and E2 displays
for a new one.
1.Don’t connect power on again
until the temperature inside pot
falls.
PLFN,PLFG series
1. E3 displays when
temperature is over ℃
the
2. Abnormal in sensor
3. Abnormal
display board
in
PCB
board
and
1. Pressure switch is open and
E4
displays
when
the
temperature is below 80 ℃(no. Exchange pressure switch
such inspection in pressure
keeping process)
17