Similar presentations:
Fuel normal operation
1.
FUELMENU
Normal operation
1/84
2.
During the walk around, you must checkseveral items which are part of the fuel system.
These items are not major components but a
check of their condition is very important.
FUEL
MENU
Normal operation
2/84
3.
Fuel can be measuredmanually by the magnetic fuel
level indicators located in each
fuel tank.
We are looking at a
magnetic fuel level indicator in
the right inner tank. It should
be flush with the aircraft
surface.
FUEL
MENU
Normal operation
3/84
4.
We are looking at the waterdrain valve in the right inner
tank. Each tank has a water
drain valve.
You should check that there
is no water leaking from the
valve.
If there is a leak call
maintenance.
FUEL
MENU
Normal operation
4/84
5.
A refuel panel islocated on the fuselage
side beneath the right
wing.
You should check
that the REFUEL panel
access door is closed.
FUEL
MENU
Normal operation
5/84
6.
A single refueling point isinstalled under the right wing.
You should check that the
refuel coupling door is closed.
Note : Another refueling point
can be installed under the left
wing as an option.
FUEL
MENU
Normal operation
6/84
7.
There is one surge tankconnected to the outer tank in
each wing tip. These small
tanks protect the system
against
overpressure
and
thermal expansion.
You cannot monitor or
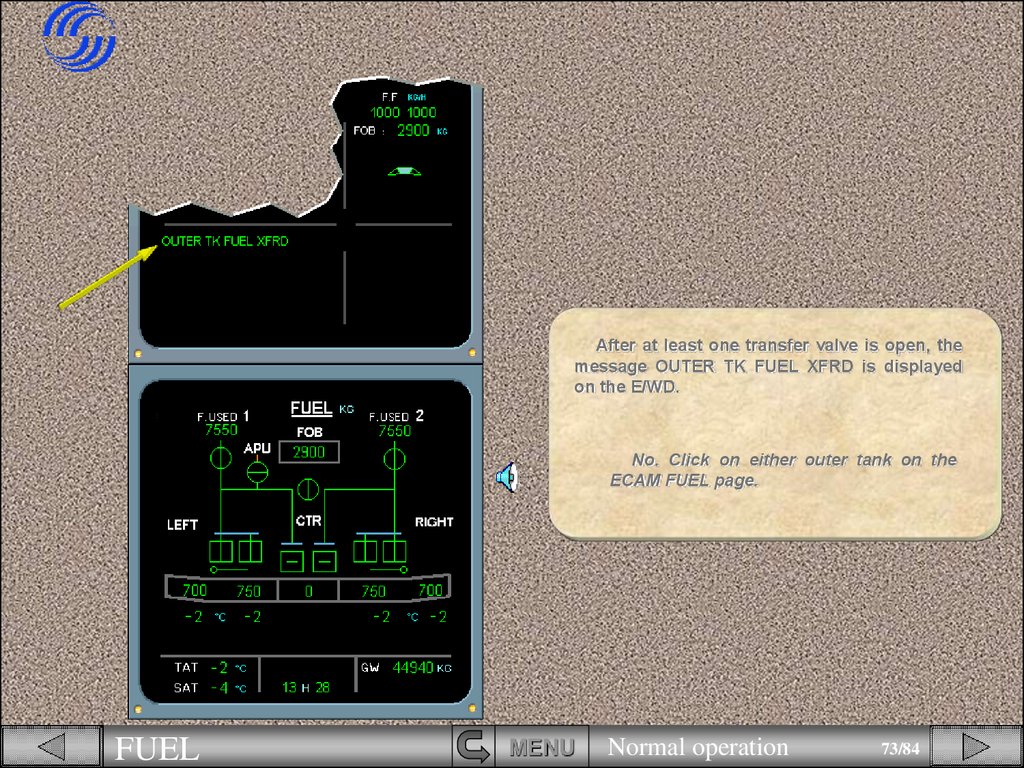
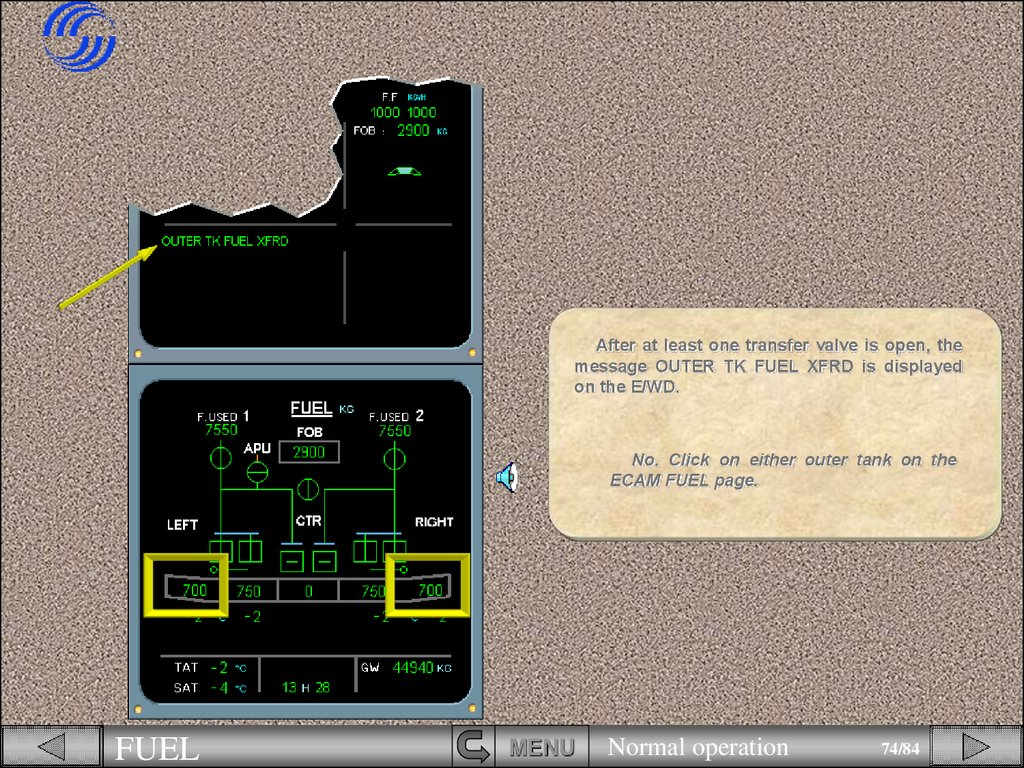
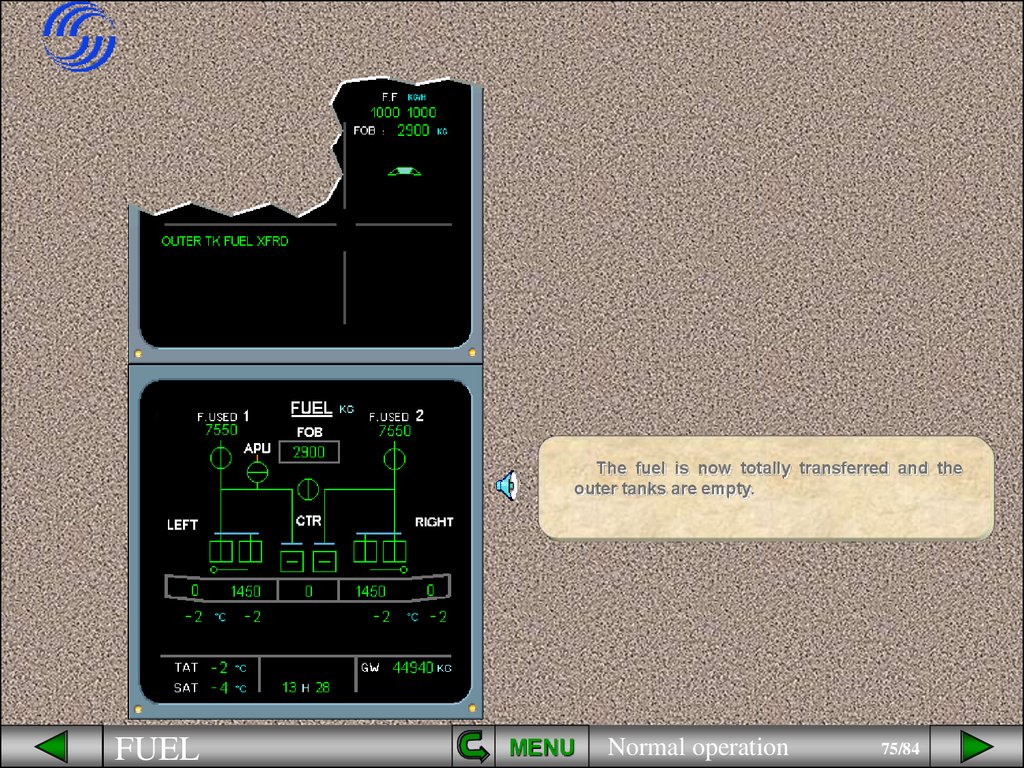
control surge tanks from the
cockpit.
The surge tank inlet should
be clear of any blockage.
FUEL
MENU
Normal operation
7/84
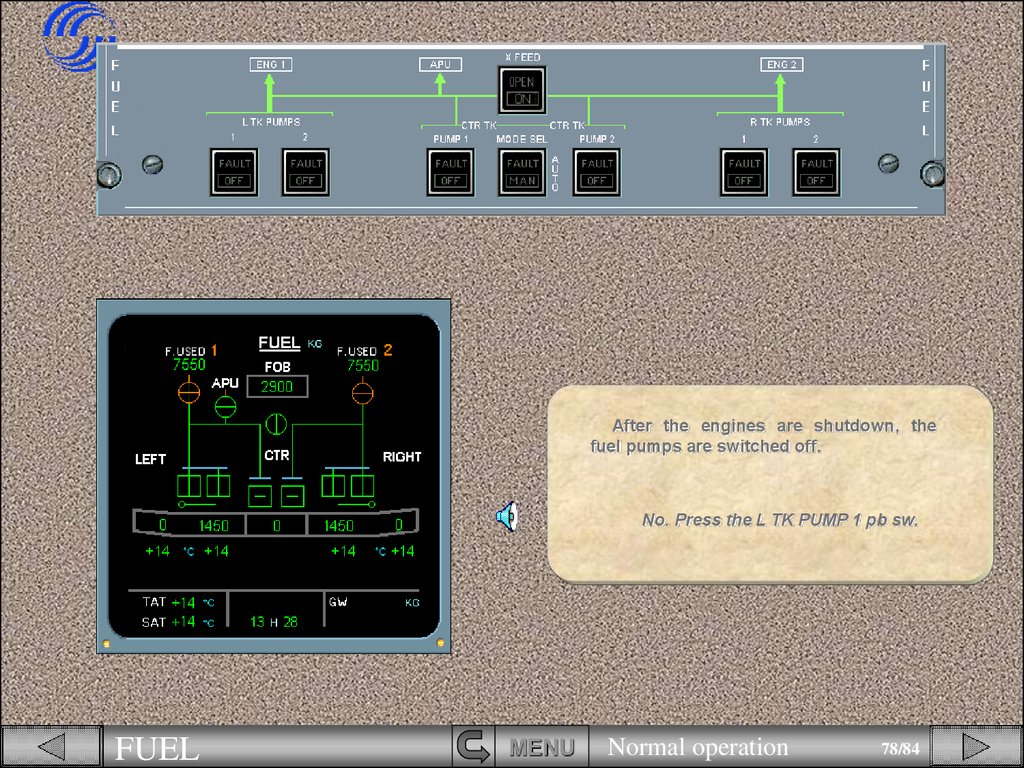
8.
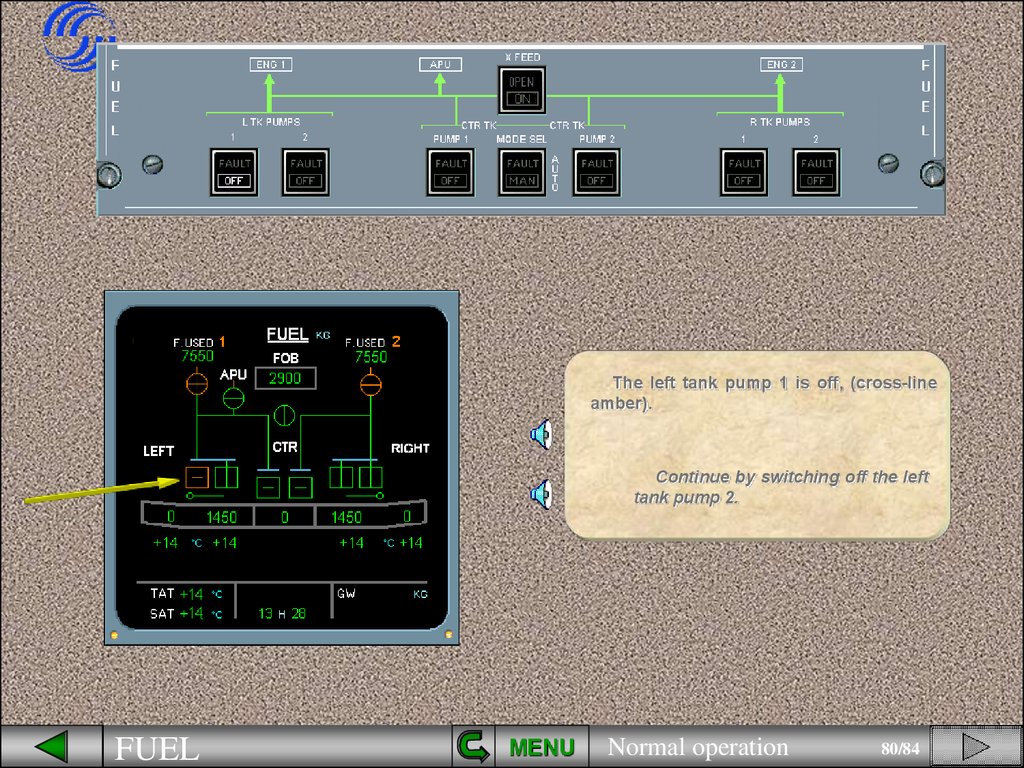
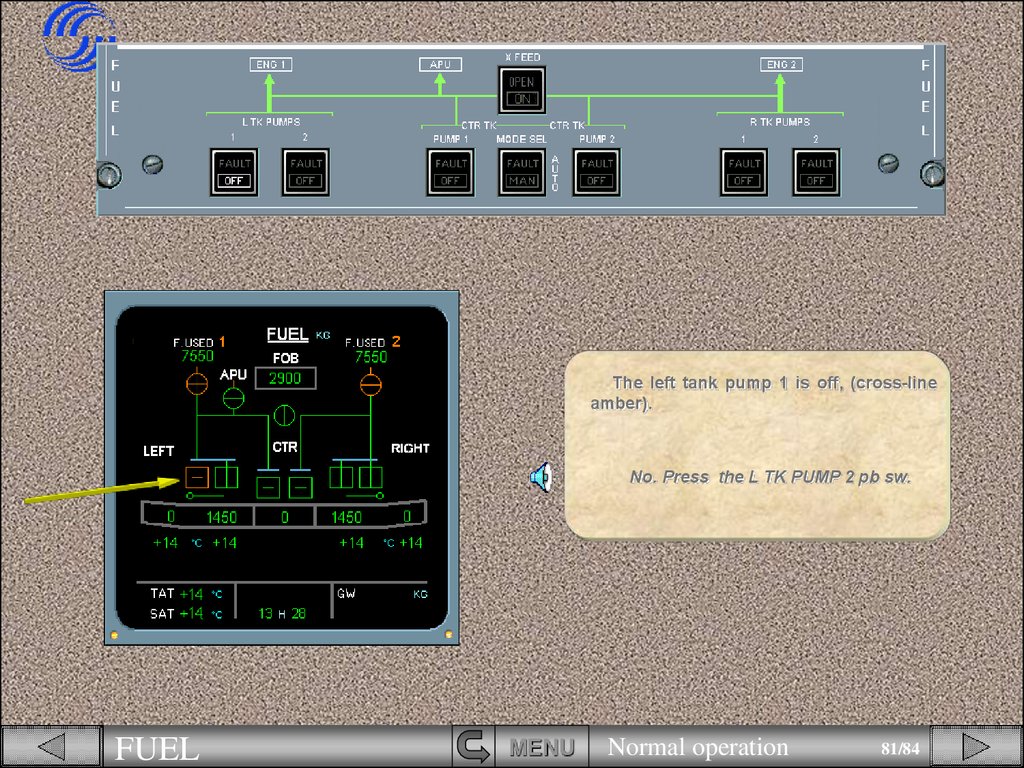
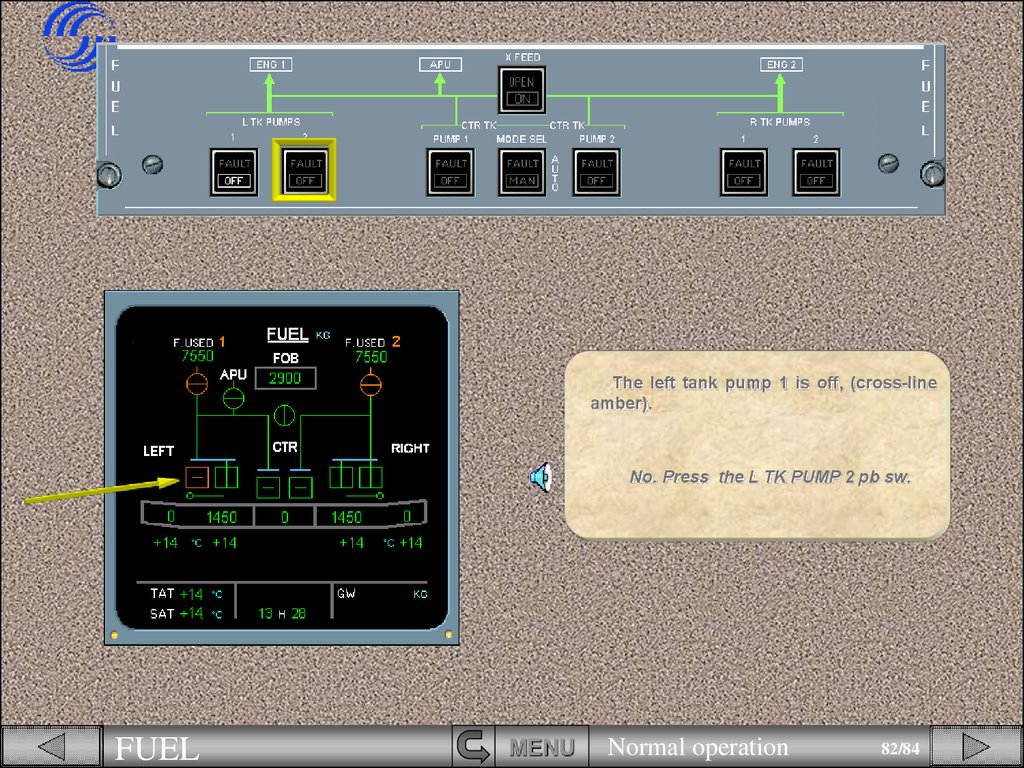
There is also a shroud drainmast. It drains fuel that could
leak from the system.
You should check that there
is no fuel leaking from the
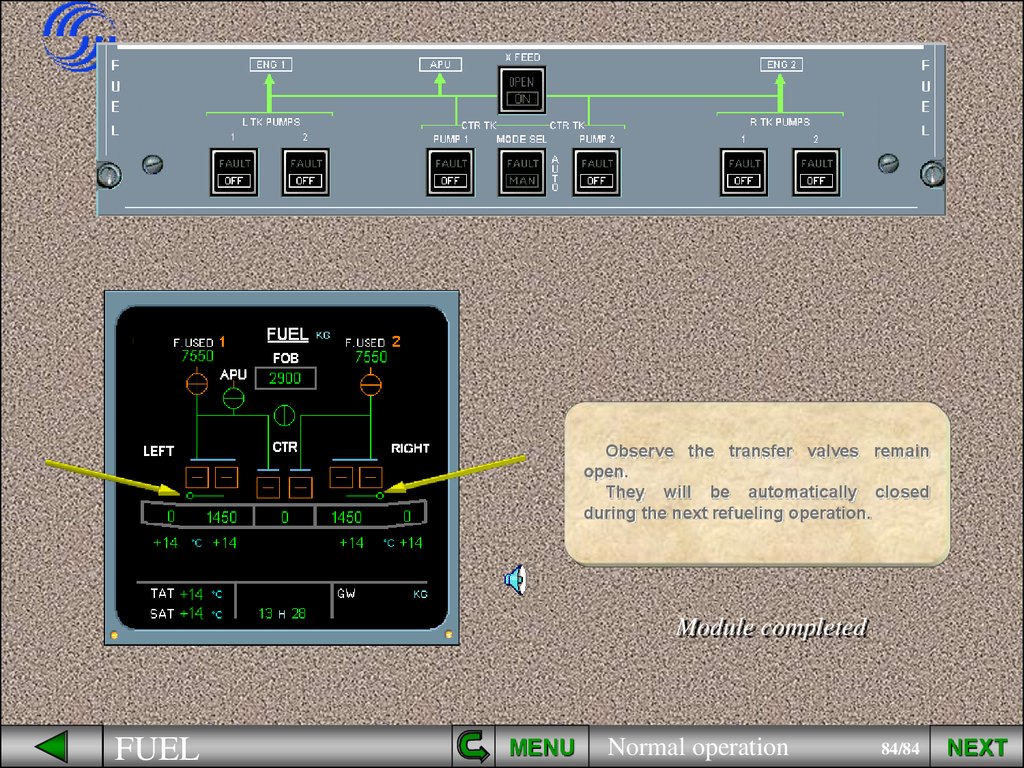
mast.
The items related to the fuel
system during the walk around
are complete.
FUEL
MENU
Normal operation
8/84
9.
We will now discuss items related tothe fuel system that you will encounter
during cockpit preparation.
To better illustrate what occurs
in the fuel system, select the ECAM
FUEL page using the ECAM
control panel.
FUEL
MENU
Normal operation
9/84
10.
We will now discuss items related tothe fuel system that you will encounter
during cockpit preparation.
No. Press the FUEL key.
FUEL
MENU
Normal operation
10/84
11.
We will now discuss items related tothe fuel system that you will encounter
during cockpit preparation.
No. Press the FUEL key.
FUEL
MENU
Normal operation
11/84
12.
With the pumps in theOFF position, observe the
symbology on the ECAM.
The pumps are crossline amber.
FUEL
MENU
Normal operation
12/84
13.
During cockpit preparation, allwhite ligths in the cockpit must be
extinguished.
Switch ON the left tank pump
1 and observe the ECAM
indications.
FUEL
MENU
Normal operation
13/84
14.
During cockpit preparation, allwhite ligths in the cockpit must be
extinguished.
No. Press the L TK PUMP 1 pb sw.
FUEL
MENU
Normal operation
14/84
15.
During cockpit preparation, allwhite ligths in the cockpit must be
extinguished.
No. Press the L TK PUMP 1 pb sw.
FUEL
MENU
Normal operation
15/84
16.
The left tank pump 1 on theECAM FUEL page is in-line green,
indicating that the pump is running.
Continue by switching ON
the left tank pump 2.
FUEL
MENU
Normal operation
16/84
17.
The left tank pump 1 on theECAM FUEL page is in-line green,
indicating that the pump is running.
No. Press the L TK PUMP 2 pb sw.
FUEL
MENU
Normal operation
17/84
18.
The left tank pump 1 on theECAM FUEL page is in-line green,
indicating that the pump is running.
No. Press the L TK PUMP 2 pb sw.
FUEL
MENU
Normal operation
18/84
19.
The left tank pump 2 is now alsorunning.
Click on the forward arrow to
finish swicthing the center and
right tank pumps on.
FUEL
MENU
Normal operation
19/84
20.
All the pumps are now running.Before you continue, you observe a
message on the E/WD.
Click on the forward arrow to
display the E/WD.
FUEL
MENU
Normal operation
20/84
21.
Themessage
"REFUELG"
displayed on the E/WD indicates
that the refuel control panel door is
open.
Now let's continue the preflight
by inserting the fuel weight in the
MCDU.
FUEL
MENU
Normal operation
21/84
22.
We have typed the fuel weight in thescratch pad for you.
Note : You can insert the fuel weight in the
MCDU while refueling is in progress.
Enter the Fuel weight in the MCDU .
FUEL
MENU
Normal operation
22/84
23.
We have typed the fuel weight in thescratch pad for you.
Note : You can insert the fuel weight in the
MCDU while refueling is in progress.
No. Press the Line Select Key 2R.
FUEL
MENU
Normal operation
23/84
24.
We have typed the fuel weight in thescratch pad for you.
Note : You can insert the fuel weight in the
MCDU while refueling is in progress.
No. Press the Line Select Key 2R.
FUEL
MENU
Normal operation
24/84
25.
Click on the forward arrow tocontinue.
FUEL
MENU
Normal operation
25/84
26.
A few minutes later you observe thatthe refueling message on the E/WD has
disappeared, indicating that refueling is
complete and the refueling control
panel door is closed.
FUEL
MENU
Normal operation
26/84
27.
Now that the fuel weight has beenentered, let’s verify the FOB.
Note : the minimum fuel quantity for take-off
is 1500 kg.
FUEL
MENU
Normal operation
27/84
28.
DISPATCH PAPERSTOTAL FUEL
18000
Verify that the Fuel On Board quantity on
the E/WD and on the ECAM FUEL page
corresponds to the fuel required by the
computerized flight-plan.
FUEL
MENU
Normal operation
28/84
29.
Verify also the fuel distribution in thedifferent tanks.
FUEL
MENU
Normal operation
29/84
30.
FUELMENU
Normal operation
30/84
31.
It’s now time to start the APU.Before we start it, notice that :
• the APU low pressure valve is closed
(cross-line green),
• and the fuel line dowstream from the
low pressure valve is amber indicating the
APU is not running.
FUEL
MENU
Normal operation
31/84
32.
We have started the APU for you.On the ECAM FUEL page you can see
that the APU is running because :
• the APU Low Pressure valve has
opened (in- line green),
• and the fuel line dowstream is green.
FUEL
MENU
Normal operation
32/84
33.
The items related to the fuel systemduring cockpit preparation are complete.
We will now discuss items related to the
fuel system that you will encounter during
engine start.
The indications and starting procedures
are the same for both engines.
In our example we will start engine 2 first.
FUEL
MENU
Normal operation
33/84
34.
Normally, during engine start, theECAM ENGINE page will be automatically
displayed.
For training purposes only, to better
illustrate what occurs in the fuel system,
the ECAM FUEL page will be presented.
Select the ECAM FUEL page on the
ECAM control panel.
FUEL
MENU
Normal operation
34/84
35.
Normally, during engine start, theECAM ENGINE page will be automatically
displayed.
For training purposes only, to better
illustrate what occurs in the fuel system,
the ECAM FUEL page will be presented.
No. Press the FUEL key.
FUEL
MENU
Normal operation
35/84
36.
Normally, during engine start, theECAM ENGINE page will be automatically
displayed.
For training purposes only, to better
illustrate what occurs in the fuel system,
the ECAM FUEL page will be presented.
No. Press the FUEL key.
FUEL
MENU
Normal operation
36/84
37.
FUELMENU
Normal operation
37/84
38.
FUELMENU
Normal operation
38/84
39.
FUELMENU
Normal operation
39/84
40.
Before we start the engine observe thefollowing :
• the engine low pressure valves are
cross-line amber to indicate closure,
• The fuel used quantities remain from
the previous flight,
• Engine identification numbers are
amber. (This is because the engines are
not running),
• On the E/WD, the Fuel Flow (F.F.)
indicates amber crosses.
FUEL
MENU
Normal operation
40/84
41.
FUELMENU
Normal operation
41/84
42.
FUELMENU
Normal operation
42/84
43.
FUELMENU
Normal operation
43/84
44.
FUELMENU
Normal operation
44/84
45.
Engine 2 is starting, observe :• The Low Pressure valve is in-line
green,
• Fuel used
resets to 0,
indication
automatically
• On the E/WD, Fuel Flow starts,
• Engine identification number 2 changes
to white.
Click on the forward arrow to start
engine number 1.
FUEL
MENU
Normal operation
45/84
46.
FUELMENU
Normal operation
46/84
47.
FUELMENU
Normal operation
47/84
48.
FUELMENU
Normal operation
48/84
49.
FUELMENU
Normal operation
49/84
50.
Engine 1 is starting, observe :• The LP valve is in- line green,
• Fuel used
resets to 0,
indication
automatically
• On the E/WD, fuel flow starts,
• Engine identification number 1 changes
to white.
FUEL
MENU
Normal operation
50/84
51.
The Gross Weight (GW) has nowappeared . This indication is not available
until after the second engine is started.
FUEL
MENU
Normal operation
51/84
52.
Observe the message CTR TK FEEDGhas appeared on the ECAM E/WD. This
indicates that the center tank pumps are
feeding the engines.
FUEL
MENU
Normal operation
52/84
53.
The items related to the engine start arecomplete.
We will now discuss items related to
the fuel system that you will encounter
during taxi.
FUEL
MENU
Normal operation
53/84
54.
When we extend the slats, you will seeone of the automatic functions of the
center tank pumps.
Notice that the MODE SEL pb sw is set
to AUTO.
Extend the slats, and observe the
indications.
FUEL
MENU
Normal operation
54/84
55.
When we extend the slats, you will seeone of the automatic functions of the
center tank pumps.
Notice that the MODE SEL pb sw is set
to AUTO.
No. Click on the FLAPS lever.
FUEL
MENU
Normal operation
55/84
56.
When we extend the slats, you will seeone of the automatic functions of the
center tank pumps.
Notice that the MODE SEL pb sw is set
to AUTO.
No. Click on the FLAPS lever.
FUEL
MENU
Normal operation
56/84
57.
FUELMENU
Normal operation
57/84
58.
FUELMENU
Normal operation
58/84
59.
FUELMENU
Normal operation
59/84
60.
Observe :• The flaps extending,
• The message CTR TK FEEDG disappears,
• On the ECAM FUEL page, the center
tank pumps are cross-line green,
indicating that they have stopped running
automatically,
• The inner tank pumps now feed the
engines for take-off.
FUEL
MENU
Normal operation
60/84
61.
The items related to TAXI are complete.We will now discuss items related to
the fuel system that you will encounter
during normal climb, cruise and descent.
FUEL
MENU
Normal operation
61/84
62.
You are in climb, the slats are nowretracted.
Observe the CTR TK FEEDG message
reappears. This indicates (at slats
retraction) the center tank pumps are
again feeding the engines.
This is another automatic function of
the center tank pumps with the MODE SEL
pb in AUTO .
Select the ECAM FUEL page on the ECP.
FUEL
MENU
Normal operation
62/84
63.
You are in climb, the slats are nowretracted.
Observe the CTR TK FEEDG message
reappears. This indicates (at slats
retraction) the center tank pumps are
again feeding the engines.
This is another automatic function of
the center tank pumps with the MODE SEL
pb in AUTO .
No. Press the FUEL key.
FUEL
MENU
Normal operation
63/84
64.
You are in climb, the slats are nowretracted.
Observe the CTR TK FEEDG message
reappears. This indicates (at slats
retraction) the center tank pumps are
again feeding the engines.
This is another automatic function of
the center tank pumps with the MODE SEL
pb in AUTO .
No. Press the FUEL key.
FUEL
MENU
Normal operation
64/84
65.
Observe the corresponding pumpindications on the ECAM (in-line green).
FUEL
MENU
Normal operation
65/84
66.
You are now in cruise.Notice the CTR TK FEEDG message has again
disappeared indicating that the center tank pumps
have automatically shut off. However the center
tank is not empty and an AUTO function has again
occurred.
To explain
recirculation.
FUEL
MENU
why,
we
Normal operation
must
look
at
66/84
fuel
67.
FUELMENU
Normal operation
67/84
68.
Some fuel to the engines is diverted to coolthe Integrated Drive Generators (IDGs) then
returns to the wing tanks.
If the engines are fed from the center tank
and the wing tanks are full, the center tank
pumps automatically shut off.
The inner tank pumps take over and feed the
engines so that there is room for fuel from the
IDGs.
FUEL
MENU
Normal operation
68/84
69.
After the inner tank pumps have fedapproximately 500 kg of fuel, the center tank
pumps automatically restart.
FUEL
MENU
Normal operation
69/84
70.
You are in descent.To better illustrate the remaining indications,
we will keep the ECAM FUEL page displayed.
The center tank pumps have automatically
shut off (cross- line green) because the center
tank is empty.
The inner tanks are now again feeding the
engines.
Let’s see what happens when the inner tanks
reach a low level.
FUEL
MENU
Normal operation
70/84
71.
When either inner tank reaches a low levellimit, both transfer valves open automatically
transferring fuel from the outer to the inner
tanks.
FUEL
MENU
Normal operation
71/84
72.
After at least one transfer valve is open, themessage OUTER TK FUEL XFRD is displayed
on the E/WD.
Click on either outer tank and observe
the fuel transferring.
FUEL
MENU
Normal operation
72/84
73.
After at least one transfer valve is open, themessage OUTER TK FUEL XFRD is displayed
on the E/WD.
No. Click on either outer tank on the
ECAM FUEL page.
FUEL
MENU
Normal operation
73/84
74.
After at least one transfer valve is open, themessage OUTER TK FUEL XFRD is displayed
on the E/WD.
No. Click on either outer tank on the
ECAM FUEL page.
FUEL
MENU
Normal operation
74/84
75.
The fuel is now totally transferred and theouter tanks are empty.
FUEL
MENU
Normal operation
75/84
76.
The items related to the fuel systemduring climb, cruise and descent are
complete.
We will now discuss items related to
the fuel system that you will encounter
during post flight.
FUEL
MENU
Normal operation
76/84
77.
After the engines are shutdown, thefuel pumps are switched off.
Switch off the left tank pump 1.
FUEL
MENU
Normal operation
77/84
78.
After the engines are shutdown, thefuel pumps are switched off.
No. Press the L TK PUMP 1 pb sw.
FUEL
MENU
Normal operation
78/84
79.
After the engines are shutdown, thefuel pumps are switched off.
No. Press the L TK PUMP 1 pb sw.
FUEL
MENU
Normal operation
79/84
80.
The left tank pump 1 is off, (cross-lineamber).
Continue by switching off the left
tank pump 2.
FUEL
MENU
Normal operation
80/84
81.
The left tank pump 1 is off, (cross-lineamber).
No. Press the L TK PUMP 2 pb sw.
FUEL
MENU
Normal operation
81/84
82.
The left tank pump 1 is off, (cross-lineamber).
No. Press the L TK PUMP 2 pb sw.
FUEL
MENU
Normal operation
82/84
83.
Click on the forward arrow tofinish swicthing the center and right
tank pumps off.
FUEL
MENU
Normal operation
83/84
84.
Observe the transfer valves remainopen.
They will be automatically closed
during the next refueling operation.
Module completed
FUEL
MENU
Normal operation
84/84
NEXT
85.
LIST OF SUBJECTSPREFLIGHT (WALK AROUND)
PREFLIGHT (COCKPIT PREPARATION)
PREFLIGHT (ENGINE START)
PREFLIGHT (TAXI)
IN FLIGHT
POST FLIGHT
AUDIO
RETURN
FUEL
GLOSSARY
FCOM
EXIT
MENU
Normal operation
85/84






 english
 electronics


