


 electronics
Similar presentations:


")


AP-640 Usage Guide
1.
AP-640 Usage Guide2.
Basic InformationWhat Is the AP-640?
How the Water-based Resin Printer Works
Printing Characteristics
Advanced Functions on Output
Points for Optimal Output
Point 1: Set Up by Inserting the Leading Edge
of the Media into the Dryer
Point 2: Use the Take-up Unit
Point 3: Turn Off Pullback after Printing
Point 4: Print with Minimum Margins
(Use Perforated Sheet Cutting)
Point 4: Print with Minimum Margins
(Outputting Print Data at Once)
Contents
Output FAQ
Media Buckles during Setup
Media Buckles during Dryer Heat-up
OP Test Pattern is Difficult to See
Media Sticks during Printing
Print Heads Rubs Media during Printing
Printed Area of Paper Media Buckles
Advanced Functions for Image Quality
Points for Optimal Image Quality
Point 1: Ambient Temperature/Humidity
Point 2: Adjust the Amount of Optimizer Ink (1)
Point 2: Adjust the Amount of Optimizer Ink (2)
Point 3: Print Heater Settings
Image Quality FAQ
Concerns about Pinch Roller Marks
Concerns about Bands as If the Media Has Been Folded
Damage to the Media Is Extensive
Spot-like Patterns Appear
Uneven Some Time after Printing
Coating Performance Is Poor (Peels Off Easily)
Concerns about Vertical Patterns
Concerns about Banding
3.
BasicInformation
What Is the AP-640?
How the Water-based Resin Printer
Works
Printing Characteristics
4.
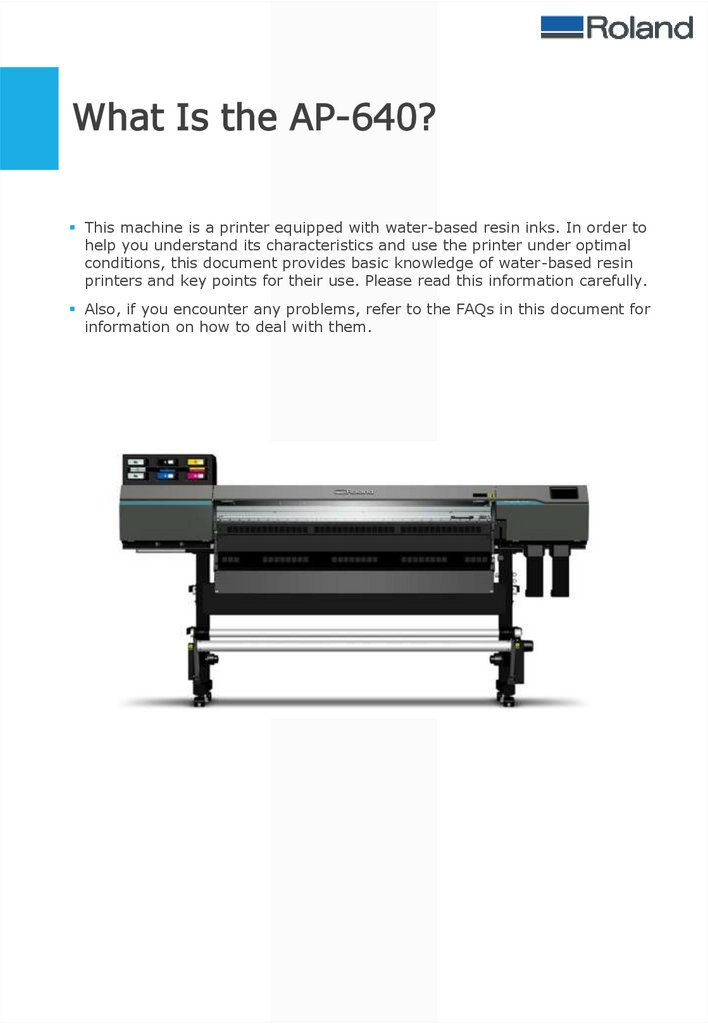
What Is the AP-640?This machine is a printer equipped with water-based resin inks. In order to
help you understand its characteristics and use the printer under optimal
conditions, this document provides basic knowledge of water-based resin
printers and key points for their use. Please read this information carefully.
Also, if you encounter any problems, refer to the FAQs in this document for
information on how to deal with them.
5.
How the Water-based ResinPrinter Works
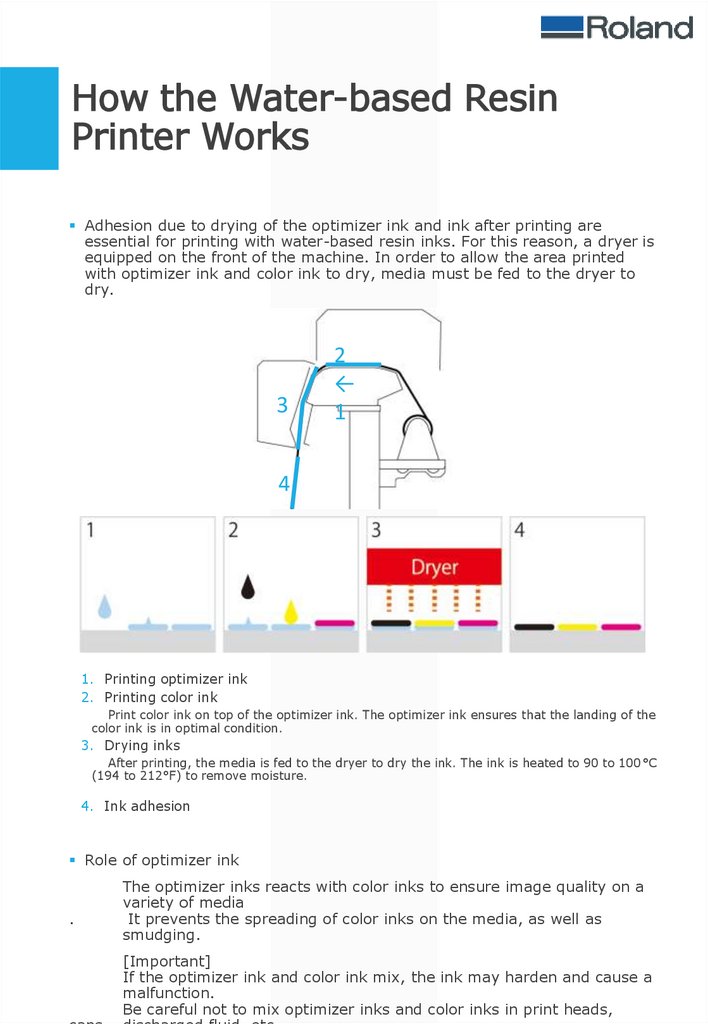
Adhesion due to drying of the optimizer ink and ink after printing are
essential for printing with water-based resin inks. For this reason, a dryer is
equipped on the front of the machine. In order to allow the area printed
with optimizer ink and color ink to dry, media must be fed to the dryer to
dry.
3
2
←
1
4
1. Printing optimizer ink
2. Printing color ink
Print color ink on top of the optimizer ink. The optimizer ink ensures that the landing of the
color ink is in optimal condition.
3. Drying inks
After printing, the media is fed to the dryer to dry the ink. The ink is heated to 90 to 100°C
(194 to 212°F) to remove moisture.
4. Ink adhesion
Role of optimizer ink
.
The optimizer inks reacts with color inks to ensure image quality on a
variety of media
It prevents the spreading of color inks on the media, as well as
smudging.
[Important]
If the optimizer ink and color ink mix, the ink may harden and cause a
malfunction.
Be careful not to mix optimizer inks and color inks in print heads,
6.
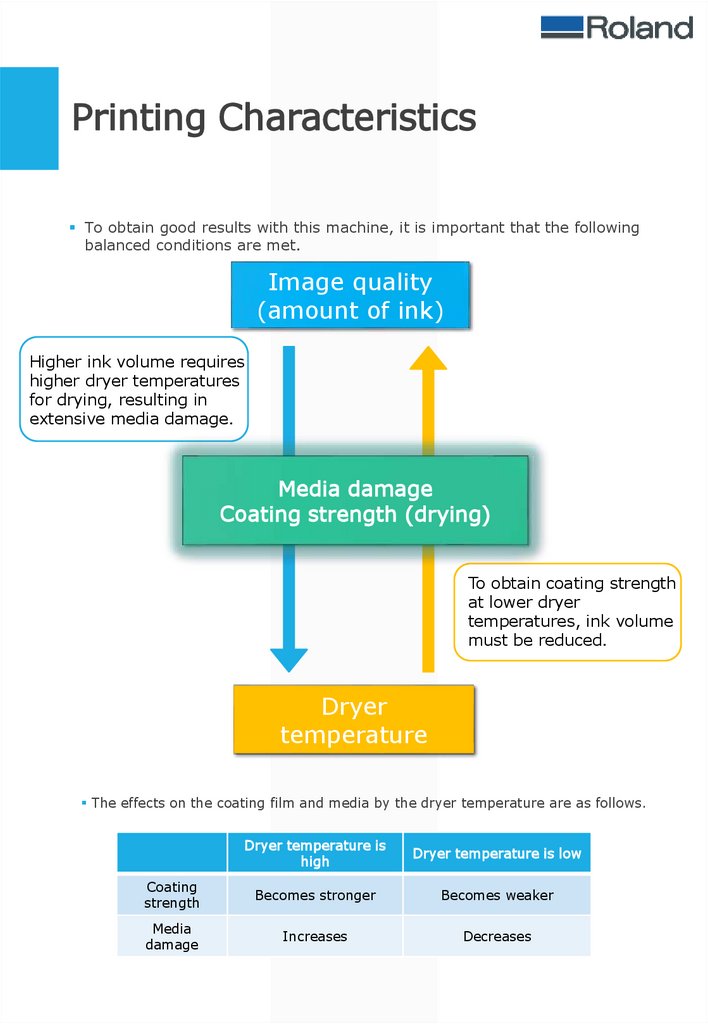
Printing CharacteristicsTo obtain good results with this machine, it is important that the following
balanced conditions are met.
Image quality
(amount of ink)
Higher ink volume requires
higher dryer temperatures
for drying, resulting in
extensive media damage.
Media damage
Coating strength (drying)
To obtain coating strength
at lower dryer
temperatures, ink volume
must be reduced.
Dryer
temperature
The effects on the coating film and media by the dryer temperature are as follows.
Dryer temperature is
high
Dryer temperature is low
Coating
strength
Becomes stronger
Becomes weaker
Media
damage
Increases
Decreases
7.
Points for Optimal OutputAdvanced
Functions
on Output
Point 1: Set Up by Inserting the
Leading Edge of the Media into the
Dryer
Point 2: Use the Take-up Unit
Point 3: Turn Off Pullback after
Printing
Point 4: Print with Minimum Margins
(Use Perforated Sheet Cutting)
Point 4: Print with Minimum Margins
(Outputting Print Data at Once)
8.
Points for Optimal OutputIn addition to basic operations, this document describes key points
necessary for smooth output.
1. Set Up by Inserting the Leading Edge of the Media into the Dryer
2. Use the Take-up Unit
3. Turn Off Pullback after Printing
4. Print with Minimum Margins(Use Perforated Sheet Cutting)
4. Print with Minimum Margins(Outputting Print Data at Once)
For basic operations such as how to set up the media, refer to the
product manual.
https://downloadcenter.rolanddg.com/AP-640
9.
Point 1: Set Up by Inserting theLeading Edge of the Media into
the Dryer
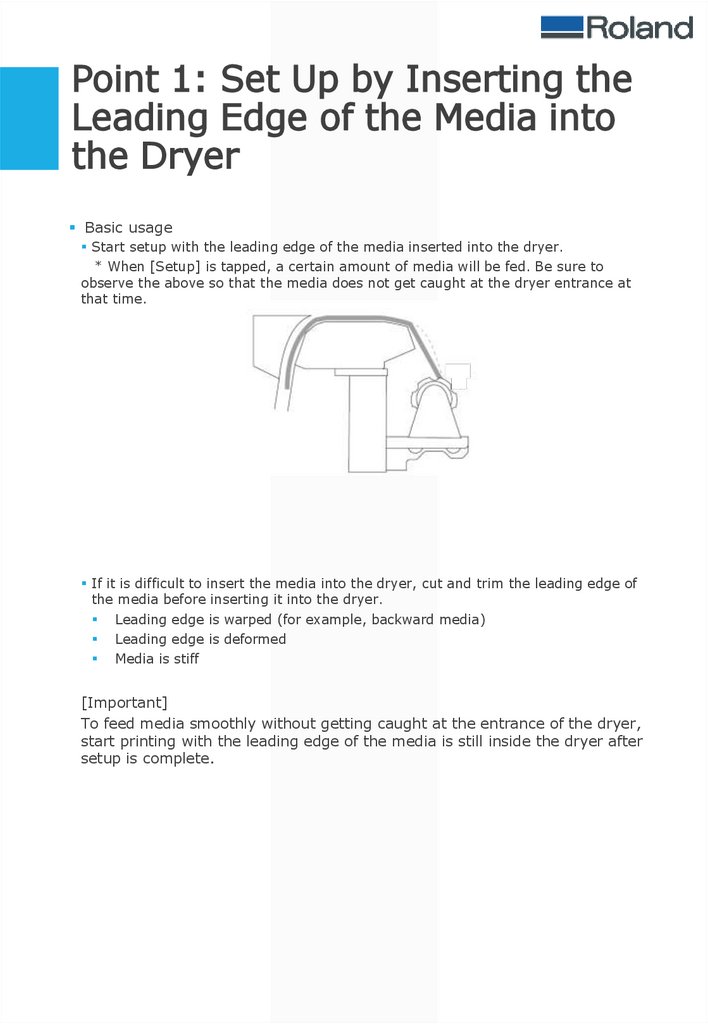
Basic usage
Start setup with the leading edge of the media inserted into the dryer.
* When [Setup] is tapped, a certain amount of media will be fed. Be sure to
observe the above so that the media does not get caught at the dryer entrance at
that time.
If it is difficult to insert the media into the dryer, cut and trim the leading edge of
the media before inserting it into the dryer.
Leading edge is warped (for example, backward media)
Leading edge is deformed
Media is stiff
[Important]
To feed media smoothly without getting caught at the entrance of the dryer,
start printing with the leading edge of the media is still inside the dryer after
setup is complete.
10.
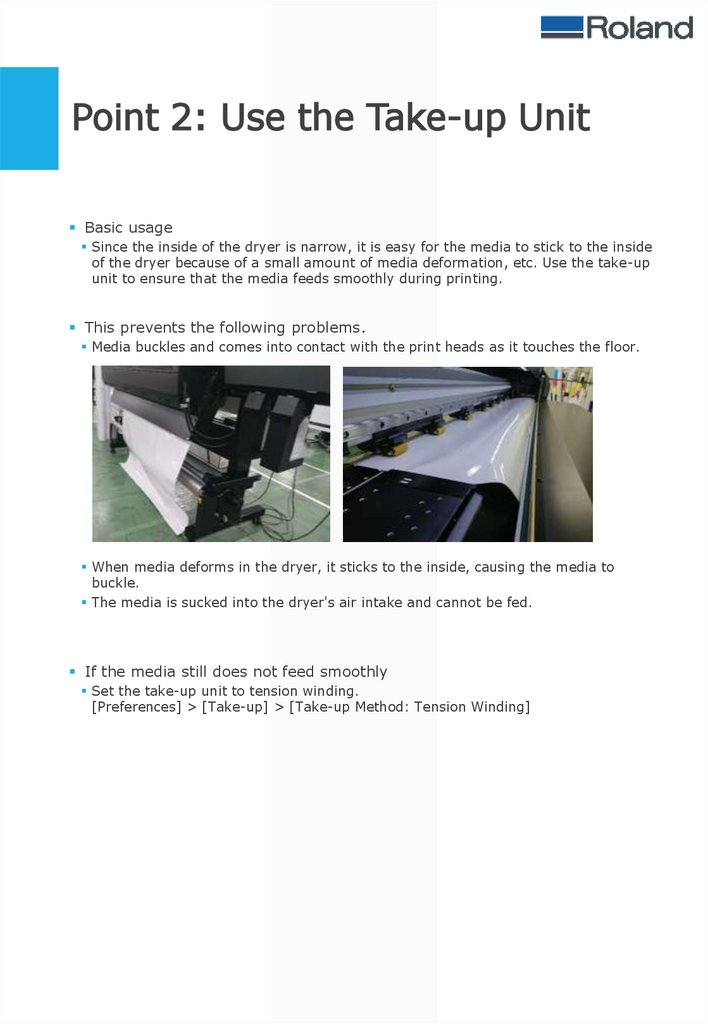
Point 2: Use the Take-up UnitBasic usage
Since the inside of the dryer is narrow, it is easy for the media to stick to the inside
of the dryer because of a small amount of media deformation, etc. Use the take-up
unit to ensure that the media feeds smoothly during printing.
This prevents the following problems.
Media buckles and comes into contact with the print heads as it touches the floor.
When media deforms in the dryer, it sticks to the inside, causing the media to
buckle.
The media is sucked into the dryer's air intake and cannot be fed.
If the media still does not feed smoothly
Set the take-up unit to tension winding.
[Preferences] > [Take-up] > [Take-up Method: Tension Winding]
11.
Point 3: Turn Off Pullback afterPrinting
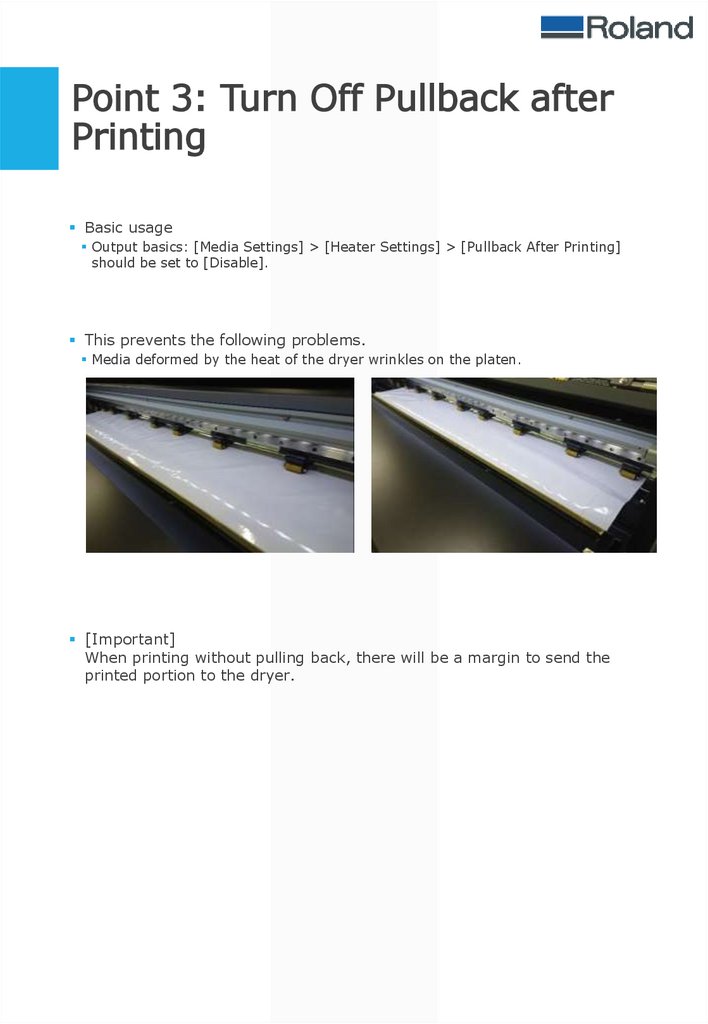
Basic usage
Output basics: [Media Settings] > [Heater Settings] > [Pullback After Printing]
should be set to [Disable].
This prevents the following problems.
Media deformed by the heat of the dryer wrinkles on the platen.
[Important]
When printing without pulling back, there will be a margin to send the
printed portion to the dryer.
12.
Point 4: Print with MinimumMargins
(Use Perforated Sheet Cutting)
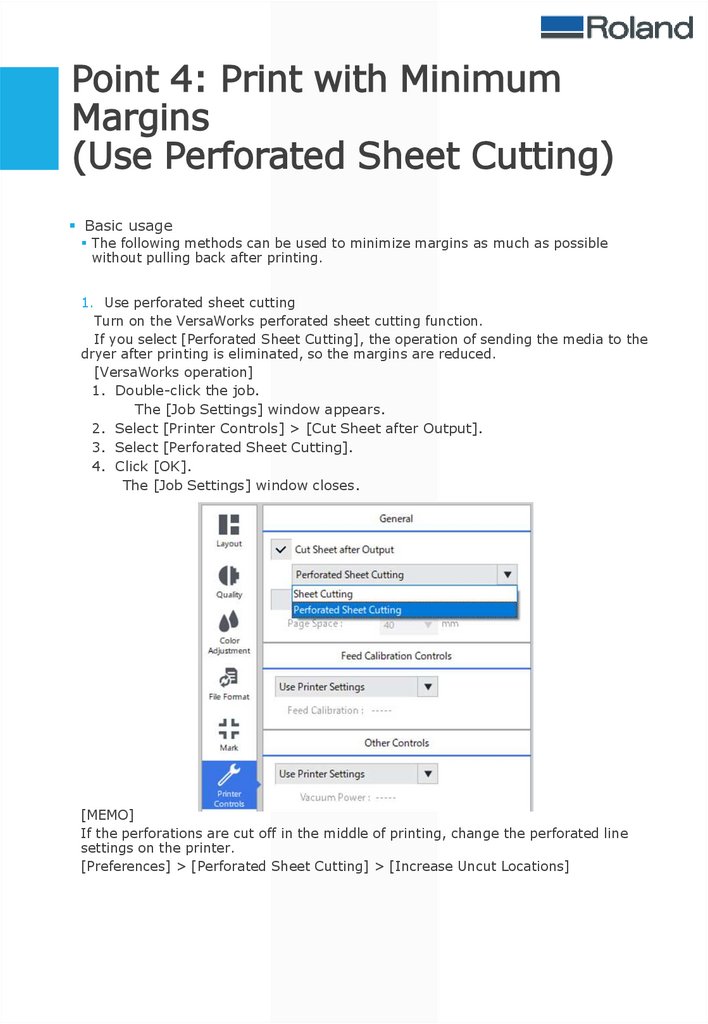
Basic usage
The following methods can be used to minimize margins as much as possible
without pulling back after printing.
1. Use perforated sheet cutting
Turn on the VersaWorks perforated sheet cutting function.
If you select [Perforated Sheet Cutting], the operation of sending the media to the
dryer after printing is eliminated, so the margins are reduced.
[VersaWorks operation]
1. Double-click the job.
The [Job Settings] window appears.
2. Select [Printer Controls] > [Cut Sheet after Output].
3. Select [Perforated Sheet Cutting].
4. Click [OK].
The [Job Settings] window closes.
[MEMO]
If the perforations are cut off in the middle of printing, change the perforated line
settings on the printer.
[Preferences] > [Perforated Sheet Cutting] > [Increase Uncut Locations]
13.
Point 4: Print with MinimumMargins
(Outputting Print Data at Once)
Basic usage
The following methods can be used to minimize margins as much as possible
without pulling back after printing.
1. Outputting print data at once (job nesting)
Follow the procedure below to output print data at once as a single job from
VersaWorks. Multiple jobs are treated as one job, so drying feed is no longer
performed for each job.
[VersaWorks operation]
1. While holding down the Ctrl key, select multiple jobs to be output at once.
2. Right-click the job in 1) and click [Multiple Job Nesting].
2. Outputting print data at once (job grouping)
Print multiple data continuously without performing drying feed. Individual settings
can be made for each job.
[VersaWorks operation]
1. While holding down the Ctrl key, select multiple jobs to be output at once.
2. Right-click the job in 1) and click [Multiple Job Grouping].
[Important]
Jobs with different resolutions and paths can be combined, but image quality
and drying may be affected.
Do not set the margin between pages to less than 80 mm (3.15 in.). Media
pull-back may occur and media may buckle.
When [Cut Sheet after Output] under [Job Settings] is selected, the function is
enabled for the last job only.
14.
Media Buckles during SetupMedia Buckles during Dryer Heat-up
Output FAQ
OP Test Pattern is Difficult to See
Media Sticks during Printing
Print Heads Rubs Media during
Printing
Printed Area of Paper Media Buckles
15.
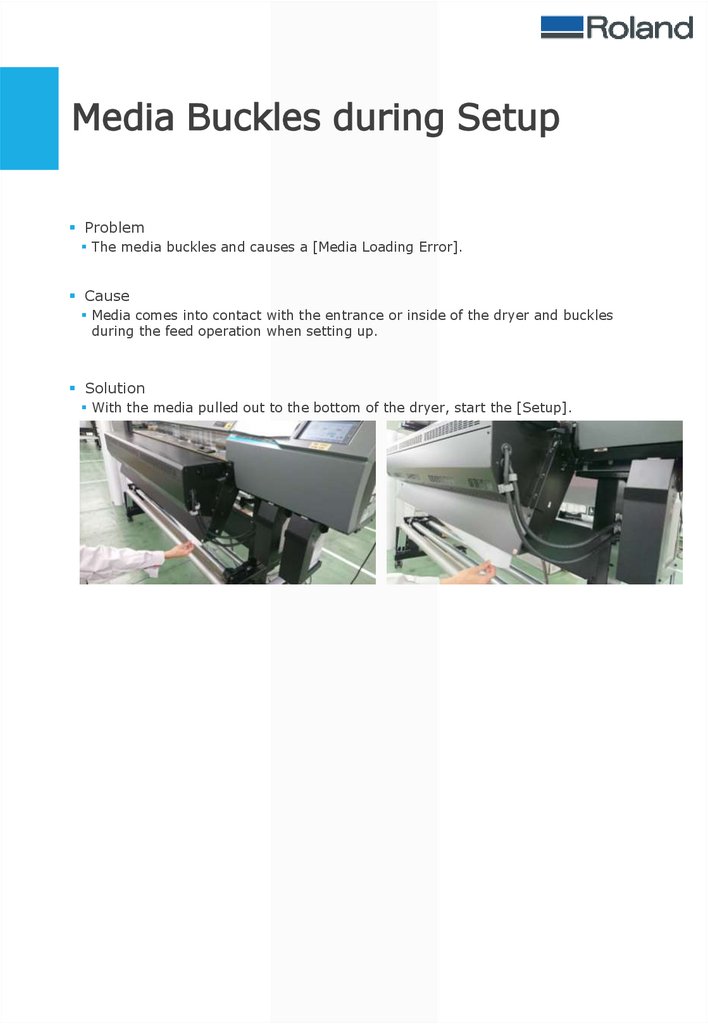
Media Buckles during SetupProblem
The media buckles and causes a [Media Loading Error].
Cause
Media comes into contact with the entrance or inside of the dryer and buckles
during the feed operation when setting up.
Solution
With the media pulled out to the bottom of the dryer, start the [Setup].
16.
Media Buckles during DryerHeat-up
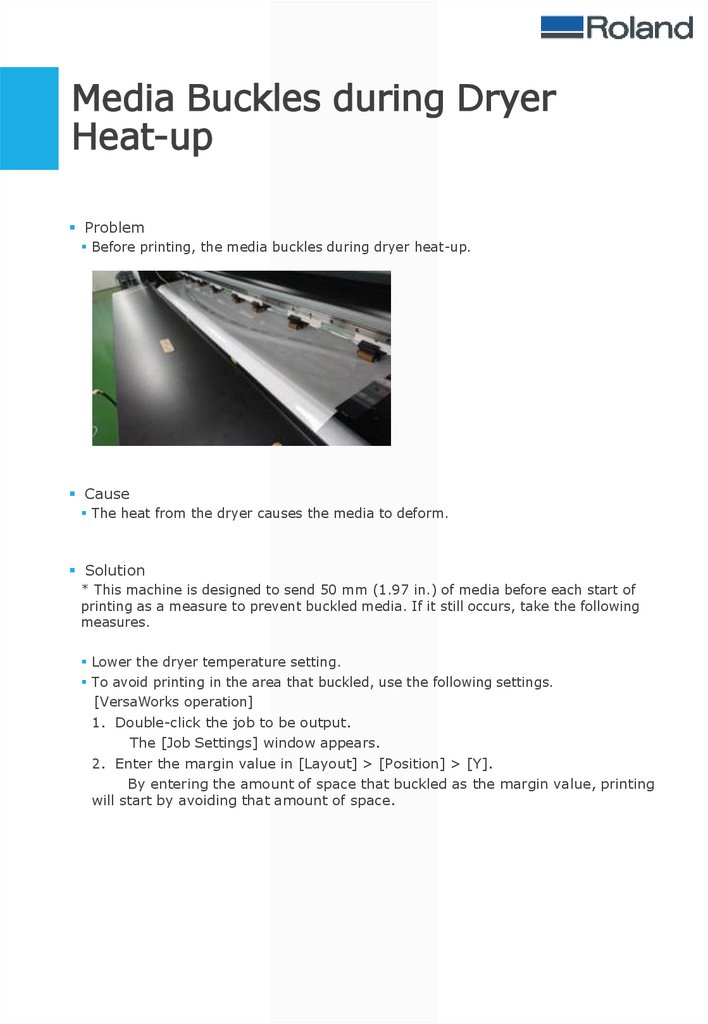
Problem
Before printing, the media buckles during dryer heat-up.
Cause
The heat from the dryer causes the media to deform.
Solution
* This machine is designed to send 50 mm (1.97 in.) of media before each start of
printing as a measure to prevent buckled media. If it still occurs, take the following
measures.
Lower the dryer temperature setting.
To avoid printing in the area that buckled, use the following settings.
[VersaWorks operation]
1. Double-click the job to be output.
The [Job Settings] window appears.
2. Enter the margin value in [Layout] > [Position] > [Y].
By entering the amount of space that buckled as the margin value, printing
will start by avoiding that amount of space.
17.
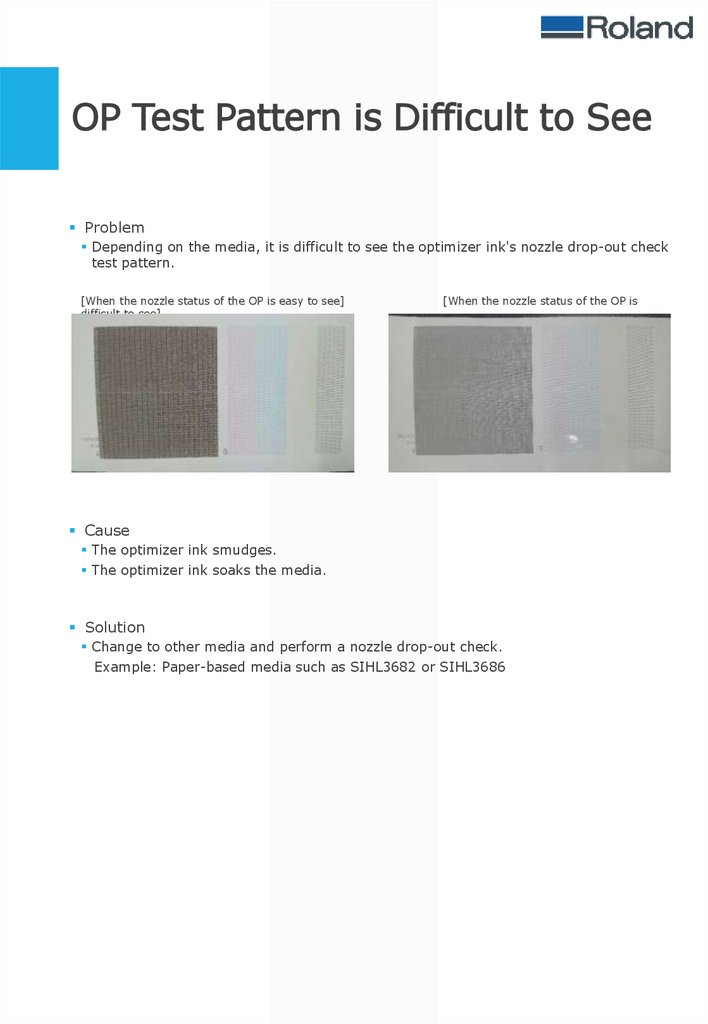
OP Test Pattern is Difficult to SeeProblem
Depending on the media, it is difficult to see the optimizer ink's nozzle drop-out check
test pattern.
[When the nozzle status of the OP is easy to see]
difficult to see]
[When the nozzle status of the OP is
Cause
The optimizer ink smudges.
The optimizer ink soaks the media.
Solution
Change to other media and perform a nozzle drop-out check.
Example: Paper-based media such as SIHL3682 or SIHL3686
18.
Media Sticks during PrintingProblem
Media deforming in the dryer and sticking to the inside, causing the media to
buckle.
Printing stops when buckled media is detected.
Cause
Since the inside of the dryer is narrow, media that is deformed by heat comes into
contact and sticks to the inside.
Solution
Cancel the setup, check that the dryer has cooled down, and then remove the
media from the top of the dryer.
[MEMO]: When removing the media, be careful of the area where the ink has not dried while
removing it.
19.
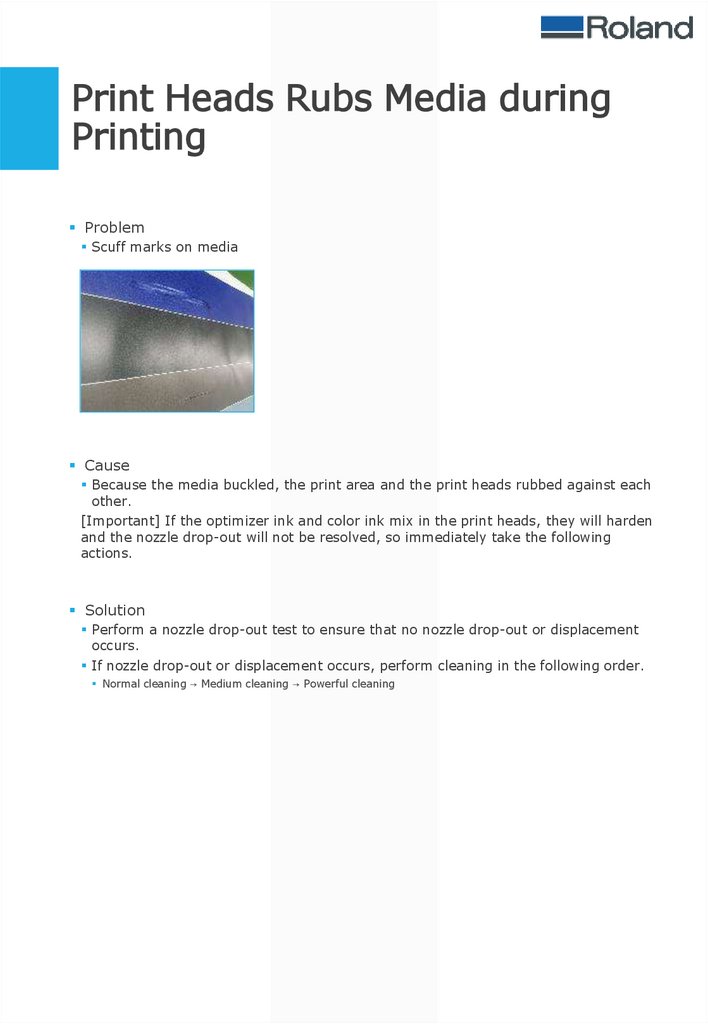
Print Heads Rubs Media duringPrinting
Problem
Scuff marks on media
Cause
Because the media buckled, the print area and the print heads rubbed against each
other.
[Important] If the optimizer ink and color ink mix in the print heads, they will harden
and the nozzle drop-out will not be resolved, so immediately take the following
actions.
Solution
Perform a nozzle drop-out test to ensure that no nozzle drop-out or displacement
occurs.
If nozzle drop-out or displacement occurs, perform cleaning in the following order.
Normal cleaning → Medium cleaning → Powerful cleaning
20.
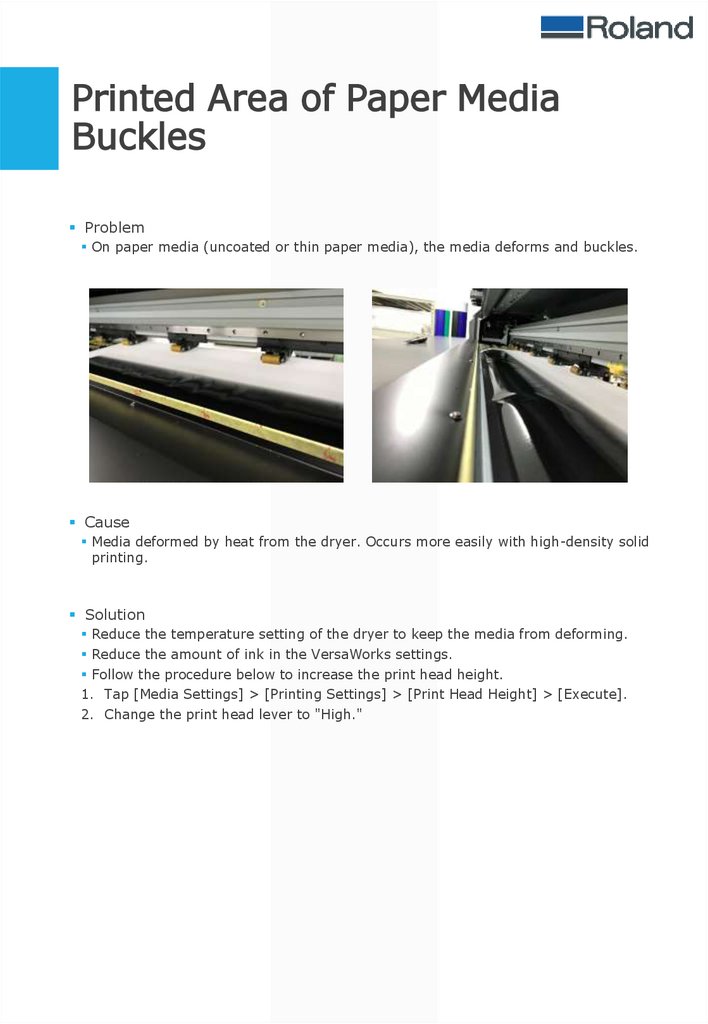
Printed Area of Paper MediaBuckles
Problem
On paper media (uncoated or thin paper media), the media deforms and buckles.
Cause
Media deformed by heat from the dryer. Occurs more easily with high-density solid
printing.
Solution
Reduce the temperature setting of the dryer to keep the media from deforming.
Reduce the amount of ink in the VersaWorks settings.
Follow the procedure below to increase the print head height.
1. Tap [Media Settings] > [Printing Settings] > [Print Head Height] > [Execute].
2. Change the print head lever to "High."
21.
Points for Optimal Image QualityAdvanced
Functions for
Image Quality
Point 1: Ambient
Temperature/Humidity
Point 2: Adjust the Amount of
Optimizer Ink (1)
Point 2: Adjust the Amount of
Optimizer Ink (2)
Point 3: Print Heater Settings
22.
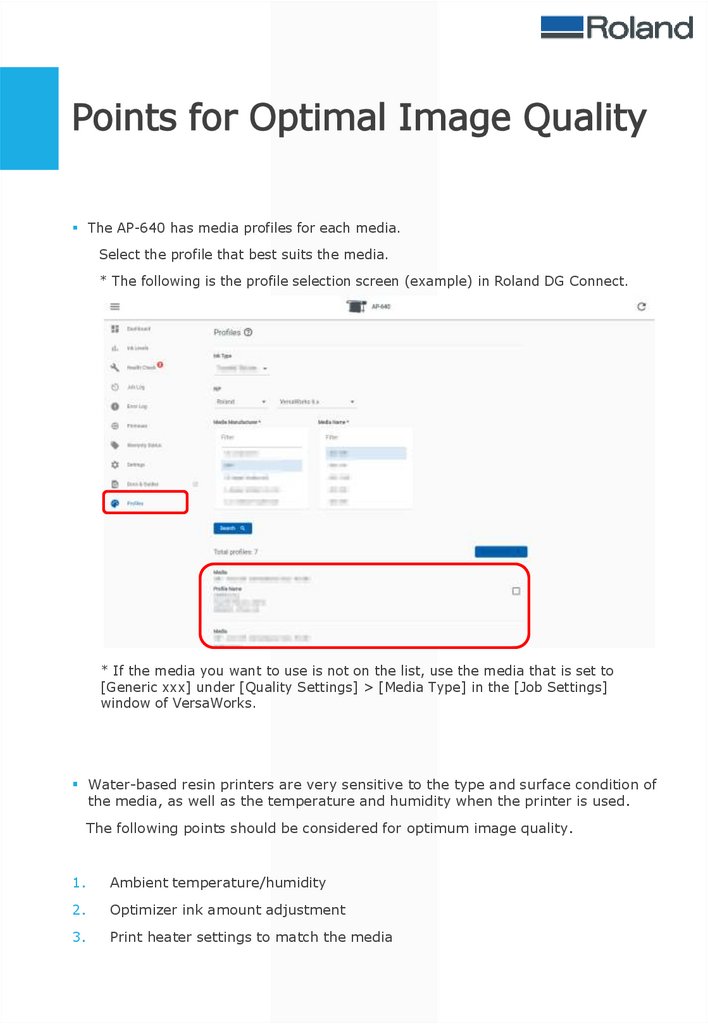
Points for Optimal Image QualityThe AP-640 has media profiles for each media.
Select the profile that best suits the media.
* The following is the profile selection screen (example) in Roland DG Connect.
* If the media you want to use is not on the list, use the media that is set to
[Generic xxx] under [Quality Settings] > [Media Type] in the [Job Settings]
window of VersaWorks.
Water-based resin printers are very sensitive to the type and surface condition of
the media, as well as the temperature and humidity when the printer is used.
The following points should be considered for optimum image quality.
1.
Ambient temperature/humidity
2.
Optimizer ink amount adjustment
3.
Print heater settings to match the media
23.
Point 1: AmbientTemperature/Humidity
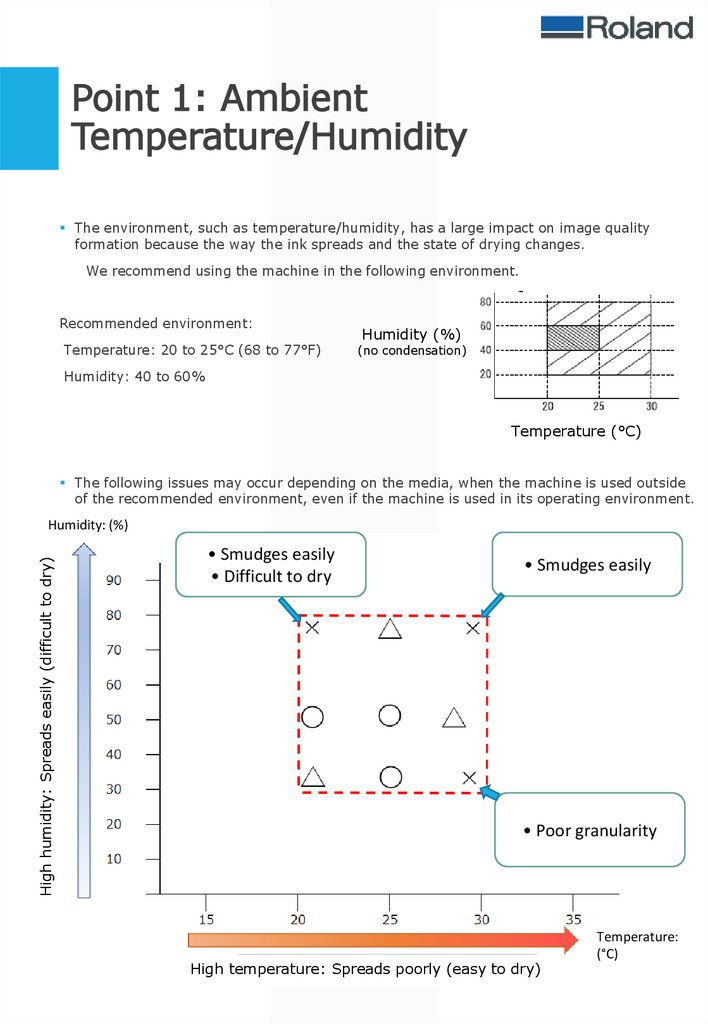
The environment, such as temperature/humidity, has a large impact on image quality
formation because the way the ink spreads and the state of drying changes.
We recommend using the machine in the following environment.
Recommended environment:
Temperature: 20 to 25°C (68 to 77°F)
Humidity (%)
(no condensation)
Humidity: 40 to 60%
Temperature (°C)
The following issues may occur depending on the media, when the machine is used outside
of the recommended environment, even if the machine is used in its operating environment.
High humidity: Spreads easily (difficult to dry)
Humidity: (%)
• Smudges easily
• Difficult to dry
• Smudges easily
• Poor granularity
High temperature: Spreads poorly (easy to dry)
Temperature:
(°C)
24.
Point 2: Adjust the Amount ofOptimizer Ink (1)
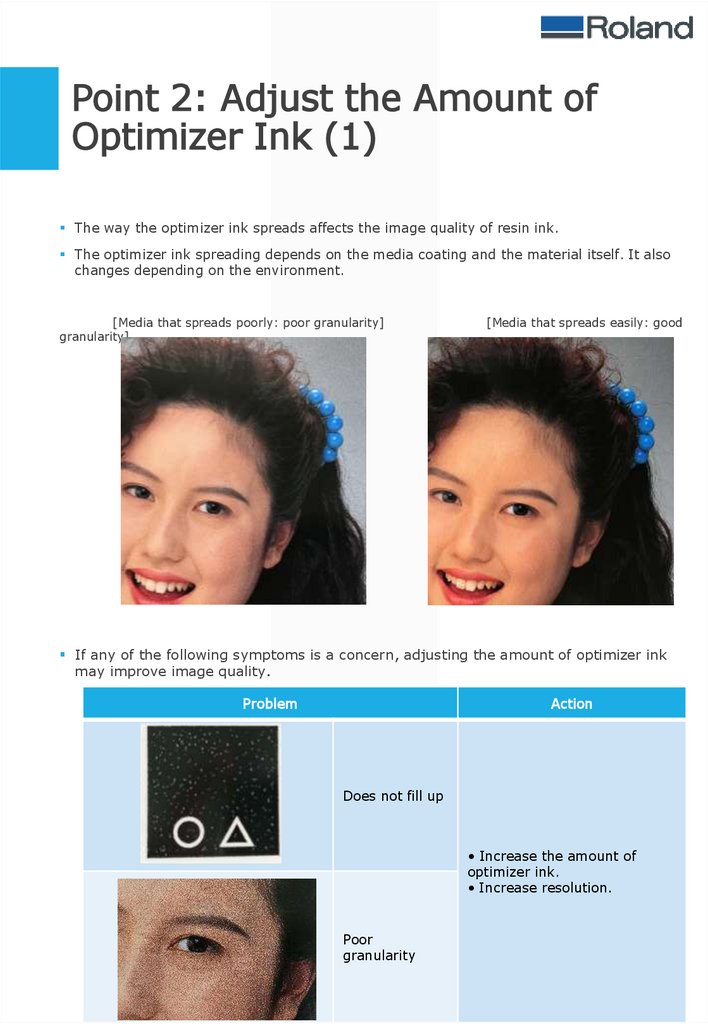
The way the optimizer ink spreads affects the image quality of resin ink.
The optimizer ink spreading depends on the media coating and the material itself. It also
changes depending on the environment.
[Media that spreads poorly: poor granularity]
granularity]
[Media that spreads easily: good
If any of the following symptoms is a concern, adjusting the amount of optimizer ink
may improve image quality.
Problem
Action
Does not fill up
• Increase the amount of
optimizer ink.
• Increase resolution.
Poor
granularity
25.
Point 2: Adjust the Amount ofOptimizer Ink (2)
The amount of optimizer ink can be adjusted in VersaWorks. Adjust the level
according to the image quality conditions.
The optimizer ink level can be adjusted in ±5 steps.
(* As a general guide, the discharge amount changes by 5% per level)
Optimizer ink amount adjustment image
Optimizer ink amount (%)
100
90
80
70
60
50
40
30
20
10
0
0
10
20
30
40
50
60
70
80
90
100 110 120 130 140 150 160 170 180 190 200
Ink amount CMYK (%)
26.
Point 3: Print Heater SettingsResin ink is easily affected by the media material, and some media may smudge badly.
(Mainly paper and other media that ink penetrates easily)
In such cases, using print heaters may inhibit smudging.
Below is a guide to print heater settings for each media.
Media type
PVC
Banner
Paper
Wallpape
r
Film
Textile
Print heater temperature
Spreads easily
25 to 30°C (77 to 86°F)
Spreads poorly
25°C (77°F)
—
25 to 30°C (77 to 86°F)
Coated
30 to 40°C (86 to 104°F)
Uncoated
35 to 40°C (95 to 104°F)
Coated
30 to 40°C (86 to 104°F)
Uncoated
35 to 40°C (95 to 104°F)
Coated
25 to 35°C (77 to 95°F)
Uncoated
30 to 40°C (86 to 104°F)
—
35 to 40°C (95 to 104°F)
If any of the following symptoms is a concern, using a print heater may improve
image quality.
Problem
Action
Smudging
Ink pooling
Patchy
pattern
• Raise the temperature of
the print heater.
• Reduce the amount of ink.
27.
Concerns about Pinch Roller MarksConcerns about Bands as If the Media
Has Been Folded
Image Quality
FAQ
Damage to the Media Is Extensive
Spot-like Patterns Appear
Uneven Some Time after Printing
Coating Performance Is Poor (Peels
Off Easily)
Concerns about Vertical Patterns
Concerns about Banding
28.
Concerns about Pinch RollerMarks
Problem
There are bands like pinch roller marks on the printed area.
Cause
Friction between the pinch roller and the media results in static charge, and mist
adheres to the path of the pinch roller, resulting in banding.
Solution
Increase the room temperature and humidity.
If the problem occurs in some pinch rollers, the pinch rollers that are causing the
problem can be raised individually with a lever from the back of the machine.
29.
Concerns about Bands as If theMedia Has Been Folded
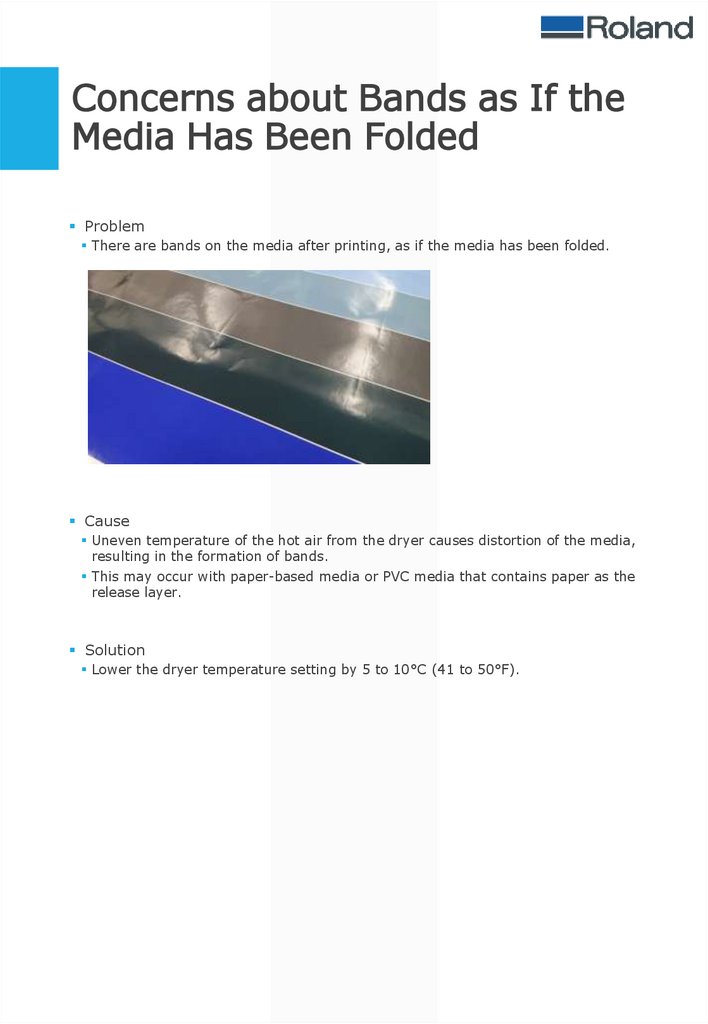
Problem
There are bands on the media after printing, as if the media has been folded.
Cause
Uneven temperature of the hot air from the dryer causes distortion of the media,
resulting in the formation of bands.
This may occur with paper-based media or PVC media that contains paper as the
release layer.
Solution
Lower the dryer temperature setting by 5 to 10°C (41 to 50°F).
30.
Damage to the Media IsExtensive
Problem
Bumpy and deformed media after printing
Cause
Media is damaged by the heat from the dryer causing the media to expand,
contract, and deform.
This problem tends to occur with the release paper for paper-based PVC and
banners.
Solution
Lower the dryer temperature setting by 5 to 10°C (41 to 50°F).
31.
Spot-like Patterns AppearProblem
Spot-like patterns appear.
Cause
Printing results are uneven because of the media plasticizer.
Prone to occur with media that is left unattended.
Solution
With roll media, discard about 3 m (9.84 ft.) of media exposed to surface air before
printing.
If this does not fix the problem, use another media that is not affected by
plasticizers.
32.
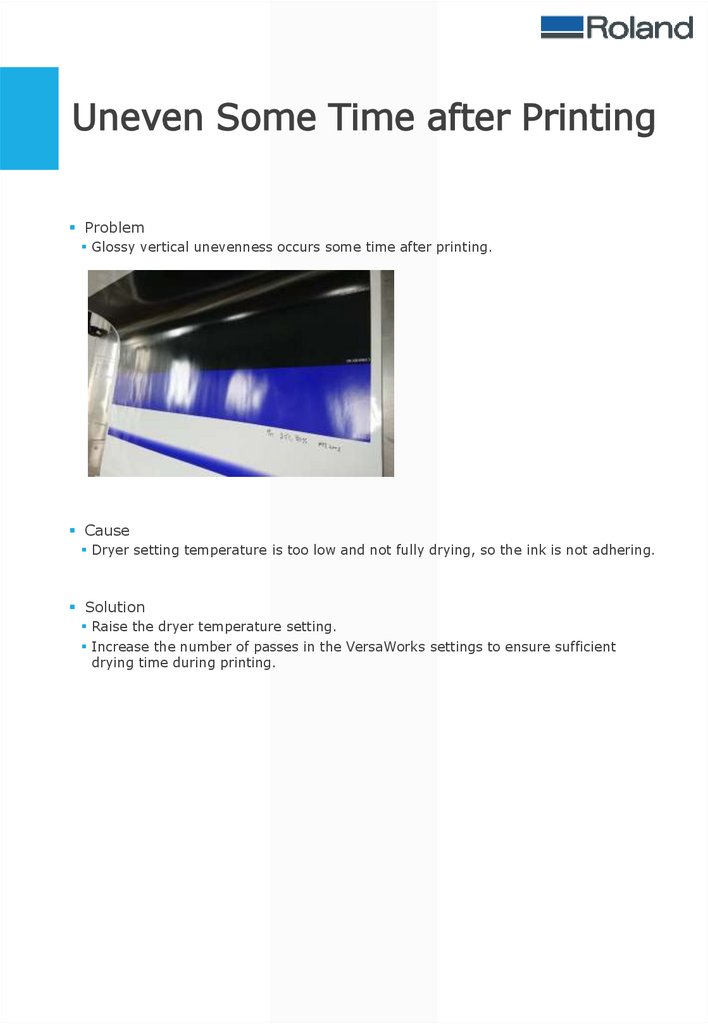
Uneven Some Time after PrintingProblem
Glossy vertical unevenness occurs some time after printing.
Cause
Dryer setting temperature is too low and not fully drying, so the ink is not adhering.
Solution
Raise the dryer temperature setting.
Increase the number of passes in the VersaWorks settings to ensure sufficient
drying time during printing.
33.
Coating Performance Is Poor(Peels Off Easily)
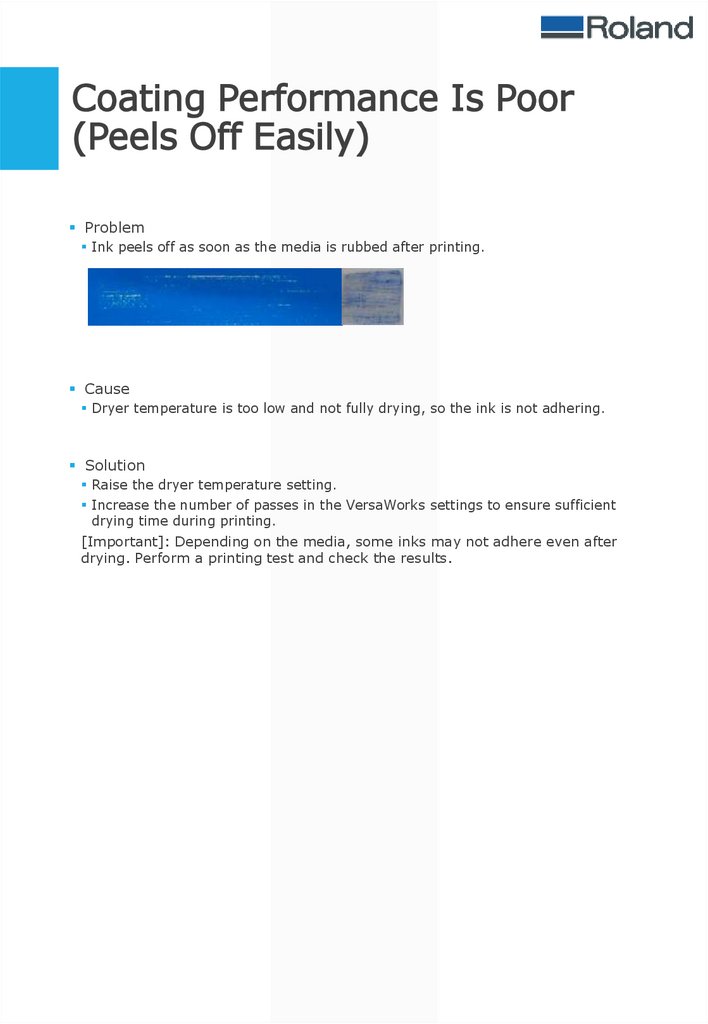
Problem
Ink peels off as soon as the media is rubbed after printing.
Cause
Dryer temperature is too low and not fully drying, so the ink is not adhering.
Solution
Raise the dryer temperature setting.
Increase the number of passes in the VersaWorks settings to ensure sufficient
drying time during printing.
[Important]: Depending on the media, some inks may not adhere even after
drying. Perform a printing test and check the results.
34.
Concerns about Vertical PatternsProblem
Vertical patterns appear on printed material as shown below.
Cause
1) Media surface issues (the material itself has a vertical pattern)
2) In the case of materials such as cloth or film, the suction fan causes banding.
3) Uneven drying results in partial failure to fully cure and causes banding.
Solution
If 1) occurs, change the media.
If 2) occurs, go to [Media Settings] > [Other Media Settings] > [Media Suction
Force] and reduce the suction force.
If 3) occurs, raise the dryer temperature setting.
35.
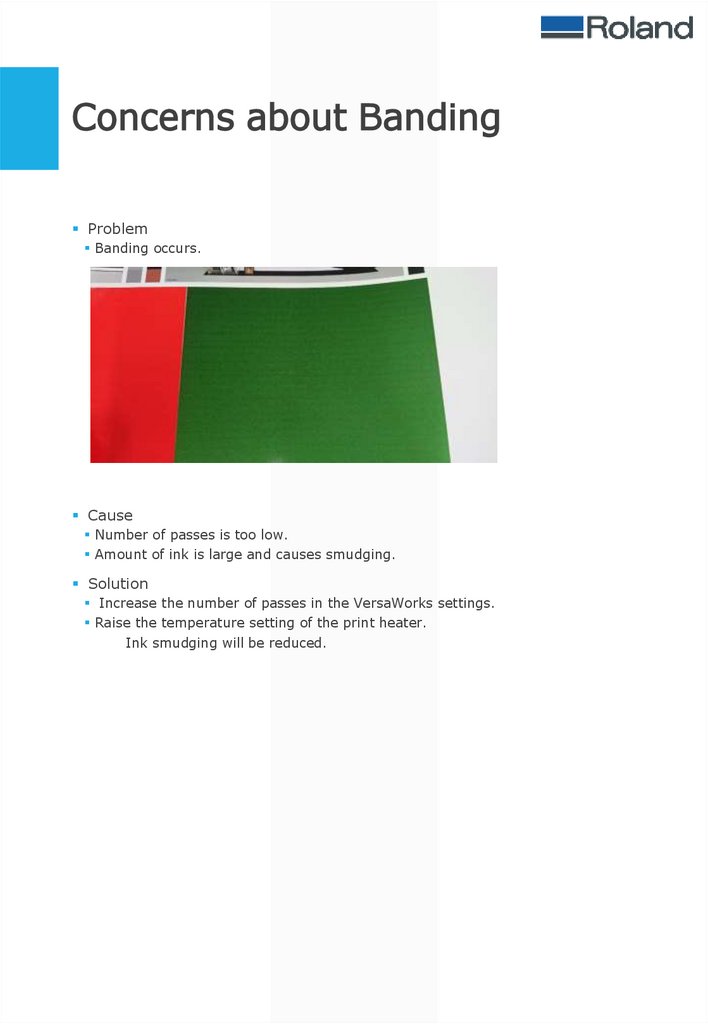
Concerns about BandingProblem
Banding occurs.
Cause
Number of passes is too low.
Amount of ink is large and causes smudging.
Solution
Increase the number of passes in the VersaWorks settings.
Raise the temperature setting of the print heater.
Ink smudging will be reduced.
36.
Copyright © 2023 Roland DG Corporationhttps://www.rolanddg.com/
R1-230126