


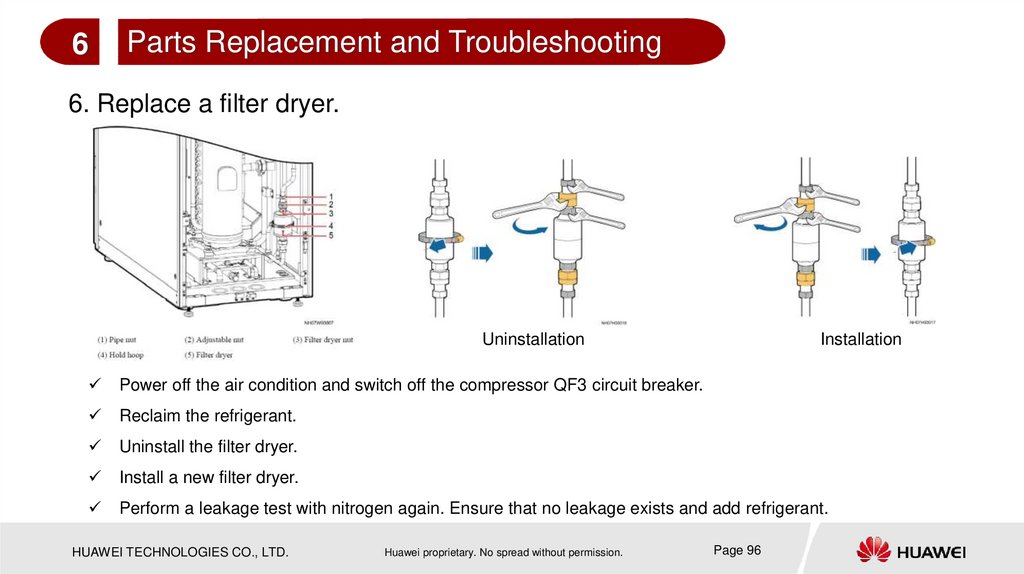
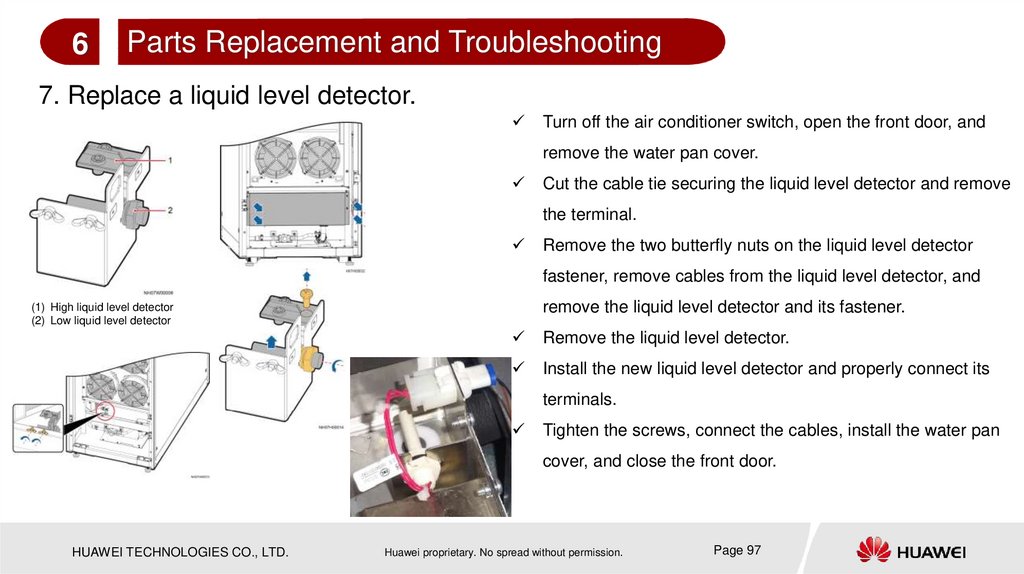

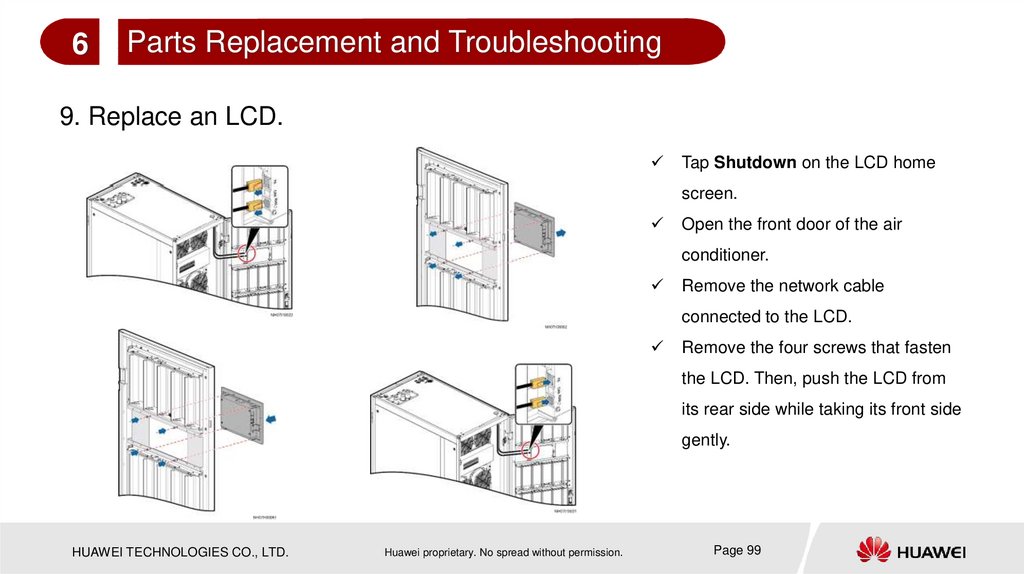


 electronics
Similar presentations:


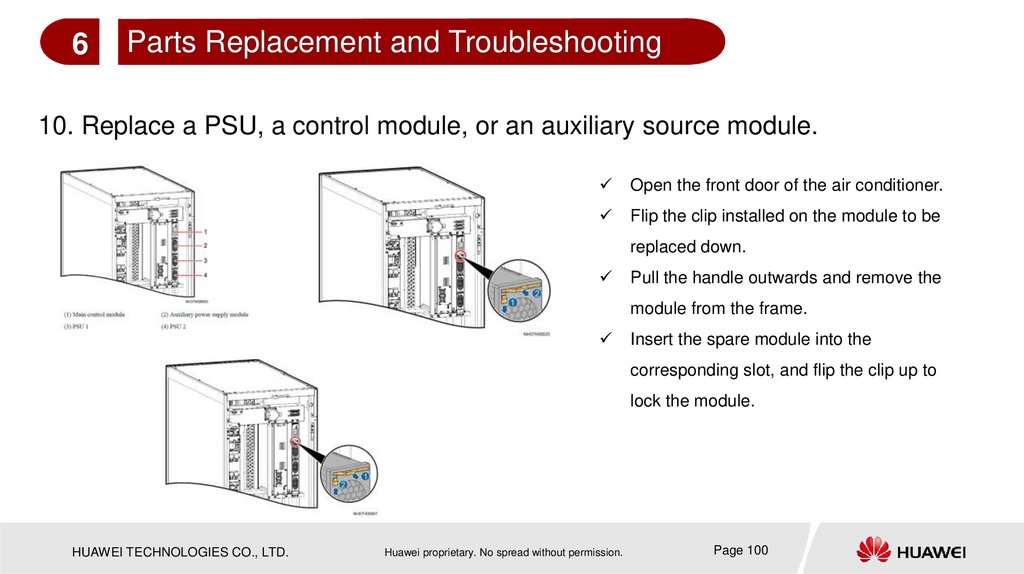
NetCol5000-A 42 kW Air Cooled In-row Full-sized Variable-Frequency Precision Air Conditioner Training Slides--part 1
1.
NetCol5000-A 42 kW Air Cooled In-row Full-sized VariableFrequency Precision Air ConditionerTraining Slides
Product model: NetCol5000-A042
HUAWEI TECHNOLOGIES CO., LTD.
www.huawei.com
2.
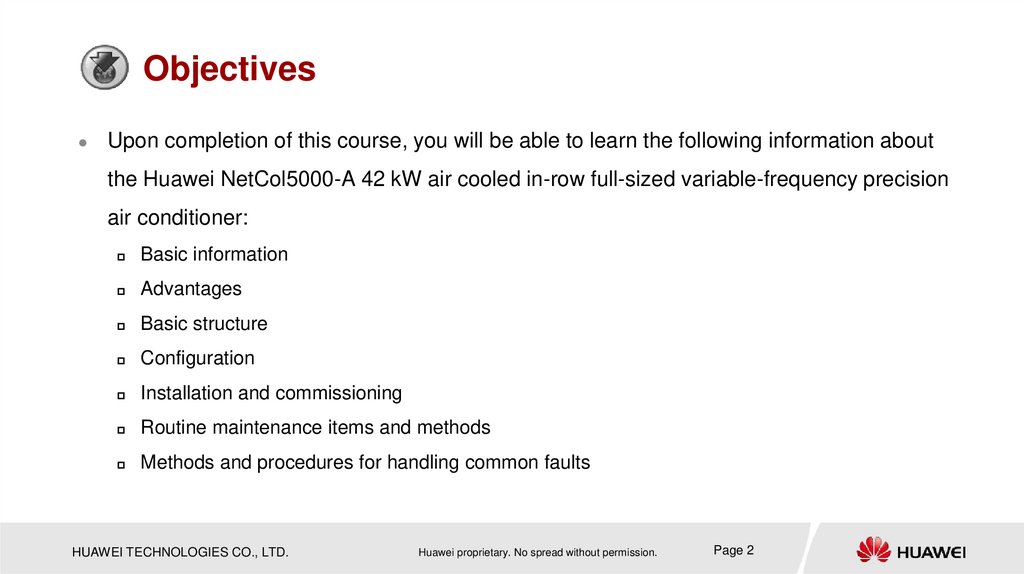
ObjectivesUpon completion of this course, you will be able to learn the following information about
the Huawei NetCol5000-A 42 kW air cooled in-row full-sized variable-frequency precision
air conditioner:
Basic information
Advantages
Basic structure
Configuration
Installation and commissioning
Routine maintenance items and methods
Methods and procedures for handling common faults
HUAWEI TECHNOLOGIES CO., LTD.
Huawei proprietary. No spread without permission.
Page 2
3.
Contents1
Basic Information
2
Features and Parameters
3
Main Components
4
Installation and Commissioning
5
Routine Maintenance
6
Parts Replacement and Troubleshooting
4.
Contents1
Basic Information
2
Features and Parameters
3
Main Components
4
Installation and Commissioning
5
Routine Maintenance
6
Parts Replacement and Troubleshooting
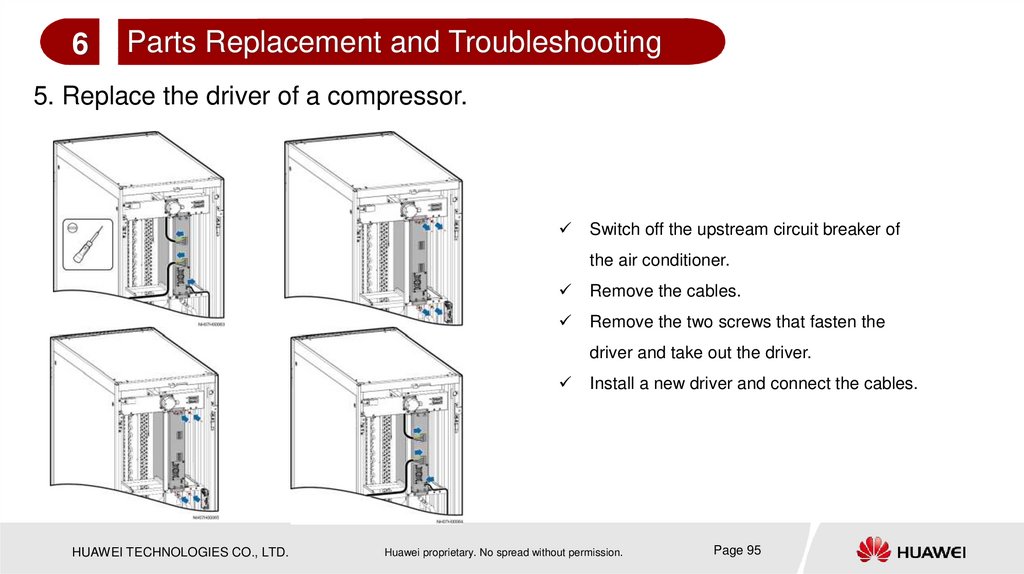
5.
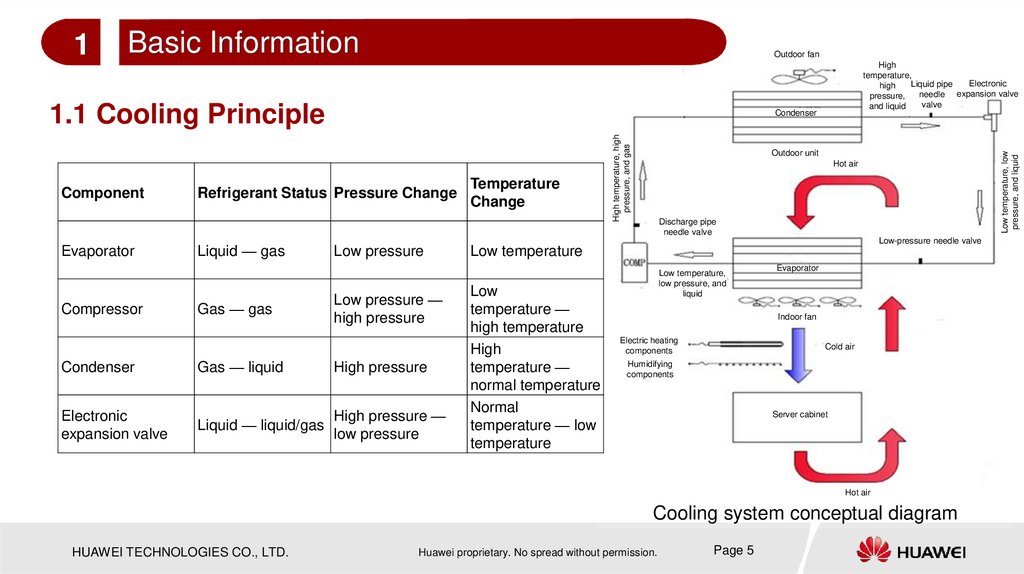
Basic InformationOutdoor fan
1.1 Cooling Principle
Evaporator
Compressor
Condenser
Refrigerant Status Pressure Change
Liquid — gas
Gas — gas
Low pressure
Low pressure —
high pressure
Condenser
Gas — liquid
High pressure
Electronic
expansion valve
Liquid — liquid/gas
High pressure —
low pressure
Temperature
Change
High temperature, high
pressure, and gas
Component
High
temperature,
Electronic
Liquid pipe
high
needle expansion valve
pressure,
valve
and liquid
Outdoor unit
Hot air
Discharge pipe
needle valve
Low-pressure needle valve
Low temperature
Low
temperature —
high temperature
High
temperature —
normal temperature
Normal
temperature — low
temperature
Low temperature, low
pressure, and liquid
1
Low temperature,
low pressure, and
liquid
Evaporator
Indoor fan
Electric heating
components
Cold air
Humidifying
components
Server cabinet
Hot air
Cooling system conceptual diagram
HUAWEI TECHNOLOGIES CO., LTD.
Huawei proprietary. No spread without permission.
Page 5
6.
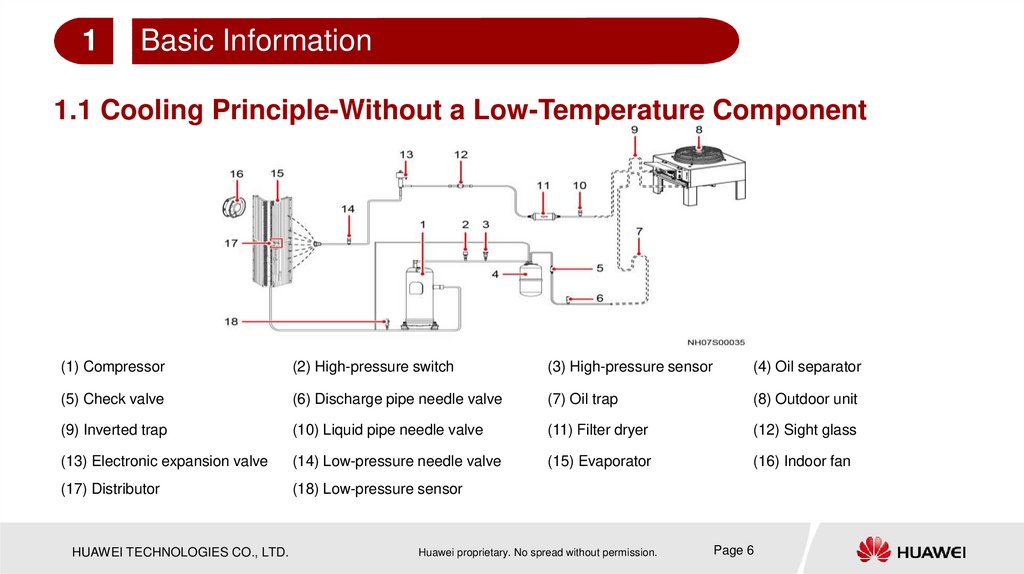
1Basic Information
1.1 Cooling Principle-Without a Low-Temperature Component
(1) Compressor
(2) High-pressure switch
(3) High-pressure sensor
(4) Oil separator
(5) Check valve
(6) Discharge pipe needle valve
(7) Oil trap
(8) Outdoor unit
(9) Inverted trap
(10) Liquid pipe needle valve
(11) Filter dryer
(12) Sight glass
(13) Electronic expansion valve
(14) Low-pressure needle valve
(15) Evaporator
(16) Indoor fan
(17) Distributor
(18) Low-pressure sensor
HUAWEI TECHNOLOGIES CO., LTD.
Huawei proprietary. No spread without permission.
Page 6
7.
1Basic Information
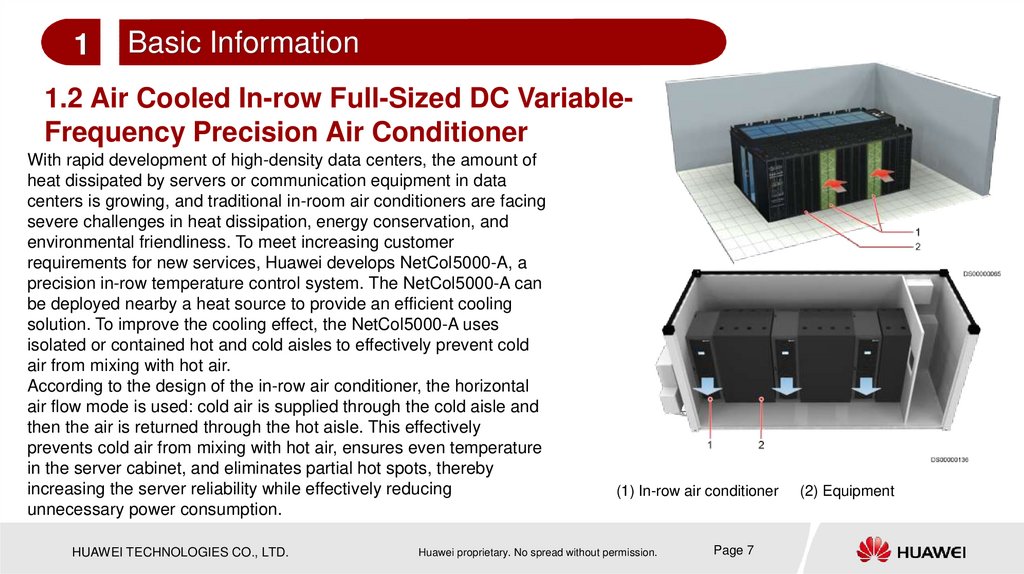
1.2 Air Cooled In-row Full-Sized DC VariableFrequency Precision Air Conditioner
With rapid development of high-density data centers, the amount of
heat dissipated by servers or communication equipment in data
centers is growing, and traditional in-room air conditioners are facing
severe challenges in heat dissipation, energy conservation, and
environmental friendliness. To meet increasing customer
requirements for new services, Huawei develops NetCol5000-A, a
precision in-row temperature control system. The NetCol5000-A can
be deployed nearby a heat source to provide an efficient cooling
solution. To improve the cooling effect, the NetCol5000-A uses
isolated or contained hot and cold aisles to effectively prevent cold
air from mixing with hot air.
According to the design of the in-row air conditioner, the horizontal
air flow mode is used: cold air is supplied through the cold aisle and
then the air is returned through the hot aisle. This effectively
prevents cold air from mixing with hot air, ensures even temperature
in the server cabinet, and eliminates partial hot spots, thereby
increasing the server reliability while effectively reducing
unnecessary power consumption.
HUAWEI TECHNOLOGIES CO., LTD.
(1) In-row air conditioner
Huawei proprietary. No spread without permission.
Page 7
(2) Equipment
8.
1Basic Information
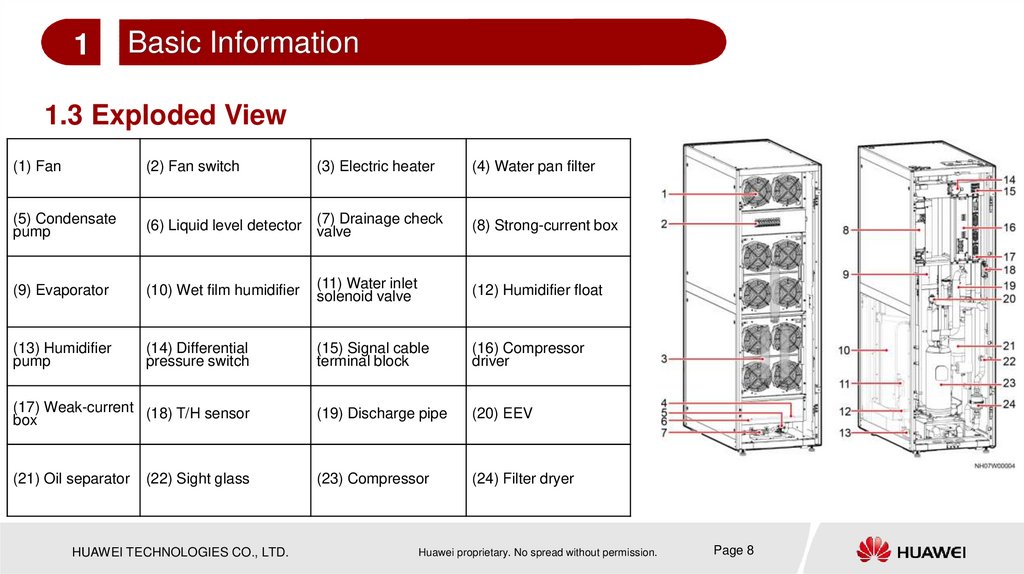
1.3 Exploded View
(1) Fan
(2) Fan switch
(3) Electric heater
(4) Water pan filter
(5) Condensate
pump
(6) Liquid level detector
(7) Drainage check
valve
(8) Strong-current box
(9) Evaporator
(10) Wet film humidifier
(11) Water inlet
solenoid valve
(12) Humidifier float
(13) Humidifier
pump
(14) Differential
pressure switch
(15) Signal cable
terminal block
(16) Compressor
driver
(17) Weak-current (18) T/H sensor
box
(19) Discharge pipe
(20) EEV
(21) Oil separator
(23) Compressor
(24) Filter dryer
(22) Sight glass
HUAWEI TECHNOLOGIES CO., LTD.
Huawei proprietary. No spread without permission.
Page 8
9.
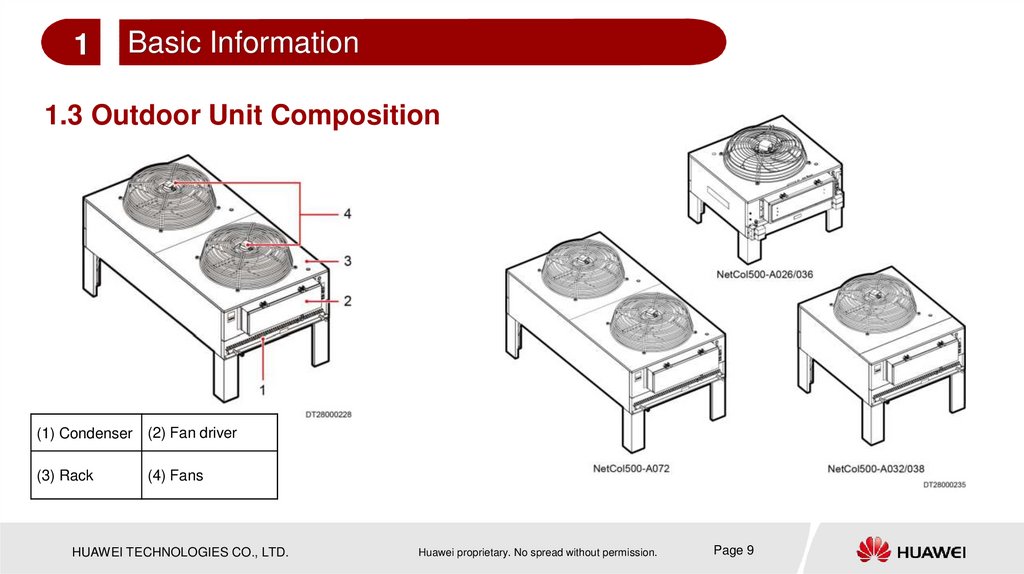
1Basic Information
1.3 Outdoor Unit Composition
(1) Condenser (2) Fan driver
(3) Rack
(4) Fans
HUAWEI TECHNOLOGIES CO., LTD.
Huawei proprietary. No spread without permission.
Page 9
10.
1Basic Information About the Air Conditioner
Summary of This Chapter
This chapter describes basic information about the NetCol5000-A 42 kW air cooled inrow full-sized variable-frequency precision air conditioner, including the cooling
principle, basic features, and indoor unit appearance.
Question
1. The NetCol5000-A 42 kW air cooled in-row full-sized variable-frequency precision air
conditioner uses ______ air supply mode.
A. Upflow
B. Horizontal
C. Downflow
HUAWEI TECHNOLOGIES CO., LTD.
Huawei proprietary. No spread without permission.
Page 10
11.
Contents1
Basic Information
2
Features and Parameters
3
Main Components
4
Installation and Commissioning
5
Routine Maintenance
6
Parts Replacement and Troubleshooting
HUAWEI TECHNOLOGIES CO., LTD.
Huawei proprietary. No spread without permission.
Page 11
12.
2Features and Parameters
2.1 Features
Operating Range
Works in an environment with an outdoor temperature ranging from –40 C to +55 C.
Applies to class A, B, and C environments.
Power System
Supports multiple power systems: 380–415 V (±10% tolerance), 3Ph, 50 or 60 Hz (±3 Hz
tolerance).
Cooling Adjustment Range
Uses the DC frequency-converting scroll compressor and electronically commutated (EC)
fan to support a wide cooling adjustment ranging from 10% to 100%. The compressor
rotates at 17 RPS to 90 RPS. The speed adjustment of the EC fan ranges from 30% to
100%.
HUAWEI TECHNOLOGIES CO., LTD.
Huawei proprietary. No spread without permission.
Page 12
13.
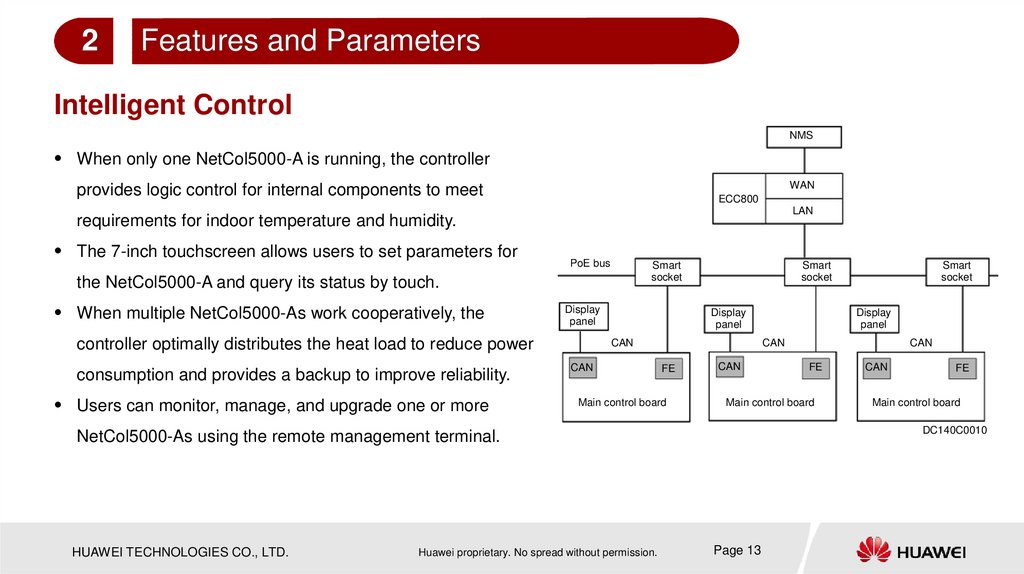
2Features and Parameters
Intelligent Control
NMS
When only one NetCol5000-A is running, the controller
WAN
provides logic control for internal components to meet
ECC800
LAN
requirements for indoor temperature and humidity.
The 7-inch touchscreen allows users to set parameters for
PoE bus
the NetCol5000-A and query its status by touch.
When multiple NetCol5000-As work cooperatively, the
Display
panel
controller optimally distributes the heat load to reduce power
consumption and provides a backup to improve reliability.
Users can monitor, manage, and upgrade one or more
FE
Main control board
Huawei proprietary. No spread without permission.
CAN
CAN
CAN
CAN
FE
Main control board
CAN
FE
Main control board
DC140C0010
NetCol5000-As using the remote management terminal.
HUAWEI TECHNOLOGIES CO., LTD.
Display
panel
Display
panel
CAN
Smart
socket
Smart
socket
Smart
socket
Page 13
14.
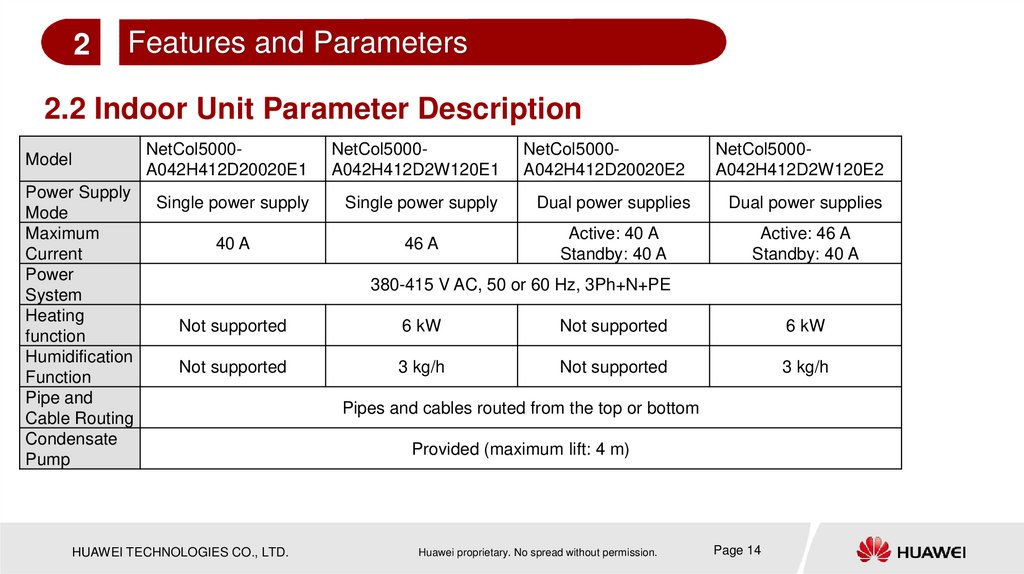
2Features and Parameters
2.2 Indoor Unit Parameter Description
Model
Power Supply
Mode
Maximum
Current
Power
System
Heating
function
Humidification
Function
Pipe and
Cable Routing
Condensate
Pump
NetCol5000A042H412D20020E1
NetCol5000A042H412D2W120E1
NetCol5000A042H412D20020E2
NetCol5000A042H412D2W120E2
Single power supply
Single power supply
Dual power supplies
Dual power supplies
40 A
46 A
Active: 40 A
Standby: 40 A
Active: 46 A
Standby: 40 A
380-415 V AC, 50 or 60 Hz, 3Ph+N+PE
Not supported
6 kW
Not supported
6 kW
Not supported
3 kg/h
Not supported
3 kg/h
HUAWEI TECHNOLOGIES CO., LTD.
Pipes and cables routed from the top or bottom
Provided (maximum lift: 4 m)
Huawei proprietary. No spread without permission.
Page 14
15.
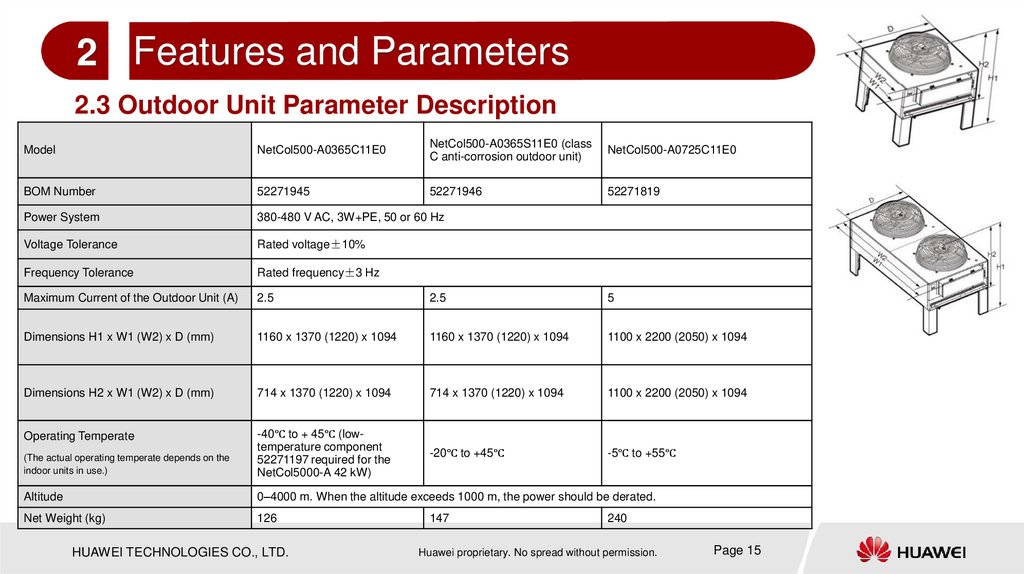
2 Features and Parameters2.3 Outdoor Unit Parameter Description
Model
NetCol500-A0365C11E0
NetCol500-A0365S11E0 (class
C anti-corrosion outdoor unit)
NetCol500-A0725C11E0
BOM Number
52271945
52271946
52271819
Power System
380-480 V AC, 3W+PE, 50 or 60 Hz
Voltage Tolerance
Rated voltage±10%
Frequency Tolerance
Rated frequency±3 Hz
Maximum Current of the Outdoor Unit (A)
2.5
2.5
5
Dimensions H1 x W1 (W2) x D (mm)
1160 x 1370 (1220) x 1094
1160 x 1370 (1220) x 1094
1100 x 2200 (2050) x 1094
Dimensions H2 x W1 (W2) x D (mm)
714 x 1370 (1220) x 1094
714 x 1370 (1220) x 1094
1100 x 2200 (2050) x 1094
Operating Temperate
(The actual operating temperate depends on the
indoor units in use.)
-40℃ to + 45℃ (lowtemperature component
52271197 required for the
NetCol5000-A 42 kW)
-20℃ to +45℃
-5℃ to +55℃
Altitude
0–4000 m. When the altitude exceeds 1000 m, the power should be derated.
Net Weight (kg)
126
HUAWEI TECHNOLOGIES CO., LTD.
147
240
Huawei proprietary. No spread without permission.
Page 15
16.
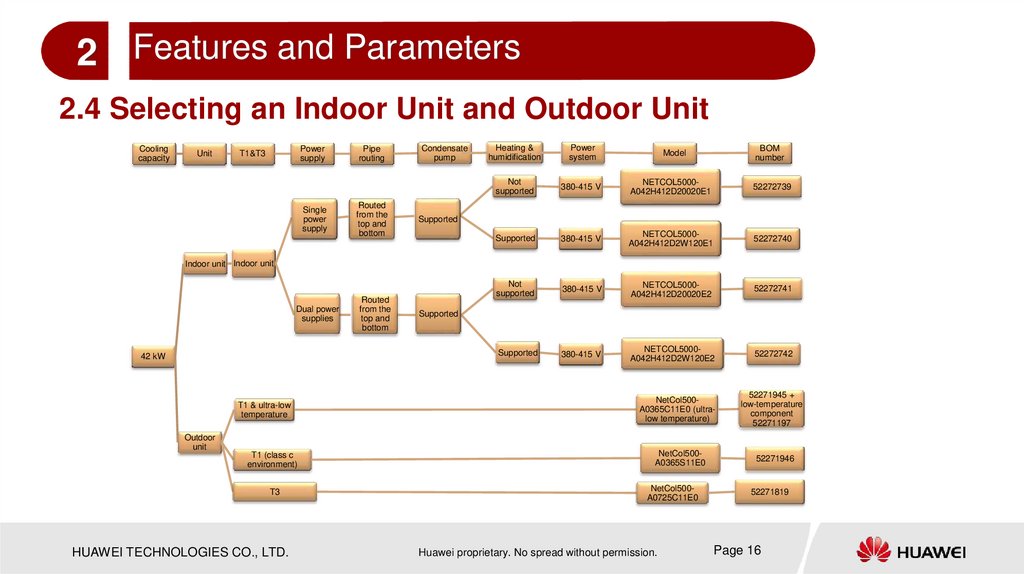
2 Features and Parameters2.4 Selecting an Indoor Unit and Outdoor Unit
Cooling
capacity
Unit
Power
supply
T1&T3
Single
power
supply
Pipe
routing
Routed
from the
top and
bottom
Condensate
pump
Heating &
humidification
Power
system
Not
supported
380-415 V
NETCOL5000A042H412D20020E1
52272739
Supported
380-415 V
NETCOL5000A042H412D2W120E1
52272740
Not
supported
380-415 V
NETCOL5000A042H412D20020E2
52272741
Supported
380-415 V
NETCOL5000A042H412D2W120E2
52272742
BOM
number
Model
Supported
Indoor unit Indoor unit
Dual power
supplies
42 kW
T1 & ultra-low
temperature
Outdoor
unit
T1 (class c
environment)
T3
HUAWEI TECHNOLOGIES CO., LTD.
Routed
from the
top and
bottom
Supported
NetCol500A0365C11E0 (ultralow temperature)
NetCol500A0365S11E0
NetCol500A0725C11E0
Huawei proprietary. No spread without permission.
52271945 +
low-temperature
component
52271197
52271946
52271819
Page 16
17.
2Features and Parameters
Summary of This Chapter
This chapter describes the main features of the NetCol5000-A 42 kW air cooled in-row
full-sized variable-frequency precision air conditioner, parameters of indoor and outdoor
units, and how to select an indoor unit and an outdoor unit.
Question
How do you select an outdoor unit to work with a 42 kW indoor unit?
HUAWEI TECHNOLOGIES CO., LTD.
Huawei proprietary. No spread without permission.
Page 17
18.
Contents1
Basic Information
2
Features and Parameters
3
Main Components
4
Installation and Commissioning
5
Routine Maintenance
6
Parts Replacement and Troubleshooting
HUAWEI TECHNOLOGIES CO., LTD.
Huawei proprietary. No spread without permission.
Page 18
19.
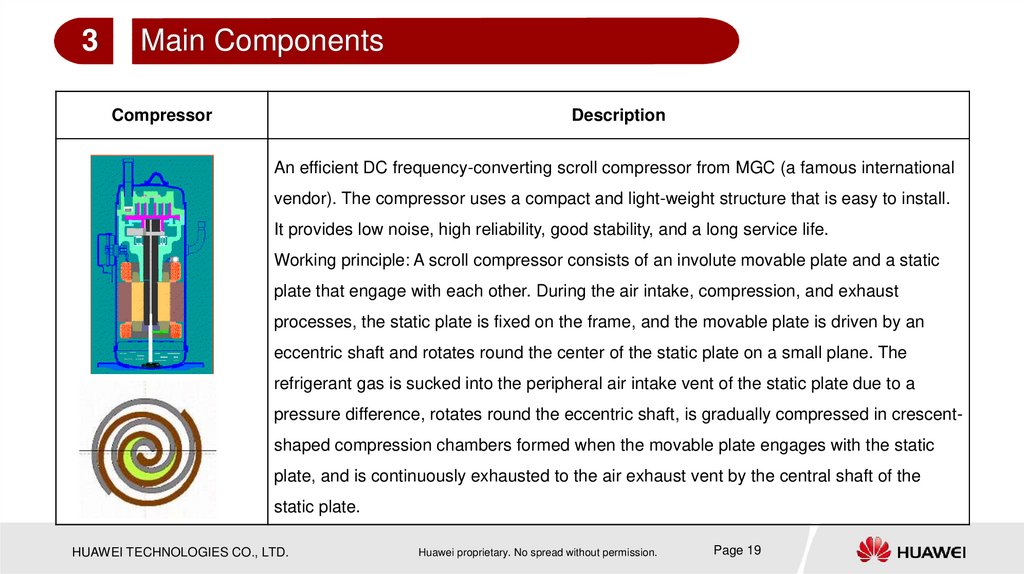
3Main Components
Compressor
Description
An efficient DC frequency-converting scroll compressor from MGC (a famous international
vendor). The compressor uses a compact and light-weight structure that is easy to install.
It provides low noise, high reliability, good stability, and a long service life.
Working principle: A scroll compressor consists of an involute movable plate and a static
plate that engage with each other. During the air intake, compression, and exhaust
processes, the static plate is fixed on the frame, and the movable plate is driven by an
eccentric shaft and rotates round the center of the static plate on a small plane. The
refrigerant gas is sucked into the peripheral air intake vent of the static plate due to a
pressure difference, rotates round the eccentric shaft, is gradually compressed in crescentshaped compression chambers formed when the movable plate engages with the static
plate, and is continuously exhausted to the air exhaust vent by the central shaft of the
static plate.
HUAWEI TECHNOLOGIES CO., LTD.
Huawei proprietary. No spread without permission.
Page 19
20.
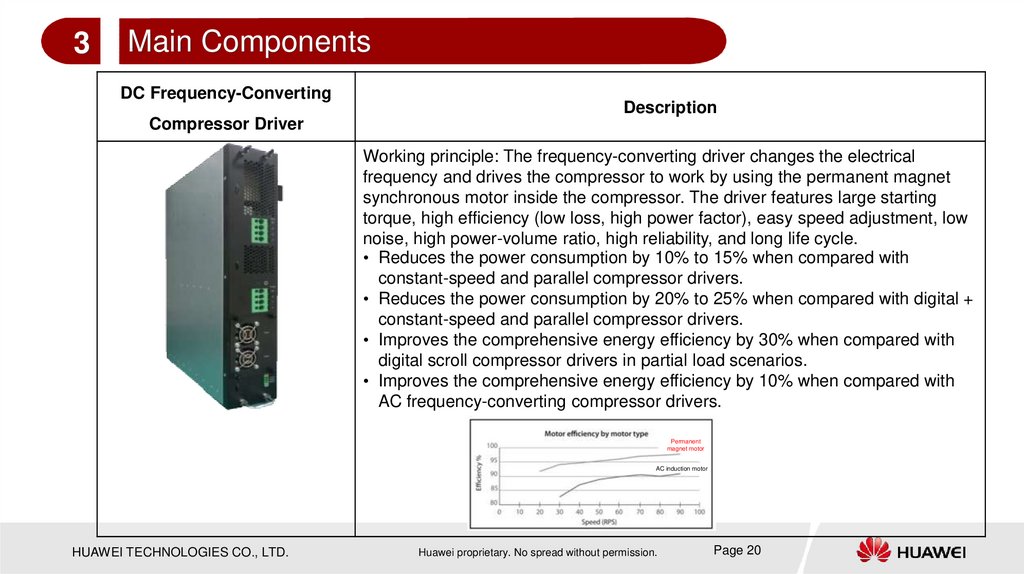
3Main Components
DC Frequency-Converting
Description
Compressor Driver
Working principle: The frequency-converting driver changes the electrical
frequency and drives the compressor to work by using the permanent magnet
synchronous motor inside the compressor. The driver features large starting
torque, high efficiency (low loss, high power factor), easy speed adjustment, low
noise, high power-volume ratio, high reliability, and long life cycle.
• Reduces the power consumption by 10% to 15% when compared with
constant-speed and parallel compressor drivers.
• Reduces the power consumption by 20% to 25% when compared with digital +
constant-speed and parallel compressor drivers.
• Improves the comprehensive energy efficiency by 30% when compared with
digital scroll compressor drivers in partial load scenarios.
• Improves the comprehensive energy efficiency by 10% when compared with
AC frequency-converting compressor drivers.
Permanent
magnet motor
AC induction motor
HUAWEI TECHNOLOGIES CO., LTD.
Huawei proprietary. No spread without permission.
Page 20
21.
3Main Components
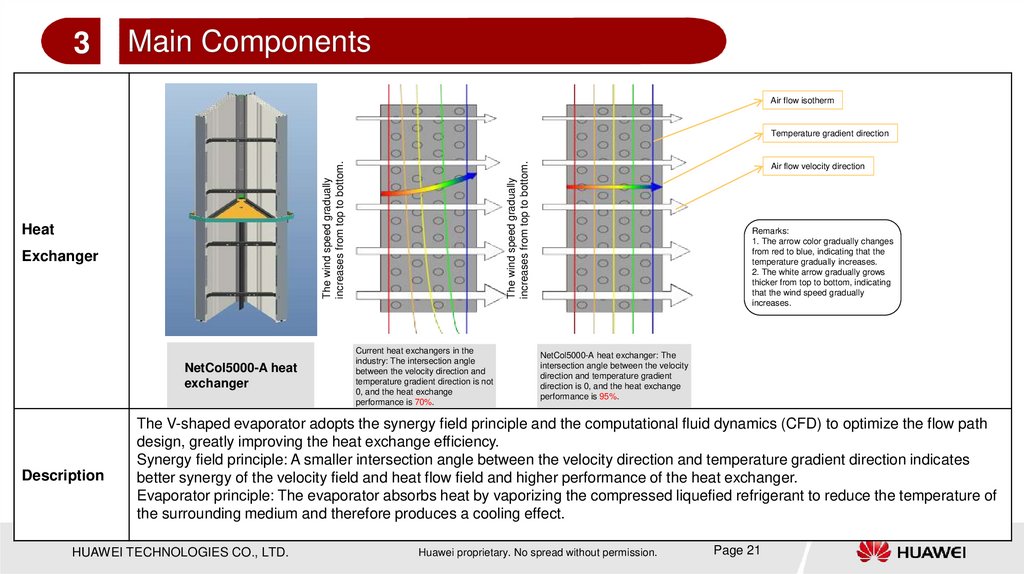
Air flow isotherm
Heat
Exchanger
NetCol5000-A heat
exchanger
Description
The wind speed gradually
increases from top to bottom.
The wind speed gradually
increases from top to bottom.
Temperature gradient direction
Current heat exchangers in the
industry: The intersection angle
between the velocity direction and
temperature gradient direction is not
0, and the heat exchange
performance is 70%.
Air flow velocity direction
Remarks:
1. The arrow color gradually changes
from red to blue, indicating that the
temperature gradually increases.
2. The white arrow gradually grows
thicker from top to bottom, indicating
that the wind speed gradually
increases.
NetCol5000-A heat exchanger: The
intersection angle between the velocity
direction and temperature gradient
direction is 0, and the heat exchange
performance is 95%.
The V-shaped evaporator adopts the synergy field principle and the computational fluid dynamics (CFD) to optimize the flow path
design, greatly improving the heat exchange efficiency.
Synergy field principle: A smaller intersection angle between the velocity direction and temperature gradient direction indicates
better synergy of the velocity field and heat flow field and higher performance of the heat exchanger.
Evaporator principle: The evaporator absorbs heat by vaporizing the compressed liquefied refrigerant to reduce the temperature of
the surrounding medium and therefore produces a cooling effect.
HUAWEI TECHNOLOGIES CO., LTD.
Huawei proprietary. No spread without permission.
Page 21
22.
3Main Components
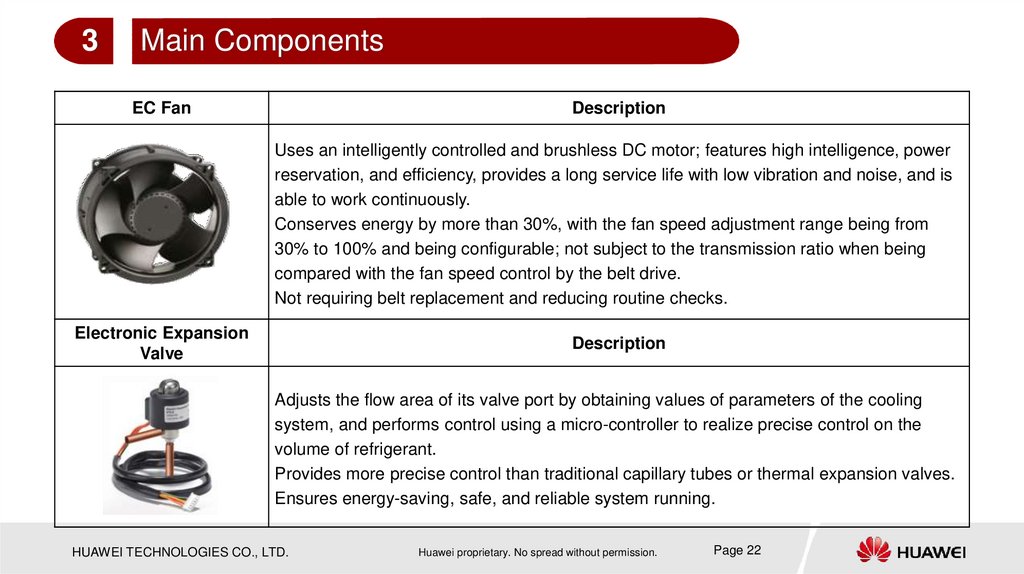
EC Fan
Description
Uses an intelligently controlled and brushless DC motor; features high intelligence, power
reservation, and efficiency, provides a long service life with low vibration and noise, and is
able to work continuously.
Conserves energy by more than 30%, with the fan speed adjustment range being from
30% to 100% and being configurable; not subject to the transmission ratio when being
compared with the fan speed control by the belt drive.
Not requiring belt replacement and reducing routine checks.
Electronic Expansion
Valve
Description
Adjusts the flow area of its valve port by obtaining values of parameters of the cooling
system, and performs control using a micro-controller to realize precise control on the
volume of refrigerant.
Provides more precise control than traditional capillary tubes or thermal expansion valves.
Ensures energy-saving, safe, and reliable system running.
HUAWEI TECHNOLOGIES CO., LTD.
Huawei proprietary. No spread without permission.
Page 22
23.
3Main Components
Description
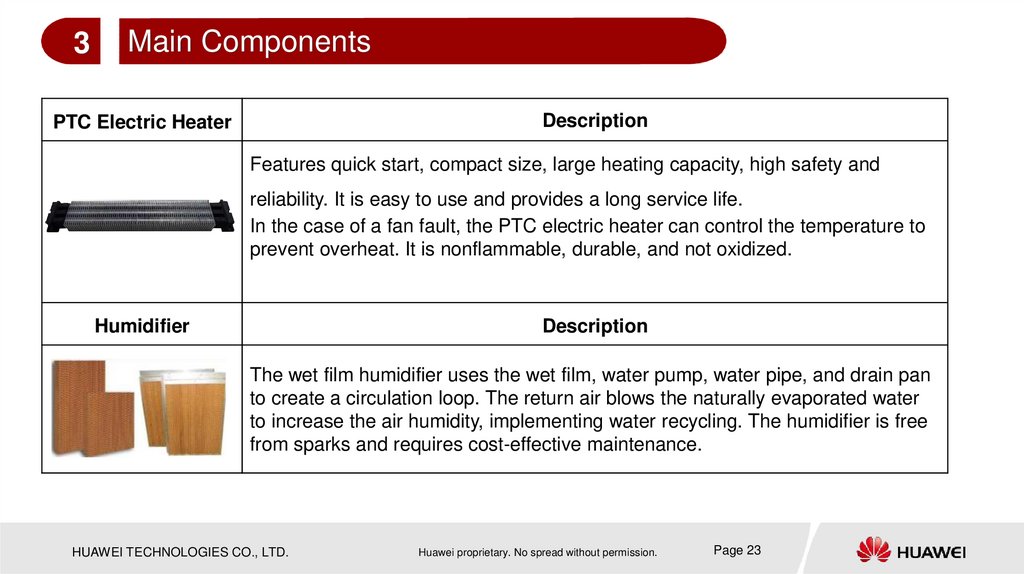
PTC Electric Heater
Features quick start, compact size, large heating capacity, high safety and
reliability. It is easy to use and provides a long service life.
In the case of a fan fault, the PTC electric heater can control the temperature to
prevent overheat. It is nonflammable, durable, and not oxidized.
Humidifier
Description
The wet film humidifier uses the wet film, water pump, water pipe, and drain pan
to create a circulation loop. The return air blows the naturally evaporated water
to increase the air humidity, implementing water recycling. The humidifier is free
from sparks and requires cost-effective maintenance.
HUAWEI TECHNOLOGIES CO., LTD.
Huawei proprietary. No spread without permission.
Page 23
24.
3Main Components
Filter Dryer
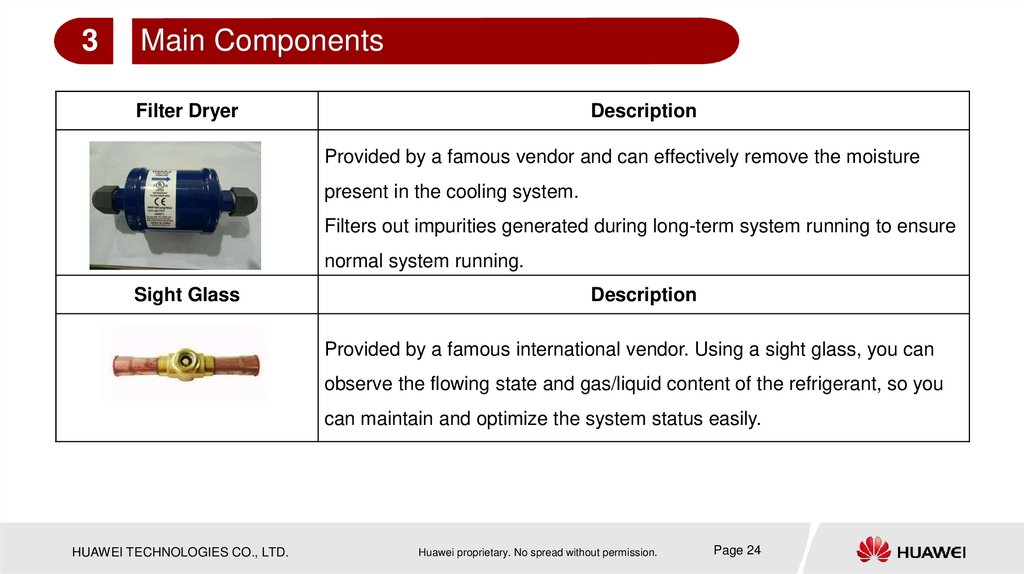
Description
Provided by a famous vendor and can effectively remove the moisture
present in the cooling system.
Filters out impurities generated during long-term system running to ensure
normal system running.
Sight Glass
Description
Provided by a famous international vendor. Using a sight glass, you can
observe the flowing state and gas/liquid content of the refrigerant, so you
can maintain and optimize the system status easily.
HUAWEI TECHNOLOGIES CO., LTD.
Huawei proprietary. No spread without permission.
Page 24
25.
3Main Components
Check Valve
Description
Provided by a famous international vendor and can effectively prevent gas/liquid
backflows.
Prevents starting when being loaded to reduce pipeline vibration.
Effectively improves the reliability of the involved unit.
Description
Water Sensor
Detects water through electrode and converts received signals into dry contacts
based on the principle of electric conductivity of liquid.
HUAWEI TECHNOLOGIES CO., LTD.
Huawei proprietary. No spread without permission.
Page 25
26.
3Main Components
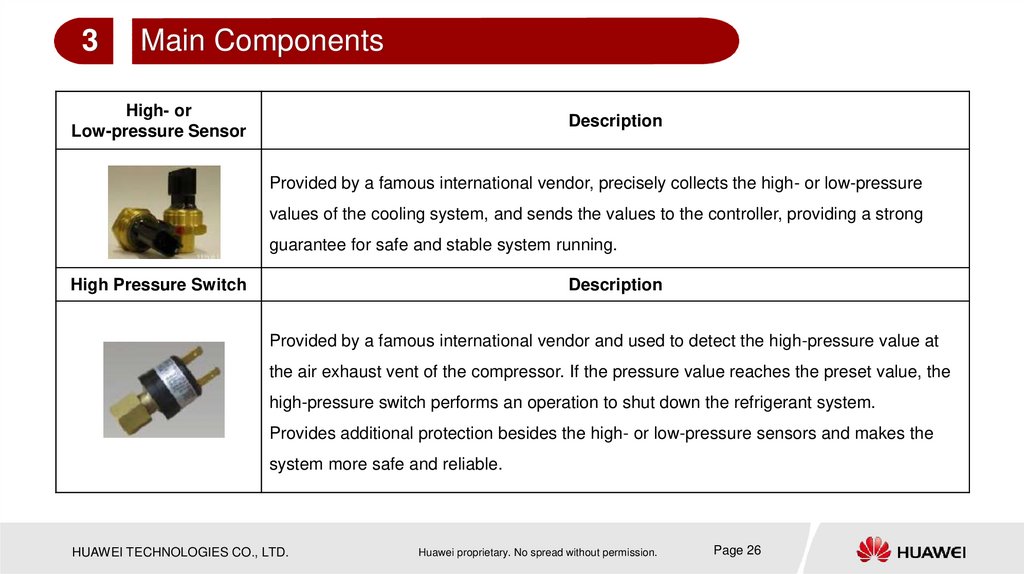
High- or
Low-pressure Sensor
Description
Provided by a famous international vendor, precisely collects the high- or low-pressure
values of the cooling system, and sends the values to the controller, providing a strong
guarantee for safe and stable system running.
High Pressure Switch
Description
Provided by a famous international vendor and used to detect the high-pressure value at
the air exhaust vent of the compressor. If the pressure value reaches the preset value, the
high-pressure switch performs an operation to shut down the refrigerant system.
Provides additional protection besides the high- or low-pressure sensors and makes the
system more safe and reliable.
HUAWEI TECHNOLOGIES CO., LTD.
Huawei proprietary. No spread without permission.
Page 26
27.
3Main Components
Description
Display Panel
A 7-inch true color-sensitive LCD that provides a user-friendly interface for you to perform
query, settings, monitoring, and maintenance.
When only one NetCol5000-A is running, provides logic control of its components to meet
temperature and humidity requirements.
When multiple units work cooperatively, optimally distributes the heat load to reduce power
consumption and provides a backup to improve reliability.
T/H Sensor
Description
Primarily placed in a cold or hot aisle and used to detect the temperature and humidity of
the location where it is placed, so the temperature and humidity in the equipment room can
be controlled based on the difference between the detected value and the preset value.
(Set the DIP switch of a T/H sensor before installing the sensor.)
HUAWEI TECHNOLOGIES CO., LTD.
Huawei proprietary. No spread without permission.
Page 27
28.
3Main Components
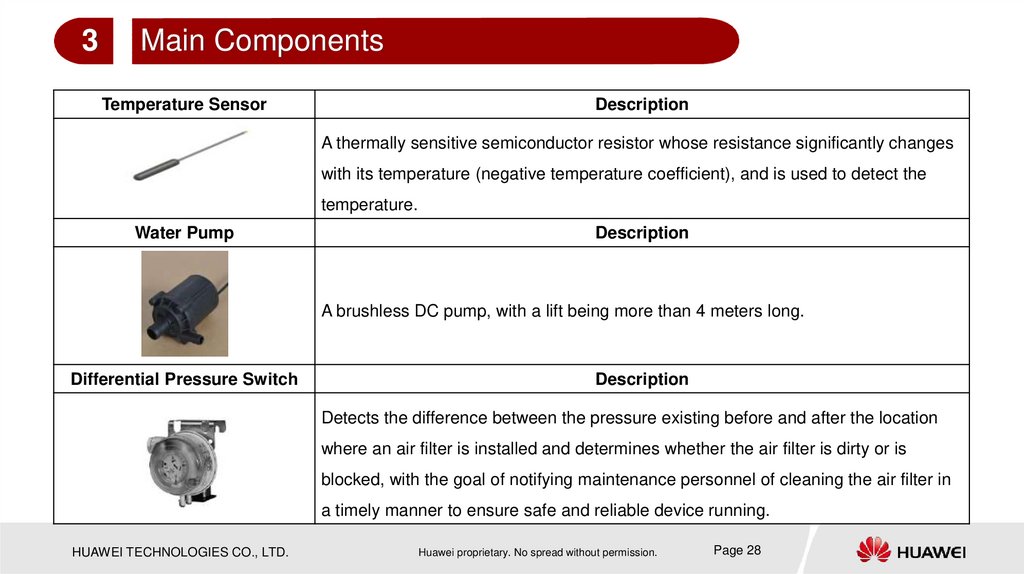
Temperature Sensor
Description
A thermally sensitive semiconductor resistor whose resistance significantly changes
with its temperature (negative temperature coefficient), and is used to detect the
temperature.
Water Pump
Description
A brushless DC pump, with a lift being more than 4 meters long.
Differential Pressure Switch
Description
Detects the difference between the pressure existing before and after the location
where an air filter is installed and determines whether the air filter is dirty or is
blocked, with the goal of notifying maintenance personnel of cleaning the air filter in
a timely manner to ensure safe and reliable device running.
HUAWEI TECHNOLOGIES CO., LTD.
Huawei proprietary. No spread without permission.
Page 28
29.
3Main Components
Description
Air Filter
Meets hygienic requirements of data center equipment rooms.
Liquid Level Float
Switch
Description
The white float on the left controls the water pump, and the electric liquid level
switch on the right controls the full water alarm signal. The two float switches
precisely monitor the water level in the water pan, preventing water overflow in
the water pan, protecting the water pump, and improving device reliability.
HUAWEI TECHNOLOGIES CO., LTD.
Huawei proprietary. No spread without permission.
Page 29
30.
3Main Components
Description
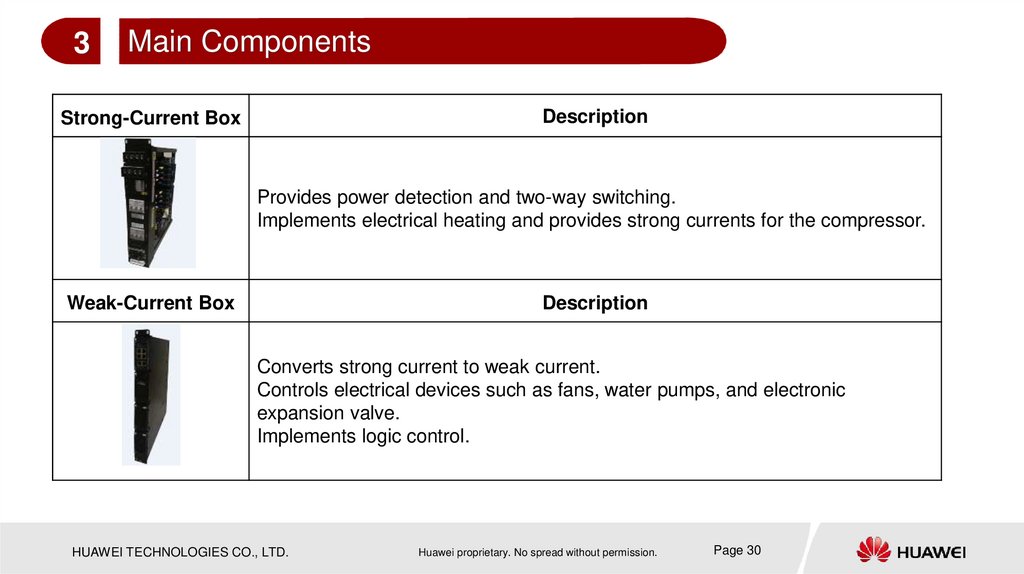
Strong-Current Box
Provides power detection and two-way switching.
Implements electrical heating and provides strong currents for the compressor.
Weak-Current Box
Description
Converts strong current to weak current.
Controls electrical devices such as fans, water pumps, and electronic
expansion valve.
Implements logic control.
HUAWEI TECHNOLOGIES CO., LTD.
Huawei proprietary. No spread without permission.
Page 30
31.
3Main Components
Summary of This Chapter
This chapter describes the main components of the NetCol5000-A 42 kW air cooled inrow full-sized variable-frequency precision air conditioner.
Question
1. When is a low-temperature component required?
HUAWEI TECHNOLOGIES CO., LTD.
Huawei proprietary. No spread without permission.
Page 31
32.
Contents1
Basic Information
2
Features and Parameters
3
Main Components
4
Installation and Commissioning
5
Routine Maintenance
6
Parts Replacement and Troubleshooting
HUAWEI TECHNOLOGIES CO., LTD.
Huawei proprietary. No spread without permission.
Page 32
33.
4Installation and Commissioning
4.1 Installation Process Flowchart
HUAWEI TECHNOLOGIES CO., LTD.
Huawei proprietary. No spread without permission.
Page 33
34.
4Installation and Commissioning
4.2 Preparing MaterialsInstallation Tools
Indoor unit structure
HUAWEI TECHNOLOGIES CO., LTD.
Vacuum pump
Lifting rope
Pressure gauge
Fluorine injection hose
Installation tools
Huawei proprietary. No spread without permission.
Page 34
35.
Installation and Commissioning4
4.2 Preparing Materials-Refrigerant R410A (Optional)
Do not use low-quality refrigerant. Huawei is not responsible for any damage caused by low-quality refrigerant.
Check the refrigerant by following the steps shown in the figure below: Keep the refrigerant indoors at a constant temperature and humidity for 24 hours. Use a
thermometer to measure the external surface temperature of the refrigerant container, and connect a pressure gauge to the container to measure its internal
pressure. Determine the saturation pressure that corresponds to the measured external surface temperature according to Table 1 and calculate the deviation from
the measured internal pressure. If the deviation is more than 0.2 MPa, the refrigerant is not qualified and should be replaced.
Table 1 Mapping between temperatures and R410A saturation pressure
Temperature (°C)
0
1
2
3
4
5
6
7
8
9
10
11
12
13
14
15
16
17
18
Saturation
Temperature (°C)
Saturation
Temperature (°C)
Saturation
Pressure-Surface
Pressure-Surface
Pressure-Surface
Pressure (MPa)
Pressure (MPa)
Pressure (MPa)
0.7
19
1.31
38
2.21
0.73
20
1.35
39
2.27
0.75
21
1.39
40
2.33
0.78
22
1.4
41
2.39
0.81
23
1.47
50
2.45
0.84
24
1.51
43
2.51
0.87
25
1.56
44
2.57
0.9
26
1.6
45
2.63
0.93
27
1.65
46
2.7
0.96
28
1.69
47
2.76
0.99
29
1.74
48
2.83
1.02
30
1.79
49
2.9
1.05
31
1.84
50
2.97
1.09
32
1.89
51
3.04
1.12
33
1.94
52
3.11
1.16
34
1.99
53
3.19
1.19
35
2.04
54
3.26
1.23
36
2.1
55
3.34
1.27
37
2.15
–
–
HUAWEI TECHNOLOGIES CO., LTD.
Table 2 Refrigerant R410A charge amount
Length of the One-Way Connection Pipe (m)
Item
0 < L ≤ 10
10 < L ≤ 60
60 < L ≤ 100
Refrigerant charge for the
NetCol500-A036 (kg)
9.2
9.2 + (L – 10) x 0.19
9.2 + (L – 10) x 0.25
Refrigerant charge for the
NetCol500-A036 Including
a Low-Temperature
Component (kg)
20.2
20.2 + (L – 10) x 0.19
20.2 + (L – 10) x 0.25
Refrigerant charge for the
NetCol500-A072 (kg)
13.2
13.2 + (L – 10) x 0.19
13.2 + (L – 10) x 0.25
Huawei proprietary. No spread without permission.
Page 35
36.
4Installation and Commissioning
4.2 Preparing Materials-Refrigerant Oil (Optional)
The recommended refrigerant oil is MEL-32. You can purchase it from Huawei or purchase it by
yourself after being confirmed by Huawei.
The NetCol5000-A042 has been filled with refrigerant oil for 100 m long pipes before delivery.
Additional refrigerant oil is not required during onsite installation. In the case of oil leakage, oil
shortage, or compressor replacement, charge additional refrigerant oil.
HUAWEI TECHNOLOGIES CO., LTD.
Huawei proprietary. No spread without permission.
Page 36
37.
Installation and Commissioning4
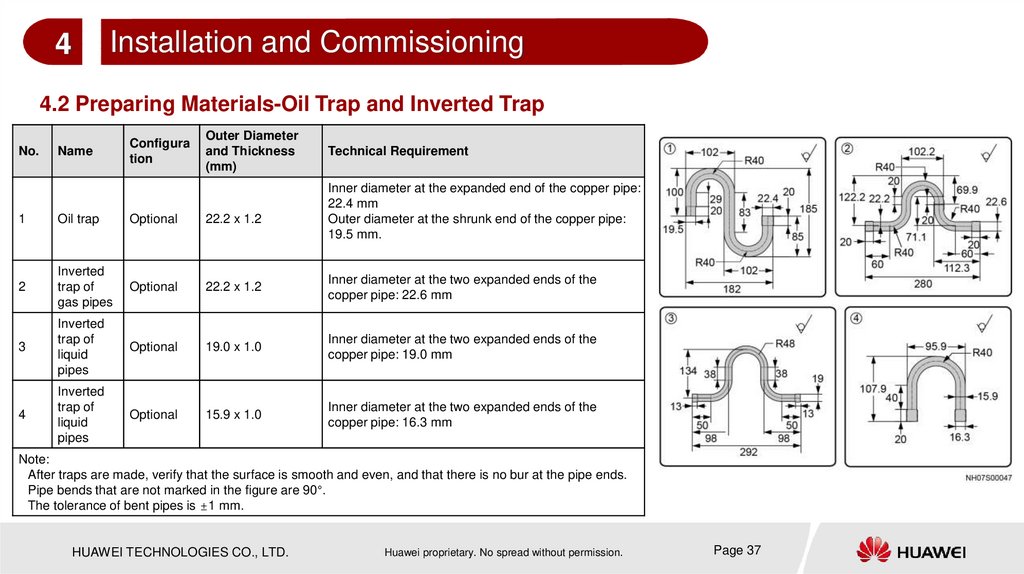
4.2 Preparing Materials-Oil Trap and Inverted Trap
No.
Name
Configura
tion
Outer Diameter
and Thickness
(mm)
Technical Requirement
Inner diameter at the expanded end of the copper pipe:
22.4 mm
Outer diameter at the shrunk end of the copper pipe:
19.5 mm.
1
Oil trap
Optional
22.2 x 1.2
2
Inverted
trap of
gas pipes
Optional
22.2 x 1.2
Inner diameter at the two expanded ends of the
copper pipe: 22.6 mm
3
Inverted
trap of
liquid
pipes
Optional
19.0 x 1.0
Inner diameter at the two expanded ends of the
copper pipe: 19.0 mm
4
Inverted
trap of
liquid
pipes
Optional
15.9 x 1.0
Inner diameter at the two expanded ends of the
copper pipe: 16.3 mm
Note:
After traps are made, verify that the surface is smooth and even, and that there is no bur at the pipe ends.
Pipe bends that are not marked in the figure are 90°.
The tolerance of bent pipes is ±1 mm.
HUAWEI TECHNOLOGIES CO., LTD.
Huawei proprietary. No spread without permission.
Page 37
38.
Installation and Commissioning4
4.2 Preparing Materials-Copper Pipe
Determine the total equivalent length of refrigerant pipes based on site requirements. Consider the bend resistance. The total equivalent length
equals the equivalent length of the bends plus the length of straight pipes between the indoor and outdoor units.
Equivalent pipe length for components (such as bends) that causes pressure loss
Copper
Pipe Outer
Diameter
(in.)
Equivalent Pipe Length (m)
45°Bend
90°Bend
180°Bend
T-shaped
Three-Way
Valve
3/8
0.12
0.2
0.4
0.6
1/2
0.14
0.25
0.5
0.65
5/8
0.17
0.3
0.6
0.7
3/4
0.2
0.35
0.7
0.8
7/8
0.24
0.42
0.8
1.2
1
0.28
0.5
1
1.3
1-1/8
0.32
0.6
1.2
1.4
Pipe assemblies are optional. The following pipe assemblies may be
used:
• Liquid pipe:
L ≤ 60 m: R410A copper pipe; outer diameter of 5/8 inch (15.88 mm);
wall thickness of 1.0 mm; operating pressure > 4.5 MPa
60 m < L ≤ 100 m: R410A copper pipe; outer diameter of 3/4 inch
(19.05 mm); wall thickness of 1.2 mm; operating pressure > 4.5 MPa
• Gas pipe requirements: R410A copper pipe; outer diameter of 7/8 inch;
thickness of 1.2 mm; operating pressure ≥ 4.5 MPa
• Thermal insulation foam: thickness ≥ 9.2 mm
Note: The equivalent length of the one-way pipe should not be longer than 100 m. If the outdoor unit is higher than the indoor unit, the maximum
vertical difference between the units is 30 m. If the outdoor unit is lower than the indoor unit, the maximum vertical difference is 8 m.
HUAWEI TECHNOLOGIES CO., LTD.
Huawei proprietary. No spread without permission.
Page 38
39.
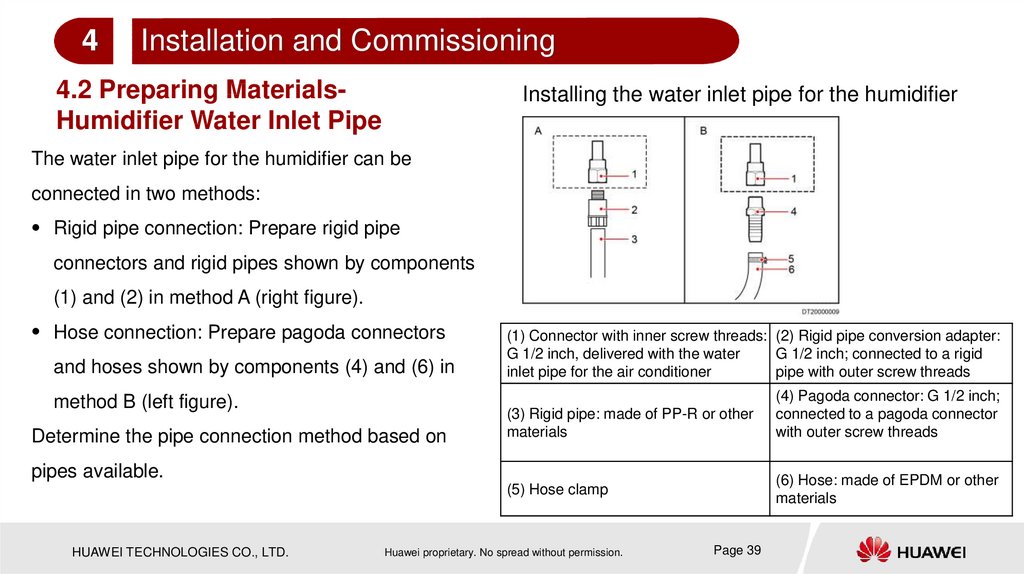
4Installation and Commissioning
4.2 Preparing MaterialsHumidifier Water Inlet Pipe
Installing the water inlet pipe for the humidifier
The water inlet pipe for the humidifier can be
connected in two methods:
Rigid pipe connection: Prepare rigid pipe
connectors and rigid pipes shown by components
(1) and (2) in method A (right figure).
Hose connection: Prepare pagoda connectors
and hoses shown by components (4) and (6) in
method B (left figure).
Determine the pipe connection method based on
(1) Connector with inner screw threads: (2) Rigid pipe conversion adapter:
G 1/2 inch, delivered with the water
G 1/2 inch; connected to a rigid
inlet pipe for the air conditioner
pipe with outer screw threads
(3) Rigid pipe: made of PP-R or other
materials
pipes available.
(6) Hose: made of EPDM or other
materials
(5) Hose clamp
HUAWEI TECHNOLOGIES CO., LTD.
Huawei proprietary. No spread without permission.
(4) Pagoda connector: G 1/2 inch;
connected to a pagoda connector
with outer screw threads
Page 39
40.
4Installation and Commissioning
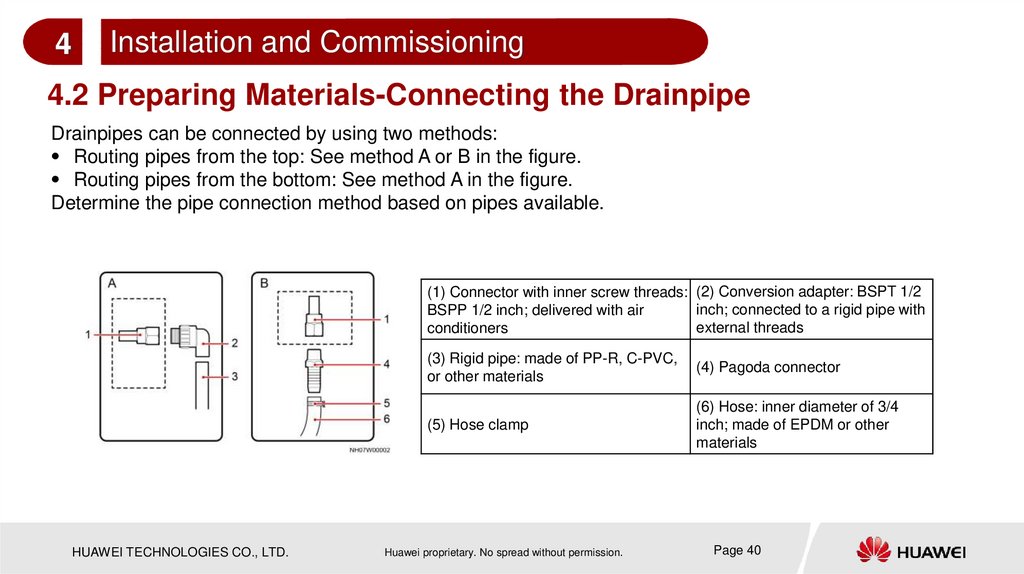
4.2 Preparing Materials-Connecting the Drainpipe
Drainpipes can be connected by using two methods:
Routing pipes from the top: See method A or B in the figure.
Routing pipes from the bottom: See method A in the figure.
Determine the pipe connection method based on pipes available.
(1) Connector with inner screw threads: (2) Conversion adapter: BSPT 1/2
inch; connected to a rigid pipe with
BSPP 1/2 inch; delivered with air
external threads
conditioners
HUAWEI TECHNOLOGIES CO., LTD.
(3) Rigid pipe: made of PP-R, C-PVC,
or other materials
(4) Pagoda connector
(5) Hose clamp
(6) Hose: inner diameter of 3/4
inch; made of EPDM or other
materials
Huawei proprietary. No spread without permission.
Page 40
41.
4Installation and Commissioning
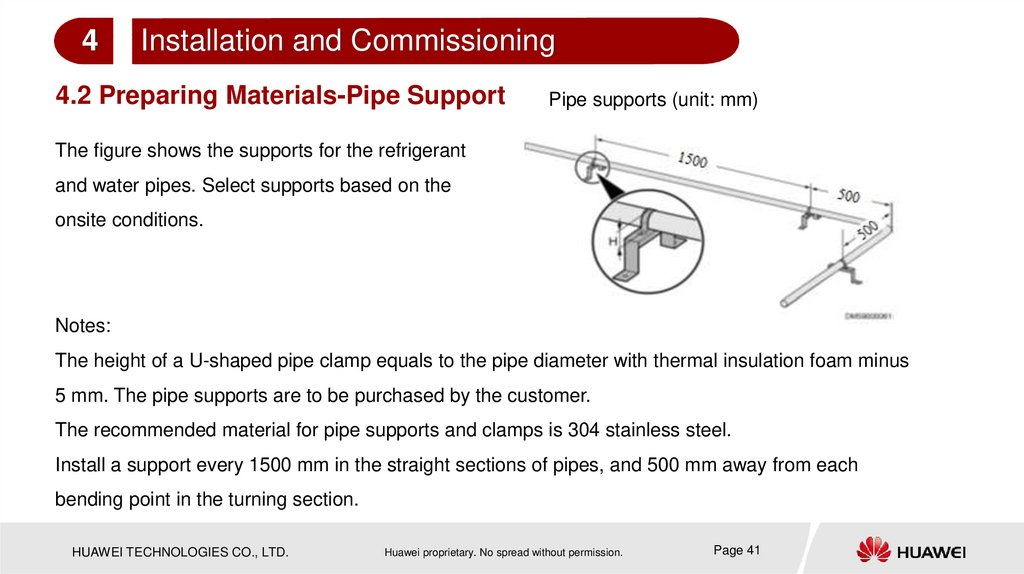
4.2 Preparing Materials-Pipe Support
Pipe supports (unit: mm)
The figure shows the supports for the refrigerant
and water pipes. Select supports based on the
onsite conditions.
Notes:
The height of a U-shaped pipe clamp equals to the pipe diameter with thermal insulation foam minus
5 mm. The pipe supports are to be purchased by the customer.
The recommended material for pipe supports and clamps is 304 stainless steel.
Install a support every 1500 mm in the straight sections of pipes, and 500 mm away from each
bending point in the turning section.
HUAWEI TECHNOLOGIES CO., LTD.
Huawei proprietary. No spread without permission.
Page 41
42.
4Installation and Commissioning
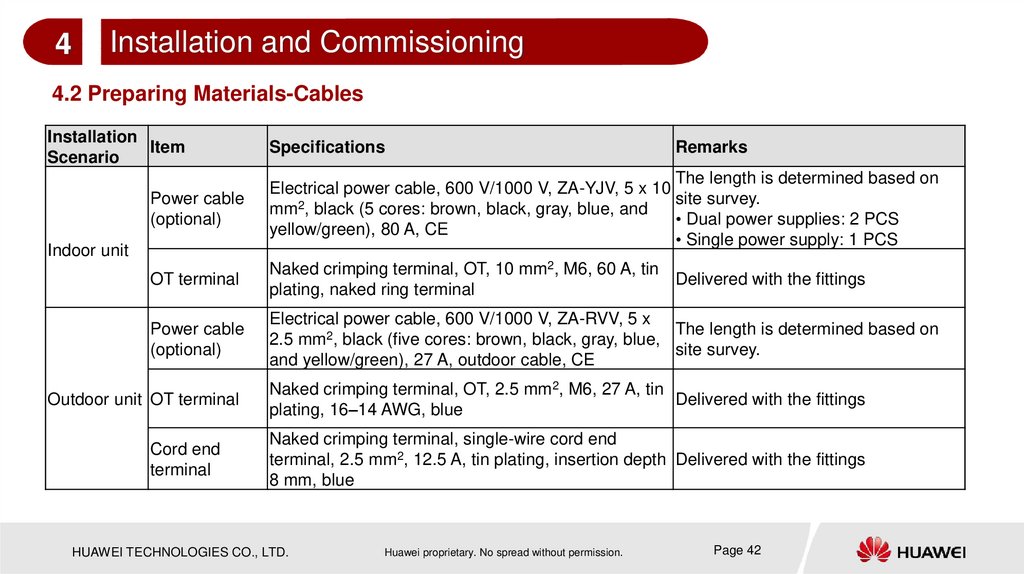
4.2 Preparing Materials-Cables
Installation
Item
Scenario
Specifications
Remarks
Power cable
(optional)
The length is determined based on
Electrical power cable, 600 V/1000 V, ZA-YJV, 5 x 10
site survey.
mm2, black (5 cores: brown, black, gray, blue, and
• Dual power supplies: 2 PCS
yellow/green), 80 A, CE
• Single power supply: 1 PCS
OT terminal
Naked crimping terminal, OT, 10 mm2, M6, 60 A, tin
Delivered with the fittings
plating, naked ring terminal
Power cable
(optional)
Electrical power cable, 600 V/1000 V, ZA-RVV, 5 x
The length is determined based on
2.5 mm2, black (five cores: brown, black, gray, blue,
site survey.
and yellow/green), 27 A, outdoor cable, CE
Indoor unit
Outdoor unit OT terminal
Cord end
terminal
Naked crimping terminal, OT, 2.5 mm2, M6, 27 A, tin
Delivered with the fittings
plating, 16–14 AWG, blue
Naked crimping terminal, single-wire cord end
terminal, 2.5 mm2, 12.5 A, tin plating, insertion depth Delivered with the fittings
8 mm, blue
HUAWEI TECHNOLOGIES CO., LTD.
Huawei proprietary. No spread without permission.
Page 42
43.
4Installation and Commissioning
4.2 Preparing Materials-Cables
Installation
Item
Scenario
Signal cable to the
indoor and outdoor
units (optional)
Indoor and
outdoor
units
Signal cable to the
indoor and outdoor
units (optional)
Cord end terminal
for the cable
Teamwork
control
Teamwork control
network cable
(optional)
Water
sensor
monitoring
Water detection
cable
HUAWEI TECHNOLOGIES CO., LTD.
Specifications
Remarks
The cable applies to the RS485
Electrical power cable, 300 V, SJTW, 3 x 16 AWG,
communication connection. The
black (three cores: black, white, and green), 10 A,
length is determined based on site
shielded outdoor cable, UL
survey.
Electrical power cable, 450 V/750 V, H07RN-F, 2 The cable applies to the dry contact
x 1 mm2, black (two cores: brown and blue), 10 A, connection. The length is determined
rubber power cable, VDE
based on site survey.
Naked crimping terminal, single-wire cord end
terminal, 1.5 mm2, 7.5 A, tin plating, insertion
Delivered with the fittings
depth 8 mm, red
Symmetric twisted-pair cable, 100 ohm,
enhanced category 5 cable, aluminum foil shield,
1 PCS (10 m)
0.52 mm, 24 AWG, eight cores, four pairs of
PANTONE 430U, equipped with plug
Electrical power cable, 5 m, 22 AWG, black, (2 x
T0.52, orange), (2 x 22UL1007, black), (2 x T0.52, Delivered with the fittings
orange)
Huawei proprietary. No spread without permission.
Page 43
44.
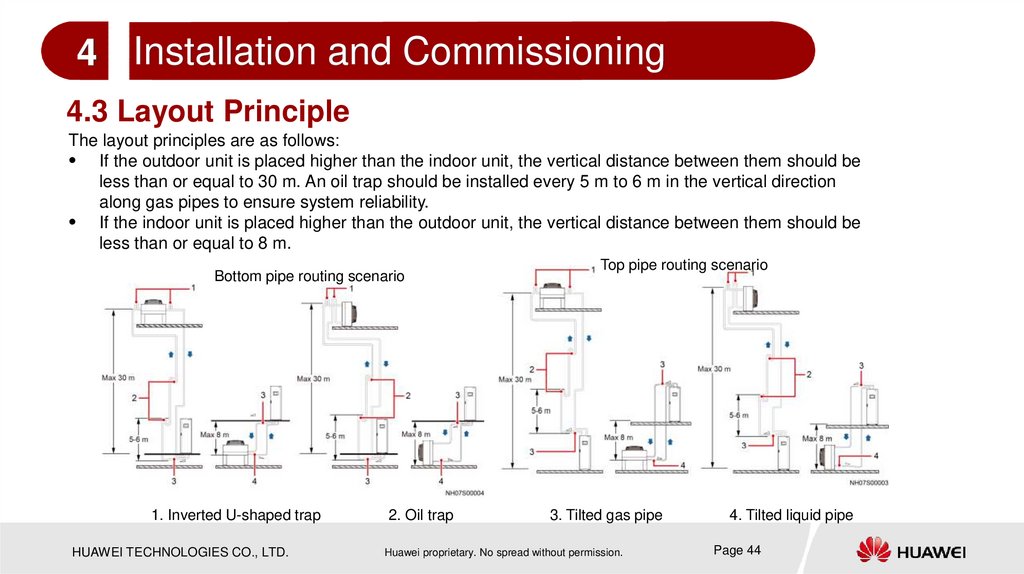
4 Installation and Commissioning4.3 Layout Principle
The layout principles are as follows:
If the outdoor unit is placed higher than the indoor unit, the vertical distance between them should be
less than or equal to 30 m. An oil trap should be installed every 5 m to 6 m in the vertical direction
along gas pipes to ensure system reliability.
If the indoor unit is placed higher than the outdoor unit, the vertical distance between them should be
less than or equal to 8 m.
Bottom pipe routing scenario
1. Inverted U-shaped trap
HUAWEI TECHNOLOGIES CO., LTD.
2. Oil trap
Top pipe routing scenario
3. Tilted gas pipe
Huawei proprietary. No spread without permission.
4. Tilted liquid pipe
Page 44
45.
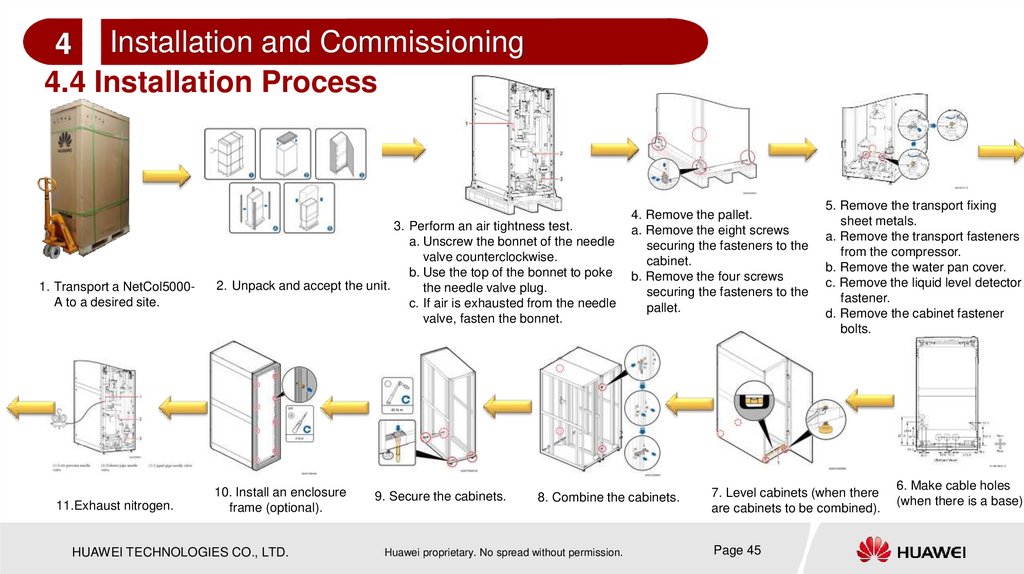
4 Installation and Commissioning4.4 Installation Process
1. Transport a NetCol5000A to a desired site.
11.Exhaust nitrogen.
3. Perform an air tightness test.
a. Unscrew the bonnet of the needle
valve counterclockwise.
b. Use the top of the bonnet to poke
2. Unpack and accept the unit.
the needle valve plug.
c. If air is exhausted from the needle
valve, fasten the bonnet.
10. Install an enclosure
frame (optional).
HUAWEI TECHNOLOGIES CO., LTD.
9. Secure the cabinets.
4. Remove the pallet.
a. Remove the eight screws
securing the fasteners to the
cabinet.
b. Remove the four screws
securing the fasteners to the
pallet.
8. Combine the cabinets.
Huawei proprietary. No spread without permission.
5. Remove the transport fixing
sheet metals.
a. Remove the transport fasteners
from the compressor.
b. Remove the water pan cover.
c. Remove the liquid level detector
fastener.
d. Remove the cabinet fastener
bolts.
7. Level cabinets (when there
are cabinets to be combined).
Page 45
6. Make cable holes
(when there is a base).
46.
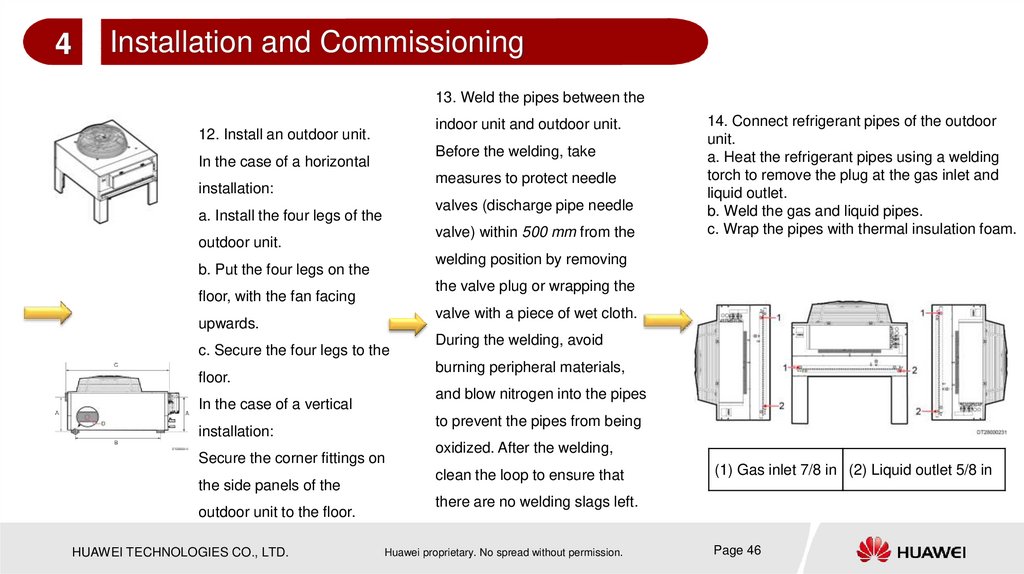
4Installation and Commissioning
13. Weld the pipes between the
indoor unit and outdoor unit.
12. Install an outdoor unit.
Before the welding, take
In the case of a horizontal
measures to protect needle
installation:
valves (discharge pipe needle
a. Install the four legs of the
valve) within 500 mm from the
outdoor unit.
welding position by removing
b. Put the four legs on the
the valve plug or wrapping the
floor, with the fan facing
valve with a piece of wet cloth.
upwards.
c. Secure the four legs to the
and blow nitrogen into the pipes
In the case of a vertical
to prevent the pipes from being
installation:
Secure the corner fittings on
outdoor unit to the floor.
HUAWEI TECHNOLOGIES CO., LTD.
During the welding, avoid
burning peripheral materials,
floor.
the side panels of the
14. Connect refrigerant pipes of the outdoor
unit.
a. Heat the refrigerant pipes using a welding
torch to remove the plug at the gas inlet and
liquid outlet.
b. Weld the gas and liquid pipes.
c. Wrap the pipes with thermal insulation foam.
oxidized. After the welding,
clean the loop to ensure that
(1) Gas inlet 7/8 in (2) Liquid outlet 5/8 in
there are no welding slags left.
Huawei proprietary. No spread without permission.
Page 46
47.
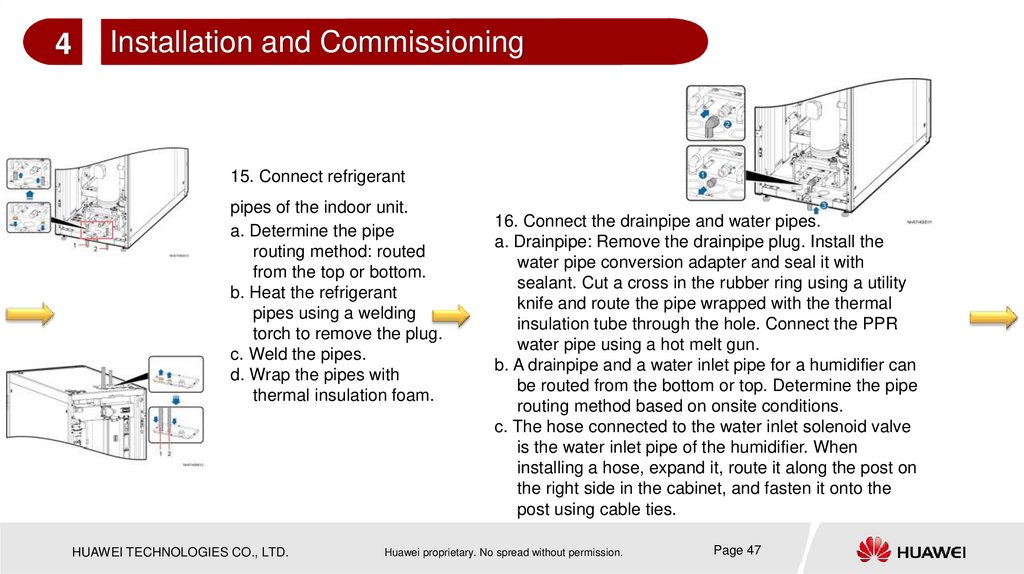
4Installation and Commissioning
15. Connect refrigerant
pipes of the indoor unit.
a. Determine the pipe
routing method: routed
from the top or bottom.
b. Heat the refrigerant
pipes using a welding
torch to remove the plug.
c. Weld the pipes.
d. Wrap the pipes with
thermal insulation foam.
HUAWEI TECHNOLOGIES CO., LTD.
16. Connect the drainpipe and water pipes.
a. Drainpipe: Remove the drainpipe plug. Install the
water pipe conversion adapter and seal it with
sealant. Cut a cross in the rubber ring using a utility
knife and route the pipe wrapped with the thermal
insulation tube through the hole. Connect the PPR
water pipe using a hot melt gun.
b. A drainpipe and a water inlet pipe for a humidifier can
be routed from the bottom or top. Determine the pipe
routing method based on onsite conditions.
c. The hose connected to the water inlet solenoid valve
is the water inlet pipe of the humidifier. When
installing a hose, expand it, route it along the post on
the right side in the cabinet, and fasten it onto the
post using cable ties.
Huawei proprietary. No spread without permission.
Page 47
48.
4Installation and Commissioning
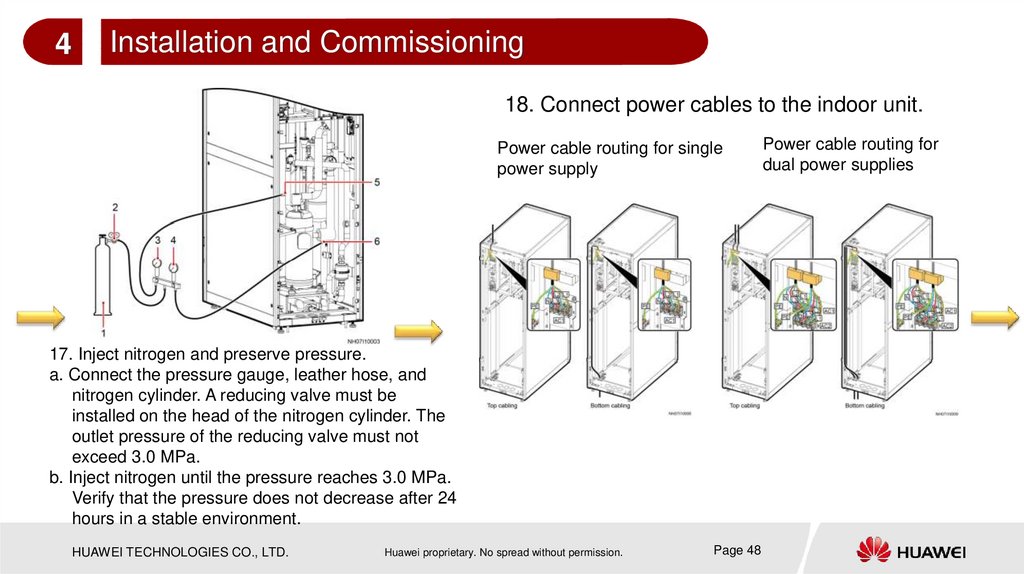
18. Connect power cables to the indoor unit.
Power cable routing for single
power supply
17. Inject nitrogen and preserve pressure.
a. Connect the pressure gauge, leather hose, and
nitrogen cylinder. A reducing valve must be
installed on the head of the nitrogen cylinder. The
outlet pressure of the reducing valve must not
exceed 3.0 MPa.
b. Inject nitrogen until the pressure reaches 3.0 MPa.
Verify that the pressure does not decrease after 24
hours in a stable environment.
HUAWEI TECHNOLOGIES CO., LTD.
Huawei proprietary. No spread without permission.
Page 48
Power cable routing for
dual power supplies
49.
4Installation and Commissioning
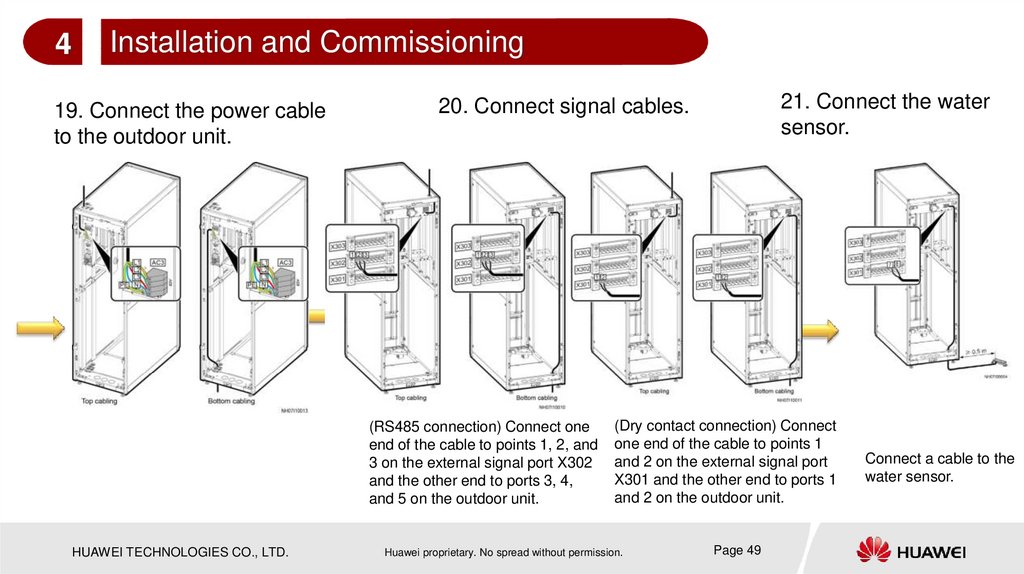
19. Connect the power cable
to the outdoor unit.
(RS485 connection) Connect one
end of the cable to points 1, 2, and
3 on the external signal port X302
and the other end to ports 3, 4,
and 5 on the outdoor unit.
HUAWEI TECHNOLOGIES CO., LTD.
21. Connect the water
sensor.
20. Connect signal cables.
(Dry contact connection) Connect
one end of the cable to points 1
and 2 on the external signal port
X301 and the other end to ports 1
and 2 on the outdoor unit.
Huawei proprietary. No spread without permission.
Page 49
Connect a cable to the
water sensor.
50.
4Installation and Commissioning
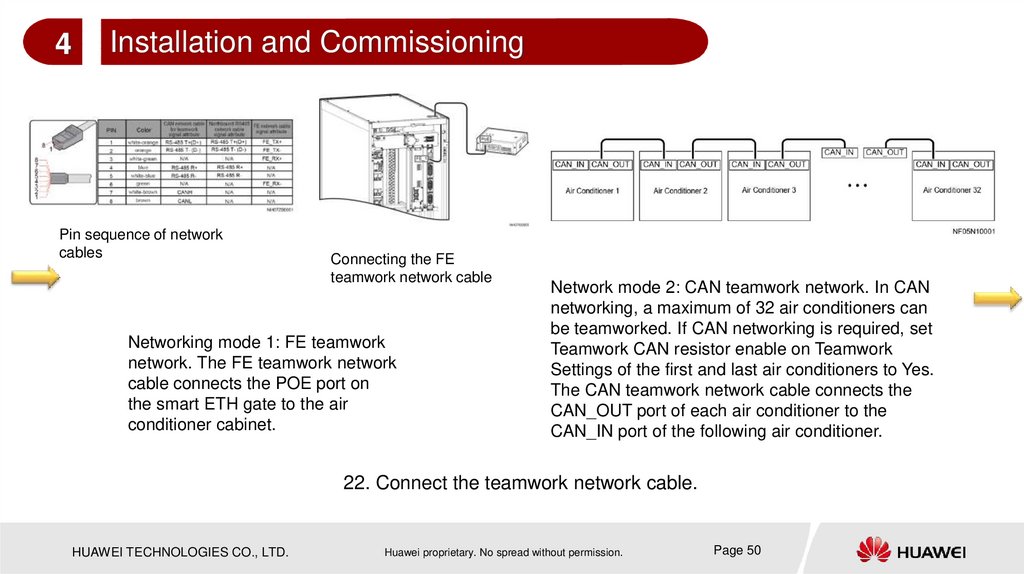
Pin sequence of network
cables
Connecting the FE
teamwork network cable
Networking mode 1: FE teamwork
network. The FE teamwork network
cable connects the POE port on
the smart ETH gate to the air
conditioner cabinet.
Network mode 2: CAN teamwork network. In CAN
networking, a maximum of 32 air conditioners can
be teamworked. If CAN networking is required, set
Teamwork CAN resistor enable on Teamwork
Settings of the first and last air conditioners to Yes.
The CAN teamwork network cable connects the
CAN_OUT port of each air conditioner to the
CAN_IN port of the following air conditioner.
22. Connect the teamwork network cable.
HUAWEI TECHNOLOGIES CO., LTD.
Huawei proprietary. No spread without permission.
Page 50
51.
4Installation and Commissioning
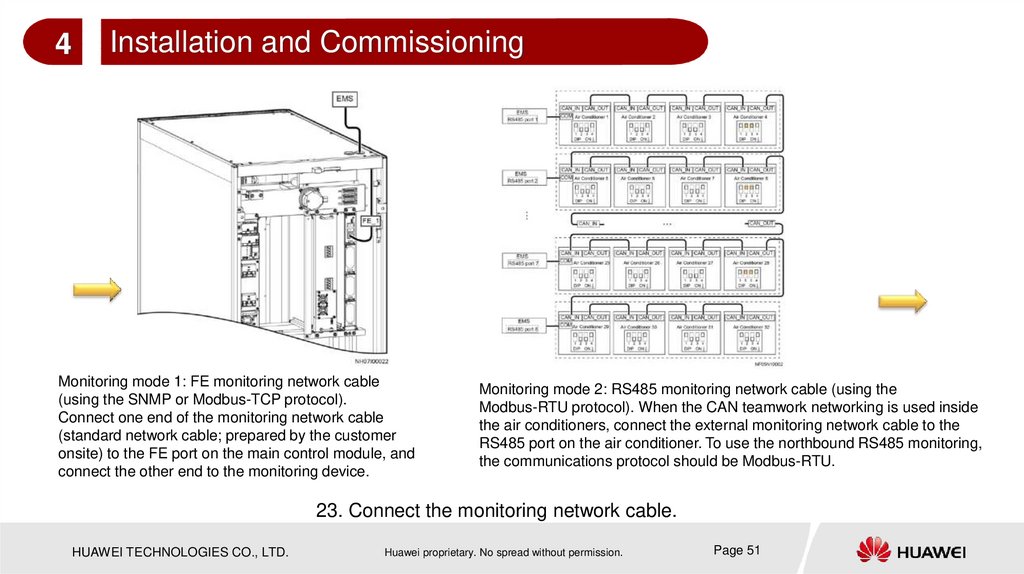
Monitoring mode 1: FE monitoring network cable
(using the SNMP or Modbus-TCP protocol).
Connect one end of the monitoring network cable
(standard network cable; prepared by the customer
onsite) to the FE port on the main control module, and
connect the other end to the monitoring device.
Monitoring mode 2: RS485 monitoring network cable (using the
Modbus-RTU protocol). When the CAN teamwork networking is used inside
the air conditioners, connect the external monitoring network cable to the
RS485 port on the air conditioner. To use the northbound RS485 monitoring,
the communications protocol should be Modbus-RTU.
23. Connect the monitoring network cable.
HUAWEI TECHNOLOGIES CO., LTD.
Huawei proprietary. No spread without permission.
Page 51
52.
4Installation and Commissioning
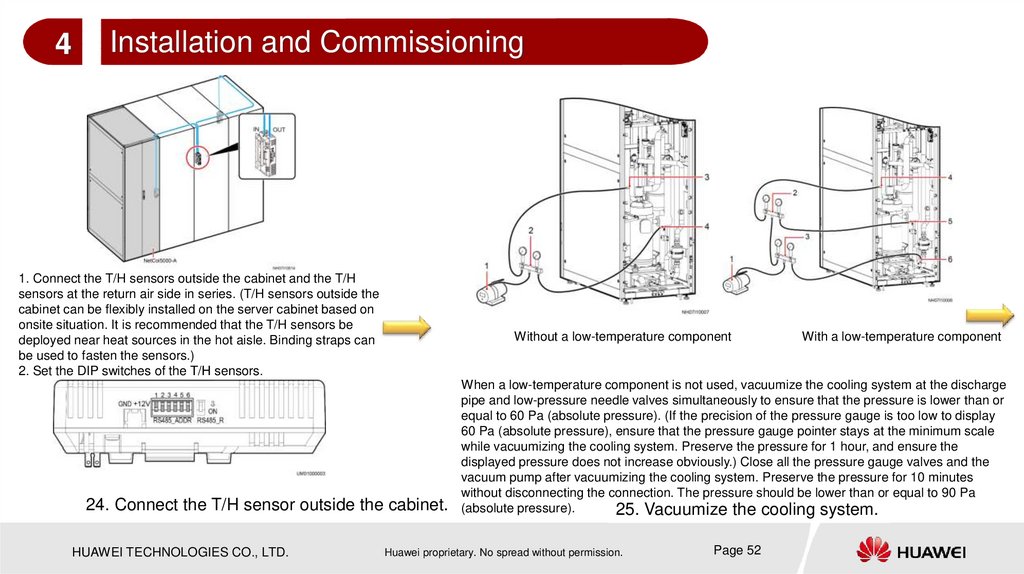
1. Connect the T/H sensors outside the cabinet and the T/H
sensors at the return air side in series. (T/H sensors outside the
cabinet can be flexibly installed on the server cabinet based on
onsite situation. It is recommended that the T/H sensors be
deployed near heat sources in the hot aisle. Binding straps can
be used to fasten the sensors.)
2. Set the DIP switches of the T/H sensors.
Without a low-temperature component
24. Connect the T/H sensor outside the cabinet.
HUAWEI TECHNOLOGIES CO., LTD.
With a low-temperature component
When a low-temperature component is not used, vacuumize the cooling system at the discharge
pipe and low-pressure needle valves simultaneously to ensure that the pressure is lower than or
equal to 60 Pa (absolute pressure). (If the precision of the pressure gauge is too low to display
60 Pa (absolute pressure), ensure that the pressure gauge pointer stays at the minimum scale
while vacuumizing the cooling system. Preserve the pressure for 1 hour, and ensure the
displayed pressure does not increase obviously.) Close all the pressure gauge valves and the
vacuum pump after vacuumizing the cooling system. Preserve the pressure for 10 minutes
without disconnecting the connection. The pressure should be lower than or equal to 90 Pa
(absolute pressure).
25. Vacuumize the cooling system.
Huawei proprietary. No spread without permission.
Page 52
53.
4Installation and Commissioning
Without a low-temperature component
With a low-temperature component
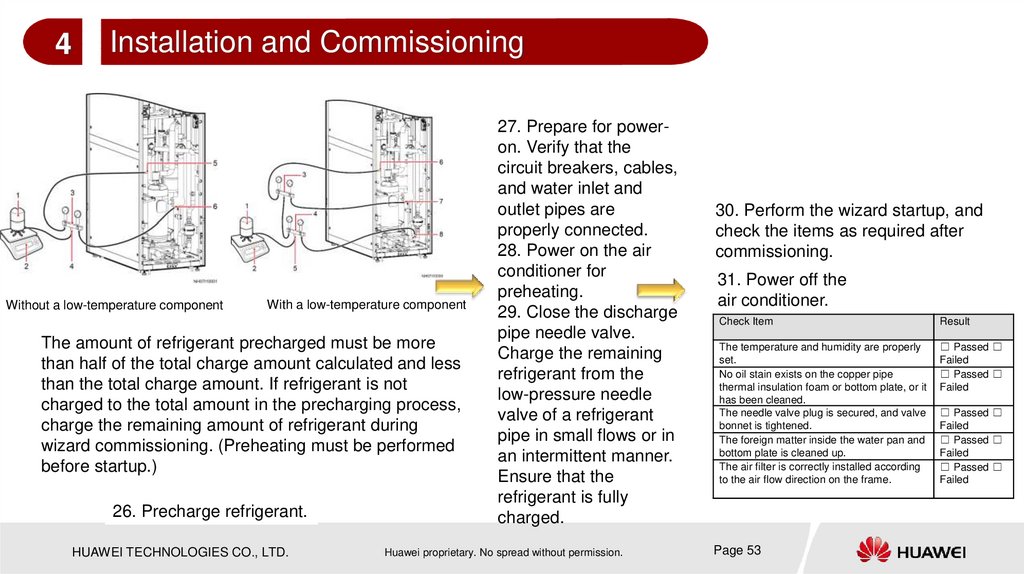
The amount of refrigerant precharged must be more
than half of the total charge amount calculated and less
than the total charge amount. If refrigerant is not
charged to the total amount in the precharging process,
charge the remaining amount of refrigerant during
wizard commissioning. (Preheating must be performed
before startup.)
26. Precharge refrigerant.
HUAWEI TECHNOLOGIES CO., LTD.
27. Prepare for poweron. Verify that the
circuit breakers, cables,
and water inlet and
outlet pipes are
properly connected.
28. Power on the air
conditioner for
preheating.
29. Close the discharge
pipe needle valve.
Charge the remaining
refrigerant from the
low-pressure needle
valve of a refrigerant
pipe in small flows or in
an intermittent manner.
Ensure that the
refrigerant is fully
charged.
Huawei proprietary. No spread without permission.
30. Perform the wizard startup, and
check the items as required after
commissioning.
31. Power off the
air conditioner.
Check Item
Result
The temperature and humidity are properly
set.
No oil stain exists on the copper pipe
thermal insulation foam or bottom plate, or it
has been cleaned.
The needle valve plug is secured, and valve
bonnet is tightened.
The foreign matter inside the water pan and
bottom plate is cleaned up.
The air filter is correctly installed according
to the air flow direction on the frame.
□ Passed □
Failed
□ Passed □
Failed
Page 53
□ Passed □
Failed
□ Passed □
Failed
□ Passed □
Failed
54.
4Installation and Commissioning
4.5 Installation Precautions
Pipe Welding
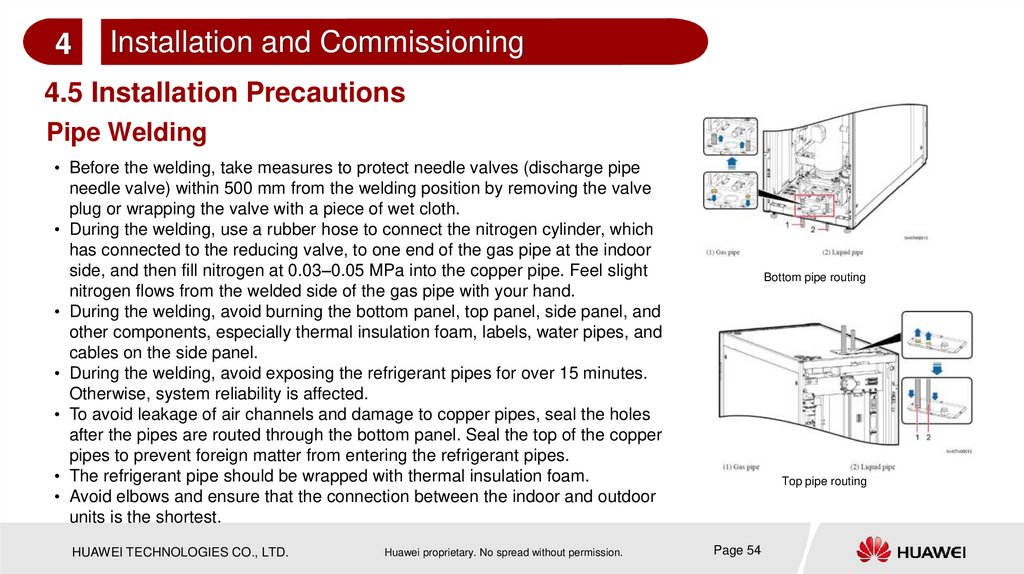
• Before the welding, take measures to protect needle valves (discharge pipe
needle valve) within 500 mm from the welding position by removing the valve
plug or wrapping the valve with a piece of wet cloth.
• During the welding, use a rubber hose to connect the nitrogen cylinder, which
has connected to the reducing valve, to one end of the gas pipe at the indoor
side, and then fill nitrogen at 0.03–0.05 MPa into the copper pipe. Feel slight
nitrogen flows from the welded side of the gas pipe with your hand.
• During the welding, avoid burning the bottom panel, top panel, side panel, and
other components, especially thermal insulation foam, labels, water pipes, and
cables on the side panel.
• During the welding, avoid exposing the refrigerant pipes for over 15 minutes.
Otherwise, system reliability is affected.
• To avoid leakage of air channels and damage to copper pipes, seal the holes
after the pipes are routed through the bottom panel. Seal the top of the copper
pipes to prevent foreign matter from entering the refrigerant pipes.
• The refrigerant pipe should be wrapped with thermal insulation foam.
• Avoid elbows and ensure that the connection between the indoor and outdoor
units is the shortest.
HUAWEI TECHNOLOGIES CO., LTD.
Huawei proprietary. No spread without permission.
Bottom pipe routing
Top pipe routing
Page 54
55.
4Installation and Commissioning
4.5 Installation Precautions
Foreign Matter Discharge for Pipes
Foreign matter discharge for an air pipe (the procedure is similar for discharging foreign matter from a liquid pipe):
1. Connect one end of the leather hose to the nitrogen cylinder with a reducing valve, and connect the other end to
the refrigerant air pipe in the unit in a higher position (if the outdoor unit is higher than the indoor unit, connect the
hose to the outdoor unit; otherwise, connect the hose to the indoor unit).
2. Block the other end of the refrigerant air pipe using hands.
3. Adjust the nitrogen reducing valve to set the nitrogen pressure to 1 MPa, and add pressure to the copper pipe.
4. Remove the hand that blocks the end of the air pipe quickly so that the foreign matter inside the pipe can be
discharged with the impact of airflow.
5. Repeat steps 2 to 4 for multiple times until no foreign matter is discharged.
6. After discharging foreign matter, remove the leather hose that connects to the air pipe and seal the two ends of the
pipe using tape to prevent foreign matter from entering the pipe again.
Note:
• The plug cannot directly point to people during nitrogen charging.
• The end of the leather hose that connects to the refrigerant air or liquid pipe must have favorable sealing performance.
• Direction of foreign matter discharge: Charge nitrogen from the higher end of the air or liquid pipe and discharge foreign
matter from the lower end of the pipe to avoid being affected by the gravity of the foreign matter.
• After foreign matter drainage, seal the two ends of the pipe properly to prevent foreign matter from entering the pipe again.
HUAWEI TECHNOLOGIES CO., LTD.
Huawei proprietary. No spread without permission.
Page 55
56.
4Installation and Commissioning
4.5 Installation Precautions
Vacuumizing
• After checking that the cooling system
does not leak, vacuumize the cooling
system and ensure that the pressure
displayed on the vacuum pump is less
than or equal to 60 Pa (absolute
pressure). Pump for another 30
minutes, and ensure that the reading
of the pressure gauge does not
change and the indication of sight
glass is dry (green).
• After vacuumizing the cooling system,
close all the pressure gauge valves
and the vacuum pump. Preserve the
pressure for 10 minutes without
disconnecting the connection. The
pressure should be lower than or equal
to 90 Pa (absolute pressure).
HUAWEI TECHNOLOGIES CO., LTD.
Vacuumizing the system with a
low-temperature component
Vacuumizing the system without a
low-temperature component
(1) Vacuum
pump
(3) Lowpressure
needle valve
(2) Pressure gauge
(4) Discharge pipe
needle valve
Huawei proprietary. No spread without permission.
(1) Vacuum
pump
(4) Lowpressure needle
valve
Page 56
(2) Pressure
gauge 1
(5) Discharge
pipe needle
valve
(3) Pressure gauge 2
(6) Liquid pipe needle
valve
57.
4Installation and Commissioning
4.5 Installation Precautions
Refrigerant Charging
Remove the vacuum pump from the vacuumizing
equipment, and replace the vacuum pump with a
refrigerant cylinder.
Slightly open the refrigerant cylinder valve and
loosen the connection nut of the pressure gauge.
Tighten the nut when cold air escapes out of the
nut.
Put the refrigerant cylinder upside down on the
electronic scale. Clear the reading on the balance.
Open all the valves to charge refrigerant. The
amount of refrigerant precharged must be more
than half of the total charge amount calculated
and less than the total charge amount. If
refrigerant is not charged to the total amount in
the precharging process, charge the remaining
amount of refrigerant during wizard
commissioning. (Preheating must be performed
before startup.)
After charging refrigerant, close the pressure
gauge valves and refrigerant cylinder valve.
HUAWEI TECHNOLOGIES CO., LTD.
Charging refrigerant into the system
without a low-temperature component
Charging refrigerant into the system
with a low-temperature component
(1) Refrigerant
cylinder
(2) Electronic
scale
(3) Pressure
gauge
(1) Refrigerant
cylinder
(2) Electronic
scale
(3) Pressure
gauge 1
(4) Pressure
gauge 2
(4) Connection
nut
(5) Lowpressure needle
valve
(6) Discharge
pipe needle
valve
(5) Connection
nut
(6) Lowpressure
needle valve
(7) Discharge
pipe needle
valve
(8) Liquid
pipe needle
valve
Huawei proprietary. No spread without permission.
Page 57
58.
4 Installation and Commissioning4.5 Installation Precautions
Cable Connections for Indoor Units
Routing cables for an indoor unit with single power supply
Routing cables for an indoor unit with dual power supplies
Route the external power cable through the cabinet cable hole to
the L1, L2, L3, and N ports of the AC1 terminal on the indoor unit.
Then connect the PE cable to the cabinet ground bar.
Route the external power cable through the cabinet cable
hole to the L1, L2, L3, and N ports of the AC1 and AC2
terminals on the indoor unit. Then connect the PE cable to
the cabinet ground bar.
HUAWEI TECHNOLOGIES CO., LTD.
Huawei proprietary. No spread without permission.
Page 58
59.
4 Installation and Commissioning4.5 Installation Precautions
Outdoor Unit
Connecting pipes for the outdoor unit:
Before welding pipes, take measures to protect nearby cables and components from being
burnt.
Connecting cables:
The connection of all power cables, control cables, and ground cables must comply with local
electrical regulations and cable specifications should comply with local cabling rules.
Electrical connection can be performed only by trained professionals.
Before connecting power cables, use a voltmeter to measure the input voltage and ensure that
the power supply is disconnected.
Connecting power cables:
Before connecting power cables, use a voltmeter to measure the input voltage and ensure that
the power supply is disconnected.
Connecting signal cables:
The outdoor unit signal cable can connect to a dry contact or RS485 port. Determine the
connection mode based on that of the indoor unit. (RS485 is used by default.)
HUAWEI TECHNOLOGIES CO., LTD.
Huawei proprietary. No spread without permission.
Page 59
60.
4 Installation and Commissioning4.5 Installation Precautions
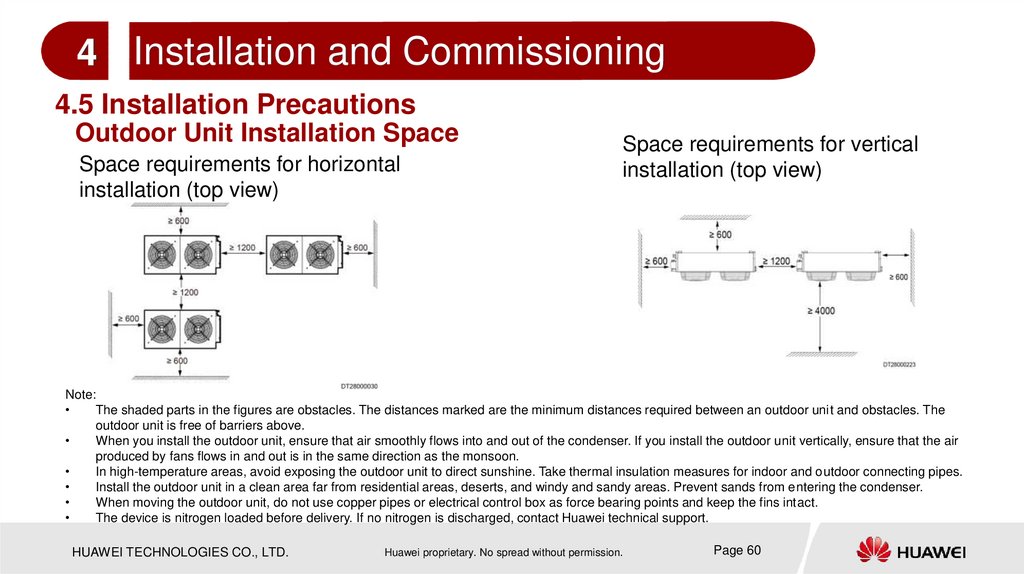
Outdoor Unit Installation Space
Space requirements for horizontal
installation (top view)
Space requirements for vertical
installation (top view)
Note:
The shaded parts in the figures are obstacles. The distances marked are the minimum distances required between an outdoor unit and obstacles. The
outdoor unit is free of barriers above.
When you install the outdoor unit, ensure that air smoothly flows into and out of the condenser. If you install the outdoor unit vertically, ensure that the air
produced by fans flows in and out is in the same direction as the monsoon.
In high-temperature areas, avoid exposing the outdoor unit to direct sunshine. Take thermal insulation measures for indoor and outdoor connecting pipes.
Install the outdoor unit in a clean area far from residential areas, deserts, and windy and sandy areas. Prevent sands from entering the condenser.
When moving the outdoor unit, do not use copper pipes or electrical control box as force bearing points and keep the fins intact.
The device is nitrogen loaded before delivery. If no nitrogen is discharged, contact Huawei technical support.
HUAWEI TECHNOLOGIES CO., LTD.
Huawei proprietary. No spread without permission.
Page 60
61.
4 Installation and Commissioning4.5 Installation Precautions
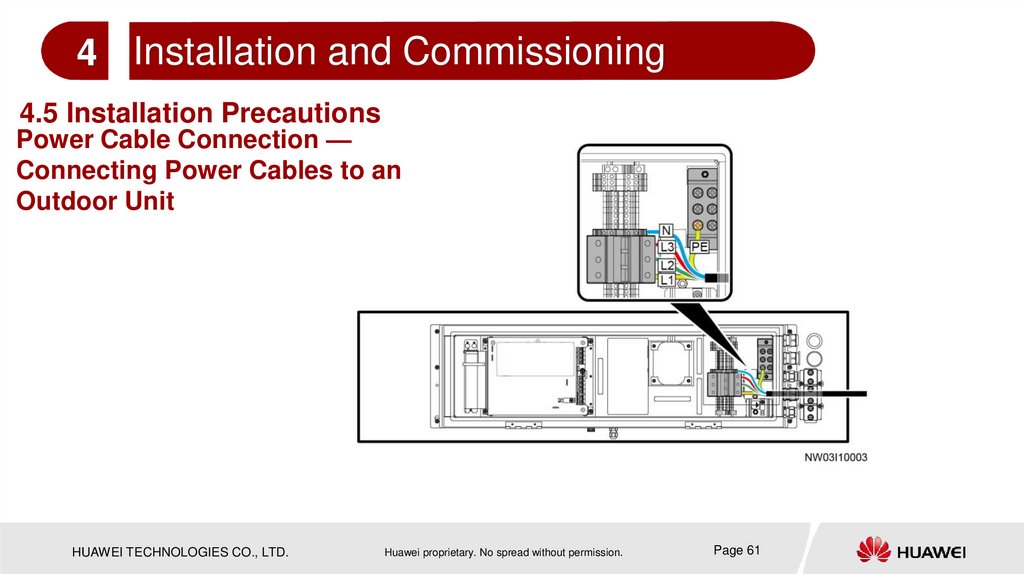
Power Cable Connection —
Connecting Power Cables to an
Outdoor Unit
HUAWEI TECHNOLOGIES CO., LTD.
Huawei proprietary. No spread without permission.
Page 61
62.
4 Installation and Commissioning4.5 Installation Precautions
Power Cable Connection — Outdoor Unit
Obtaining Power from the Indoor Unit
Route the outdoor unit power cable through the cabinet
cable hole to the L1, L2, L3, and N ports of the AC3
terminal on the indoor unit. Then connect the PE cable to
the PE bar on the right of the AC3 terminal.
Note:
The figure shows how to connect the outdoor unit power
cable AC3 in the single power supply scenario. The cable
connection method is the same when there are two power
supplies.
HUAWEI TECHNOLOGIES CO., LTD.
Huawei proprietary. No spread without permission.
Page 62
63.
4Installation and Commissioning
4.5 Installation Precautions
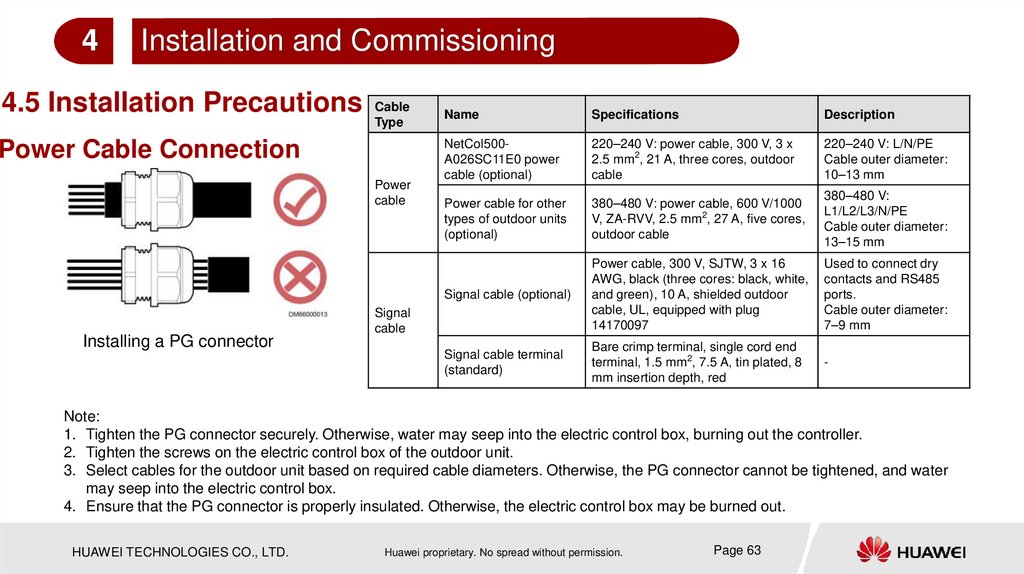
Cable
Type
Power Cable Connection
Power
cable
Installing a PG connector
Name
Specifications
Description
NetCol500A026SC11E0 power
cable (optional)
220–240 V: power cable, 300 V, 3 x
2.5 mm2, 21 A, three cores, outdoor
cable
220–240 V: L/N/PE
Cable outer diameter:
10–13 mm
Power cable for other
types of outdoor units
(optional)
380–480 V: power cable, 600 V/1000
V, ZA-RVV, 2.5 mm2, 27 A, five cores,
outdoor cable
380–480 V:
L1/L2/L3/N/PE
Cable outer diameter:
13–15 mm
Signal cable (optional)
Power cable, 300 V, SJTW, 3 x 16
AWG, black (three cores: black, white,
and green), 10 A, shielded outdoor
cable, UL, equipped with plug
14170097
Used to connect dry
contacts and RS485
ports.
Cable outer diameter:
7–9 mm
Signal cable terminal
(standard)
Bare crimp terminal, single cord end
terminal, 1.5 mm2, 7.5 A, tin plated, 8
mm insertion depth, red
-
Signal
cable
Note:
1. Tighten the PG connector securely. Otherwise, water may seep into the electric control box, burning out the controller.
2. Tighten the screws on the electric control box of the outdoor unit.
3. Select cables for the outdoor unit based on required cable diameters. Otherwise, the PG connector cannot be tightened, and water
may seep into the electric control box.
4. Ensure that the PG connector is properly insulated. Otherwise, the electric control box may be burned out.
HUAWEI TECHNOLOGIES CO., LTD.
Huawei proprietary. No spread without permission.
Page 63
64.
4 Installation and Commissioning4.5 Installation Precautions
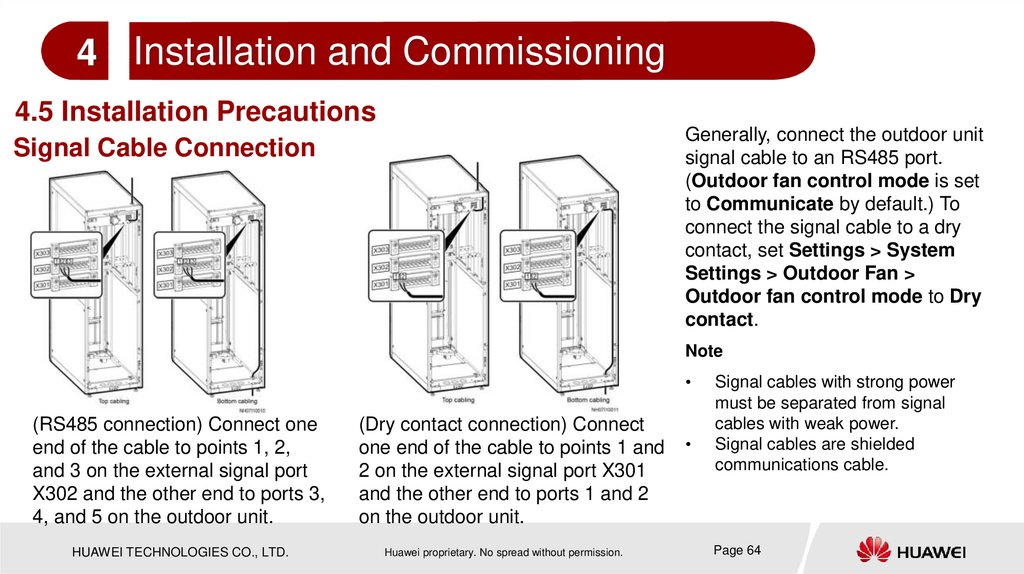
Generally, connect the outdoor unit
signal cable to an RS485 port.
(Outdoor fan control mode is set
to Communicate by default.) To
connect the signal cable to a dry
contact, set Settings > System
Settings > Outdoor Fan >
Outdoor fan control mode to Dry
contact.
Signal Cable Connection
Note
(RS485 connection) Connect one
end of the cable to points 1, 2,
and 3 on the external signal port
X302 and the other end to ports 3,
4, and 5 on the outdoor unit.
HUAWEI TECHNOLOGIES CO., LTD.
(Dry contact connection) Connect
one end of the cable to points 1 and
2 on the external signal port X301
and the other end to ports 1 and 2
on the outdoor unit.
Huawei proprietary. No spread without permission.
Signal cables with strong power
must be separated from signal
cables with weak power.
Signal cables are shielded
communications cable.
Page 64
65.
4Installation and Commissioning
4.6 Verifying the Installation
HUAWEI TECHNOLOGIES CO., LTD.
Huawei proprietary. No spread without permission.
Page 65
66.
4Installation and Commissioning
4.7 Power-On Commissioning
Preparing for Power-On
1. Verify that the air conditioner switch in the upstream power distribution cabinet (PDC) is OFF.
2. Verify that the input voltage meets the requirement.
3. Ensure that there is no reverse or open phase for the input power cable of the air conditioner. Otherwise, the
air conditioner may be damaged beyond repair.
4. Verify that the L1, L2, L3, N, and PE wires are connected to the indoor and outdoor units in correct phase
sequence.
5. Verify that the signal cable between the indoor and outdoor units is properly connected.
6. Verify that the water sensor is properly installed.
7. If teamwork networking is required, verify that the teamwork cable is correctly connected.
8. Verify that the cable connections and DIP switch settings of the T/H sensors are correct.
9. If humidifier is required, verify that the main water inlet valve is open.
10. Verify that the humidifier water inlet pipe and drainpipe are correctly connected, refrigerant pipes are
connected, and refrigerant has been precharged.
11. Verify that fan switches Fan1–Fan10 are turned on.
HUAWEI TECHNOLOGIES CO., LTD.
Huawei proprietary. No spread without permission.
Page 66
67.
Installation and Commissioning4
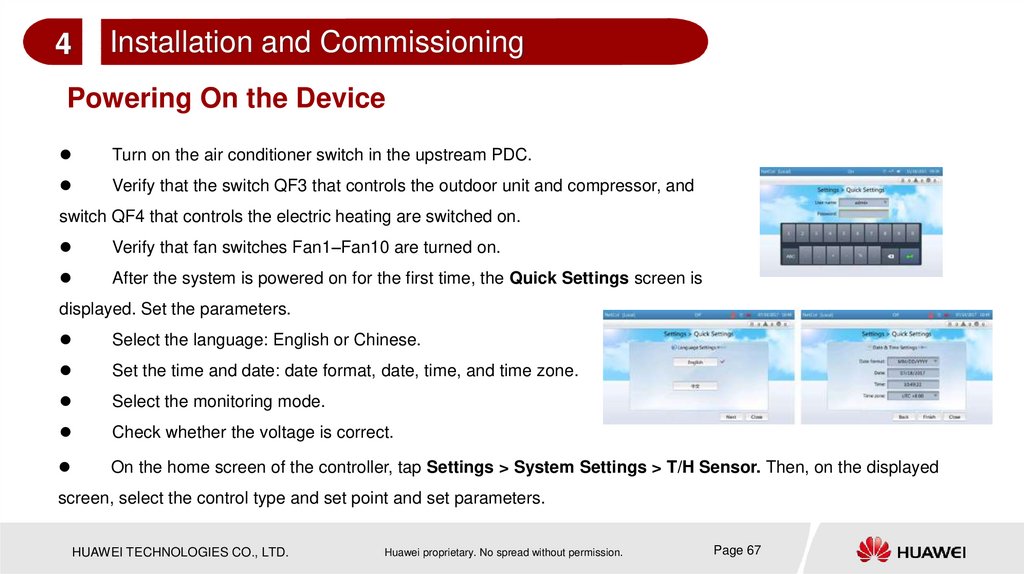
Powering On the Device
Turn on the air conditioner switch in the upstream PDC.
Verify that the switch QF3 that controls the outdoor unit and compressor, and
switch QF4 that controls the electric heating are switched on.
Verify that fan switches Fan1–Fan10 are turned on.
After the system is powered on for the first time, the Quick Settings screen is
displayed. Set the parameters.
Select the language: English or Chinese.
Set the time and date: date format, date, time, and time zone.
Select the monitoring mode.
Check whether the voltage is correct.
On the home screen of the controller, tap Settings > System Settings > T/H Sensor. Then, on the displayed
screen, select the control type and set point and set parameters.
HUAWEI TECHNOLOGIES CO., LTD.
Huawei proprietary. No spread without permission.
Page 67
68.
Installation and Commissioning4
Wizard Start Commissioning
1. On the home screen, tap Maint > Wizard, and
2. Tap Yes to perform check before startup.
tap Yes.
4. Select commissioning items as expected.
If water is unavailable, do not select
Humidifier commissioning.
HUAWEI TECHNOLOGIES CO., LTD.
5. Tap Yes. Fan commissioning is started.
Huawei proprietary. No spread without permission.
3. Tap Yes until all check items have
been checked.
6. After fan commissioning, electric heater
commissioning is started. Read L1, L2, and L3
current from the clamp meter in the input end.
Page 68
69.
4Installation and Commissioning
Wizard Start Commissioning
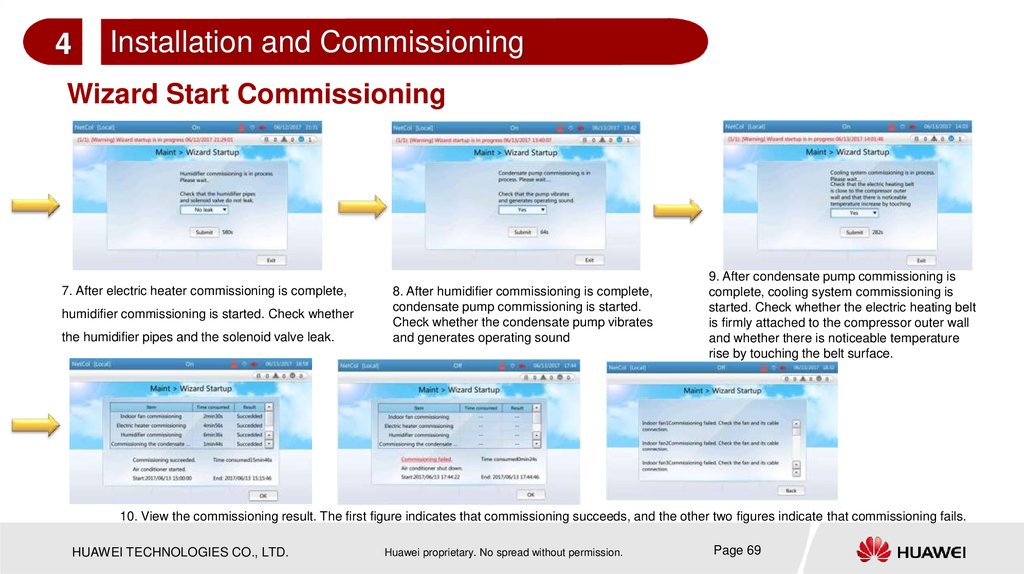
7. After electric heater commissioning is complete,
humidifier commissioning is started. Check whether
the humidifier pipes and the solenoid valve leak.
8. After humidifier commissioning is complete,
condensate pump commissioning is started.
Check whether the condensate pump vibrates
and generates operating sound
9. After condensate pump commissioning is
complete, cooling system commissioning is
started. Check whether the electric heating belt
is firmly attached to the compressor outer wall
and whether there is noticeable temperature
rise by touching the belt surface.
10. View the commissioning result. The first figure indicates that commissioning succeeds, and the other two figures indicate that commissioning fails.
HUAWEI TECHNOLOGIES CO., LTD.
Huawei proprietary. No spread without permission.
Page 69
70.
4Installation and Commissioning
Precautions for Wizard Startup
1. Ensure that refrigerant is fully charged before performing the wizard startup.
2. Tapping No or Exit, submission timeout, and system exception all result in commissioning failures.
Tap Maint > Wizard Startup to enter the Wizard Startup screen for new commissioning.
3. If the system is not configured with the electric heater and humidifier components, the electric
heater and humidifier commissioning items will not appear on the screen.
4. If the heating function and humidification function are disabled, you cannot select the electric
heater and humidifier items.
5. All the items are selected by default if you first enter the screen where you select commissioning
items. Except that the indoor fan item is mandatory, you can clear other commissioning items that are
not required.
HUAWEI TECHNOLOGIES CO., LTD.
Huawei proprietary. No spread without permission.
Page 70
71.
4 Installation and CommissioningCheck After Commissioning
Check Item
The temperature and humidity are properly set.
Check Result
□Passed□Failed
No oil stain exists on the copper pipe thermal insulation foam or □Passed□Failed
bottom plate, or it has been cleaned.
The needle valve plug is secured, and valve bonnet is tightened. □Passed□Failed
The foreign matter inside the water pan and bottom plate is
cleaned up.
The air filter is correctly installed according to the air flow
direction on the frame.
HUAWEI TECHNOLOGIES CO., LTD.
Huawei proprietary. No spread without permission.
□Passed□Failed
□Passed□Failed
Page 71
72.
Installation and Commissioning4
Powering Off the Device
Excise caution as the device is still powered on.
When replacing or maintaining an air conditioner component, you must power off the air conditioner
by switching off the air conditioner circuit breaker in the upstream PDC.
Tap Shutdown on the LCD home screen.
Switch off all switches in the electric control box of the air conditioner.
Switch off the air conditioner circuit breaker in the upstream PDC.
----End
HUAWEI TECHNOLOGIES CO., LTD.
Huawei proprietary. No spread without permission.
Page 72
73.
4Installation and Commissioning
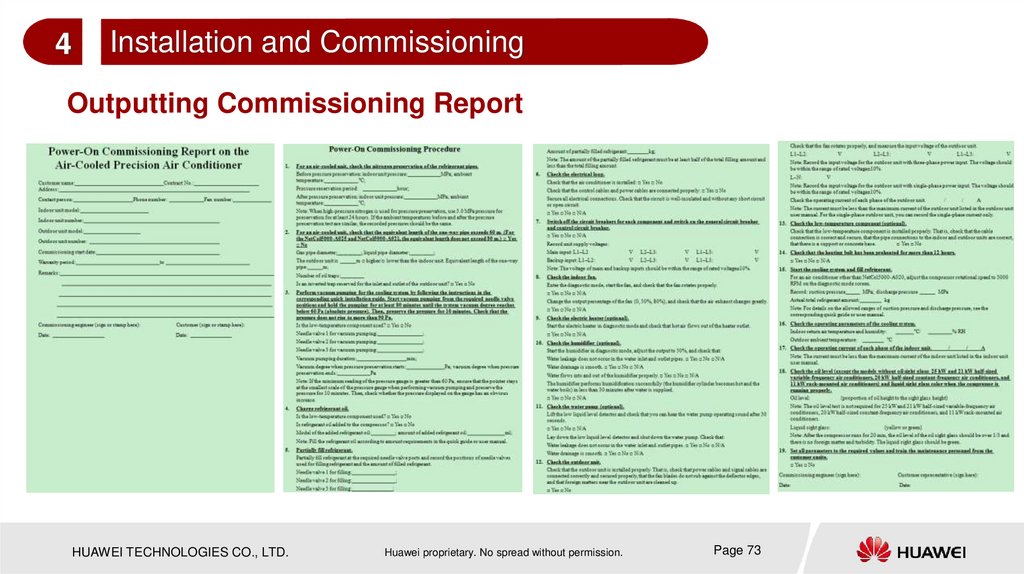
Outputting Commissioning Report
HUAWEI TECHNOLOGIES CO., LTD.
Huawei proprietary. No spread without permission.
Page 73
74.
4Installation and Commissioning
Screen Description
The startup process requires about 90s.
7-inch true color touchscreen After the NetCol5000-A is powered on for
the first time, the LCD displays the Quick
The standby screen becomes
Settings screen. Set parameters based on
dark if no button is pressed
during a period of 3 minutes.
Start screen
instructions, such as Language, Date,
Time, Time zone, Monitoring mode, and
Energy-saving mode.
Indicator Alarm Status
Indicators
HUAWEI TECHNOLOGIES CO., LTD.
Green
indicator
Yellow
indicator
Red
indicator
The device is operating properly, or a
warning is generated.
A major alarm is generated.
A critical alarm is generated.
Huawei proprietary. No spread without permission.
If multiple alarms are generated,
the indicator enters the status
that represents the severest
alarm.
Page 74
75.
4Installation and Commissioning
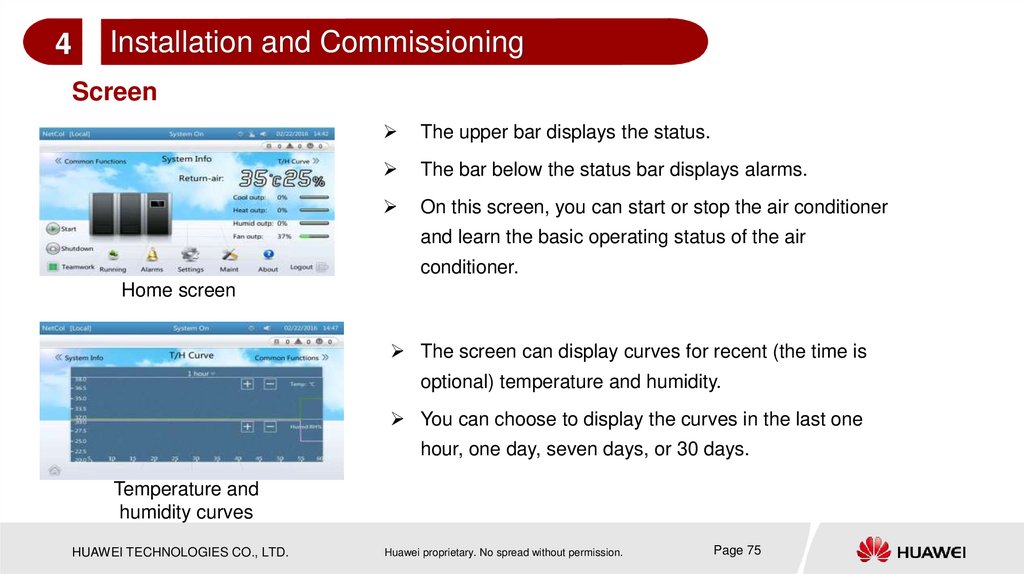
Screen
The upper bar displays the status.
The bar below the status bar displays alarms.
On this screen, you can start or stop the air conditioner
and learn the basic operating status of the air
conditioner.
Home screen
The screen can display curves for recent (the time is
optional) temperature and humidity.
You can choose to display the curves in the last one
hour, one day, seven days, or 30 days.
Temperature and
humidity curves
HUAWEI TECHNOLOGIES CO., LTD.
Huawei proprietary. No spread without permission.
Page 75
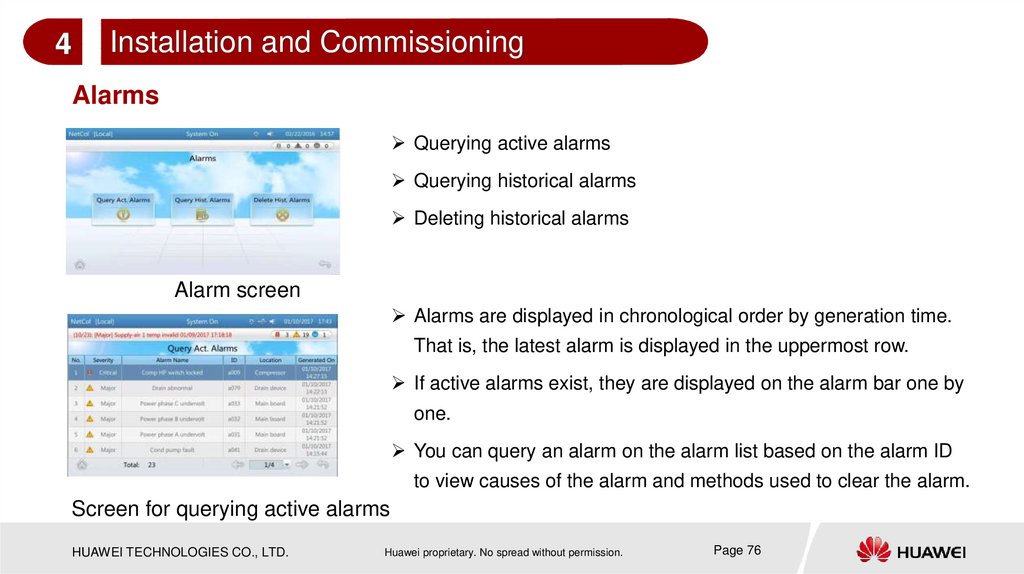
76.
4Installation and Commissioning
Alarms
Querying active alarms
Querying historical alarms
Deleting historical alarms
Alarm screen
Alarms are displayed in chronological order by generation time.
That is, the latest alarm is displayed in the uppermost row.
If active alarms exist, they are displayed on the alarm bar one by
one.
You can query an alarm on the alarm list based on the alarm ID
to view causes of the alarm and methods used to clear the alarm.
Screen for querying active alarms
HUAWEI TECHNOLOGIES CO., LTD.
Huawei proprietary. No spread without permission.
Page 76
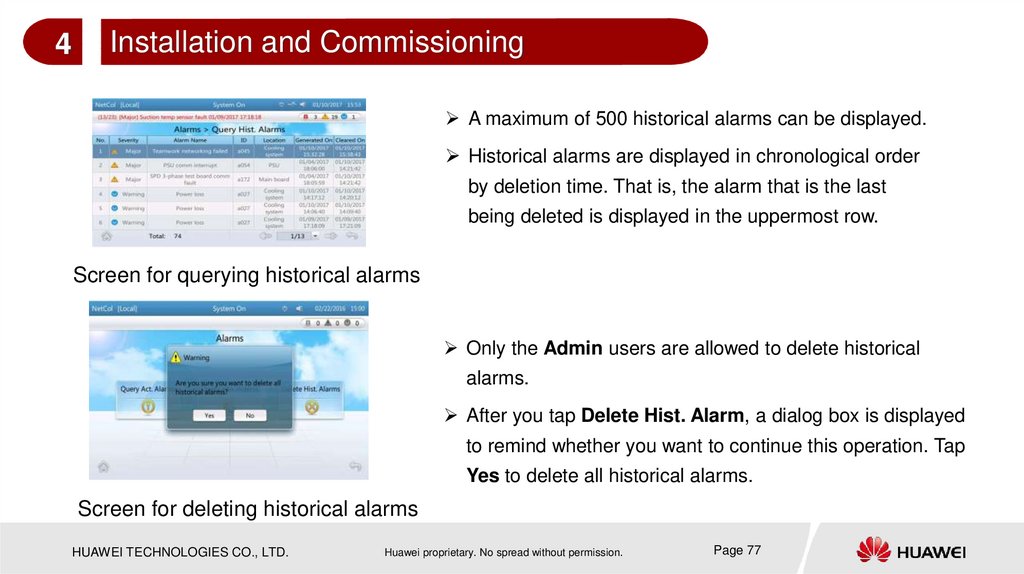
77.
4Installation and Commissioning
A maximum of 500 historical alarms can be displayed.
Historical alarms are displayed in chronological order
by deletion time. That is, the alarm that is the last
being deleted is displayed in the uppermost row.
Screen for querying historical alarms
Only the Admin users are allowed to delete historical
alarms.
After you tap Delete Hist. Alarm, a dialog box is displayed
to remind whether you want to continue this operation. Tap
Yes to delete all historical alarms.
Screen for deleting historical alarms
HUAWEI TECHNOLOGIES CO., LTD.
Huawei proprietary. No spread without permission.
Page 77
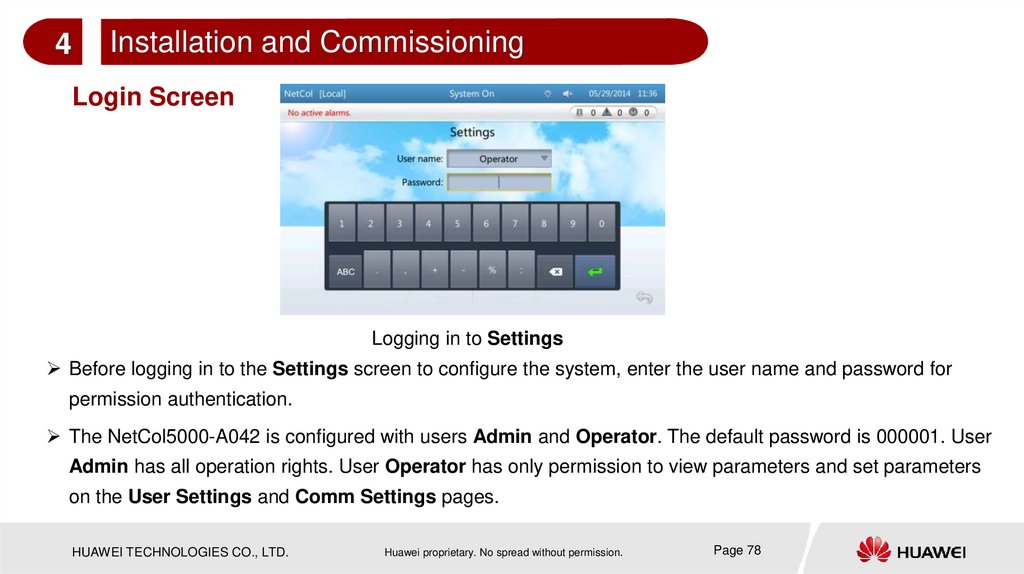
78.
4Installation and Commissioning
Login Screen
Logging in to Settings
Before logging in to the Settings screen to configure the system, enter the user name and password for
permission authentication.
The NetCol5000-A042 is configured with users Admin and Operator. The default password is 000001. User
Admin has all operation rights. User Operator has only permission to view parameters and set parameters
on the User Settings and Comm Settings pages.
HUAWEI TECHNOLOGIES CO., LTD.
Huawei proprietary. No spread without permission.
Page 78
79.
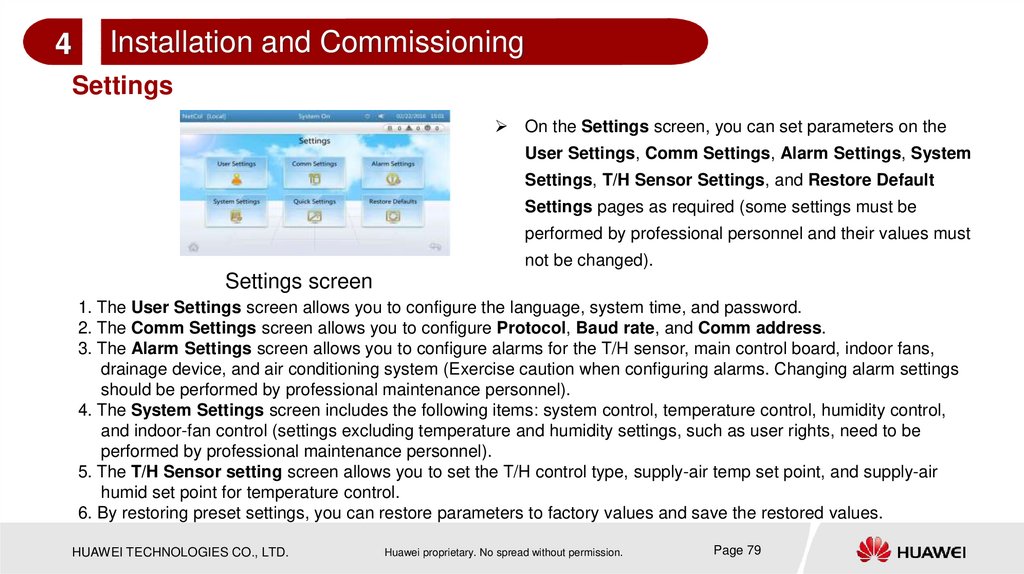
4Installation and Commissioning
Settings
On the Settings screen, you can set parameters on the
User Settings, Comm Settings, Alarm Settings, System
Settings, T/H Sensor Settings, and Restore Default
Settings pages as required (some settings must be
performed by professional personnel and their values must
not be changed).
Settings screen
1. The User Settings screen allows you to configure the language, system time, and password.
2. The Comm Settings screen allows you to configure Protocol, Baud rate, and Comm address.
3. The Alarm Settings screen allows you to configure alarms for the T/H sensor, main control board, indoor fans,
drainage device, and air conditioning system (Exercise caution when configuring alarms. Changing alarm settings
should be performed by professional maintenance personnel).
4. The System Settings screen includes the following items: system control, temperature control, humidity control,
and indoor-fan control (settings excluding temperature and humidity settings, such as user rights, need to be
performed by professional maintenance personnel).
5. The T/H Sensor setting screen allows you to set the T/H control type, supply-air temp set point, and supply-air
humid set point for temperature control.
6. By restoring preset settings, you can restore parameters to factory values and save the restored values.
HUAWEI TECHNOLOGIES CO., LTD.
Huawei proprietary. No spread without permission.
Page 79
80.
4Installation and Commissioning
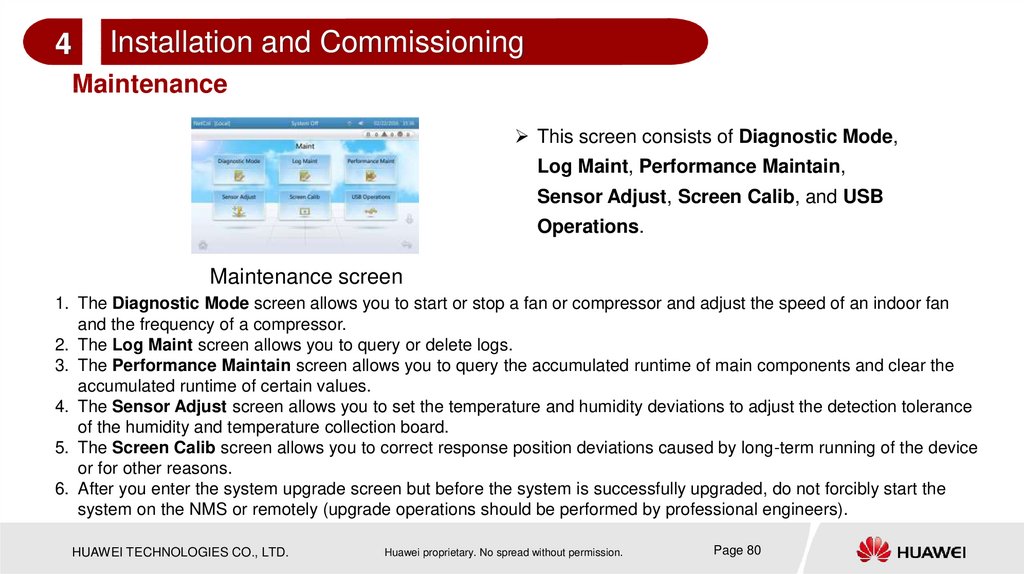
Maintenance
This screen consists of Diagnostic Mode,
Log Maint, Performance Maintain,
Sensor Adjust, Screen Calib, and USB
Operations.
Maintenance screen
1. The Diagnostic Mode screen allows you to start or stop a fan or compressor and adjust the speed of an indoor fan
and the frequency of a compressor.
2. The Log Maint screen allows you to query or delete logs.
3. The Performance Maintain screen allows you to query the accumulated runtime of main components and clear the
accumulated runtime of certain values.
4. The Sensor Adjust screen allows you to set the temperature and humidity deviations to adjust the detection tolerance
of the humidity and temperature collection board.
5. The Screen Calib screen allows you to correct response position deviations caused by long-term running of the device
or for other reasons.
6. After you enter the system upgrade screen but before the system is successfully upgraded, do not forcibly start the
system on the NMS or remotely (upgrade operations should be performed by professional engineers).
HUAWEI TECHNOLOGIES CO., LTD.
Huawei proprietary. No spread without permission.
Page 80
81.
4Installation and Commissioning
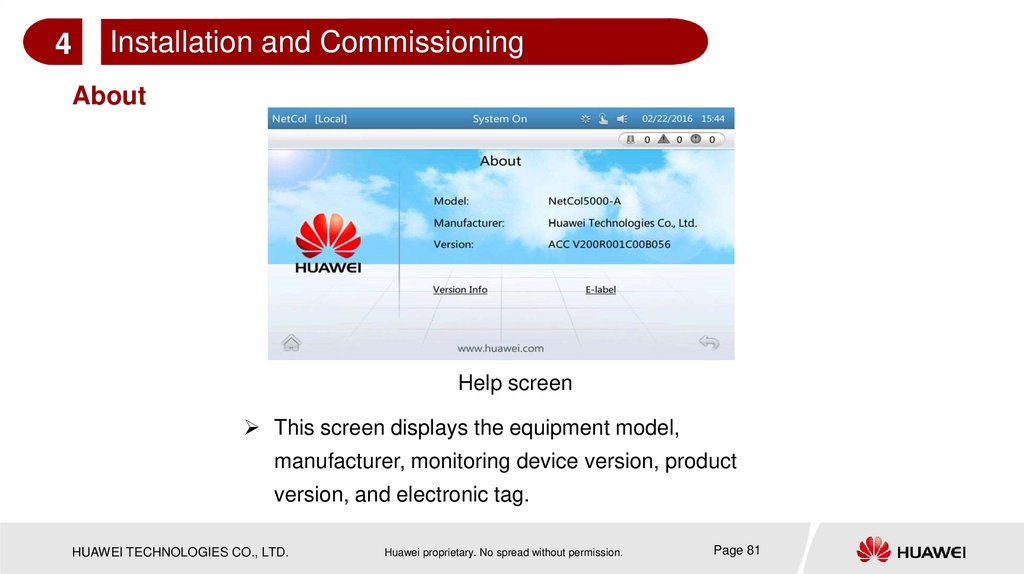
About
Help screen
This screen displays the equipment model,
manufacturer, monitoring device version, product
version, and electronic tag.
HUAWEI TECHNOLOGIES CO., LTD.
Huawei proprietary. No spread without permission.
Page 81
82.
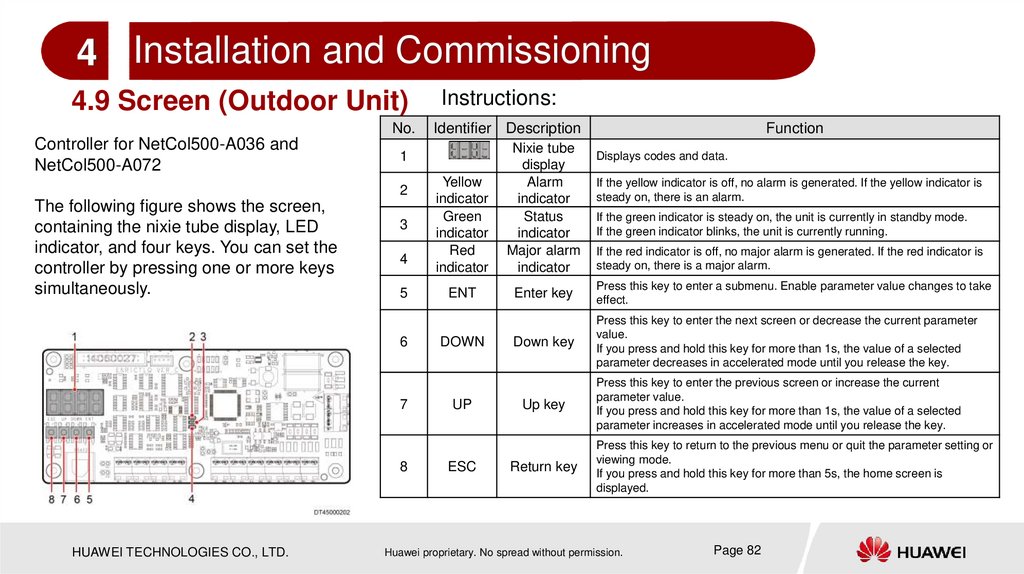
4 Installation and Commissioning4.9 Screen (Outdoor Unit)
No.
Controller for NetCol500-A036 and
NetCol500-A072
3
4
5
6
7
8
HUAWEI TECHNOLOGIES CO., LTD.
Identifier Description
Function
Yellow
indicator
Green
indicator
Red
indicator
Nixie tube
display
Alarm
indicator
Status
indicator
Major alarm
indicator
ENT
Enter key
Press this key to enter a submenu. Enable parameter value changes to take
effect.
Down key
Press this key to enter the next screen or decrease the current parameter
value.
If you press and hold this key for more than 1s, the value of a selected
parameter decreases in accelerated mode until you release the key.
1
2
The following figure shows the screen,
containing the nixie tube display, LED
indicator, and four keys. You can set the
controller by pressing one or more keys
simultaneously.
Instructions:
DOWN
UP
ESC
Up key
Return key
Displays codes and data.
If the yellow indicator is off, no alarm is generated. If the yellow indicator is
steady on, there is an alarm.
If the green indicator is steady on, the unit is currently in standby mode.
If the green indicator blinks, the unit is currently running.
If the red indicator is off, no major alarm is generated. If the red indicator is
steady on, there is a major alarm.
Press this key to enter the previous screen or increase the current
parameter value.
If you press and hold this key for more than 1s, the value of a selected
parameter increases in accelerated mode until you release the key.
Press this key to return to the previous menu or quit the parameter setting or
viewing mode.
If you press and hold this key for more than 5s, the home screen is
displayed.
Huawei proprietary. No spread without permission.
Page 82
83.
4 Installation and CommissioningSummary of This Chapter
This chapter describes installation and commissioning for NetCol5000-A 42 kW air cooled in-row fullsized variable-frequency precision air conditioner, including installation parts preparation, installation
process, major installation operations, power-on commissioning of the indoor unit and outdoor unit,
and introductions to the indoor unit and outdoor unit controllers.
Question
1. What layout principles does unit installation conform to?
HUAWEI TECHNOLOGIES CO., LTD.
Huawei proprietary. No spread without permission.
Page 83
84.
Contents1
Basic Information
2
Features and Parameters
3
Main Components
4
Installation and Commissioning
5
Routine Maintenance
6
Parts Replacement and Troubleshooting
HUAWEI TECHNOLOGIES CO., LTD.
Huawei proprietary. No spread without permission.
Page 84
85.
5Routine Maintenance
5.1 Monthly Maintenance
Maintenance Item
Operation Guide
Troubleshooting
Water pan filter
Check that the water pan filter is clean and not blocked.
Clean the water pan filter.
Condensate pan and liquid
level detector
Check that the condensate pan and liquid level detector have no dirt or
scale.
Clean up the dirt and scale from the condensate pan
and liquid level detector.
Check that the air filter is clean and not blocked.
Clear the air filter with water (recommended).
Check that the air filter is not damaged or distorted.
Replace the air filter.
Check that the compressor is secured.
Tighten screws if the compressor is not secured.
Check that the compressor service valve has no oil stains.
Clean the oil stains.
Check that the operating compressor generates no abnormal noises.
Replace the compressor.
Evaporator
Check that no foreign matter exists on the evaporator surface.
Remove foreign matter.
Connecting pipe
Check that the refrigerant pipe does not leak or corrode, and is properly
wrapped with thermal insulation foam.
Repair the refrigerant pipe and re-wrap thermal
insulation foam.
Check that the refrigerant pipe support is secure and intact.
Replace and re-tighten the refrigerant pipe support.
Check that the indoor fan guard is not distorted.
Repair or replace the fan guard if it is distorted.
Check that the indoor fan blades are intact.
Replace the fan component if it is damaged.
Check that the operating indoor fan generates no abnormal noises.
Replace the fan component if it is damaged.
Check that the screws on the indoor fan are not loose or distorted.
Tighten loose screws.
Air filter
Compressor
Indoor fan
HUAWEI TECHNOLOGIES CO., LTD.
Huawei proprietary. No spread without permission.
Page 85
86.
5Routine Maintenance
Humidifier
If water feed is abnormal:
1. Check whether is available in the upstream pipe.
Check that the water inlet pipe valve is open.
Start the air conditioner, tap Maint > Diagnostic Mode > Enter from 2. Check whether the float interconnection terminals
the main screen. Set the humidity status to on, and check the wet-film are properly connected.
3. If the water inlet solenoid valve cannot be opened,
water pan. At this time, the water inlet valve is started. The water
replace it.
pump works 5s after the float is floated. The water inlet valve is
4. Check whether the float is jammed.
automatically started if the float drops down during humiliation.
The humidifier pump is faulty.
Wet film replacement due
Humidifier Pump Timeout
HUAWEI TECHNOLOGIES CO., LTD.
1. Check whether the pump races or is blocked due
to air pressure.
2. Check whether the pump power supply voltage is
normal.
3. Check whether the pump or the drainpipe is
blocked.
4. Check whether the pump cables are properly
connected.
5. Check whether the water pump races due to a
liquid level detection fault.
Maintain or replace the humidifier pump and clear the
accumulated runtime.
Maintain or replace the humidifier pump and clear the
accumulated runtime.
Huawei proprietary. No spread without permission.
Page 86
87.
Routine Maintenance5
5.2 Semi-annual Maintenance
Maintenance Item
Monitoring unit
Electric heater
Components inside the electric
control box (Remove the electric
control box before maintaining
the internal components.)
Cable
Operation Guide
Troubleshooting
Export air conditioner logs, alarms, temperature, humidity,
the operating status of the compressor, fan, electric heater,
electric humidifier, and water pump, and time from the
monitoring system. View the historical alarms generated in Rectify the fault or contact Huawei technical support.
this quarter and select the most common five ones. (If no
monitoring system is available, skip this item.)
Check that the electric heaters and switches are secure.
Secure the electric heaters and switches.
Check that the electric heater surfaces are not eroded.
Replace the electric heater if its surface is eroded.
Check that all circuit breakers and fuses work properly.
Replace faulty circuit breakers and fuses.
Check that the cable connection is secure and correct.
Secure loose cables.
Check that the electrical components, control components, (Perform the operation when the system is powered off.) Use a brush or
and surge protection and voltage detection board are not compressed dry air to remove dust from the electrical components, control
dusty.
components, and surge protection and voltage detection board.
Check that the control board, display panel, T/H sensor,
and surge protection and voltage detection board are not
aging on the surface.
Replace the abnormal board.
Check that all contactors work properly.
Replace faulty components.
Check that no cable is aging.
Replace aging cables.
Check and calibrate the T/H sensor.
If the temperature error is greater than 1℃ or humidity error is greater than 5%,
the T/H sensor must be calibrated or replaced. For the calibration method, see
the ACC Precision Air Conditioner Controller User Manual.
Check whether the water detector cable is securely
connected.
-
T/H sensor
Water detector
HUAWEI TECHNOLOGIES CO., LTD.
Huawei proprietary. No spread without permission.
Page 87
88.
5Routine Maintenance
5.3 Annual Maintenance
Maintenance Item
Operation Guide (on the Basis of
Monthly Maintenance)
Troubleshooting
Sensor
Use a high-precision humidity and
temperature sensor to calibrate the
humidity and temperature sensors
inside and outside the cabinet.
If the temperature deviation is greater than 1°C or
humidity deviation is greater than 5%, the T/H sensor
must be calibrated or replaced.
Evaporator
The evaporator fins are not pushed
down
Use a fin brush to organize the fins that are pushed
down.
Welding spot and
needle valve
Check that the welding spots and
needle valves do not leak using soapy
water, or check that they are free from
oil stains.
If leaking points are found, retrieve the refrigerant and
weld the leaking points again. For details, contact
Huawei technical support.
HUAWEI TECHNOLOGIES CO., LTD.
Huawei proprietary. No spread without permission.
Page 88
89.
5 Routine MaintenanceSummary of This Chapter
This chapter describes routine maintenance for NetCol5000-A 42 kW air cooled in-row
full-sized variable-frequency precision air conditioner, including component
introduction, operation guide and troubleshooting of monthly and annual maintenance.
Question
1. How do you perform maintenance for a humidifier?
HUAWEI TECHNOLOGIES CO., LTD.
Huawei proprietary. No spread without permission.
Page 89
90.
Contents1
Basic Information
2
Features and Parameters
3
Main Components
4
Installation and Commissioning
5
Routine Maintenance
6
Parts Replacement and Troubleshooting
HUAWEI TECHNOLOGIES CO., LTD.
Huawei proprietary. No spread without permission.
Page 90
91.
6Parts Replacement and Troubleshooting
6.1 Parts Replacement
2. Replace an indoor fan.
1. Replace an air filter.
Open the rear door
of an air conditioner.
Rotate the fasteners
and take out the air
filter.
Install a new air
filter and clear the
runtime.
HUAWEI TECHNOLOGIES CO., LTD.
Switch off the circuit
breaker of the faulty fan.
Cut the cable tie that binds
the cable connected to the
faulty fan, remove the fan
terminal, and remove the
faulty fan.
Install a new fan and fan
guard, connect the
connectors, and use a cable
tie to secure the cable.
Clear the runtime.
Huawei proprietary. No spread without permission.
Page 91
92.
Parts Replacement and Troubleshooting6
3. Replace a differential pressure switch.
Switch off the air conditioner circuit breaker in the PDC.
Remove the pressure pipe and the cable of the faulty differential pressure switch. Then,
remove the faulty differential pressure switch.
Set the differential pressure switch value.
Install the new differential pressure switch and close the rear door.
Ensure that no alarms are generated during system running.
HUAWEI TECHNOLOGIES CO., LTD.
Huawei proprietary. No spread without permission.
Page 92
93.
6Parts Replacement and Troubleshooting
4. Replace a compressor.
Switch off the air conditioner circuit
Remove the crankcase electric
Remove the compressor
breaker, reclaim the refrigerant, remove
heating belt and angle valves.
rack and then remove the
compressor.
the heating belt, and compressor cables.
HUAWEI TECHNOLOGIES CO., LTD.
Huawei proprietary. No spread without permission.
Page 93
94.
6Parts Replacement and Troubleshooting
4. Replace a compressor.
Replace a compressor, and fix
the compressor rack.
Install angle valves and oil heating
Install angle valves and oil
heating belts.
belts. Vacuumize the cooling
system, add refrigerant, and clear
the runtime.
HUAWEI TECHNOLOGIES CO., LTD.
Huawei proprietary. No spread without permission.
Page 94
95.
6Parts Replacement and Troubleshooting
5. Replace the driver of a compressor.
Switch off the upstream circuit breaker of
the air conditioner.
Remove the cables.
Remove the two screws that fasten the
driver and take out the driver.
HUAWEI TECHNOLOGIES CO., LTD.
Install a new driver and connect the cables.
Huawei proprietary. No spread without permission.
Page 95
96.
6Parts Replacement and Troubleshooting
6. Replace a filter dryer.
Uninstallation
Installation
Power off the air condition and switch off the compressor QF3 circuit breaker.
Reclaim the refrigerant.
Uninstall the filter dryer.
Install a new filter dryer.
Perform a leakage test with nitrogen again. Ensure that no leakage exists and add refrigerant.
HUAWEI TECHNOLOGIES CO., LTD.
Huawei proprietary. No spread without permission.
Page 96
97.
6Parts Replacement and Troubleshooting
7. Replace a liquid level detector.
Turn off the air conditioner switch, open the front door, and
remove the water pan cover.
Cut the cable tie securing the liquid level detector and remove
the terminal.
Remove the two butterfly nuts on the liquid level detector
fastener, remove cables from the liquid level detector, and
remove the liquid level detector and its fastener.
(1) High liquid level detector
(2) Low liquid level detector
Remove the liquid level detector.
Install the new liquid level detector and properly connect its
terminals.
Tighten the screws, connect the cables, install the water pan
cover, and close the front door.
HUAWEI TECHNOLOGIES CO., LTD.
Huawei proprietary. No spread without permission.
Page 97
98.
6Parts Replacement and Troubleshooting
8. Replace an electric heater.
On the controller home screen, tap Shutdown, and turn off the air
conditioner switch in the PDC.
Open the front door, and remove the fans.
Cut the cable ties that secure the electric heater terminal and remove
the terminals.
Unscrew the four screws on the single electric heater.
Install the new electric heater in the reverse order of the removal, and
install the fan supports.
Power on the system. On the main screen, tap Maint > Diagnostic
Mode > Enter. Manually start the electric heater, and check that the
electric heater works properly. Then exit from the diagnostic mode.
HUAWEI TECHNOLOGIES CO., LTD.
Clear the electric heater runtime.
Huawei proprietary. No spread without permission.
Page 98
99.
6Parts Replacement and Troubleshooting
9. Replace an LCD.
Tap Shutdown on the LCD home
screen.
Open the front door of the air
conditioner.
Remove the network cable
connected to the LCD.
Remove the four screws that fasten
the LCD. Then, push the LCD from
its rear side while taking its front side
gently.
HUAWEI TECHNOLOGIES CO., LTD.
Huawei proprietary. No spread without permission.
Page 99
100.
6Parts Replacement and Troubleshooting
10. Replace a PSU, a control module, or an auxiliary source module.
Open the front door of the air conditioner.
Flip the clip installed on the module to be
replaced down.
Pull the handle outwards and remove the
module from the frame.
Insert the spare module into the
corresponding slot, and flip the clip up to
lock the module.
HUAWEI TECHNOLOGIES CO., LTD.
Huawei proprietary. No spread without permission.
Page 100
101.
6Parts Replacement and Troubleshooting
11. Uninstall an electric control box.
On the controller home screen, tap Shutdown, and turn off the
air conditioner switch in the PDC. Check whether the port is
energized. (Use a multimeter to check that the AC voltage of the
port is 0 V.)
Open the rear door and remove the air filter. Remove all the
power cables and terminals of the electric control box.
Remove the four screws in front of the electric control box using
a Phillips screwdriver.
Remove the electric control box, replace components. Place the
new electric control box in the installation position and secure it.
HUAWEI TECHNOLOGIES CO., LTD.
Reconnect the cables and terminals.
Huawei proprietary. No spread without permission.
Page 101
102.
6Parts Replacement and Troubleshooting
12. Replace a condensate pump.
On the controller home screen, tap Shutdown, and turn off the air conditioner switch in the PDC.
Open the front door, and disconnect the white power cable terminals of the condensate pump at
the lower right corner of the cabinet.
Remove the hose clamp at the water pan drain outlet, and remove the hose.
Remove the three screws that secure the condensate pump assembly using a socket wrench,
and pull out the condensate pump assembly.
Remove the hose clamps on the condensate pump pipes and the condensate pump using a flathead screwdriver, pull out the hose, and take out the condensate pump.
Install the new condensate pump and reinstall the condensate pump assembly in the cabinet.
Connect the water pipe and secure it using hose clamps. Connect the condensate pump power
cable.
Remove the blockage from the pipe, close the front door, and clear the runtime.
HUAWEI TECHNOLOGIES CO., LTD.
Huawei proprietary. No spread without permission.
Note:
Before removing the condensate pump,
block the water pan outlet and one-way
valve outlet, preventing water in the water
pan and pipe from overflowing.
At the front of the condensate pump,
block the water pan outlet as required. For
example, a cleaning cloth can be used.
Page 102
103.
6Parts Replacement and Troubleshooting
13. Replace a humidifier pump.
On the controller home screen, tap Shutdown, and turn off the air
conditioner switch in the PDC.
Open the rear door and remove the air filter.
Cut the cable ties securing the humidifier pump cable and remove the
terminals.
Remove the screws that secure the humidifier pump fastener using a
Phillips screwdriver, and pull out the humidifier pump and the fastener.
Remove the hose clamps at the water inlet and outlet ports of the
humidifier pump and on the humidifier pump using a flat-head screwdriver,
and remove the water inlet and outlet pipes.
Install the new humidifier pump by performing the preceding steps in
reverse order, connect the hoses and cables, and secure them using hose
clamps.
HUAWEI TECHNOLOGIES CO., LTD.
Install the air filter and close the rear door.
Huawei proprietary. No spread without permission.
Page 103
104.
6Parts Replacement and Troubleshooting
14. Replace a wet film humidifier.
On the controller home screen, tap Shutdown, and turn off
the air conditioner switch in the PDC.
Open the rear door and remove the air filter.
Remove the wet film humidifier. (Hold the blue release
sleeve and remove the water inlet pipe. Loosen the two
captive nuts on one side of the wet film humidifier and
remove the humidifier.)
Install the new wet film humidifier in the original position by
performing the preceding steps in reverse order, secure the
screws, and connect the hose.
Install the air filter and close the rear door.
HUAWEI TECHNOLOGIES CO., LTD.
Huawei proprietary. No spread without permission.
Page 104
105.
6Parts Replacement and Troubleshooting
6.2 Exporting Fault Data
You can export data in one-click mode or by configurations. With the one-click mode, you can export active
alarms, historical alarms, run logs, and so on. The two export methods are the same. This section uses oneclick mode as an example to describe the export method
You are advised to use the FAT32 USB flash drive with a capacity no greater than 64 GB. The following
models are recommended:
Model
Capacity
Netac U188
4 GB
Kingston DT101G2
8 GB
Before using a USB flash drive, ensure that its data has been scanned by antivirus software and is
secure.
Before exporting active alarms, historical alarms, logs, and configurations, ensure that the USB
flash drive has been successfully identified.
If the USB flash drive has been successfully identified,
is displayed in the status bar.
If the USB flash drive is not properly connected, the system will display No USB device found
during operations about the USB flash drive.
HUAWEI TECHNOLOGIES CO., LTD.
Huawei proprietary. No spread without permission.
Page 105
106.
6Parts Replacement and Troubleshooting
Tap Maint > USB Operations > Export on the home
screen to enter the Select Path screen.
On the Select Path screen, select the folder that is used to
store the data, and tap Next. In the displayed dialog box, tap
OK. After the data is successfully exported, tap Finish.
Tap Maint > USB Operations > Remove USB on the home
screen to remove the USB flash drive in safe mode.
HUAWEI TECHNOLOGIES CO., LTD.
Huawei proprietary. No spread without permission.
Page 106
107.
6Parts Replacement and Troubleshooting
6.3 Upgrading the System
To upgrade ACC V200R001C30B052 to ACC V200R001C30B053, perform the following steps:
1. Obtain the Huawei_ACC_V200R001C30B053.tar.gz package from http://support.huawei.com.
2. Copy the package to the USB flash drive that is in FAT or FAT 32 format. In this example, the package is saved in the
root directory if the USB flash drive.
3. Connect the USB flash drive to the USB host port of the display panel.
4. On the home screen, tap Maint, and log in as use admin. Tap USB Operations > Software Upgrade to open the
Software Upgrade page. The system scans all files stored in the USB flash drive, as shown in the following figure.
HUAWEI TECHNOLOGIES CO., LTD.
Huawei proprietary. No spread without permission.
Page 107
108.
6Parts Replacement and Troubleshooting
6.3 Upgrading the Air Conditioner
5. Select the Huawei_ACC_V200R001C30B053.tar.gz package,
and tap Next. The system displays the message "Loading
upgrade software. Please wait."
6. If the file is successfully parsed, the version information is
displayed, as shown in the figure.
HUAWEI TECHNOLOGIES CO., LTD.
Huawei proprietary. No spread without permission.
Page 108
109.
6Parts Replacement and Troubleshooting
6.3 Upgrading the System
7. Select the components to be upgraded, and tap Upgrade. A
dialog box is displayed. To continue the upgrade, tap Yes. To
modify the selected components, tap No.
8. After you tap Yes, the upgrade progress of selected components is displayed in sequence, for example, the T/H
board, surge protective device (SPD), outdoor fan, compressor, control board, and display panel.
HUAWEI TECHNOLOGIES CO., LTD.
Huawei proprietary. No spread without permission.
Page 109
110.
6Parts Replacement and Troubleshooting
6.3 Upgrading the System
9. After the upgrade is complete, the Upgrade Result screen is displayed.
If all components are successfully upgraded, the figure as shown is
displayed. If the display panel or control panel has been successfully
upgraded, the system is automatically restarted in 10 seconds. If you tap
Finish, the system is immediately restarted.
10. After the system is restarted, tap About > Version Info to view the version
information after the upgrade to confirm that the upgrade is successful.
HUAWEI TECHNOLOGIES CO., LTD.
Huawei proprietary. No spread without permission.
Page 110
111.
6Parts Replacement and Troubleshooting
6.3 Upgrading the System
11. After the upgrade is complete, tap Maint > USB Operations, and tap the icon under
Remove USB to remove the USB flash drive. After the USB flash drive is removed, the system
displays the message "The USB device was removed successfully."
HUAWEI TECHNOLOGIES CO., LTD.
Huawei proprietary. No spread without permission.
Page 111
112.
6Parts Replacement and Troubleshooting
6.3 Common Alarm Handling
No.
Alarm Name
1
Comp HP switch
2
Comp discharge HT
3
Comp discharge HT
lock
4
Air filter blocked
5
Power loss
6
7
Possible Cause
1. The outdoor unit input power has an open phase, incorrect phase sequence, or is unavailable.
2. Signal cables to the outdoor unit are not properly connected.
3. The condenser fins are blocked.
4. Cables to the high pressure switch are not properly connected.
5. The cables to the high pressure switch are loose or damaged.
6. The high pressure switch is faulty.
7. The electronic expansion valve is faulty.
8. The refrigerant is overfilled.
9. The outdoor unit is not properly installed.
1. The refrigerant leaks.
2. The condenser fins are blocked.
3. The ambient temperature is high.
4. The discharge temperature sensor is faulty.
5. The outdoor unit is not running properly.
6. The electronic expansion valve is faulty.
Solution
1. Check the power supply of the outdoor unit.
2. Check the cables to outdoor unit.
3. Clean the condenser fins.
4. Maintain or replace the outdoor unit or unit driver.
5. Check the cables to the high pressure switch.
6. Maintain or replace the high pressure switch.
7. Maintain or replace the electronic expansion valve.
8. Decrease certain amount of refrigerant.
9. Install the outdoor unit properly.
1. Check for any leakages. Fill refrigerant after maintenance or replacement.
2. Clean the condenser fins.
3. Measure the ambient temperature.
4. Calibrate or replace the exhaust air temperature sensor.
5. Maintain or replace the outdoor unit.
6. Maintain or replace the electronic expansion valve.
The a012 comp discharge HT alarm is generated frequently.
Reference to the solutions for the a012 comp discharge HT.
1. Air filters are blocked.
2. The differential press switch is faulty.
3. The differential press switch is set inappropriately.
4. The pressure inlet tube of the differential pressure switch is blocked or disconnected.
5. The cables to the differential press switch are loose or damaged.
1. Maintain or replace the air filters.
2. Replace the differential press switch.
3. Adjust the threshold of the differential press switch.
4. Maintain or replace the press tube.
5. Check the cables to the differential press switch.
The supply power is cut off.
Check the power supply cables.
1. Teamwork CAN resistor enable is incorrectly configured for the master control board.
2. The teamwork cables are loose or damaged.
3. Any two air conditioner units have the same address.
Teamwork networking 4. No air conditioner unit is configured as the master unit.
failed
5. The master unit is powered off.
6. The ETH converter is faulty.
7. The intelligent socket is faulty.
8. Cables between the air conditioner and the intelligent socket and ECC are faulty.
1. The refrigerant leaks.
Comp freeze point 2. The press sensor is faulty.
protection
3. The dryer filter is blocked.
5. The expansion valve is blocked.
HUAWEI TECHNOLOGIES CO., LTD.
1. Set the DIP switch correctly for teamwork.
2. Check the teamwork cables.
3. Change the addresses of the air conditioner units.
4. Configure one air conditioner unit as the master unit.
5. Power on the master unit, or configure another unit as the master unit.
6. Maintain or replace the ETH converter.
7. Maintain or replace the intelligent socket.
8. Maintain or replace the cables between the air conditioner and the intelligent socket and ECC.
1. Check for any leakages. Fill refrigerant after maintenance or replacement. 2. Calibrate or replace the
press sensor. 3. Maintain or replace the dryer filter. 4. Maintain or replace the expansion valve.
Huawei proprietary. No spread without permission.
Page 112
113.
6Parts Replacement and Troubleshooting
6.3 Common Alarm Handling
No.
8
9
Alarm Name
Supply-air LT
1. Consult Huawei technical support.
2. Check the ambient temperature.
3. Adjust the supply-air LT alarm threshold.
4. Calibrate or replace the abnormal T/H sensors.
5. Maintain or replace the air filters.
Comp discharge HP
1. The outdoor unit input power has an open phase, incorrect phase sequence, or is unavailable.
2. Signal cables to the outdoor unit are not properly connected.
3. The condenser fins are blocked.
4. The outdoor fan driver or fan is faulty.
5. The press displayed is different from the actual press.
6. The electronic expansion valve is faulty.
7. The refrigerant is overfilled.
1. Check the power supply of the outdoor unit.
2. Check the signal cables to outdoor unit.
3. Clean the condenser fins.
4. Maintain or replace the outdoor unit or unit driver.
5. Calibrate or replace the press sensor.
6. Maintain or replace the electronic expansion valve.
7. Decrease certain amount of refrigerant.
1. The refrigerant leaks.
2. The cables to the press sensor are loose or damaged.
3. The press sensor displayed is different from the actual pressure.
4. The filter dryer is blocked.
5. The expansion valve is blocked.
6. The indoor fans are faulty.
1. The compressor driver is faulty.
2. The compressor is faulty.
1. The fans in the comp driver are faulty.
2. Dirt exists in the air vents of the fans in the comp driver.
1. The cables to the compressor driver are loose or damaged.
2. The comp driver is faulty.
1. The comp is in lack of oil.
2. The condenser is blocked.
3. Outdoor fans run abnormally.
4. The refrigerant is overfilled.
5. The comp is faulty.
1. Check for any leakages and refill refrigerant after maintenance.
2. Check the cables to the press sensor.
3. Calibrate or replace the press sensor.
4. Maintain or replace the filter dryer.
5. Maintain or replace the expansion valve.
6. Maintain or replace the indoor fans.
1. Maintain or replace the compressor driver.
2. Maintain or replace the compressor.
1. Check the fans in the comp driver.
2. Clean the air vents of the fans in the comp driver.
1. The cables to the compressor driver are loose or damaged.
2. The comp driver is faulty.
1. Fill oil to the comp.
2. Clean the condenser fins.
3. Maintain or replace outdoor fans.
4. Decrease certain amount of refrigerant.
5. Maintain or replace the comp.
Comp suction LP
11
Comp drive alarm
13
14
Solution
1. The load is low.
2. The ambient temperature is low.
3. The supply-air LT alarm threshold is inappropriate.
4. The temp displayed is different from the actual temp.
5. The air filters are blocked.
10
12
Possible Cause
Comp drive module
overheat
Comp drive phase
loss
Comp phase current
alarm
HUAWEI TECHNOLOGIES CO., LTD.
Huawei proprietary. No spread without permission.
Page 113
114.
6Parts Replacement and Troubleshooting
6.3 Common Alarm Handling
No.
Possible Cause
1. The power supply to the indoor fan is abnormal.
2. The cables to the indoor fan are loose or damaged.
3. The indoor fans are faulty.
1. The load is low.
2. The T/H sensors are located in inappropriate position.
3. The ambient humidity is high.
4. The high humidity alarm threshold is inappropriate.
5. The temp displayed is different from the actual temp.
Solution
1. Check the power supply to the indoor fan.
2. Check the cables to the indoor fan.
3. Maintain or replace the indoor fans.
1. Consult Huawei technical support.
2. Adjust the position of the T/H sensors.
3. Check the ambient humidity.
4. Adjust the high humidity alarm threshold.
5. Calibrate or replace the abnormal T/H sensors.
Full water
1. The cables to the high float are loose or damaged.
2. The high float is faulty or stuck.
3. The condensate pump is faulty, or the drainage capacity decreases.
4. The drainpipe of the condensate pump is faulty.
5. The pipeline or the internal drainpipe is blocked or frozen.
1. Check the cables to the high float.
2. Maintain or replace the high float.
3. Maintain or replace the condensate pump.
4. Rectify the condensate pump fault.
5. Clear the drain outlet or internal drainpipe.
18
Drain abnormal
1. The cables to the high float are loose or damaged.
2. The high float is faulty or stuck.
3. The condensate pump is faulty, or the drainage capacity decreases.
4. The drainpipe of the condensate pump is faulty.
5. The pipeline or the internal drainpipe is blocked or frozen.
6. The condensate pump pipe is filled with air.
1. Check the cables to the high float.
2. Maintain or replace the high float or clear the obstacles.
3. Maintain or replace the condensate pump.
4. Rectify the condensate pump fault.
5. Clear the drain outlet or internal drainpipe.
6. Discharge the air in the pump pipe.
19
Condensate pump
exceed runtime
The accumulated runtime of the condensate pump exceeds the upper limit.
Maintain or replace the condensate pump, and clear the runtime.
1. The load is low.
2. The T/H sensors are located in inappropriate position.
3. The ambient humidity is high.
4. The high humidity alarm threshold is inappropriate.
5. The temp displayed is different from the actual temp.
1. The T/H sensors are located in inappropriate position.
2. The ambient humidity is low.
3. The low humidity alarm threshold is inappropriate.
4. The temp displayed is different from the actual temp.
1. Consult Huawei technical support.
2. Adjust the position of the T/H sensors.
3. Check the ambient humidity.
4. Adjust the high humidity alarm threshold.
5. Calibrate or replace the abnormal T/H sensors.
1. Adjust the position of the T/H sensors.
2. Check the ambient humidity.
3. Adjust the low humidity alarm threshold.
4. Calibrate or replace the abnormal T/H sensors.
15
16
17
Alarm Name
Indoor fan fault
High humidity
20
High humidity
21
Low humidity
HUAWEI TECHNOLOGIES CO., LTD.
Huawei proprietary. No spread without permission.
Page 114
115.
6Parts Replacement and Troubleshooting
Alarms
HUAWEI TECHNOLOGIES CO., LTD.
Huawei proprietary. No spread without permission.
Page 115
116.
6 Parts Replacement and TroubleshootingSummary of This Chapter
This chapter describes parts replacement and methods for exporting fault information
of the NetCol5000-A 42 kW air cooled in-row full-sized variable-frequency precision air
conditioner.
Question
1. How do you view run logs of the air conditioner?
HUAWEI TECHNOLOGIES CO., LTD.
Huawei proprietary. No spread without permission.
Page 116
117.
HUAWEI TECHNOLOGIES CO., LTD.Huawei proprietary. No spread without permission.
Page 117