
 electronics
Similar presentations:


")

Инструкции для принтера DTF-A31 L1800
1.
DTF-A31_L1800Printer instructions
2.
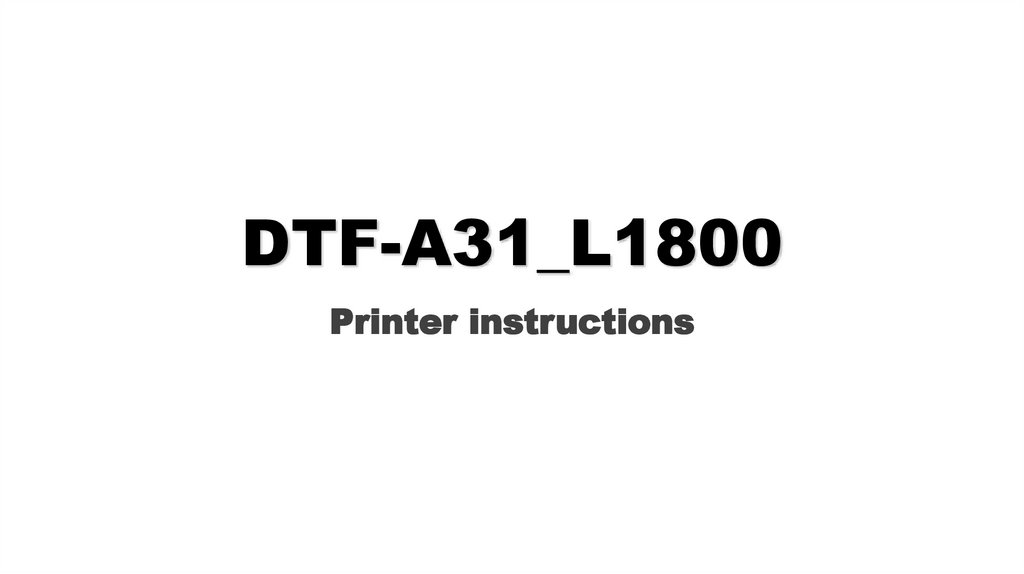
1.CHECK DEVICE APPEARANCE AND QUANTITYTractor、printing platform、the base of printhead Integral metal plate
softdog*1、U disk*1、rolling device holder side plate*2、rolling device spindle*1、fixed sleeve*2、paper tube roll
core*2、M4screw*6、USBdata cable*1、power line*1、paper delivery layer board*1、D40-M6 adjustable foot*4、
10ml injection
dismantle the rubber band that fix the base of printhead、blue packaging tape
3.
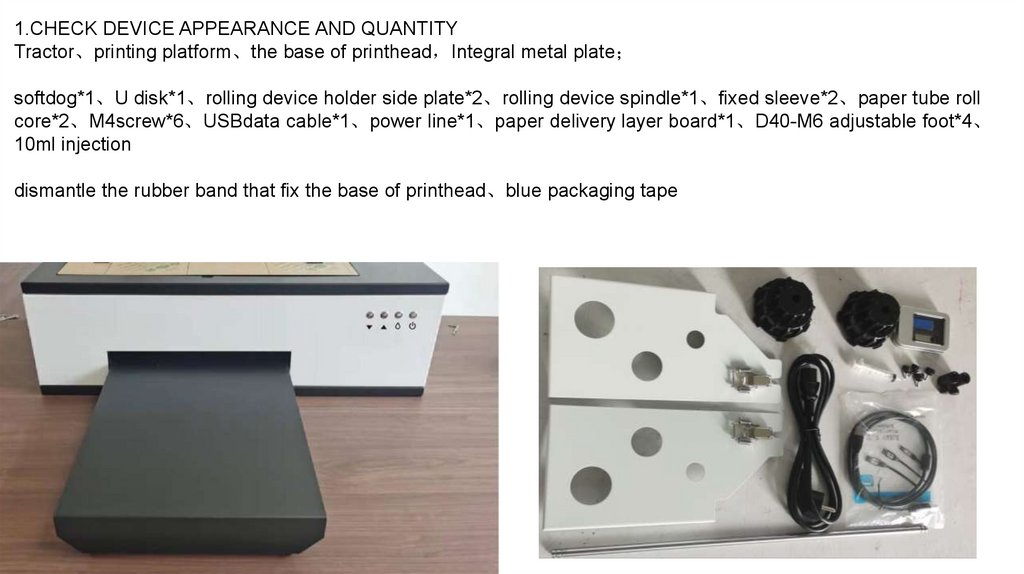
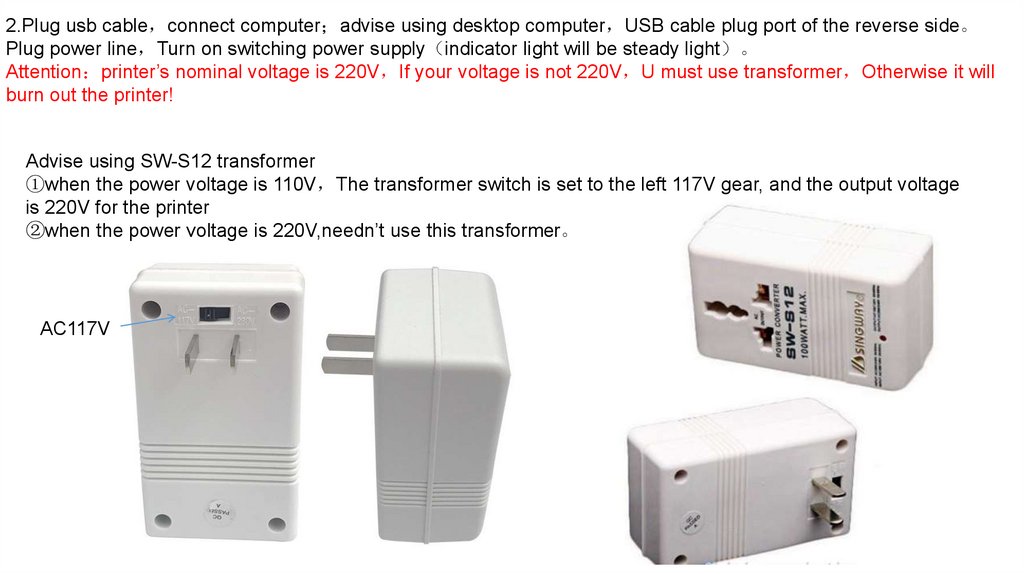
2.Plug usb cable connect computer advise using desktop computer USB cable plug port of the reverse side。Plug power line Turn on switching power supply indicator light will be steady light 。
Attention printer’s nominal voltage is 220V If your voltage is not 220V U must use transformer Otherwise it will
burn out the printer!
Advise using SW-S12 transformer
①when the power voltage is 110V The transformer switch is set to the left 117V gear, and the output voltage
is 220V for the printer
②when the power voltage is 220V,needn’t use this transformer。
AC117V
4.
2.Plug usb cable connect computer advise using desktop computer USB cable plug port of the reverse side。Plug power line Turn on switching power supply indicator light will be steady light 。
5.
3. Press the printer switch to start the printer 。The printer enters the self-test phase, at which point the switch indicator starts flashing and the
mechanisms are moving. When the self-test is complete, the switch indicator is solid.
(When the printer performs any task, the switch indicator is flashing; Solid light when finished)
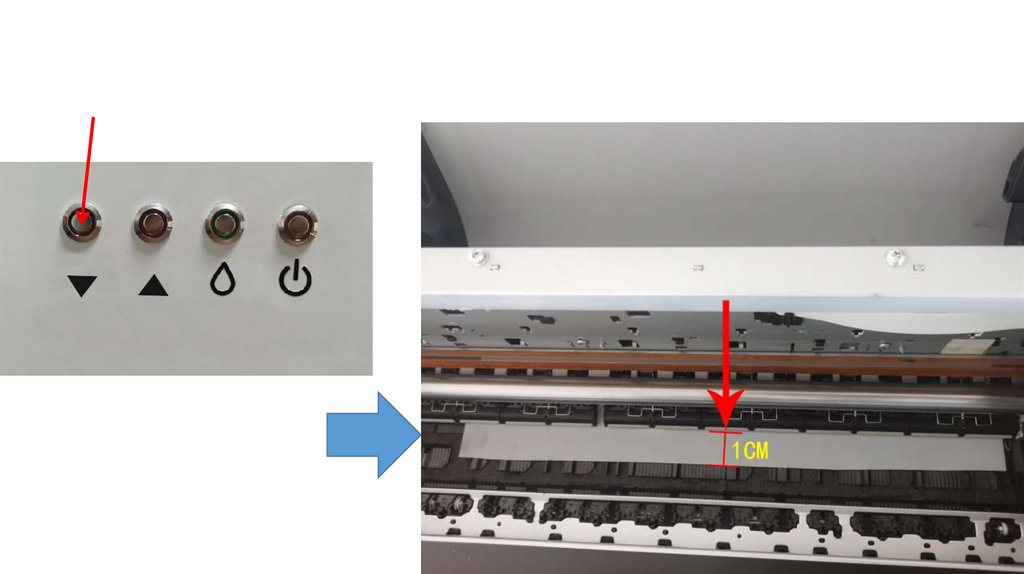
From left to right
The first button is to advance for the print film
The second button is the print film back
The third button is the ink cleaning key (long press 5S, automatic cleaning of the nozzle)
The fourth button is the power button
DTF-A31
6.
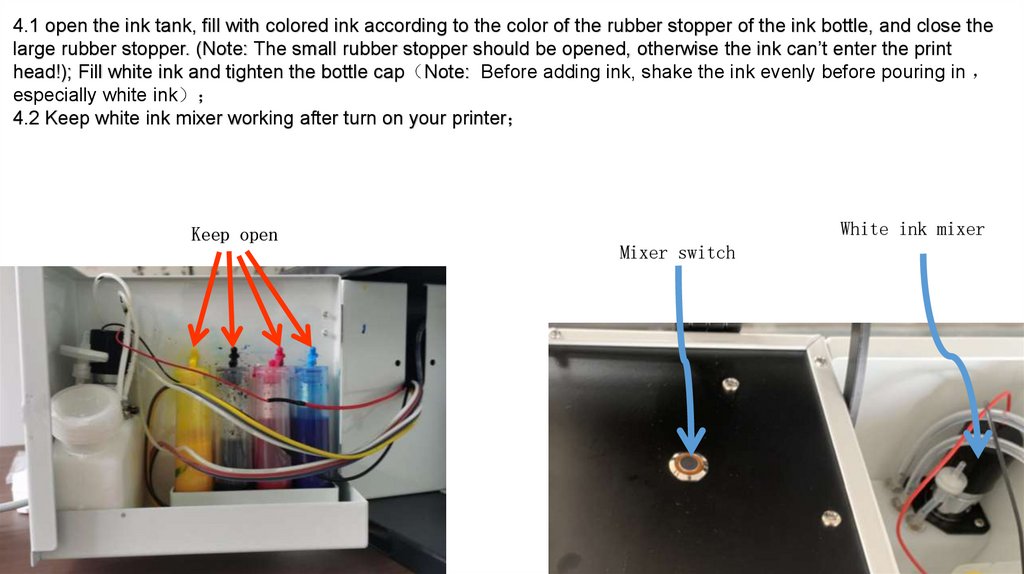
4.1 open the ink tank, fill with colored ink according to the color of the rubber stopper of the ink bottle, and close thelarge rubber stopper. (Note: The small rubber stopper should be opened, otherwise the ink can’t enter the print
head!); Fill white ink and tighten the bottle cap Note: Before adding ink, shake the ink evenly before pouring in
especially white ink
4.2 Keep white ink mixer working after turn on your printer
Keep open
White ink mixer
Mixer switch
7.
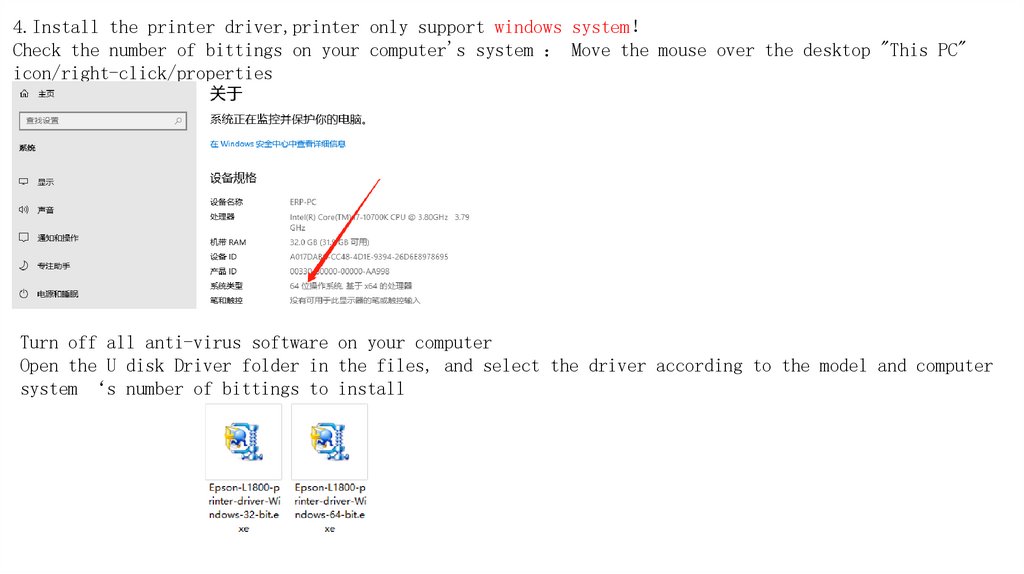
4.Install the printer driver,printer only support windows systemCheck the number of bittings on your computer's system Move the mouse over the desktop "This PC"
icon/right-click/properties
Turn off all anti-virus software on your computer
Open the U disk Driver folder in the files, and select the driver according to the model and computer
system ‘s number of bittings to install
8.
If the file is corrupted, you can download the driver yourself 。L1800 model
64 bittings driver download website
https://dl.drivers-epson.com/epson/11/Epson-L1800/Epson-L1800-printer-driver-Windows-64-bit.exe
32 bittings driver download website
https://dl.drivers-epson.com/epson/11/Epson-L1800/Epson-L1800-printer-driver-Windows-32-bit.exe
9.
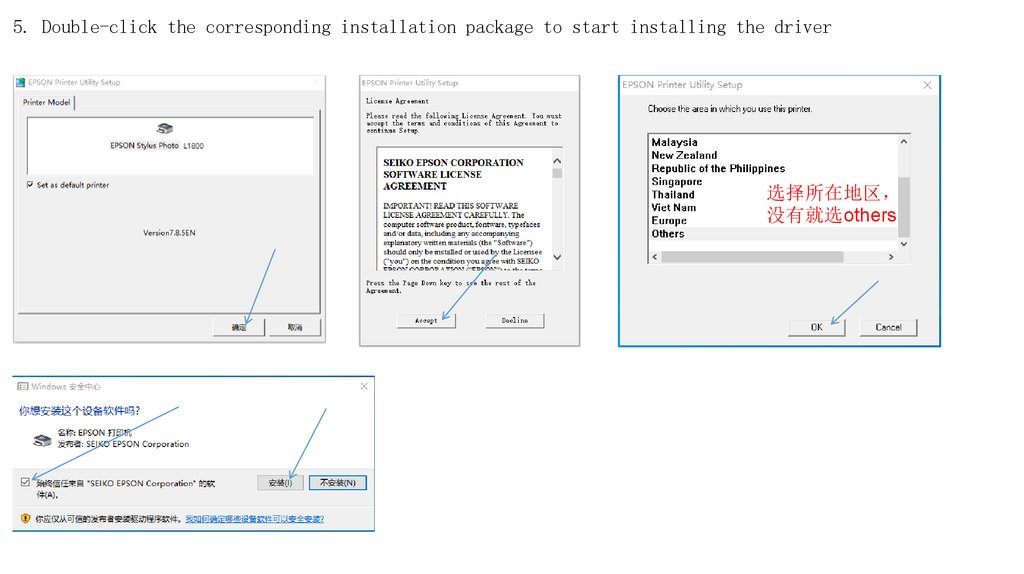
5. Double-click the corresponding installation package to start installing the driver选择所在地区
没有就选others
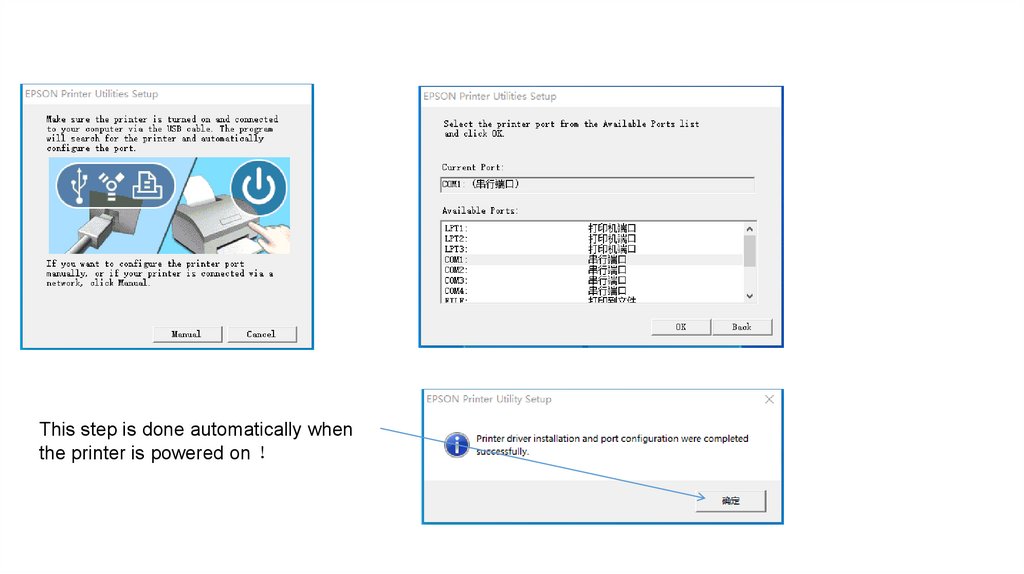
10.
This step is done automatically whenthe printer is powered on
11.
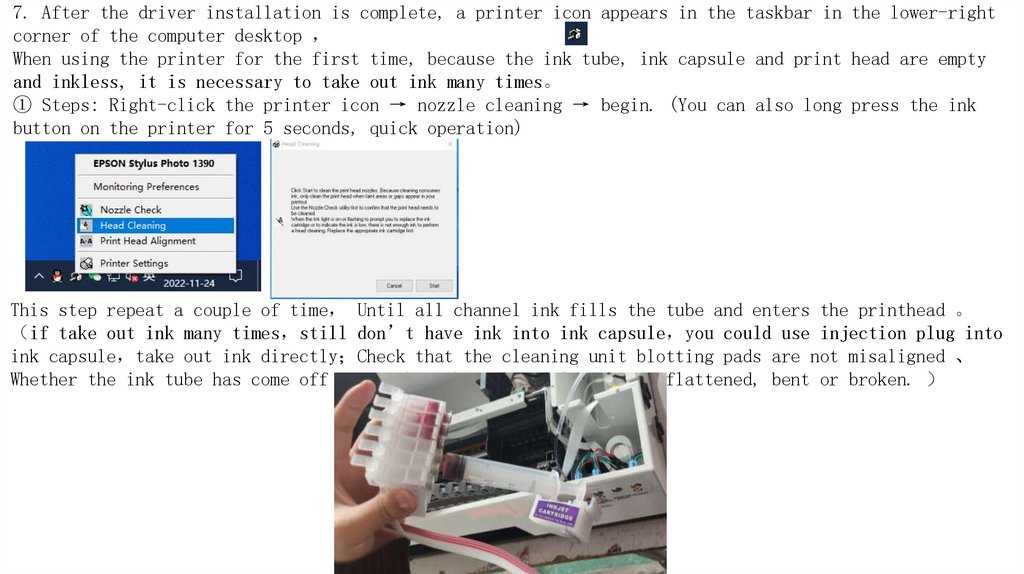
7. After the driver installation is complete, a printer icon appears in the taskbar in the lower-rightcorner of the computer desktop
When using the printer for the first time, because the ink tube, ink capsule and print head are empty
and inkless, it is necessary to take out ink many times。
① Steps: Right-click the printer icon → nozzle cleaning → begin. (You can also long press the ink
button on the printer for 5 seconds, quick operation)
This step repeat a couple of time Until all channel ink fills the tube and enters the printhead 。
if take out ink many times still don’t have ink into ink capsule you could use injection plug into
ink capsule take out ink directly Check that the cleaning unit blotting pads are not misaligned 、
Whether the ink tube has come off Whether the ink supply pipe is flattened, bent or broken.
12.
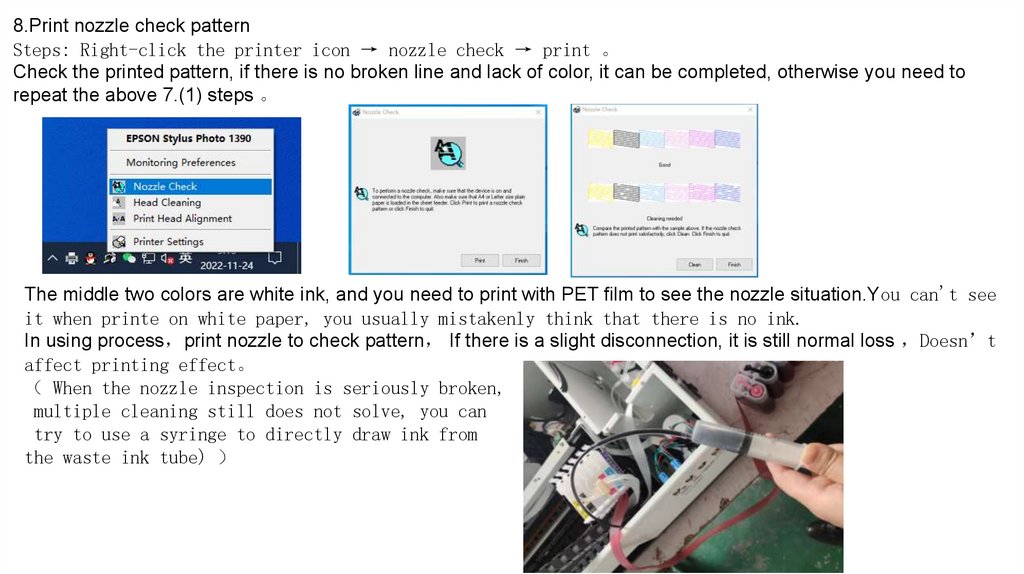
8.Print nozzle check patternSteps: Right-click the printer icon → nozzle check → print 。
Check the printed pattern, if there is no broken line and lack of color, it can be completed, otherwise you need to
repeat the above 7.(1) steps 。
The middle two colors are white ink, and you need to print with PET film to see the nozzle situation.You can't see
it when printe on white paper, you usually mistakenly think that there is no ink.
In using process print nozzle to check pattern If there is a slight disconnection, it is still normal loss Doesn’t
affect printing effect。
When the nozzle inspection is seriously broken,
multiple cleaning still does not solve, you can
try to use a syringe to directly draw ink from
the waste ink tube)
13.
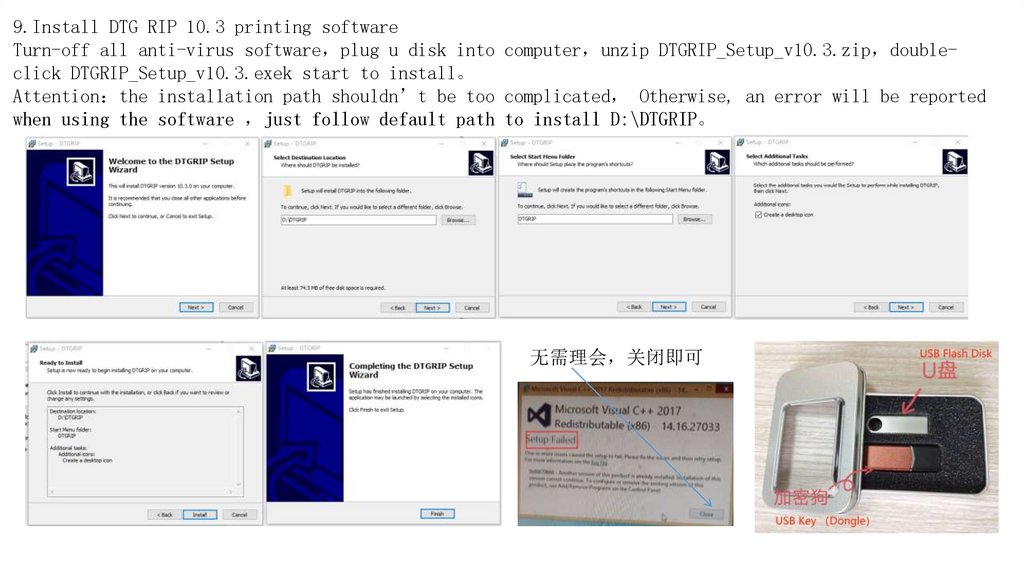
9.Install DTG RIP 10.3 printing softwareTurn-off all anti-virus software plug u disk into computer unzip DTGRIP_Setup_v10.3.zip doubleclick DTGRIP_Setup_v10.3.exek start to install。
Attention the installation path shouldn’t be too complicated Otherwise, an error will be reported
when using the software just follow default path to install D:\DTGRIP。
无需理会 关闭即可
14.
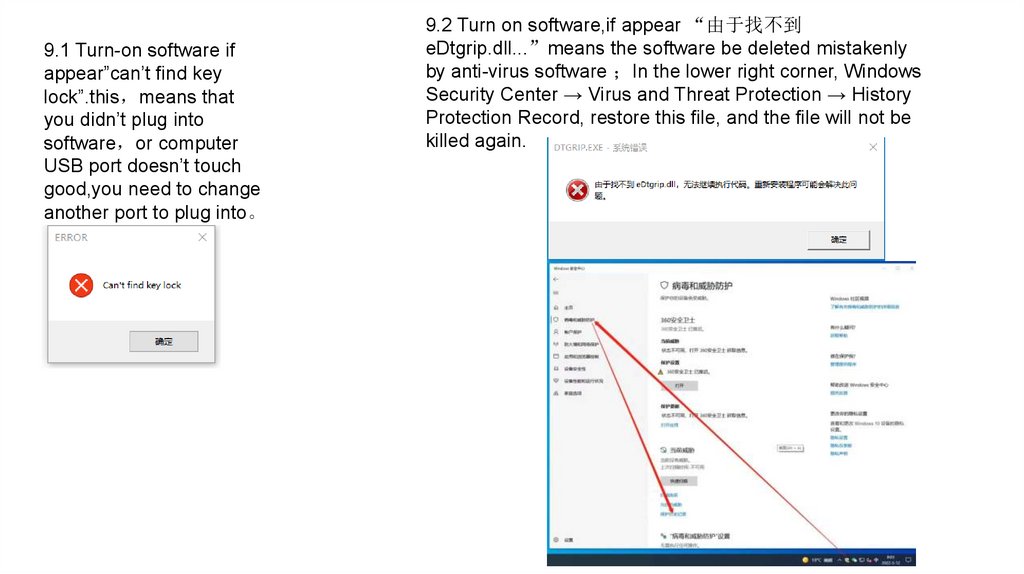
9.1 Turn-on software ifappear”can’t find key
lock”.this means that
you didn’t plug into
software or computer
USB port doesn’t touch
good,you need to change
another port to plug into。
9.2 Turn on software,if appear “由于找不到
eDtgrip.dll...”means the software be deleted mistakenly
by anti-virus software In the lower right corner, Windows
Security Center → Virus and Threat Protection → History
Protection Record, restore this file, and the file will not be
killed again.
15.
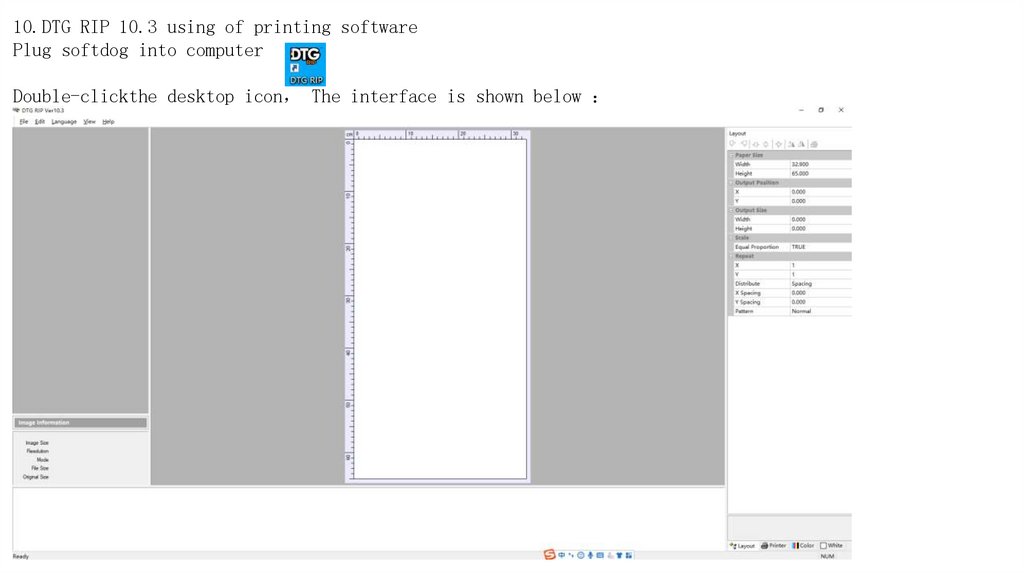
10.DTG RIP 10.3 using of printing softwarePlug softdog into computer
Double-clickthe desktop icon The interface is shown below
16.
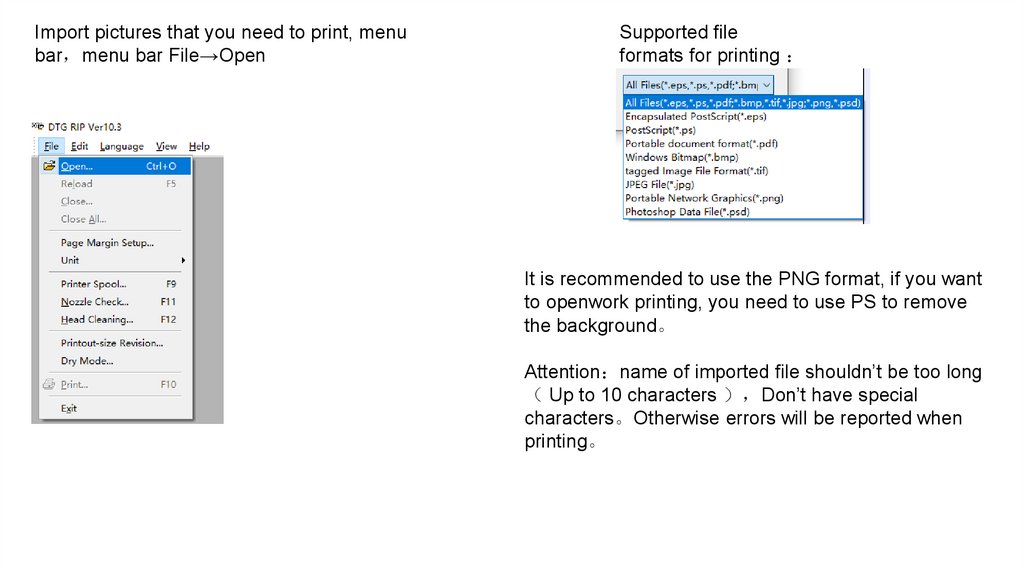
Import pictures that you need to print, menubar menu bar File→Open
Supported file
formats for printing
It is recommended to use the PNG format, if you want
to openwork printing, you need to use PS to remove
the background。
Attention name of imported file shouldn’t be too long
Up to 10 characters Don’t have special
characters。Otherwise errors will be reported when
printing。
17.
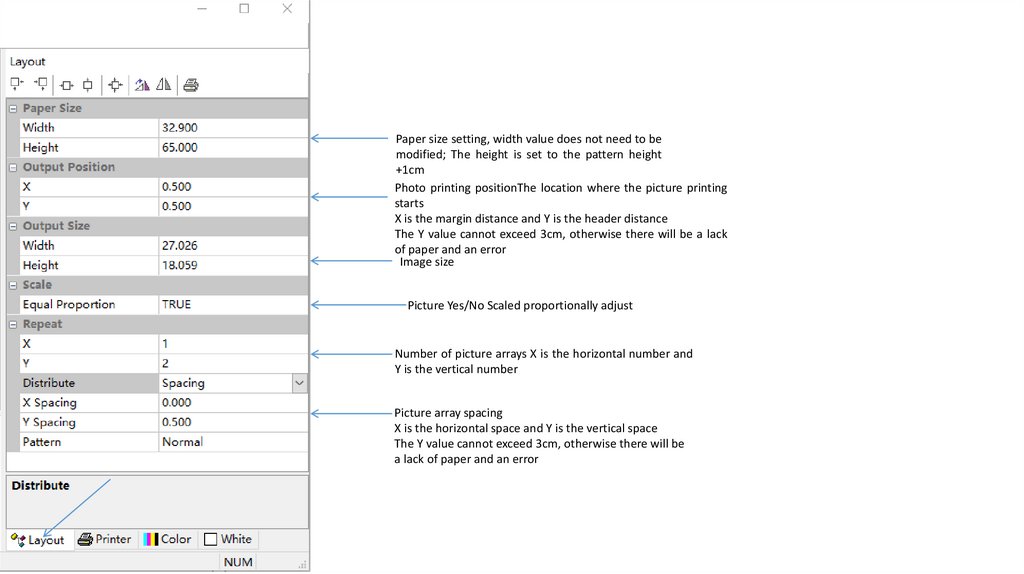
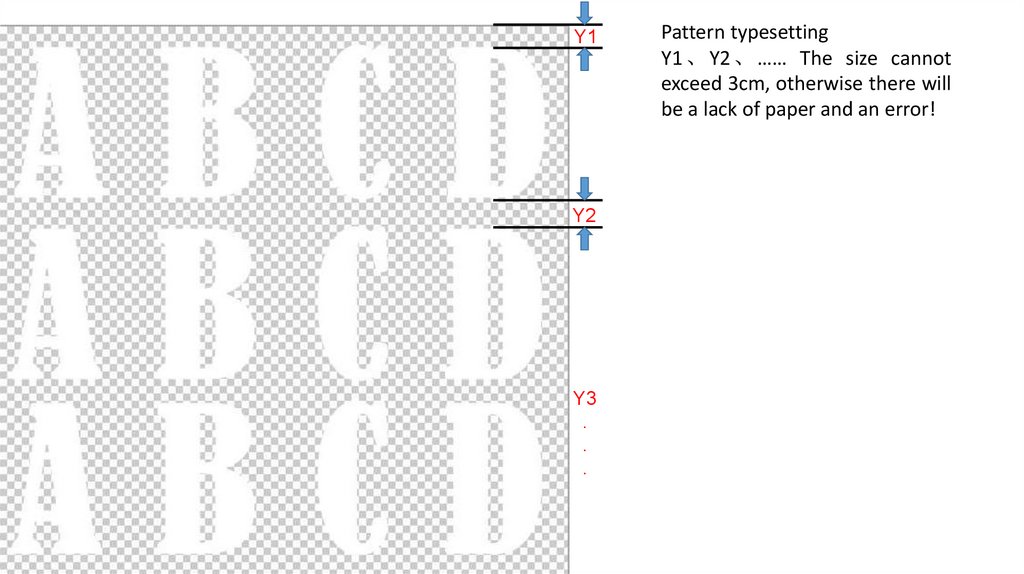
Paper size setting, width value does not need to bemodified; The height is set to the pattern height
+1cm
Photo printing positionThe location where the picture printing
starts
X is the margin distance and Y is the header distance
The Y value cannot exceed 3cm, otherwise there will be a lack
of paper and an error
Image size
Picture Yes/No Scaled proportionally adjust
Number of picture arrays X is the horizontal number and
Y is the vertical number
Picture array spacing
X is the horizontal space and Y is the vertical space
The Y value cannot exceed 3cm, otherwise there will be
a lack of paper and an error
18.
Y1Y2
Y3
.
.
.
Pattern typesetting
Y1 、 Y2 、 …… The size cannot
exceed 3cm, otherwise there will
be a lack of paper and an error!
19.
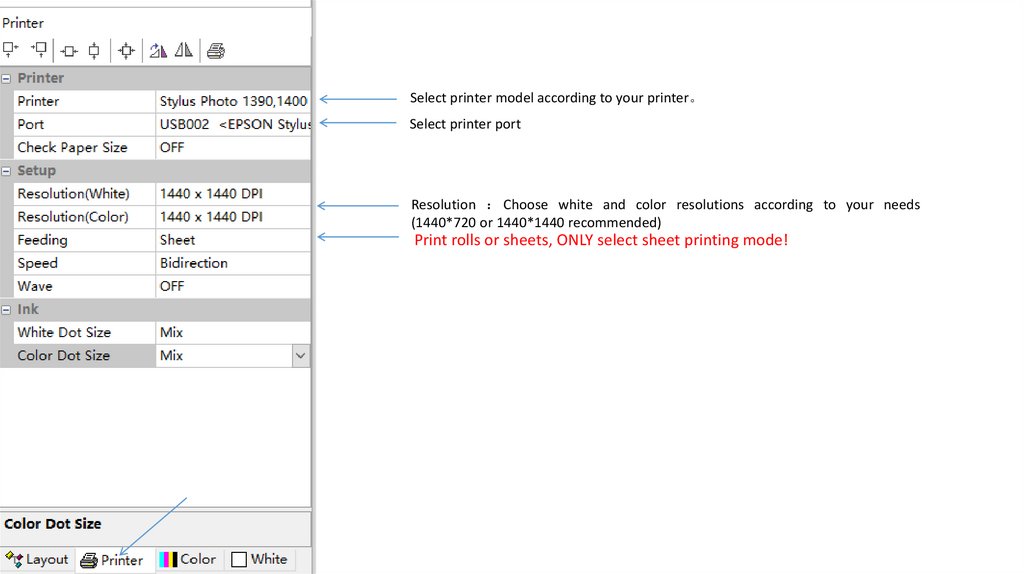
Select printer model according to your printer。Select printer port
Resolution Choose white and color resolutions according to your needs
(1440*720 or 1440*1440 recommended)
Print rolls or sheets, ONLY select sheet printing mode!
20.
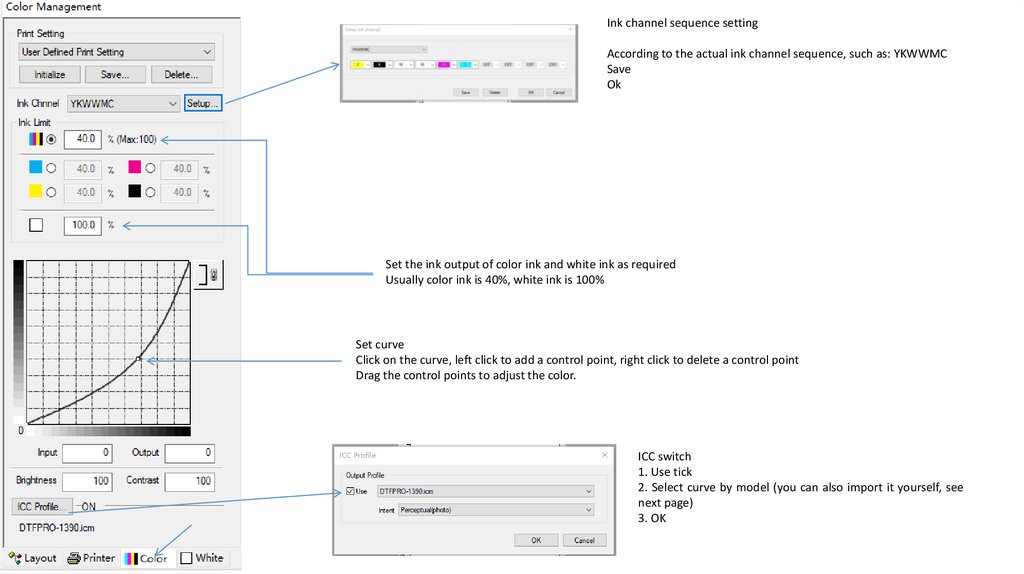
Ink channel sequence settingAccording to the actual ink channel sequence, such as: YKWWMC
Save
Ok
Set the ink output of color ink and white ink as required
Usually color ink is 40%, white ink is 100%
Set curve
Click on the curve, left click to add a control point, right click to delete a control point
Drag the control points to adjust the color.
ICC switch
1. Use tick
2. Select curve by model (you can also import it yourself, see
next page)
3. OK
21.
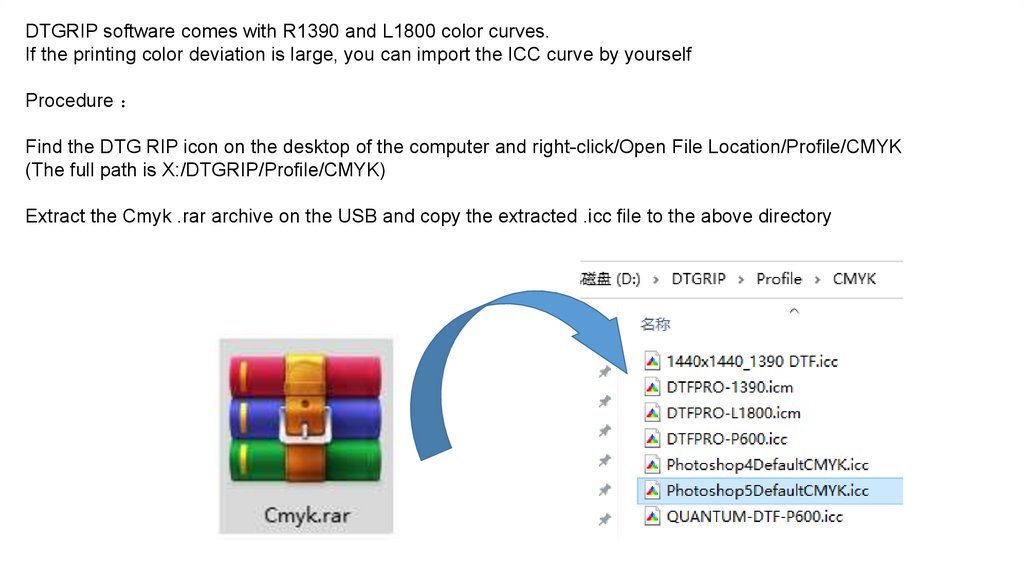
DTGRIP software comes with R1390 and L1800 color curves.If the printing color deviation is large, you can import the ICC curve by yourself
Procedure
Find the DTG RIP icon on the desktop of the computer and right-click/Open File Location/Profile/CMYK
(The full path is X:/DTGRIP/Profile/CMYK)
Extract the Cmyk .rar archive on the USB and copy the extracted .icc file to the above directory
22.
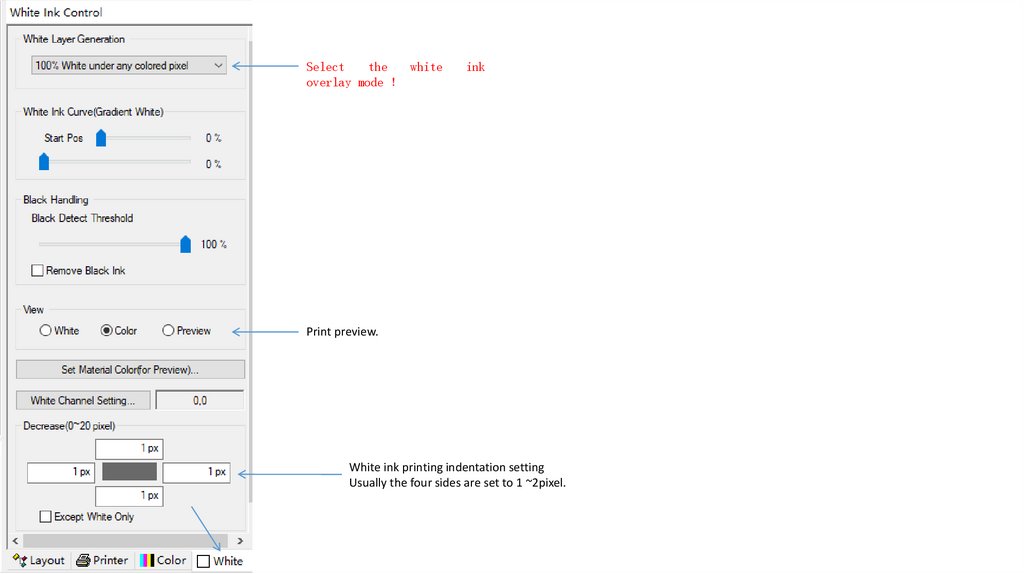
Selectthe
white
overlay mode
ink
Print preview.
White ink printing indentation setting
Usually the four sides are set to 1 ~2pixel.
23.
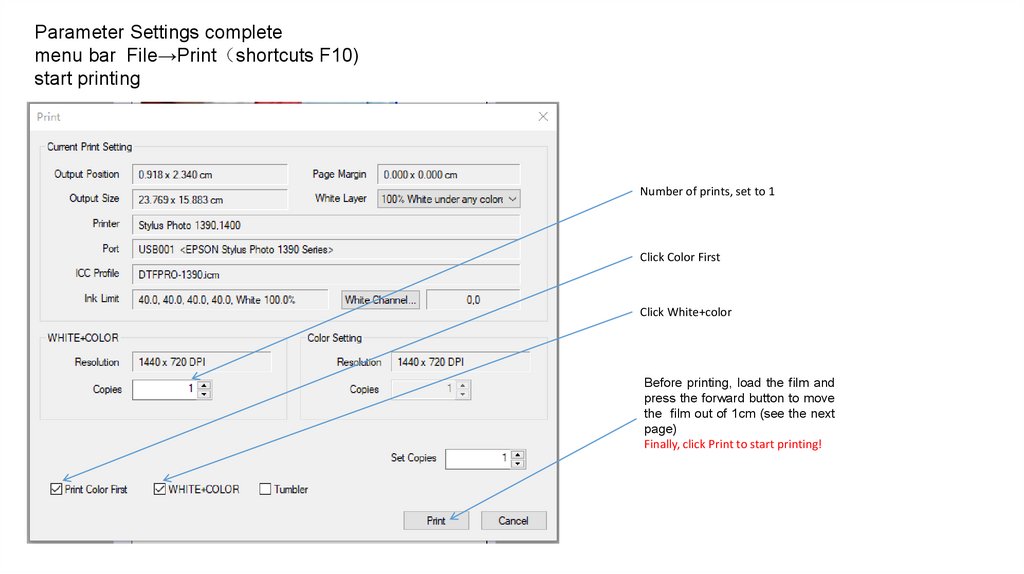
Parameter Settings completemenu bar File→Print shortcuts F10)
start printing
Number of prints, set to 1
Click Color First
Click White+color
Before printing, load the film and
press the forward button to move
the film out of 1cm (see the next
page)
Finally, click Print to start printing!
24.
25.
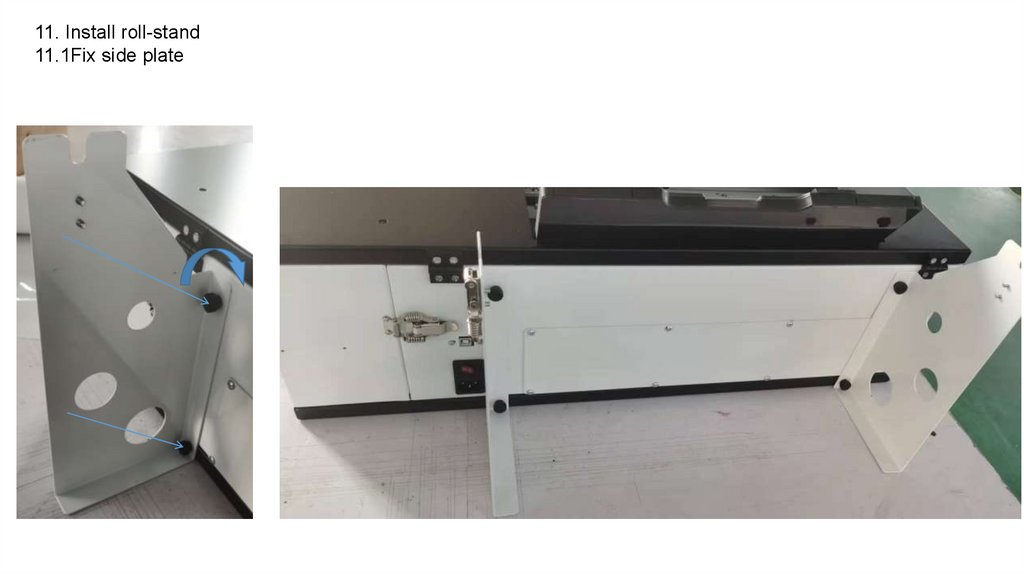
11. Install roll-stand11.1Fix side plate
26.
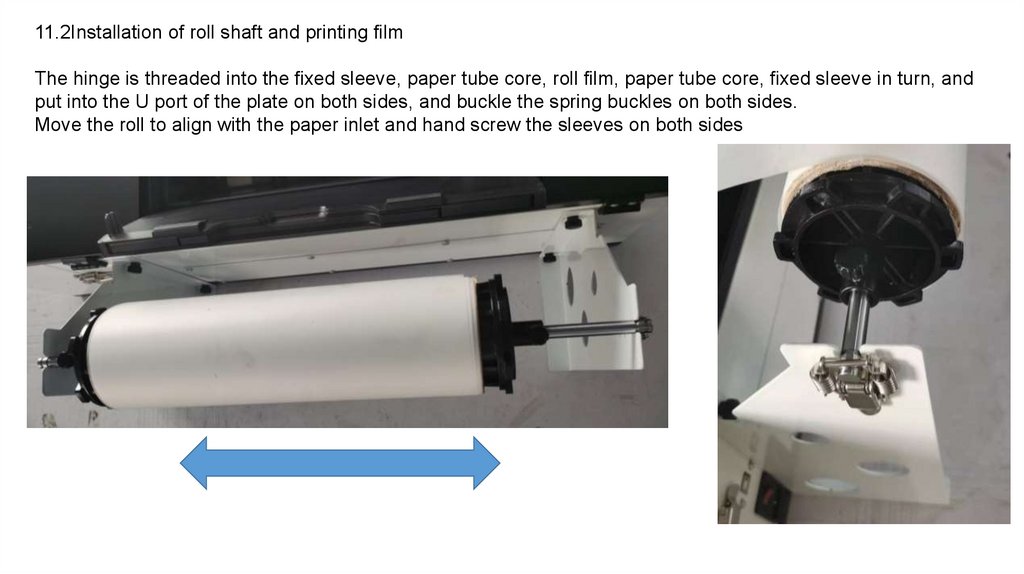
11.2Installation of roll shaft and printing filmThe hinge is threaded into the fixed sleeve, paper tube core, roll film, paper tube core, fixed sleeve in turn, and
put into the U port of the plate on both sides, and buckle the spring buckles on both sides.
Move the roll to align with the paper inlet and hand screw the sleeves on both sides
27.
13Printer maintenanceDue to the characteristics of DTF ink, the printer should not be deactivate for a long time, otherwise the ink tube,
ink capsule, and printhead are prone to precipitation and blockage.
Therefore, the printer operates the cleaning nozzle and
print nozzle inspection at least once a day.
Prevent printhead blocking.
If there is no printing task for a long time, it is also necessary to start printing once every 3~4 days, and drip
moisturizing liquid on the ink absorbing pad of the cleaning unit before turn-off printer
procedure turn on printer after the printhead moves about 10CM to the left, cut off the power directly, and drip
about 2ML of moisturizing liquid into the ink absorbing pad of the cleaning unit (note: moisturizing should not
overflow outside the ink pad!). ), and then power on the printer, normal shutdown is ok, ensure that the printhead
back to the rightmost cleaning unit position, the ink absorbing pad and the printhead fit, so that could protect the
printhead.
After each shutdown, you need to check whether the printhead back to the rightmost origin position, do not let the
printhead stay in other positions, otherwise the printhead will be directly exposed to the air, which will cause the
printhead to dry out and blocking.
(If the printer reports an error printhead does not back to the origin, you can manually push the printhead to the
origin position)
28.
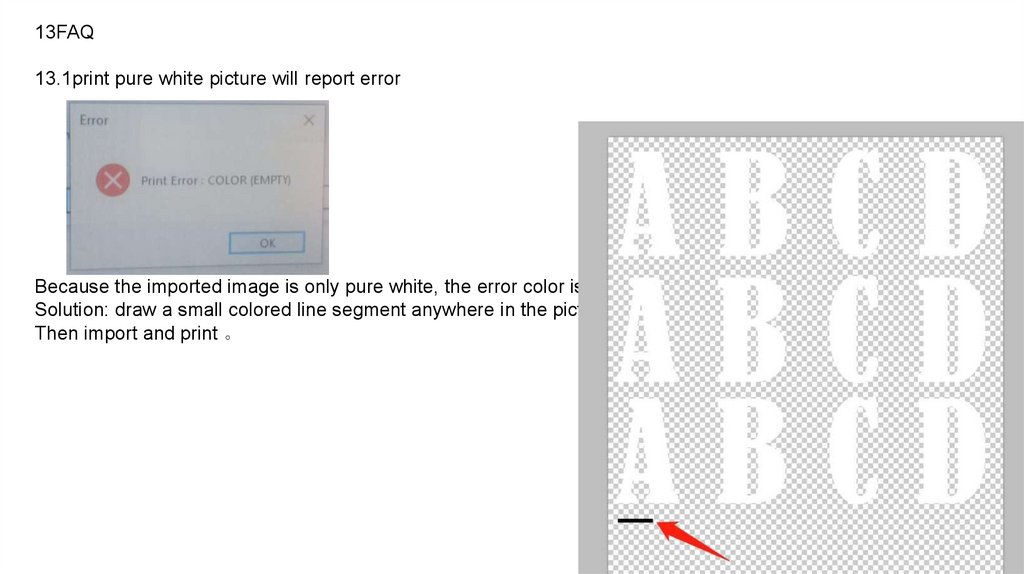
13FAQ13.1print pure white picture will report error
Because the imported image is only pure white, the error color is empty (none)
Solution: draw a small colored line segment anywhere in the picture,
Then import and print 。
29.
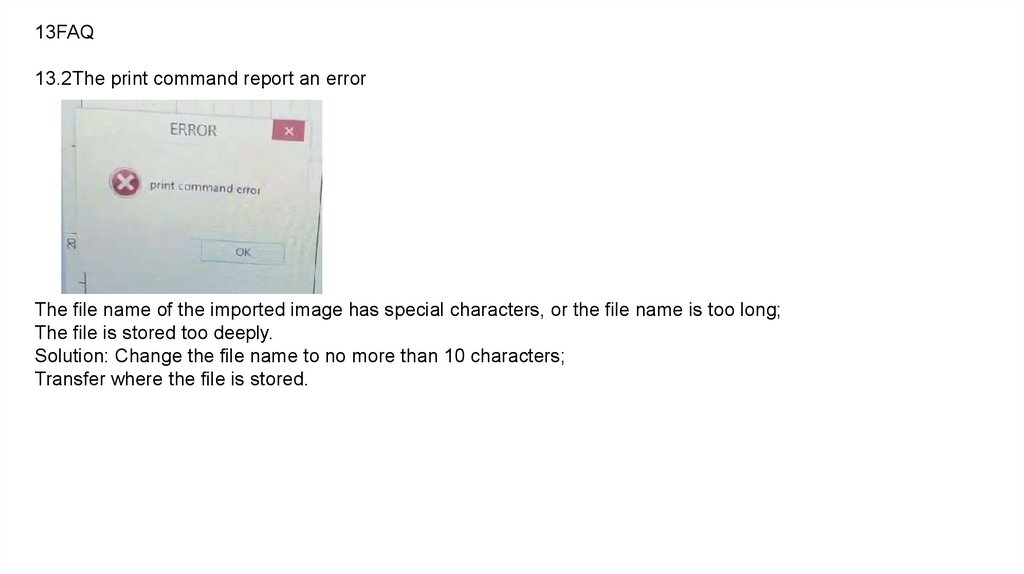
13FAQ13.2The print command report an error
The file name of the imported image has special characters, or the file name is too long;
The file is stored too deeply.
Solution: Change the file name to no more than 10 characters;
Transfer where the file is stored.
30.
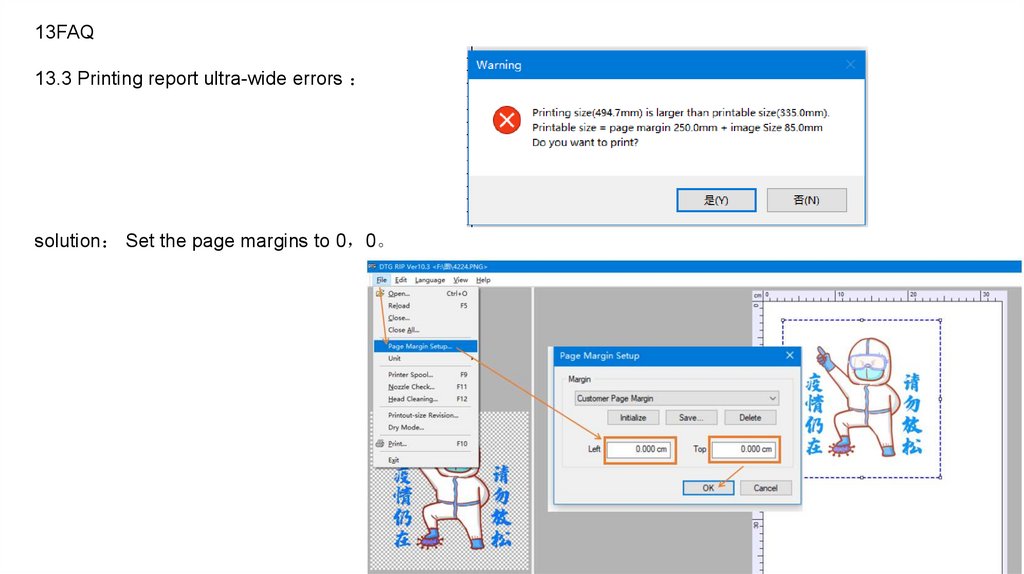
13FAQ13.3 Printing report ultra-wide errors
solution Set the page margins to 0 0。