




Similar presentations:







Blood Gas and Chemistry Analysis System - i15 Installation Guide
1.
2.
Blood Gas and Chemistry Analysis System--i15 Installation Guide
EDAN Instruments, Inc.
Watson Chen
www.edan.com
Watson.chen@edan.com
2022.09.07
3.
ContentsEnvironment requirement
Confirm the accessories
Install printer paper and battery
Connect the power adaptor
Software setting
Install the calibrant fluid pack
Ready to use
3
© EDAN Confidential
4.
Environment RequirementLiang Gong
www.edan.com.cn
gongliang@edan.com
2018.03.05
4
© EDAN Confidential
5.
Environment RequirementLocation is of great importance for the smooth running of your analyzer. Prior to installing the analyzer,
choose a site that meets the following requirements:
5
1.
Convenient for the analyzer to be connected to a grounded electrical receptacle in case it is powered by
AC power.
2.
Keep the analyzer away from direct exposure to strong sunlight.
3.
Ambient Temperature between 10 °C and 31 °C (50°F and 88°F).
4.
Relative Humidity of 25% - 80% (non-condensing).
5.
Ambient Pressure within 70 - 106.6 kPa (525 – 800 mmHg).
6.
Placed onto a clean and flat surface with good ventilation.
7.
Keep the analyzer away from equipment with strong electric field and strong magnetic field.
8.
Keep the analyzer away from explosive gases or vapors.
© EDAN Confidential
6.
Confirm the accessoriesLiang Gong
www.edan.com.cn
gongliang@edan.com
2018.03.05
6
© EDAN Confidential
7.
Confirm the accessoriesThe standard configuration of i15 contains below accessories:
7
1 pcs i15 analyzer.
1 pcs Power cable & 1 pcs power adaptor.
1 box (12 pcs) Thermal printer paper.
1 pcs Rechargeable lithium battery.
1 pcs User manual.
1 pcs Quick reference card.
1 pcs Certificate of approval.
1 pcs Packing list.
1 pcs Screw Driver
© EDAN Confidential
8.
Install printer paper and batteryLiang Gong
www.edan.com.cn
gongliang@edan.com
2018.03.05
8
© EDAN Confidential
9.
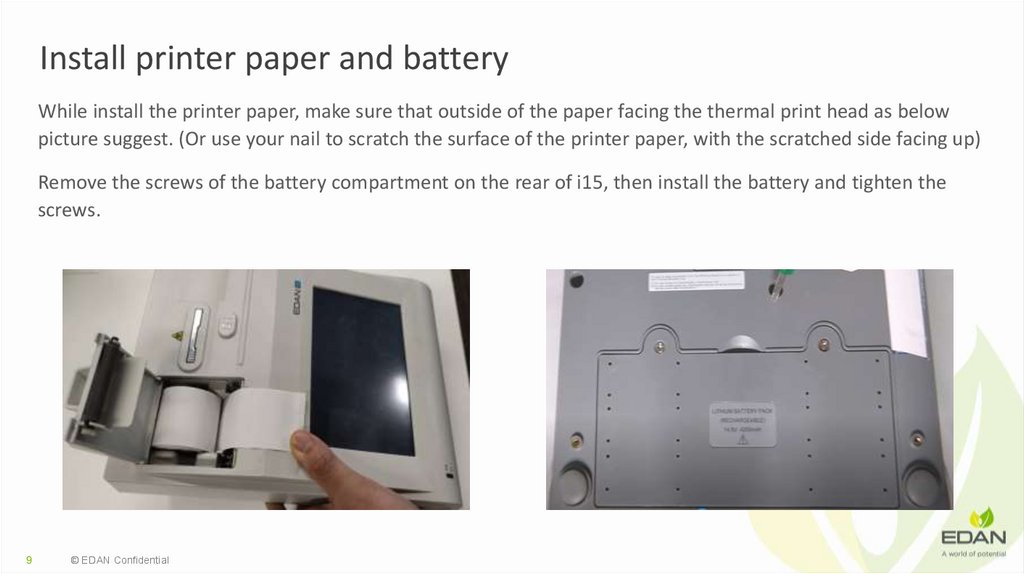
Install printer paper and batteryWhile install the printer paper, make sure that outside of the paper facing the thermal print head as below
picture suggest. (Or use your nail to scratch the surface of the printer paper, with the scratched side facing up)
Remove the screws of the battery compartment on the rear of i15, then install the battery and tighten the
screws.
9
© EDAN Confidential
10.
Connect the power adaptorLiang Gong
www.edan.com.cn
gongliang@edan.com
2018.03.05
10
© EDAN Confidential
11.
Connect the power adaptorConnect the power cable and power adapter to the analyzer.
11
© EDAN Confidential
12.
Software settingLiang Gong
www.edan.com.cn
gongliang@edan.com
2018.03.05
12
© EDAN Confidential
13.
Date & Language SetupTurn on the analyzer, login with admin account(User name: admin password: 123456). Then enter 'Setup'
interface, select 'Date & Language Setup', set date and language, click 'ok' to save.
13
© EDAN Confidential
14.
Patient Information SetupPatient info and reference ranges should be modified before use. Enter 'Setup', click 'Test setup', select Patient
info, make sure that Patient ID, Temperature and FiO2 are selected. Press ok to save.
14
© EDAN Confidential
15.
Reference Ranges SetupEnter 'Setup', click 'Test setup', select 'Reference Ranges', modify the reference ranges based on region
requirement.
15
© EDAN Confidential
16.
Install the calibrant fluid pack16
© EDAN Confidential
17.
Install the calibrant fluid packBefore installing, take the calibrant fluid pack out of the refrigerator and rewarm in room temperature for at
least 30 minutes. Make sure that the date and time information are correct. Then follow below steps to install
the calibrant fluid pack.
Enter setup interface, select 'Replace Cal Pack' on the screen.
Open the foil pouch and remove the calibrant fluid pack from it.
Remove the calibrant fluid pack cap, and remove the fish-key.
Open the chamber door with the key.
Scan the barcode on the new calibrant fluid pack foil pouch.
Insert the new calibrant fluid pack and push it gently to make sure that it click into place.
Close the chamber door, lock it and press OK in the pop up message.
Use the fish-key to lock the chamber door
17
© EDAN Confidential
18.
Install the calibrant fluid packOr follow below video to install the calibrant fluid pack.
18
© EDAN Confidential
19.
Ready to useLiang Gong
www.edan.com.cn
gongliang@edan.com
2018.03.05
19
© EDAN Confidential
20.
Ready to useBefore sample test, we have to do following tests to make sure the machine is under good
condition.
Internal simulator test
External simulator test
Pump test
Valve test
Printer test
Liquid Quality control test
20
© EDAN Confidential
21.
Ready to useLogin with service account(User name: service Password: 8008307573), enter 'setup' >
'Diagnostics'. Check Pump valve Printer and Inter Simulator. Make sure the pump, valve and
printer works normally and the analyzer pass the internal simulator test.
21
© EDAN Confidential
22.
Ready to useEnter 'QC' > 'simulator'. Follow the instruction on the screen, insert an E-simulator. Wait for
several minutes until test results appears. Make sure the analyzer pass the E-simulator test.
22
© EDAN Confidential
23.
Ready to useEnter 'QC' > 'control' > 'BG'. Follow the instruction to conduct liquid QC rest. The analyzer should
pass either Level1,Level2 or Level2,Level3 QC test, Level2 is a must to pass. Follow below video
to run Liquid quality control test
23
© EDAN Confidential
24.
After pass all above test, this analyzer is ready to run sample test!Liang Gong
www.edan.com.cn
gongliang@edan.com
2018.03.05
A, Click to edit Master text styles
25.
THANK YOUEdan Instruments, Inc.
Watson
www.edan.com
Watson.chen@edan.com
2022.09.07
25
© EDAN Confidential