


 medicine
Similar presentations:


BC-3600 plus Service Training
1.
BC-3600 plus Service TrainingHematology Global Technical Support Department
service@mindray.com
Version: 2.0
NO.:MXQ-11014-BC-3600
© 2011 Mindray Confidential
2.
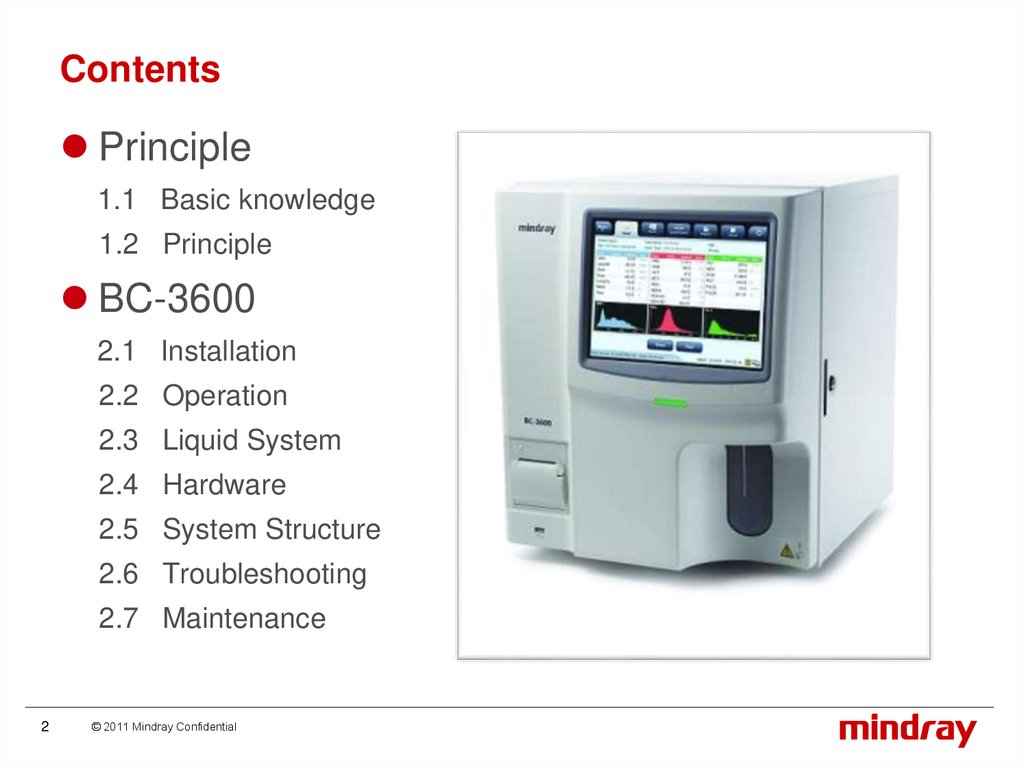
ContentsPrinciple
1.1 Basic knowledge
1.2 Principle
BC-3600
2.1 Installation
2.2 Operation
2.3 Liquid System
2.4 Hardware
2.5 System Structure
2.6 Troubleshooting
2.7 Maintenance
2
© 2011 Mindray Confidential
3.
1. Principle1.1 Basic Knowledge
1.2 Principle
3
© 2011 Mindray Confidential
4.
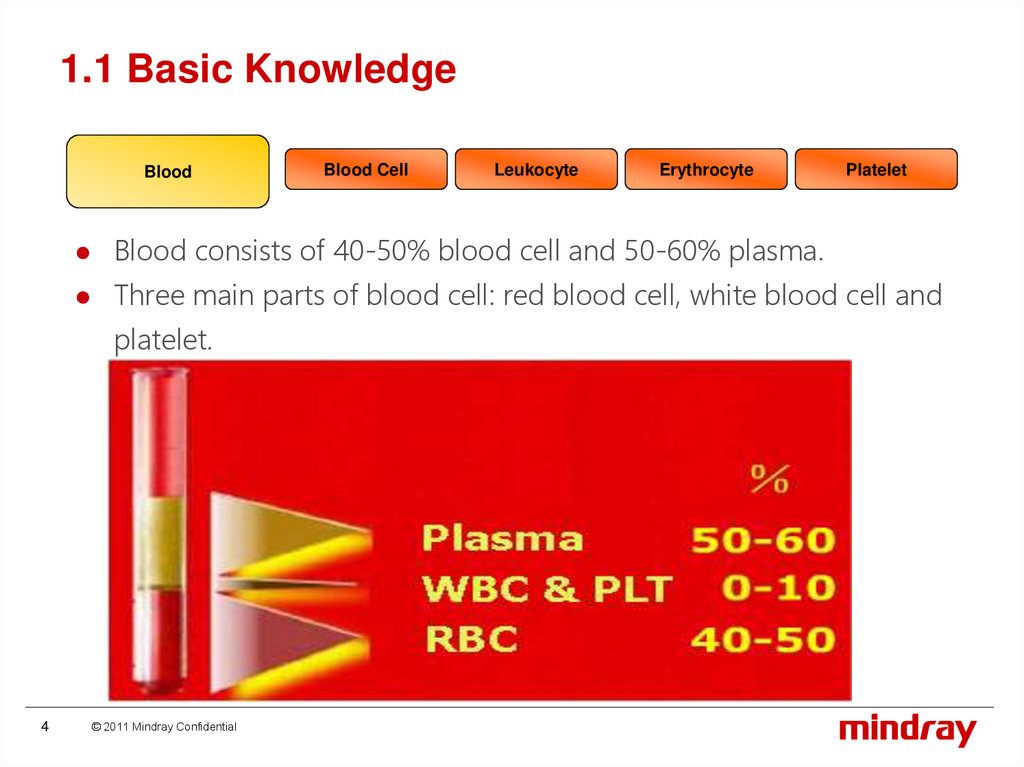
1.1 Basic KnowledgeBlood
Leukocyte
Erythrocyte
Platelet
Blood consists of 40-50% blood cell and 50-60% plasma.
Three main parts of blood cell: red blood cell, white blood cell and
platelet.
4
Blood Cell
© 2011 Mindray Confidential
5.
1.1 Basic KnowledgeBlood
Blood Cell
Leukocyte
Erythrocyte
Platelet
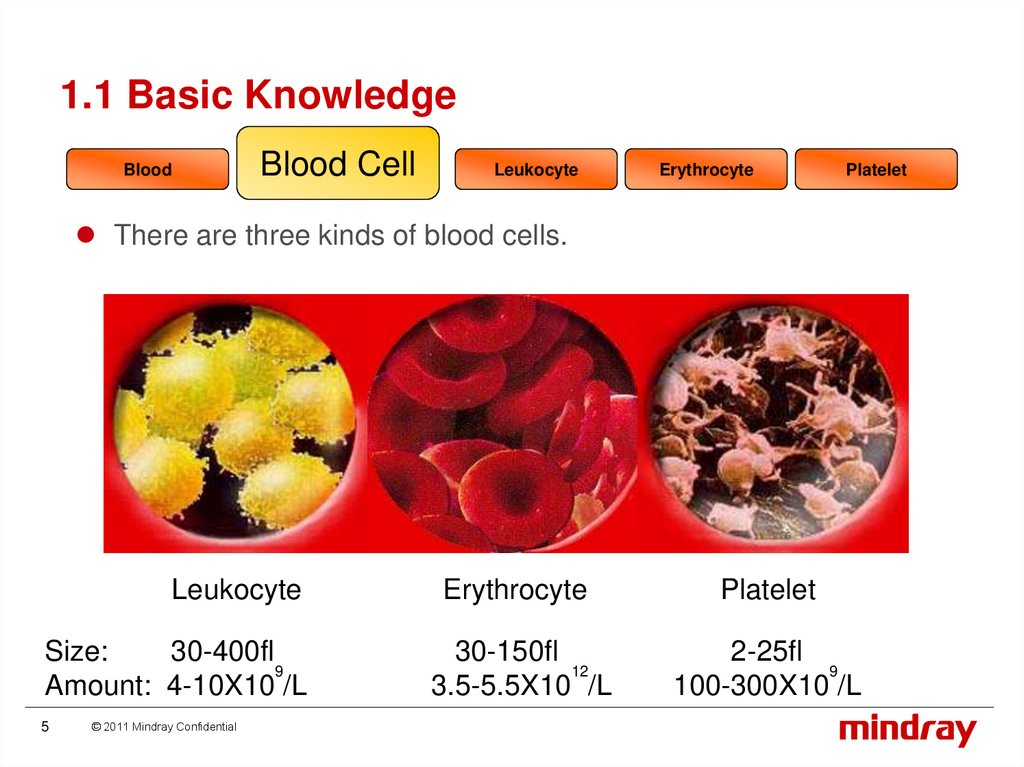
There are three kinds of blood cells.
Leukocyte
Size:
30-400fl
9
Amount: 4-10X10 /L
5
© 2011 Mindray Confidential
Erythrocyte
Platelet
30-150fl
12
3.5-5.5X10 /L
2-25fl
9
100-300X10 /L
6.
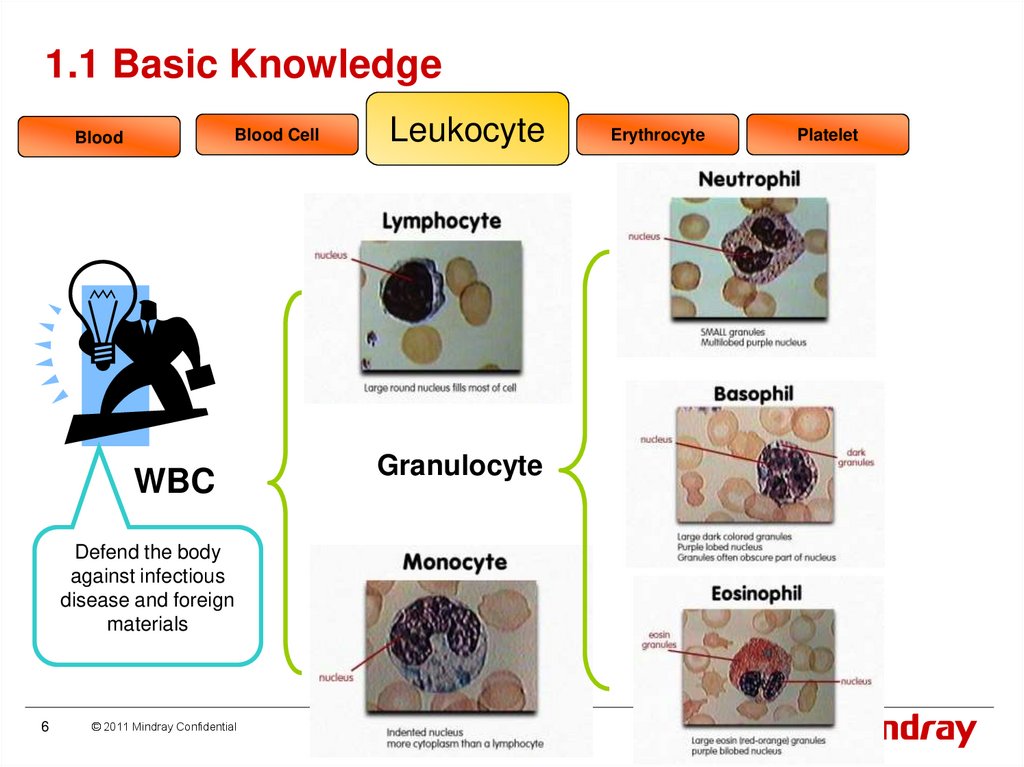
1.1 Basic KnowledgeBlood Cell
Blood
WBC
Defend the body
against infectious
disease and foreign
materials
6
© 2011 Mindray Confidential
Leukocyte
Granulocyte
Erythrocyte
Platelet
7.
1.1 Basic KnowledgeBlood
Lymphocyte
7
© 2011 Mindray Confidential
Blood Cell
Leukocyte
Mid-sized Cell
Erythrocyte
Platelet
Neutrophilic Granulocyte
8.
1.1 Basic KnowledgeBlood
Blood Cell
Leukocyte
Erythrocyte
Platelet
The function of RBC is almost completed by hemoglobin (HGB).
Transport oxygen and carbon dioxide
8
© 2011 Mindray Confidential
9.
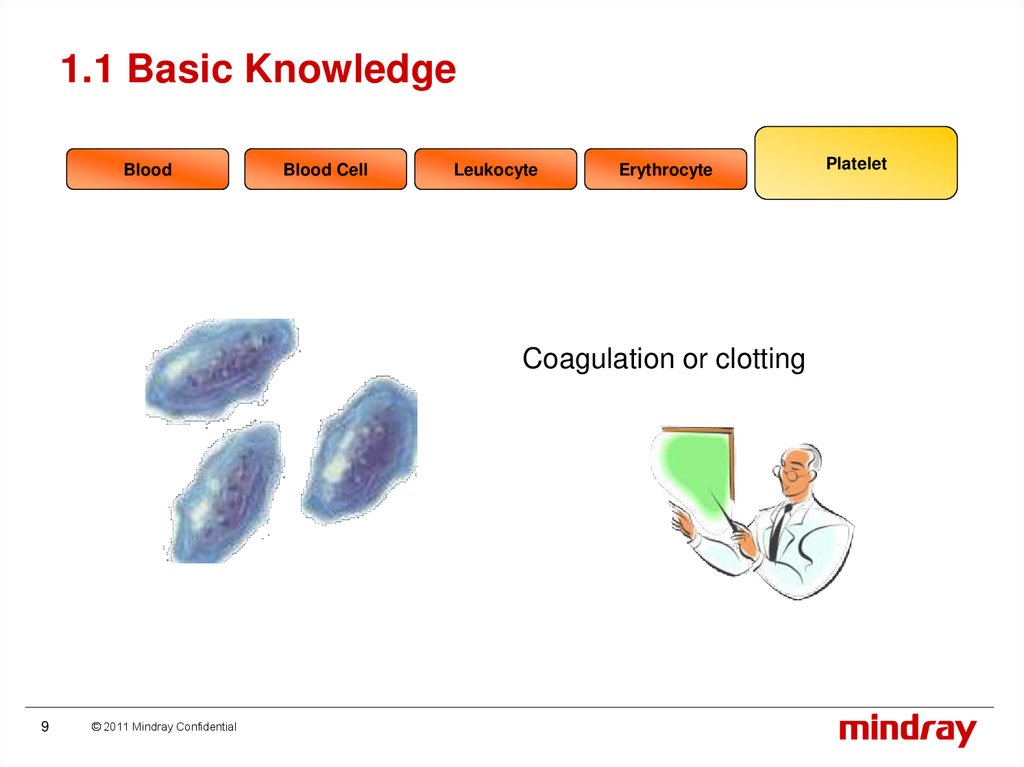
1.1 Basic KnowledgeBlood
Blood Cell
Leukocyte
Erythrocyte
Coagulation or clotting
9
© 2011 Mindray Confidential
Platelet
10.
1.2 Principle10
© 2011 Mindray Confidential
11.
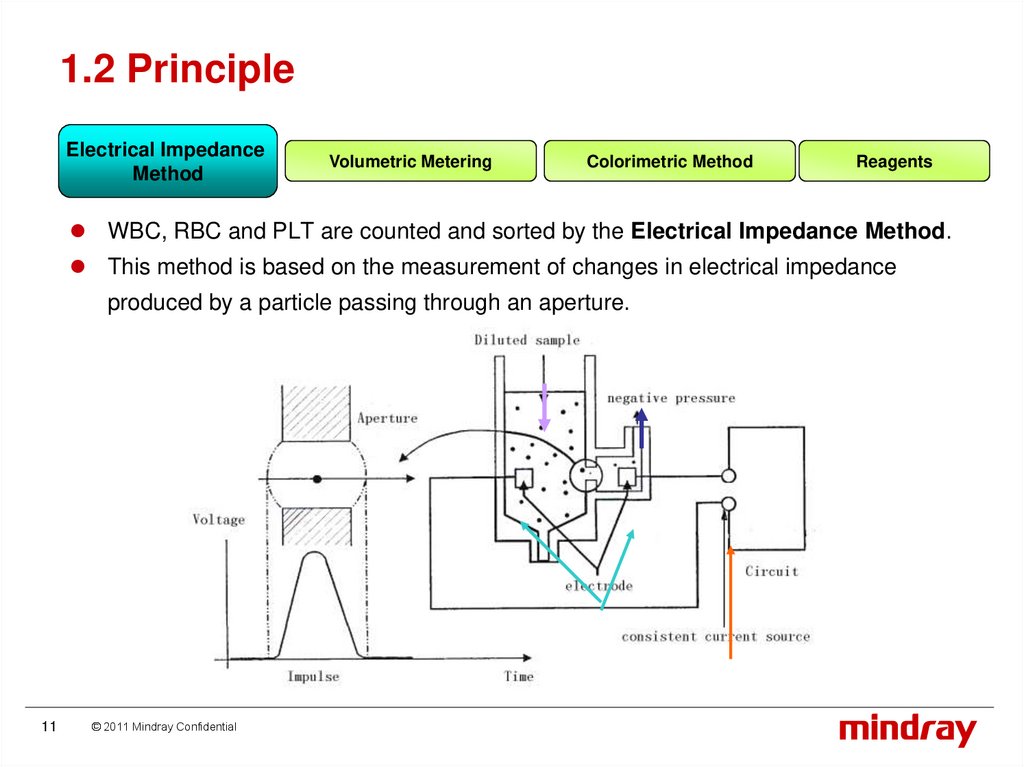
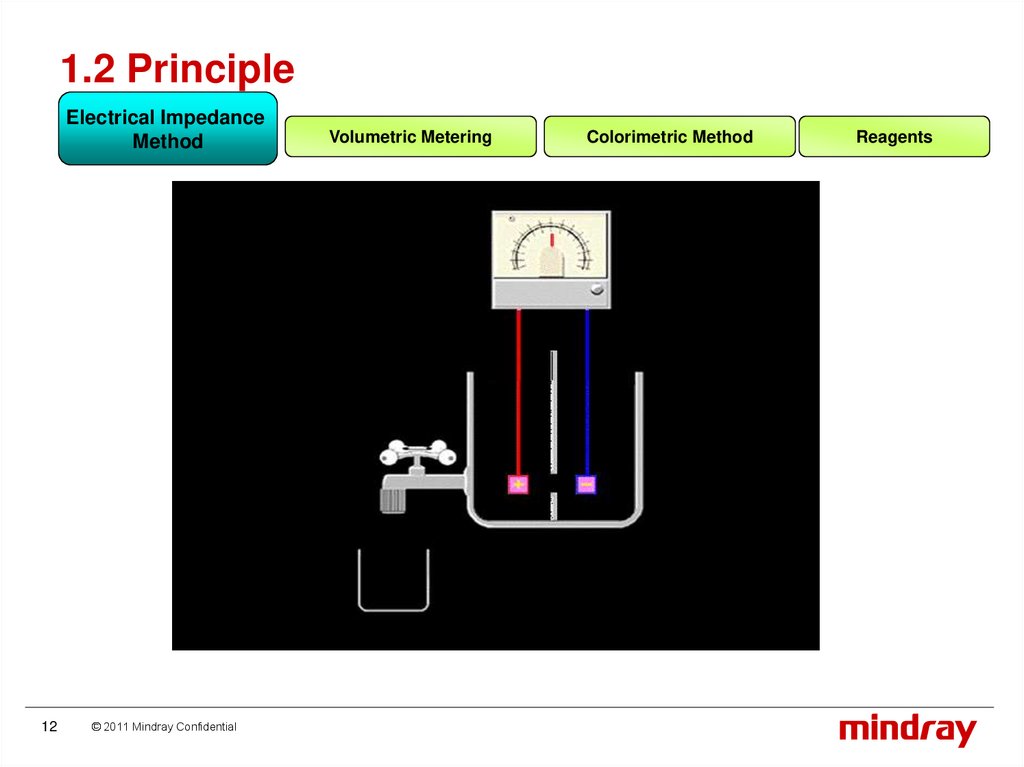
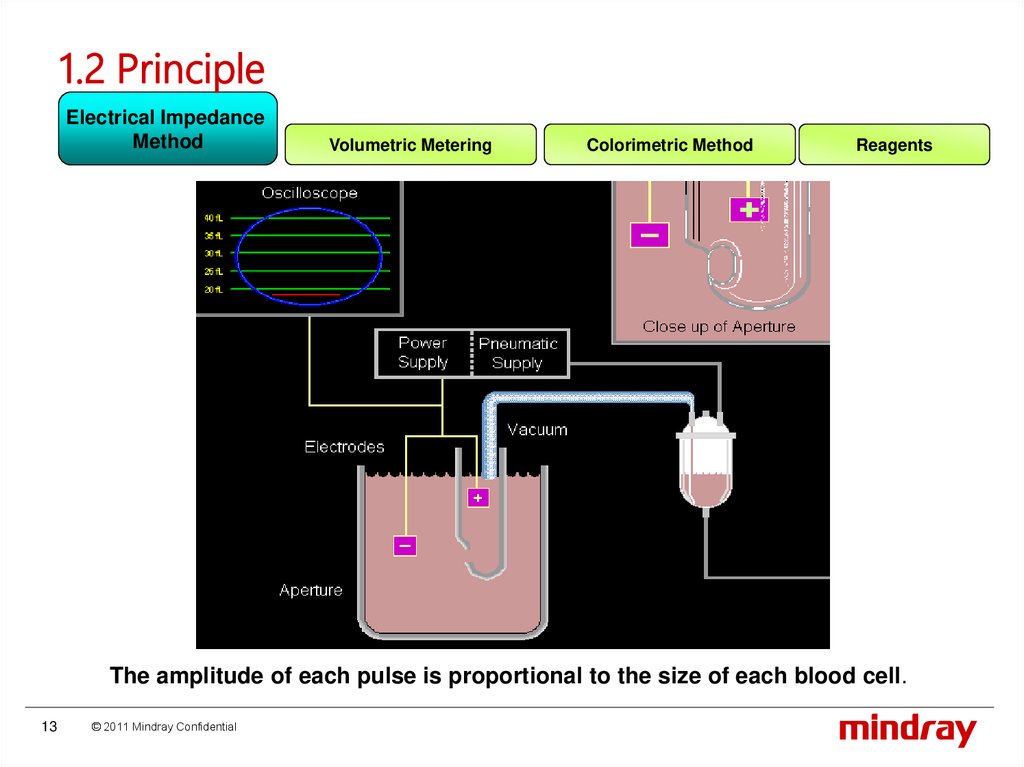
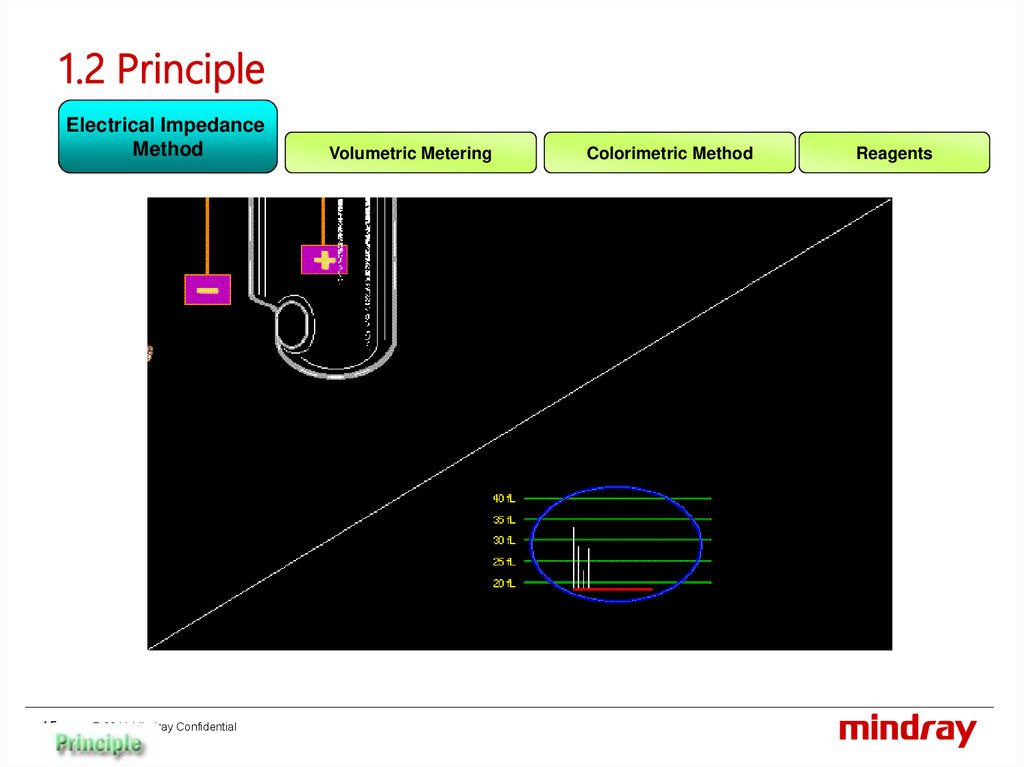
1.2 PrincipleElectrical Impedance
Method
Volumetric Metering
Colorimetric Method
Reagents
WBC, RBC and PLT are counted and sorted by the Electrical Impedance Method.
This method is based on the measurement of changes in electrical impedance
produced by a particle passing through an aperture.
11
© 2011 Mindray Confidential
12.
1.2 PrincipleElectrical Impedance
Method
12
© 2011 Mindray Confidential
Volumetric Metering
Colorimetric Method
Reagents
13.
1.2 Principle1.2 Principle
Electrical Impedance
Method
Volumetric Metering
Colorimetric Method
Reagents
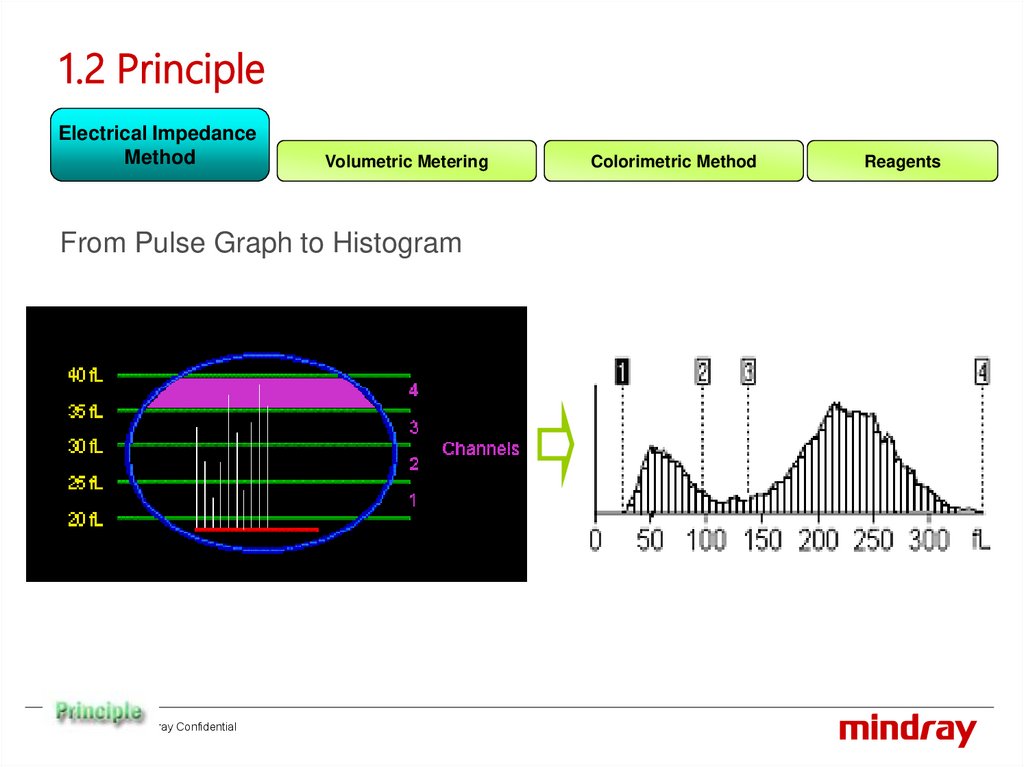
The amplitude of each pulse is proportional to the size of each blood cell.
13
© 2011 Mindray Confidential
14.
1.2 PrincipleElectrical Impedance
Method
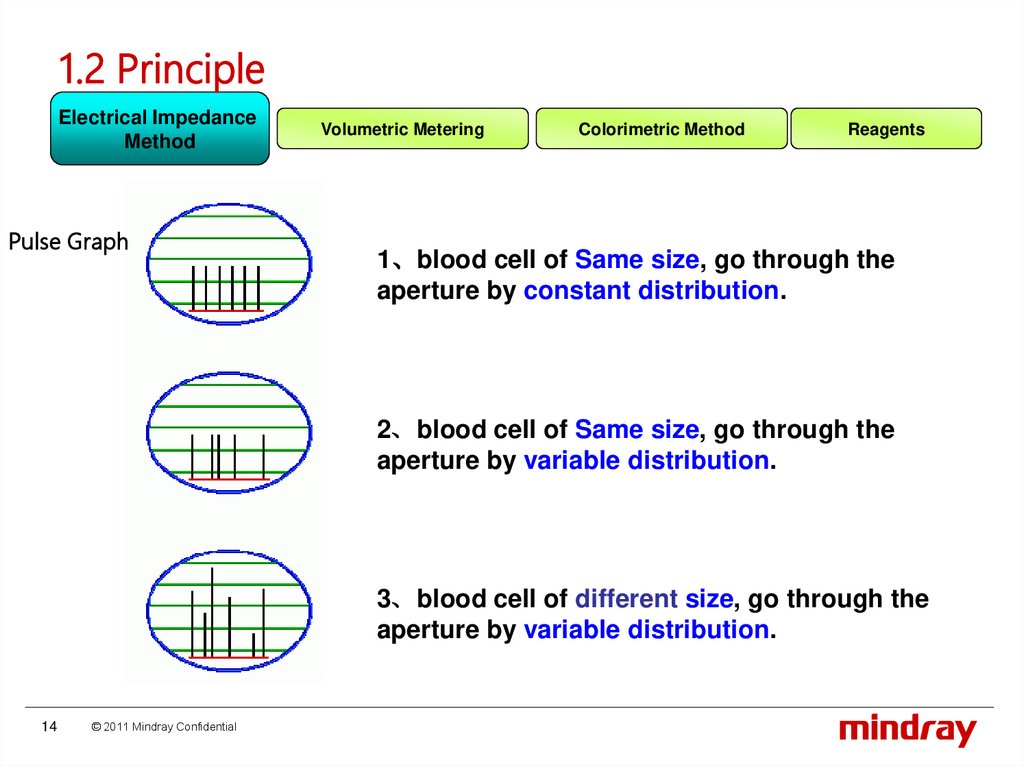
Pulse Graph
Volumetric Metering
Colorimetric Method
Reagents
1、blood cell of Same size, go through the
aperture by constant distribution.
2、blood cell of Same size, go through the
aperture by variable distribution.
3、blood cell of different size, go through the
aperture by variable distribution.
14
© 2011 Mindray Confidential
15.
1.2 Principle1.2 Principle
Electrical Impedance
Method
15
© 2011 Mindray Confidential
Volumetric Metering
Colorimetric Method
Reagents
16.
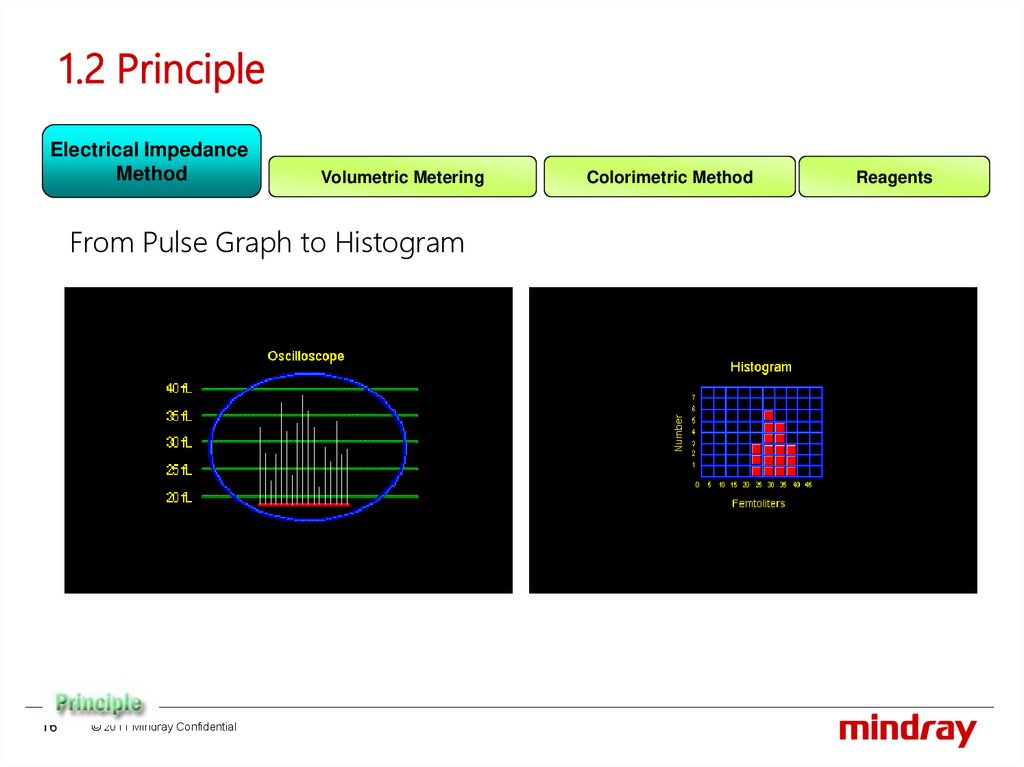
1.2 PrincipleElectrical Impedance
Method
Volumetric Metering
From Pulse Graph to Histogram
16
© 2011 Mindray Confidential
Colorimetric Method
Reagents
17.
1.2 PrincipleElectrical Impedance
Method
Volumetric Metering
From Pulse Graph to Histogram
17
© 2011 Mindray Confidential
Colorimetric Method
Reagents
18.
1.2 PrincipleElectrical Impedance
Method
Volumetric Metering
Colorimetric Method
Reagents
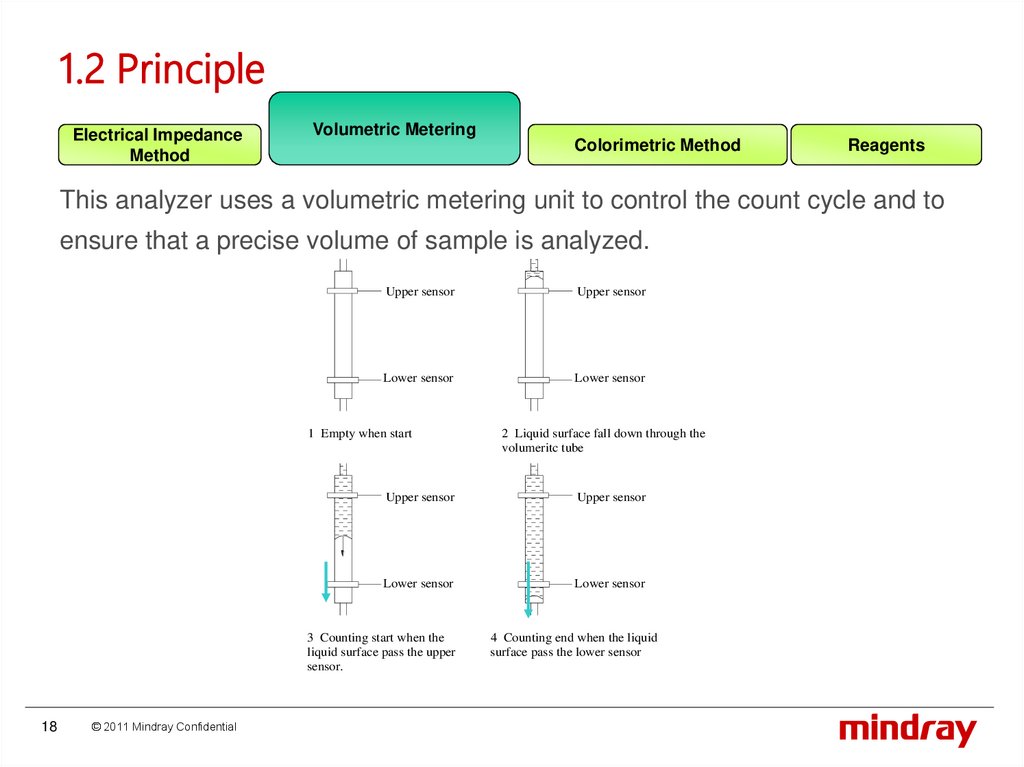
This analyzer uses a volumetric metering unit to control the count cycle and to
ensure that a precise volume of sample is analyzed.
Upper sensor
Upper sensor
Lower sensor
Lower sensor
1 Empty when start
Upper sensor
Upper sensor
Lower sensor
Lower sensor
3 Counting start when the
liquid surface pass the upper
sensor.
18
© 2011 Mindray Confidential
2 Liquid surface fall down through the
volumeritc tube
4 Counting end when the liquid
surface pass the lower sensor
19.
1.2 PrincipleElectrical Impedance
Method
Volumetric Metering
Colorimetric Method
Reagents
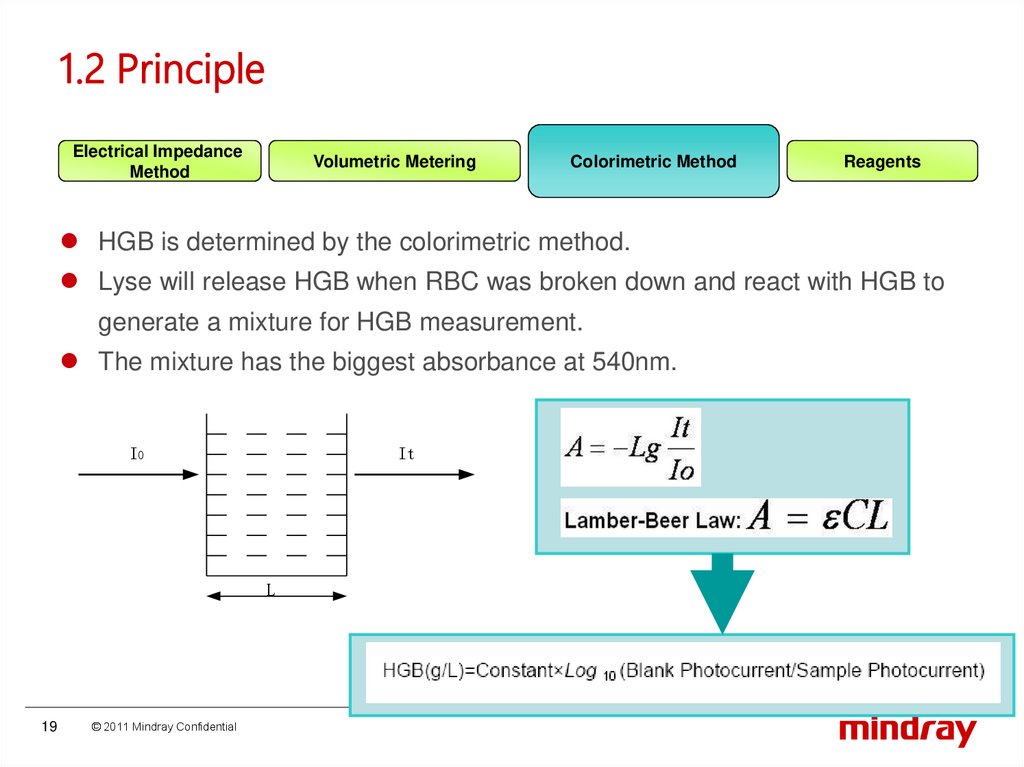
HGB is determined by the colorimetric method.
Lyse will release HGB when RBC was broken down and react with HGB to
generate a mixture for HGB measurement.
The mixture has the biggest absorbance at 540nm.
I0
It
L
19
© 2011 Mindray Confidential
20.
1.2 PrincipleElectrical Impedance
Method
20
Volumetric Metering
Light
source
Absorbing
container
LED light
Bath
© 2011 Mindray Confidential
Colorimetric Method
Detector
Signal
processing
Display
Photosensor
Reagents
21.
1.2 PrincipleElectrical Impedance
Method
Volumetric Metering
Colorimetric Method
Reagents
Reagents are one part of the system.
Lyse
Break down RBC;
Release HGB and react with HGB to generate a mixture for HGB
measurement;
Help the differential of WBC.
Diluent
Dilute the blood sample;
Provide a conductive environment for counting and an environment
which is similar to the plasma to maintain the size of blood cell;
Clean the tube and bath.
21
© 2011 Mindray Confidential
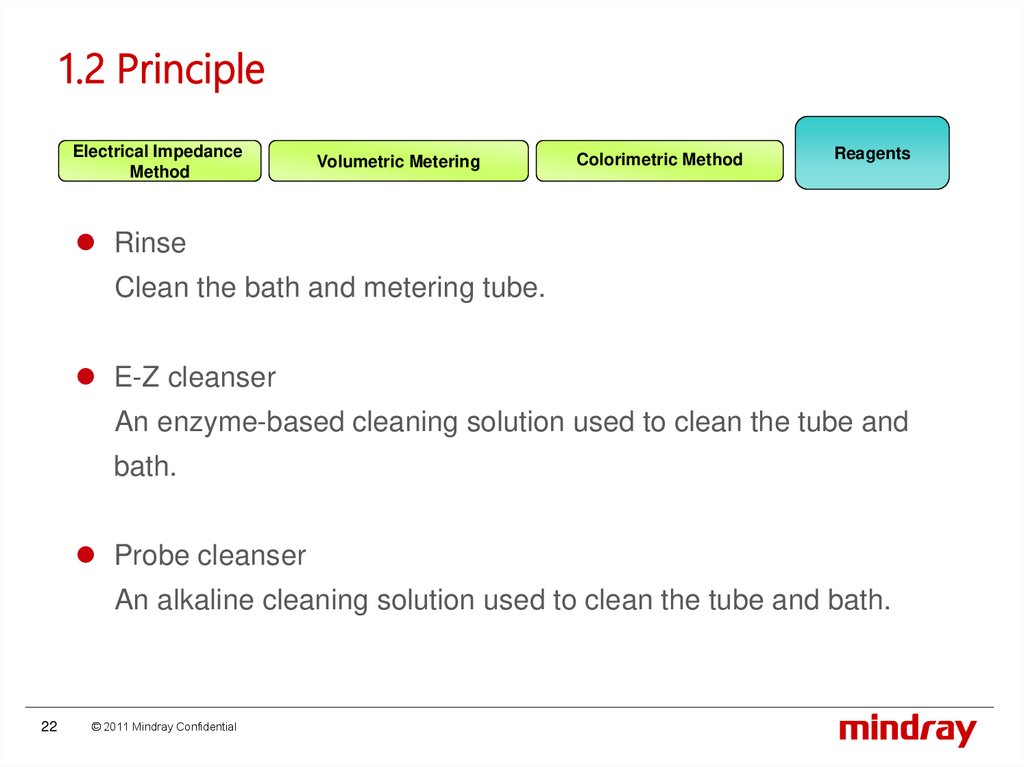
22.
1.2 PrincipleElectrical Impedance
Method
Volumetric Metering
Colorimetric Method
Reagents
Rinse
Clean the bath and metering tube.
E-Z cleanser
An enzyme-based cleaning solution used to clean the tube and
bath.
Probe cleanser
An alkaline cleaning solution used to clean the tube and bath.
22
© 2011 Mindray Confidential
23.
1.2 PrincipleParameters
BC-3600 can give out 21 parameters and 3 histograms:
WBC
RBC
PLT
Lymph#
HGB
MPV
Mid#
HCT
PDW
Gran#
MCV
PCT
Lymph%
MCH
P-LCC
Mid%
MCHC
P-LCR
Gran%
RDW-CV
RDW-SD
23
© 2011 Mindray Confidential
24.
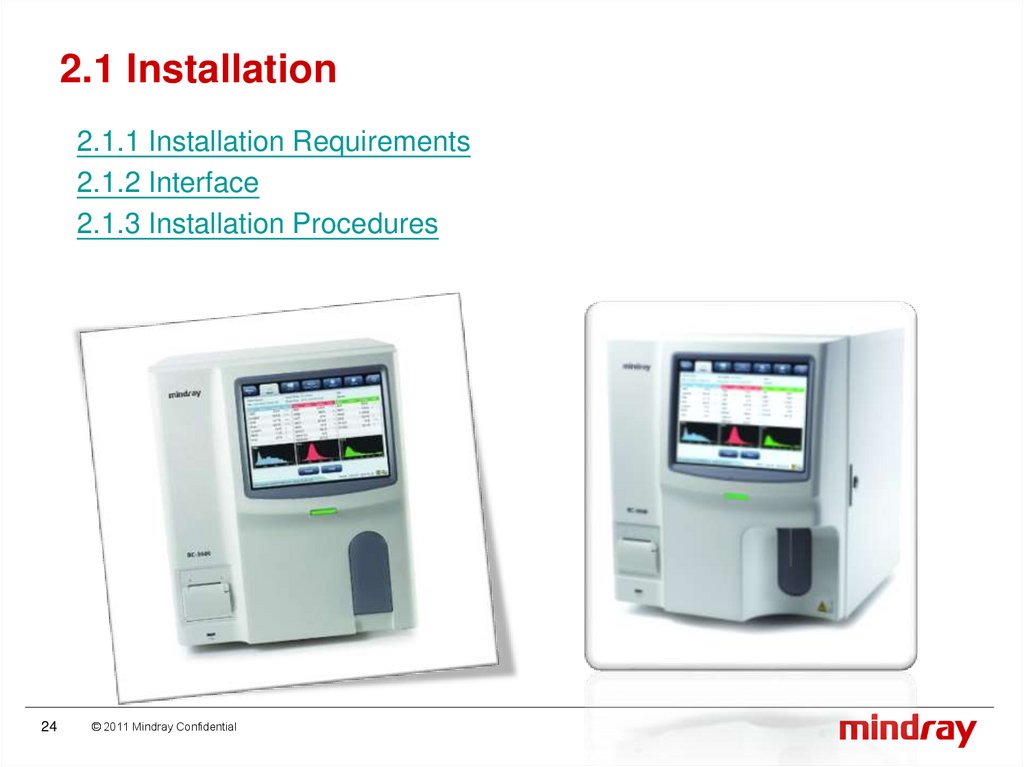
2.1 Installation2.1.1 Installation Requirements
2.1.2 Interface
2.1.3 Installation Procedures
24
© 2011 Mindray Confidential
25.
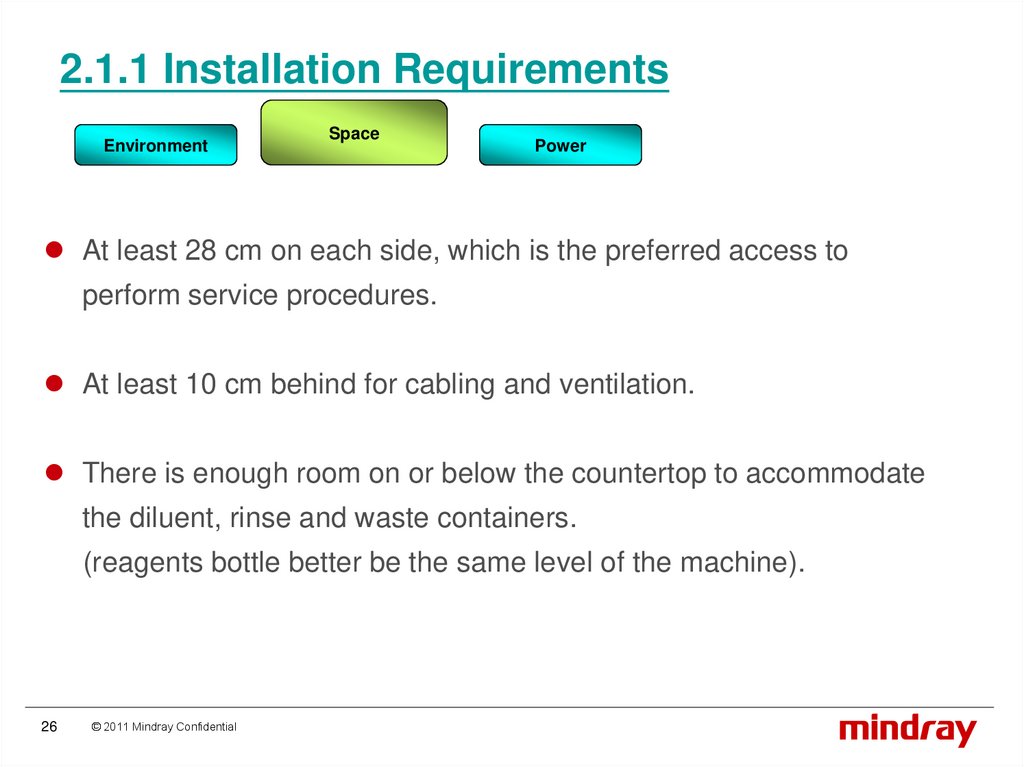
2.1.1 Installation RequirementsEnvironment
Space
Power
Operating temperature: 15 ℃ to 30 ℃.
Relative humidity: 30% to 85%.
Atmospheric pressure: 70 kPa to 110 kPa. (height above sea level
0~3km)
free as possible from dust, mechanical vibrations, loud noises, and
electrical interference.
Do not place near brush-type motors, flickering fluorescent lights, and
electrical contacts that regularly open and close.
Do not place in direct sunlight or in front of a source of heat or drafts.
25
© 2011 Mindray Confidential
26.
2.1.1 Installation RequirementsEnvironment
Space
Power
At least 28 cm on each side, which is the preferred access to
perform service procedures.
At least 10 cm behind for cabling and ventilation.
There is enough room on or below the countertop to accommodate
the diluent, rinse and waste containers.
(reagents bottle better be the same level of the machine).
26
© 2011 Mindray Confidential
27.
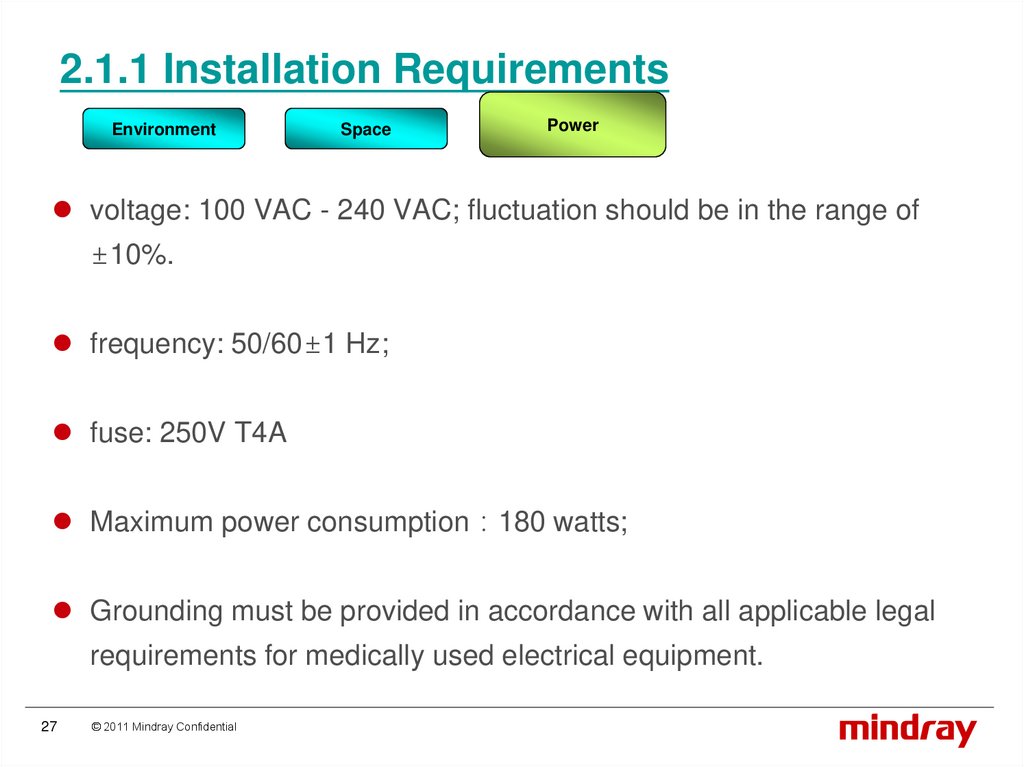
2.1.1 Installation RequirementsEnvironment
Space
Power
voltage: 100 VAC - 240 VAC; fluctuation should be in the range of
±10%.
frequency: 50/60±1 Hz;
fuse: 250V T4A
Maximum power consumption 180 watts;
Grounding must be provided in accordance with all applicable legal
requirements for medically used electrical equipment.
27
© 2011 Mindray Confidential
28.
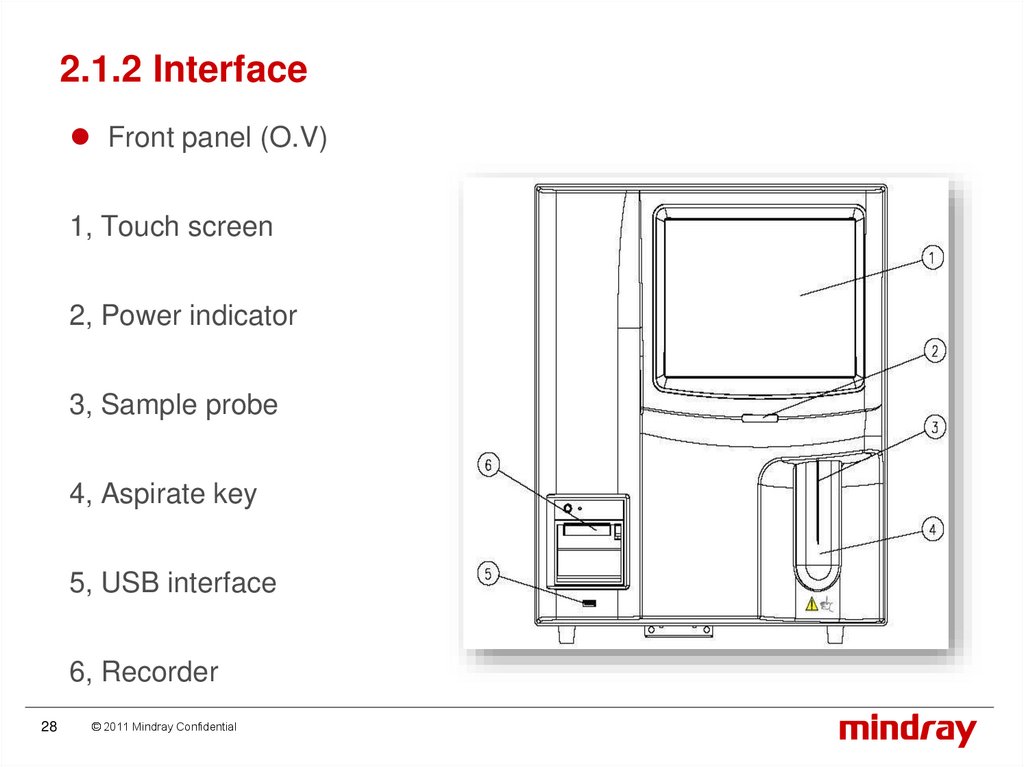
2.1.2 InterfaceFront panel (O.V)
1, Touch screen
2, Power indicator
3, Sample probe
4, Aspirate key
5, USB interface
6, Recorder
28
© 2011 Mindray Confidential
29.
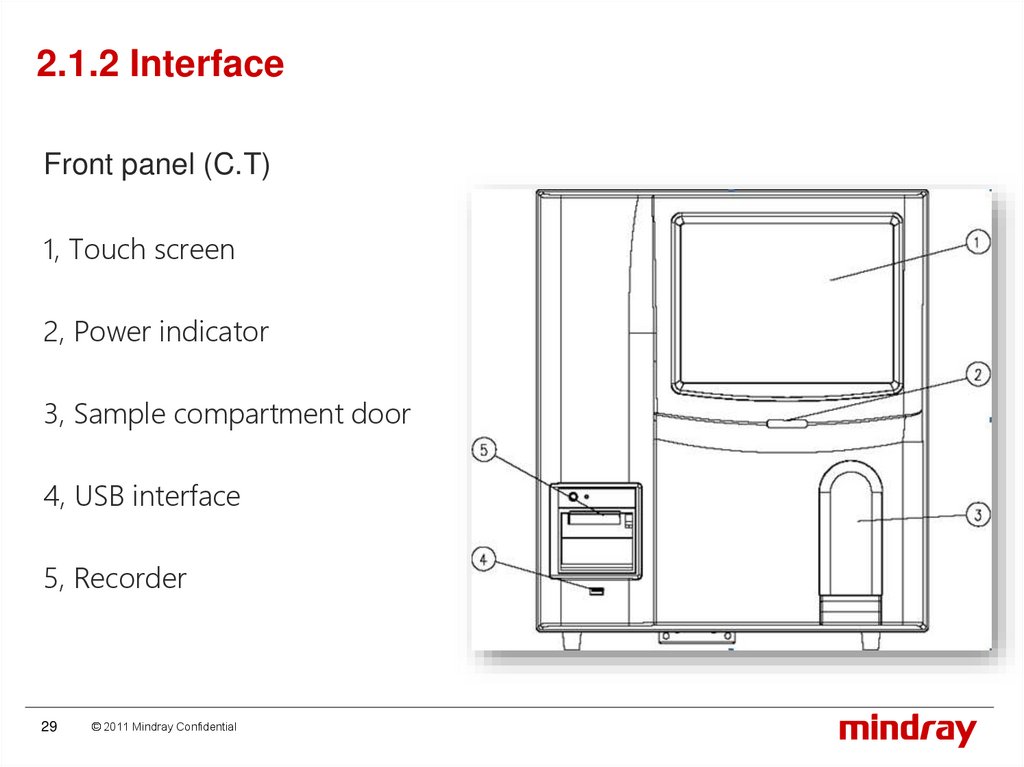
2.1.2 InterfaceFront panel (C.T)
1, Touch screen
2, Power indicator
3, Sample compartment door
4, USB interface
5, Recorder
29
© 2011 Mindray Confidential
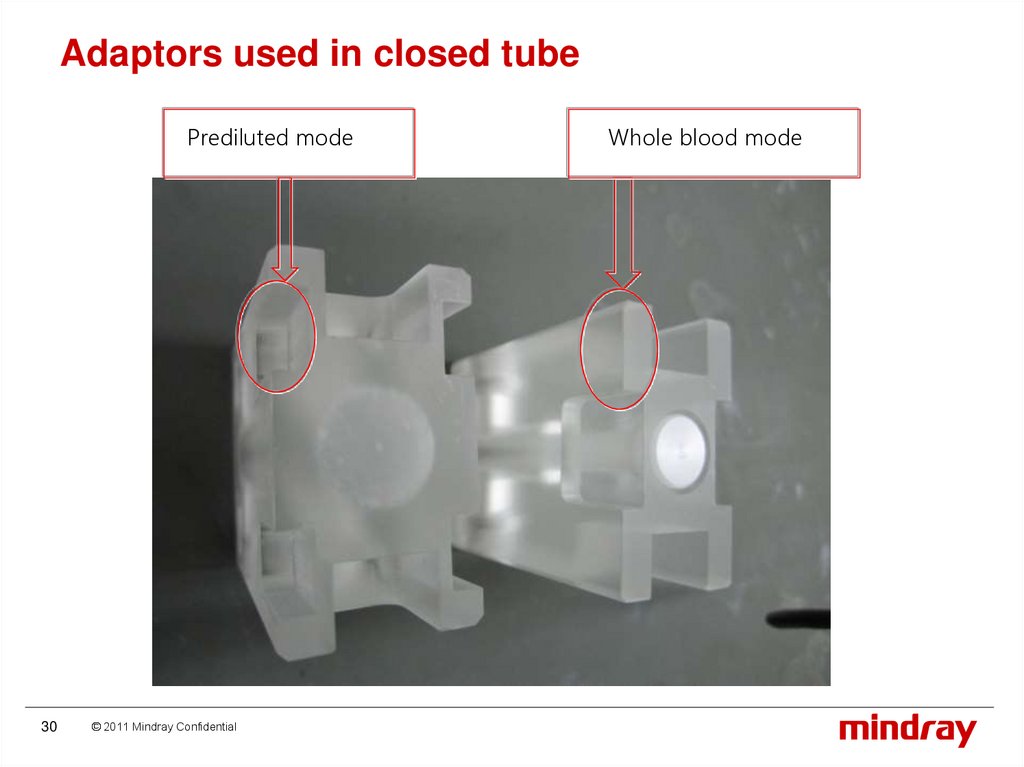
30.
Adaptors used in closed tubePrediluted mode
30
© 2011 Mindray Confidential
Whole blood mode
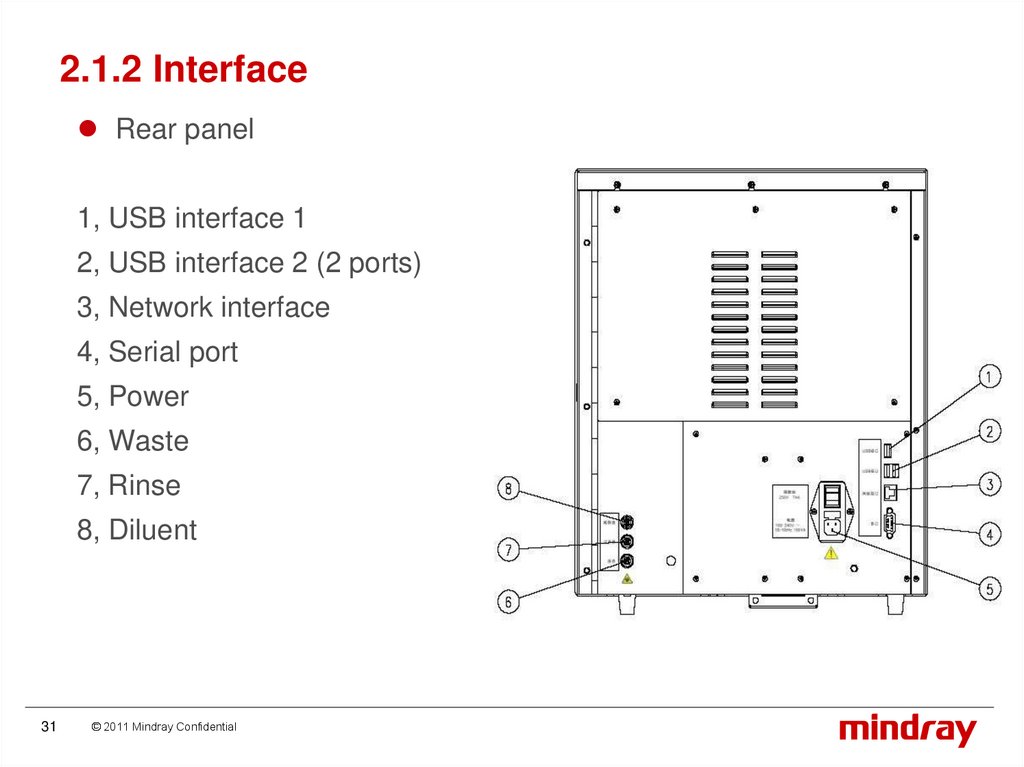
31.
2.1.2 InterfaceRear panel
1, USB interface 1
2, USB interface 2 (2 ports)
3, Network interface
4, Serial port
5, Power
6, Waste
7, Rinse
8, Diluent
31
© 2011 Mindray Confidential
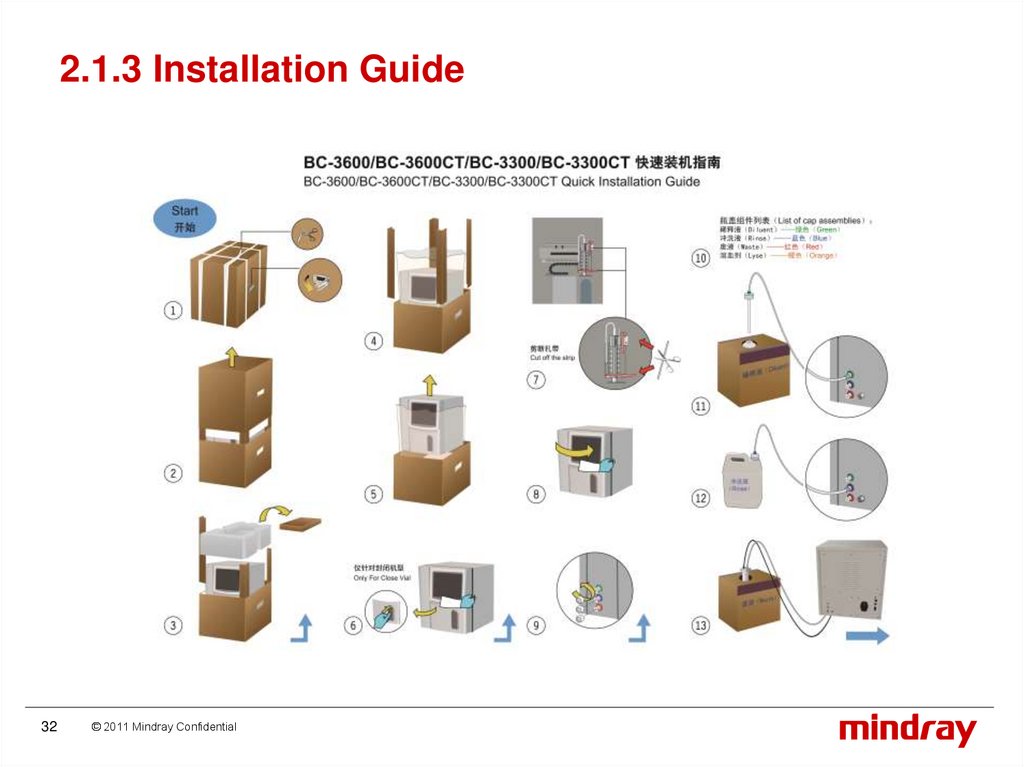
32.
2.1.3 Installation Guide32
© 2011 Mindray Confidential
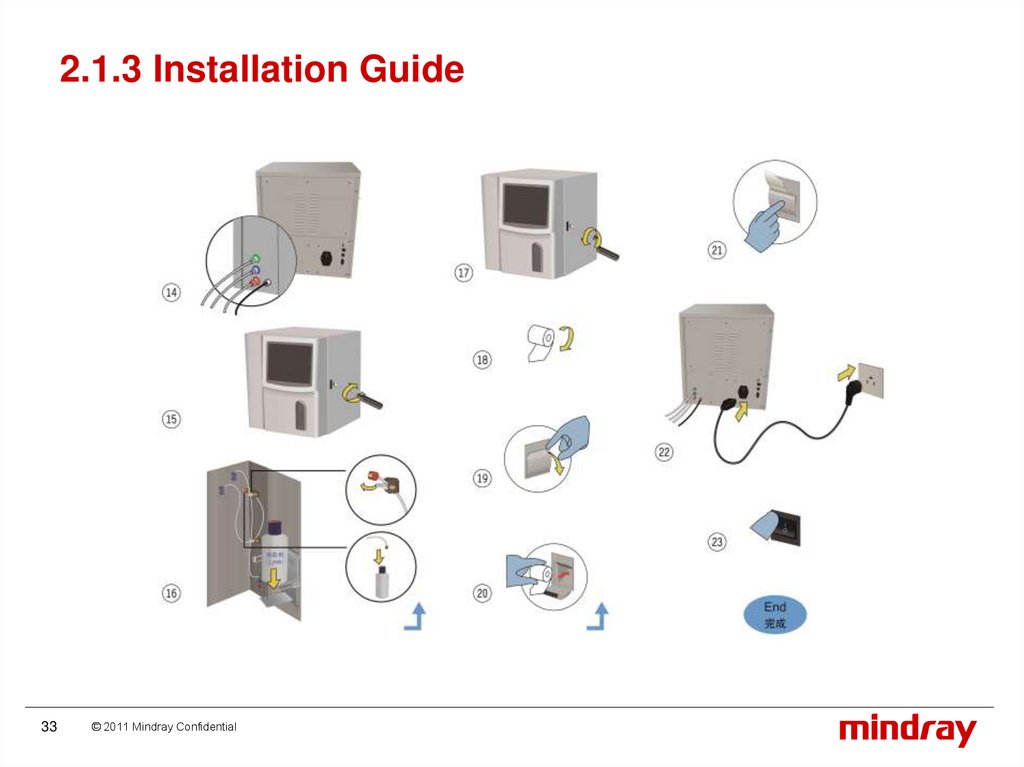
33.
2.1.3 Installation Guide33
© 2011 Mindray Confidential
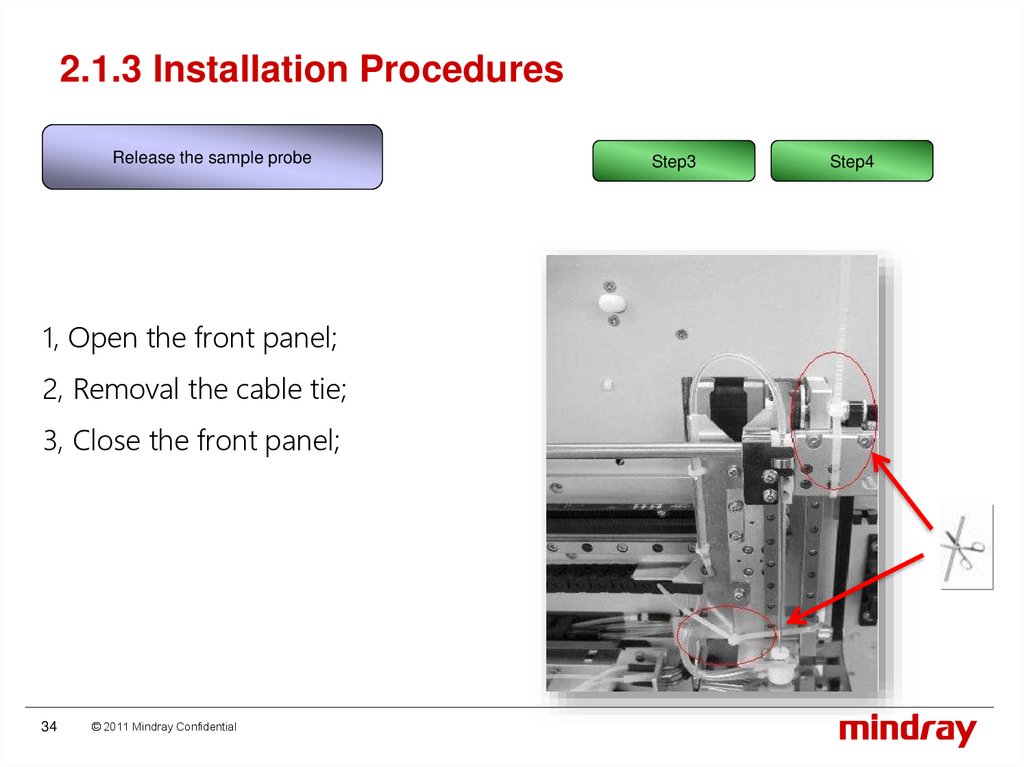
34.
2.1.3 Installation ProceduresRelease the sample probe
1, Open the front panel;
2, Removal the cable tie;
3, Close the front panel;
34
© 2011 Mindray Confidential
Step3
Step4
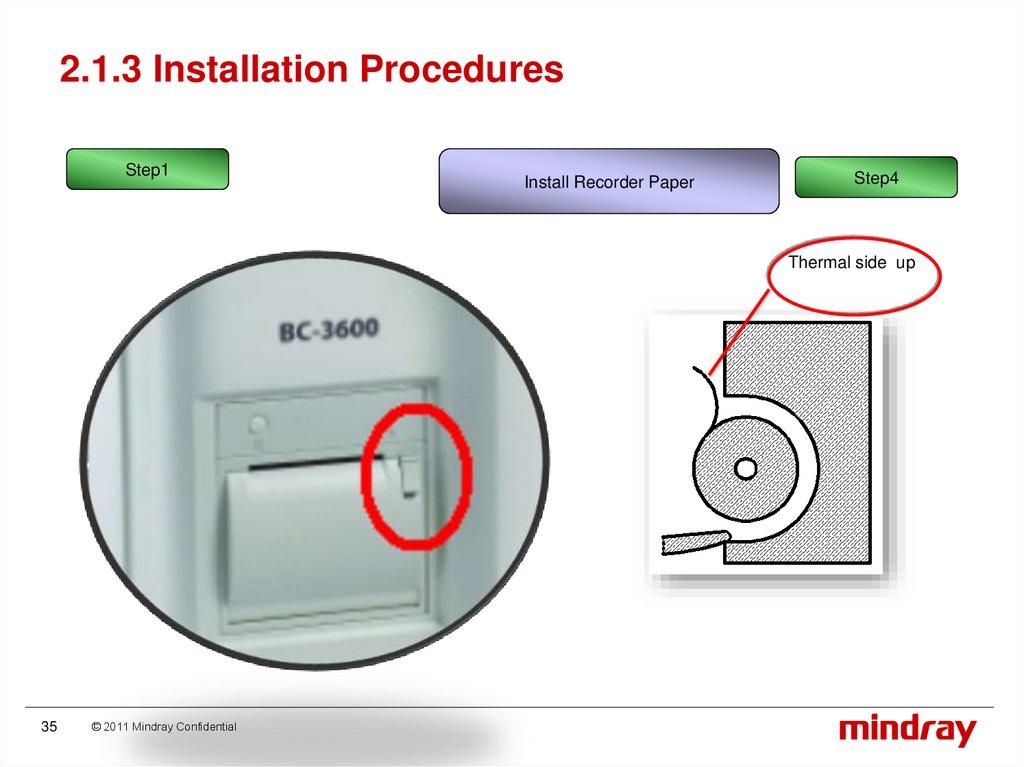
35.
2.1.3 Installation ProceduresStep1
Install Recorder Paper
Step4
Thermal side up
35
© 2011 Mindray Confidential
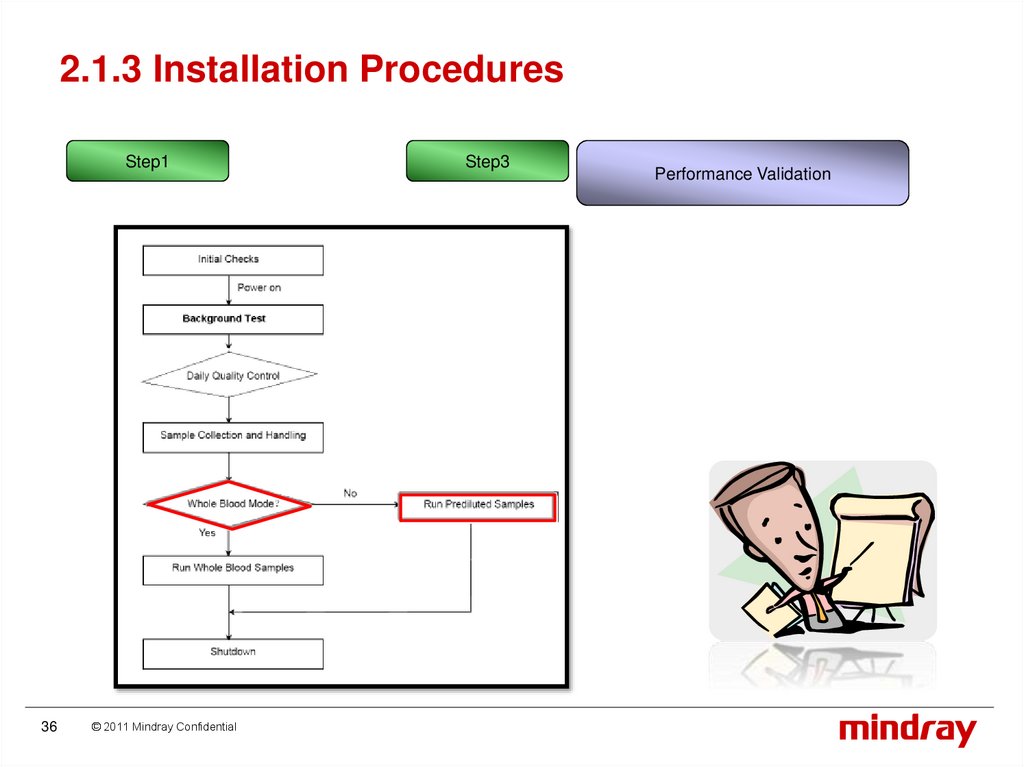
36.
2.1.3 Installation ProceduresStep1
36
© 2011 Mindray Confidential
Step3
Performance Validation
37.
2.2 Operation2.2.1 Main Screen
2.2.2 Menu
2.2.3 Startup & background
2.2.4 Daily Quality Control
2.2.5 Repeatability test
2.2.6 Calibration
37
© 2011 Mindray Confidential
38.
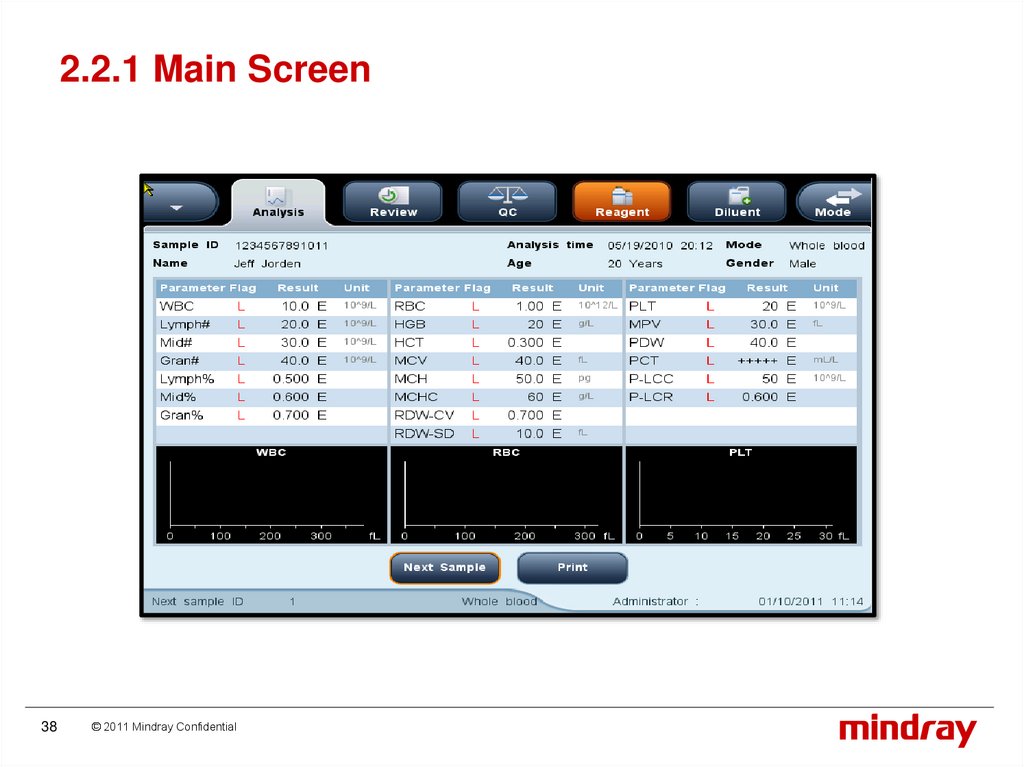
2.2.1 Main Screen38
© 2011 Mindray Confidential
39.
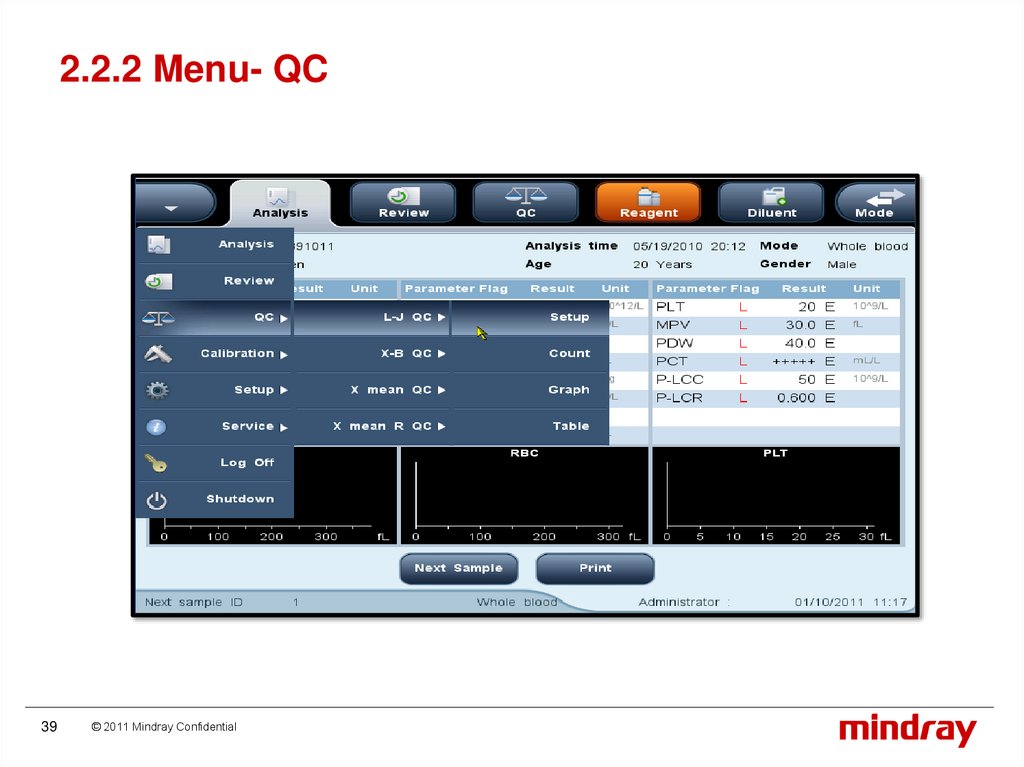
2.2.2 Menu- QC39
© 2011 Mindray Confidential
40.
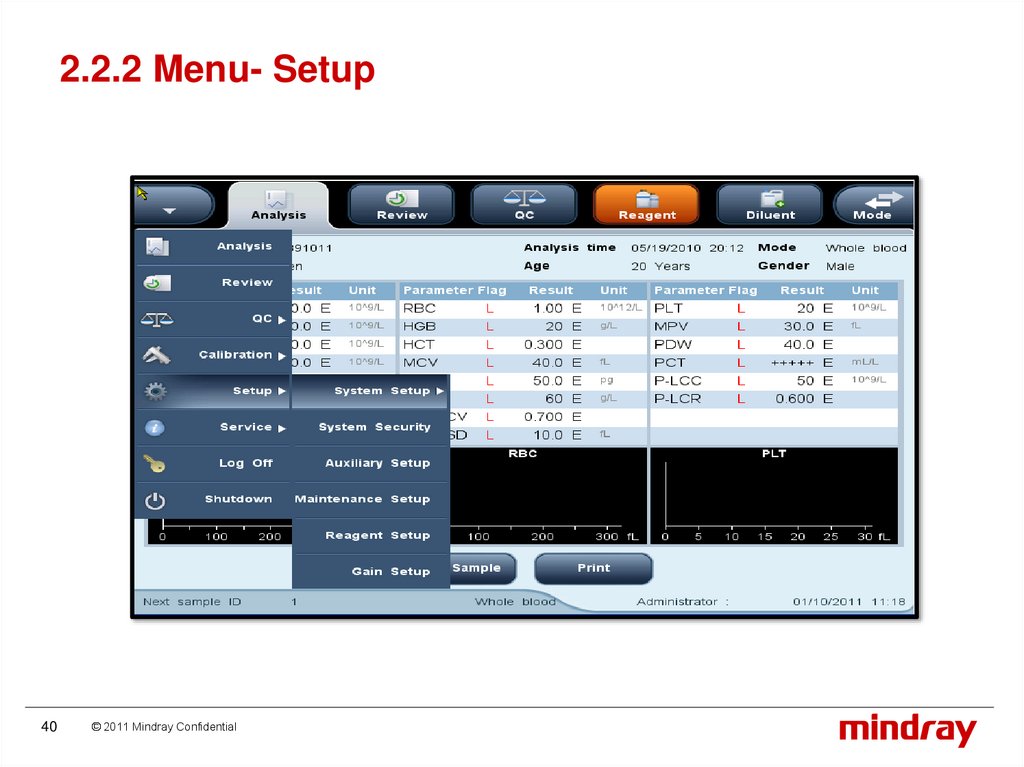
2.2.2 Menu- Setup40
© 2011 Mindray Confidential
41.
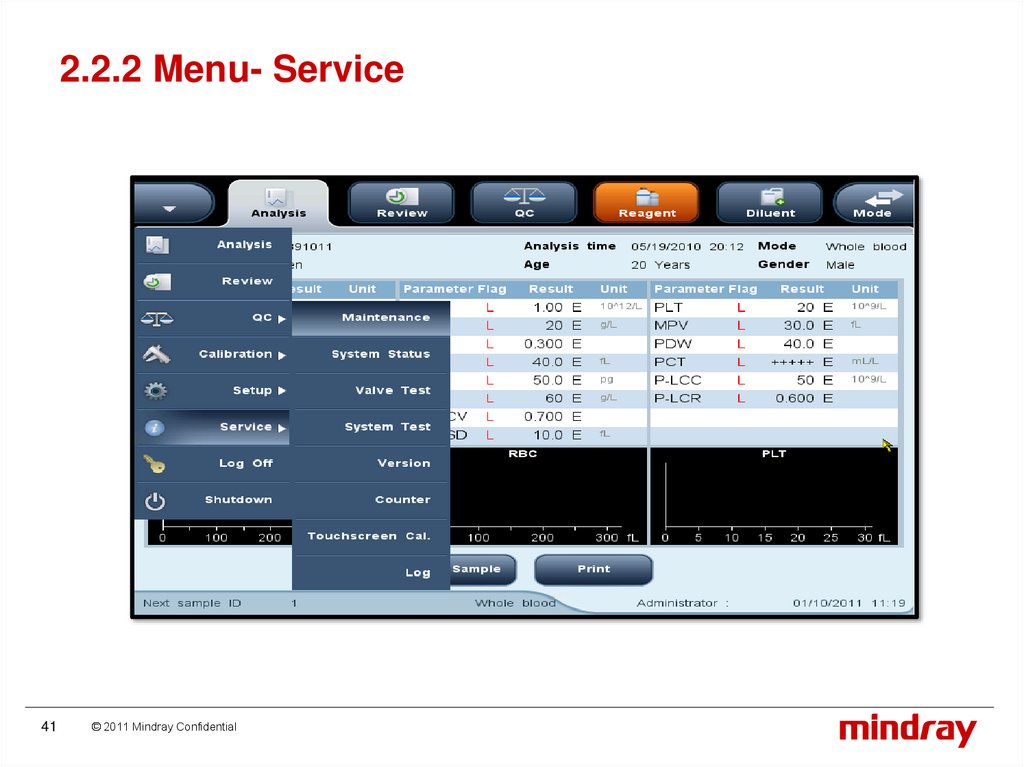
2.2.2 Menu- Service41
© 2011 Mindray Confidential
42.
2.2.3 Startup & BackgroundBefore turning on the analyzer, perform the following
checks
Checking the waste container
Checking tubing and power connections
Checking the printer (optional)
42
© 2011 Mindray Confidential
43.
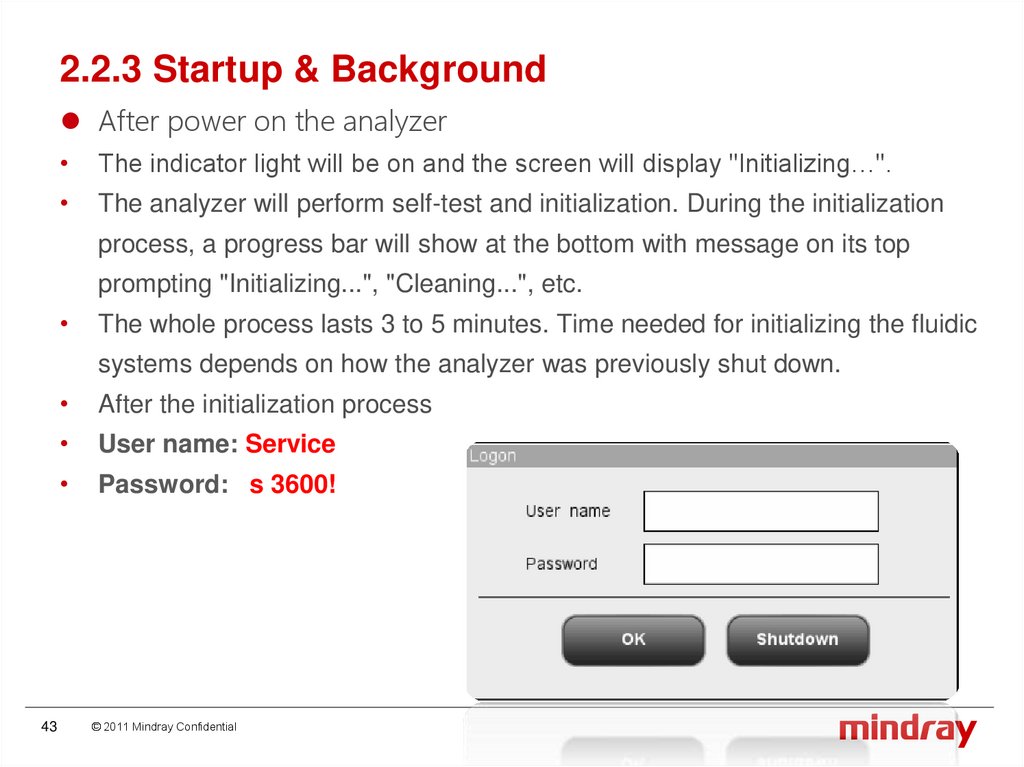
2.2.3 Startup & BackgroundAfter power on the analyzer
The indicator light will be on and the screen will display "Initializing…".
The analyzer will perform self-test and initialization. During the initialization
process, a progress bar will show at the bottom with message on its top
prompting "Initializing...", "Cleaning...", etc.
The whole process lasts 3 to 5 minutes. Time needed for initializing the fluidic
systems depends on how the analyzer was previously shut down.
43
After the initialization process
User name: Service
Password: s 3600!
© 2011 Mindray Confidential
44.
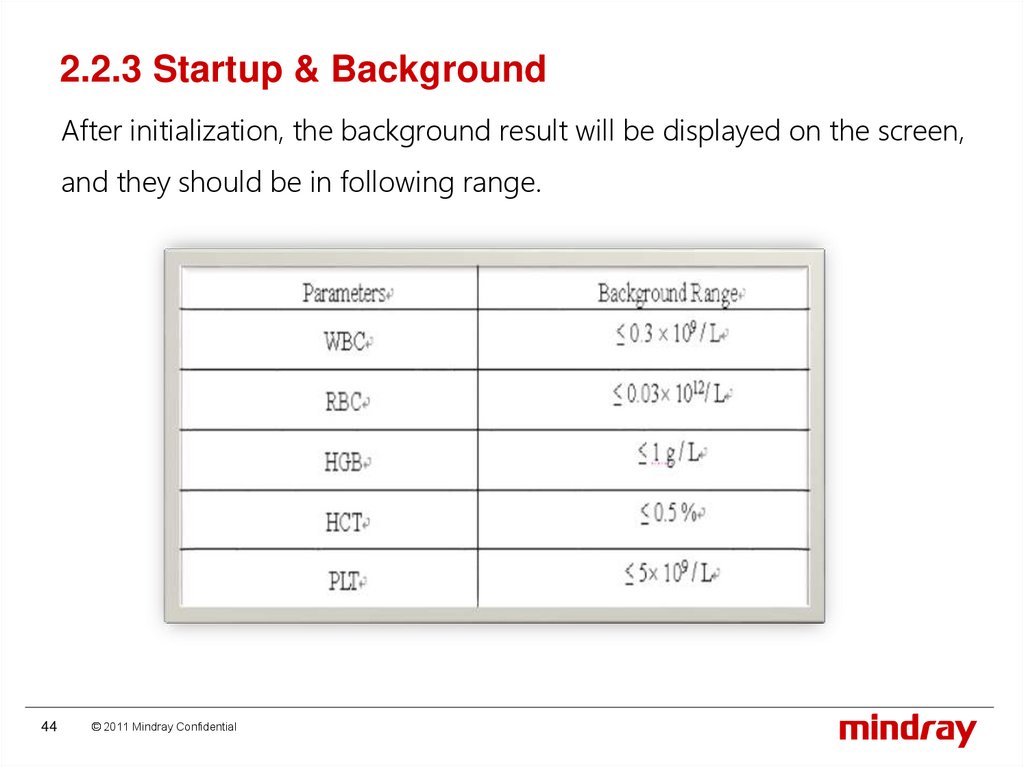
2.2.3 Startup & BackgroundAfter initialization, the background result will be displayed on the screen,
and they should be in following range.
44
© 2011 Mindray Confidential
45.
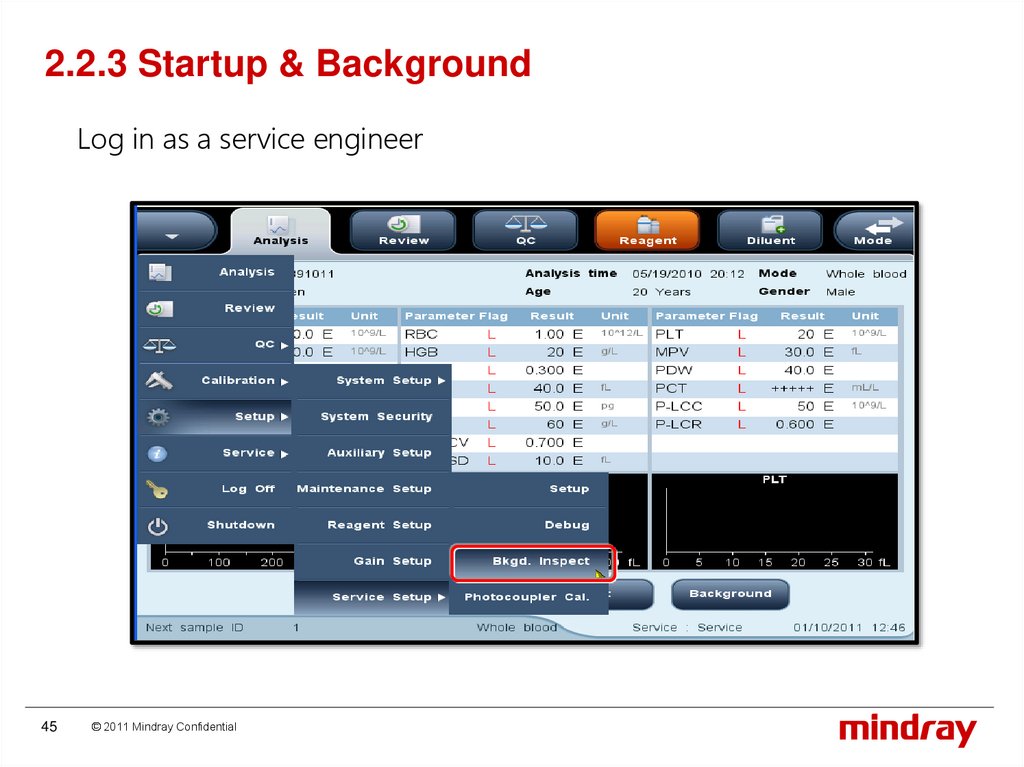
2.2.3 Startup & BackgroundLog in as a service engineer
45
© 2011 Mindray Confidential
46.
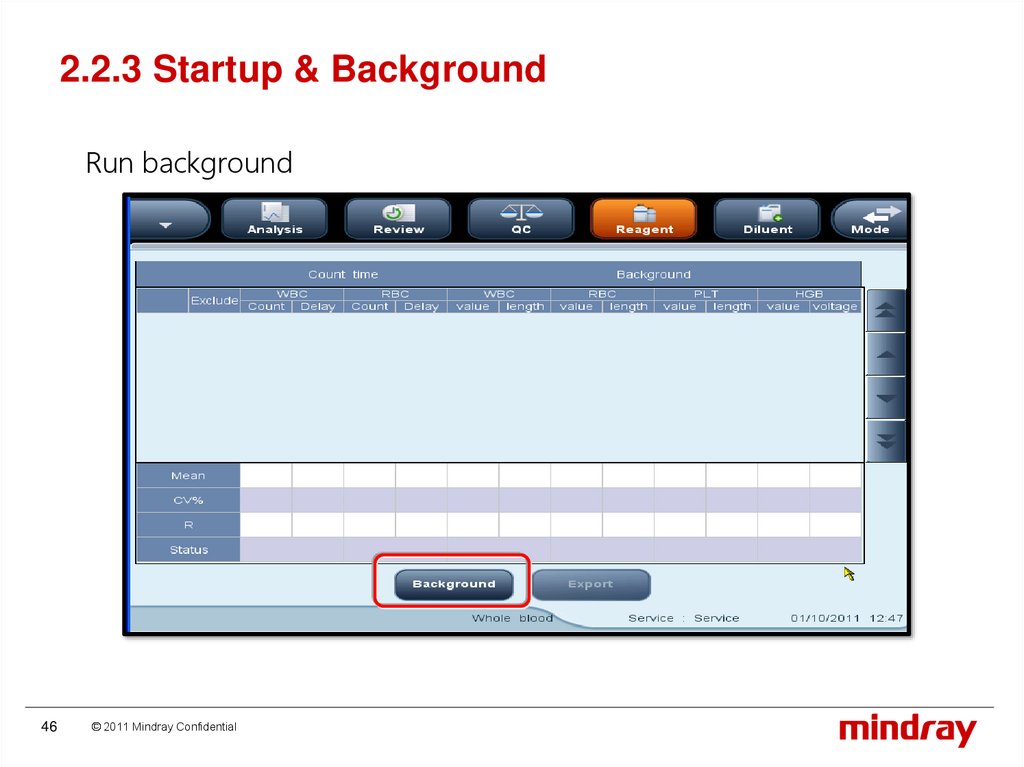
2.2.3 Startup & BackgroundRun background
46
© 2011 Mindray Confidential
47.
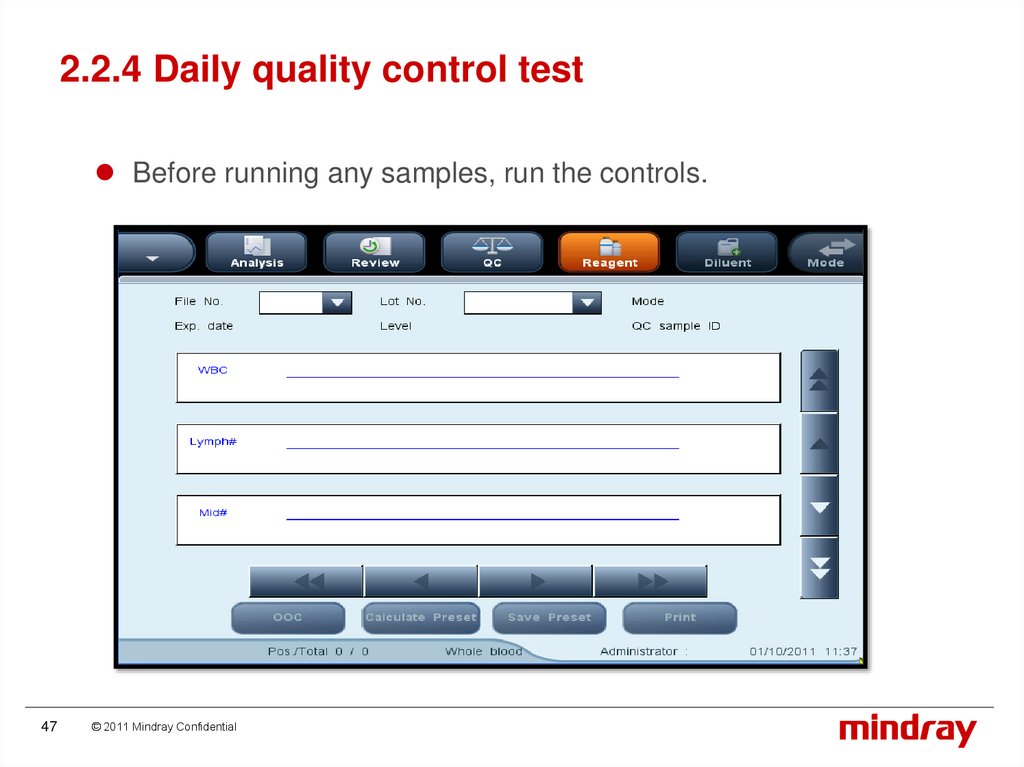
2.2.4 Daily quality control testBefore running any samples, run the controls.
47
© 2011 Mindray Confidential
48.
2.2.5 Repeatability TestWhole blood mode:CV
Parameters
48
Prerequisite
CV% Range
WBC
7.0 ~ 15.0 109 / L
4.0 ~ 6.9 109 / L
RBC
3.50 ~ 6.50 1012 / L ≤ 2.0
HGB
100 ~ 180 g/L
≤ 1.5
MCV
80.0 ~ 110.0 fL
≤ 1.0
PLT
150 ~ 500 109 / L
100~149 109 / L
≤ 4.0
≤ 5.0
HCT
30 50%
≤ 3.0
Lymph%
20 50
≤ 1.5 SD
Mid%
2 13
≤ 1.5 SD
Gran%
30 70
≤ 3.0 SD
© 2011 Mindray Confidential
≤ 2.5
≤ 3.5
49.
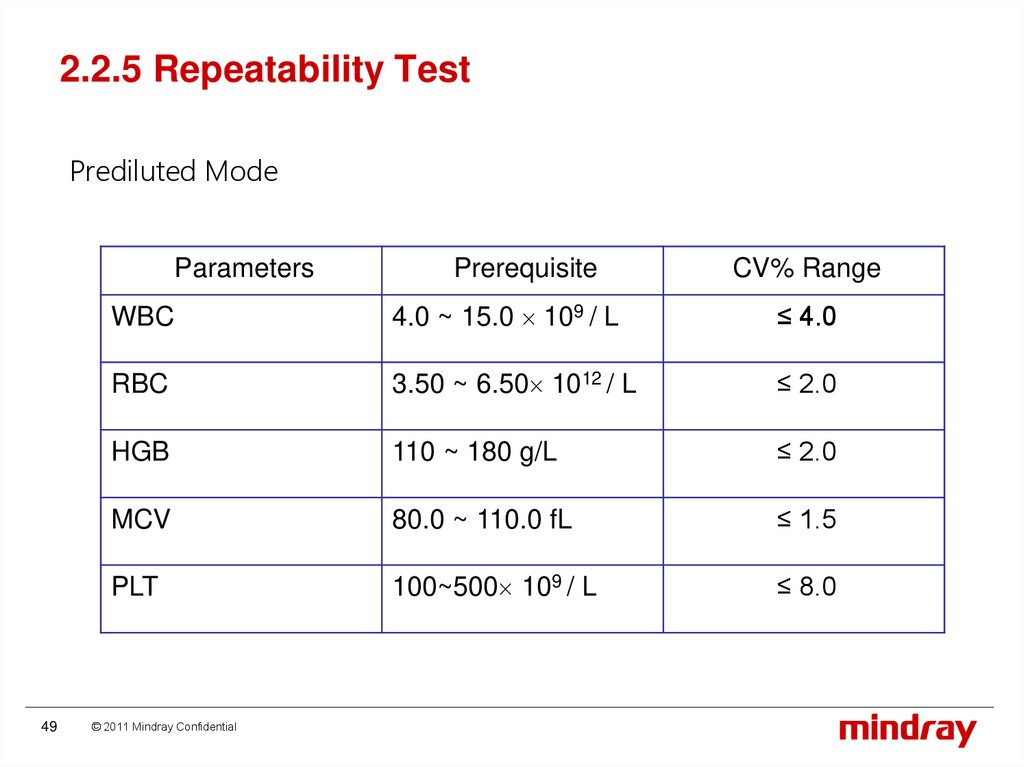
2.2.5 Repeatability TestPrediluted Mode
Parameters
49
Prerequisite
CV% Range
WBC
4.0 ~ 15.0 109 / L
≤ 4.0
RBC
3.50 ~ 6.50 1012 / L
≤ 2.0
HGB
110 ~ 180 g/L
≤ 2.0
MCV
80.0 ~ 110.0 fL
≤ 1.5
PLT
100~500 109 / L
≤ 8.0
© 2011 Mindray Confidential
50.
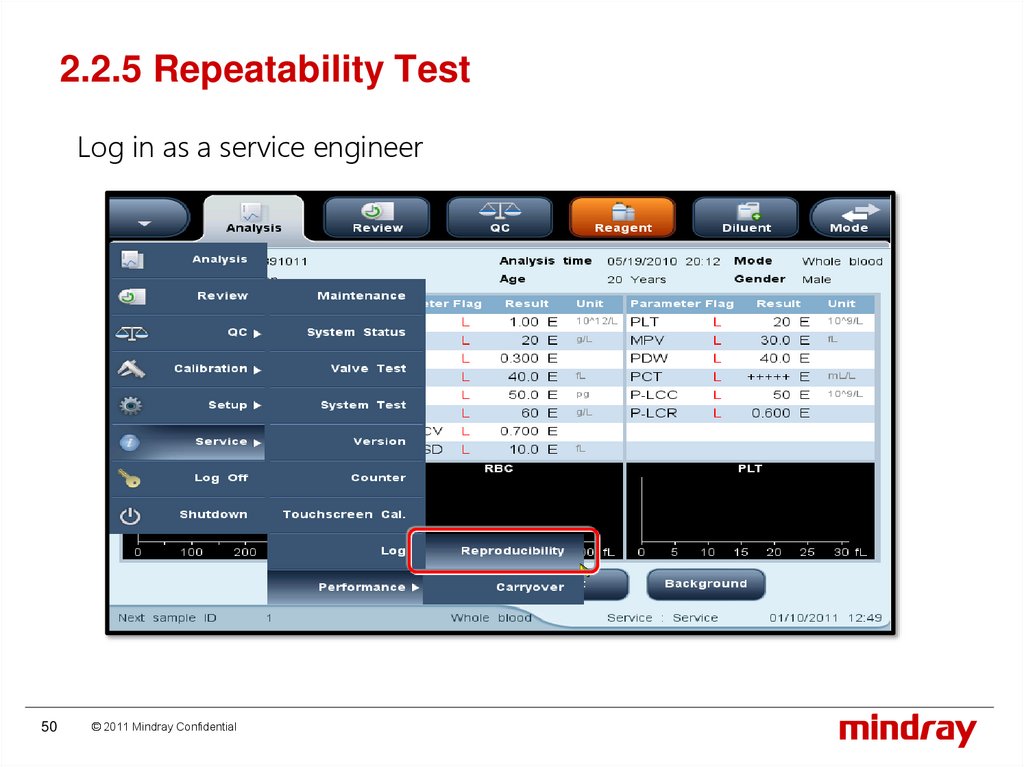
2.2.5 Repeatability TestLog in as a service engineer
50
© 2011 Mindray Confidential
51.
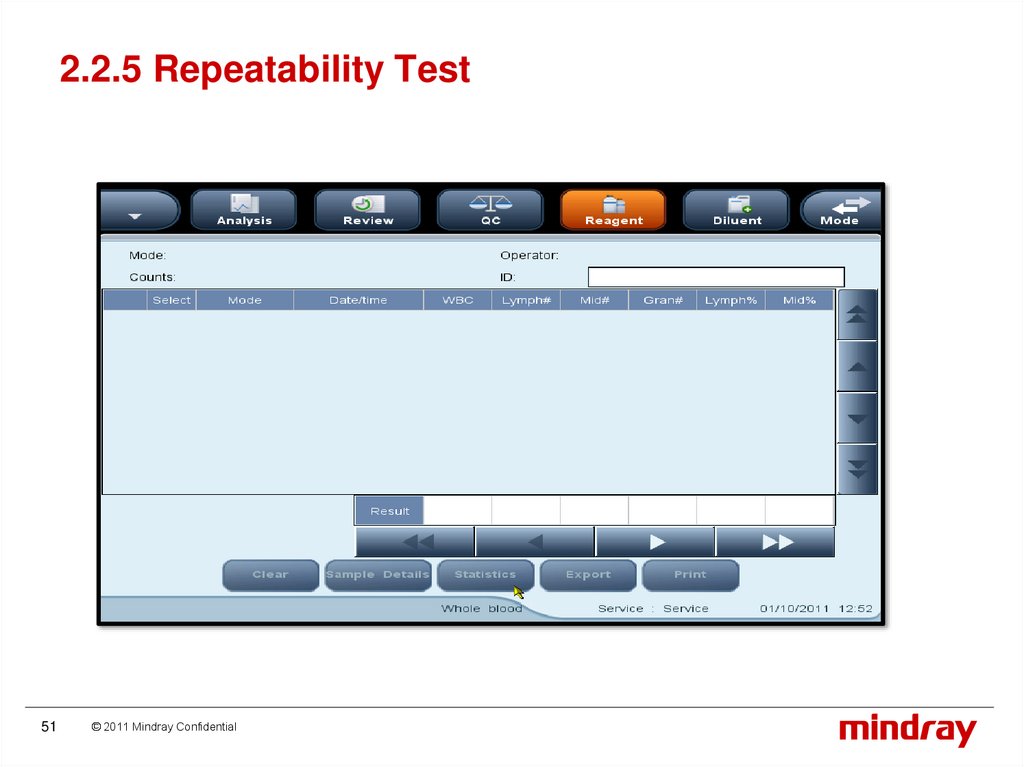
2.2.5 Repeatability Test51
© 2011 Mindray Confidential
52.
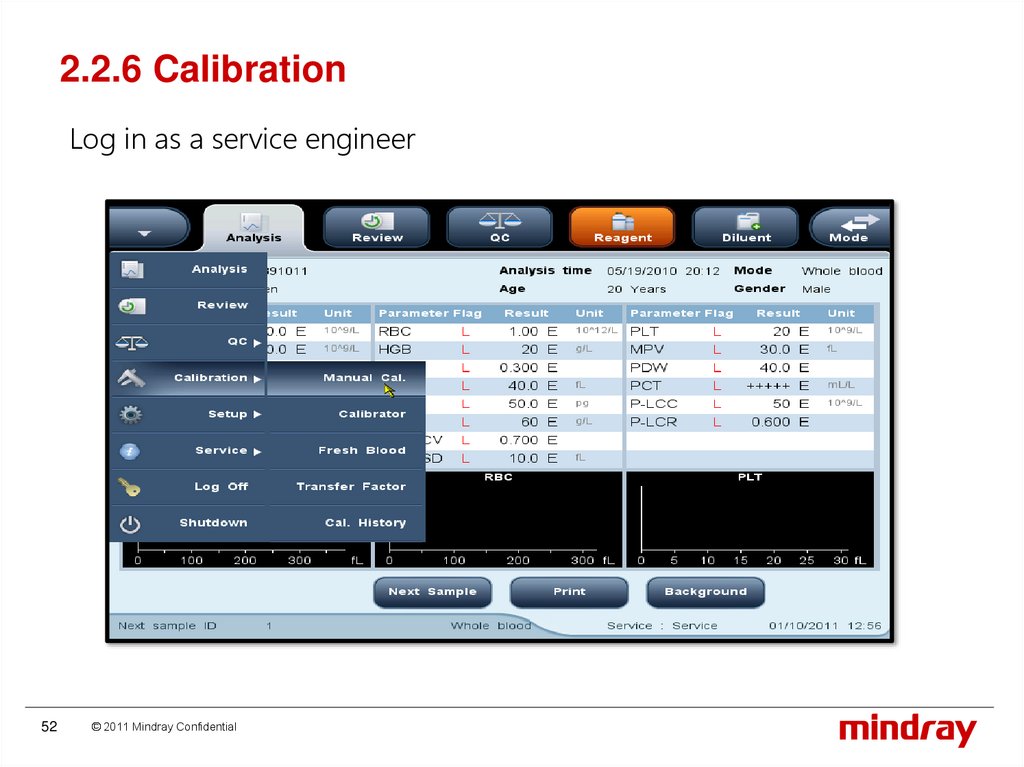
2.2.6 CalibrationLog in as a service engineer
52
© 2011 Mindray Confidential
53.
2.2.6 CalibrationBefore calibration, please
1) Do background test
2) Do repeatability test
3) Do carryover test
OK or not?
53
© 2011 Mindray Confidential
54.
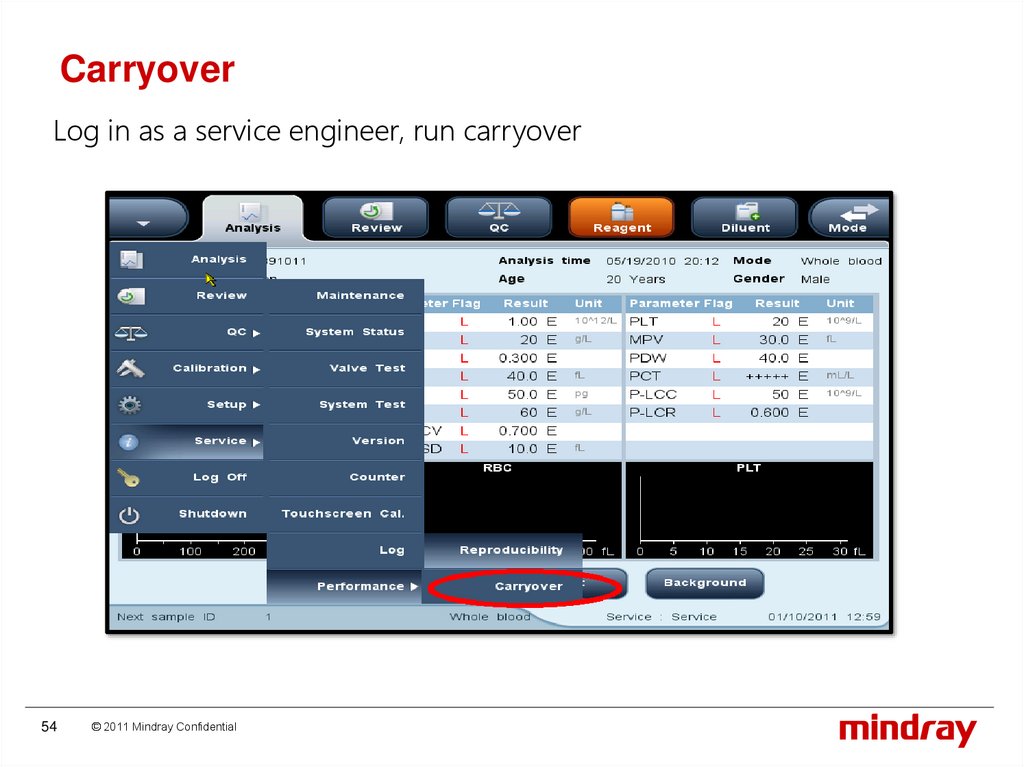
CarryoverLog in as a service engineer, run carryover
54
© 2011 Mindray Confidential
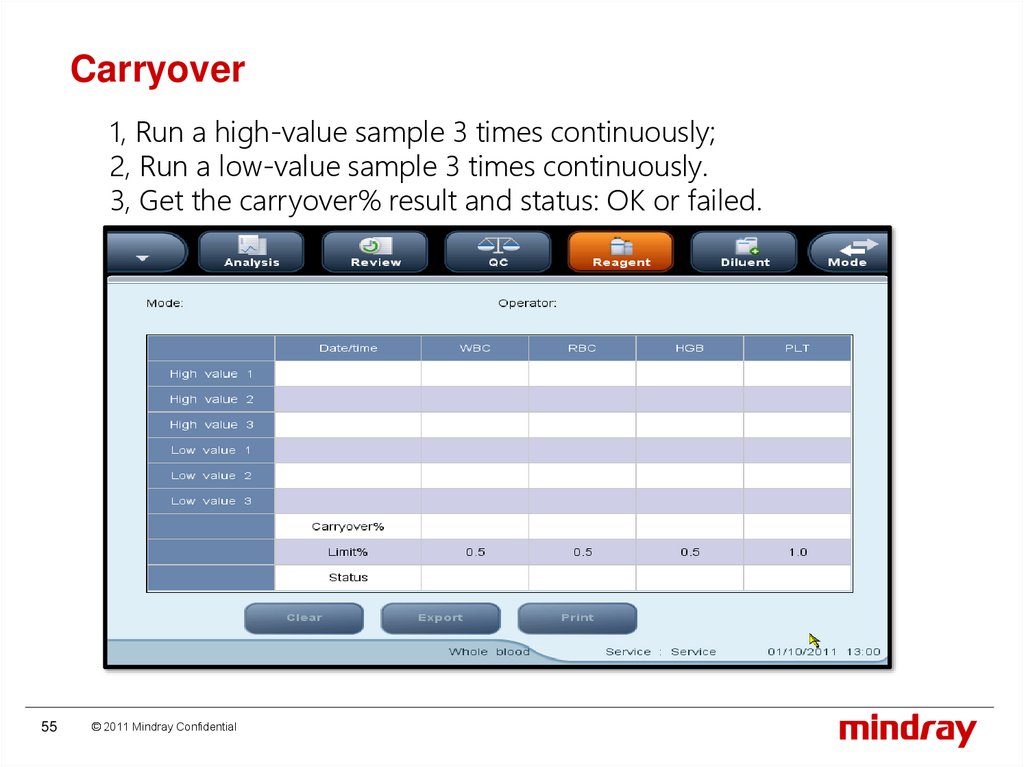
55.
Carryover1, Run a high-value sample 3 times continuously;
2, Run a low-value sample 3 times continuously.
3, Get the carryover% result and status: OK or failed.
55
© 2011 Mindray Confidential
56.
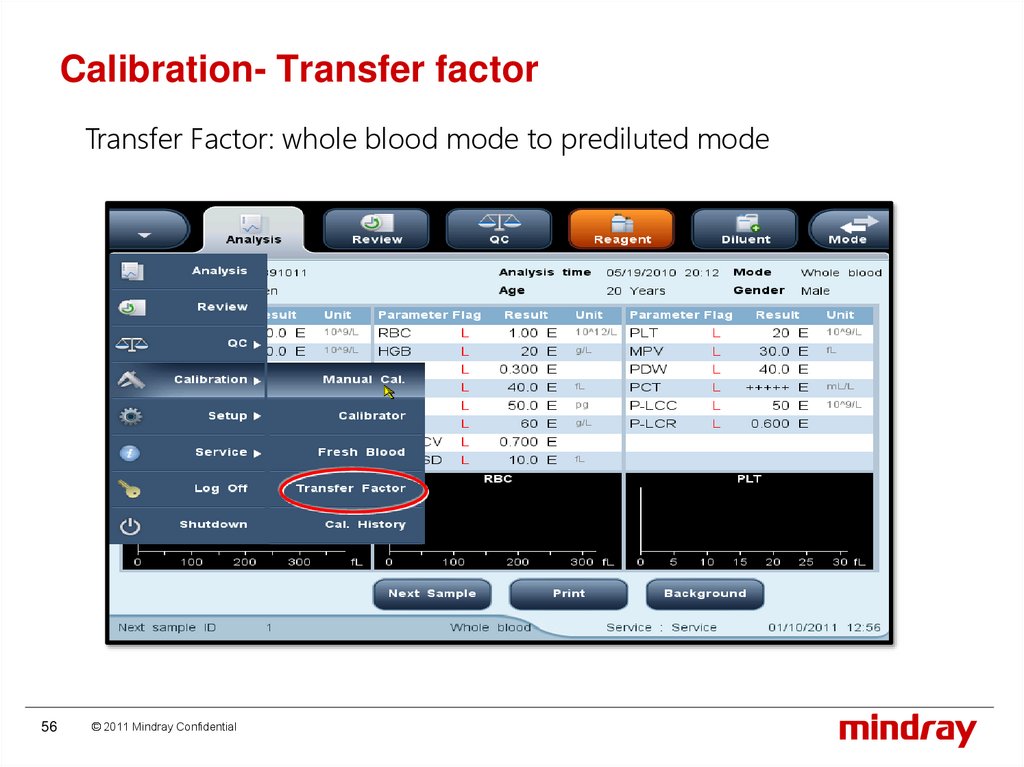
Calibration- Transfer factorTransfer Factor: whole blood mode to prediluted mode
56
© 2011 Mindray Confidential
57.
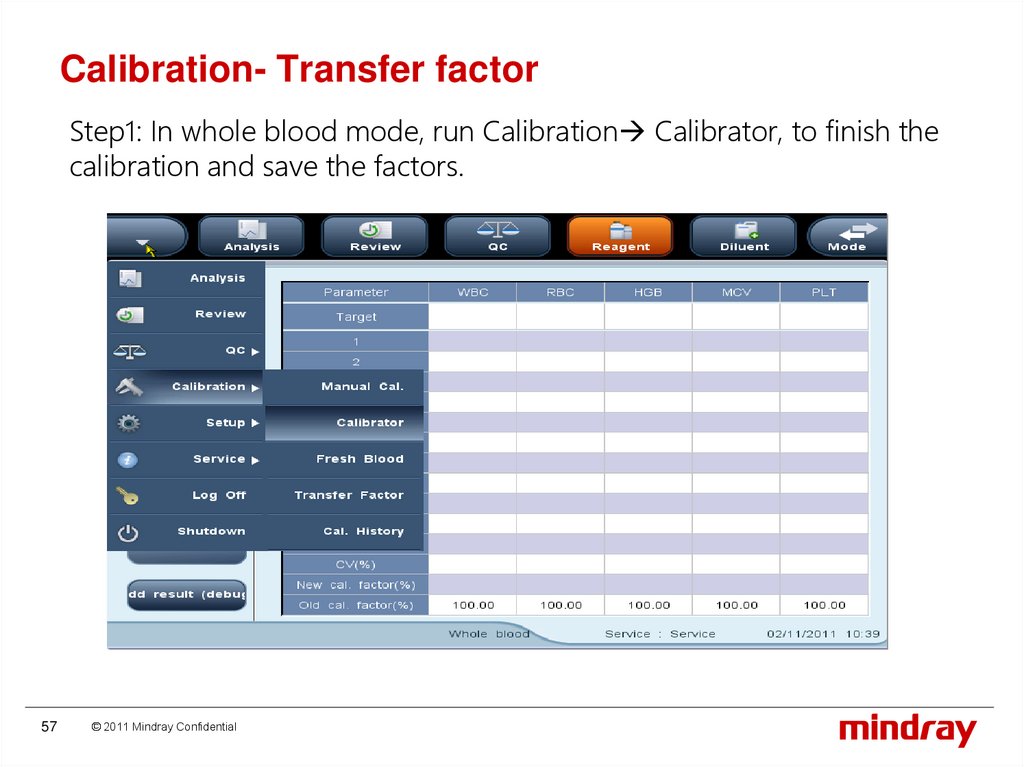
Calibration- Transfer factorStep1: In whole blood mode, run Calibration Calibrator, to finish the
calibration and save the factors.
57
© 2011 Mindray Confidential
58.
Calibration- Transfer factorStep 2: Run Calibration Transfer factor, and test calibrator for 5 or more
times in whole blood mode. Make sure the CV result in following range
58
parameter
WBC
RBC
HGB
MCV
PLT
CV%
≤2.0%
≤1.5%
≤1.5%
≤0.5%
≤4.0%
© 2011 Mindray Confidential
59.
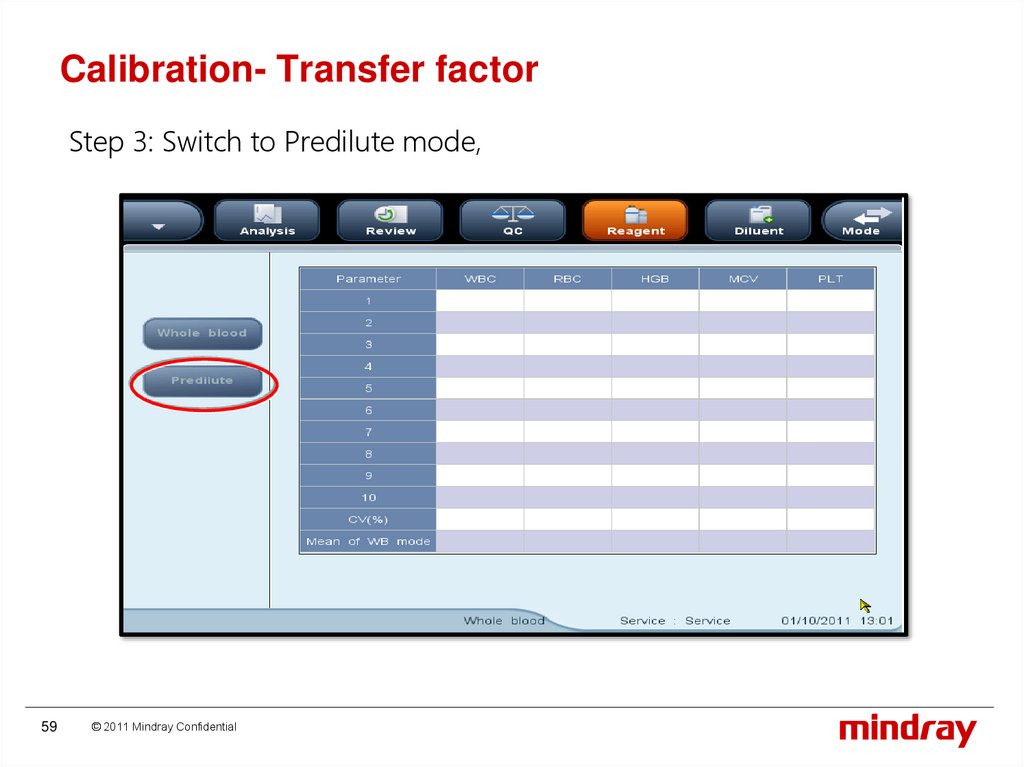
Calibration- Transfer factorStep 3: Switch to Predilute mode,
59
© 2011 Mindray Confidential
60.
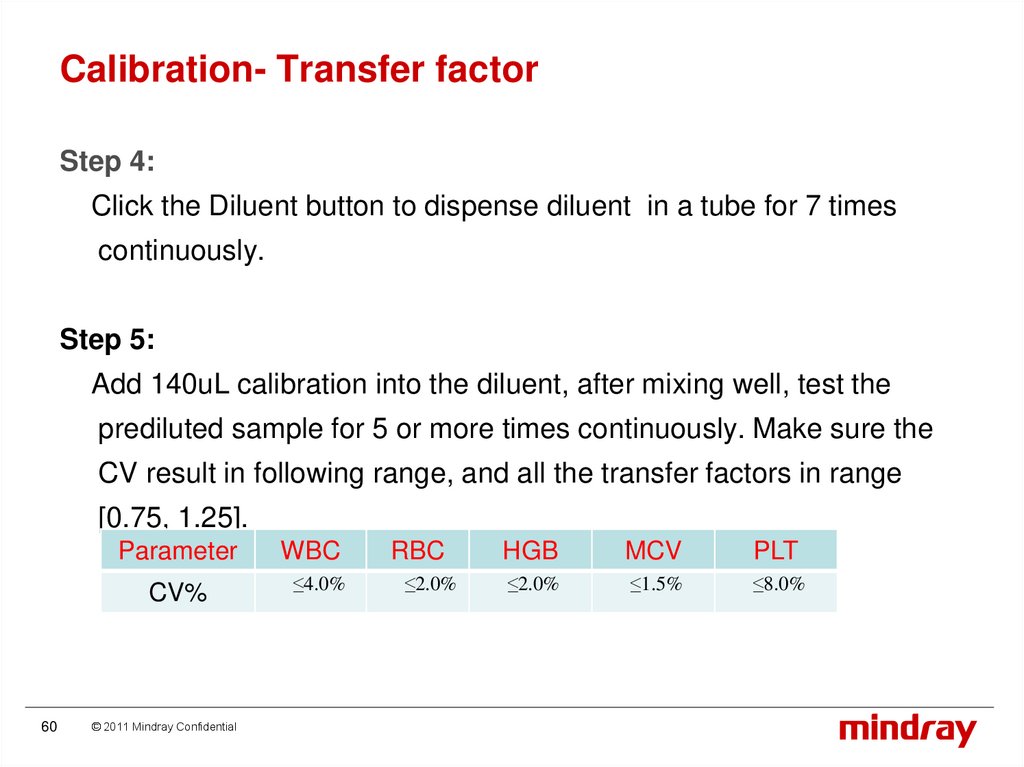
Calibration- Transfer factorStep 4:
Click the Diluent button to dispense diluent in a tube for 7 times
continuously.
Step 5:
Add 140uL calibration into the diluent, after mixing well, test the
prediluted sample for 5 or more times continuously. Make sure the
CV result in following range, and all the transfer factors in range
[0.75, 1.25].
Parameter
CV%
60
© 2011 Mindray Confidential
WBC
RBC
HGB
MCV
PLT
≤4.0%
≤2.0%
≤2.0%
≤1.5%
≤8.0%
61.
2.3 Liquid System2.3.1 Components
2.3.2 Hydraulic Diagram
2.3.3 Counting Cycle
61
© 2011 Mindray Confidential
62.
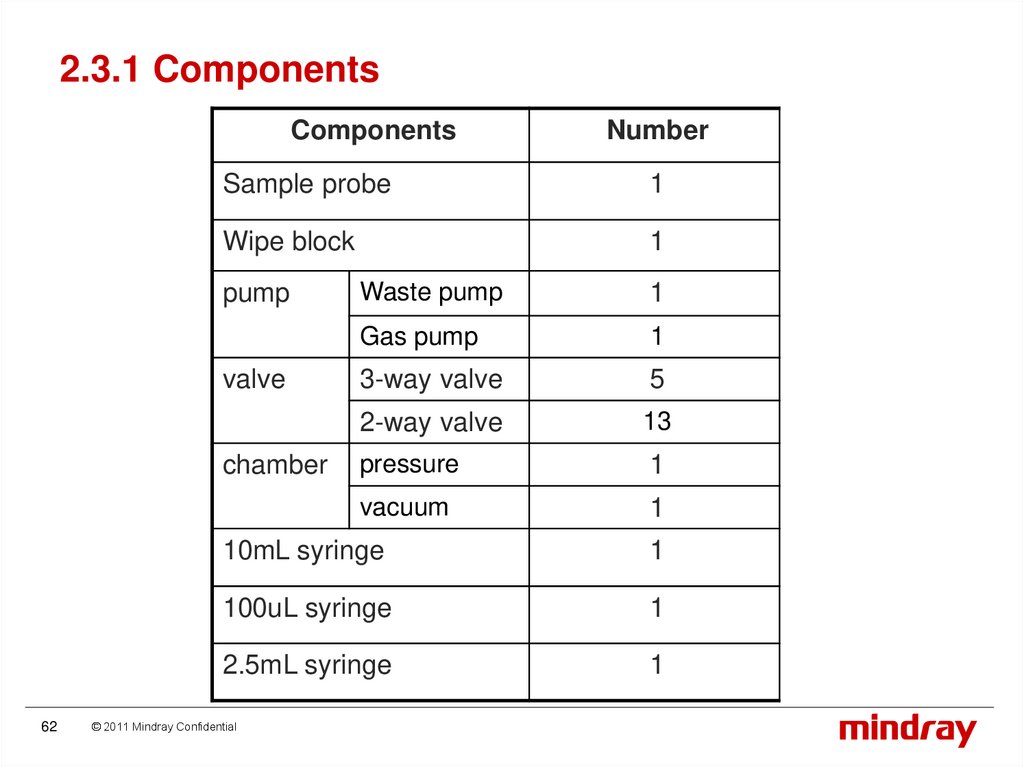
2.3.1 ComponentsComponents
Sample probe
1
Wipe block
1
pump
valve
chamber
62
Number
Waste pump
1
Gas pump
1
3-way valve
5
2-way valve
13
pressure
1
vacuum
1
10mL syringe
1
100uL syringe
1
2.5mL syringe
1
© 2011 Mindray Confidential
63.
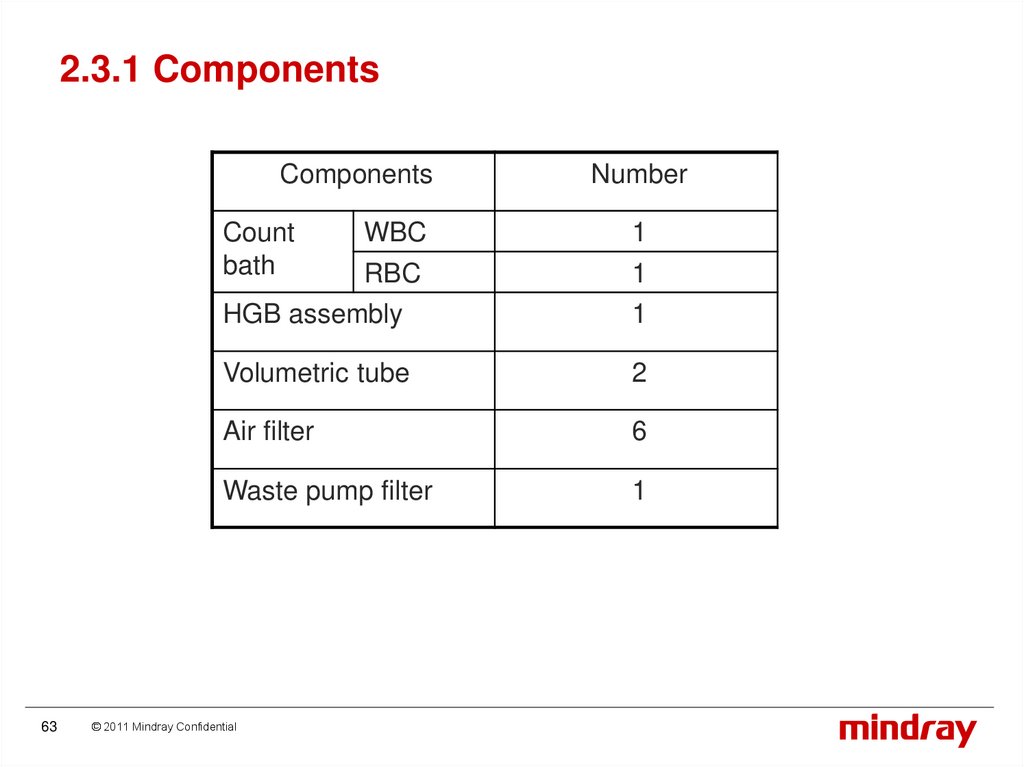
2.3.1 ComponentsComponents
Count
bath
63
Number
WBC
1
RBC
1
HGB assembly
1
Volumetric tube
2
Air filter
6
Waste pump filter
1
© 2011 Mindray Confidential
64.
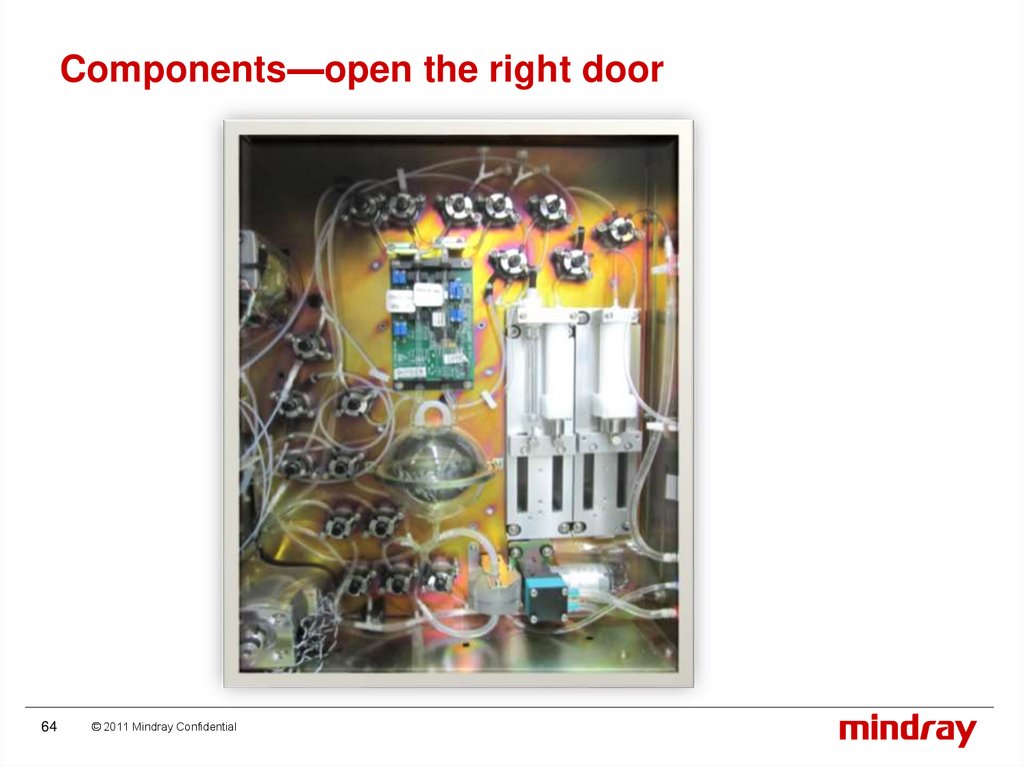
Components—open the right door64
© 2011 Mindray Confidential
65.
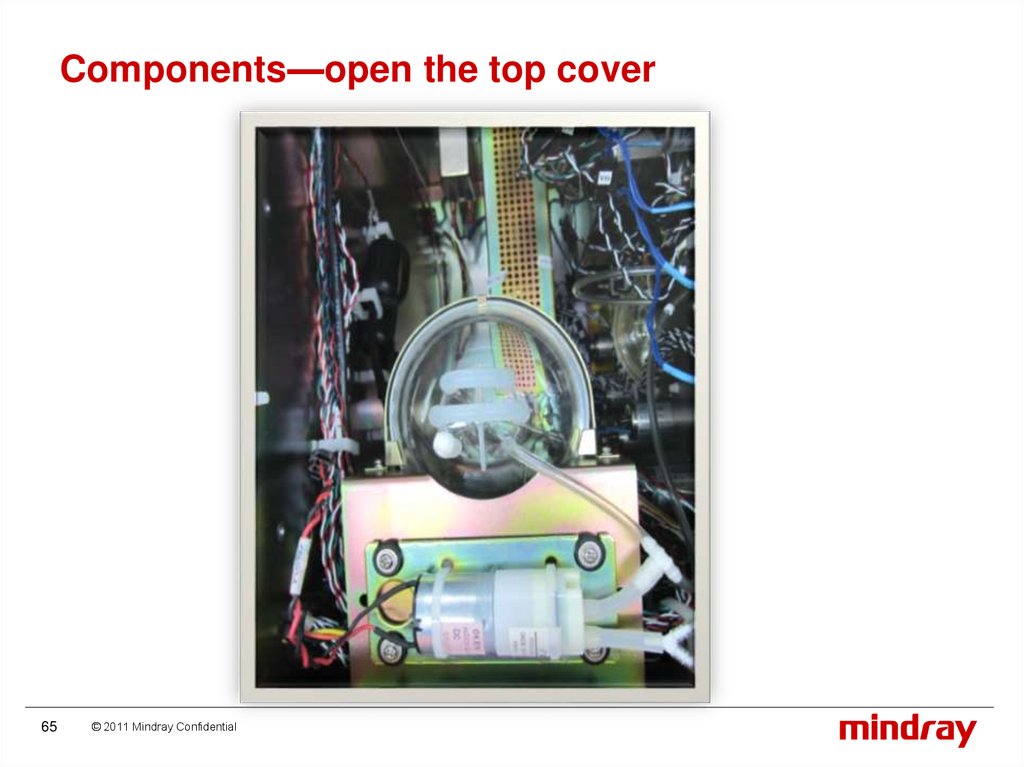
Components—open the top cover65
© 2011 Mindray Confidential
66.
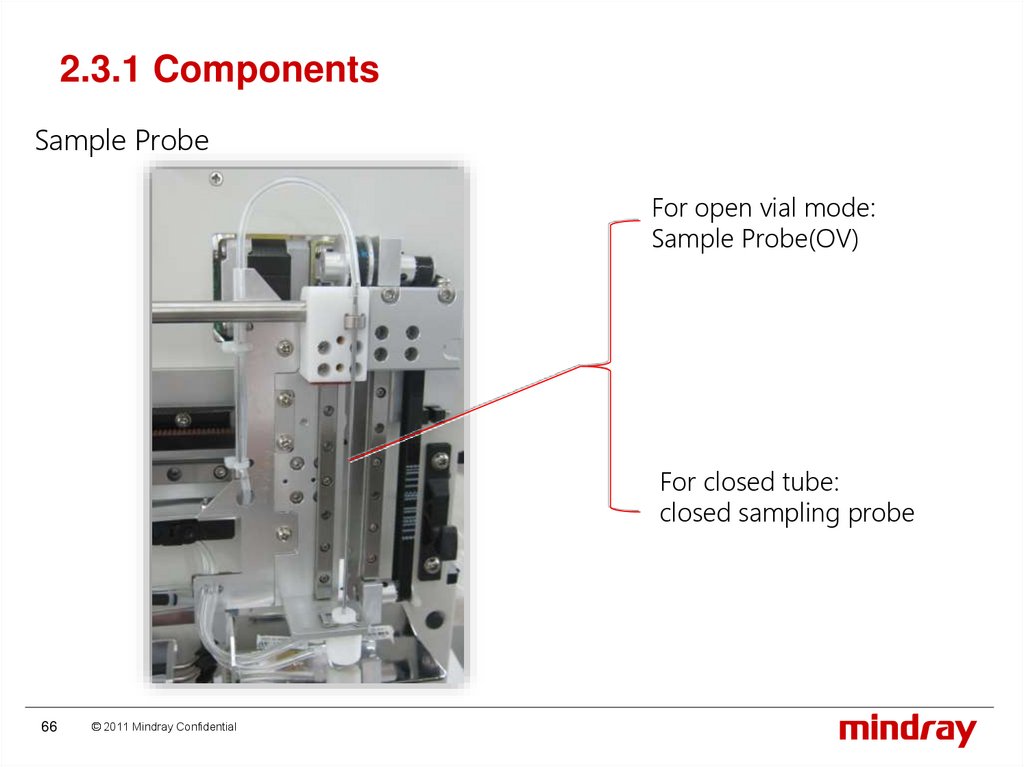
2.3.1 ComponentsSample Probe
For open vial mode:
Sample Probe(OV)
For closed tube:
closed sampling probe
66
© 2011 Mindray Confidential
67.
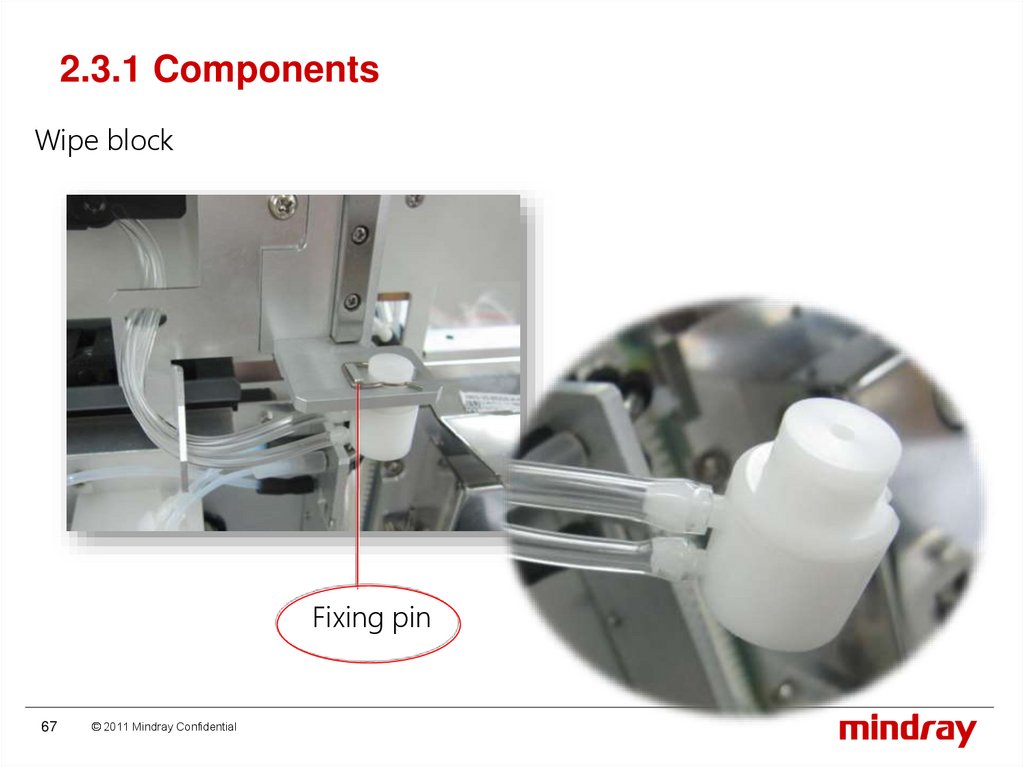
2.3.1 ComponentsWipe block
Fixing pin
67
© 2011 Mindray Confidential
68.
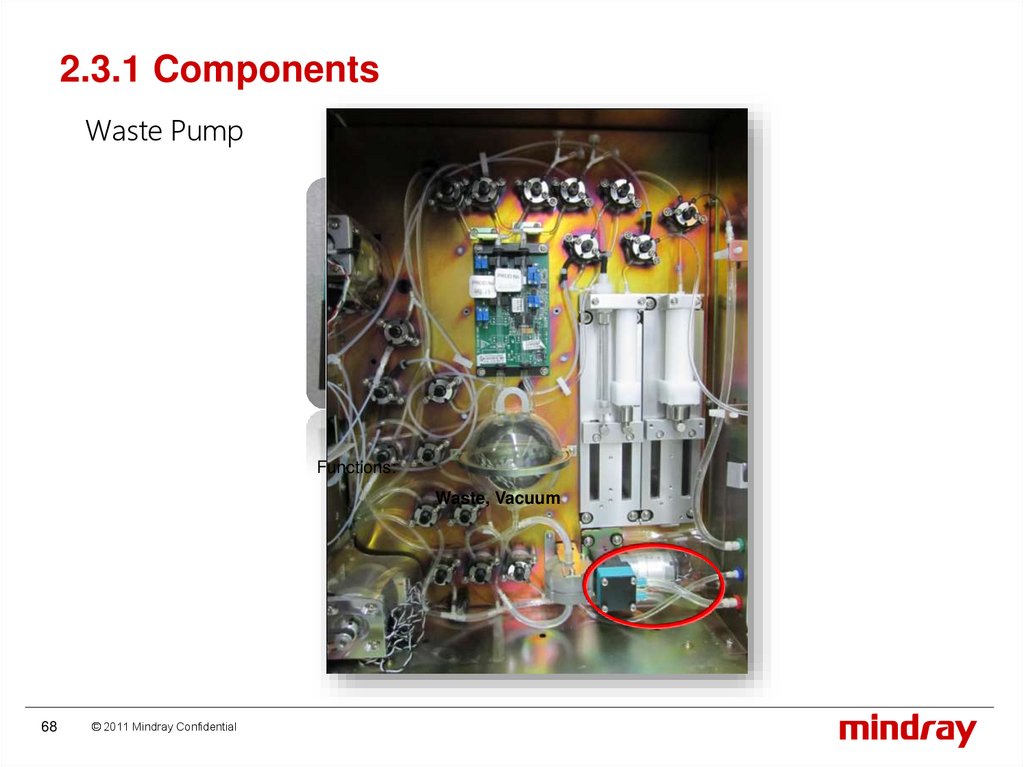
2.3.1 ComponentsWaste Pump
Functions:
Waste, Vacuum
68
© 2011 Mindray Confidential
69.
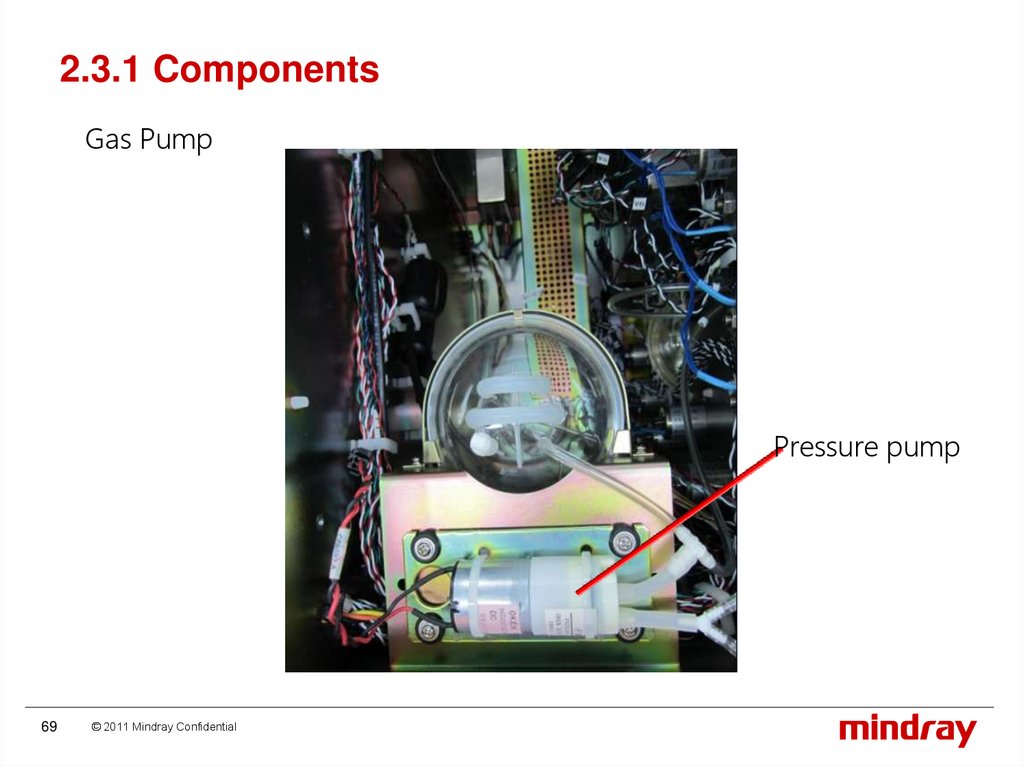
2.3.1 ComponentsGas Pump
Pressure pump
69
© 2011 Mindray Confidential
70.
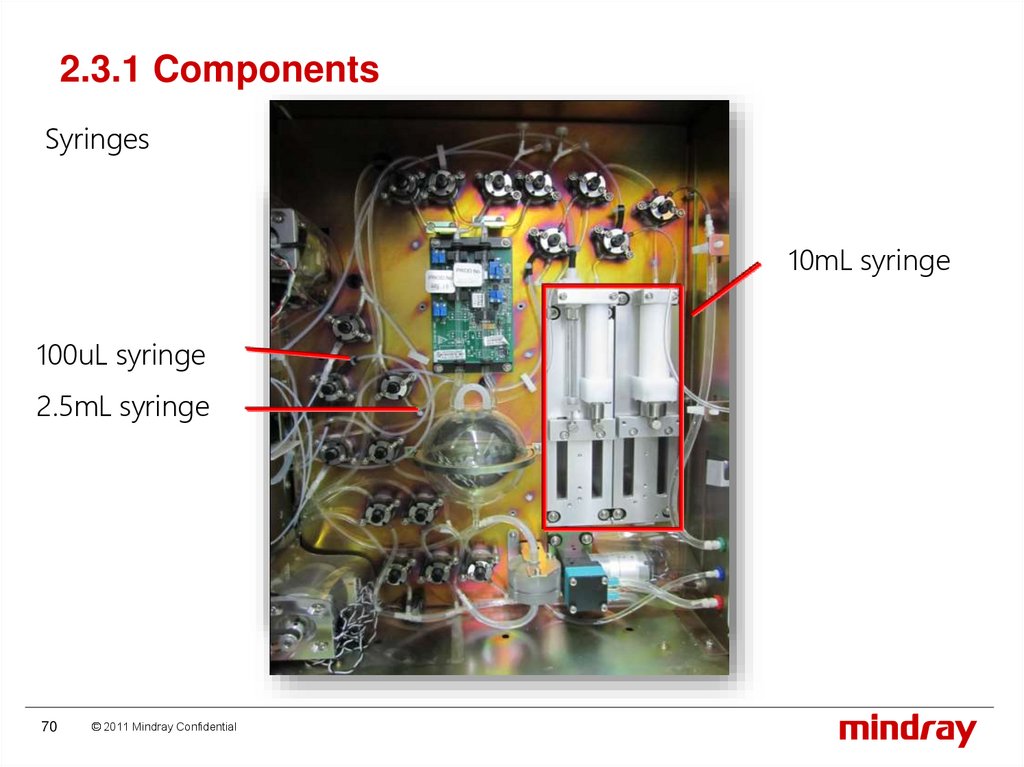
2.3.1 ComponentsSyringes
10mL syringe
100uL syringe
2.5mL syringe
70
© 2011 Mindray Confidential
71.
2.3.1 ComponentsFunction of Syringes
100uL syringe (Asp-Syringe):
Aspirate and dispense the sample (dilution).
10mL syringe (Dil-Syringe):
Dispense the diluent into WBC bath, RBC bath and clean Wipe block.
2.5mL syringe (Lyse-Syringe):
Aspirate and dispense the Lyse.
71
© 2011 Mindray Confidential
72.
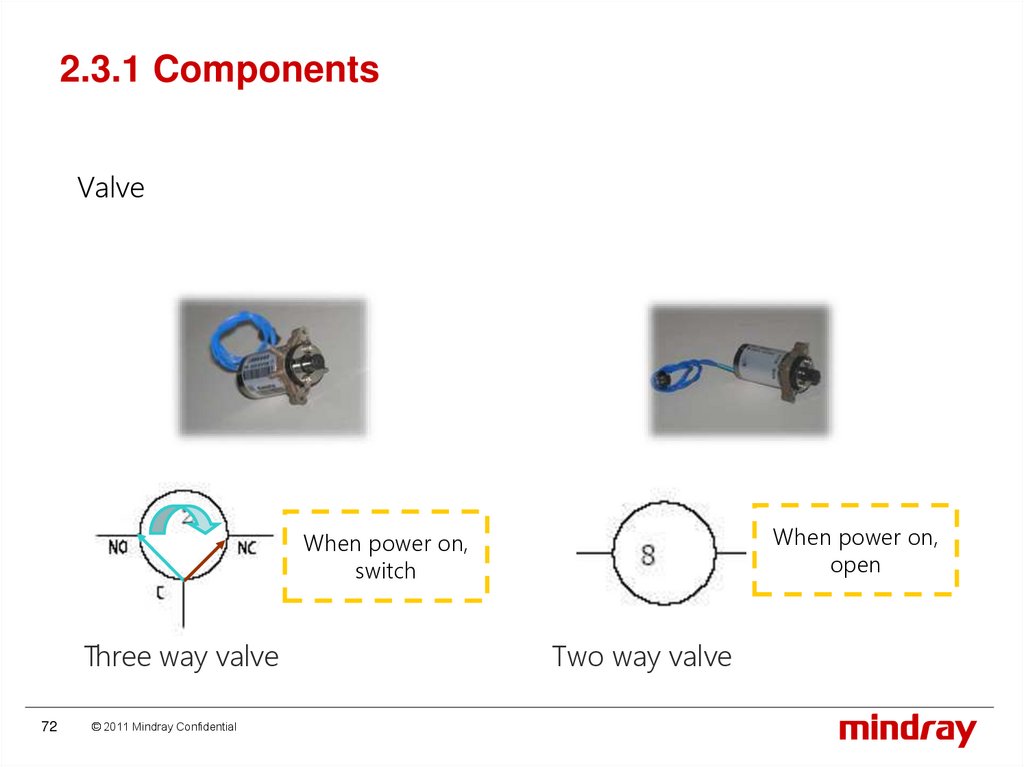
2.3.1 ComponentsValve
When power on,
open
When power on,
switch
Three way valve
72
© 2011 Mindray Confidential
Two way valve
73.
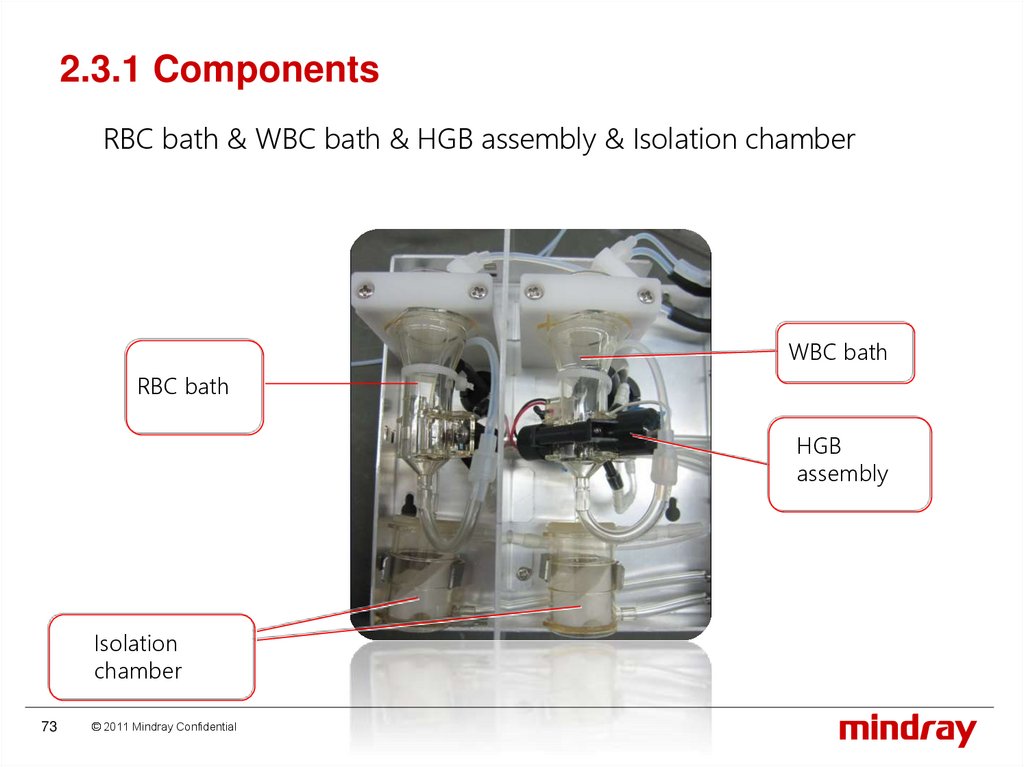
2.3.1 ComponentsRBC bath & WBC bath & HGB assembly & Isolation chamber
WBC bath
RBC bath
HGB
assembly
Isolation
chamber
73
© 2011 Mindray Confidential
74.
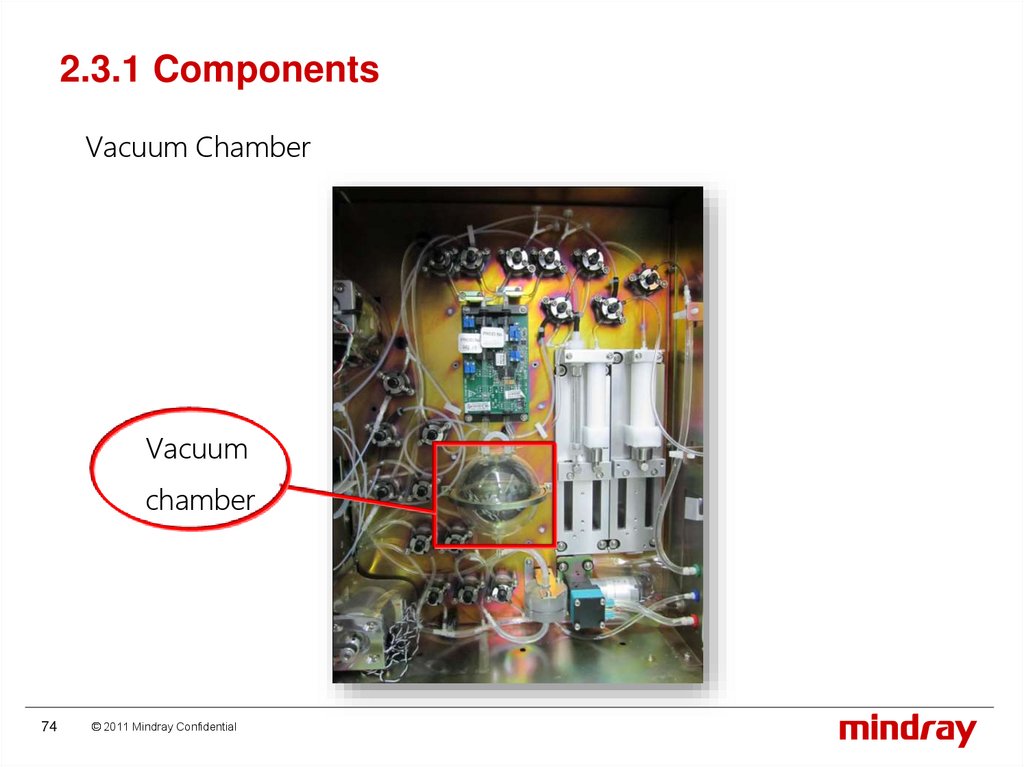
2.3.1 ComponentsVacuum Chamber
Vacuum
chamber
74
© 2011 Mindray Confidential
75.
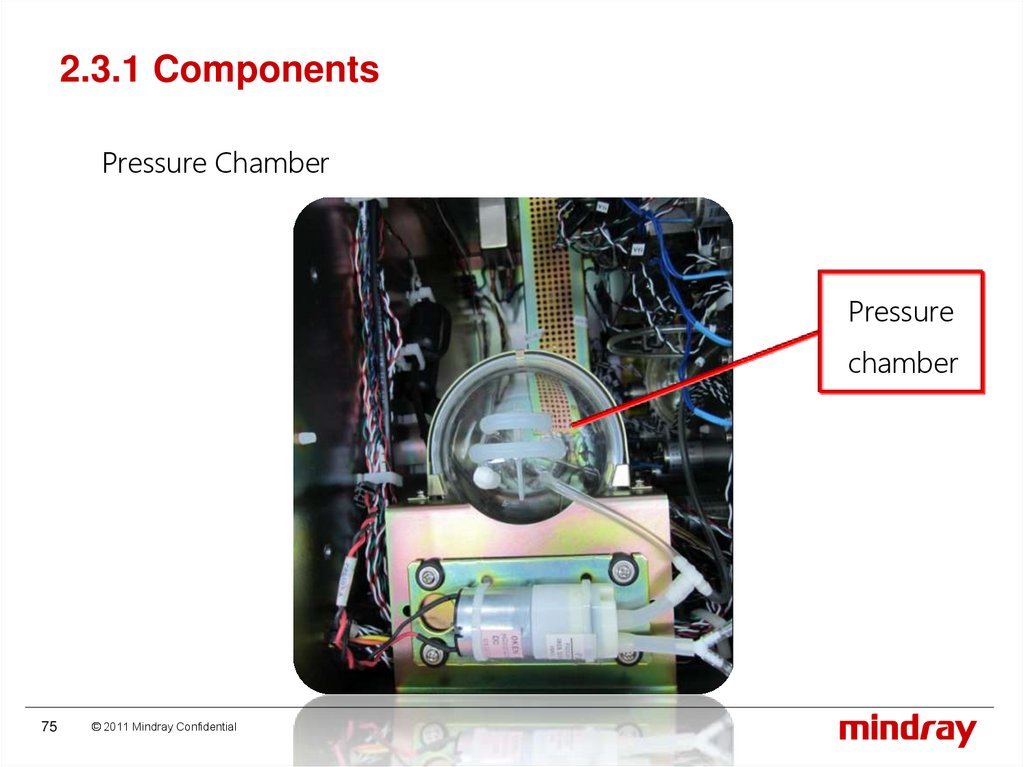
2.3.1 ComponentsPressure Chamber
Pressure
chamber
75
© 2011 Mindray Confidential
76.
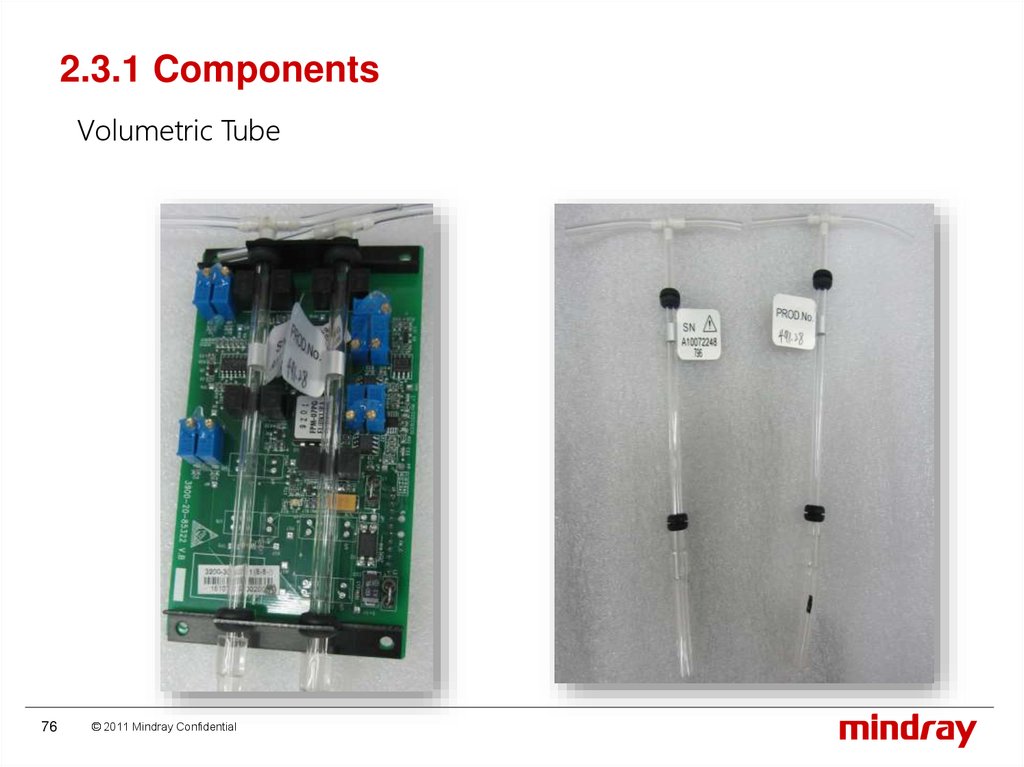
2.3.1 ComponentsVolumetric Tube
76
© 2011 Mindray Confidential
77.
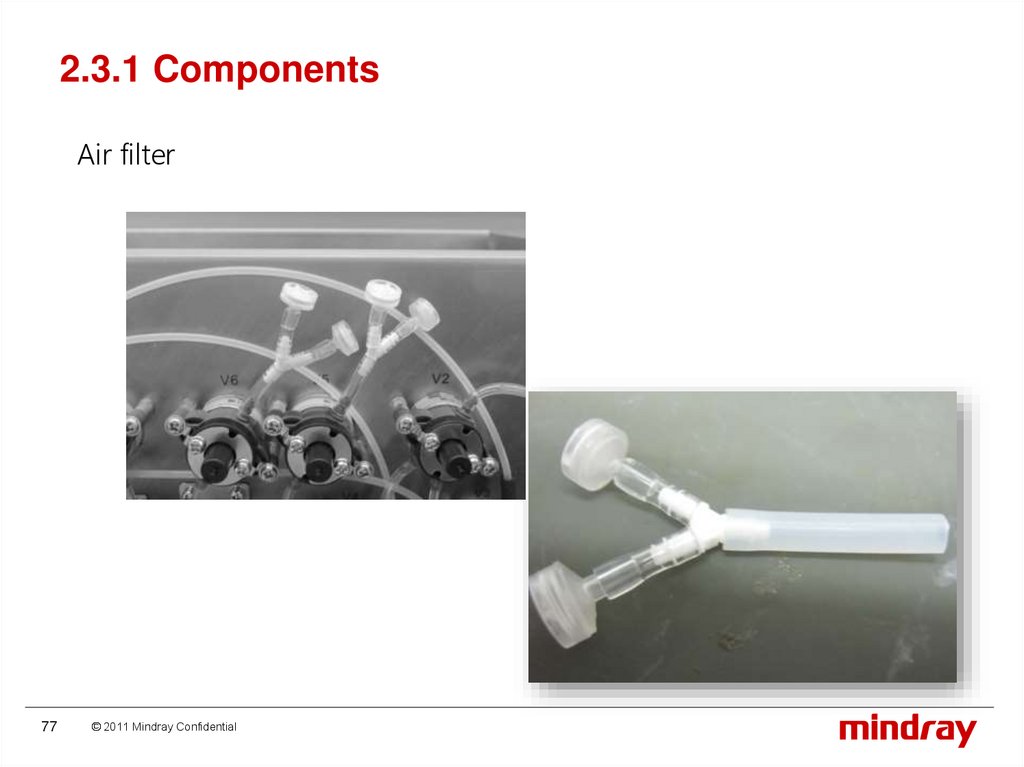
2.3.1 ComponentsAir filter
77
© 2011 Mindray Confidential
78.
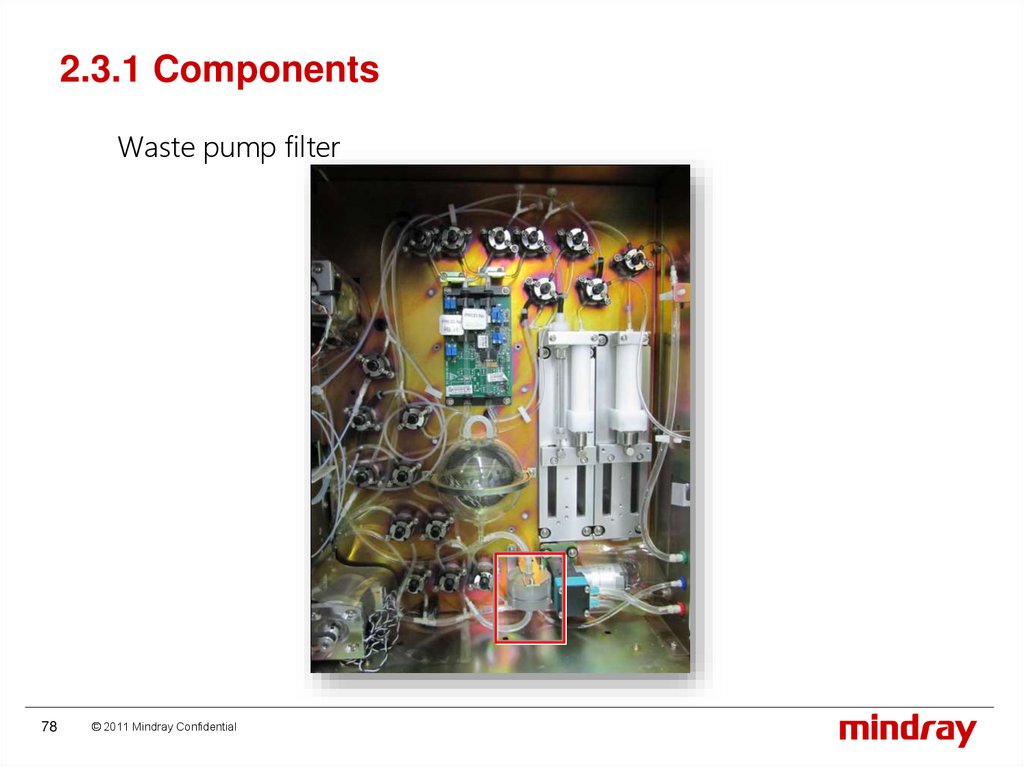
2.3.1 ComponentsWaste pump filter
78
© 2011 Mindray Confidential
79.
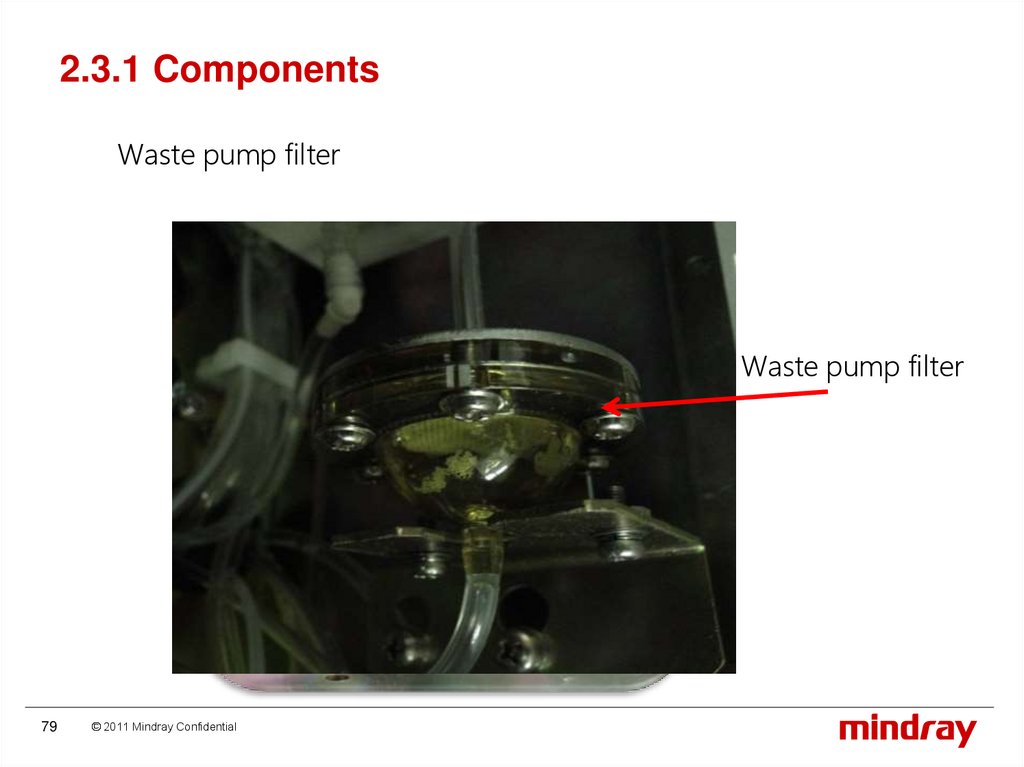
2.3.1 ComponentsWaste pump filter
Waste pump filter
79
© 2011 Mindray Confidential
80.
2.3.2 Hydraulic Diagram80
© 2011 Mindray Confidential
81.
2.3.2 Hydraulic Diagram81
© 2011 Mindray Confidential
82.
2.3.3 Counting Cycle2.3.3 Counting Cycle
82
© 2011 Mindray Confidential
83.
Flow chat of whole blood mode83
© 2011 Mindray Confidential
84.
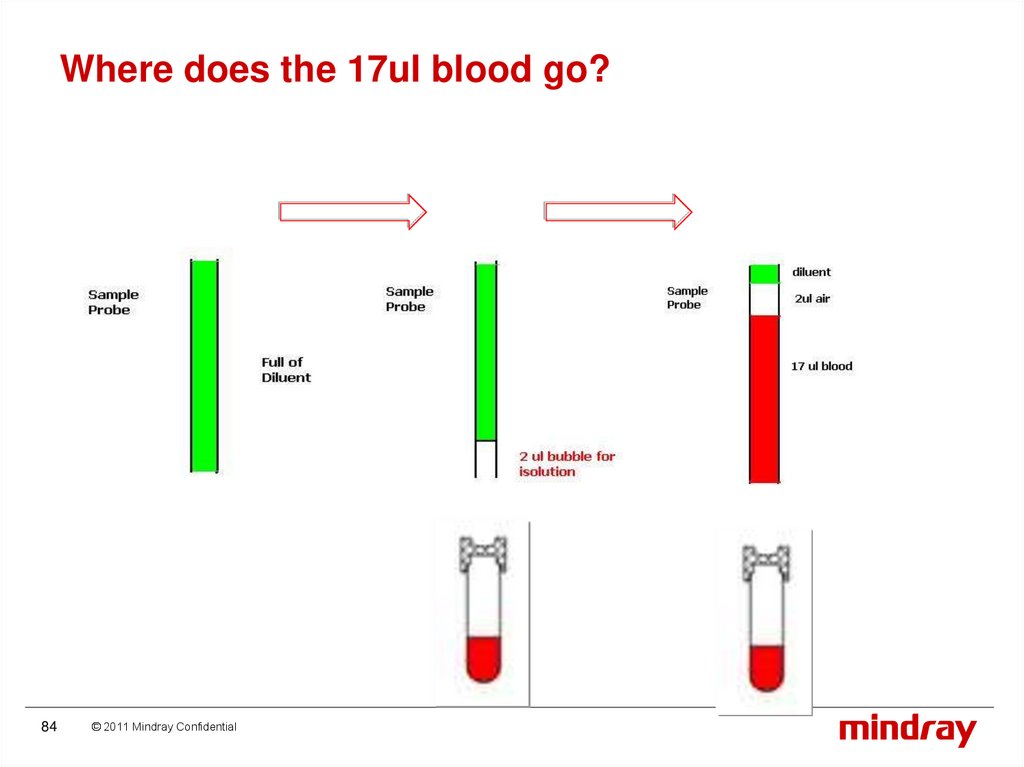
Where does the 17ul blood go?84
© 2011 Mindray Confidential
85.
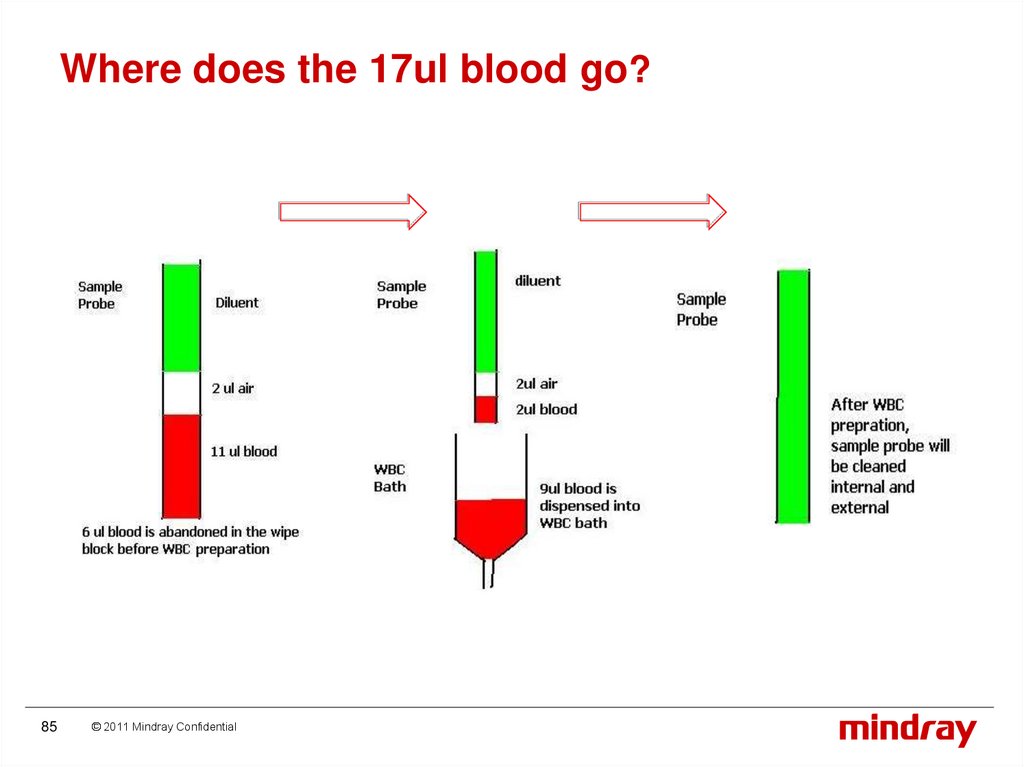
Where does the 17ul blood go?85
© 2011 Mindray Confidential
86.
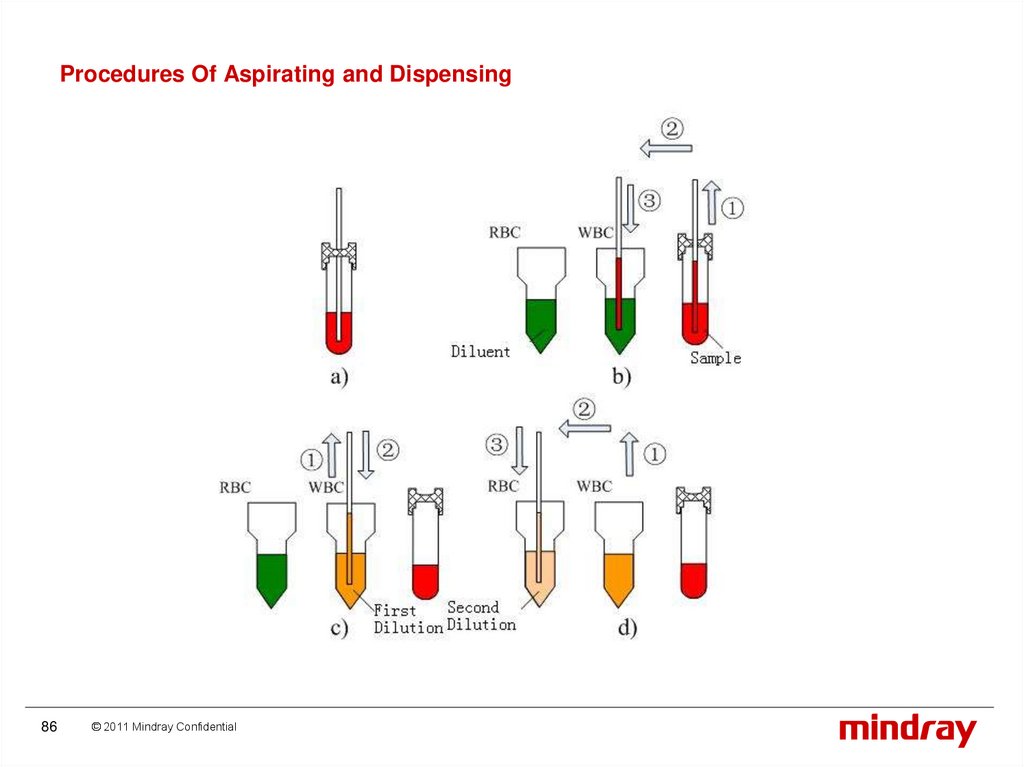
Procedures Of Aspirating and Dispensing86
© 2011 Mindray Confidential
87.
Whole blood mode in Open Vial1, Aspirate the sample
2, Sample preparation
3, Counting
4, Clean after counting
87
© 2011 Mindray Confidential
88.
Aspirate the sampleClean the sample probe: internal and external
Drain and prime the WBC bath
Clean the rear bath of both WBC bath and RBC bath, empty the
volumetric tube.
Aspirate 17ul sample and clean the sample probe (external).
Read the HGB blank.
88
© 2011 Mindray Confidential
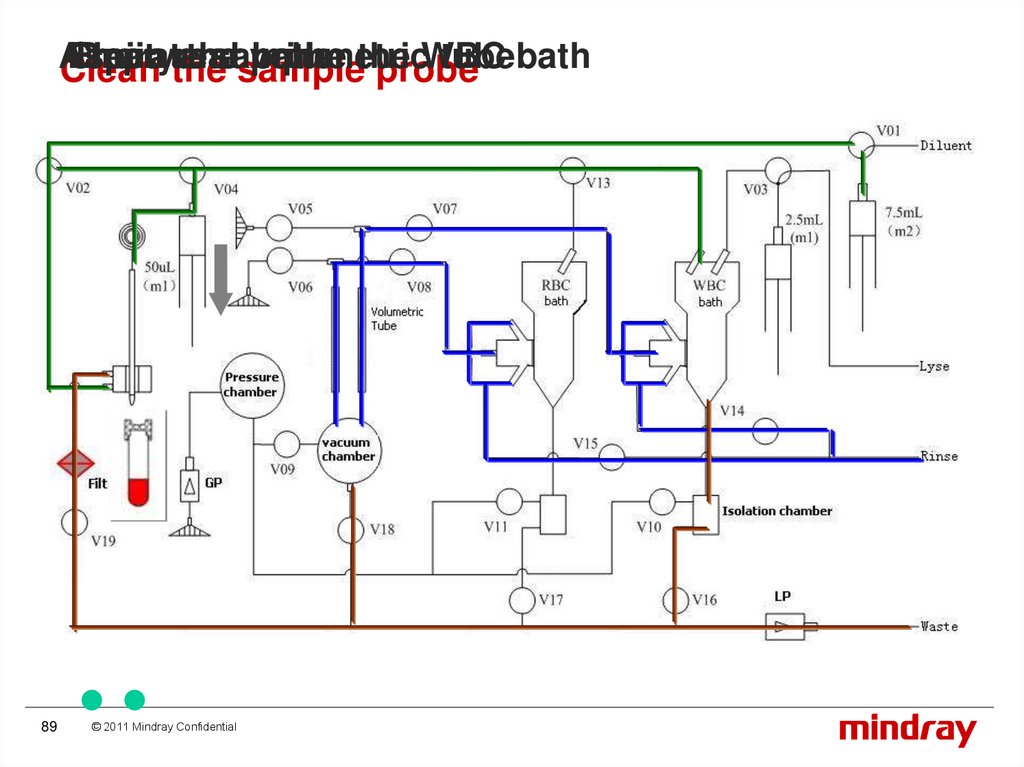
89.
AspirateClean
Empty
Drain the
rear
and
the
sample
volumetric
prime
bath the
WBC
tubebath
Clean
sample
probe
89
© 2011 Mindray Confidential
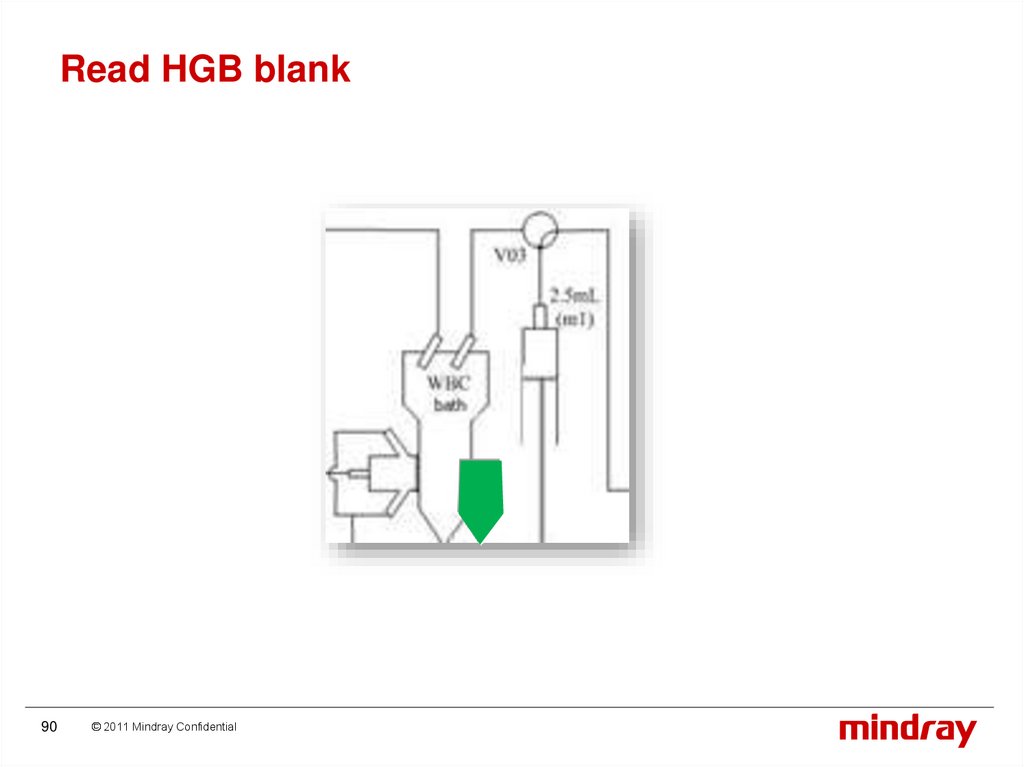
90.
Read HGB blank90
© 2011 Mindray Confidential
91.
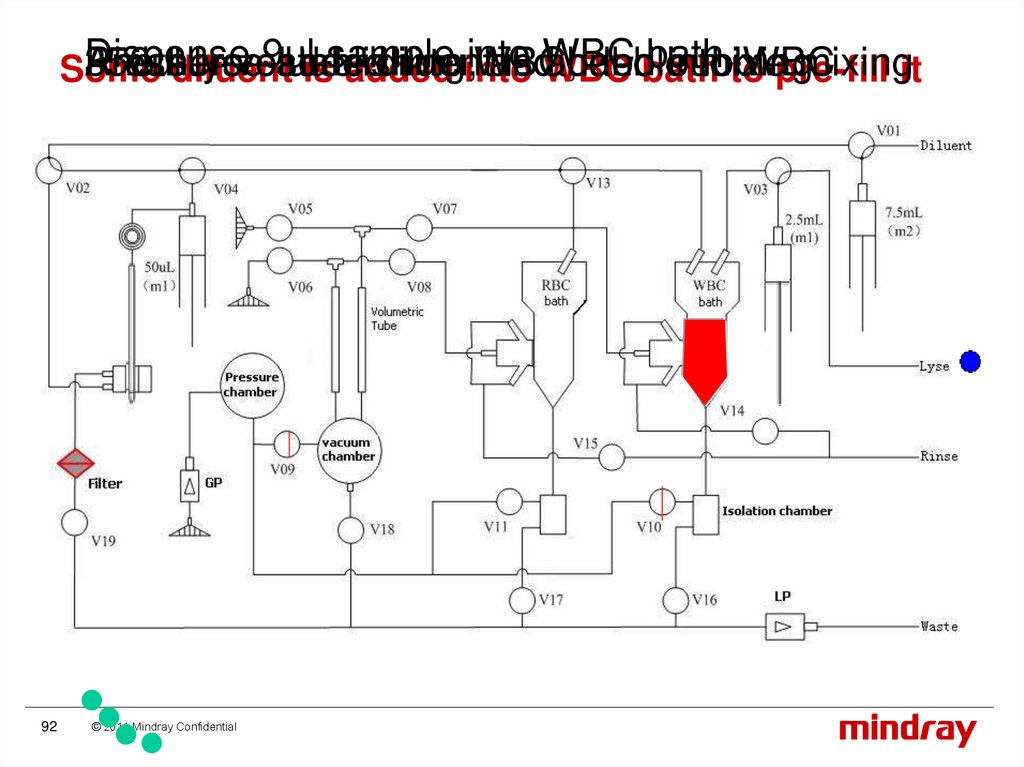
WBC Sample preparation2, WBC sample preparation:
1) Some diluent is added into WBC bath to pre-fill it;
2) Dispense 9ul sample into WBC bath;
3) Another volume diluent is added into WBC;
4) Pressure establishing, and bubble mixing;
5) 350ul lyse added into WBC, and bubble mixing.
91
© 2011 Mindray Confidential
92.
Dispense9ul
into
bath
Another
Pressure
350ul
lyse
volume
establishing,
added
diluent
into into
WBC,
and
is WBC
added
bubble
andbath
into
bubble
mixing
WBC
mixingit
Some
diluent
issample
added
WBC
to
pre-fill
92
© 2011 Mindray Confidential
93.
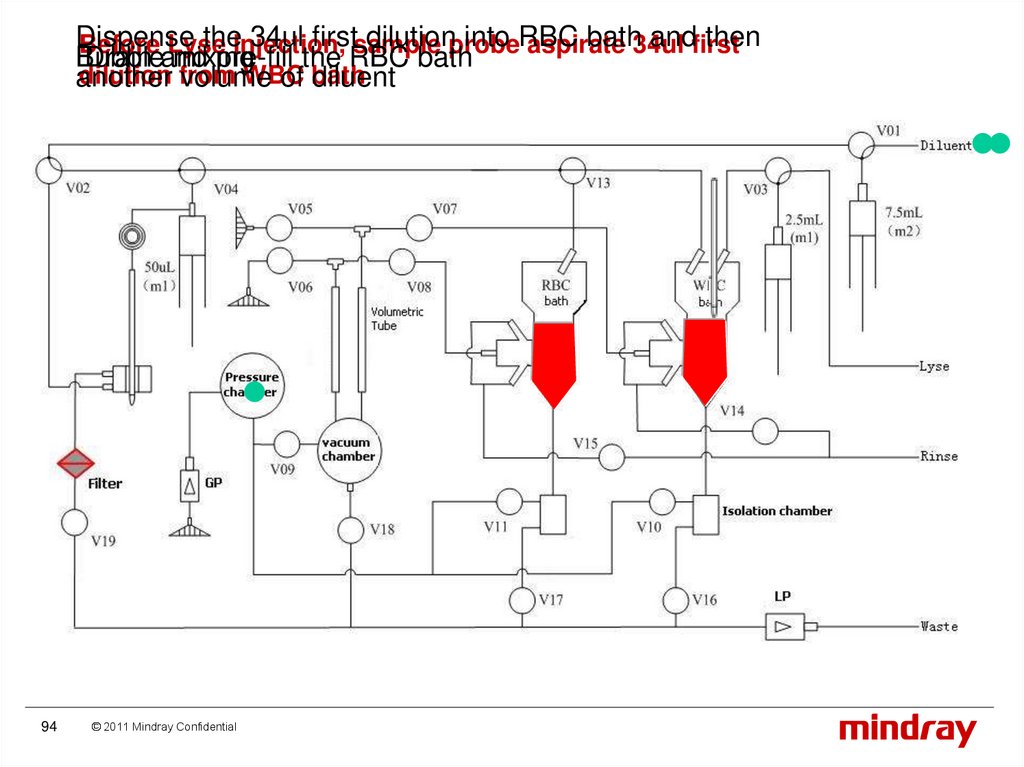
3, RBC sample preparation1) Before Lyse injection, sample probe aspirate 34ul first dilution from
WBC bath;
2) Drain and pre-fill the RBC bath.
3) Dispense the 34ul first dilution into RBC bath and then another volume
of diluent.
4) Bubble mixing
93
© 2011 Mindray Confidential
94.
Dispensetheinjection,
34ul firstsample
dilutionprobe
into RBC
bath34ul
andfirst
then
Before Lyse
aspirate
Bubble
Drain and
mixing
pre-fill the RBC
bath
dilution from
WBC
another
volume
of bath
diluent
94
© 2011 Mindray Confidential
95.
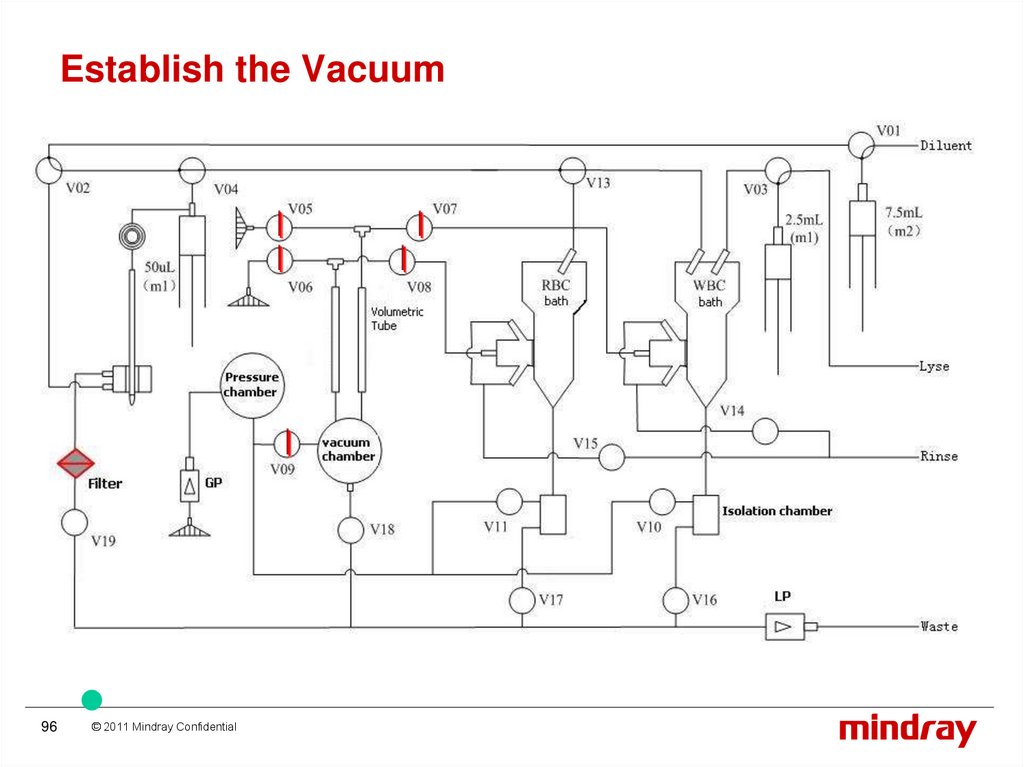
CountingEstablish the vacuum and finish the counting
95
© 2011 Mindray Confidential
96.
Establish the Vacuum96
© 2011 Mindray Confidential
97.
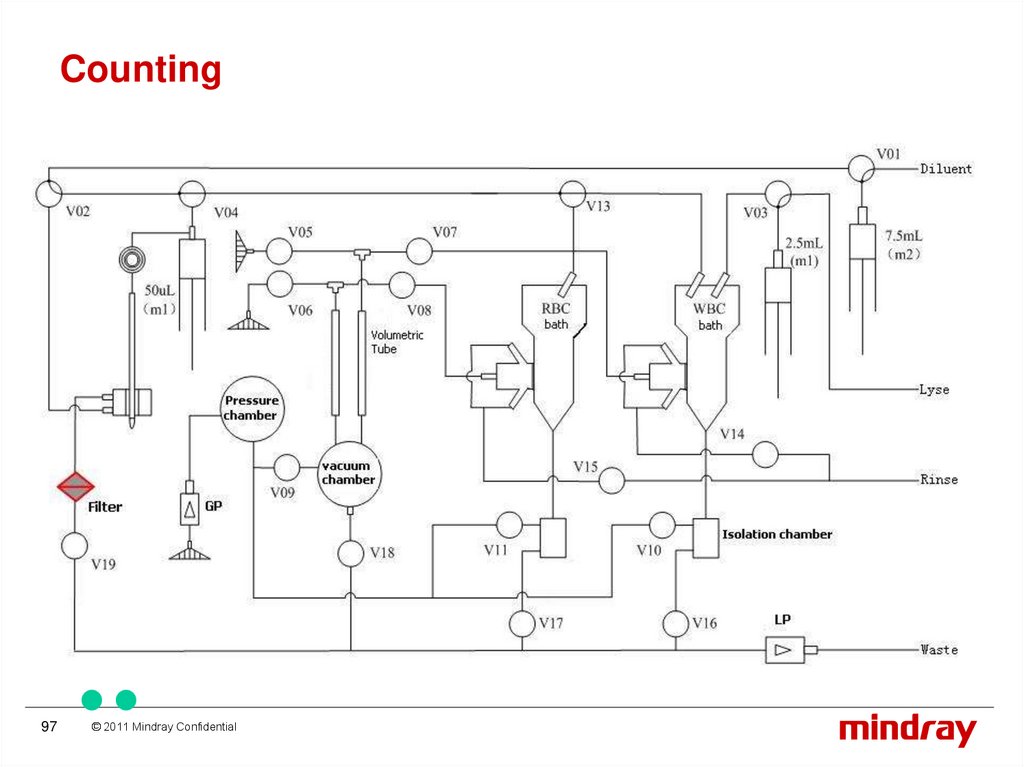
Counting97
© 2011 Mindray Confidential
98.
Counting98
© 2011 Mindray Confidential
99.
Clean after counting99
© 2011 Mindray Confidential
100.
Clean after countingClean front bath
Clean rear bath
Zap
100
© 2011 Mindray Confidential
101.
Clean Front Bath101
© 2011 Mindray Confidential
102.
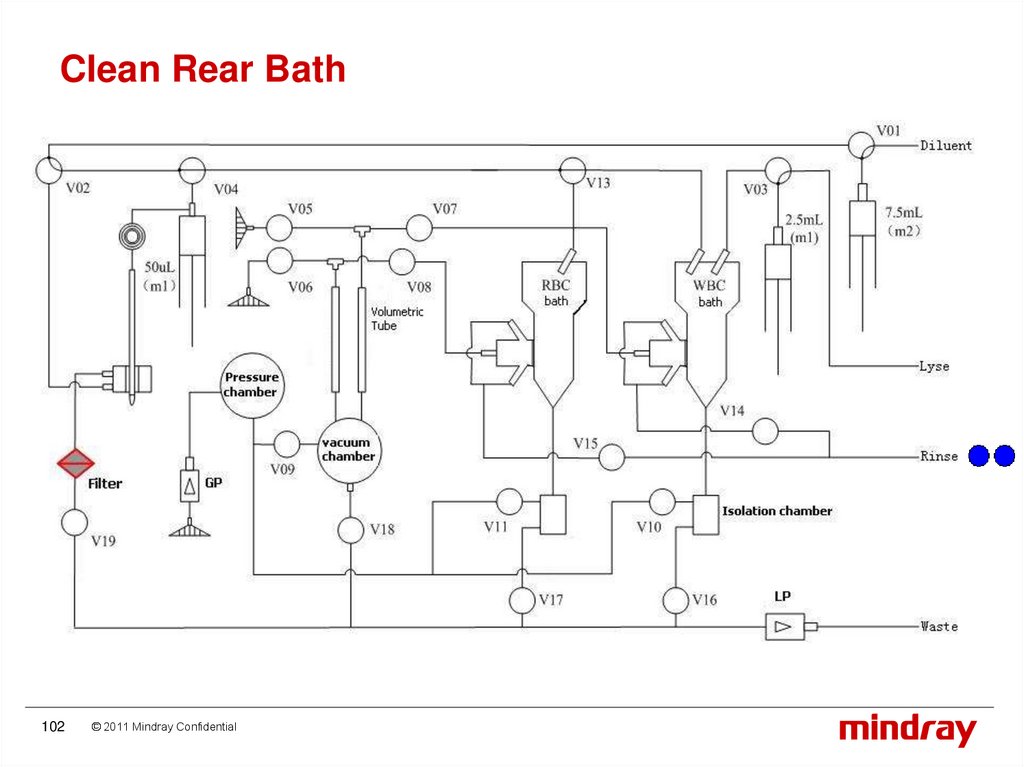
Clean Rear Bath102
© 2011 Mindray Confidential
103.
How about Pre-diluted mode?103
© 2011 Mindray Confidential
104.
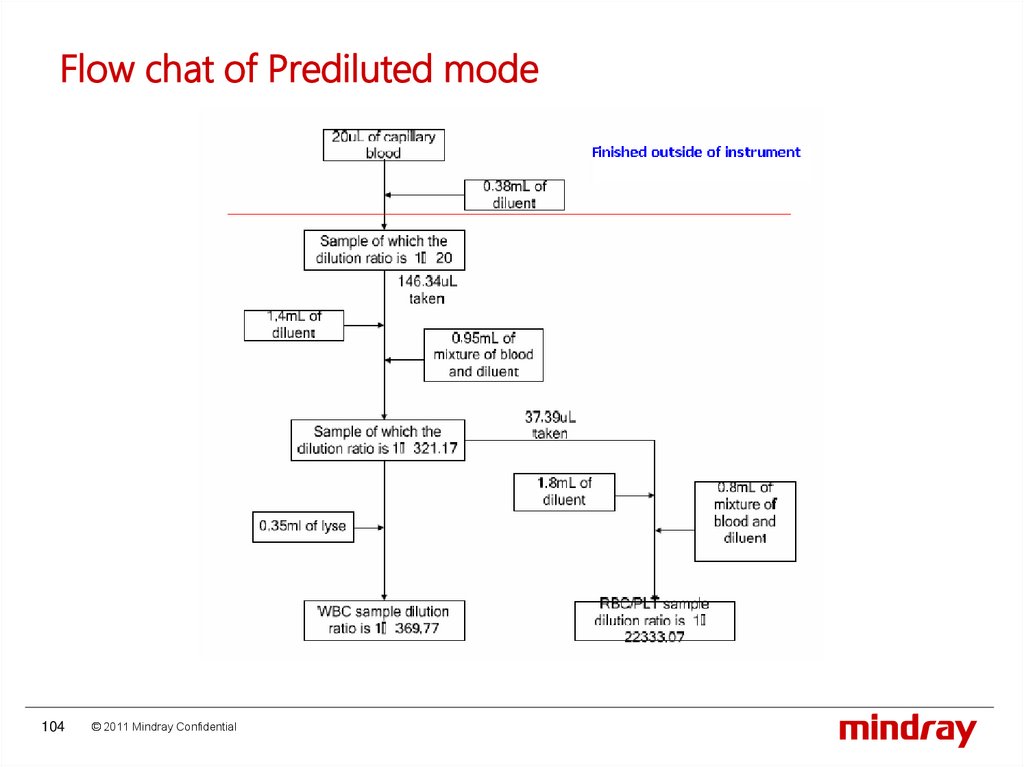
Flow chat of Prediluted mode104
© 2011 Mindray Confidential
105.
Other sequences105
© 2011 Mindray Confidential
106.
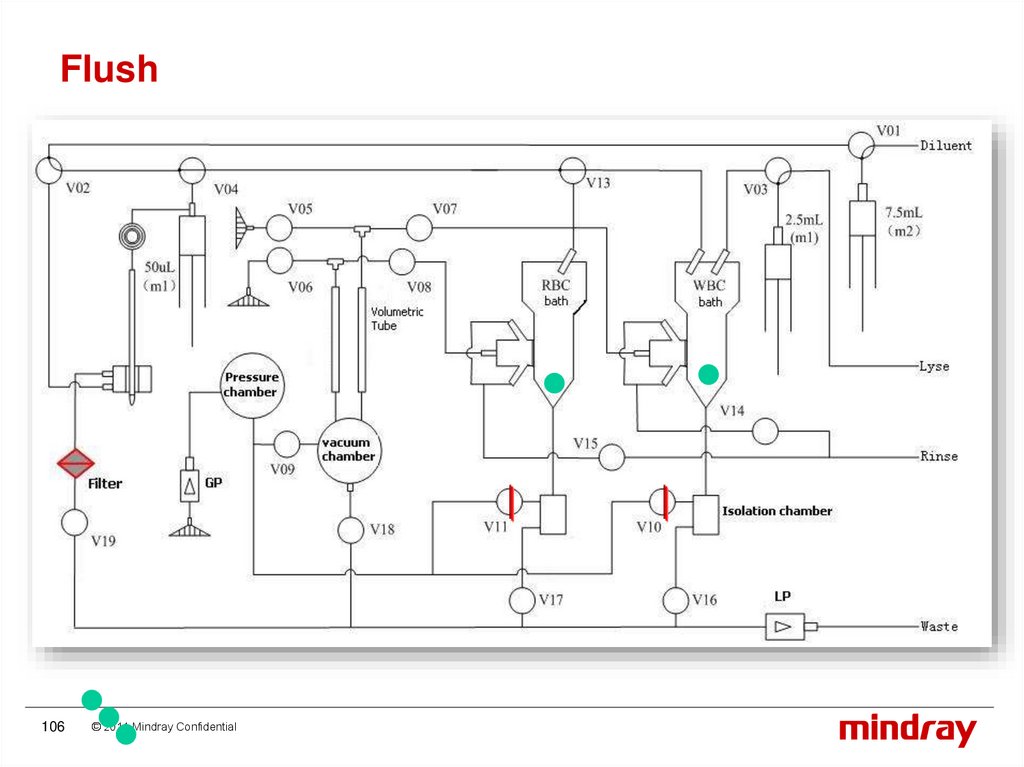
Flush106
© 2011 Mindray Confidential
107.
Hardware107
© 2011 Mindray Confidential
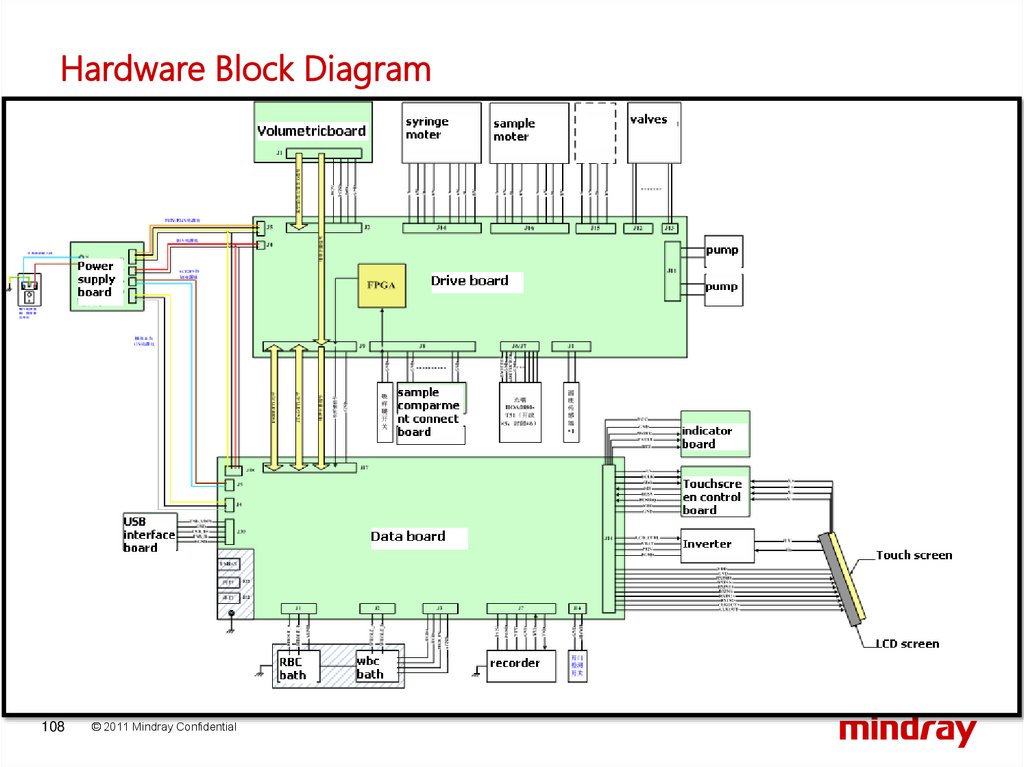
108.
Hardware Block Diagram108
© 2011 Mindray Confidential
109.
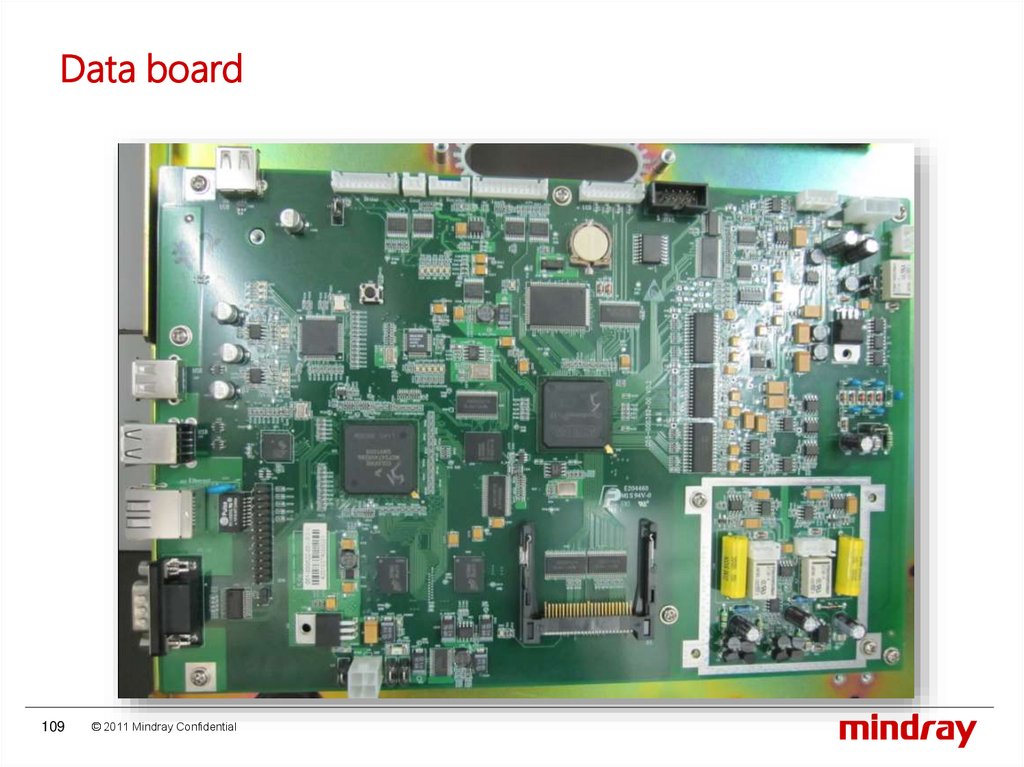
Data board109
© 2011 Mindray Confidential
110.
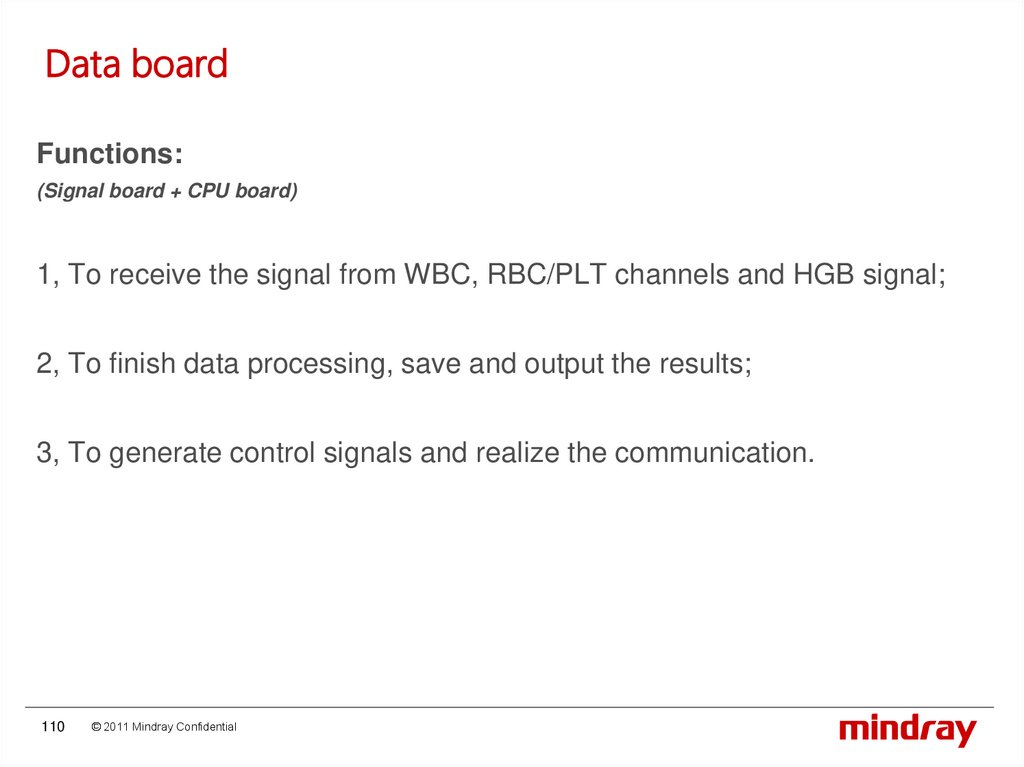
Data boardFunctions:
(Signal board + CPU board)
1, To receive the signal from WBC, RBC/PLT channels and HGB signal;
2, To finish data processing, save and output the results;
3, To generate control signals and realize the communication.
110
© 2011 Mindray Confidential
111.
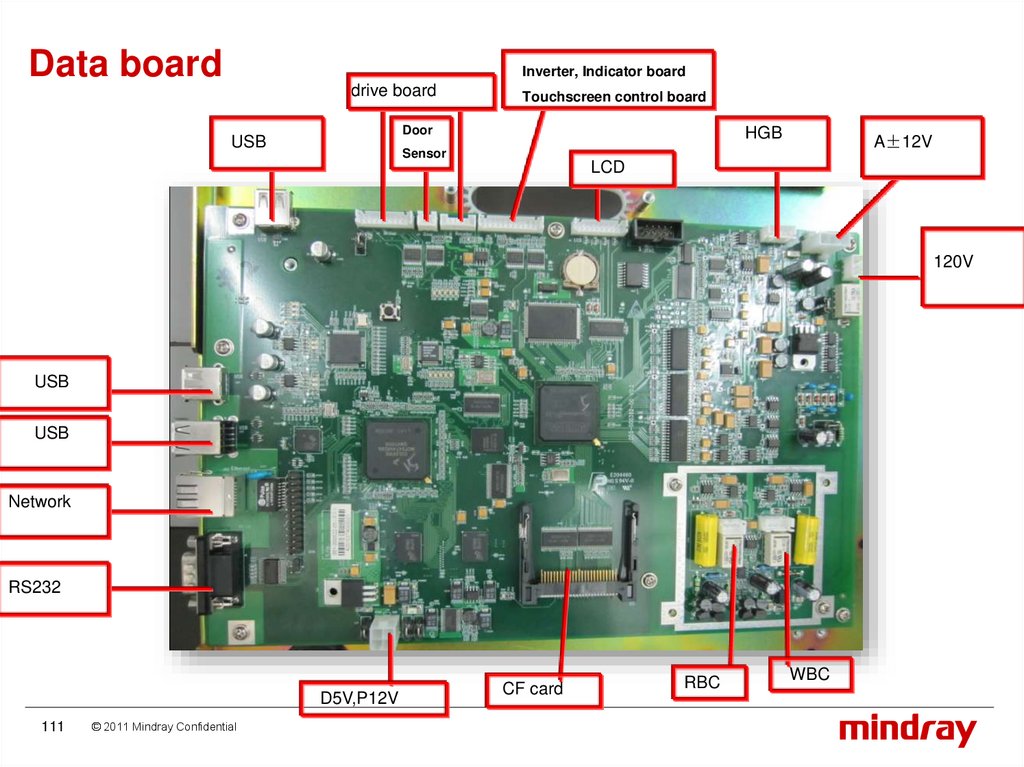
Data boardInverter, Indicator board
drive board
Touchscreen control board
Door
USB
HGB
A±12V
Sensor
LCD
120V
USB
USB
Network
RS232
D5V,P12V
111
© 2011 Mindray Confidential
CF card
RBC
WBC
112.
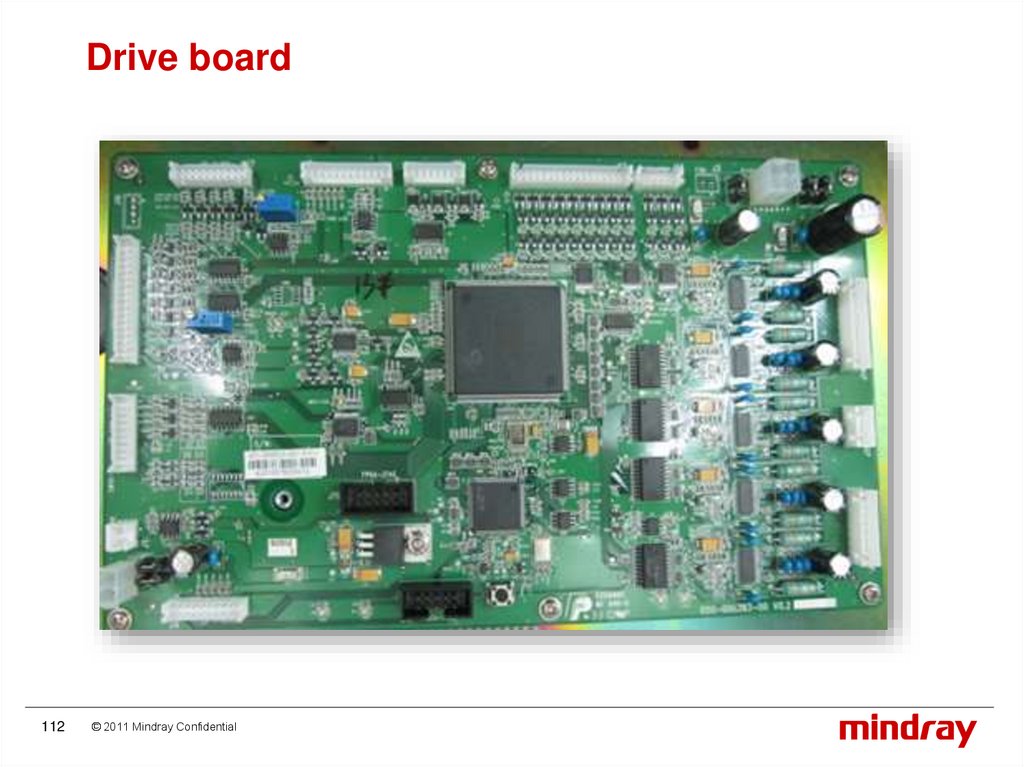
Drive board112
© 2011 Mindray Confidential
113.
Drive boardFunctions:
1, To control the motors, valves and pumps;
2, To monitor the pressure and vacuum;
3, To report status, such as temperature and voltage, to data board.
113
© 2011 Mindray Confidential
114.
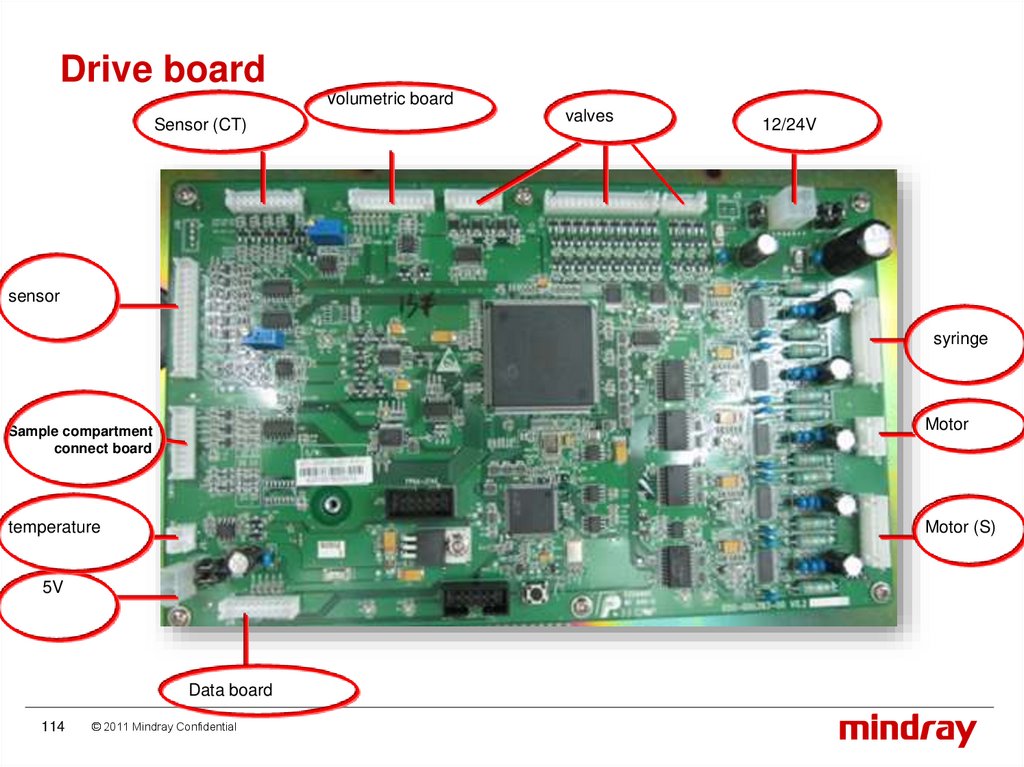
Drive boardVolumetric board
Sensor (CT)
valves
12/24V
sensor
syringe
Motor
Sample compartment
connect board
temperature
Motor (S)
5V
Data board
114
© 2011 Mindray Confidential
115.
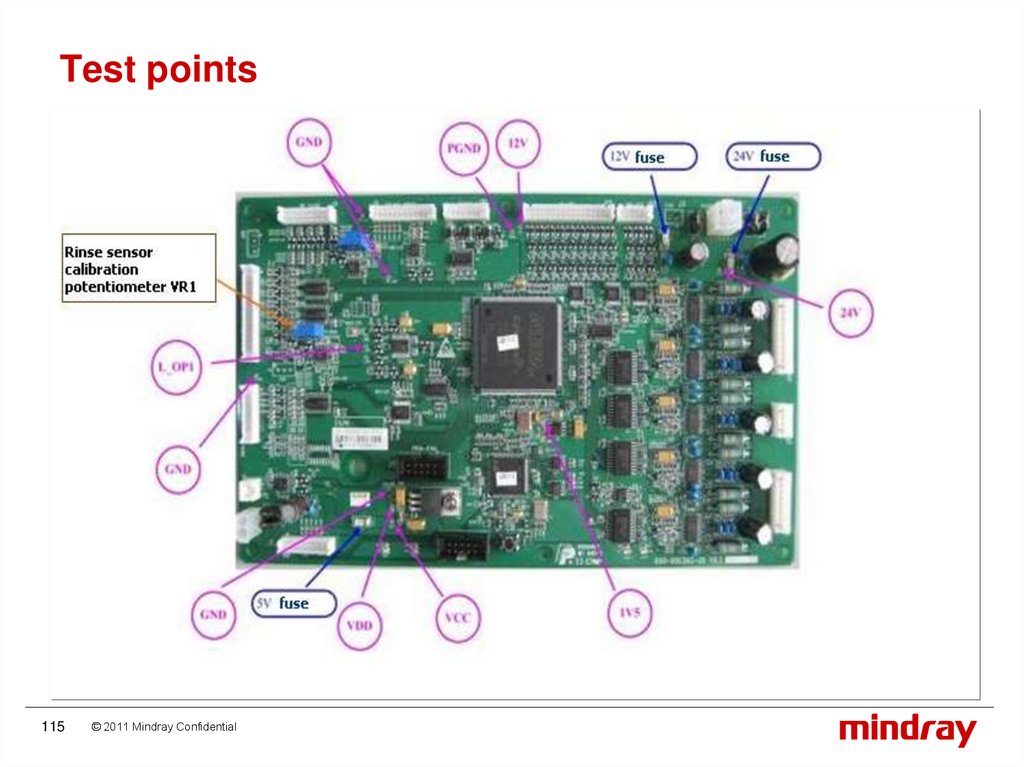
Test points115
© 2011 Mindray Confidential
116.
Drive boardAdjustment:
After replacing the drive board or rinse sensor, calibrate the
photocoupler as following steps:
116
© 2011 Mindray Confidential
117.
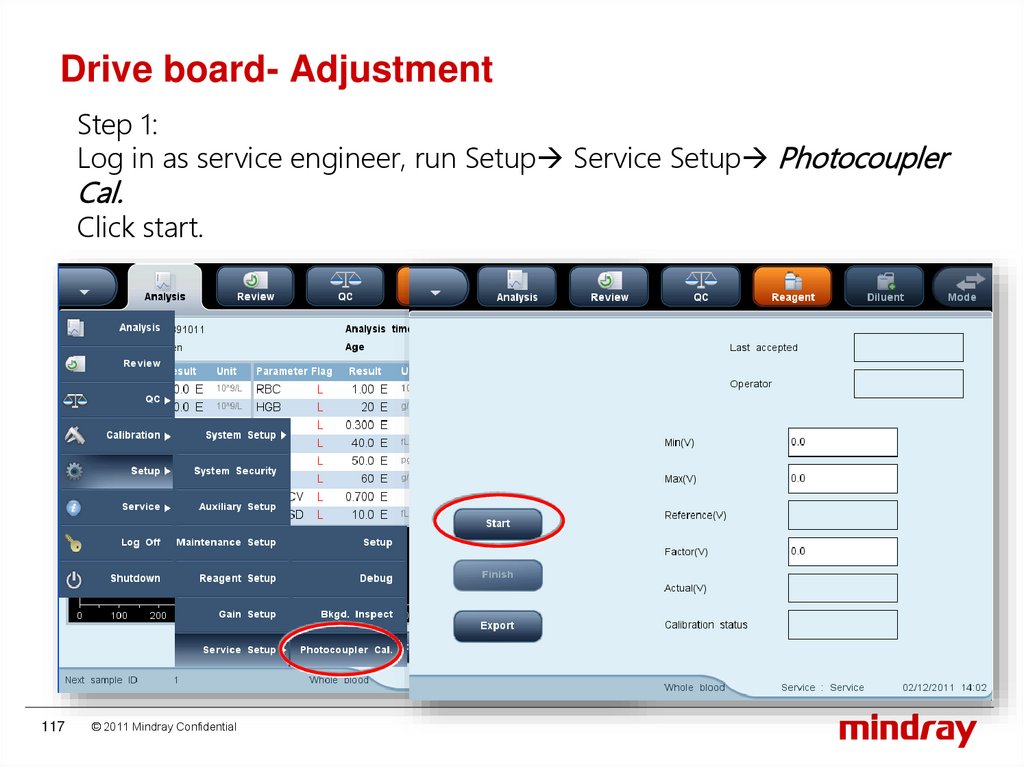
Drive board- AdjustmentStep 1:
Log in as service engineer, run Setup Service Setup Photocoupler
Cal.
Click start.
117
© 2011 Mindray Confidential
118.
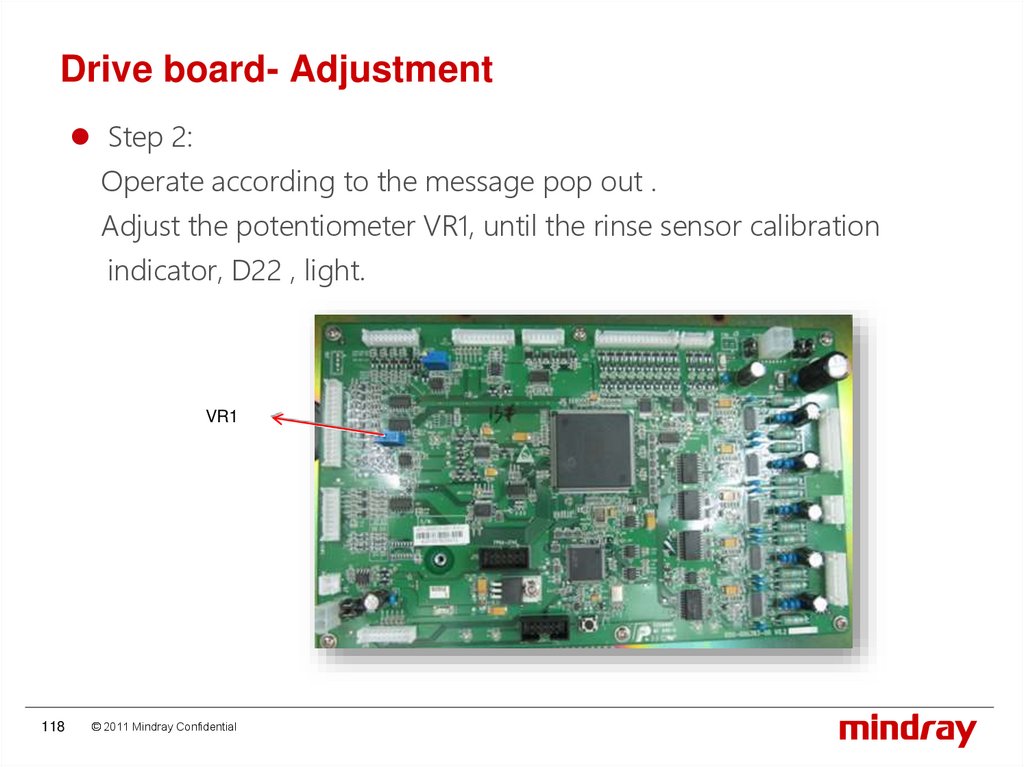
Drive board- AdjustmentStep 2:
Operate according to the message pop out .
Adjust the potentiometer VR1, until the rinse sensor calibration
indicator, D22 , light.
VR1
118
© 2011 Mindray Confidential
119.
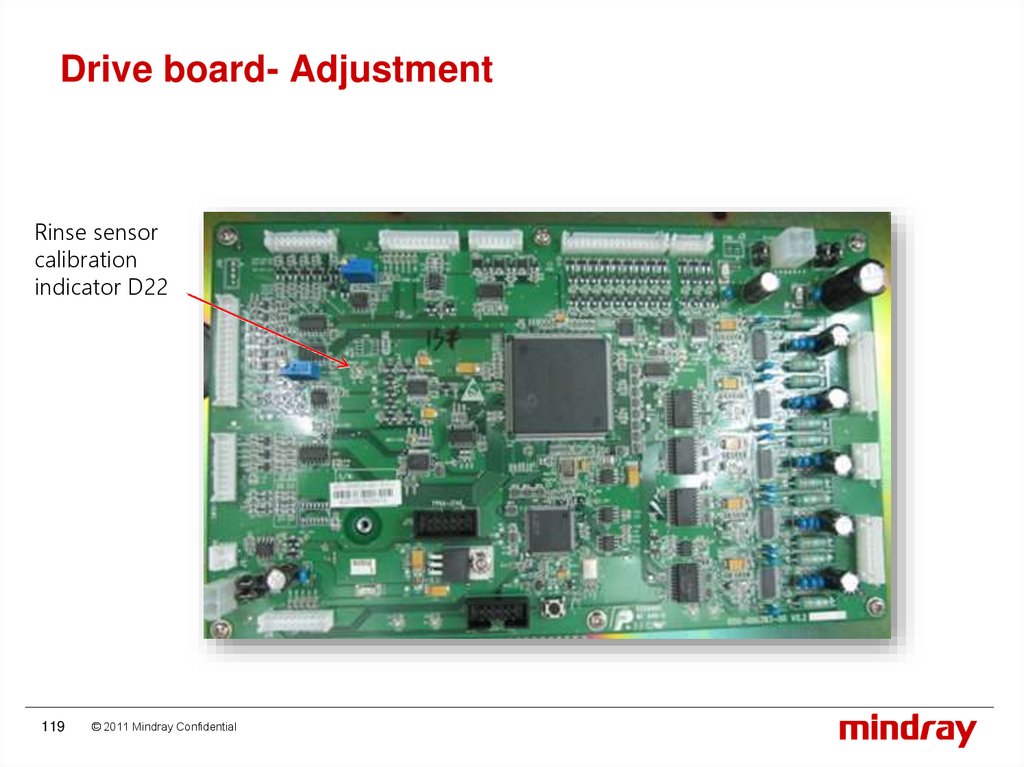
Drive board- AdjustmentRinse sensor
calibration
indicator D22
119
© 2011 Mindray Confidential
120.
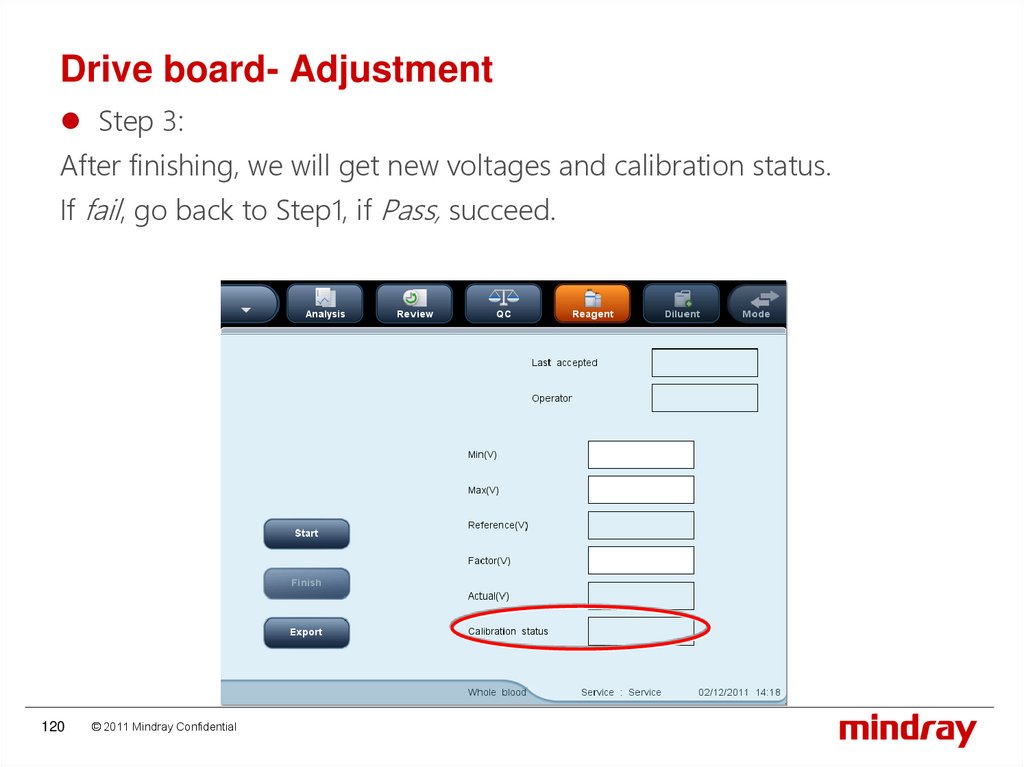
Drive board- AdjustmentStep 3:
After finishing, we will get new voltages and calibration status.
If fail, go back to Step1, if Pass, succeed.
120
© 2011 Mindray Confidential
121.
Power supply boardSupply 6 outputs:
D5V A+12V A-12V AC120V
P12V P24V
121
© 2011 Mindray Confidential
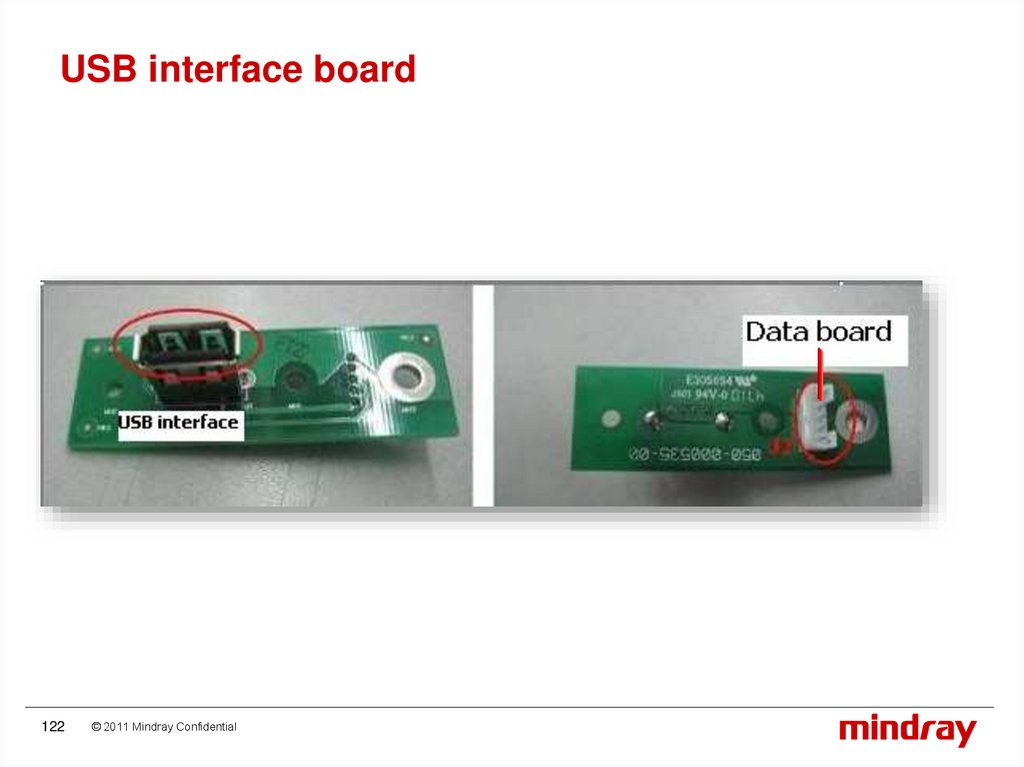
122.
USB interface board122
© 2011 Mindray Confidential
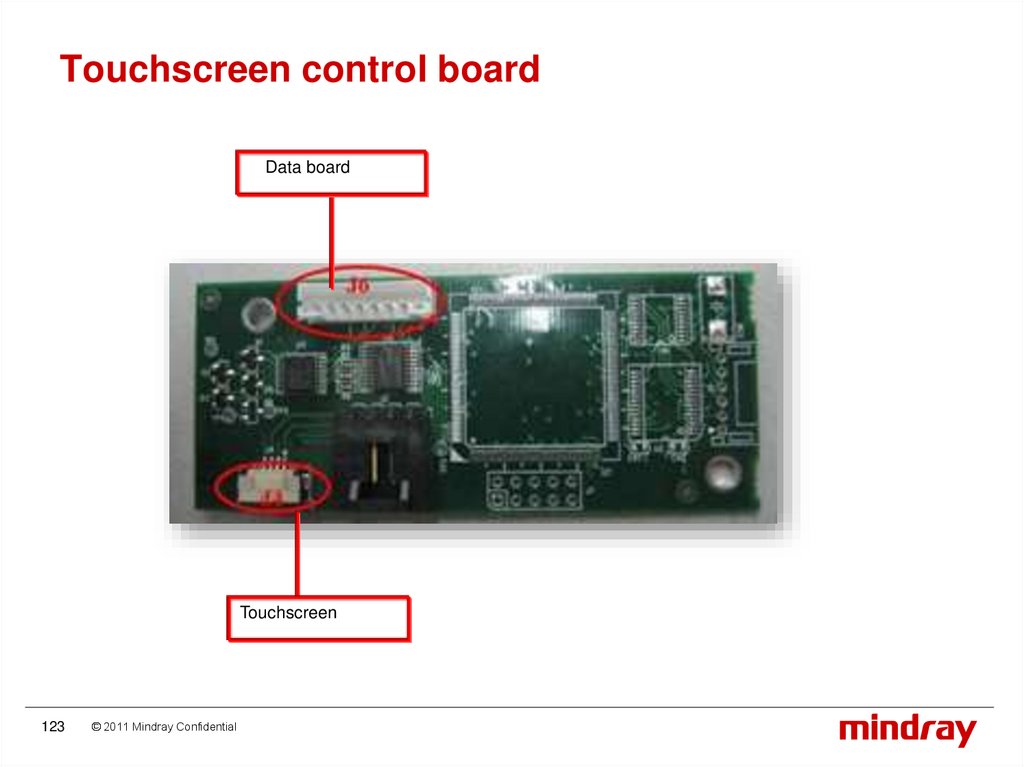
123.
Touchscreen control boardData board
Touchscreen
123
© 2011 Mindray Confidential
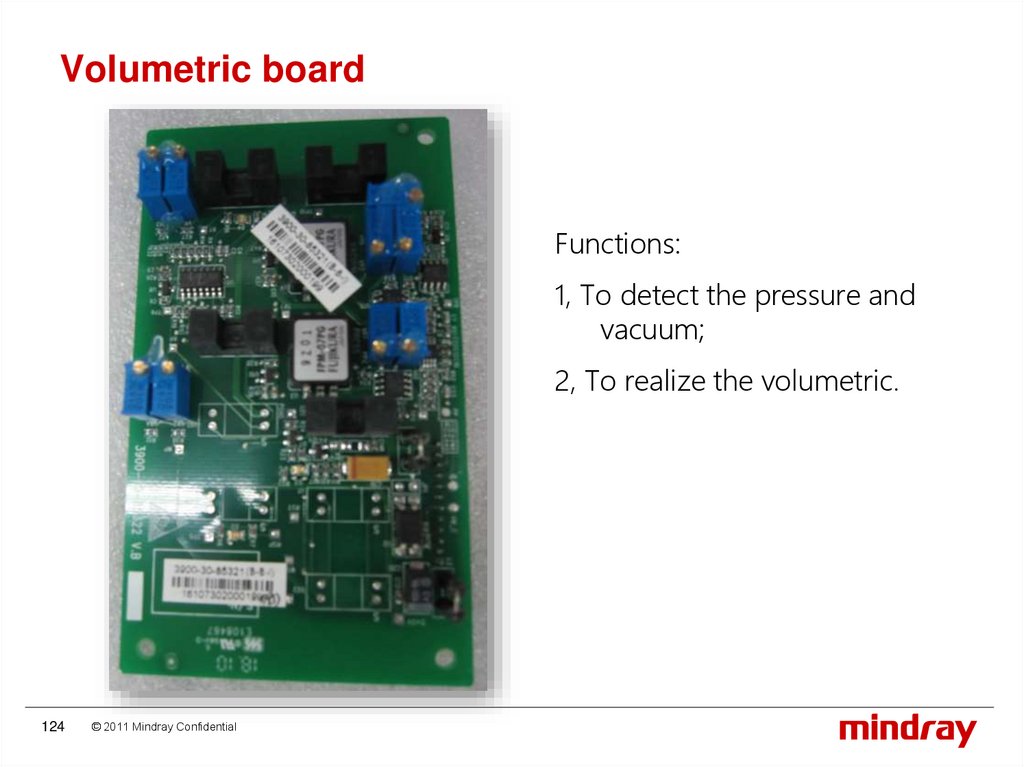
124.
Volumetric boardFunctions:
1, To detect the pressure and
vacuum;
2, To realize the volumetric.
124
© 2011 Mindray Confidential
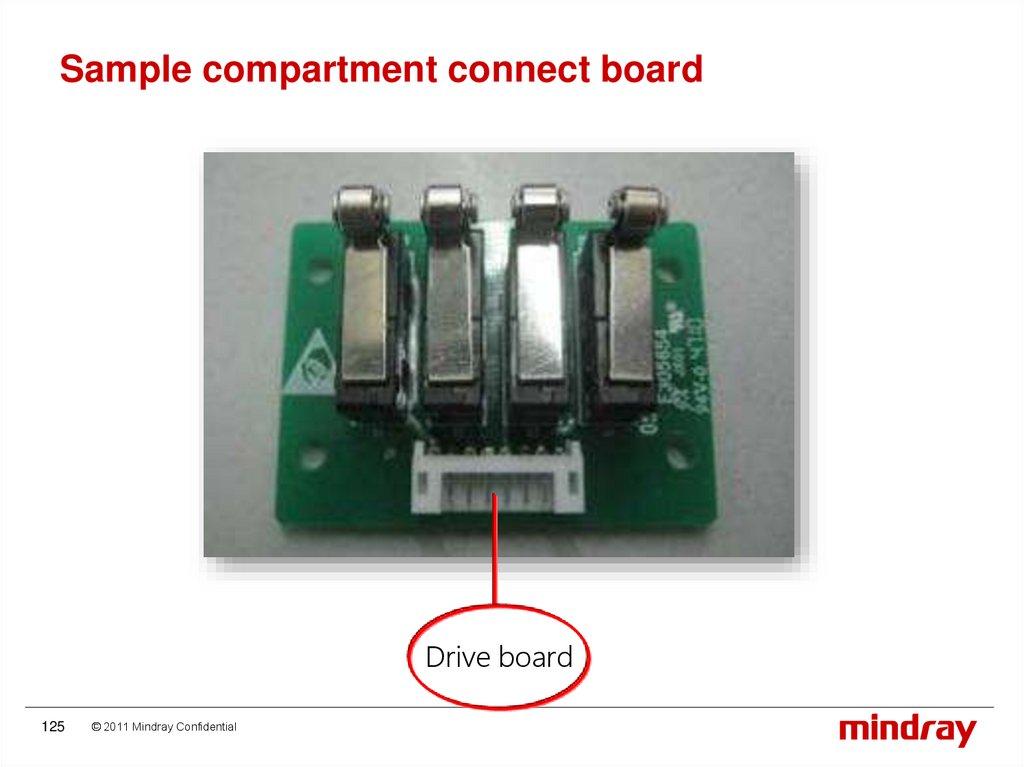
125.
Sample compartment connect boardDrive board
125
© 2011 Mindray Confidential
126.
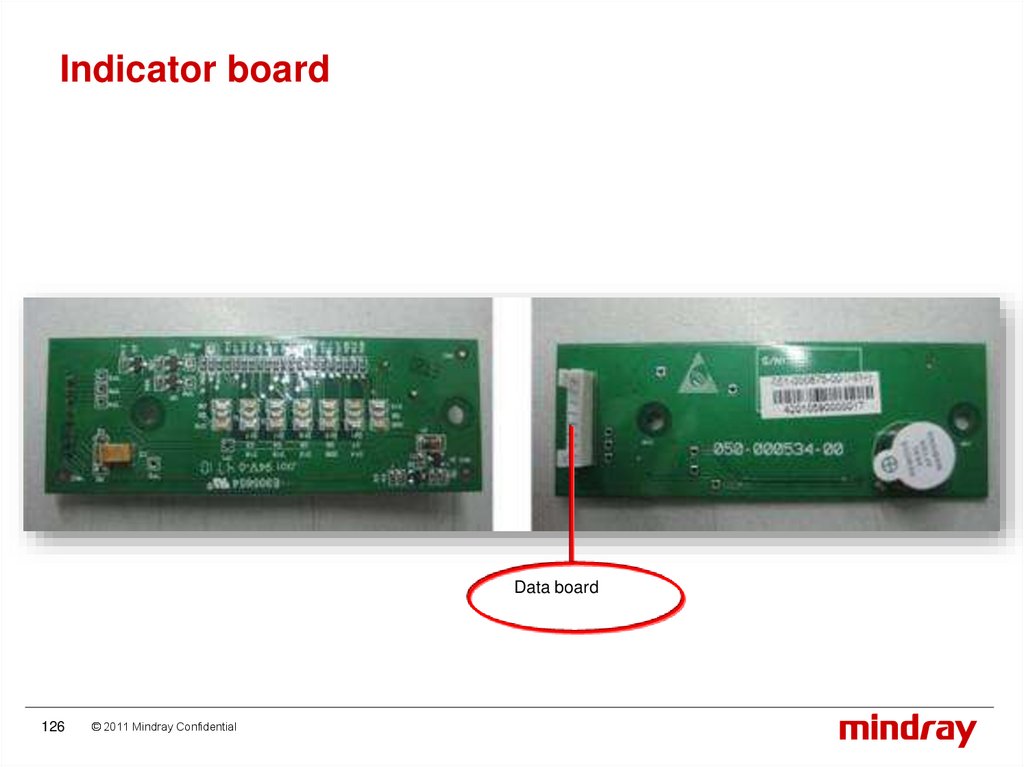
Indicator boardData board
126
© 2011 Mindray Confidential
127.
Troubleshooting127
© 2011 Mindray Confidential
128.
TroubleshootingWBC clog
Vacuum error
No startup
Display problem
HGB blank error
Motor error
128
© 2011 Mindray Confidential
129.
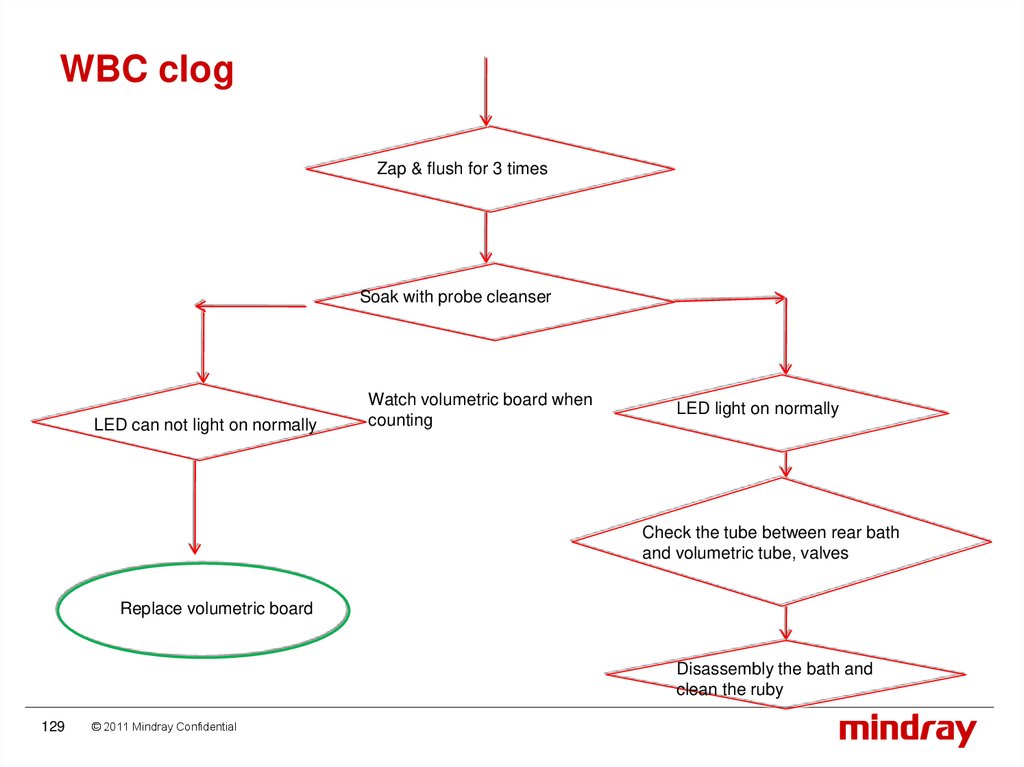
WBC clogZap & flush for 3 times
Soak with probe cleanser
LED can not light on normally
Watch volumetric board when
counting
LED light on normally
Check the tube between rear bath
and volumetric tube, valves
Replace volumetric board
Disassembly the bath and
clean the ruby
129
© 2011 Mindray Confidential
130.
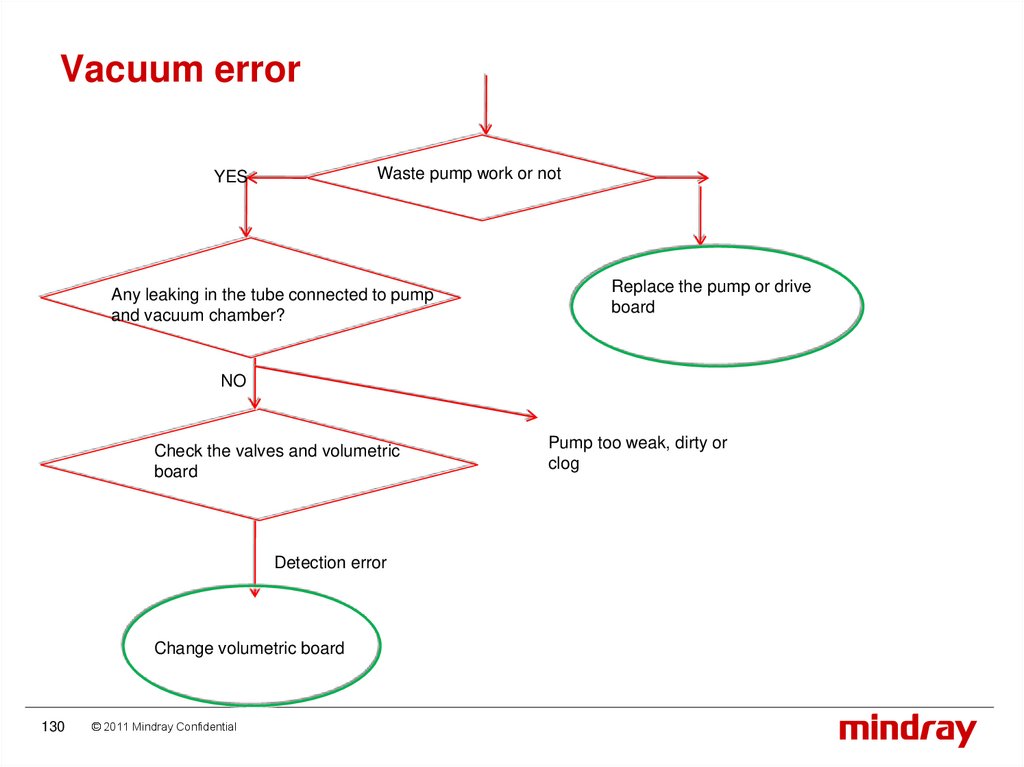
Vacuum errorWaste pump work or not
YES
Any leaking in the tube connected to pump
and vacuum chamber?
Replace the pump or drive
board
NO
Check the valves and volumetric
board
Detection error
Change volumetric board
130
© 2011 Mindray Confidential
Pump too weak, dirty or
clog
131.
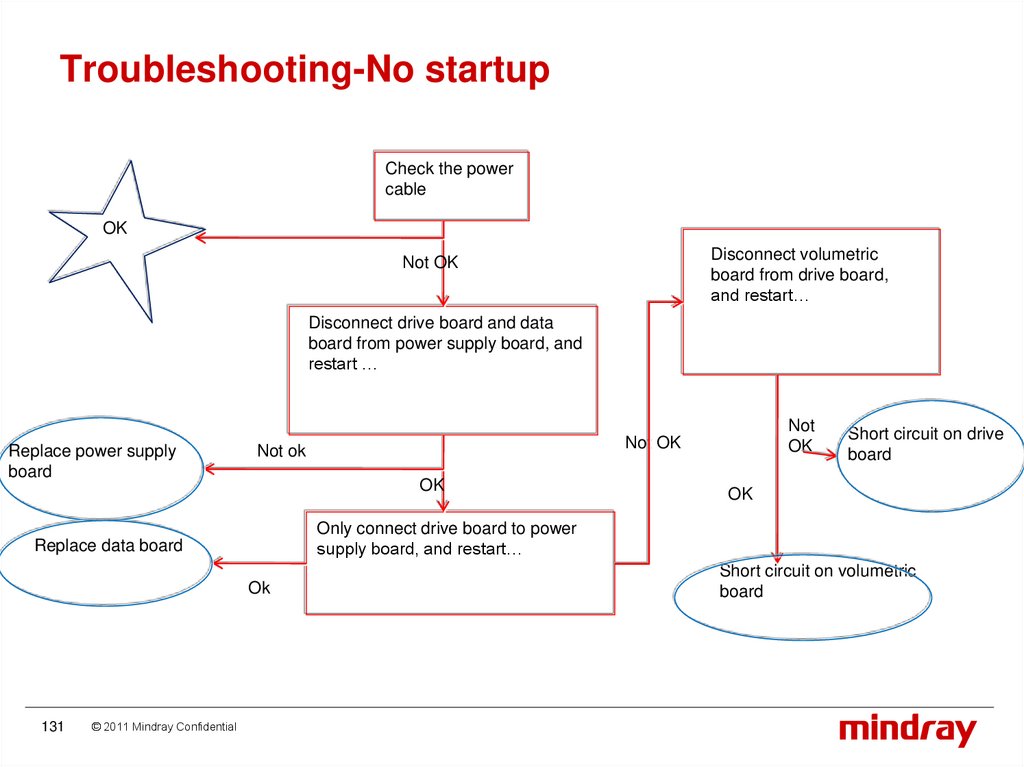
Troubleshooting-No startupCheck the power
cable
OK
Disconnect volumetric
board from drive board,
and restart…
Not OK
Disconnect drive board and data
board from power supply board, and
restart …
Replace power supply
board
Not ok
OK
Ok
© 2011 Mindray Confidential
Short circuit on drive
board
OK
Only connect drive board to power
supply board, and restart…
Replace data board
131
Not
OK
Not OK
Short circuit on volumetric
board
132.
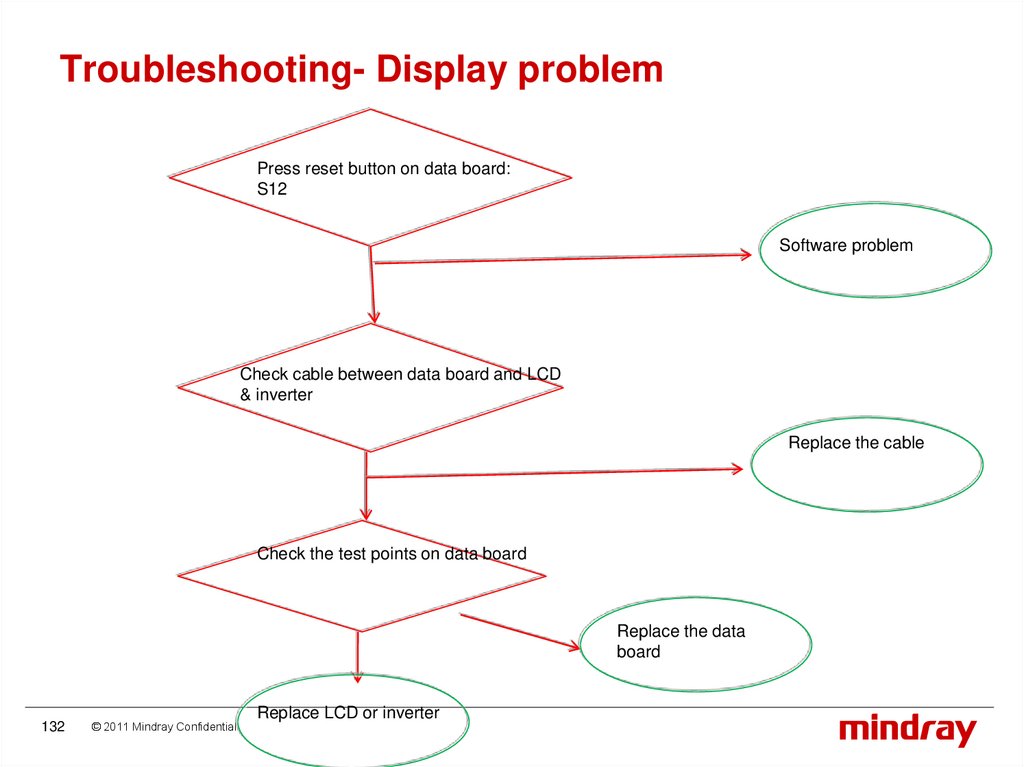
Troubleshooting- Display problemPress reset button on data board:
S12
Software problem
Check cable between data board and LCD
& inverter
Replace the cable
Check the test points on data board
Replace the data
board
132
© 2011 Mindray Confidential
Replace LCD or inverter
133.
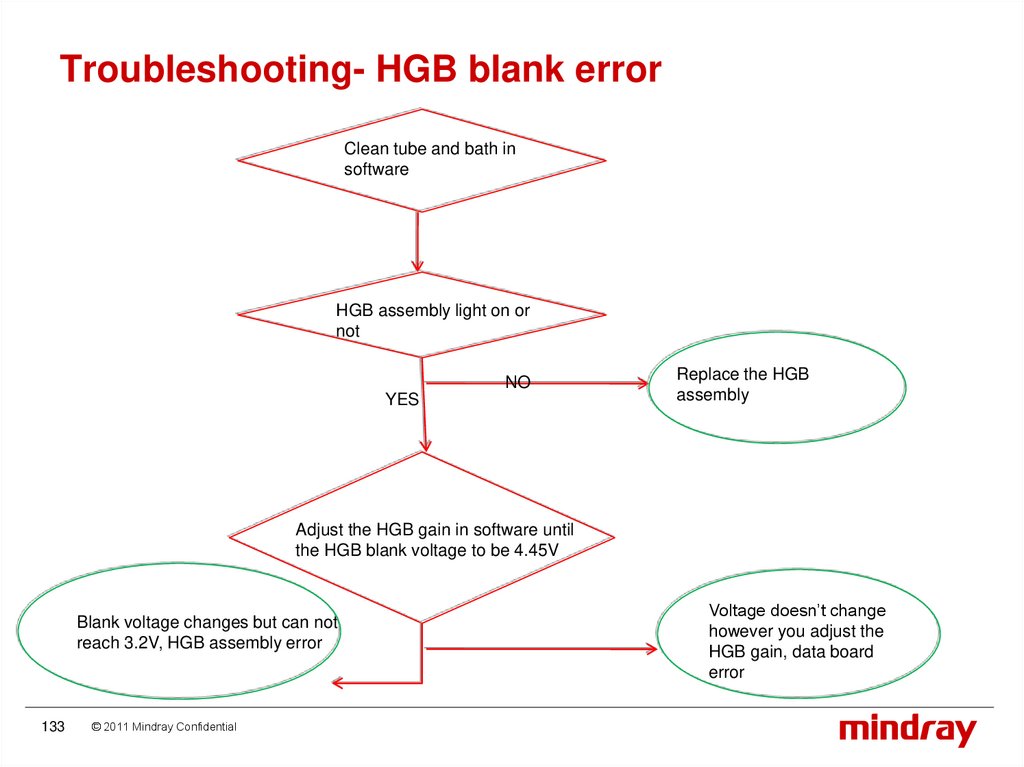
Troubleshooting- HGB blank errorClean tube and bath in
software
HGB assembly light on or
not
NO
YES
Replace the HGB
assembly
Adjust the HGB gain in software until
the HGB blank voltage to be 4.45V
Blank voltage changes but can not
reach 3.2V, HGB assembly error
133
© 2011 Mindray Confidential
Voltage doesn’t change
however you adjust the
HGB gain, data board
error
134.
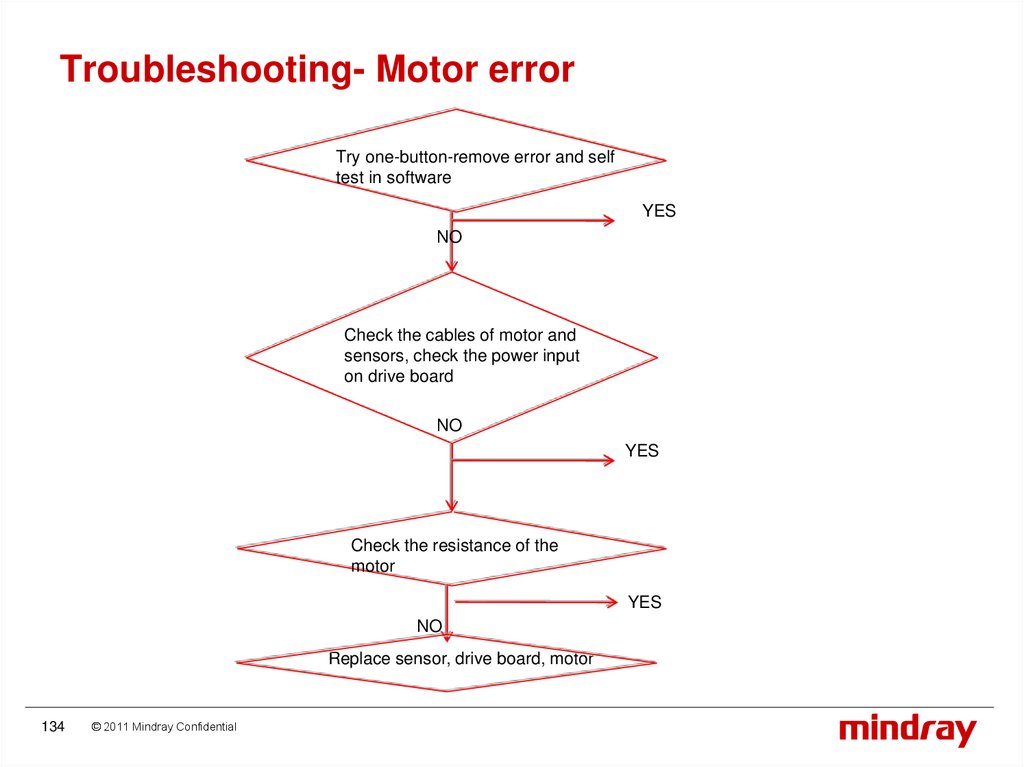
Troubleshooting- Motor errorTry one-button-remove error and self
test in software
YES
NO
Check the cables of motor and
sensors, check the power input
on drive board
NO
YES
Check the resistance of the
motor
YES
NO
Replace sensor, drive board, motor
134
© 2011 Mindray Confidential
135.
System Structure135
© 2011 Mindray Confidential
136.
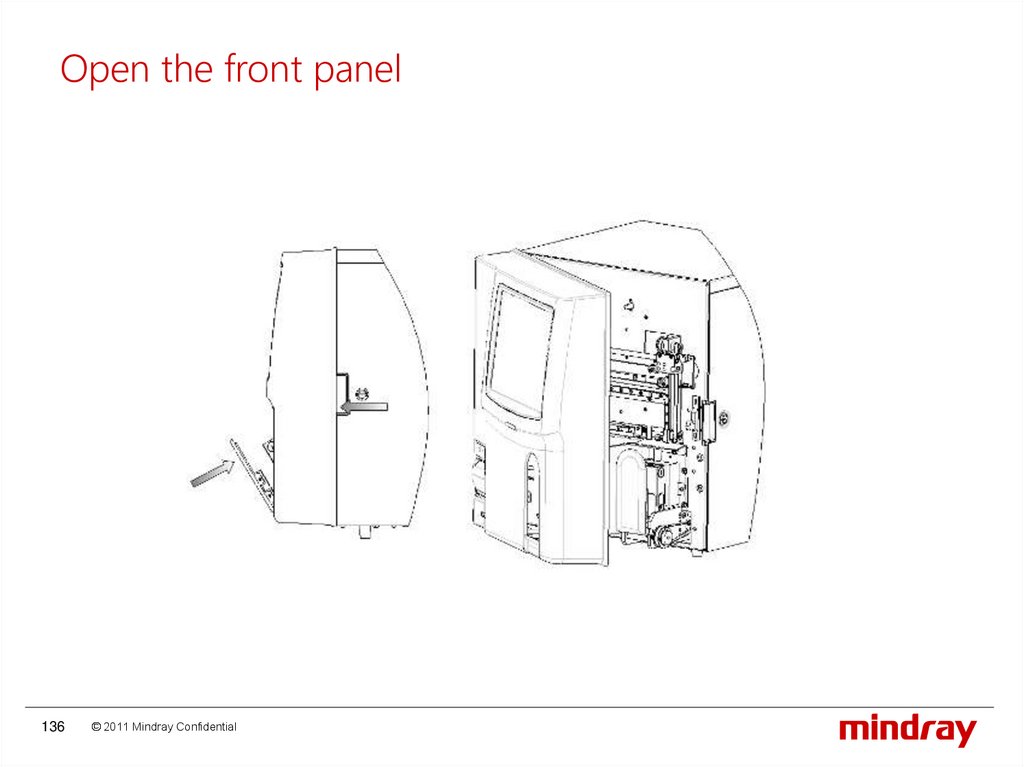
Open the front panel136
© 2011 Mindray Confidential
137.
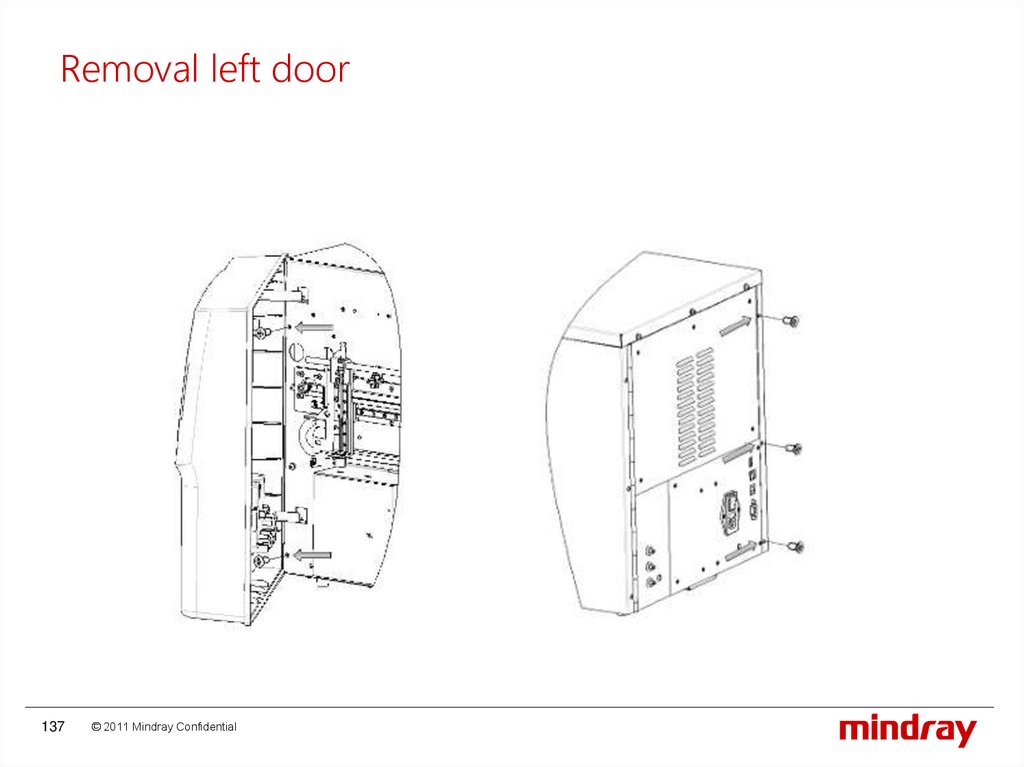
Removal left door137
© 2011 Mindray Confidential
138.
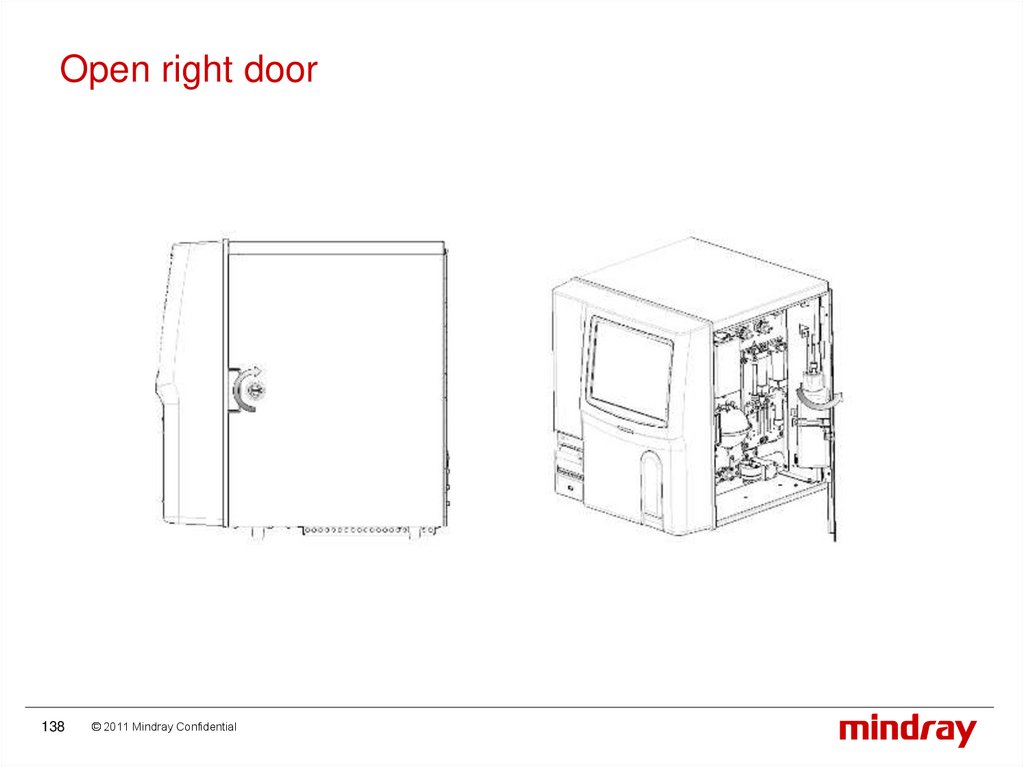
Open right door138
© 2011 Mindray Confidential
139.
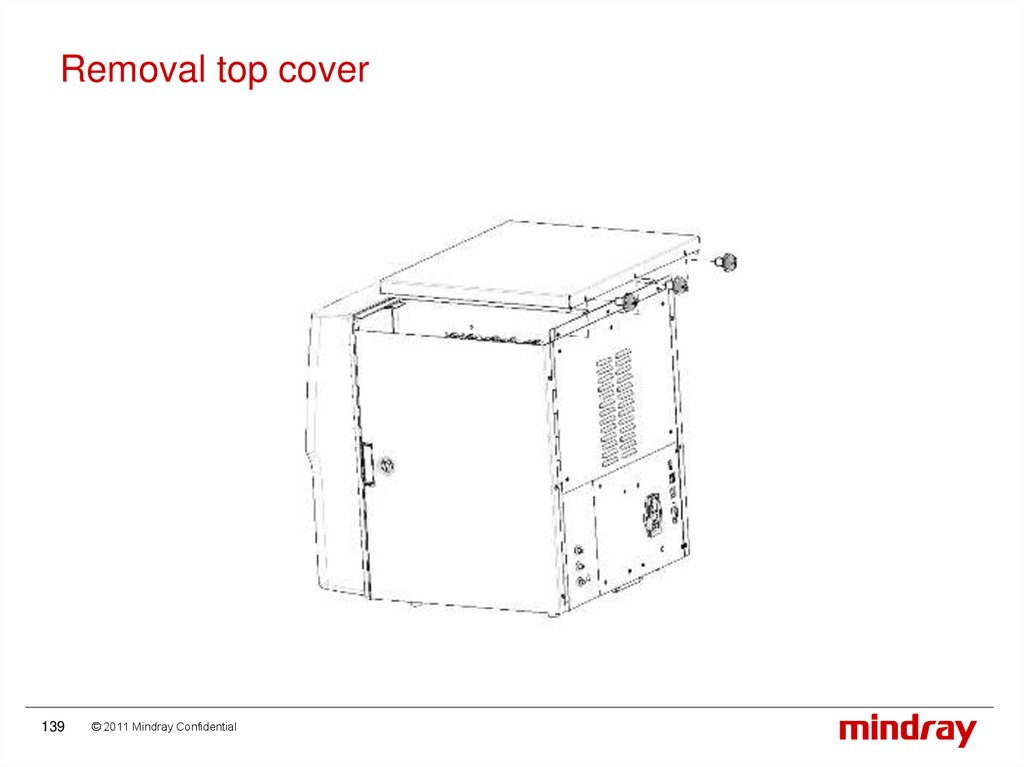
Removal top cover139
© 2011 Mindray Confidential
140.
Let’s do the disassembly!Practice 2 person 1 team.
30min
140
© 2011 Mindray Confidential
141.
Maintenance141
© 2011 Mindray Confidential
142.
Maintenance142
Recommended maintenance content
Adjust the position of sample probe
Touchscreen calibration
Service
© 2011 Mindray Confidential
143.
MaintenanceRecommended maintenance content
143
© 2011 Mindray Confidential
144.
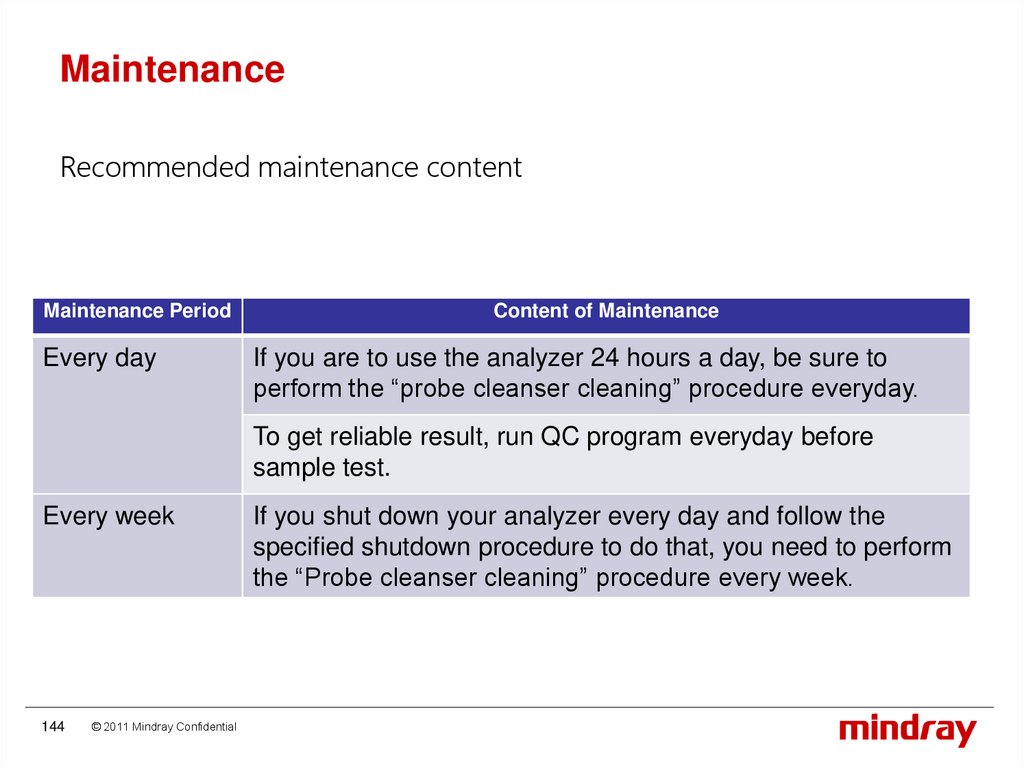
MaintenanceRecommended maintenance content
Maintenance Period
Every day
Content of Maintenance
If you are to use the analyzer 24 hours a day, be sure to
perform the “probe cleanser cleaning” procedure everyday.
To get reliable result, run QC program everyday before
sample test.
Every week
144
© 2011 Mindray Confidential
If you shut down your analyzer every day and follow the
specified shutdown procedure to do that, you need to perform
the “Probe cleanser cleaning” procedure every week.
145.
MaitenanceMaintenance
Period
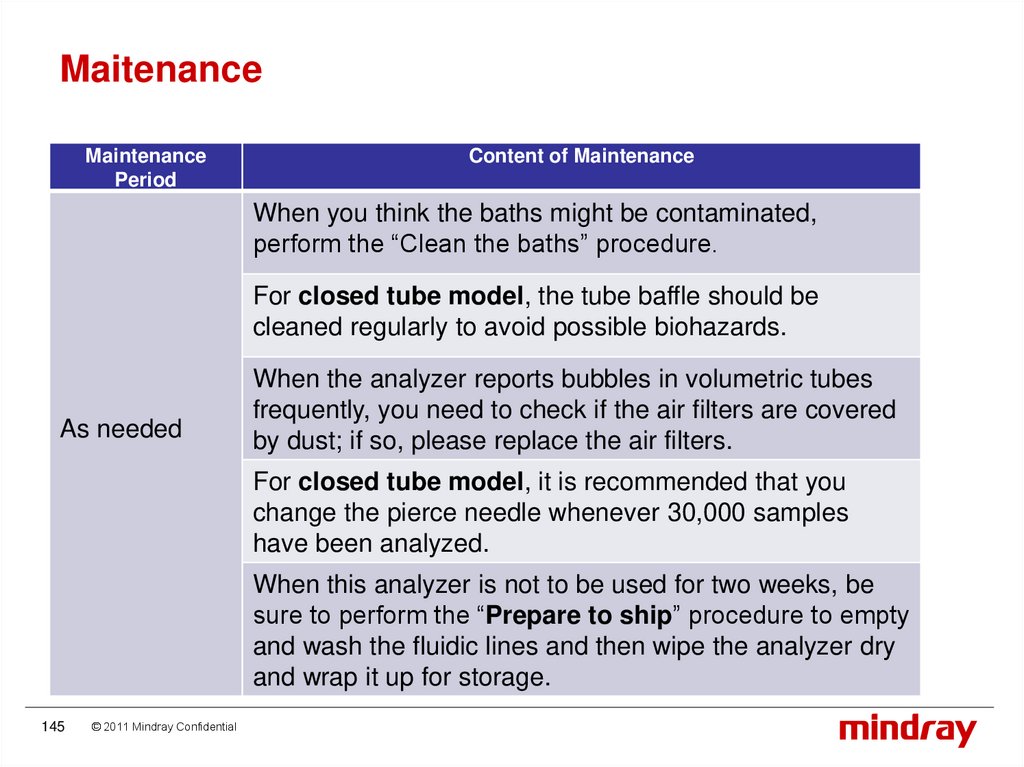
Content of Maintenance
When you think the baths might be contaminated,
perform the “Clean the baths” procedure.
For closed tube model, the tube baffle should be
cleaned regularly to avoid possible biohazards.
As needed
When the analyzer reports bubbles in volumetric tubes
frequently, you need to check if the air filters are covered
by dust; if so, please replace the air filters.
For closed tube model, it is recommended that you
change the pierce needle whenever 30,000 samples
have been analyzed.
When this analyzer is not to be used for two weeks, be
sure to perform the “Prepare to ship” procedure to empty
and wash the fluidic lines and then wipe the analyzer dry
and wrap it up for storage.
145
© 2011 Mindray Confidential
146.
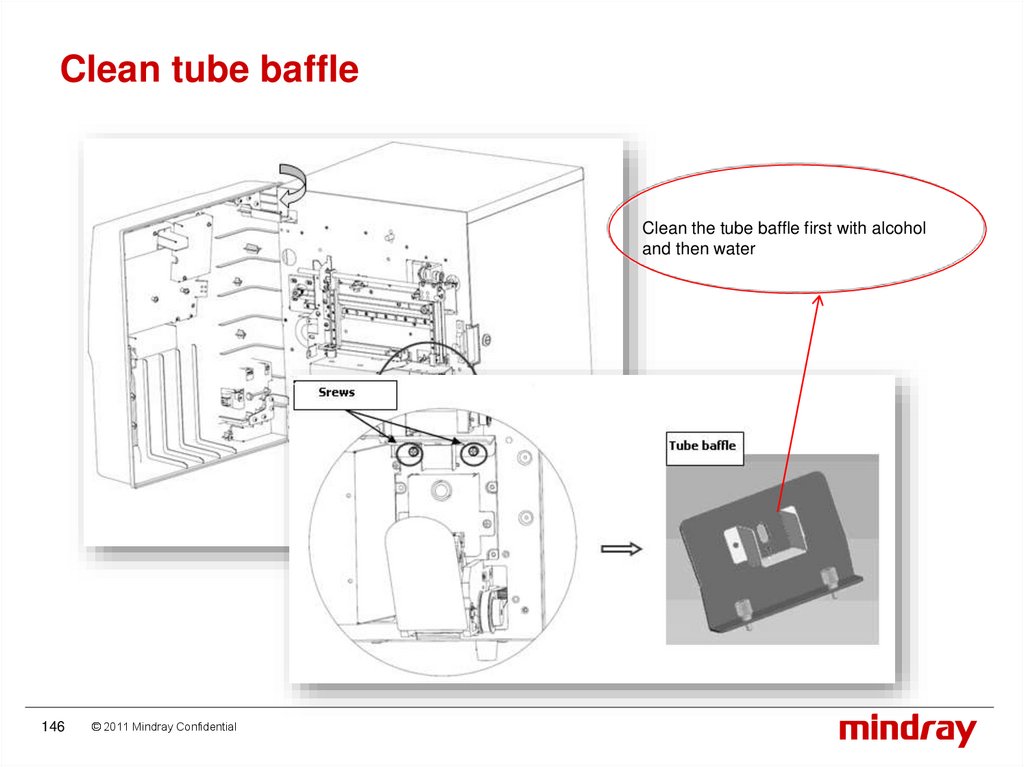
Clean tube baffleClean the tube baffle first with alcohol
and then water
146
© 2011 Mindray Confidential
147.
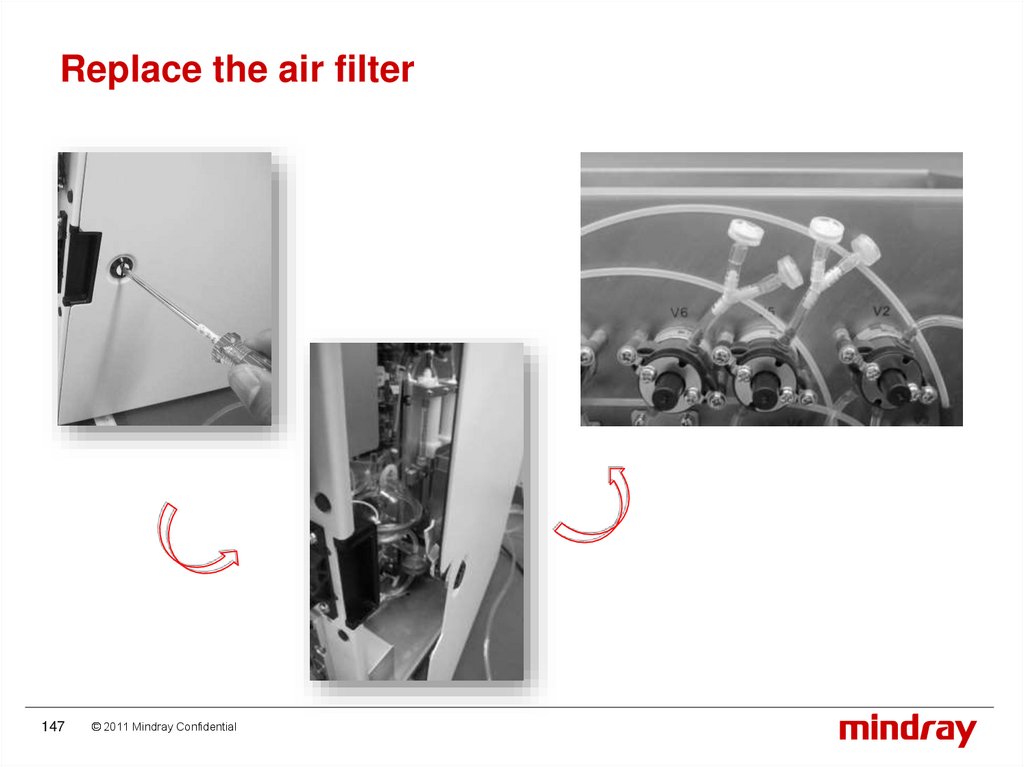
Replace the air filter147
© 2011 Mindray Confidential
148.
MaintenanceAdjust the position of sample probe
148
© 2011 Mindray Confidential
149.
Adjust the position of sample probePrecondition
After replacing sample assembly.
Tools:
1, sample probe Y-position fixture
2, sample probe X-position fixture
149
Procedures:
© 2011 Mindray Confidential
150.
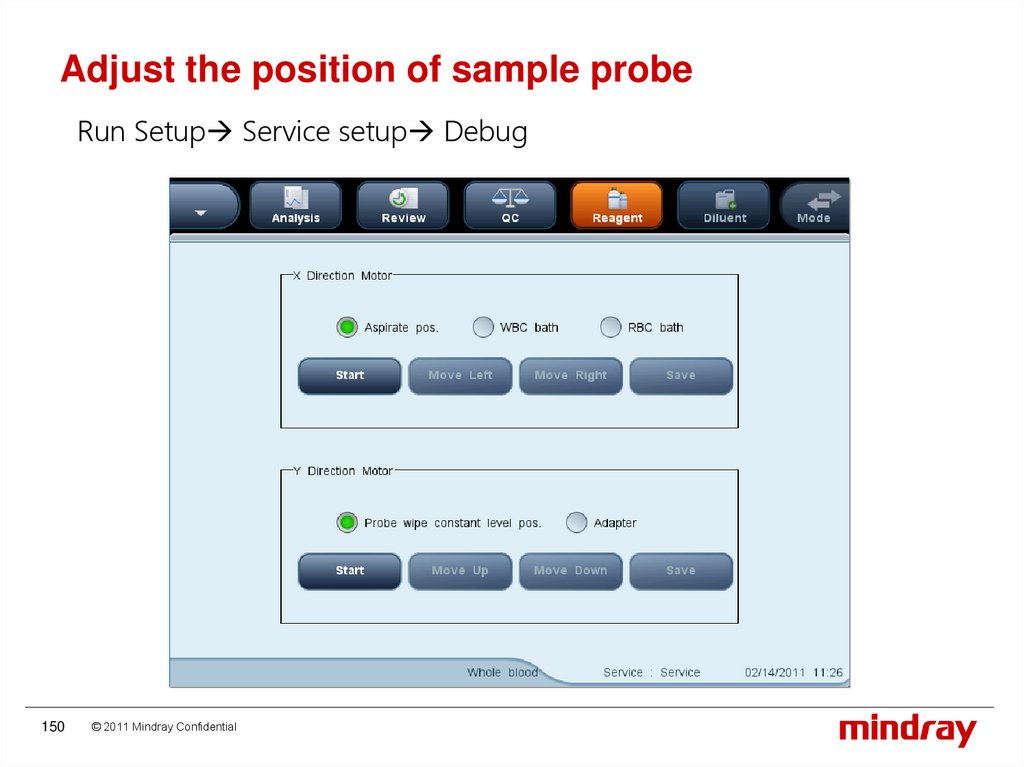
Adjust the position of sample probeRun Setup Service setup Debug
150
© 2011 Mindray Confidential
151.
Adjust the position of sample probe1, Adjust the position of wipe block
151
© 2011 Mindray Confidential
152.
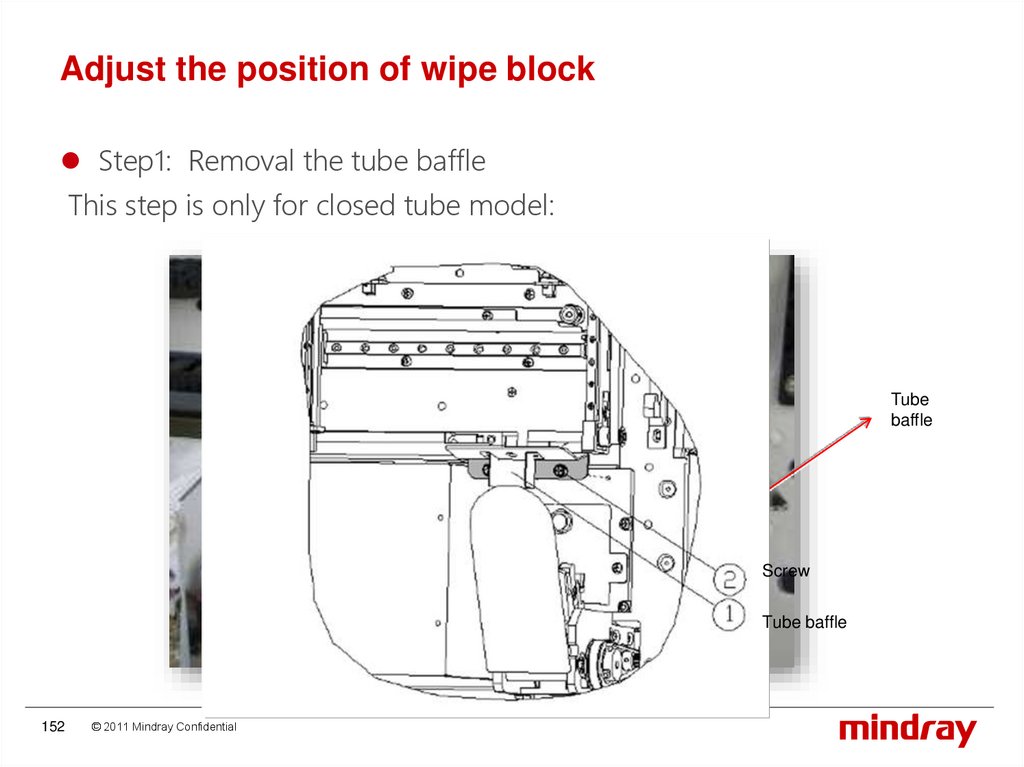
Adjust the position of wipe blockStep1: Removal the tube baffle
This step is only for closed tube model:
Tube
baffle
Screw
Tube baffle
152
© 2011 Mindray Confidential
153.
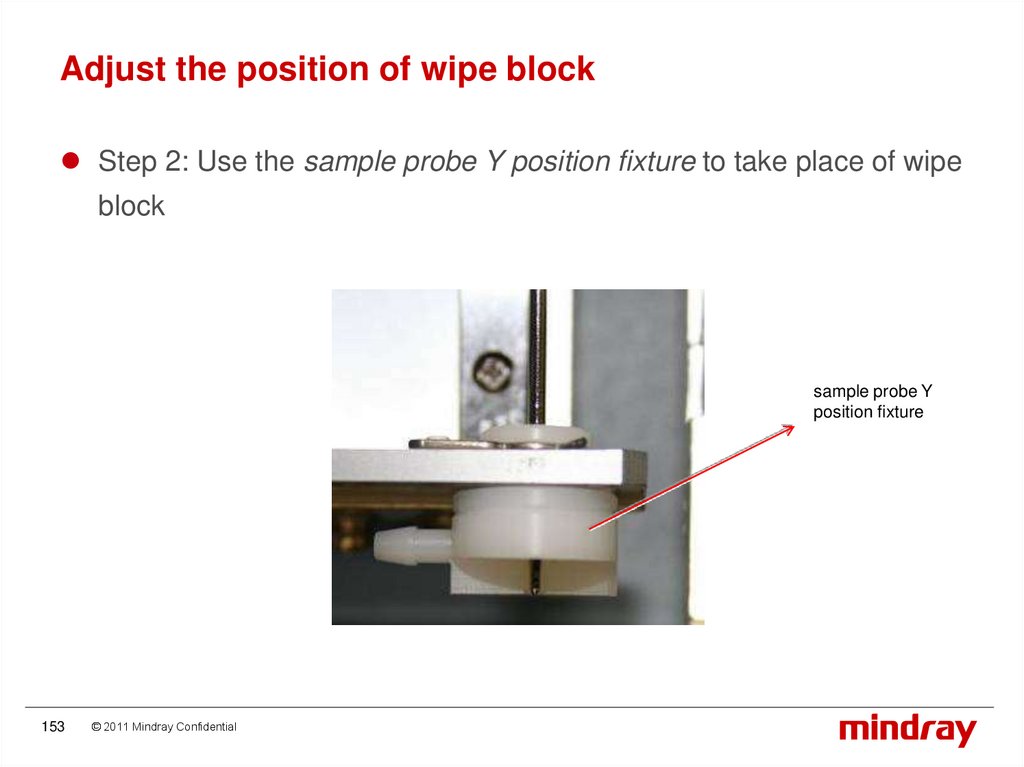
Adjust the position of wipe blockStep 2: Use the sample probe Y position fixture to take place of wipe
block
sample probe Y
position fixture
153
© 2011 Mindray Confidential
154.
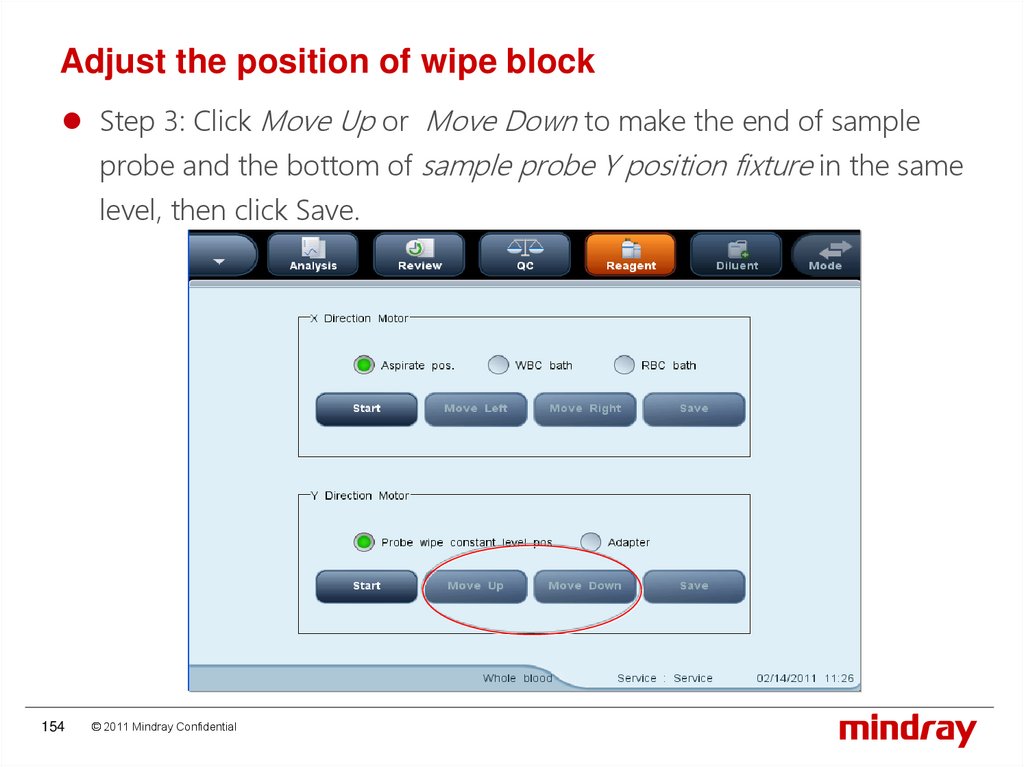
Adjust the position of wipe blockStep 3: Click Move Up or Move Down to make the end of sample
probe and the bottom of sample probe Y position fixture in the same
level, then click Save.
154
© 2011 Mindray Confidential
155.
Adjust the position of wipe blockStep 4: Removal the fixture and fix the wipe block and tube baffle.
155
© 2011 Mindray Confidential
156.
Adjust the position of sample probe2, Adjust the position of sample probe above
WBC&RBC bath
156
© 2011 Mindray Confidential
157.
Adjust the position of sample probe above WBC&RBCbath
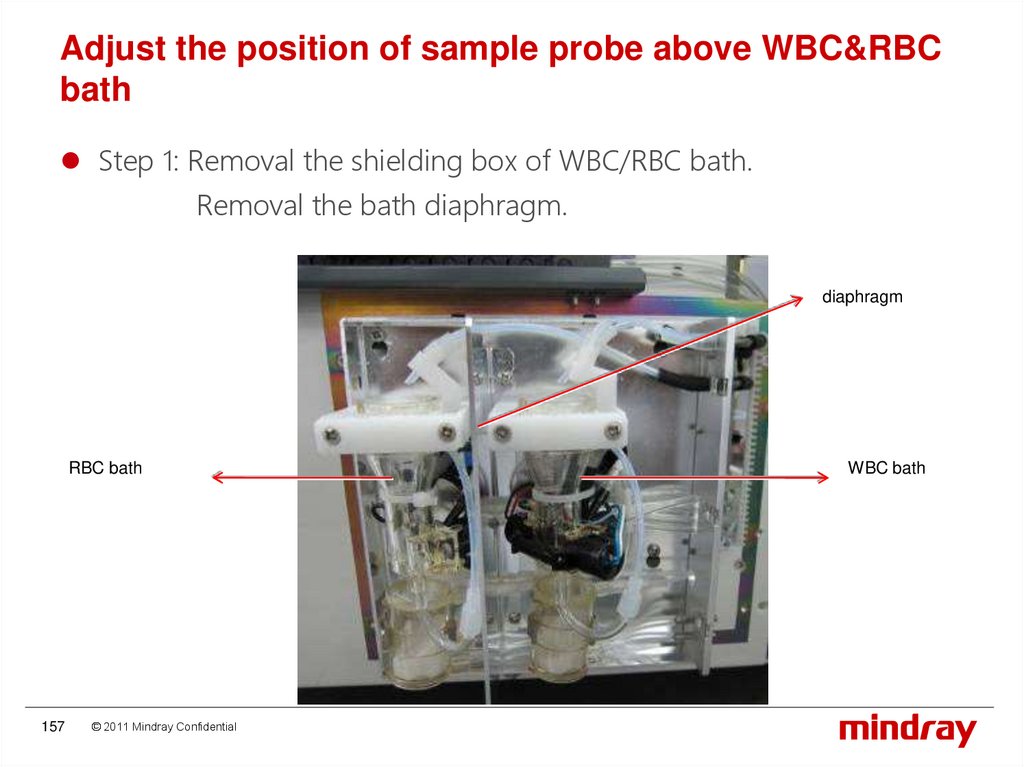
Step 1: Removal the shielding box of WBC/RBC bath.
Removal the bath diaphragm.
diaphragm
RBC bath
157
© 2011 Mindray Confidential
WBC bath
158.
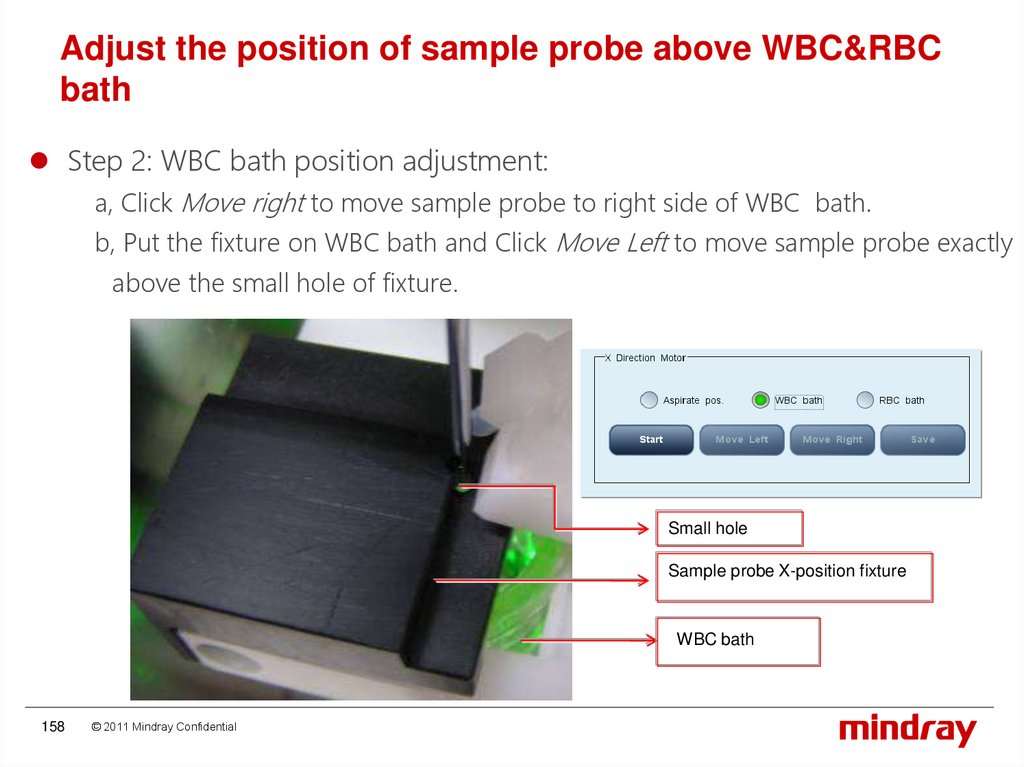
Adjust the position of sample probe above WBC&RBCbath
Step 2: WBC bath position adjustment:
a, Click Move right to move sample probe to right side of WBC bath.
b, Put the fixture on WBC bath and Click Move Left to move sample probe exactly
above the small hole of fixture.
Small hole
Sample probe X-position fixture
WBC bath
158
© 2011 Mindray Confidential
159.
Adjust the position of sample probe above WBC&RBCbath
Step 3: RBC bath position adjustment
a, Click Move right to move sample probe to right side of RBC bath.
b, Put the fixture on RBC bath and Click Move Left to move sample probe exactly
above the small hole of fixture.
Small hole
Sample probe X-position
fixture
RBC bath
159
© 2011 Mindray Confidential
160.
Adjust the position of sample probe above WBC&RBCbath
Step 4: Fix the bath diaphragm and shielding box.
160
© 2011 Mindray Confidential
161.
Touchscreen calibration161
© 2011 Mindray Confidential
162.
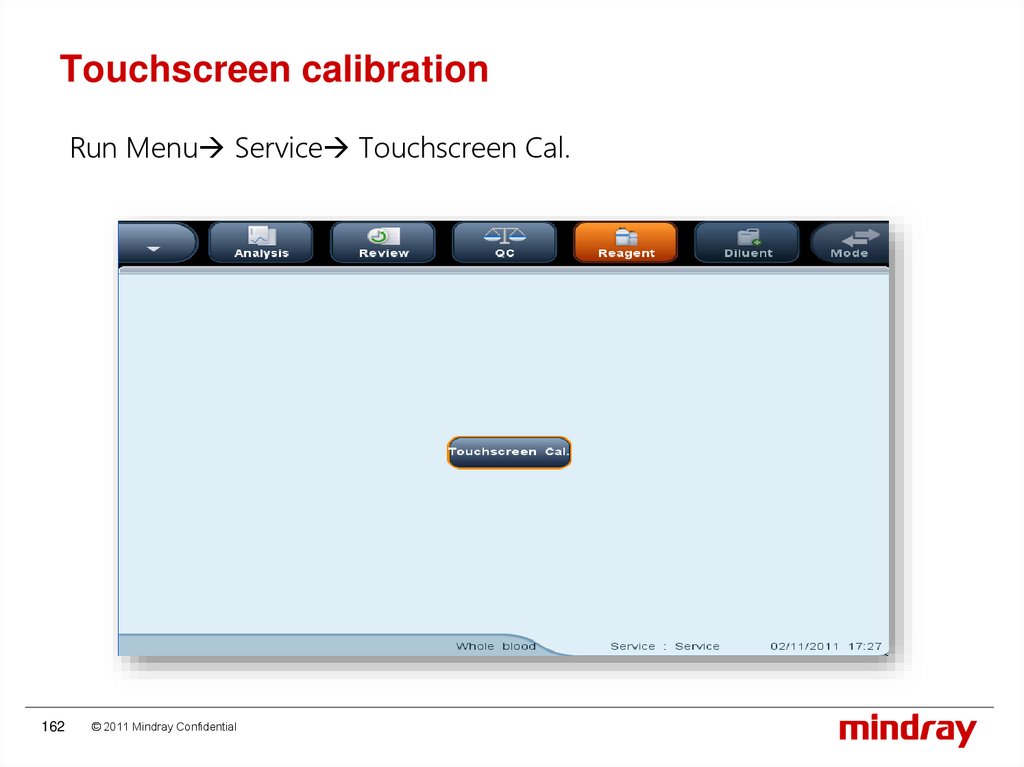
Touchscreen calibrationRun Menu Service Touchscreen Cal.
162
© 2011 Mindray Confidential
163.
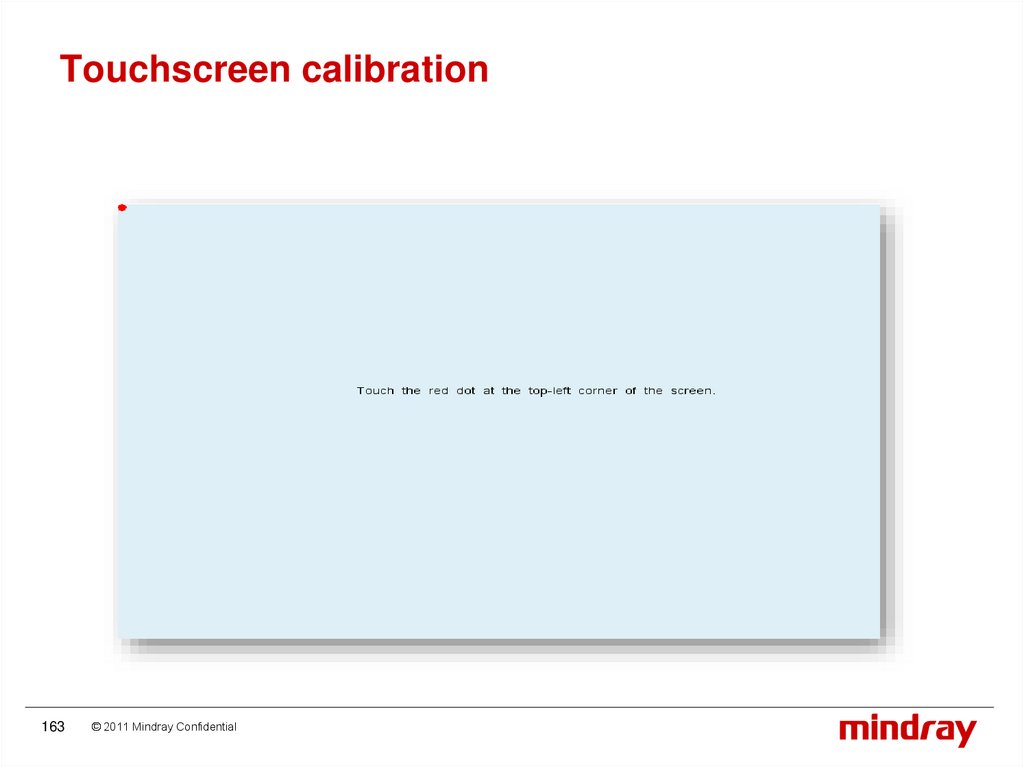
Touchscreen calibration163
© 2011 Mindray Confidential
164.
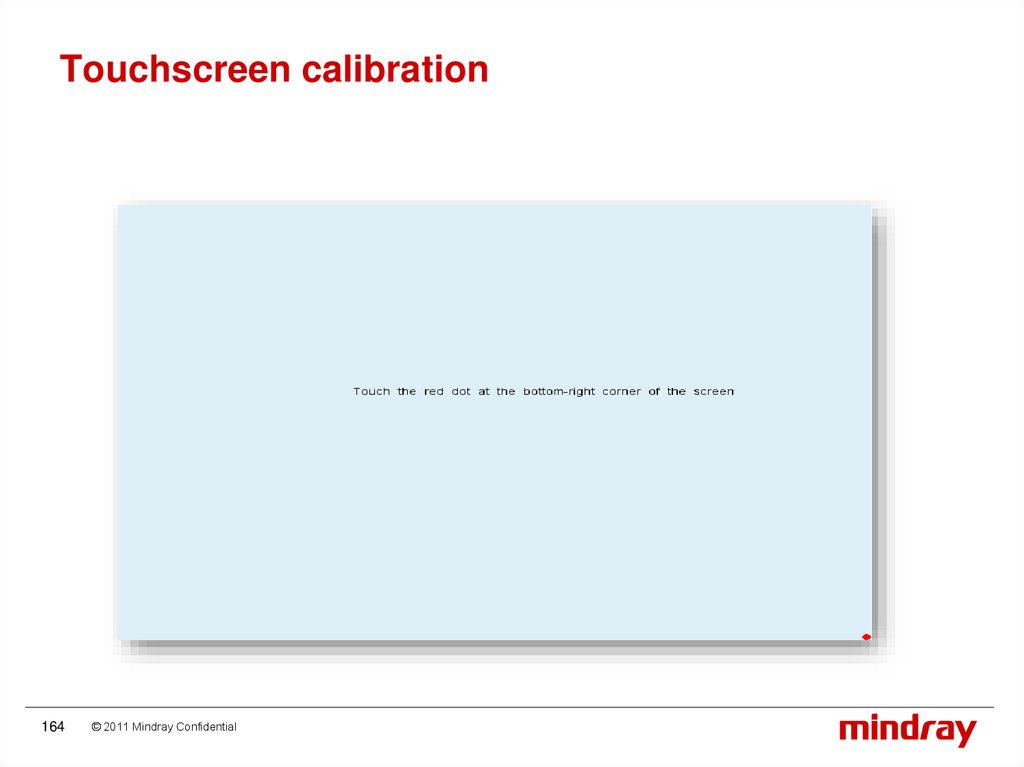
Touchscreen calibration164
© 2011 Mindray Confidential
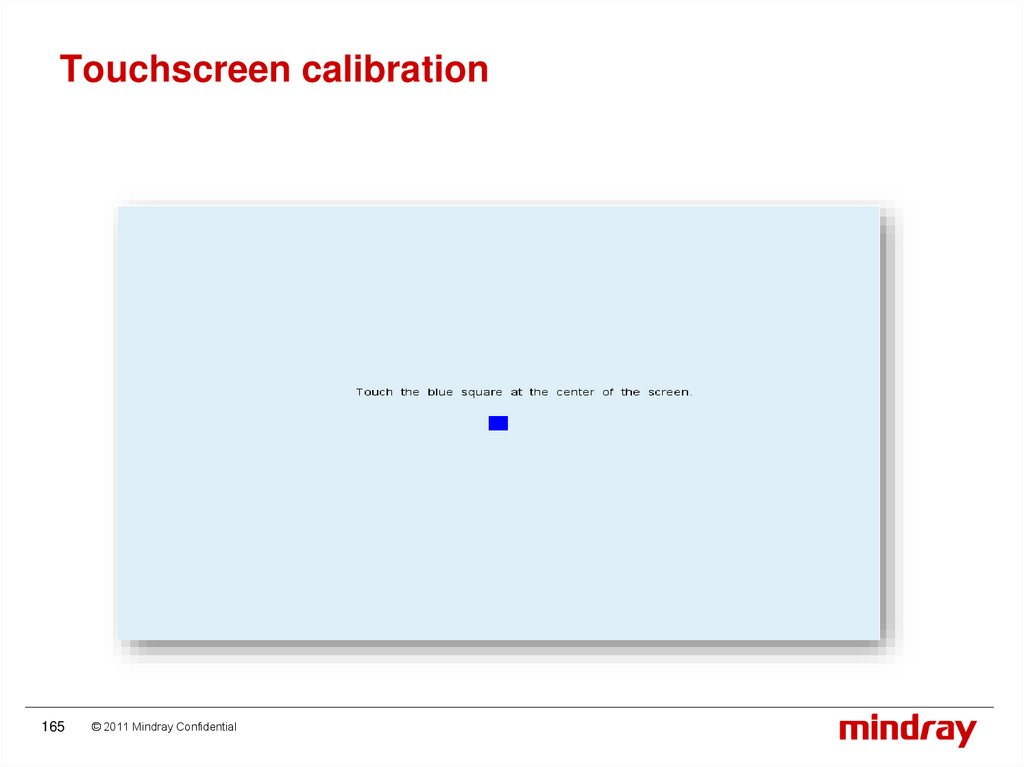
165.
Touchscreen calibration165
© 2011 Mindray Confidential
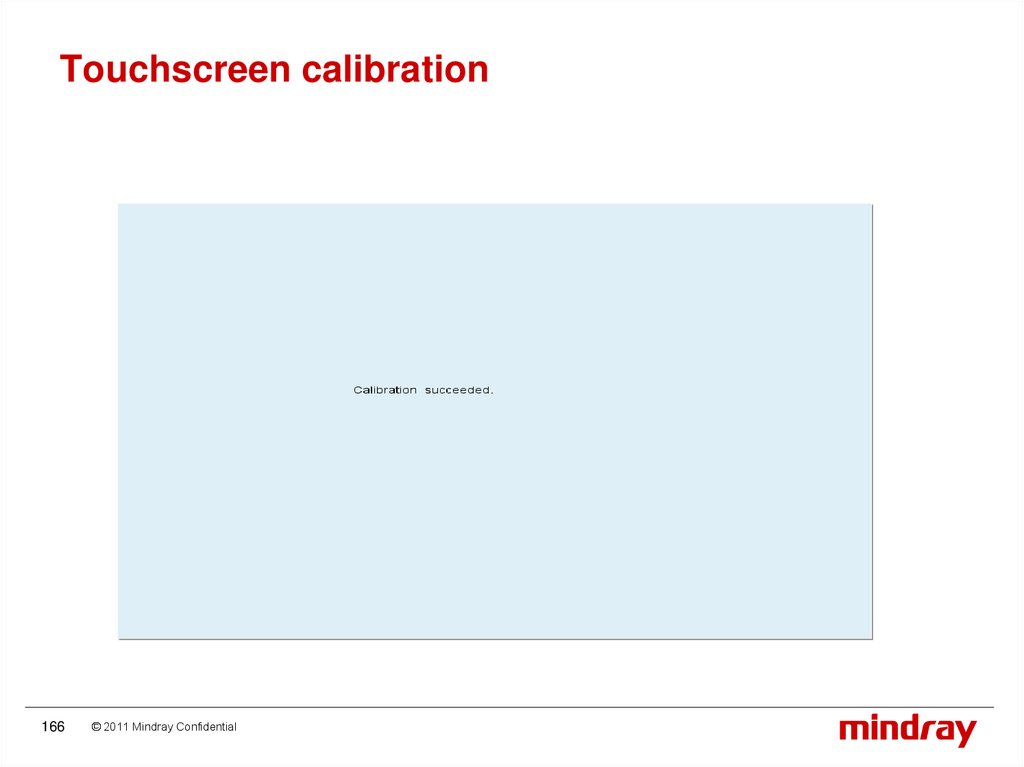
166.
Touchscreen calibration166
© 2011 Mindray Confidential
167.
MaintenanceService
167
© 2011 Mindray Confidential
168.
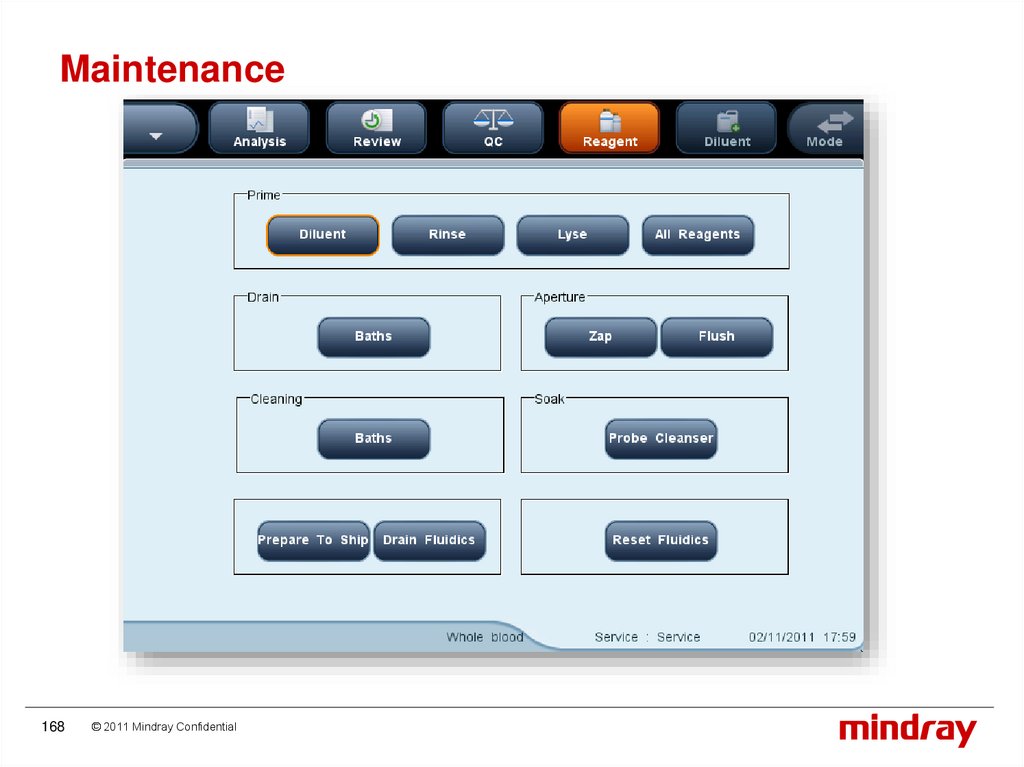
Maintenance168
© 2011 Mindray Confidential
169.
System status169
© 2011 Mindray Confidential
170.
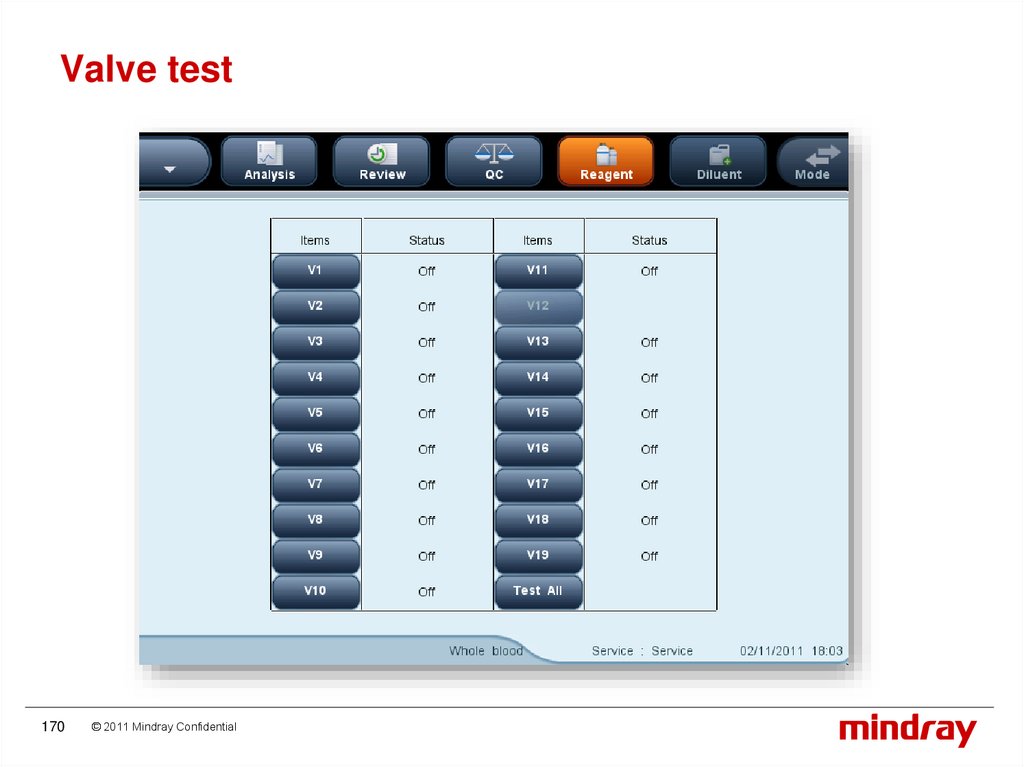
Valve test170
© 2011 Mindray Confidential
171.
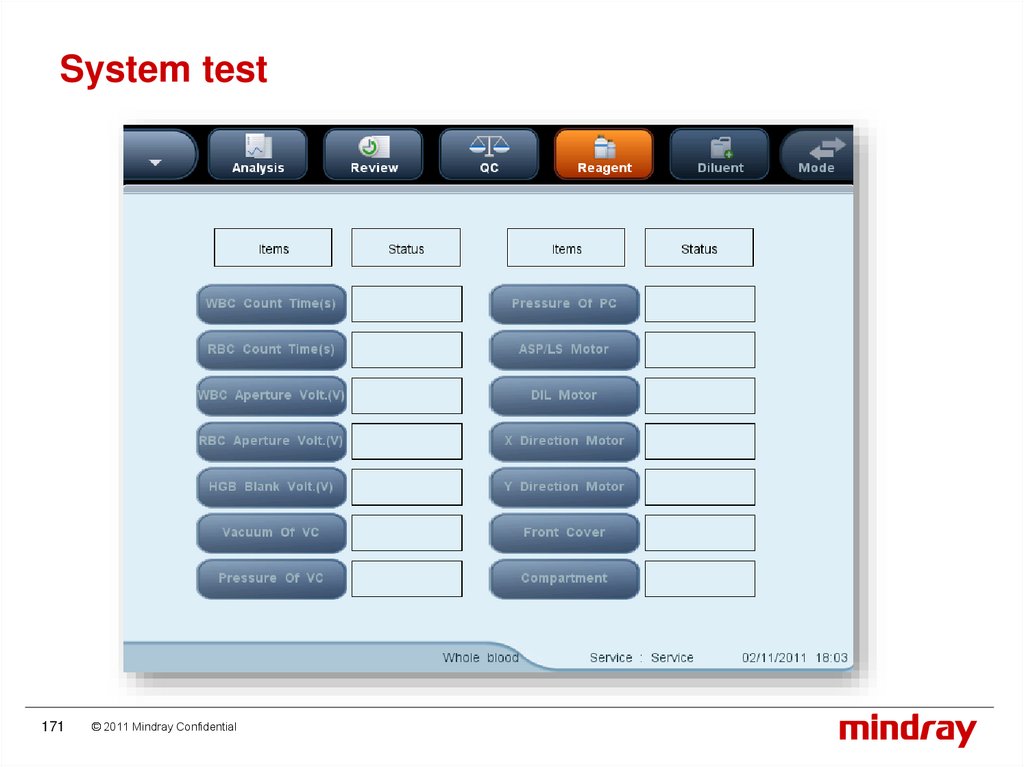
System test171
© 2011 Mindray Confidential
172.
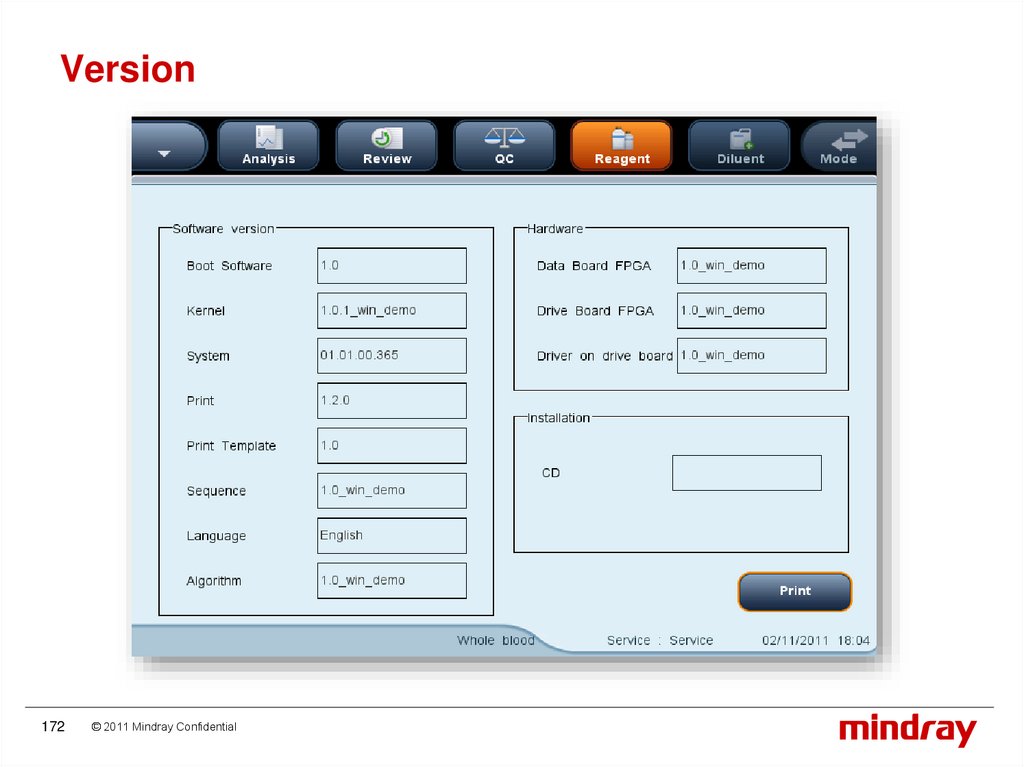
Version172
© 2011 Mindray Confidential
173.
Counter173
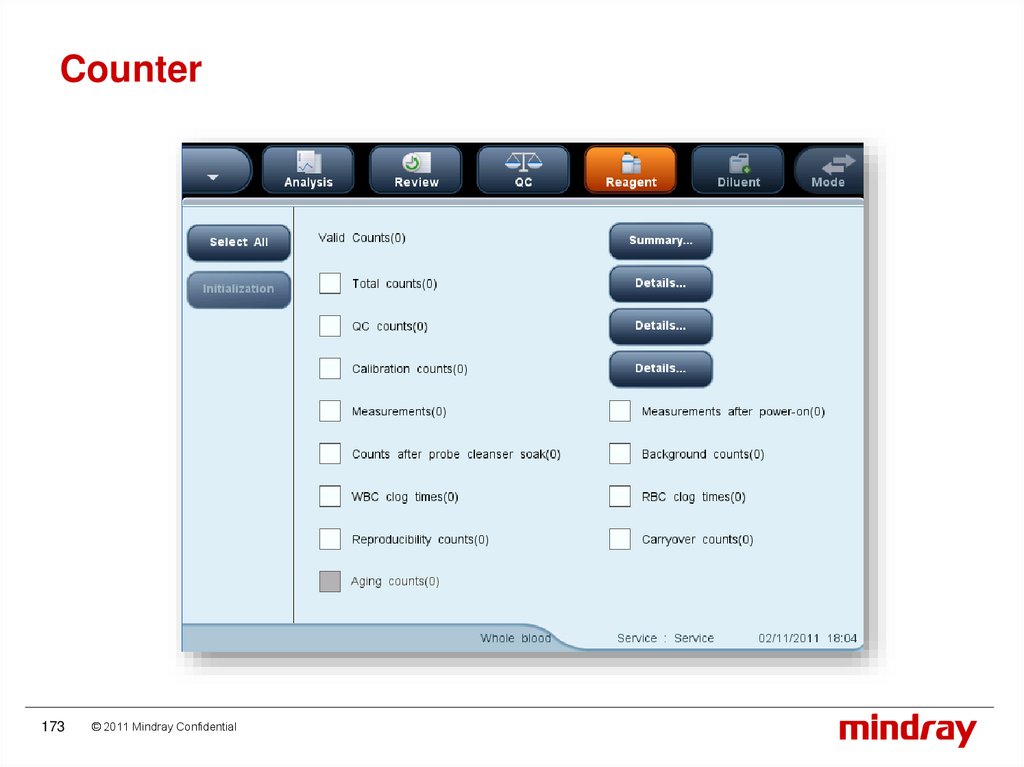
© 2011 Mindray Confidential
174.
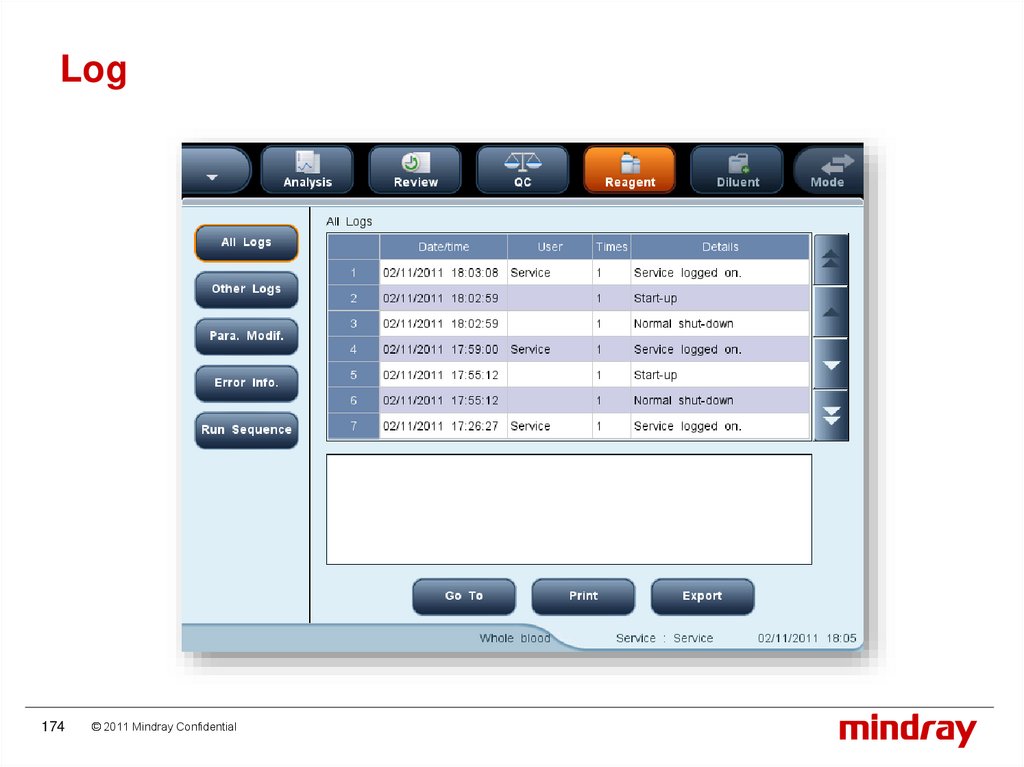
Log174
© 2011 Mindray Confidential
175.
Histogram and pulse graph175
© 2011 Mindray Confidential
176.
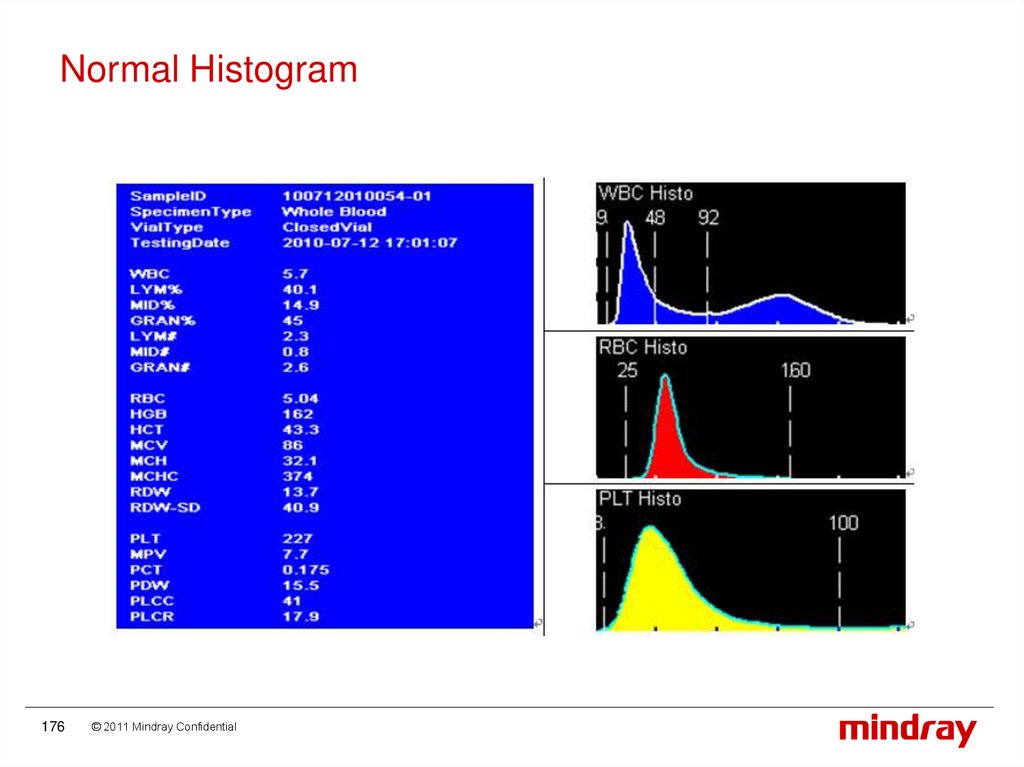
Normal Histogram176
© 2011 Mindray Confidential
177.
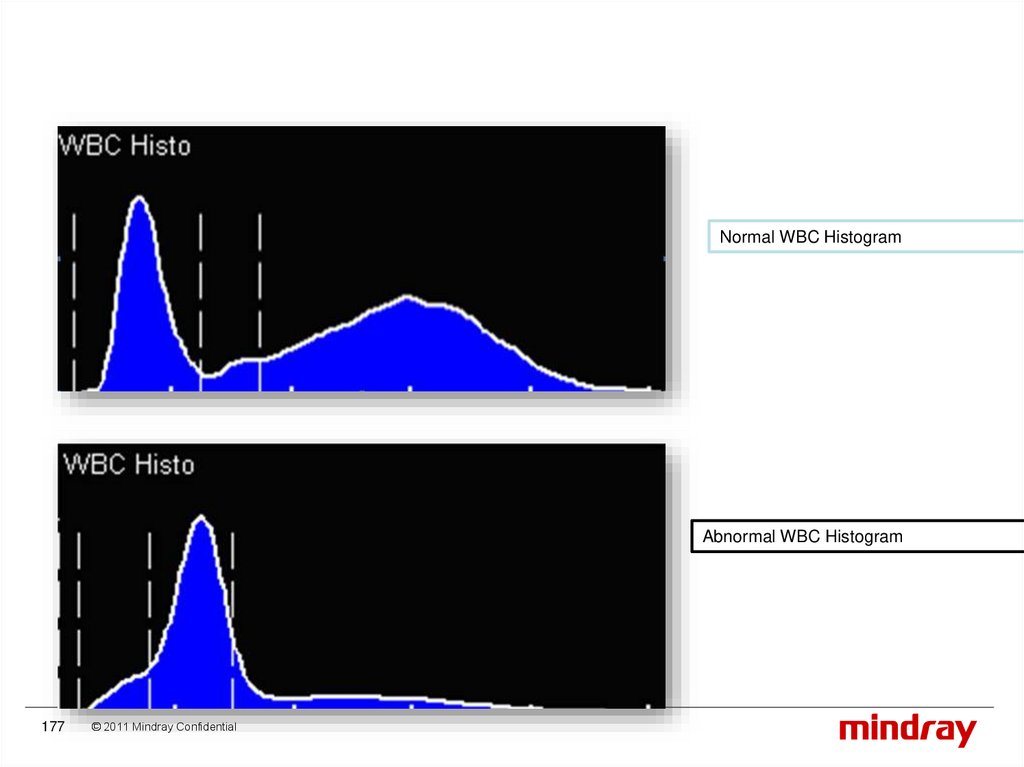
Normal WBC HistogramAbnormal WBC Histogram
177
© 2011 Mindray Confidential
178.
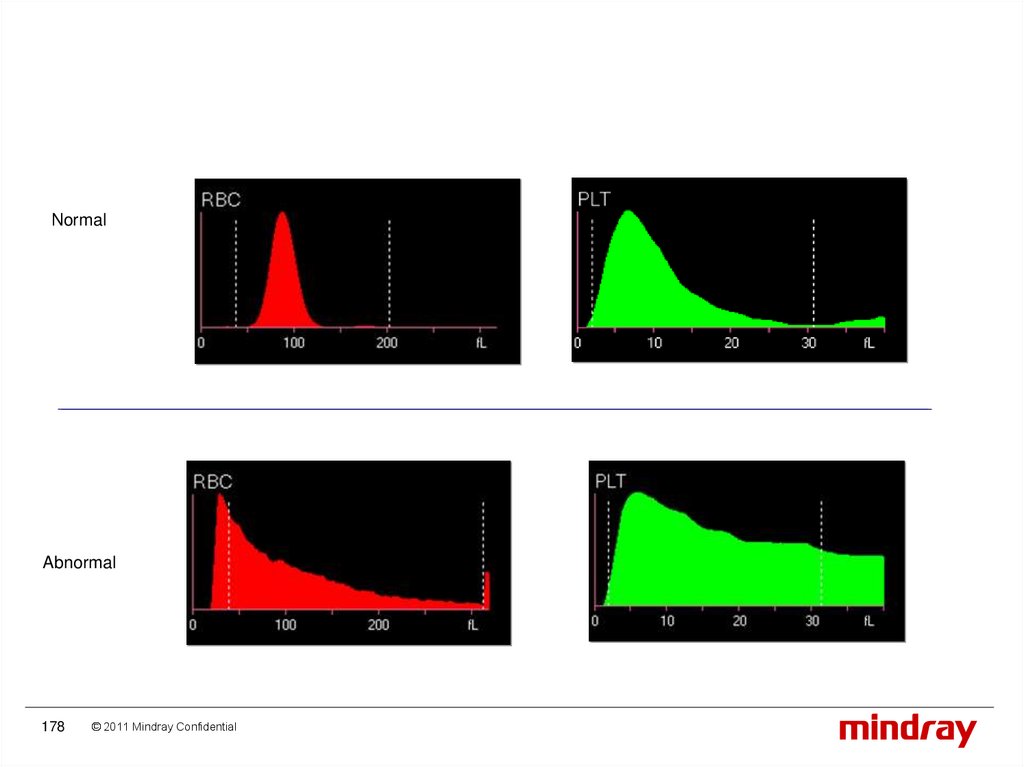
NormalAbnormal
178
© 2011 Mindray Confidential
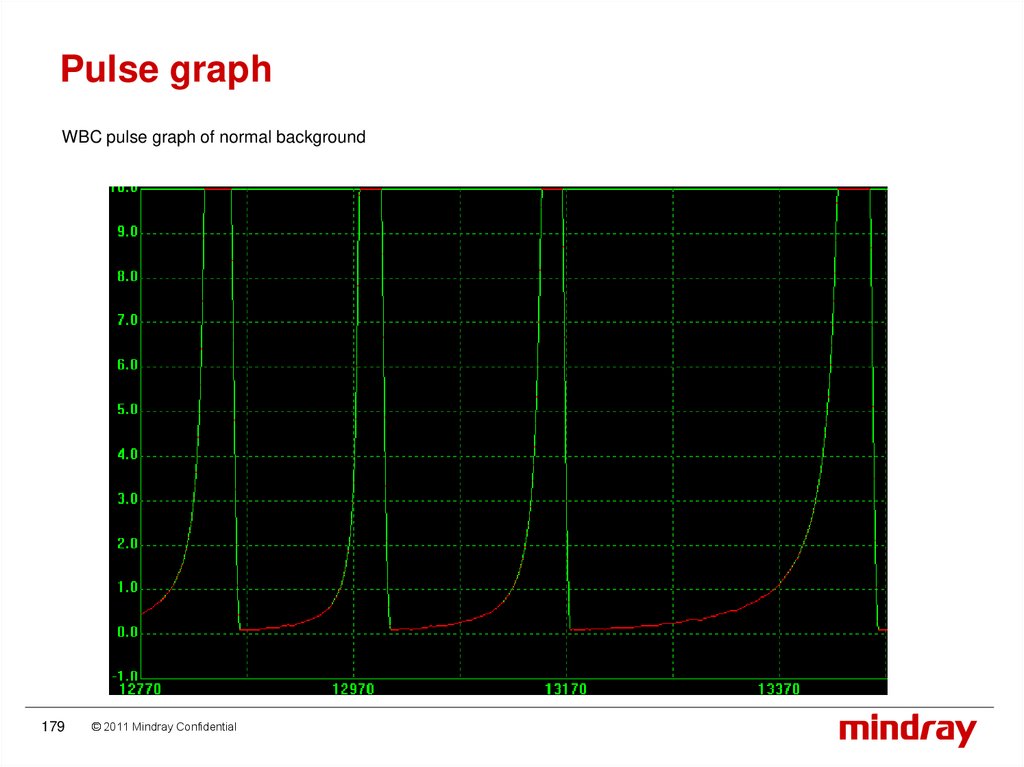
179.
Pulse graphWBC pulse graph of normal background
179
© 2011 Mindray Confidential
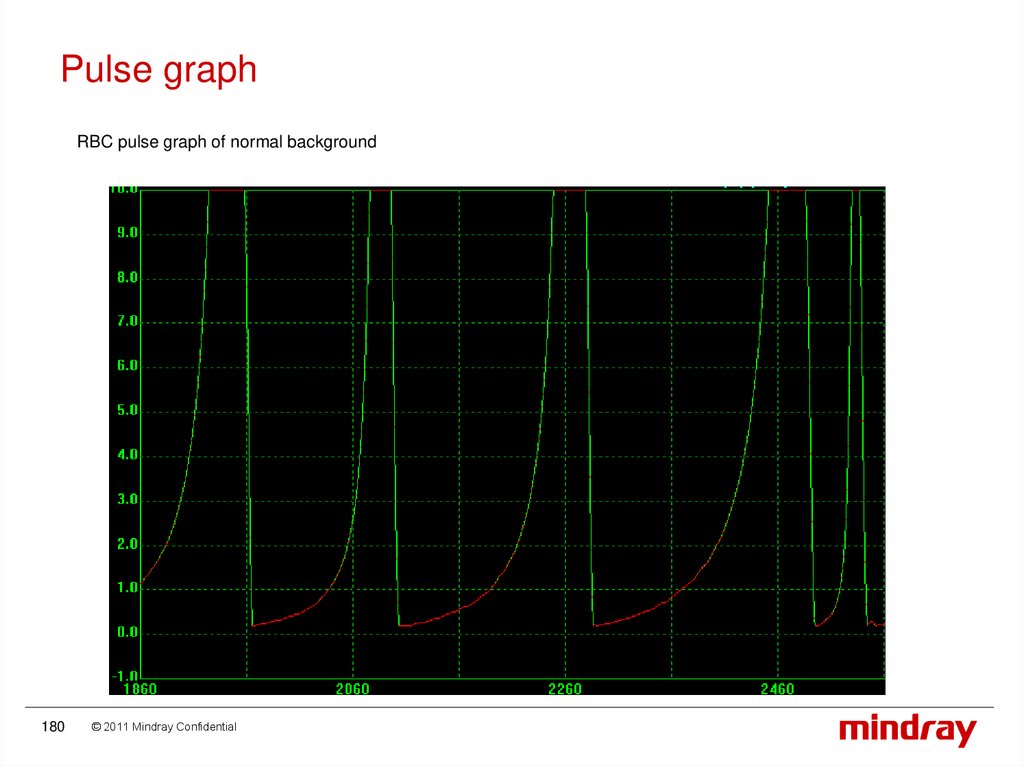
180.
Pulse graphRBC pulse graph of normal background
180
© 2011 Mindray Confidential
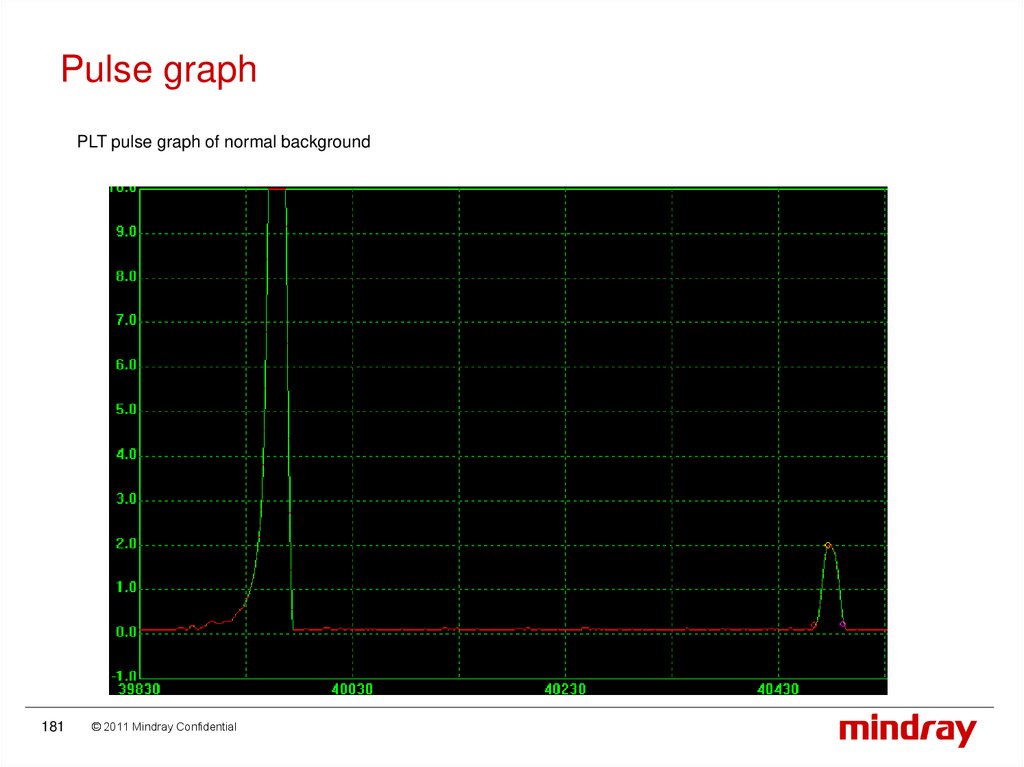
181.
Pulse graphPLT pulse graph of normal background
181
© 2011 Mindray Confidential
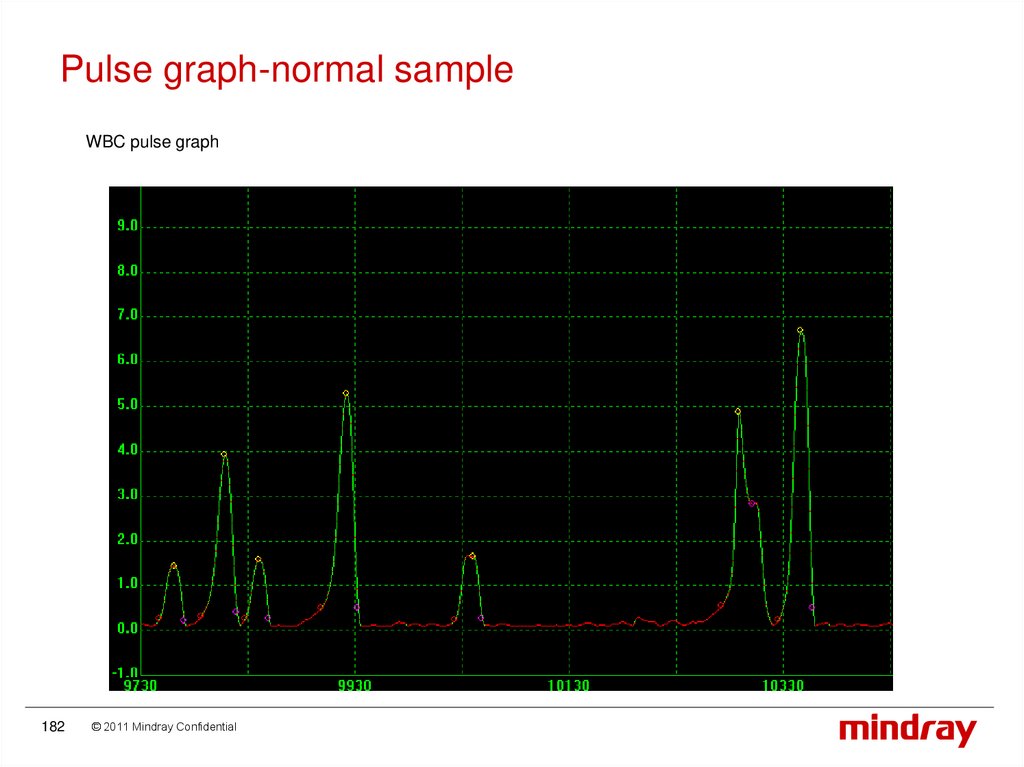
182.
Pulse graph-normal sampleWBC pulse graph
182
© 2011 Mindray Confidential
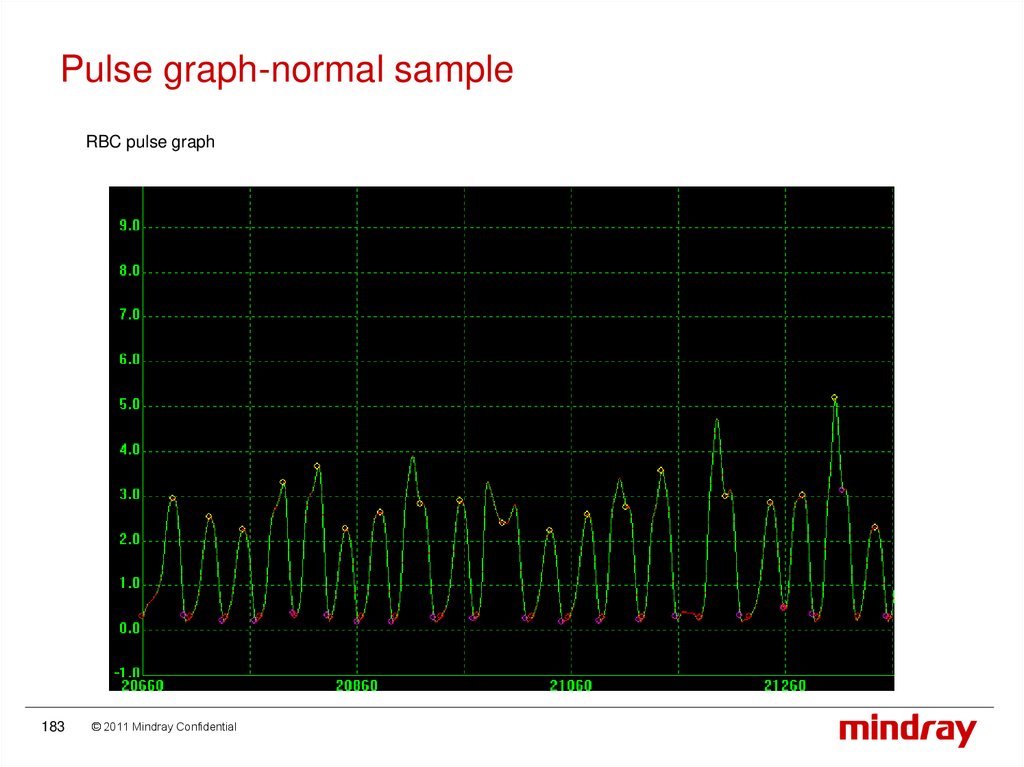
183.
Pulse graph-normal sampleRBC pulse graph
183
© 2011 Mindray Confidential
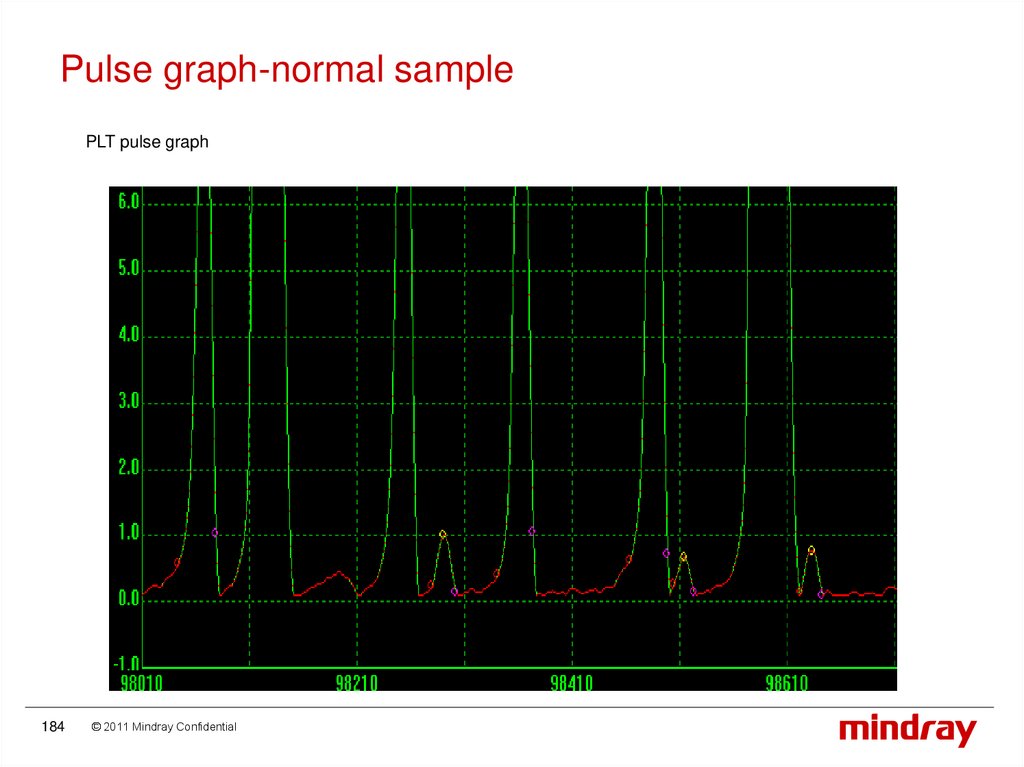
184.
Pulse graph-normal samplePLT pulse graph
184
© 2011 Mindray Confidential
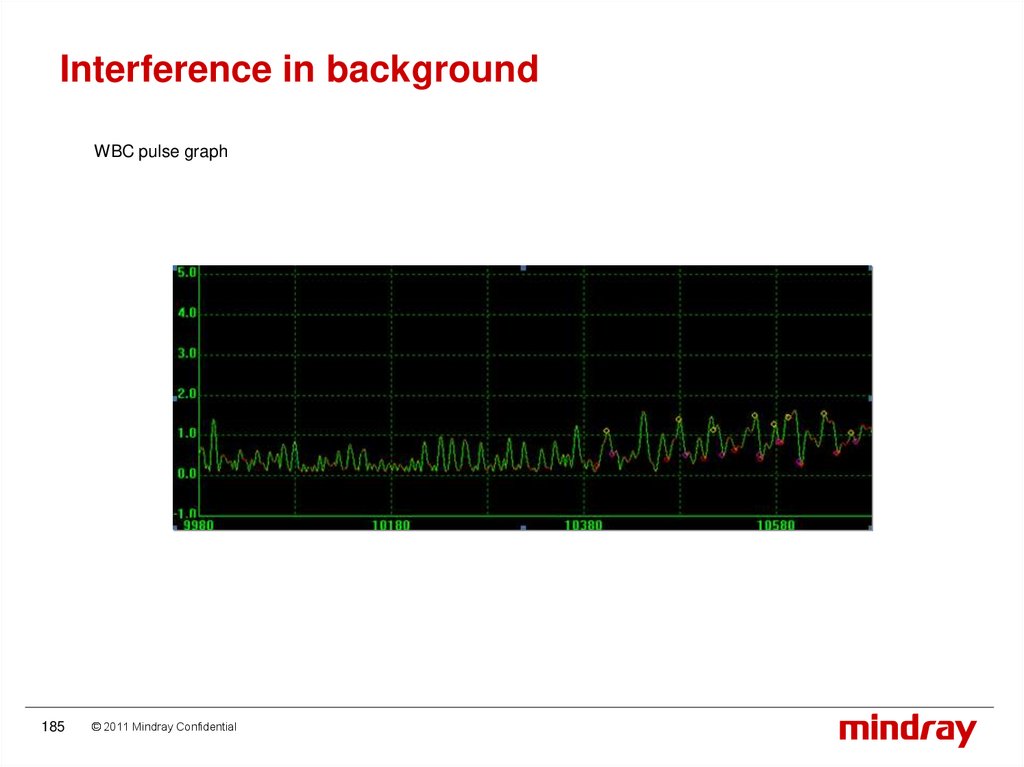
185.
Interference in backgroundWBC pulse graph
185
© 2011 Mindray Confidential
186.
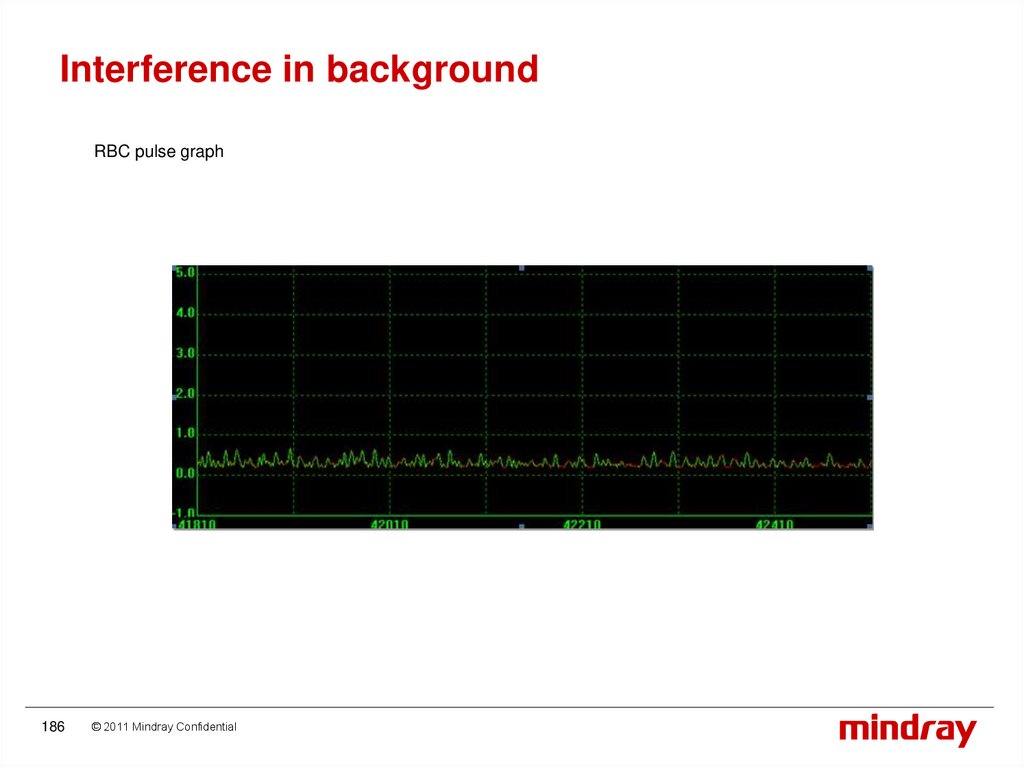
Interference in backgroundRBC pulse graph
186
© 2011 Mindray Confidential
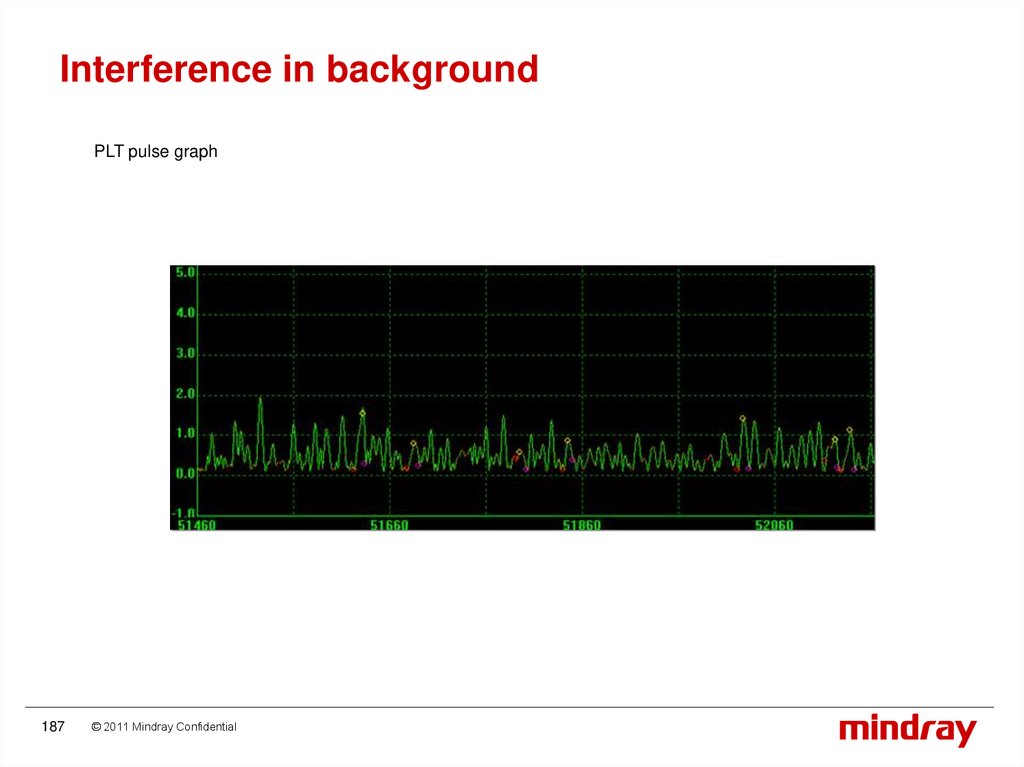
187.
Interference in backgroundPLT pulse graph
187
© 2011 Mindray Confidential
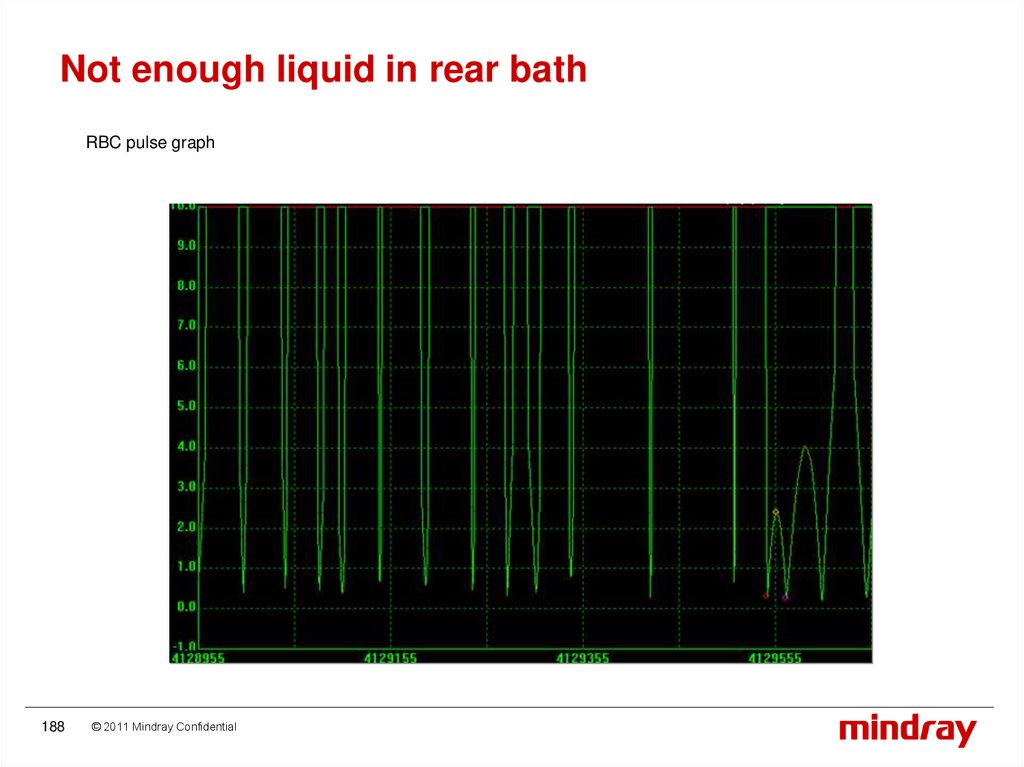
188.
Not enough liquid in rear bathRBC pulse graph
188
© 2011 Mindray Confidential
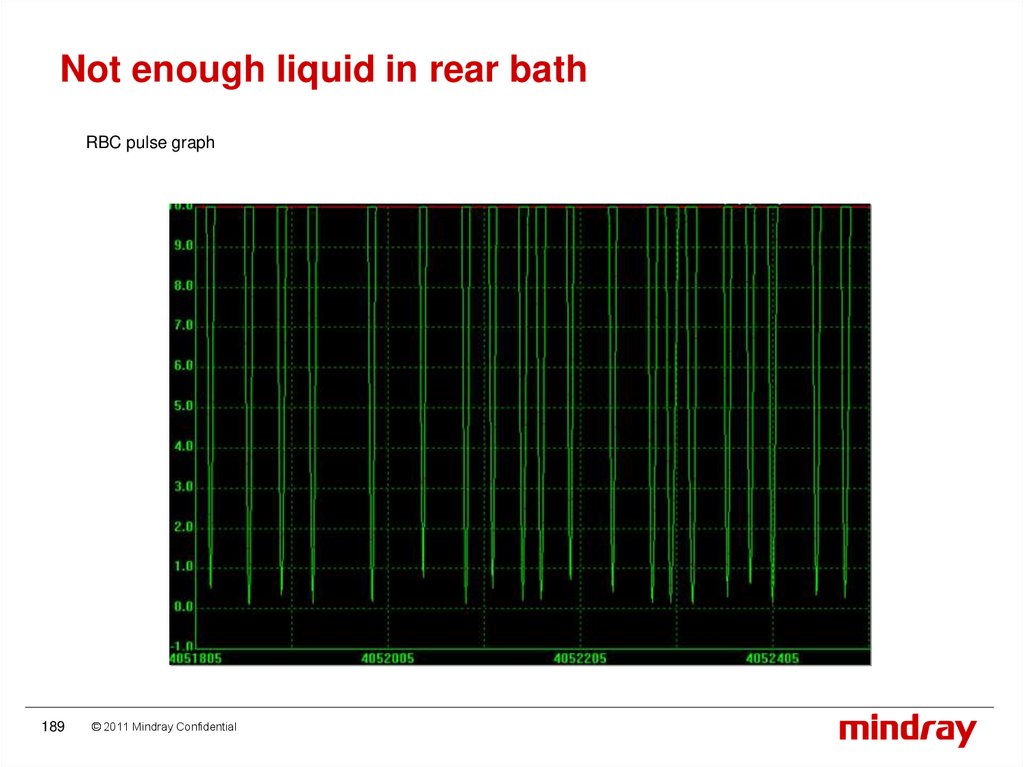
189.
Not enough liquid in rear bathRBC pulse graph
189
© 2011 Mindray Confidential
190.
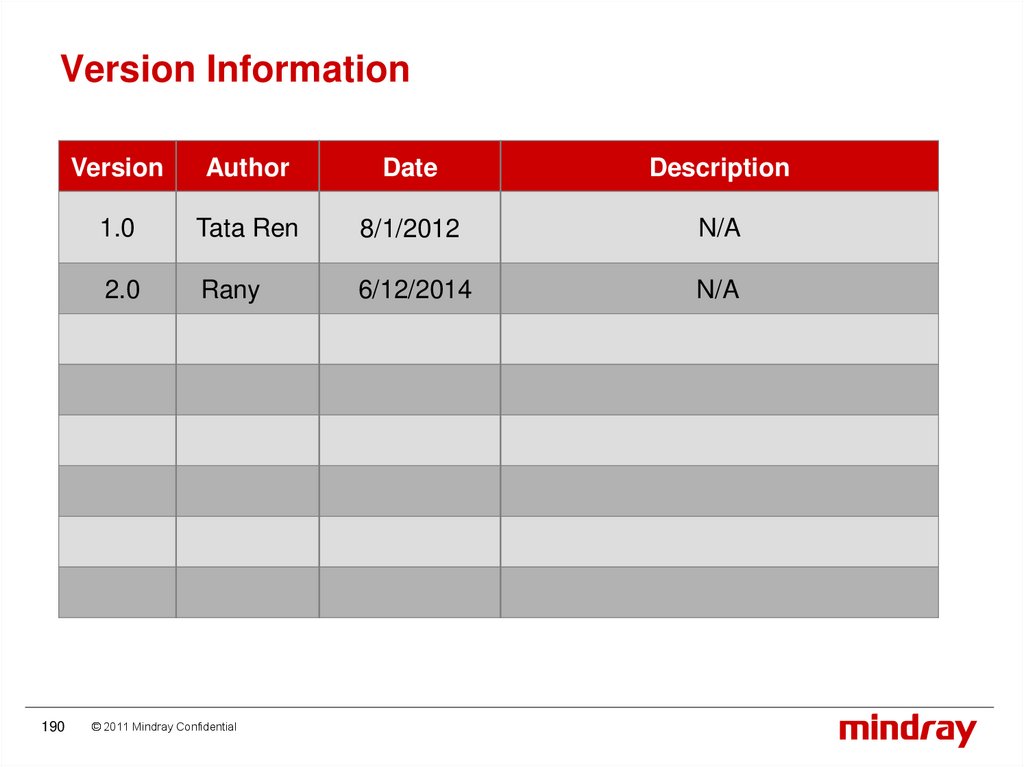
Version Information190
Version
Author
Date
Description
1.0
Tata Ren
8/1/2012
N/A
2.0
Rany
6/12/2014
N/A
© 2011 Mindray Confidential
191.
Check Information191
Version
Reviewer
Date
Comments
1.0
Bruce
8/3/2012
N/A
2.0
Mars Zhang
7/10/2014
Approved
© 2011 Mindray Confidential
192.
Thank you!192
© 2011 Mindray Confidential