


 software
Similar presentations:

")


Editing Slides With Polaris Office
1.
Editing SlidesWith Polaris Office, you can create new .ppt and .pptx
presentations or edit your presentation with ease.
2.
Title bar‘Insert’
You can insert an object.
‘Properties’
You can adjust the properties of an object.
‘More options’
You can call up the menu.
(This menu icon disappears in the device supporting ‘Hardware menu
button’.)
‘Switch to previous size’
You can split screen to two and open another application.
(This menu icon appears in the device supporting ‘Split screen’ only.)
3.
Adding SlidesTo add a slide, click the add icon on the bottom side of the
‘Manage slide’ panel. Select the slide layout, and the new sli
de with corresponding layout will be added after current sli
de.
Managing Slides
The entire list of slides will appear, and then you
can copy, move or delete the slides you want.
4.
Slide ShowTo execute a slide show, click the ‘Menu’ icon in the Title
bar and select ‘Slide Show’, and you can move to
previous/next slide and see the animation effects between sl
ides. Also, you can place the pointer and draw a line on
the slide.
Slide Note
To see a slide note, click the ‘Menu’ icon and select ‘Slide
Note’, and the slide note appears at the bottom of the slide.
When you move to the slide you want to see, the applicable
slide note is displayed. To edit the content, tap the note.
5.
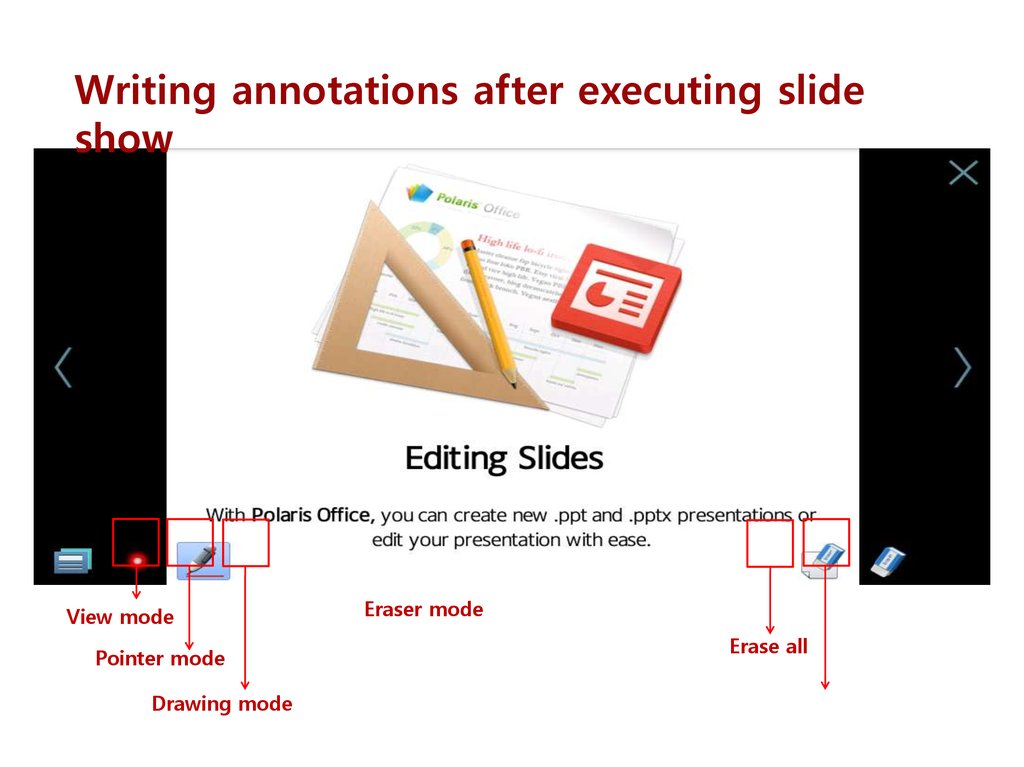
Writing annotations after executing slideshow
View mode
Pointer mode
Drawing mode
Eraser mode
Erase all
6.
After executing slide show, you can write annotations youwant by choosing between 'pointer mode' and 'drawing
mode'.
Choosing 'drawing mode' will allow you to adjust properties
such as a color, a thickness, an opacity of your drawing.
To rub out your mistakes, click the 'erase all' button or
choose 'eraser mode'.
And also you can erase the drawn object by touching and
pressing it with an eraser on top of the stylus pen.
7.
Inserting ShapesTo insert a shape, first click the ‘Insert’ icon in the Title bar,
and select ‘Shapes’. Choose the shape you want, and it will
be inserted into the document. Using the Style menu at the
top of the Shapes page, you can apply a style to the shape
in advance.
Drawing Free Curves
To draw a free curve, click the ‘Insert’ icon in the Title bar,
and the Object items you can insert will appear. Choosing
‘Free Curve’ of the items will allow you to draw the line freely.
To finish drawing the line, tap the screen.
8.
Inserting ChartsTo insert a chart, click the ‘Insert’ icon in the Title bar.
Choose ‘Chart’ from the items to go to the Chart page.
Select the type of chart you want, and the chart will be
inserted into the slide. Using the Style menu at the top of
the Chart page, you can apply a style to the chart in advance.
Inserting a Table
To insert a table, click the ‘Insert’ icon in the Title bar, and the
Object items you can insert appear. Choose ‘Table’ from the
items to go to the Table page. Select the number of rows and c
olumns you want and press ‘Done’, and the table will be
inserted into the text. Before inserting a table, you can apply
a style to the table in advance using the Style menu at the top
of the Table page.
9.
Multi-selecting ObjectsWhen you long press an object such as a shape or an
image, you will be in multi-selecting mode. In this mode,
you can multi-select objects when you click other shapes
or images. You can move, resize or rotate all of the objects s
elected simultaneously and, if they are of the same type, cha
nge their style simultaneously as well.
Adjusting the Position of Objects
Click the ‘Properties’ icon after multi-selecting objects, and
then you can adjust the position of the selected objects.
Positioning options include align left, align right, align
center, align top, align middle, align bottom, align justified
and align justified vertically.