


 software
Similar presentations:

")

")
")


Move, copy, rotate, align, snap
1.
Move (+ Copy and Rotate)Like in Sketchup, the Move and Copy
function are built into one tool. To
move an object, click the Move tool,
and when the Move icon is close to
an object, it automatically selects it
and is ready to be moved. But if two
objects are close to each other and
the auto-select is selecting the
wrong object, we should be able to
fist select the object manually and
then use the Move tool (see video).
When using the Move tool, pressing
Cntrl turns it into Copy. At this time,
a small + symbol appears next to the
Move icon to tell us that it is now in
Copy mode.
If Ortho model is ON (set by F8 or
some other key), the object being
moved or copied only travels in the
X or Y direction set by the Ortho
(general ortho, not object ortho).
Move and Copy should have snap
modes available to use.
Move
Copy
Copy multiple
The move tool should also activate a
simple Rotate handle on the object
similar to PowerPoint or Sketchup. This
means that while the Move tool is
active, the object can also rotated by
using the handle. This is different from
a proper Rotate tool. A proper Rotate
tool allows for precision rotate using
base point and snap while this is just a
simple rotate around a base point
which is automatically fixed at the
centre of an object like in SKP.
The Move tool should also activate a
simple XY scaling tool – same as in
PowerPoint. It will automatically use
the current XY direction of the object
and display the grips (we can set the
XY direction icon for an object before
starting to copy it. So no need to
display the XY icon or ability to edit it).
Again, this is a quick version of the XY
scale function.
All the above means that it will be
possible to quickly move or copy an
object, rotate it and scale it without
having to click separate tool icons for
all those actions.
There should also be a dedicated
copy tool. Move + Copy tool is not a
fast option for copying objects
multiple times. You have to click the
object again each time to copy it
again. If we have 50 chimneys or
200 trees to copy, a dedicated
Multiple copy works better. With a
dedicated multiple copy, you select
the object, then select a base point
for Copy and then each time you
click the mouse at a point, it pastes
a copy of the object at that point.
Once a moved or copied object is
placed, it displays a simple Rotate
handle. Once clicked and rotate
starts, the handle point can be
moved far away from the object
and it still works (same as in PPT).
This gives more accuracy to
control the rotation angle. The
base point will be the rough
centre of the object.
Once copied object is placed, it
displays the grips (ready for XY
scaling, CNTRL makes it obey base
point for scaling, no need for XY
and base icon display or editing
options here, just simple way to
scale quickly like in PPT). Press ESC
to get rid of grips and rotate icon.
2.
Move tool over object to rotate andobject is auto-selected (or select
first before clicking rotate tool).
Rotate tool
This is a Rotate tool with some more
control compared to the basic rotate
tool that comes with the Move tool.
The tool works exactly as in
Sketchup.
Once you select the tool, moving
over an object auto-selects it. This
way, many objects can be rotated
quickly without having to go away
from the tool and selecting the
object, then pick the rotate tool
again. But if two objects share a
vertex and this vertex is to be used
as the base point, it may be
necessary to select the object first
before rotation.
You select a base point, then
another point to define the start
angle of rotation (base line) and
then you start to rotate. While
rotating, the handle can be pulled
far away from the object so that the
end angle can be set by snapping on
to some object far away.
Clicking Rotate tool
changes mouse pointer to
Rotate tool
All point selection should have snap
available (end point, mid point,
nearest, perpendicular etc).
Once an object has been rotated,
the rotate tool pointer is ready to
auto-select and rotate the next
object. This allows many objects to
be rotated quickly one after the
other.
Click on a point on the object to set
the base point of rotation.
Select another point to set the base
line of rotation
Now an infinitely
stretchable handle line
appears and you start
rotating it.
3.
Align without CNTRL key (no scaling)Align Tool
The Align tool moves and rotates an
object at the same time, basically
aligning an object to another. It can
also scale the object at the same
time if necessary.
Now cursor displays 2A. Select the
next point on the object (second
source point). Once this is picked,
cursor displays 2B. Pick the 2nd
destination point.
Align is useful when we want to
copy a window and then move it to
a wall of a house and align it such
that the window sits flush with the
wall.
This moves the object in such a way
that 1A is moved to 1B and 2A is
moved to line up with 2B. Note that
the object is just aligned, not scaled
this time. But while selecting 2B, if
CNTRL is also pressed, the object is
also scaled (in X and Y). If SHIFT is
pressed, the object is scaled in XY
and Z using the same XY scale factor.
Align will use 4 points. Two points
on the object to be aligned and the
corresponding two points on the
object to be aligned to.
Once the tool is activated, move the
tool pointer close to the object and
it auto-selects (or select the object
first if necessary). The cursor
displays a tool icon (a + is enough?)
and a number 1A next to it. This
means select point 1 on the object
(1st source point). Once selected,
the cursor displays the 1B. This
means select the corresponding
point this point should move to (1st
destination point).
2B
1B
1A
2A
Align + CNTRL key (object is scaled as well in XY)
Align + Shift key (object is scaled in XY and Z)
1A
2B
1B
1B
2A
1A
2B
2A
4.
SNAPSnap options
We need a few snap options that are
currently not on Photomod. When we draw
buildings, often we need to snap to the
middle point of a line or snap a line
perpendicular to another line. So the snap
options we need are as below. They are all
pretty simple ones. Need option to
completely turn snap On/off (just use F3)
and option to turn off individual type of
snaps (ie, turn off only Midpoint snap for
example) suing a snap options window
(CNTRL + Right mouse button).
Need a quick pulldown Snap tool bar to
quickly change snap
selections
Snap in Vertex Edit mode (Very Important)
One key thing we are missing is the ability to snap
when we are editing the vertices of an existing
object. If we are drawing a new line, it does snap to
other objects. This is fine. But if we move the
vertex of an existing object and try to snap it to
another existing object, we cannot do it. We need
that. This is already part of the Vertex edit under
Scaling and Stretching videos. Basically, Snap should
be available everywhere.
End Point (already have it)
Nearest (already have it)
Middle point
Perpendicular
Intersection
Centre (of circle)
Extension snap (explained next page)
End
Perpendicular
Nearest
Midpoint
Centre
Snap working in AutoCAD
Need option to switch individual snaps
On/Off separately. So we can switch off
Midpoint snap, but keep all other snaps
for example. A simple options window
like this should do. Activate the window
using CNTRL + Right mouse button (or
some other quick combination)
5.
Extension SnapHow it would work
Another important one we need is
an Extension snap. This allows the
end point of a line to be aligned to
some other point on the same
polyline (or even another object).
See examples below where it will be
used.
The snap is used to pick either the X or the Y coordinate of a point.
Whether it will be the X or the Y coordinate can easily be
determined automatically. In most cases, we will be drawing with
Ortho mode ON. So the new line we are drawing is either travelling
in the X direction or Y direction. If it is being drawn in Y direction,
that means X coordinate is already fixed. So we will be picking the
Y coordinate from some other point.
When we reach near
here, we need to pick
the Y coordinate of the
start point.
In Autocad and Sketchup, a similar tool exists. Please see video on
how that works. But we need a little bit more control and it can
work better. I am going to combine the good points of both.
Ortho icon
Switch on Extension snap. Start drawing the cursor will
automatically keep drawing a rubber band line to the various X or Y
end points on the same line (it assumes that you want to align
points to the same line you are currently drawing rather than some
other object) that shares the closest X or Y value (end point only). If
you keep moving the cursor, it will keep picking a different X or Y
points. Click when the rubberband has picked the correct point you
need. This works similar to Sketchup.
The helper lines will be
needed in both X and Y
direction.
But sometimes the user may want to manually select a point for X
or Y reference (maybe from another object other than the current
line being drawn or a mid-point rather than end point). In this case,
the Autocad method works better. Press key X to enter eXtension
snap manual point picking mode. Now move the cursor on top of
the point you want to pick the X or Y coordinate from and click
(snap will be on). It then draws the rubber band line from the
selected point. Now go to the point where you want the end point
of the line and finish off. See next page for further explanation.
Ortho icon
Line start
point
6.
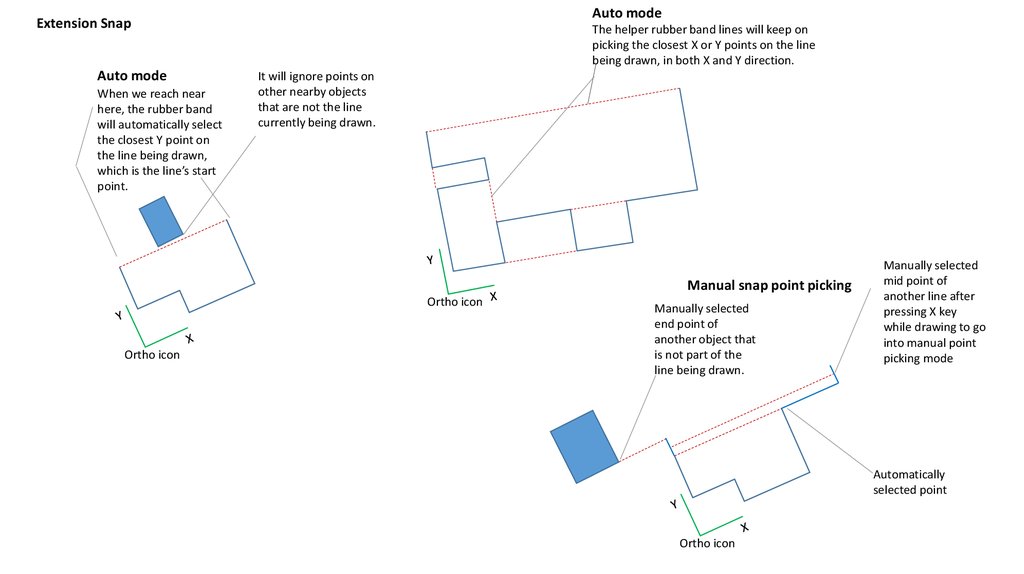
Auto modeExtension Snap
Auto mode
When we reach near
here, the rubber band
will automatically select
the closest Y point on
the line being drawn,
which is the line’s start
point.
The helper rubber band lines will keep on
picking the closest X or Y points on the line
being drawn, in both X and Y direction.
It will ignore points on
other nearby objects
that are not the line
currently being drawn.
Manual snap point picking
Ortho icon
Ortho icon
Manually selected
end point of
another object that
is not part of the
line being drawn.
Manually selected
mid point of
another line after
pressing X key
while drawing to go
into manual point
picking mode
Automatically
selected point
Ortho icon