Similar presentations:
Introduction to ultrasonic testing
1. Kein Folientitel
Introduction toUltrasonic Testing
SD 218
© Michael Berke
Agfa NDT GmbH, Hürth, Germany
1994 - 2002
Krautkramer NDT Ultrasonic Systems
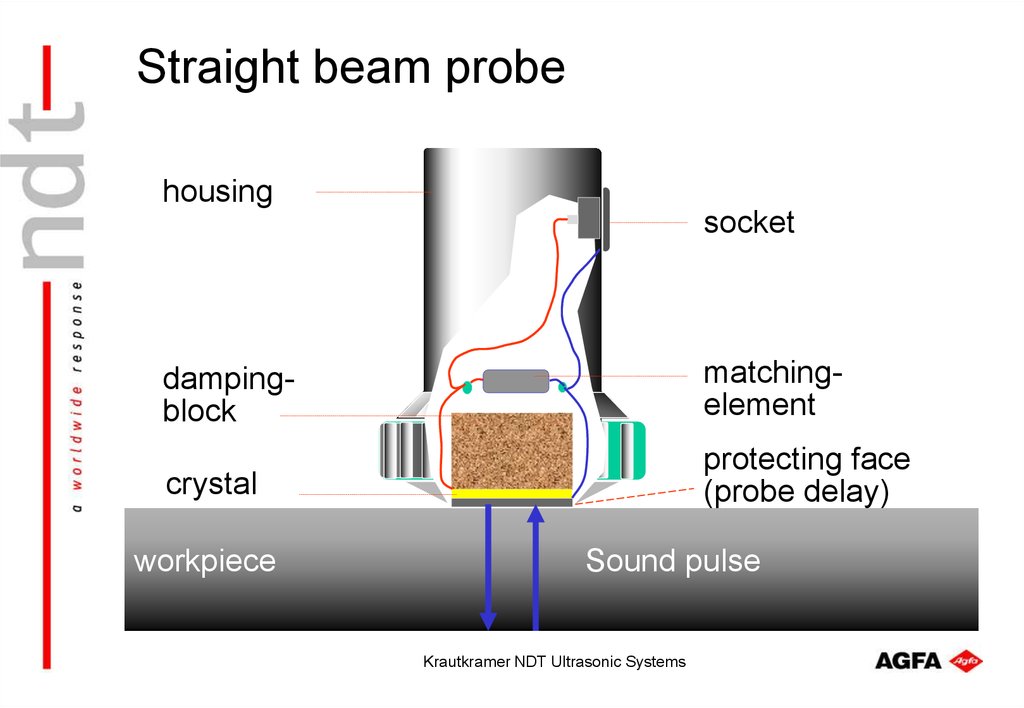
2. Straight beam probe
housingsocket
dampingblock
matchingelement
crystal
protecting face
(probe delay)
workpiece
Sound pulse
Krautkramer NDT Ultrasonic Systems
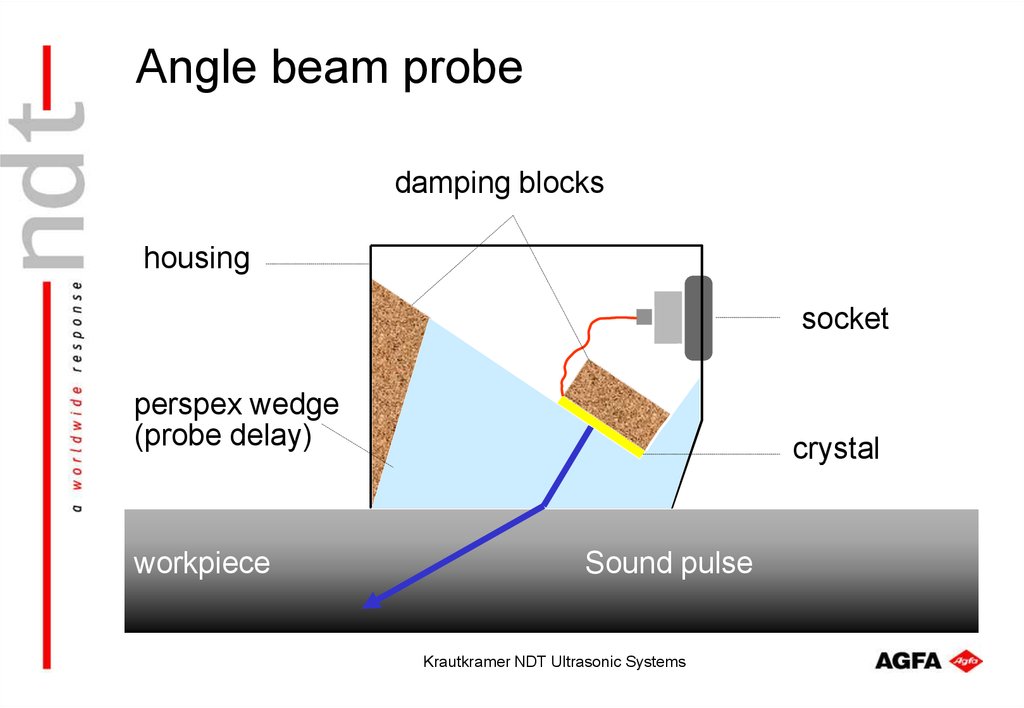
3. Angle beam probe
damping blockshousing
socket
perspex wedge
(probe delay)
workpiece
crystal
Sound pulse
Krautkramer NDT Ultrasonic Systems
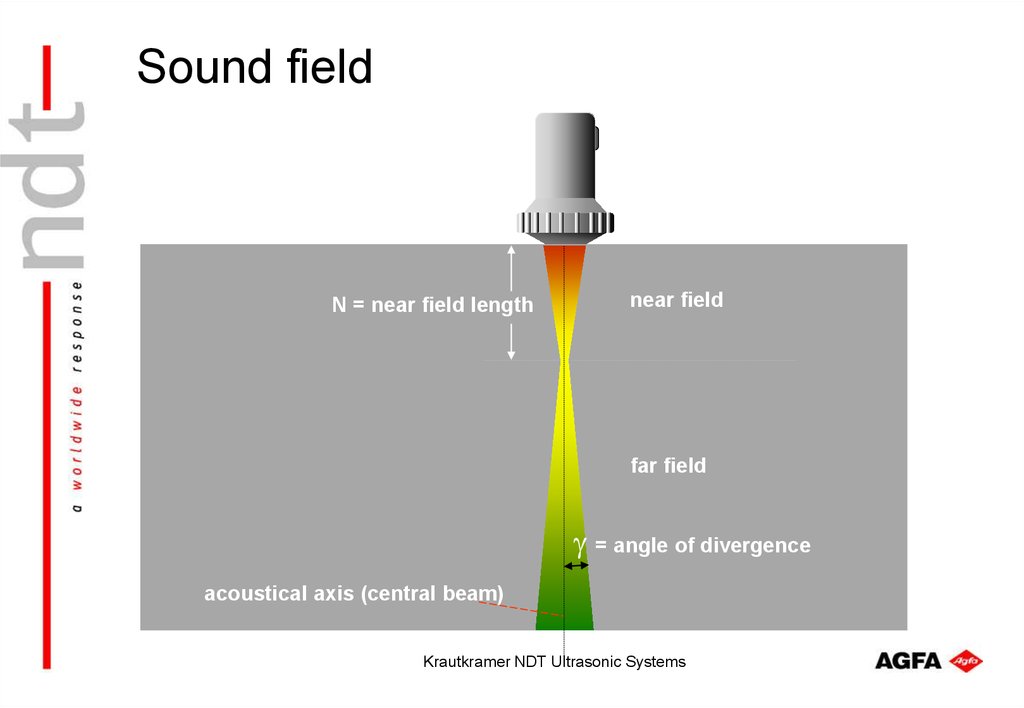
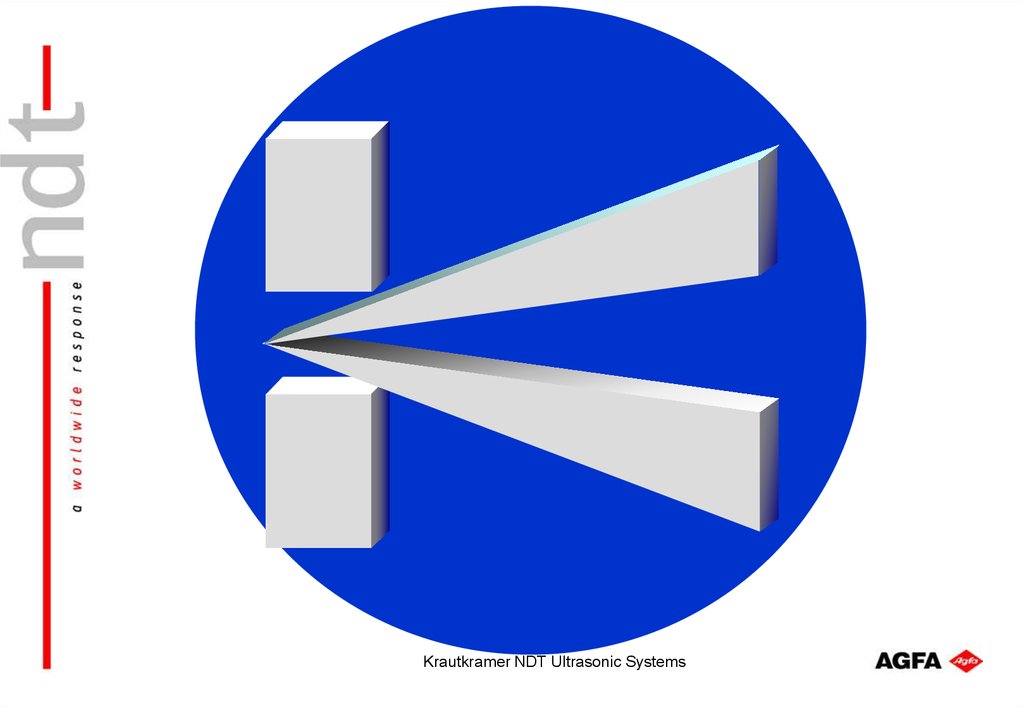
4. Sound field
3Sound field
N = near field length
near field
far field
= angle of divergence
acoustical axis (central beam)
Krautkramer NDT Ultrasonic Systems
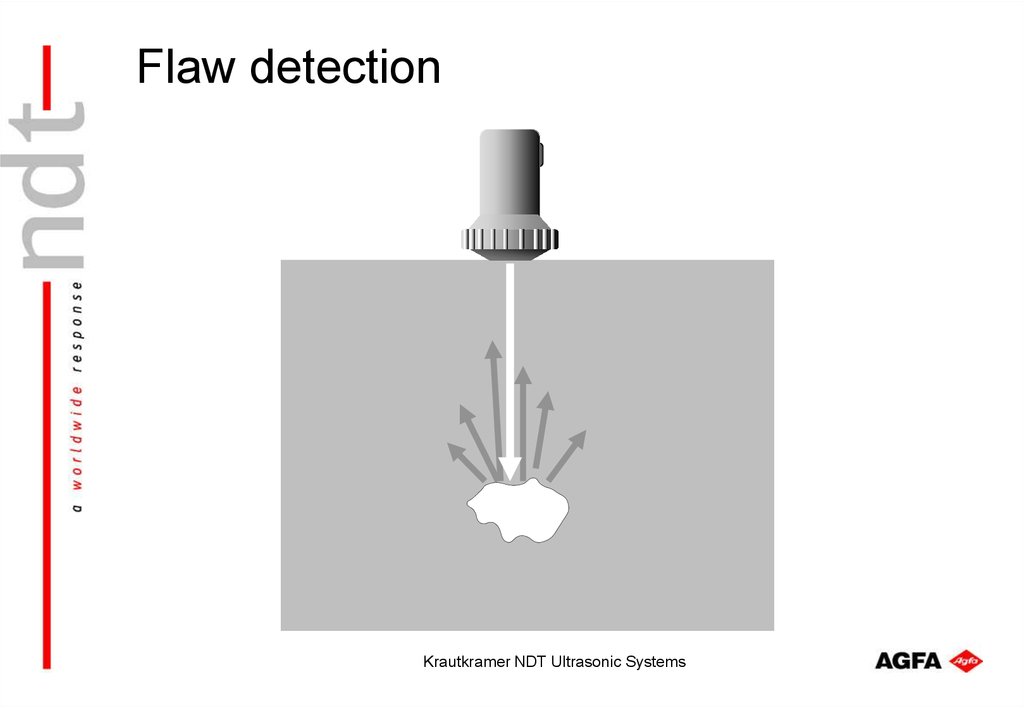
5. Flaw detection
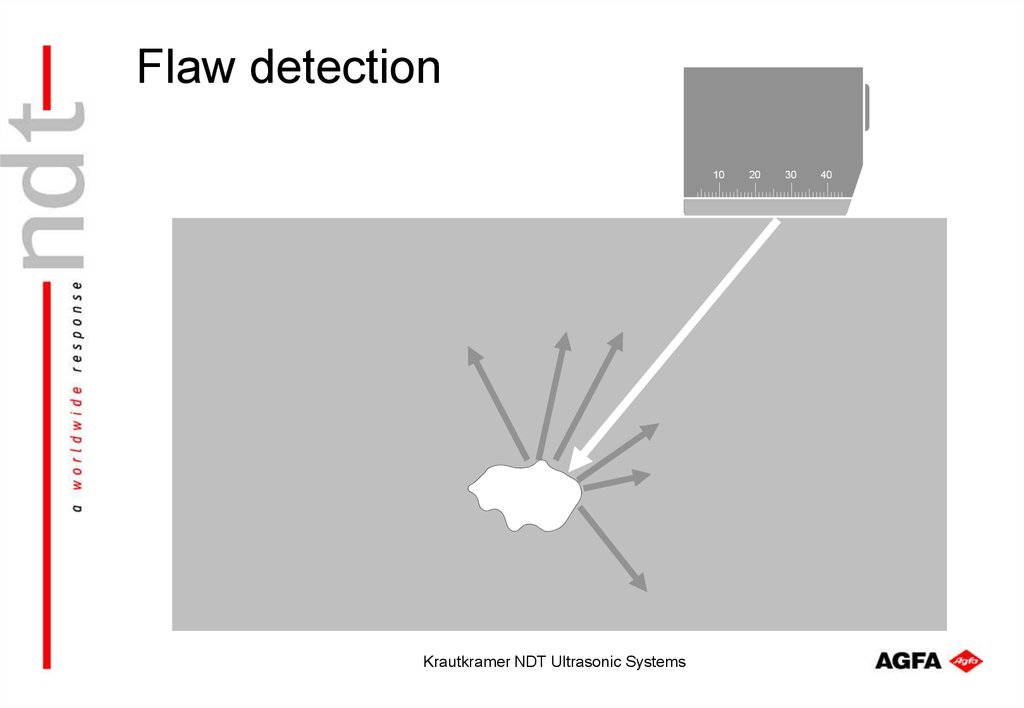
Krautkramer NDT Ultrasonic Systems6. Flaw detection
10Krautkramer NDT Ultrasonic Systems
20
30
40
7. Flaw detection
1020
30
Krautkramer NDT Ultrasonic Systems
40
8. Bad flaw orientation
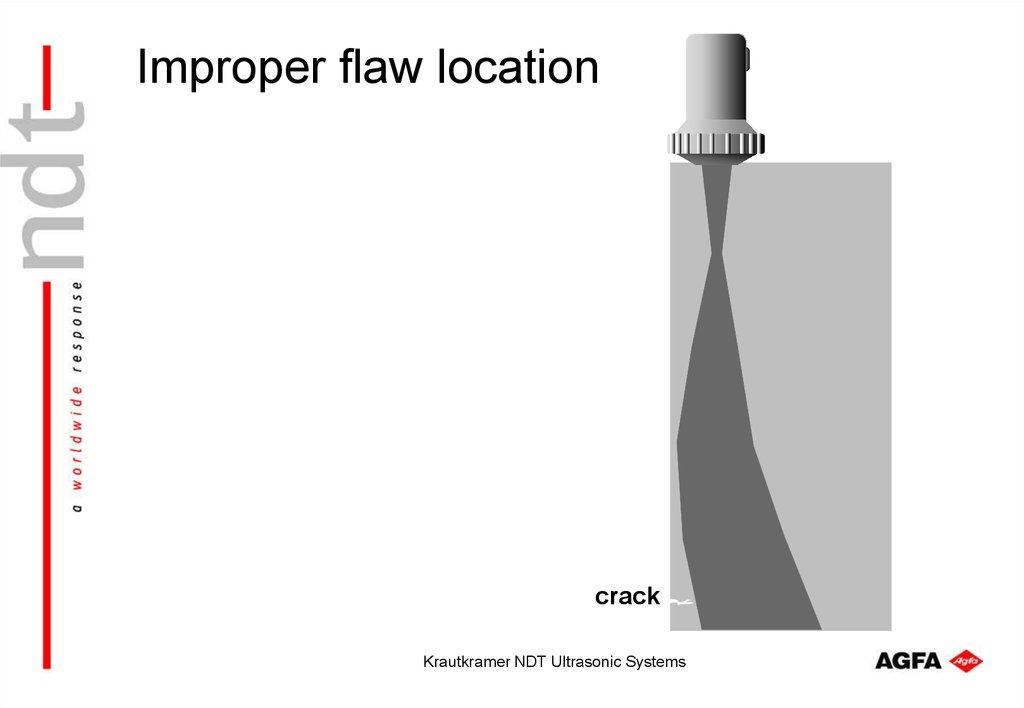
Krautkramer NDT Ultrasonic Systems9. Improper flaw location
crackKrautkramer NDT Ultrasonic Systems
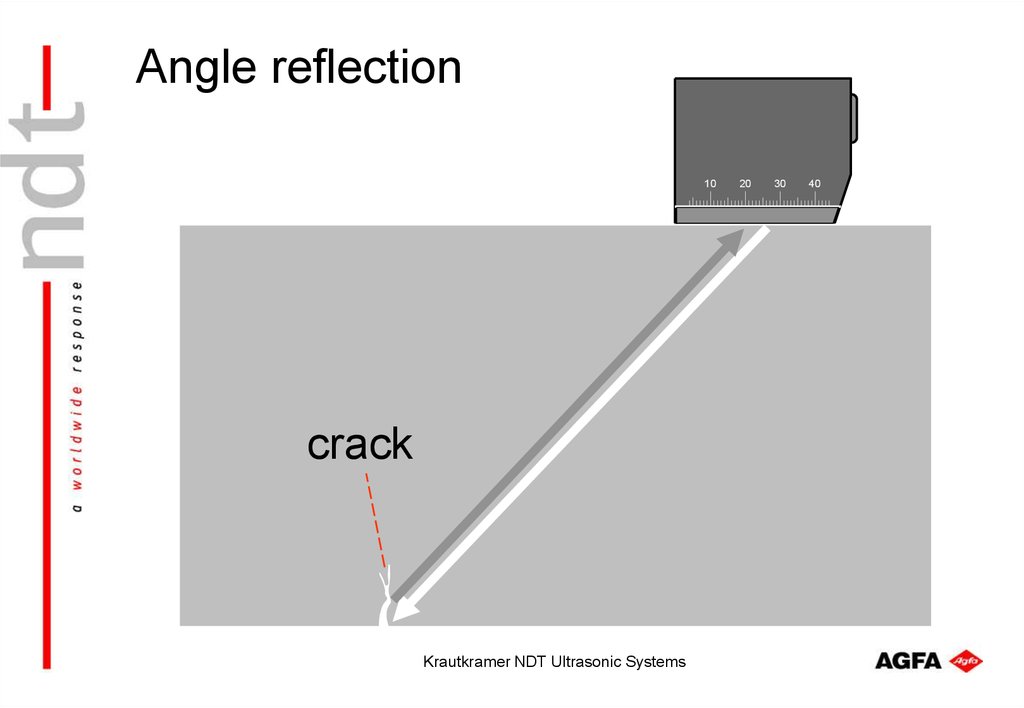
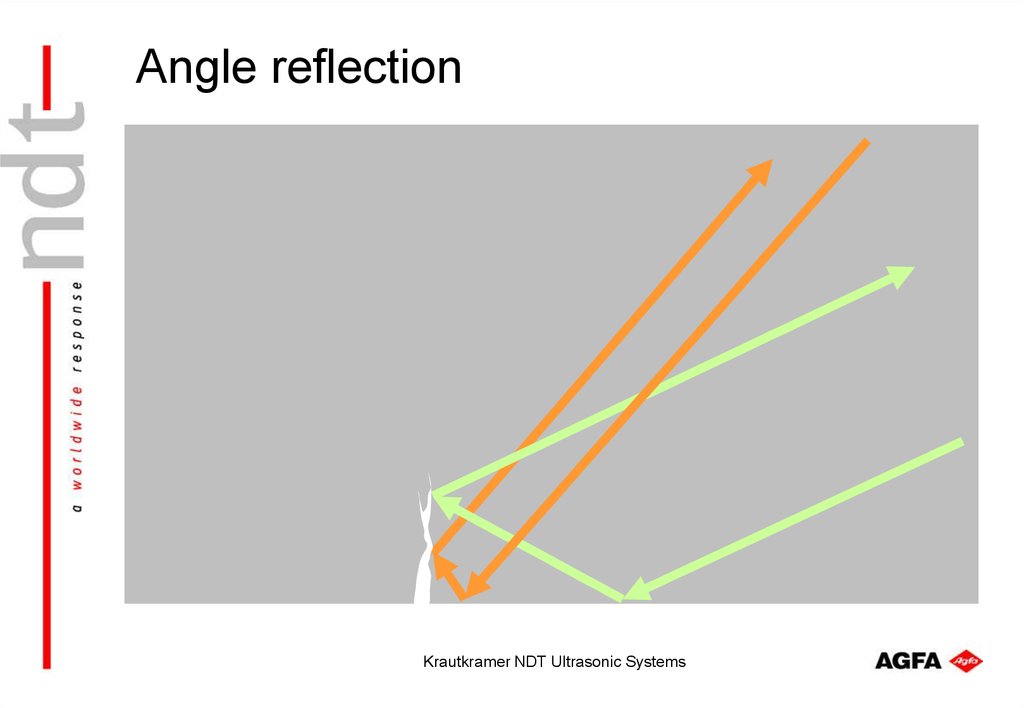
10. Angle reflection
10crack
Krautkramer NDT Ultrasonic Systems
20
30
40
11. Angle reflection
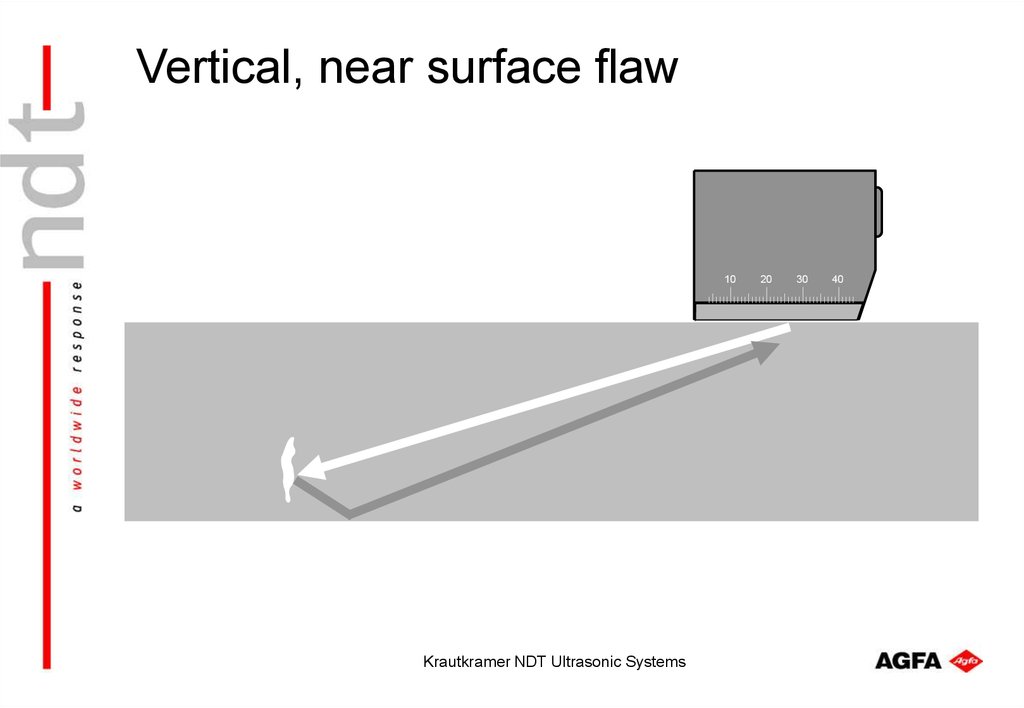
Krautkramer NDT Ultrasonic Systems12. Vertical, near surface flaw
10Krautkramer NDT Ultrasonic Systems
20
30
40
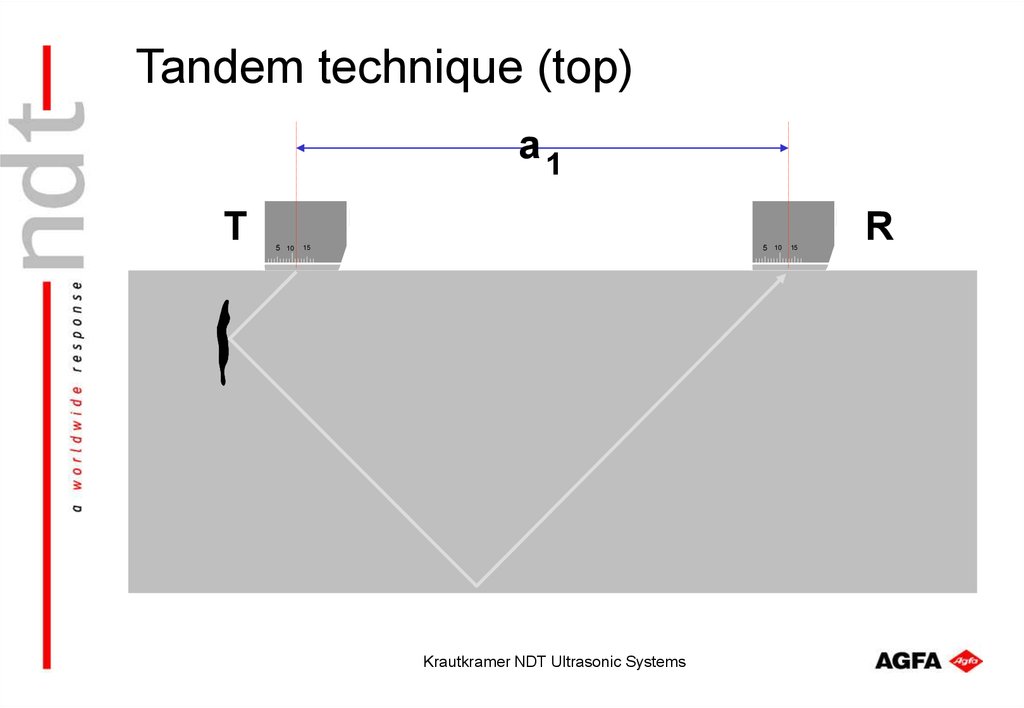
13. Tandem technique (top)
a1T
5 10
5 10
15
Krautkramer NDT Ultrasonic Systems
15
R
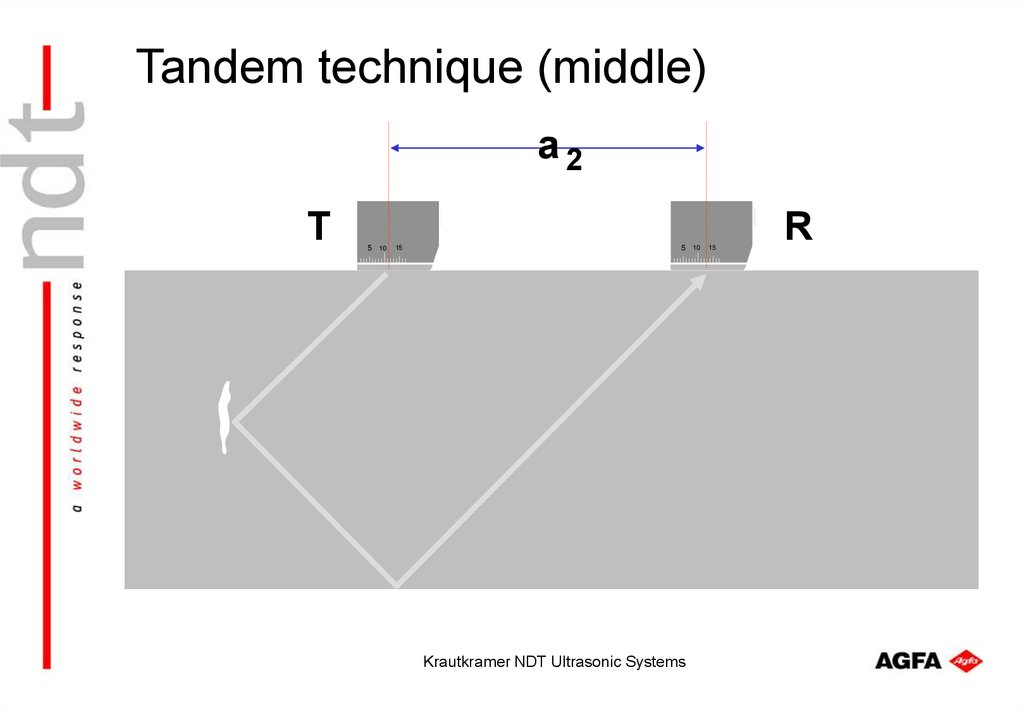
14. Tandem technique (middle)
a2T
5 10
15
5 10
Krautkramer NDT Ultrasonic Systems
15
R
15. Tandem technique (bottom)
a3T
5 10
15
5 10
15
Krautkramer NDT Ultrasonic Systems
R
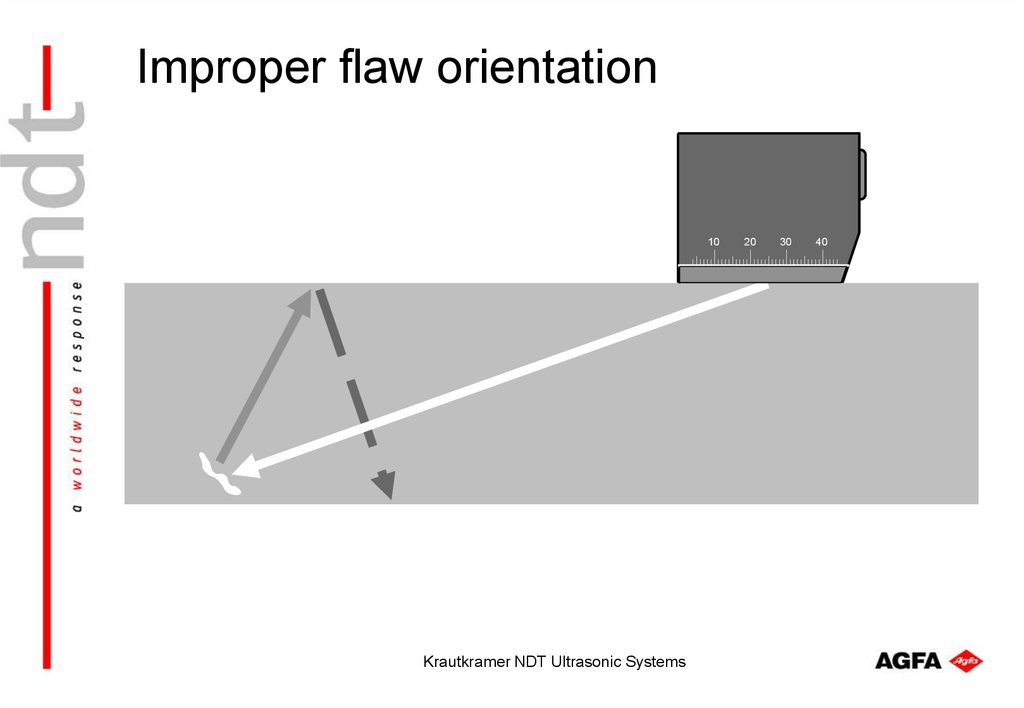
16. Improper flaw orientation
10Krautkramer NDT Ultrasonic Systems
20
30
40
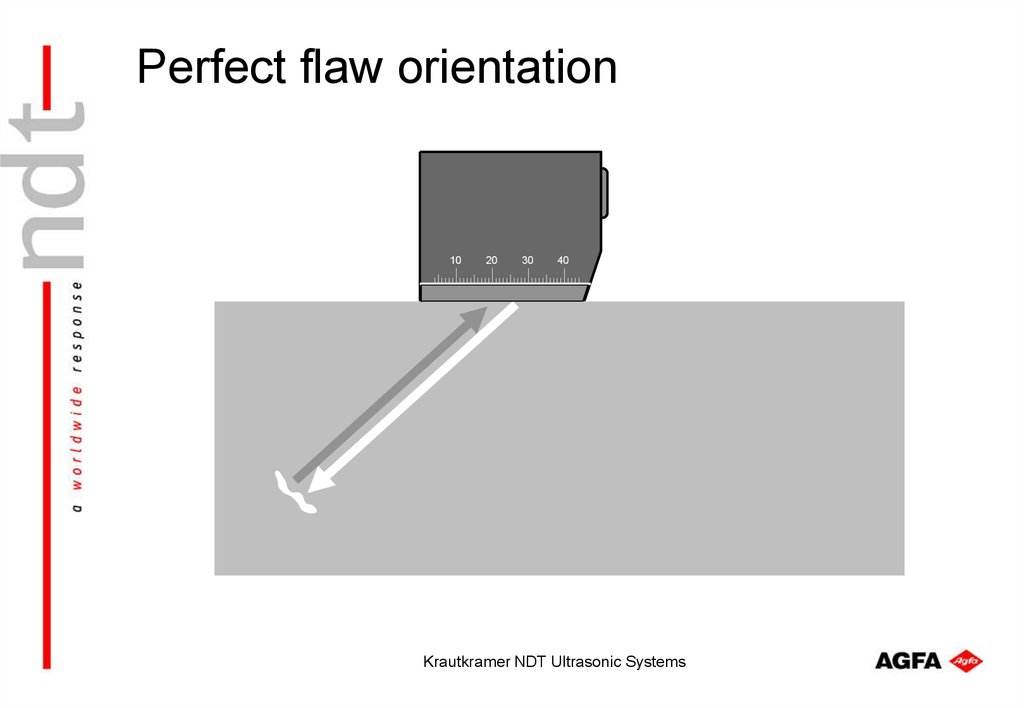
17. Perfect flaw orientation
1020
30
40
Krautkramer NDT Ultrasonic Systems
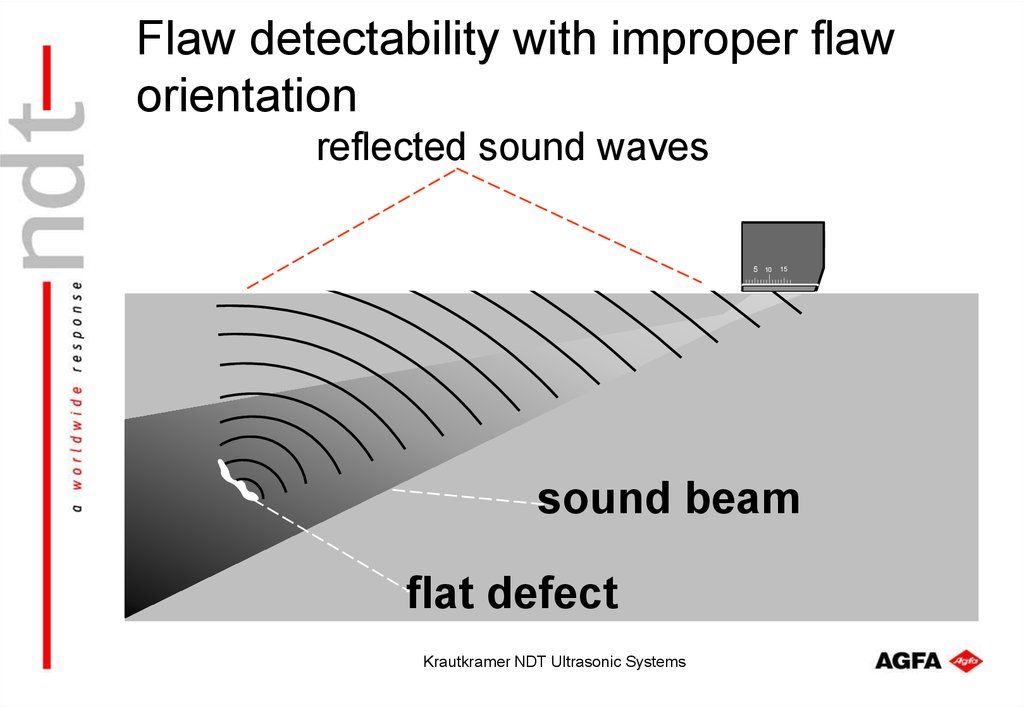
18. Flaw detectability with improper flaw orientation
reflected sound waves5 10
15
sound beam
flat defect
Krautkramer NDT Ultrasonic Systems
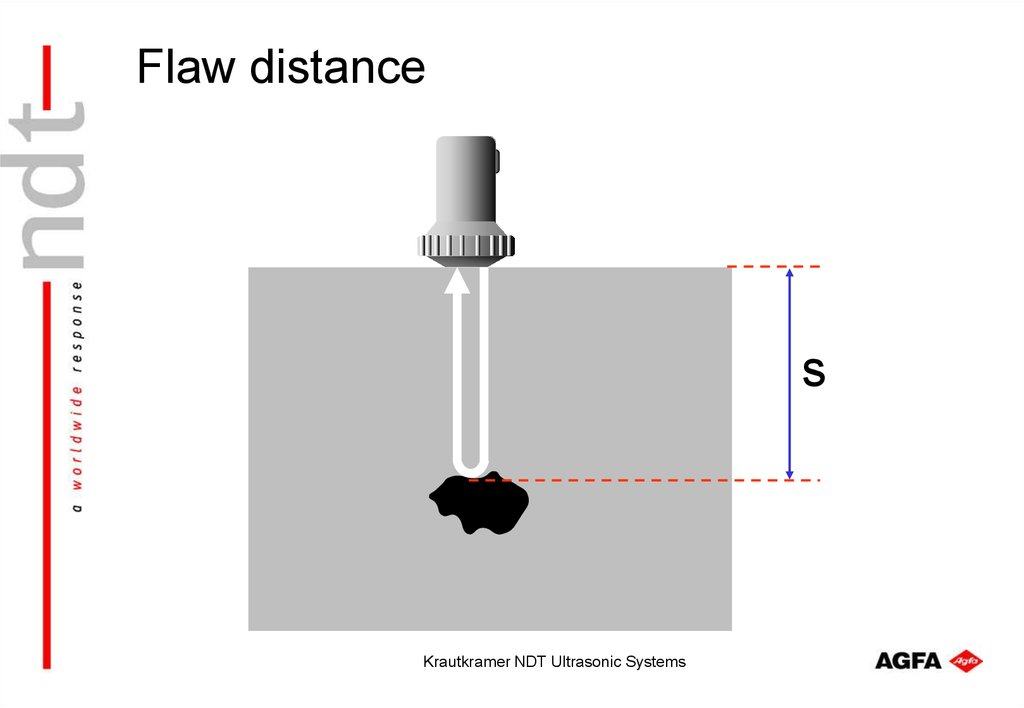
19. Flaw distance
sKrautkramer NDT Ultrasonic Systems
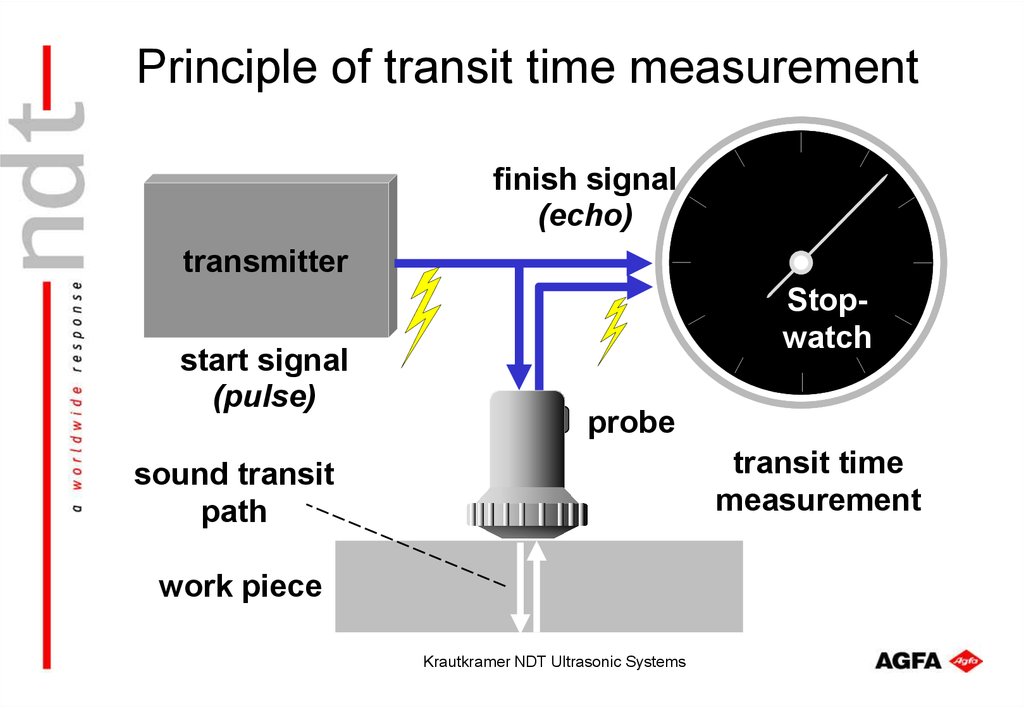
20. Principle of transit time measurement
finish signal(echo)
transmitter
start signal
(pulse)
Stopwatch
probe
transit time
measurement
sound transit
path
work piece
Krautkramer NDT Ultrasonic Systems
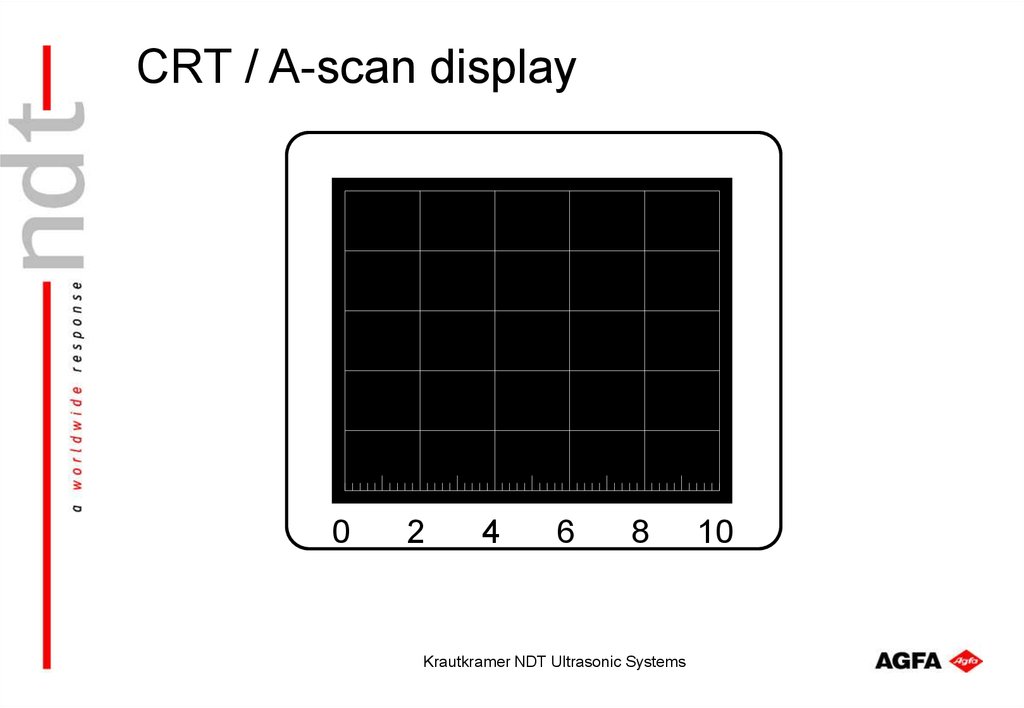
21. CRT / A-scan display
02
4
6
8
Krautkramer NDT Ultrasonic Systems
10
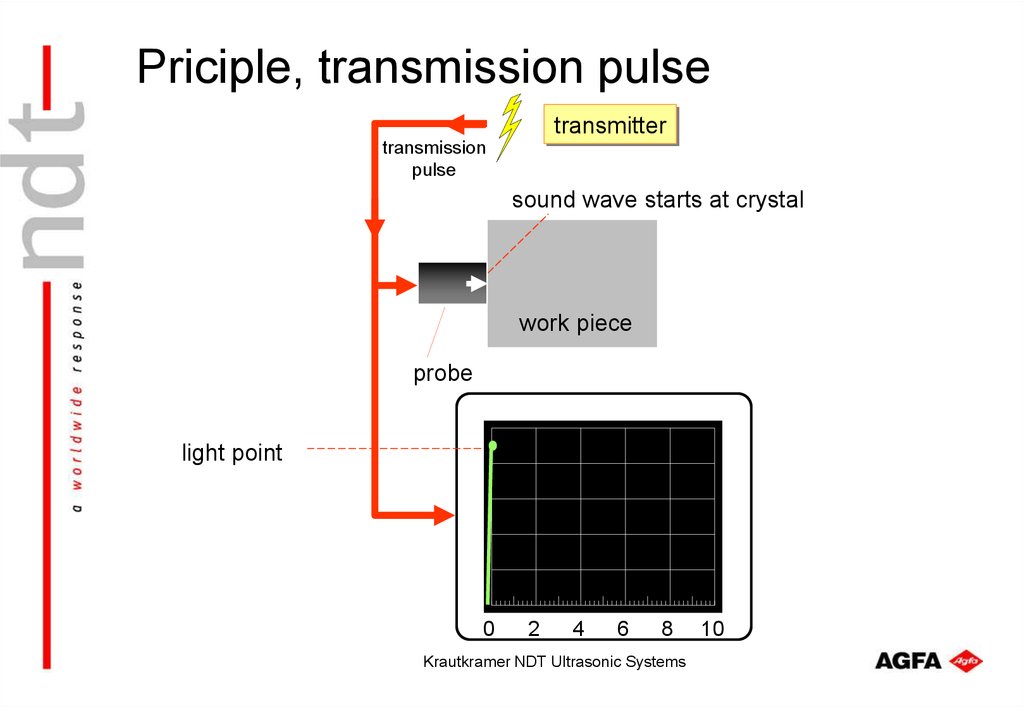
22. Priciple, transmission pulse
transmittertransmission
pulse
sound wave starts at crystal
work piece
probe
light point
0
2
4
6
8
Krautkramer NDT Ultrasonic Systems
10
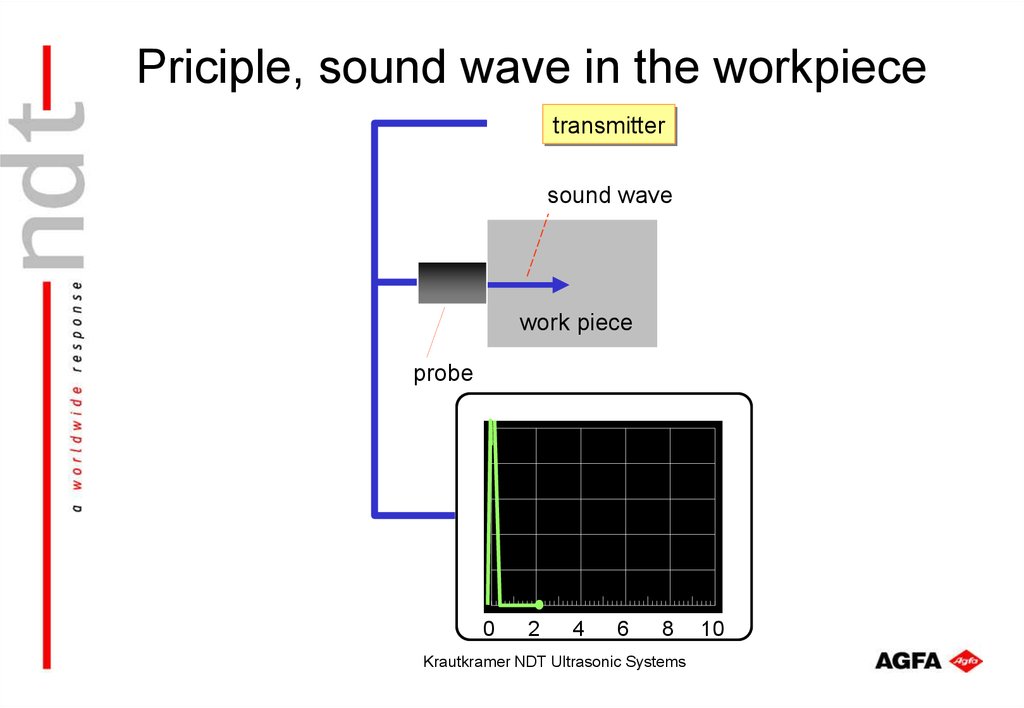
23. Priciple, sound wave in the workpiece
transmittersound wave
work piece
probe
0
2
4
6
8
Krautkramer NDT Ultrasonic Systems
10
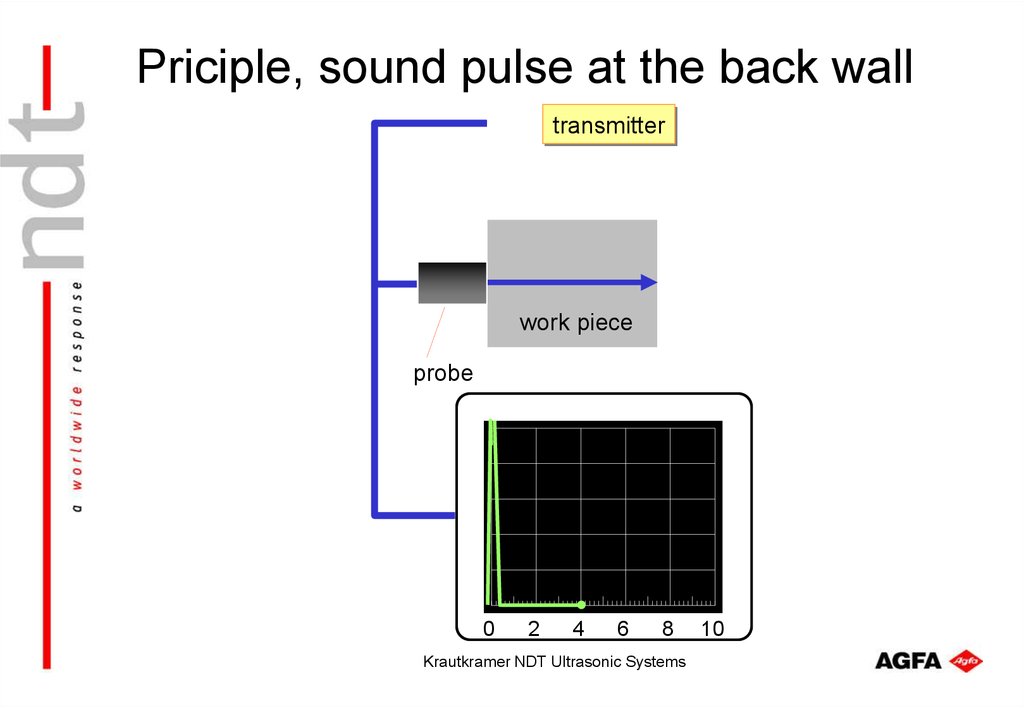
24. Priciple, sound pulse at the back wall
transmitterwork piece
probe
0
2
4
6
8
Krautkramer NDT Ultrasonic Systems
10
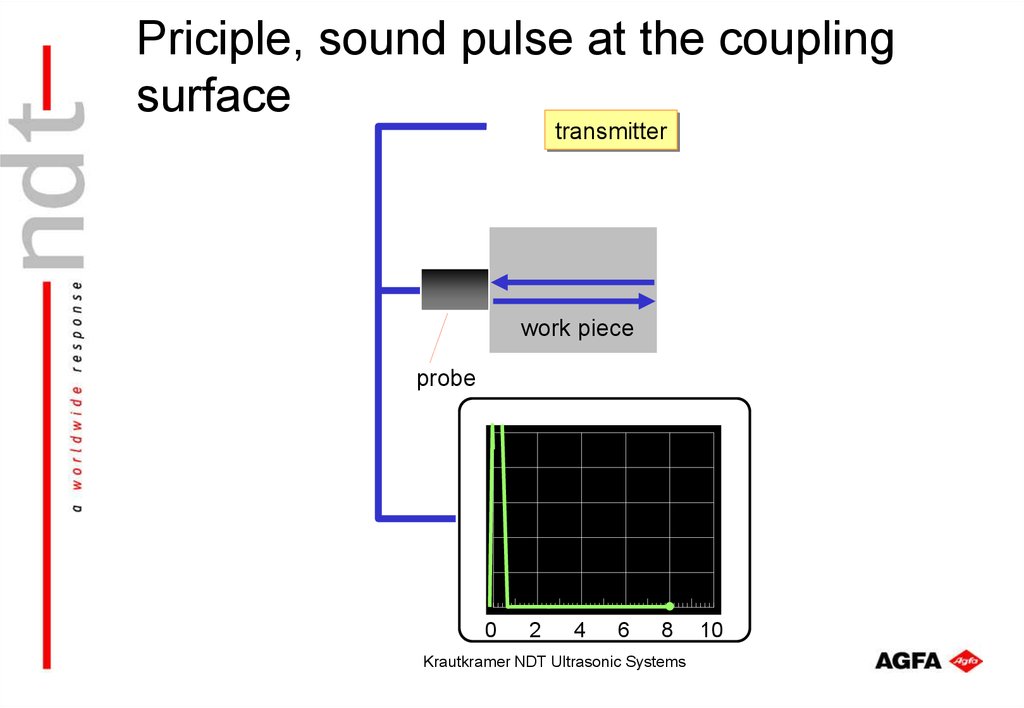
25. Priciple, sound pulse at the coupling surface
transmitterwork piece
probe
0
2
4
6
8
Krautkramer NDT Ultrasonic Systems
10
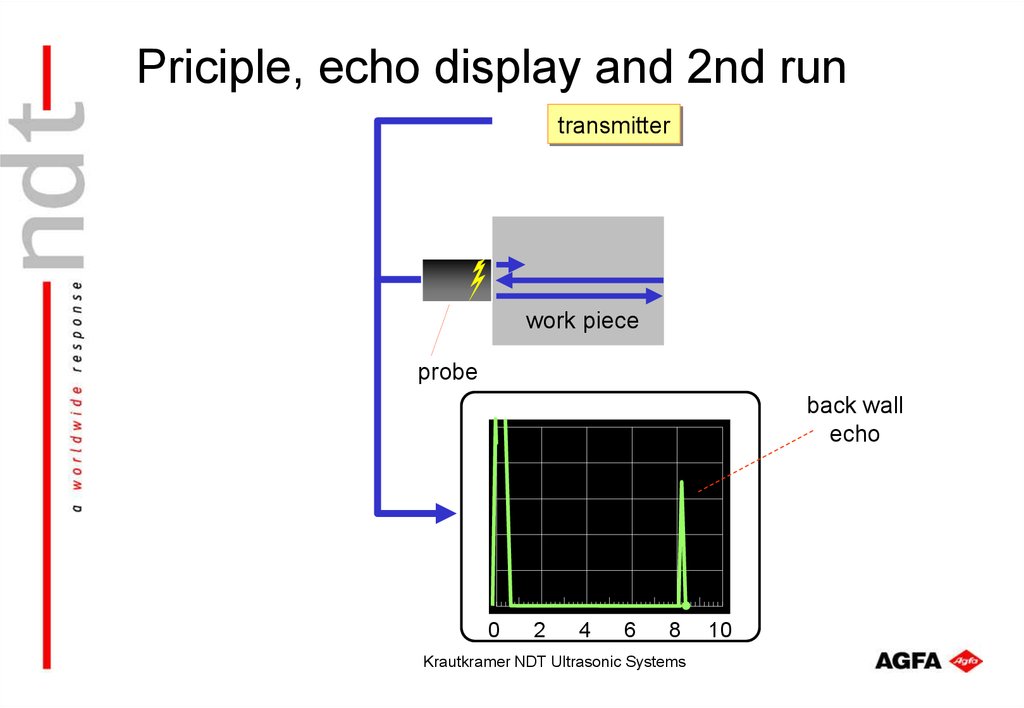
26. Priciple, echo display and 2nd run
transmitterwork piece
probe
back wall
echo
0
2
4
6
8
Krautkramer NDT Ultrasonic Systems
10
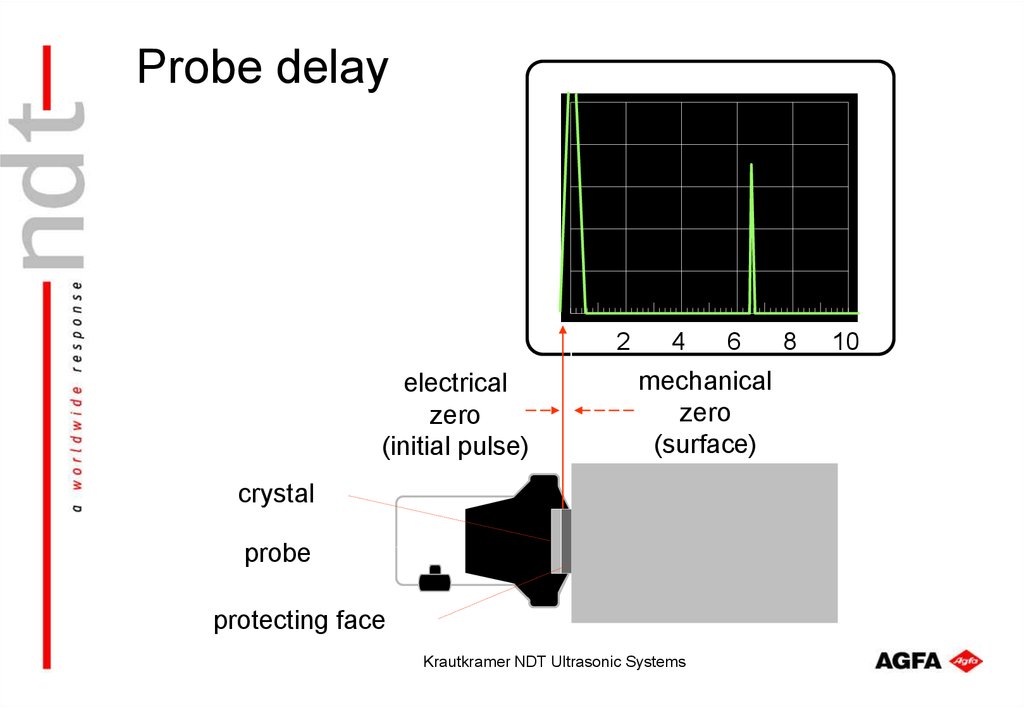
27. Probe delay
2electrical
zero
(initial pulse)
4
6
mechanical
zero
(surface)
crystal
probe
protecting face
Krautkramer NDT Ultrasonic Systems
8
10
28. Probe delay
electicalzero
(initial pulse)
0
probe
2
delay
(wedge)
sound wave
work piece
Krautkramer NDT Ultrasonic Systems
4
6
8
10
mechanical
zero
(surface)
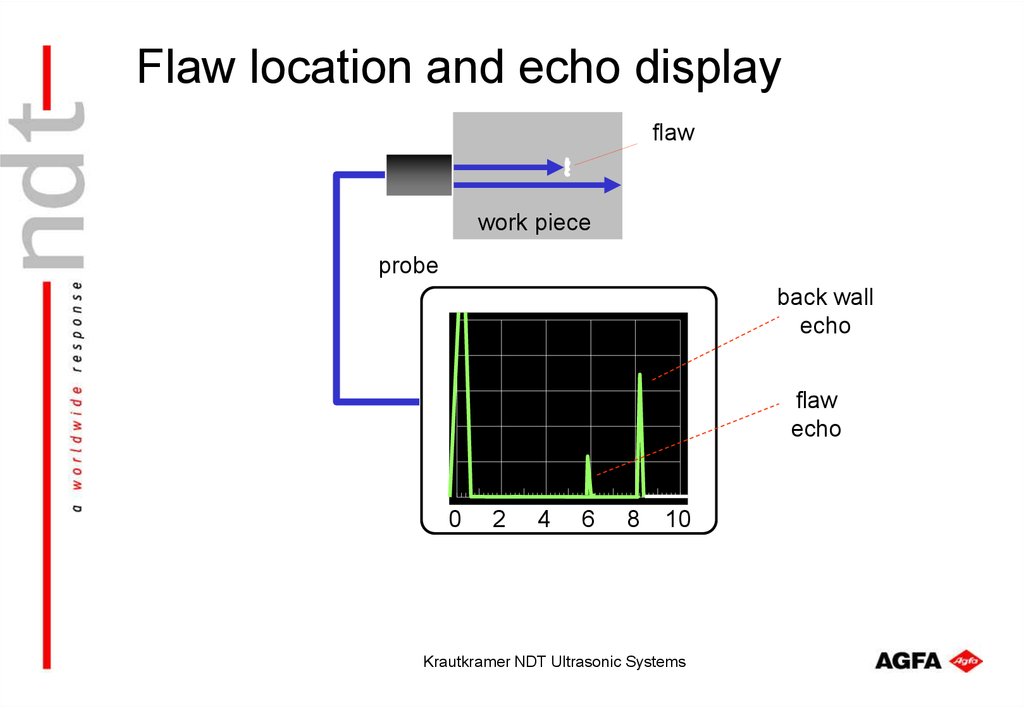
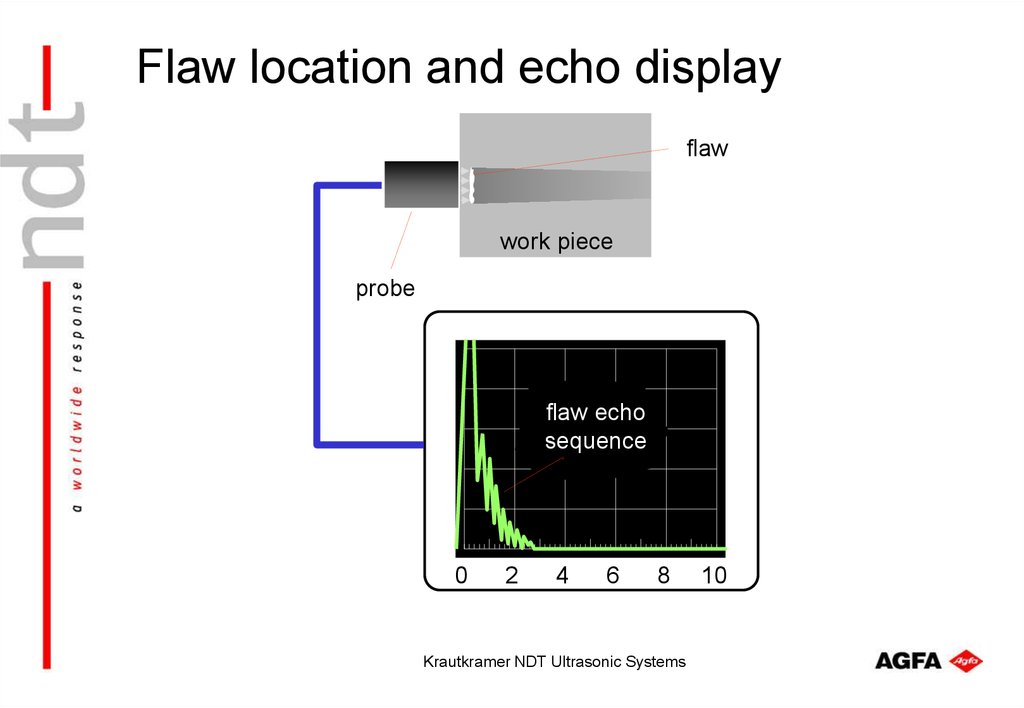
29. Flaw location and echo display
flawwork piece
probe
back wall
echo
flaw
echo
0
2
4
6
8
10
Krautkramer NDT Ultrasonic Systems
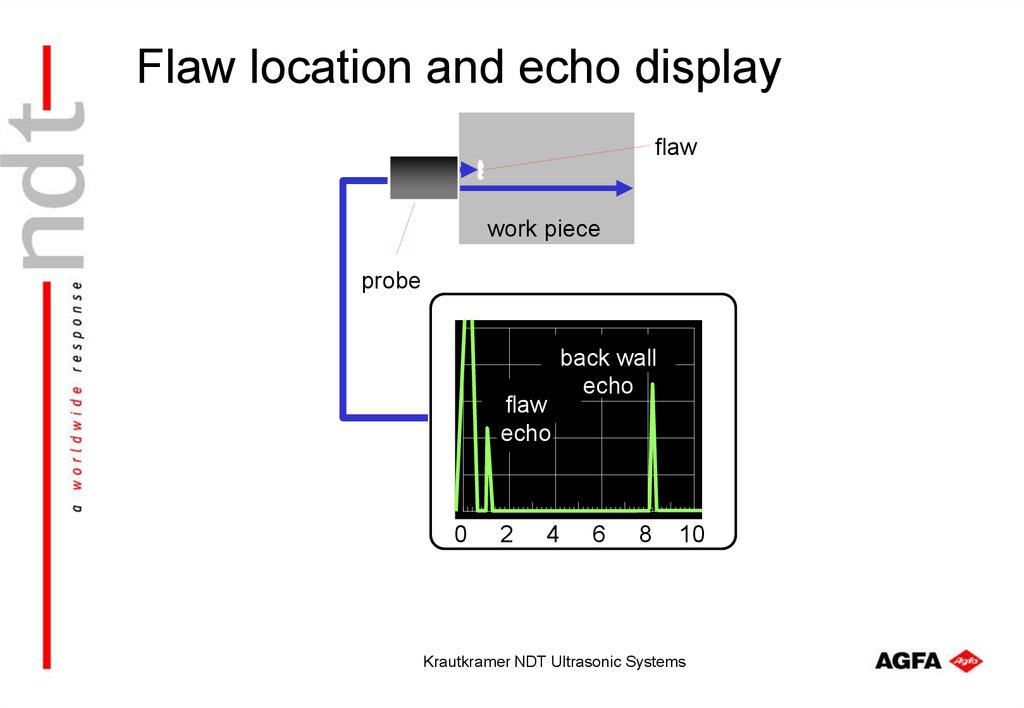
30. Flaw location and echo display
flawwork piece
probe
back wall
echo
flaw
echo
0
2
4
6
8
10
Krautkramer NDT Ultrasonic Systems
31. Flaw location and echo display
flawwork piece
probe
flaw
echo
0
2
4
back wall
echo
6
8
10
Krautkramer NDT Ultrasonic Systems
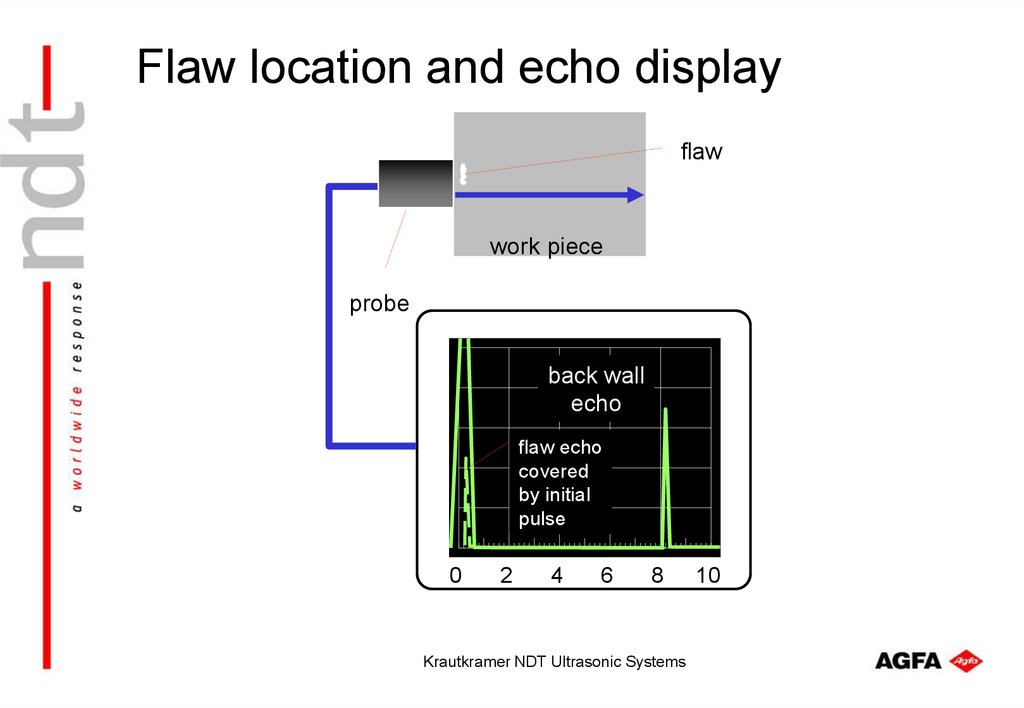
32. Flaw location and echo display
flawwork piece
probe
back wall
echo
flaw echo
covered
by initial
pulse
0
2
4
6
8
Krautkramer NDT Ultrasonic Systems
10
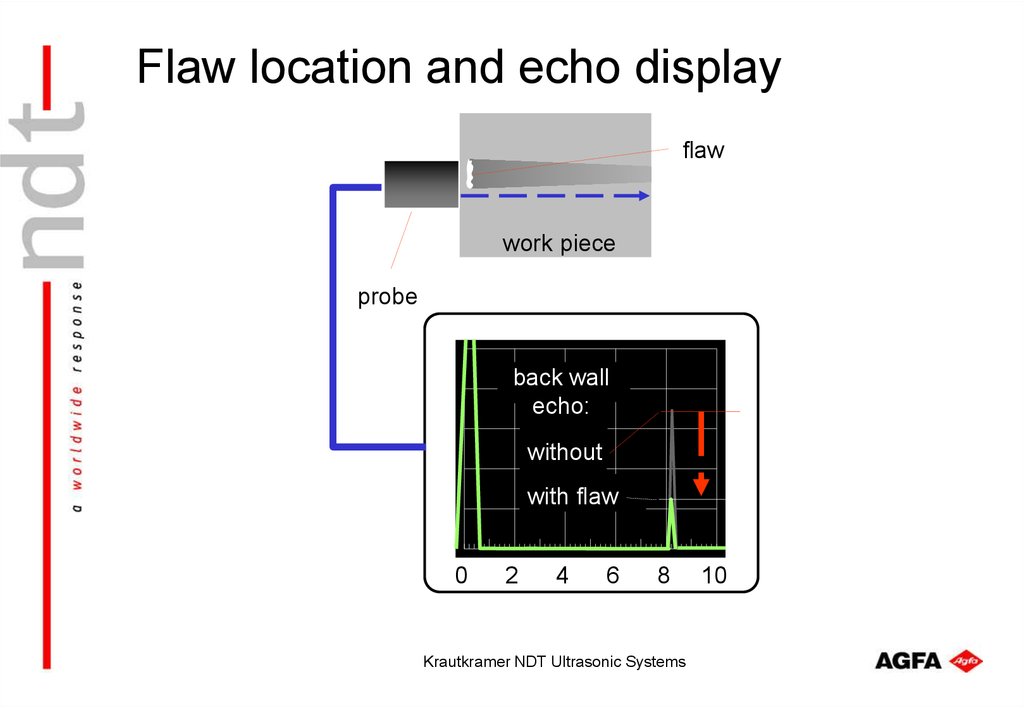
33. Flaw location and echo display
flawwork piece
probe
back wall
echo:
without
with flaw
0
2
4
6
8
Krautkramer NDT Ultrasonic Systems
10
34. Flaw location and echo display
flawwork piece
probe
flaw echo
sequence
0
2
4
6
8
Krautkramer NDT Ultrasonic Systems
10
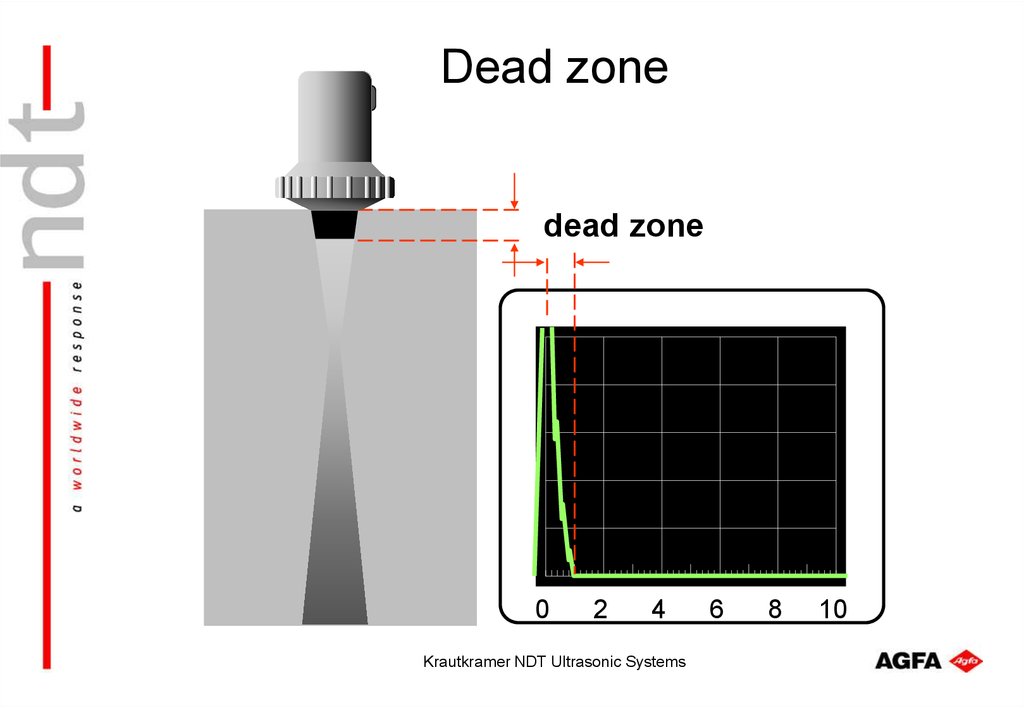
35. Dead zone
dead zone0
2
4
Krautkramer NDT Ultrasonic Systems
6
8
10
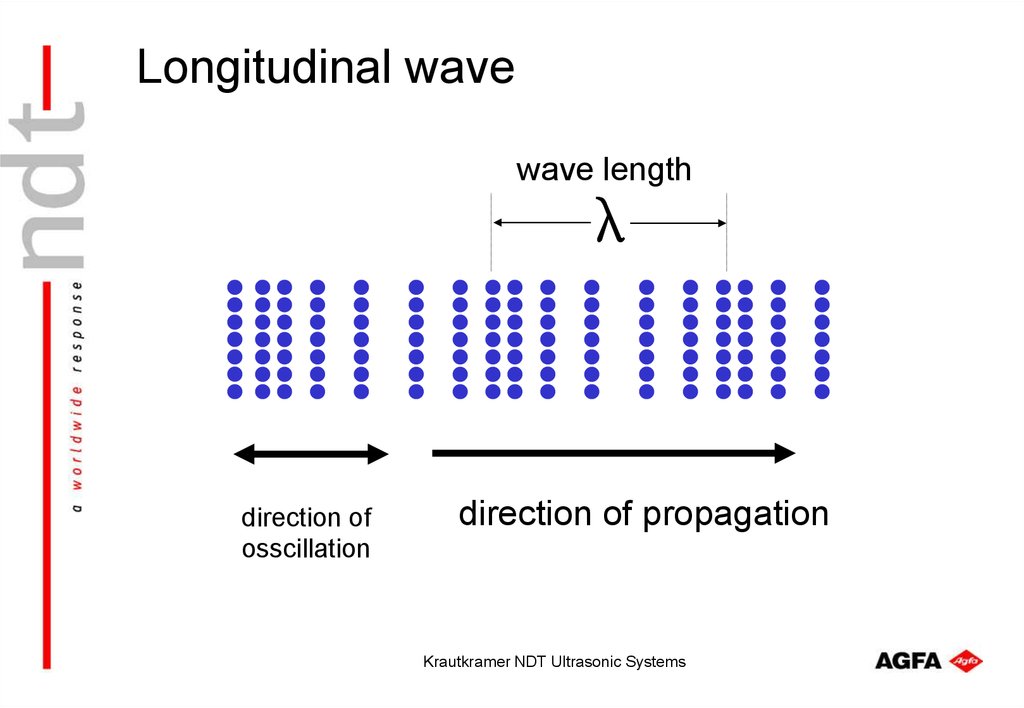
36. Longitudinal wave
wave lengthdirection of
osscillation
direction of propagation
Krautkramer NDT Ultrasonic Systems
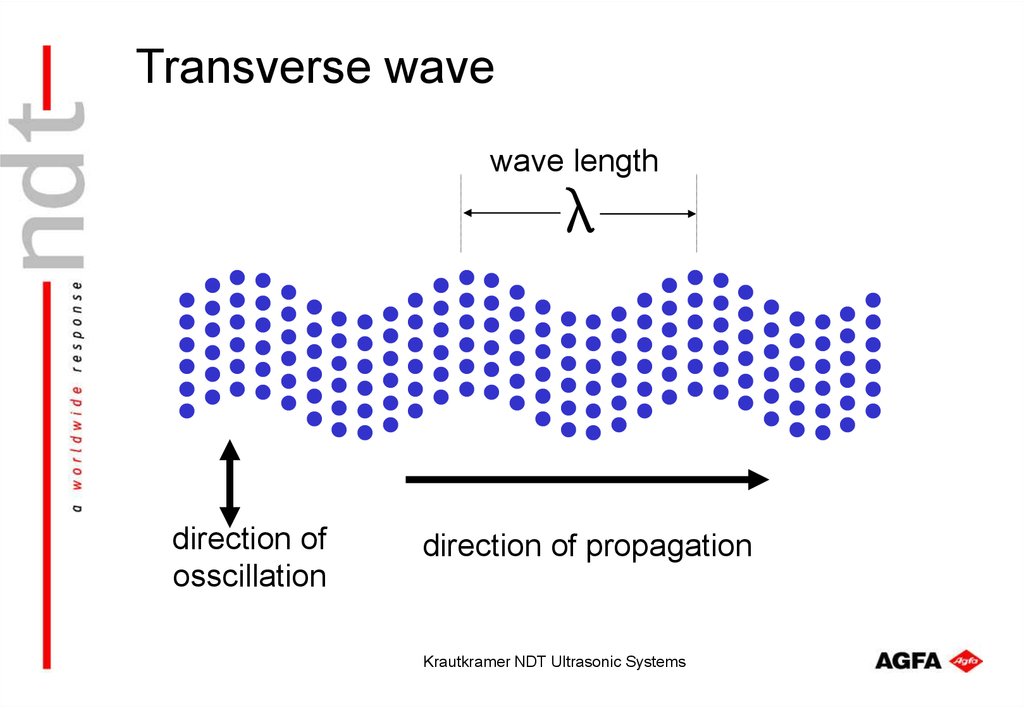
37. Transverse wave
wave lengthdirection of
osscillation
direction of propagation
Krautkramer NDT Ultrasonic Systems
38. Relection and refraction
LL
reflected
wave
incident
wave
L
medium 1
medium 2
refracted
wave
L
Krautkramer NDT Ultrasonic Systems
L
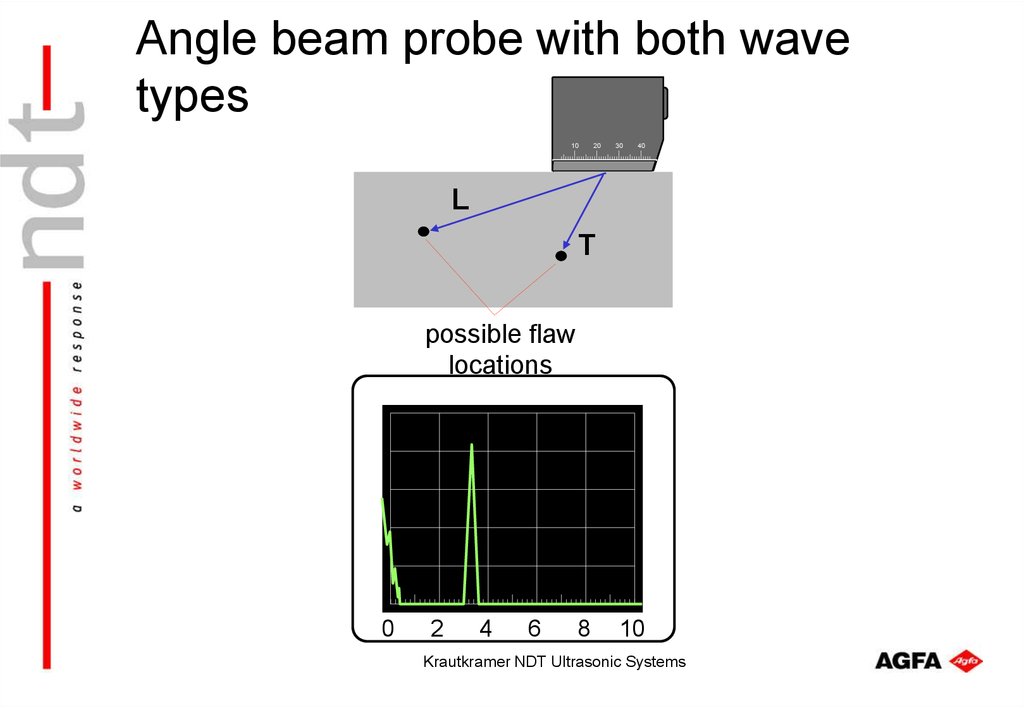
39. Angle beam probe with both wave types
1020
30
40
L
T
possible flaw
locations
0
2
4
6
8
10
Krautkramer NDT Ultrasonic Systems
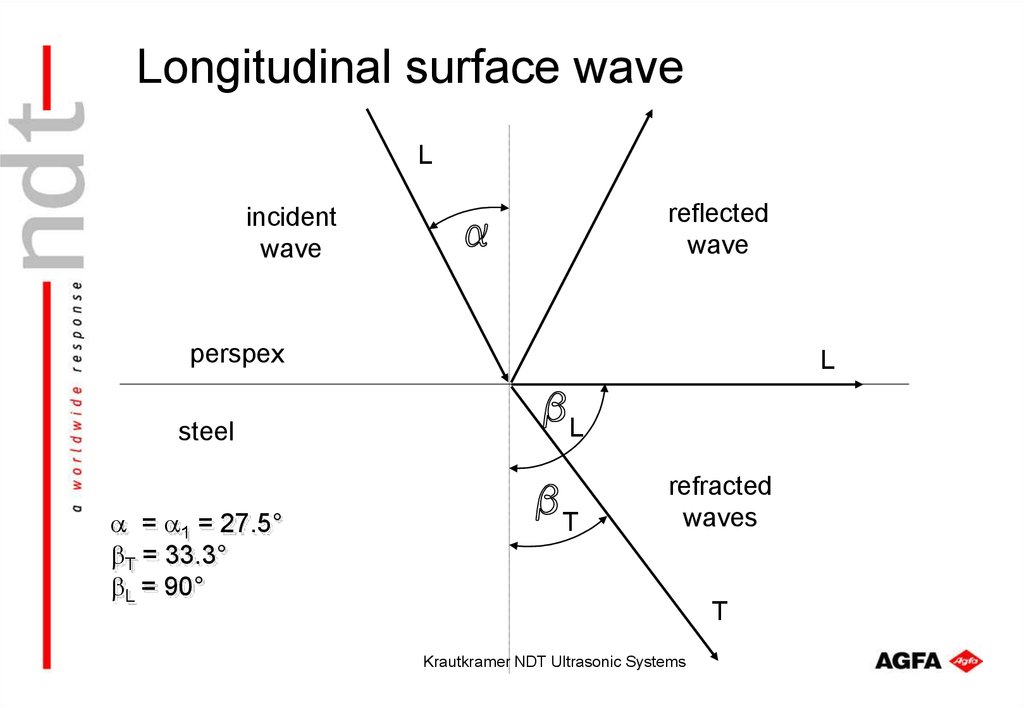
40. Longitudinal surface wave
Lreflected
wave
incident
wave
perspex
steel
= 1 = 27.5°
T = 33.3°
L = 90°
L
L
T
refracted
waves
T
Krautkramer NDT Ultrasonic Systems
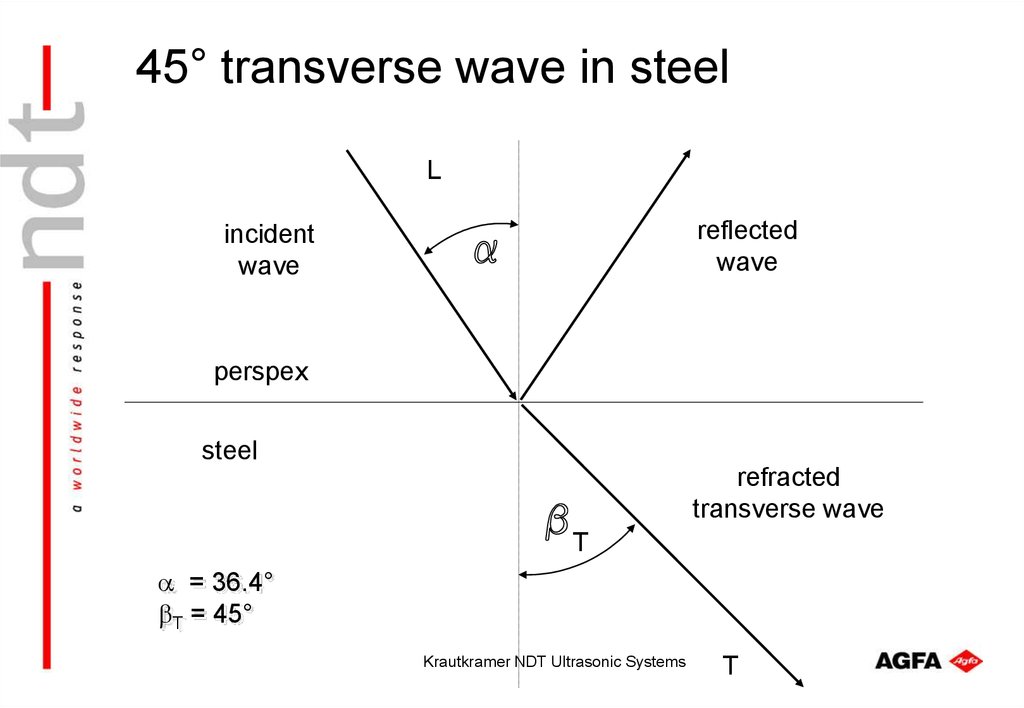
41. 45° transverse wave in steel
Lreflected
wave
incident
wave
perspex
steel
refracted
transverse wave
T
= 36.4°
T = 45°
Krautkramer NDT Ultrasonic Systems
T
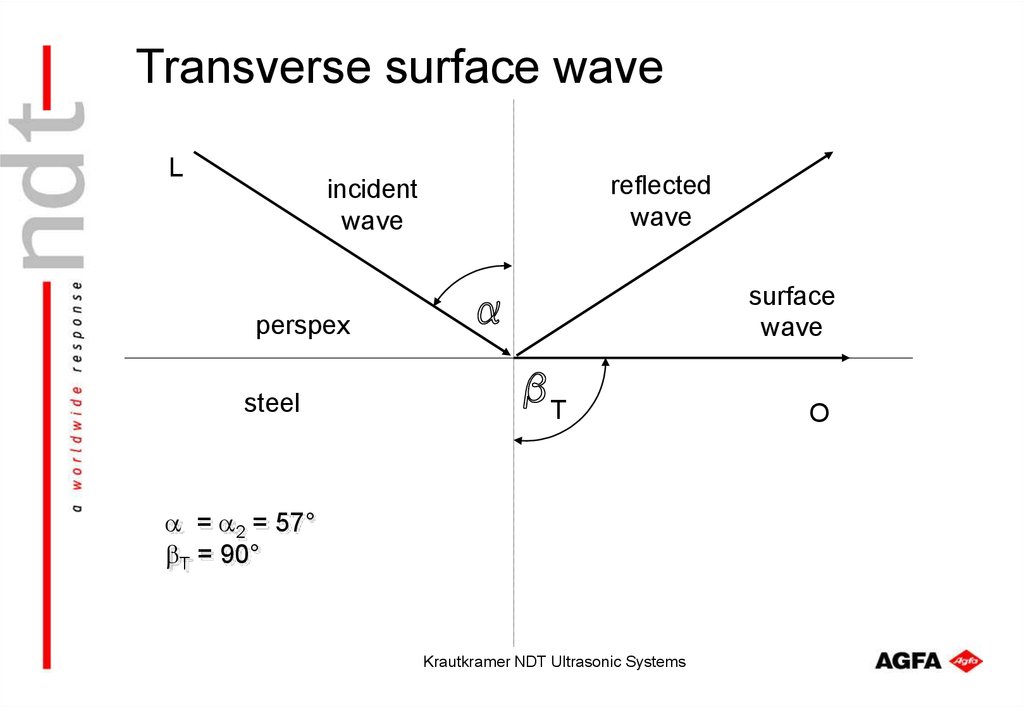
42. Transverse surface wave
Lreflected
wave
incident
wave
surface
wave
perspex
steel
T
= 2 = 57°
T = 90°
Krautkramer NDT Ultrasonic Systems
O
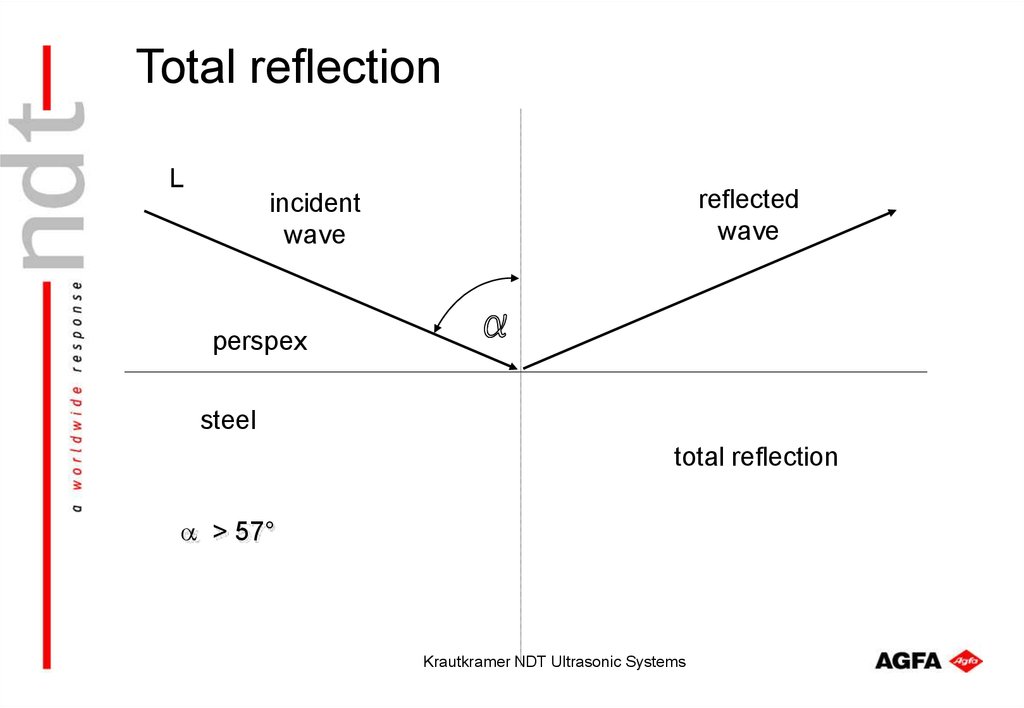
43. Total reflection
Lreflected
wave
incident
wave
perspex
steel
total reflection
> 57°
Krautkramer NDT Ultrasonic Systems
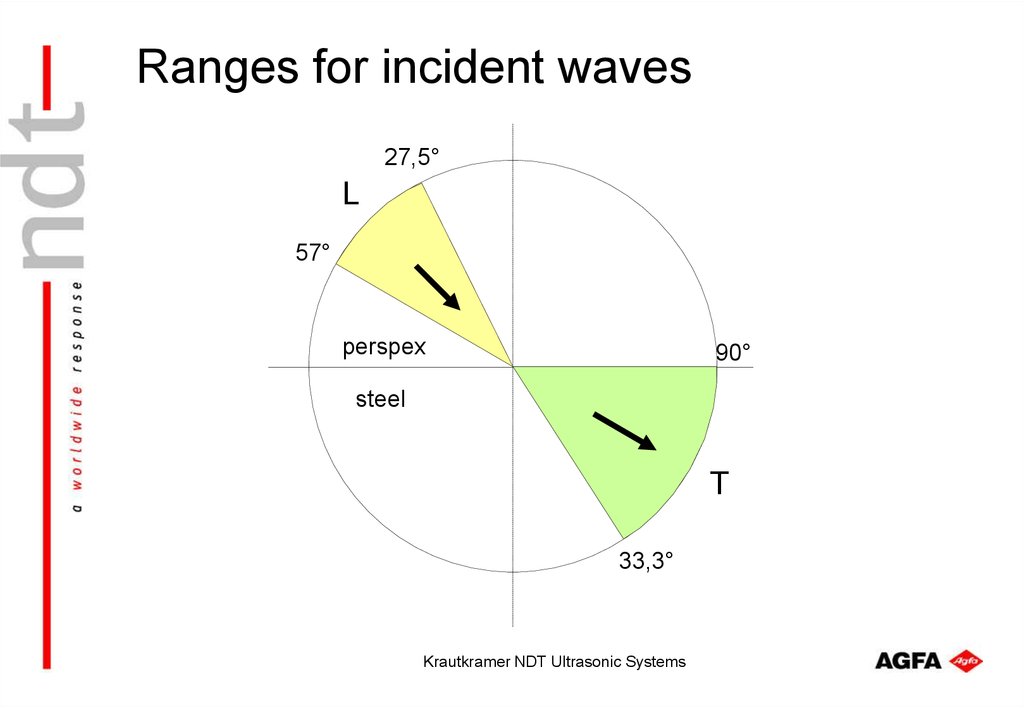
44. Ranges for incident waves
27,5°L
57°
perspex
90°
steel
T
33,3°
Krautkramer NDT Ultrasonic Systems
45. Near surface detectability with angle beam pobes
10Krautkramer NDT Ultrasonic Systems
20
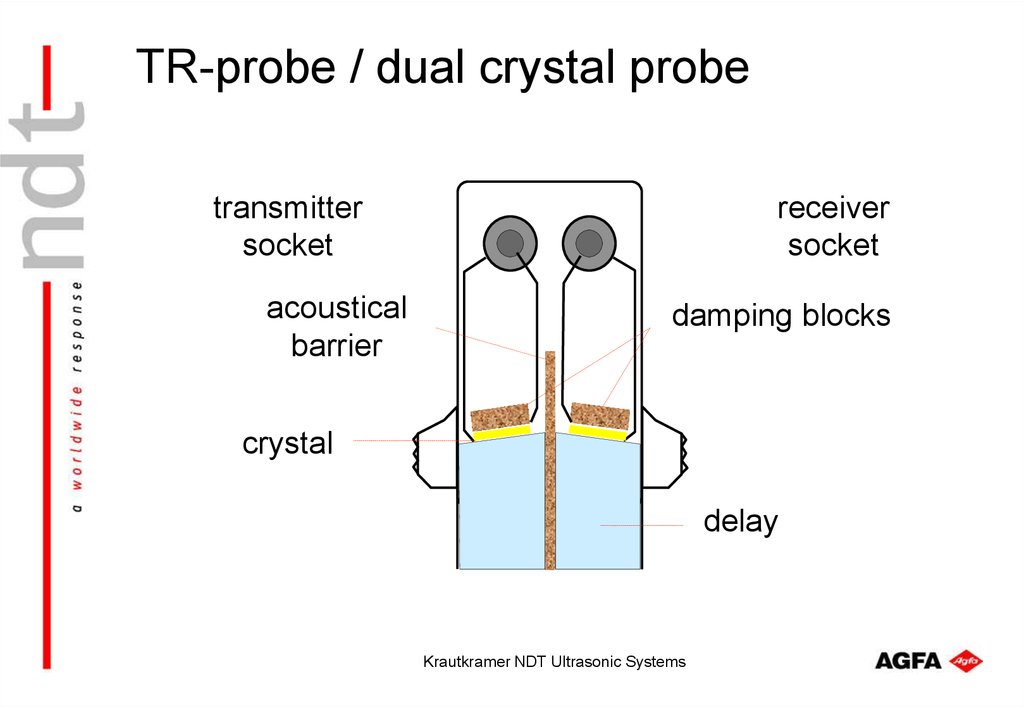
46. TR-probe / dual crystal probe
transmittersocket
acoustical
barrier
receiver
socket
damping blocks
crystal
delay
Krautkramer NDT Ultrasonic Systems
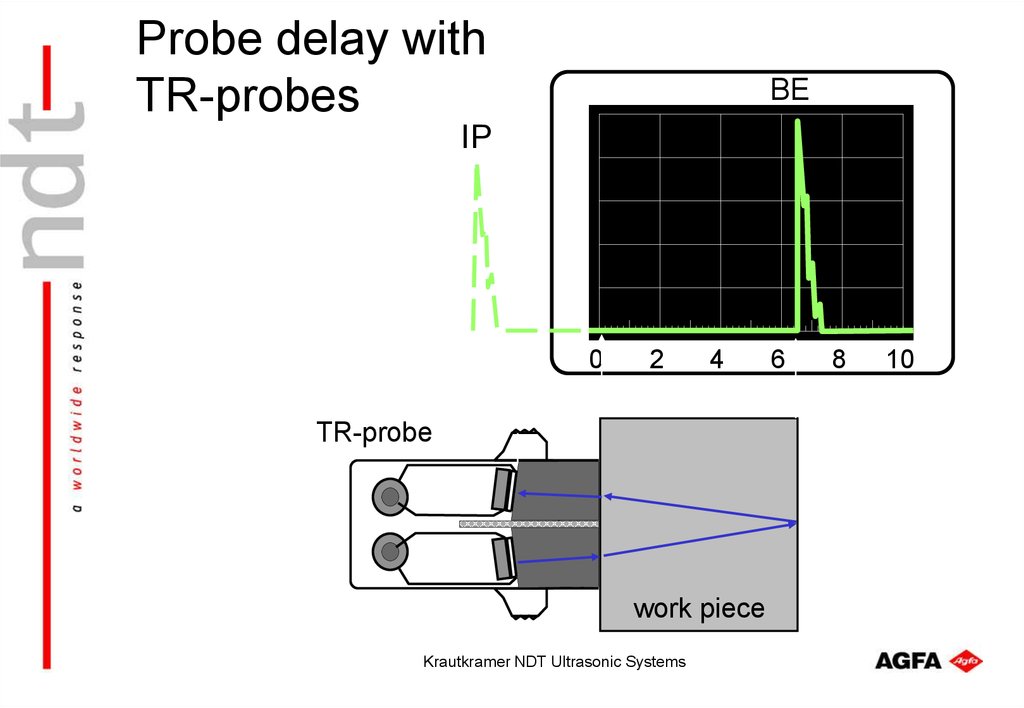
47. Probe delay with TR-probes
BEIP
0
2
4
TR-probe
work piece
Krautkramer NDT Ultrasonic Systems
6
8
10
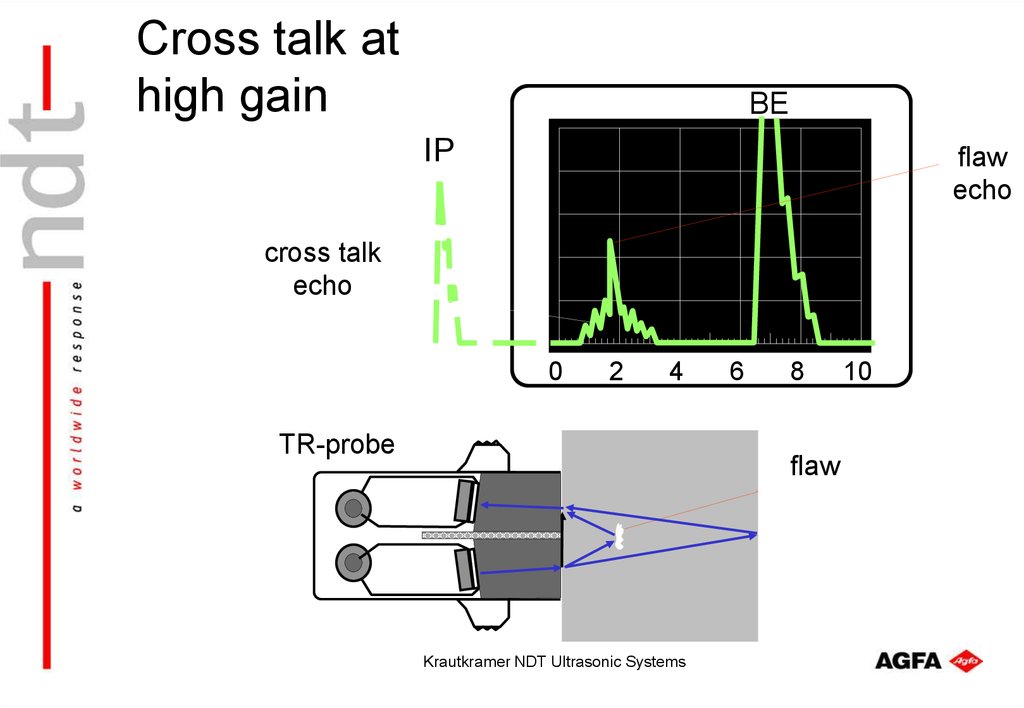
48. Cross talk at high gain
BEIP
flaw
echo
cross talk
echo
0
2
4
TR-probe
6
8
flaw
Krautkramer NDT Ultrasonic Systems
10
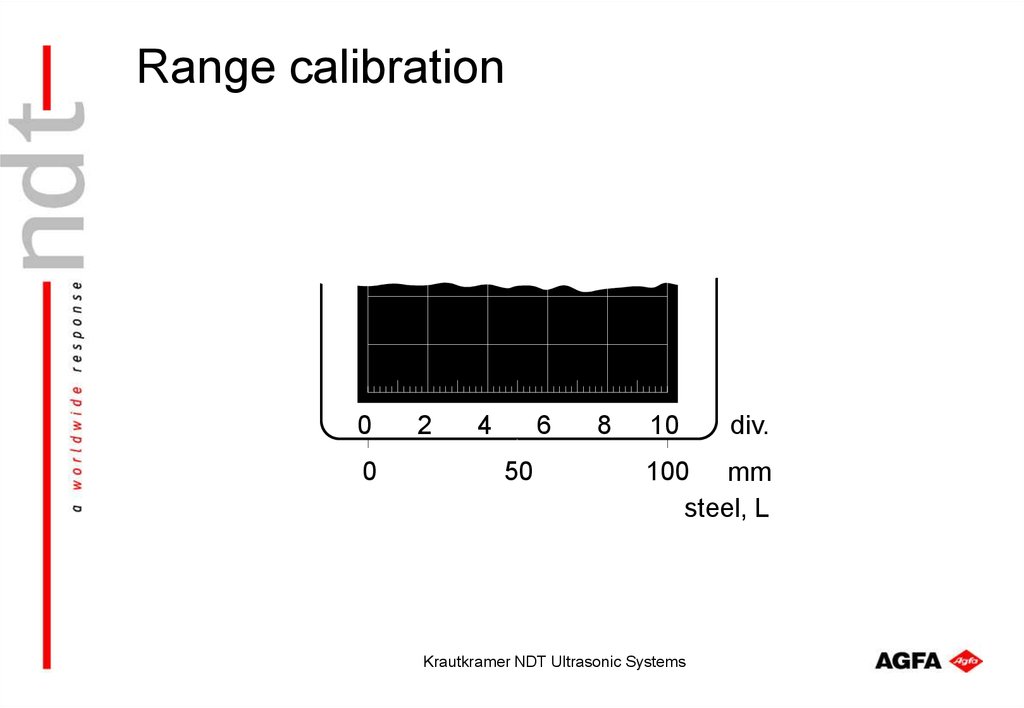
49. Range calibration
00
2
4
6
50
8
10
div.
100 mm
steel, L
Krautkramer NDT Ultrasonic Systems
50. Calibration block 1 with angle beam probes
510
15
70°
60°
45°
Krautkramer NDT Ultrasonic Systems
51. 1st echo from circular section
510
15
0
2
4
100 mm
Krautkramer NDT Ultrasonic Systems
6
8
10
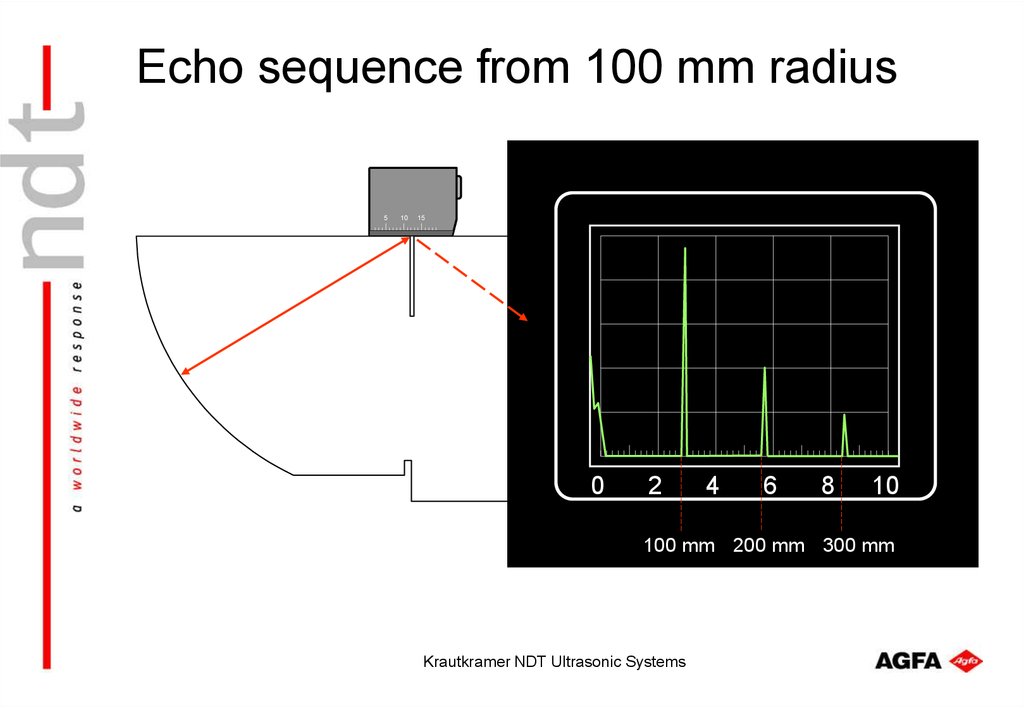
52. Echo sequence from 100 mm radius
510
15
0
2
4
6
8
10
100 mm 200 mm 300 mm
Krautkramer NDT Ultrasonic Systems
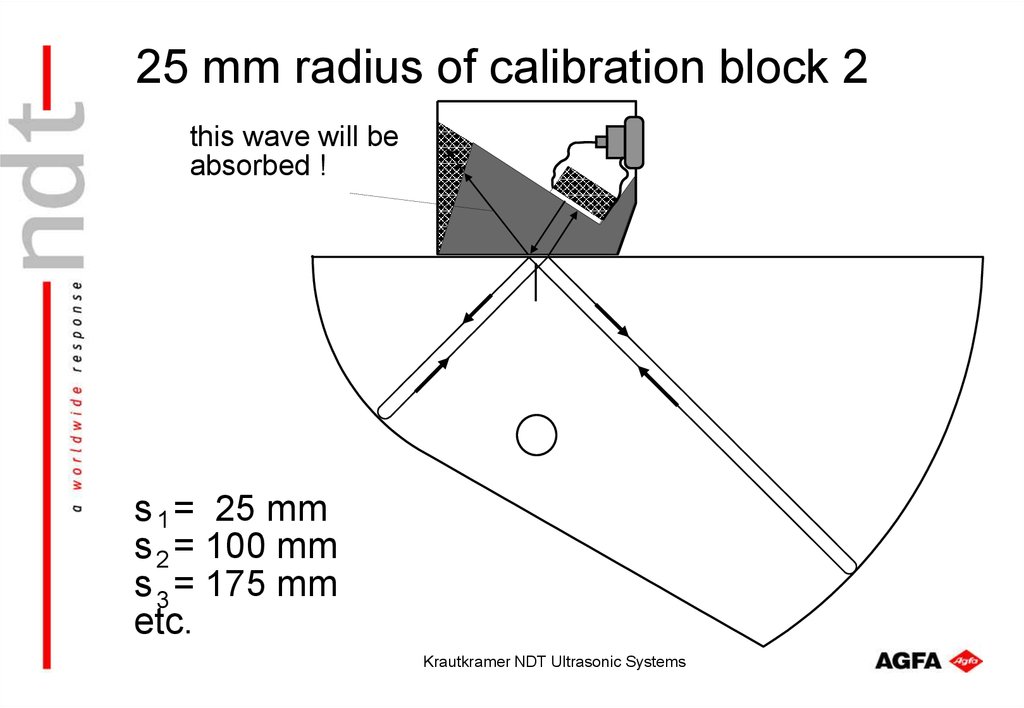
53. 25 mm radius of calibration block 2
this wave will beabsorbed !
s 1 = 25 mm
s 2 = 100 mm
s 3 = 175 mm
etc.
Krautkramer NDT Ultrasonic Systems
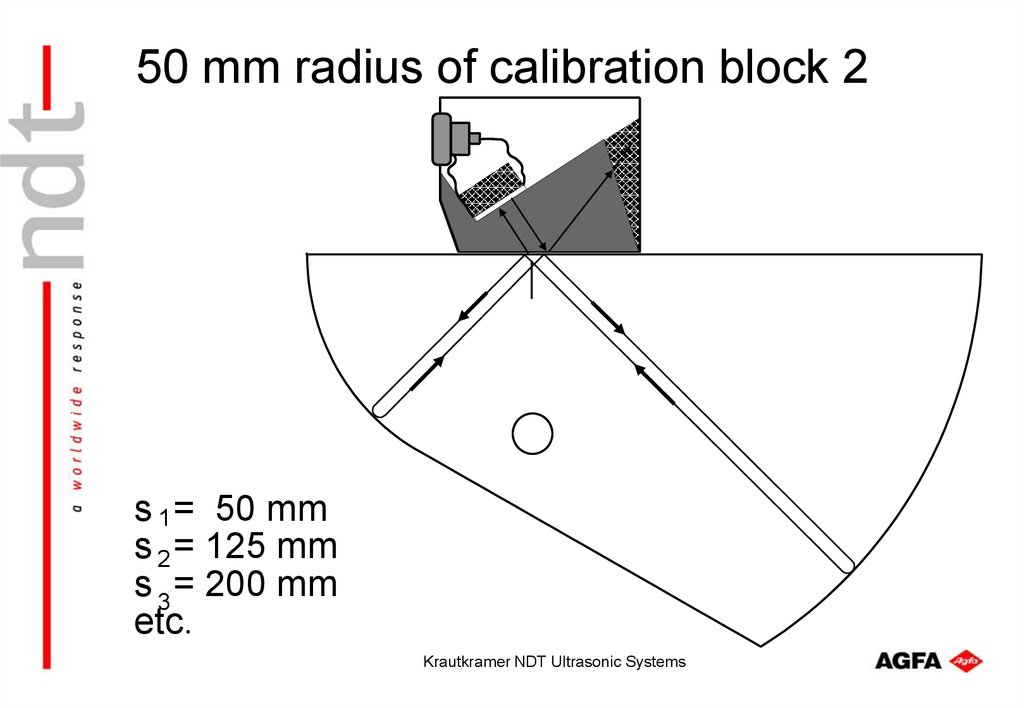
54. 50 mm radius of calibration block 2
s 1 = 50 mms 2 = 125 mm
s 3 = 200 mm
etc.
Krautkramer NDT Ultrasonic Systems
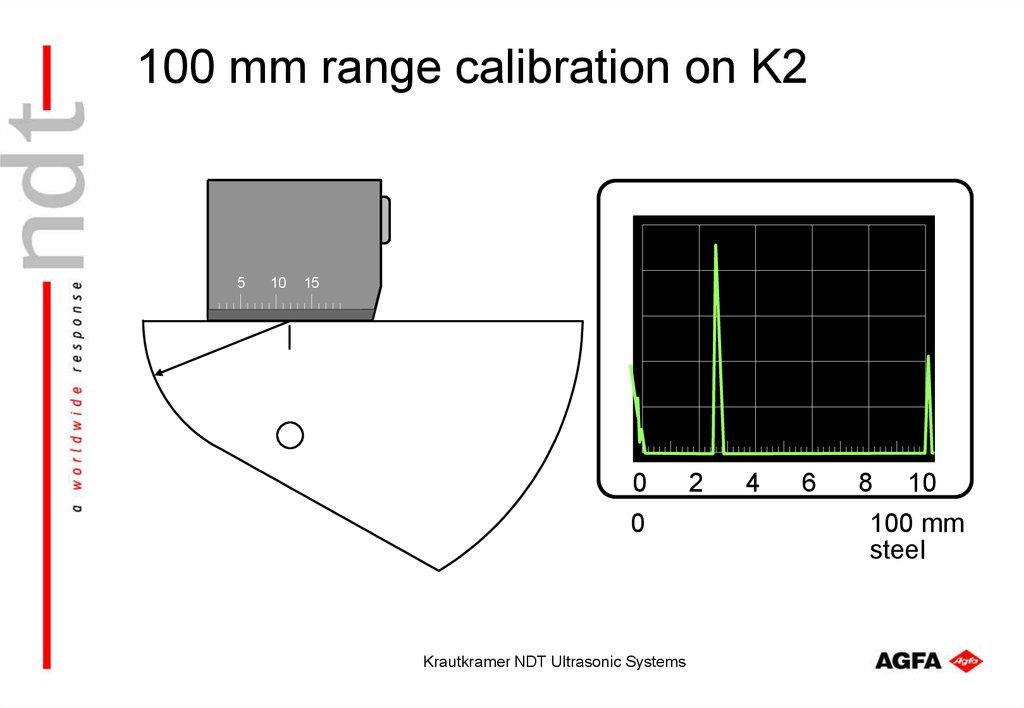
55. 100 mm range calibration on K2
510
15
0
0
Krautkramer NDT Ultrasonic Systems
2
4
6
8
10
100 mm
steel
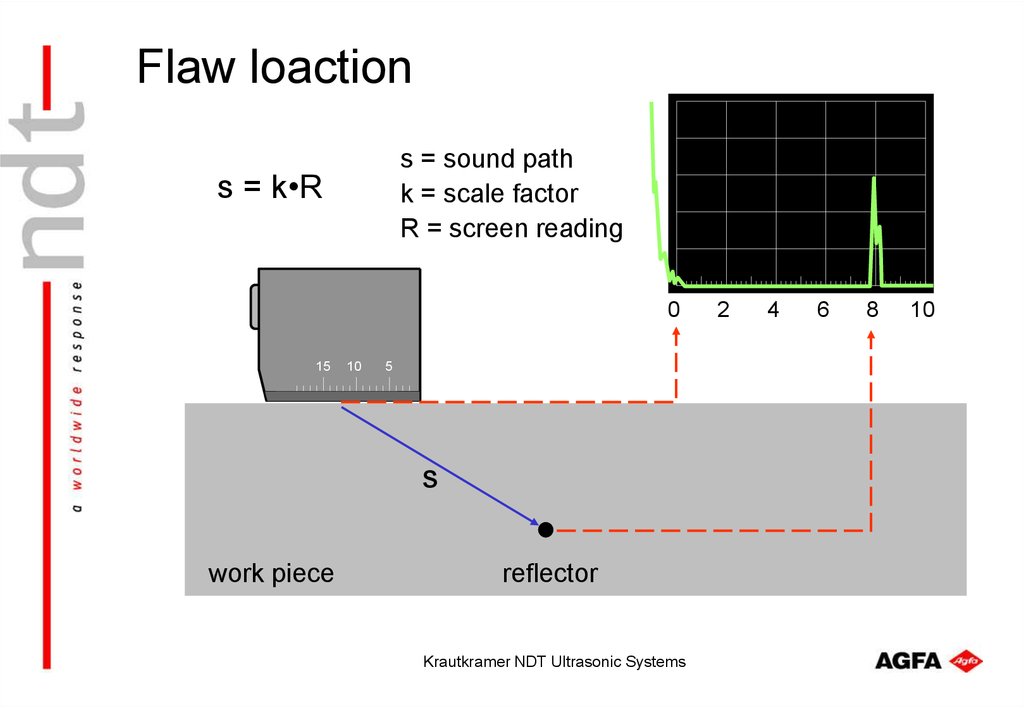
56. Flaw loaction
s = sound pathk = scale factor
R = screen reading
s = k•R
0
15
10
5
s
work piece
reflector
Krautkramer NDT Ultrasonic Systems
2
4
6
8
10
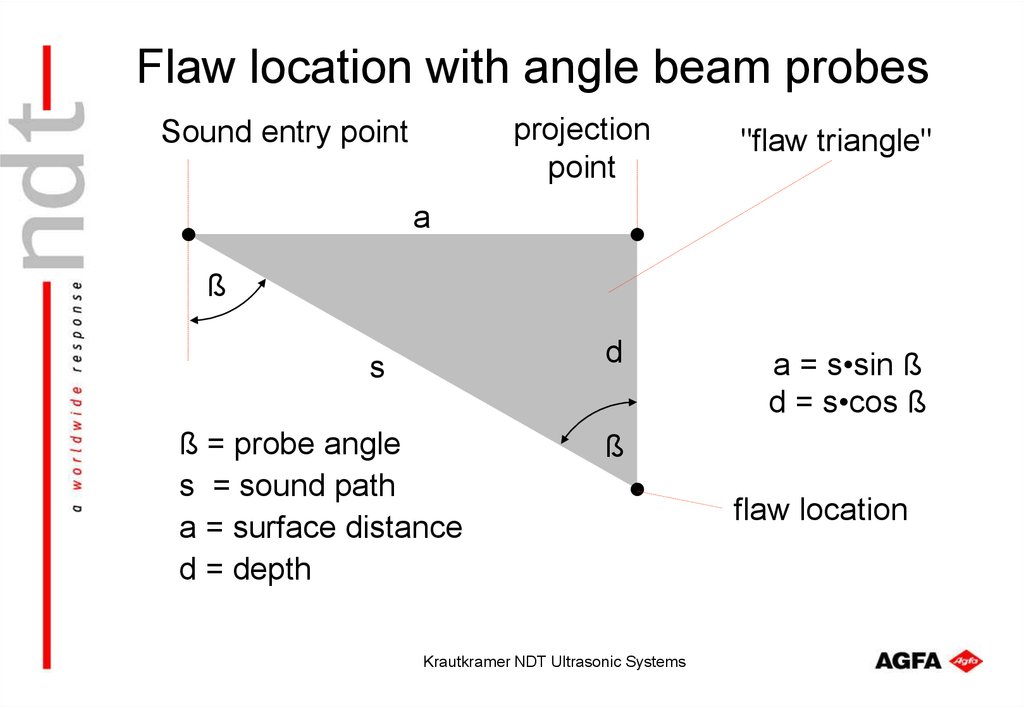
57. Flaw location with angle beam probes
projectionpoint
Sound entry point
"flaw triangle"
a
ß
d
s
ß = probe angle
s = sound path
a = surface distance
d = depth
a = s•sin ß
d = s•cos ß
ß
Krautkramer NDT Ultrasonic Systems
flaw location
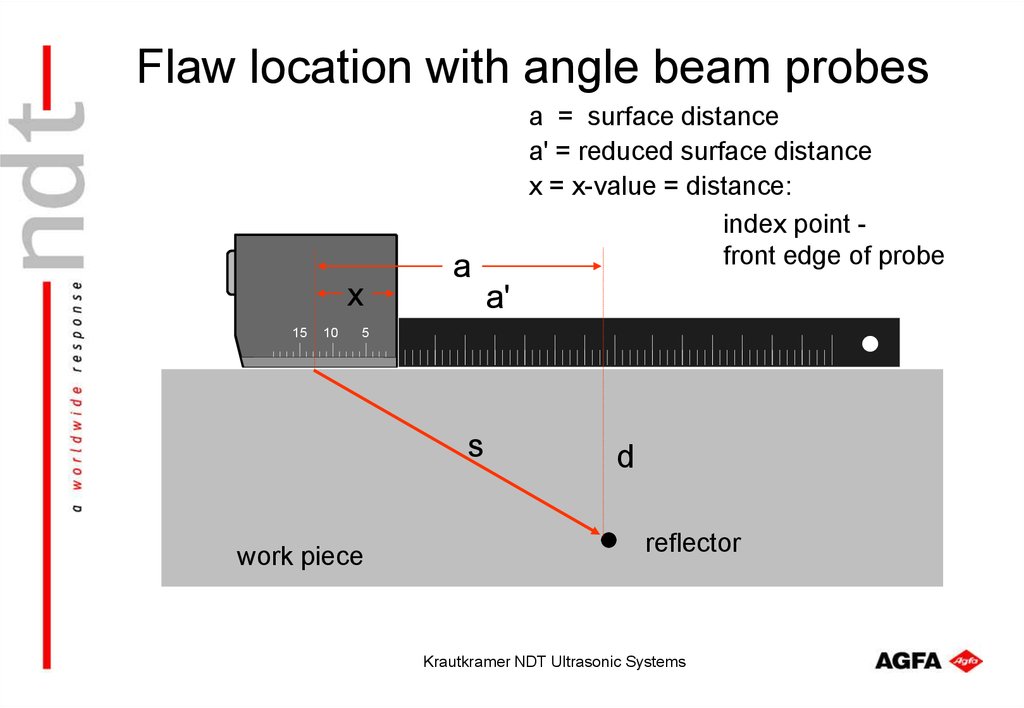
58. Flaw location with angle beam probes
x15
10
a = surface distance
a' = reduced surface distance
x = x-value = distance:
index point front edge of probe
a
a'
5
s
work piece
d
reflector
Krautkramer NDT Ultrasonic Systems
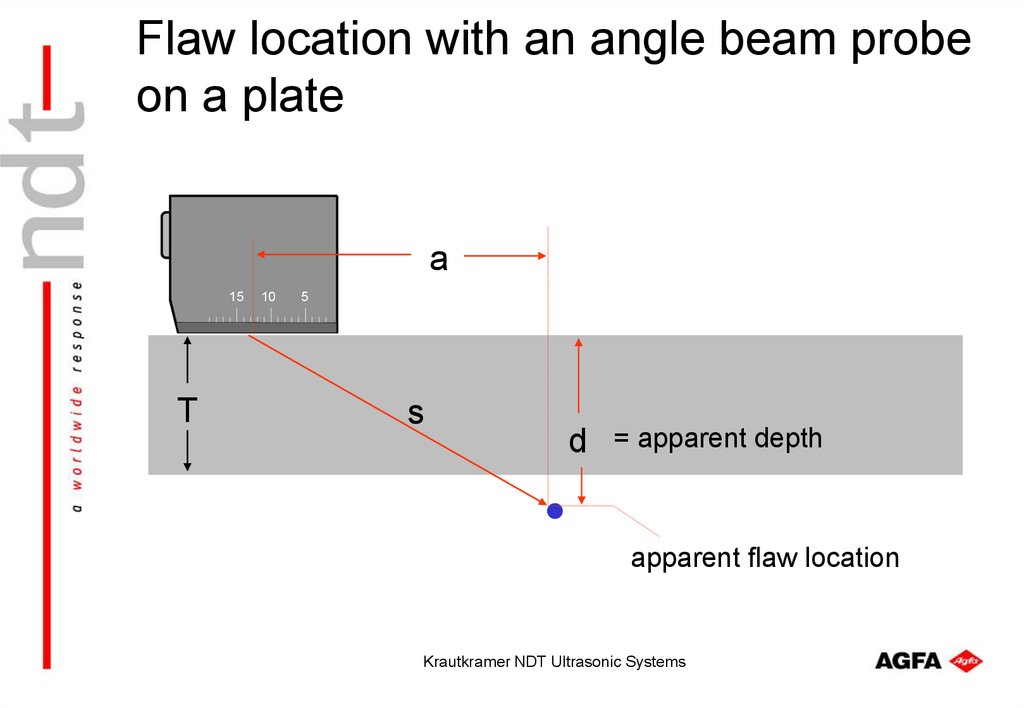
59. Flaw location with an angle beam probe on a plate
a15
T
10
5
s
d = apparent depth
apparent flaw location
Krautkramer NDT Ultrasonic Systems
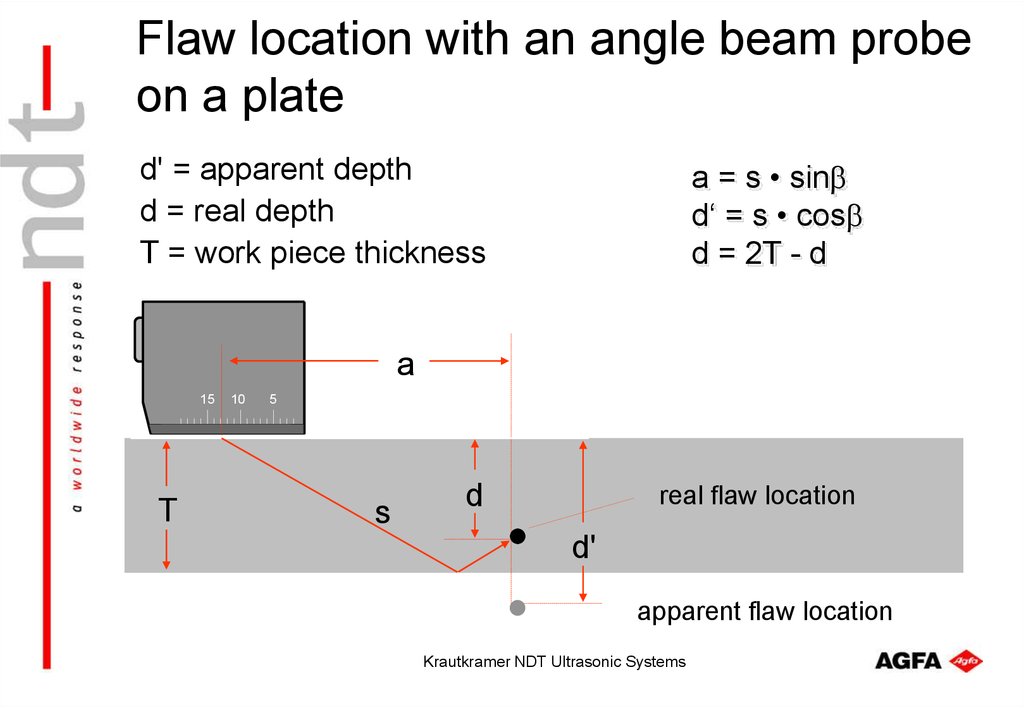
60. Flaw location with an angle beam probe on a plate
d' = apparent depthd = real depth
T = work piece thickness
a = s • sin
d‘ = s • cos
d = 2T - d
a
15
T
10
5
s
d
real flaw location
d'
apparent flaw location
Krautkramer NDT Ultrasonic Systems
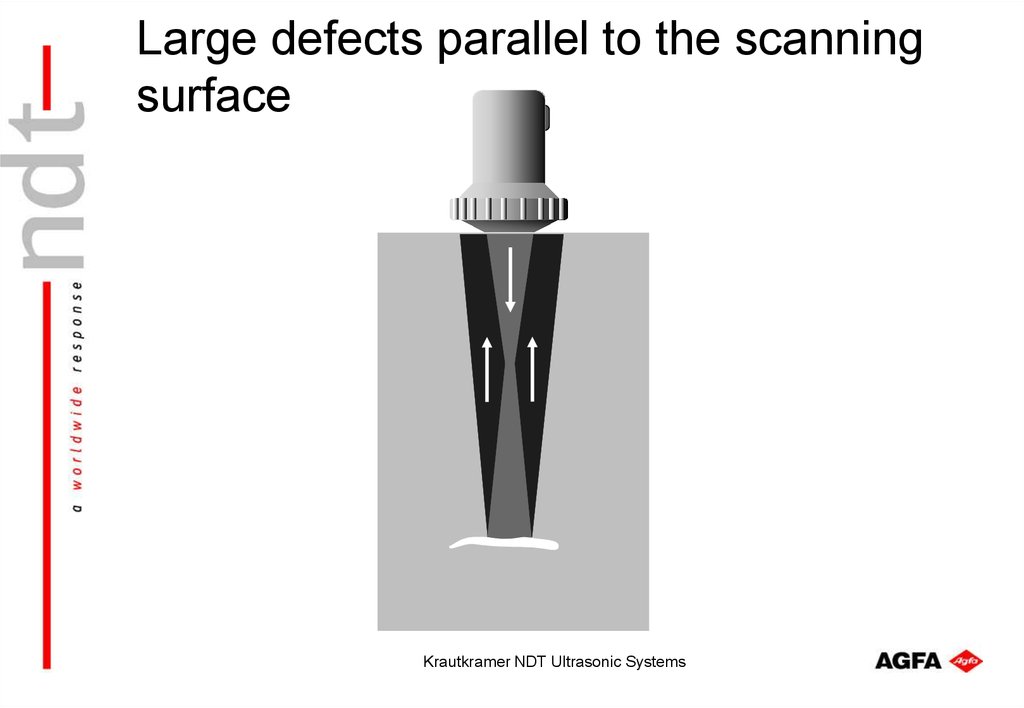
61. Large defects parallel to the scanning surface
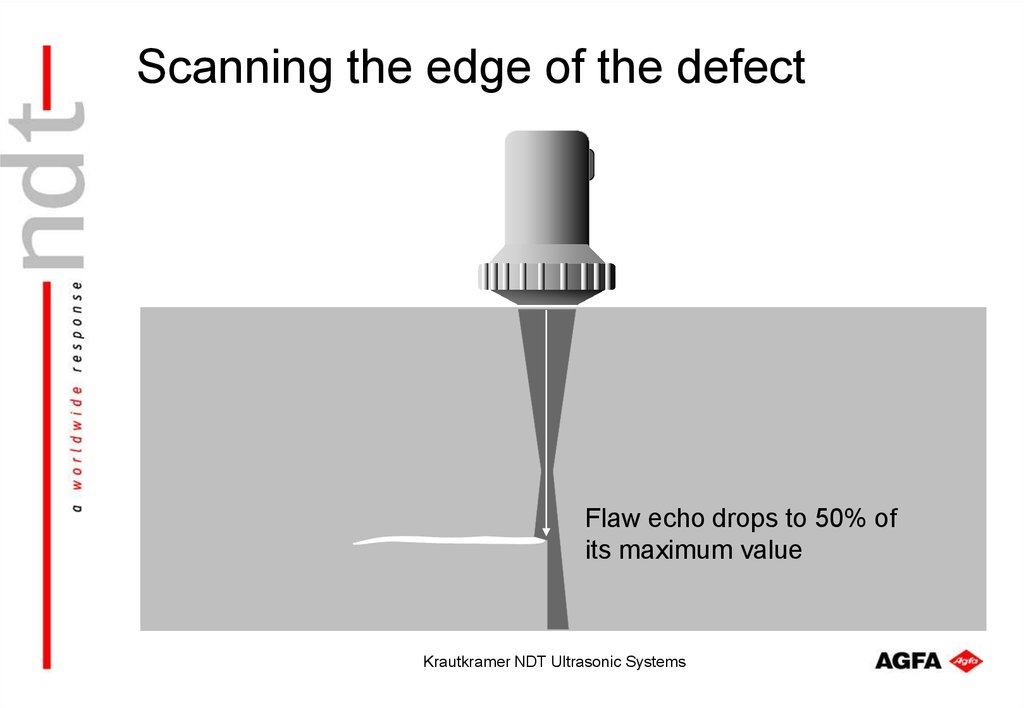
Krautkramer NDT Ultrasonic Systems62. Scanning the edge of the defect
Flaw echo drops to 50% ofits maximum value
Krautkramer NDT Ultrasonic Systems
63. Determination of the defect area
probe positionwith echo amplitude
reduced to 50 %
delamination
"half value" positions
Krautkramer NDT Ultrasonic Systems
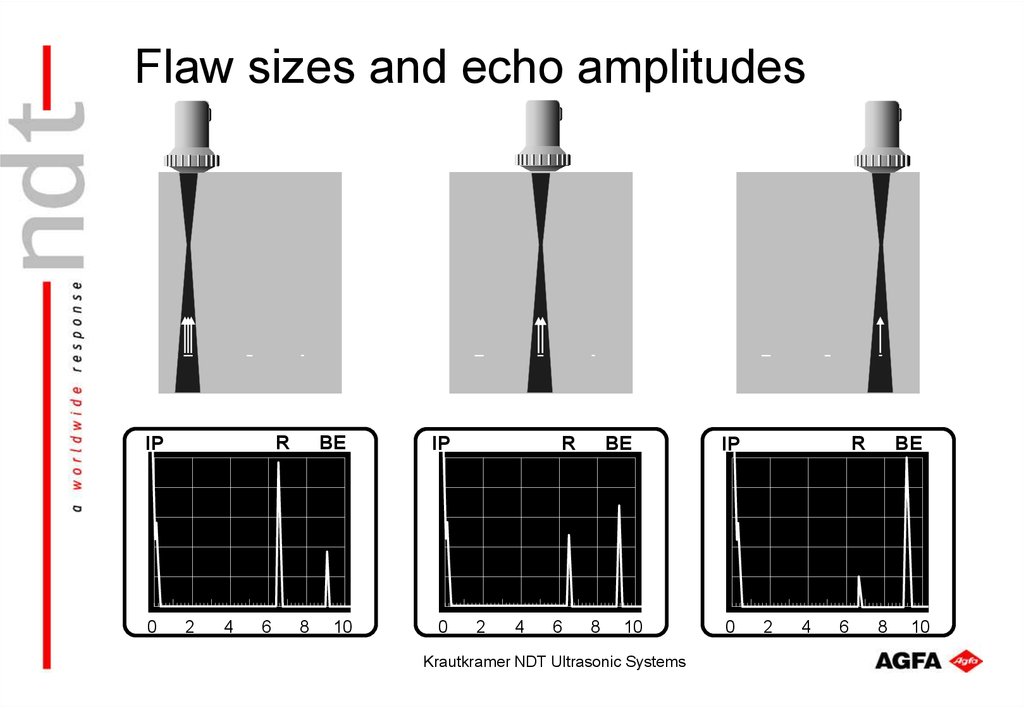
64. Flaw sizes and echo amplitudes
RIP
0
2
4
6
BE
8
10
R
IP
0
2
4
6
BE
8
10
Krautkramer NDT Ultrasonic Systems
R
IP
0
2
4
6
BE
8
10
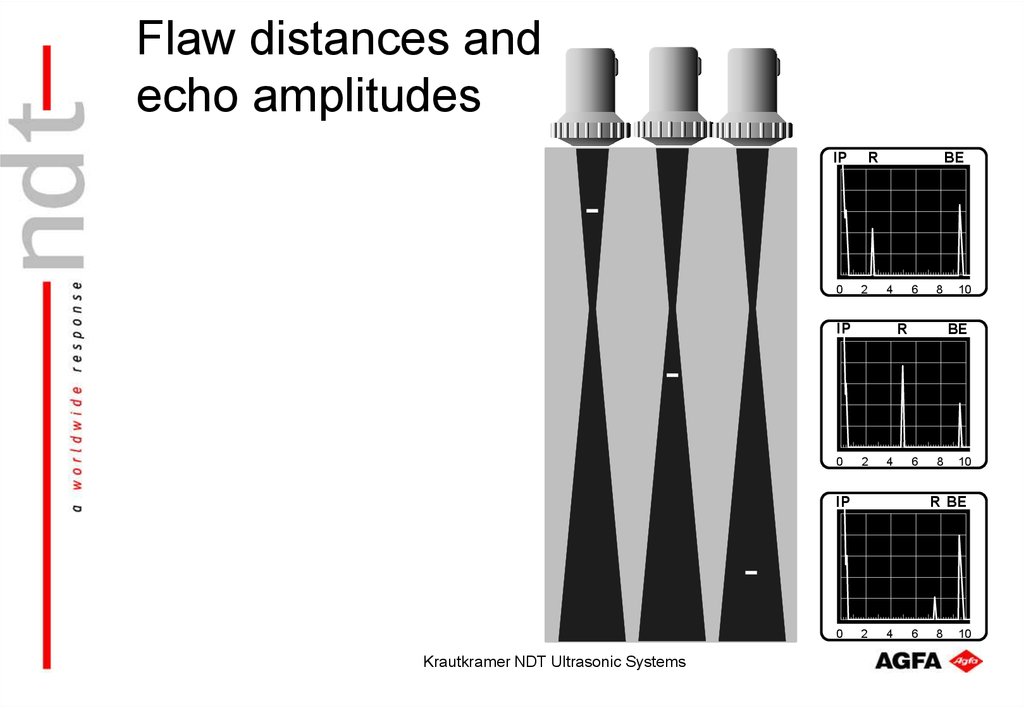
65. Flaw distances and echo amplitudes
IP0
R
2
BE
4
IP
0
6
R
2
4
Krautkramer NDT Ultrasonic Systems
10
BE
6
IP
0
8
8
10
R BE
2
4
6
8
10
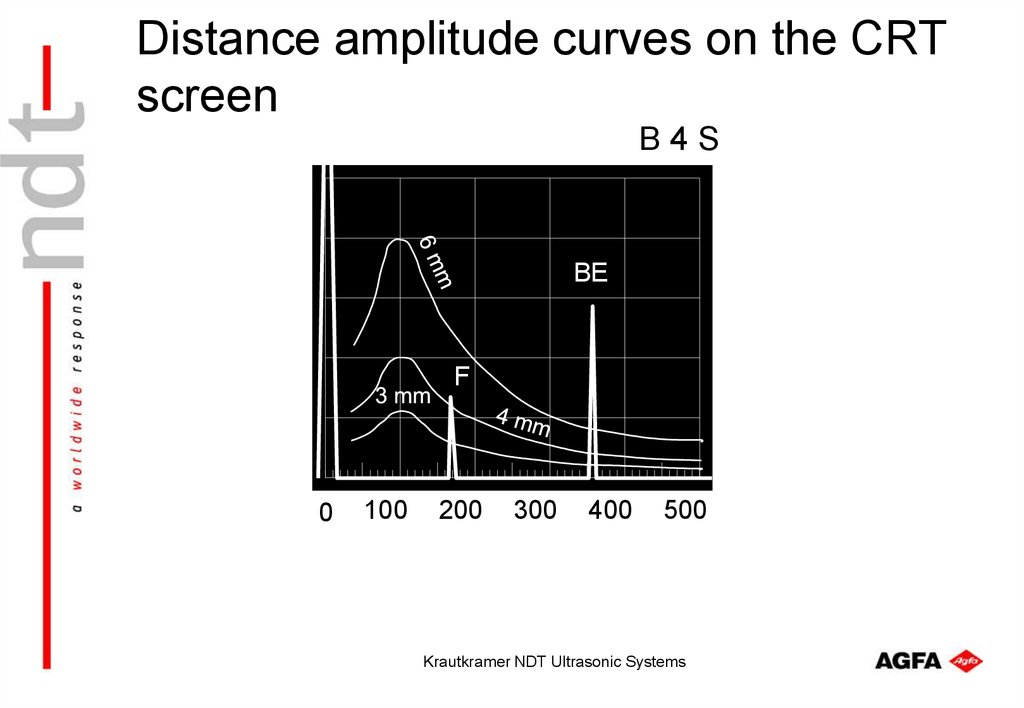
66. Distance amplitude curves on the CRT screen
B4SBE
F
0
100
200
300
400
500
Krautkramer NDT Ultrasonic Systems
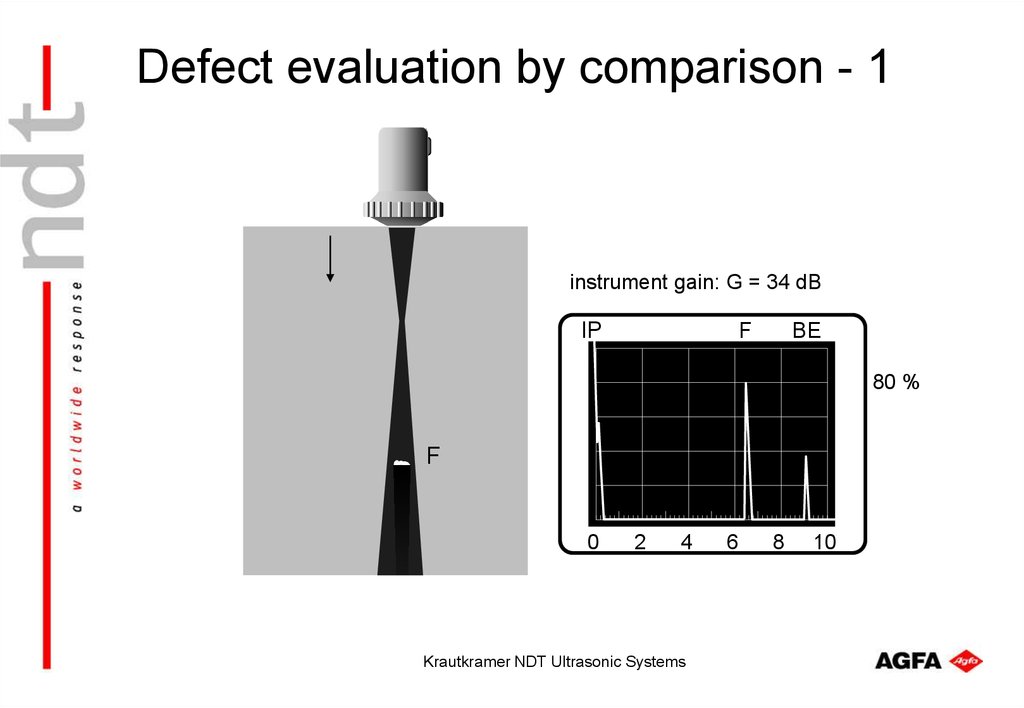
67. Defect evaluation by comparison - 1
instrument gain: G = 34 dBF
IP
BE
80 %
F
0
2
4
Krautkramer NDT Ultrasonic Systems
6
8
10
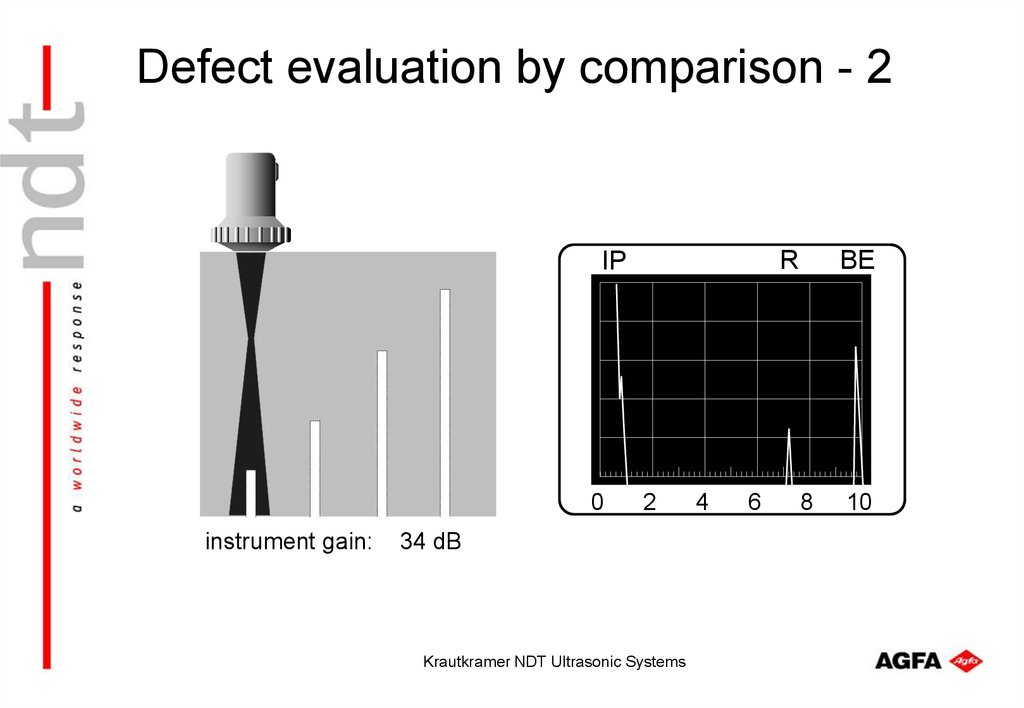
68. Defect evaluation by comparison - 2
RIP
0
instrument gain:
2
34 dB
Krautkramer NDT Ultrasonic Systems
4
6
BE
8
10
69. Defect evaluation by comparison - 3
RE BEIP
+ 8 dB
0
instrument gain:
2
42 dB
Krautkramer NDT Ultrasonic Systems
4
6
8
10
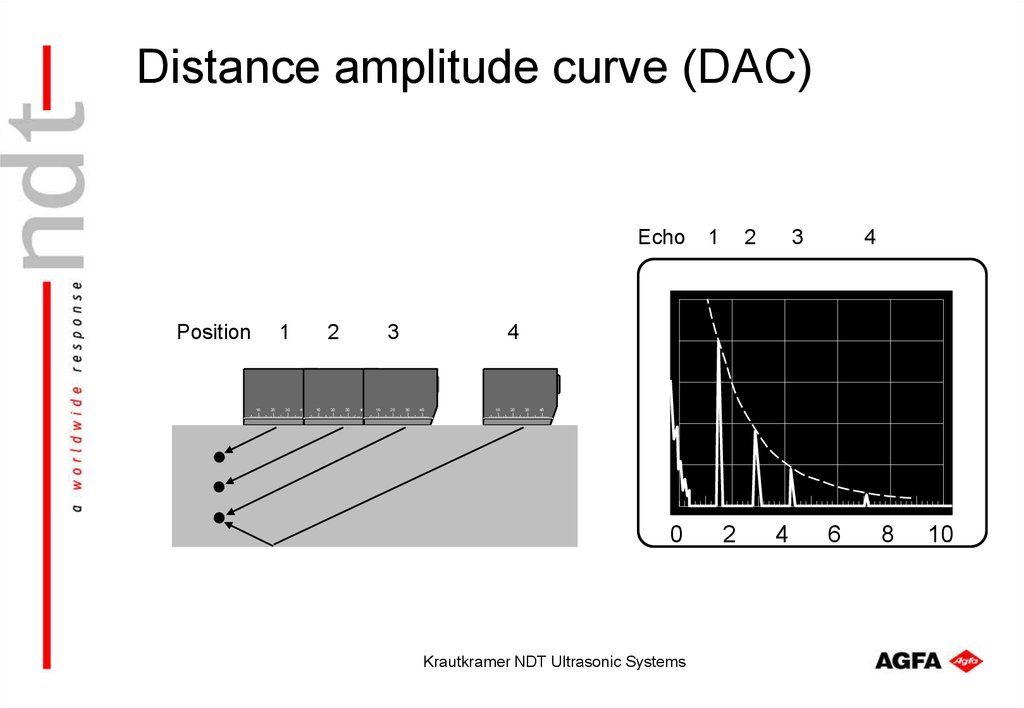
70. Distance amplitude curve (DAC)
EchoPosition
1
10
20
30
2
40
10
20
3
30
40
10
20
1
2
3
4
4
30
40
10
20
30
40
0
Krautkramer NDT Ultrasonic Systems
2
4
6
8
10
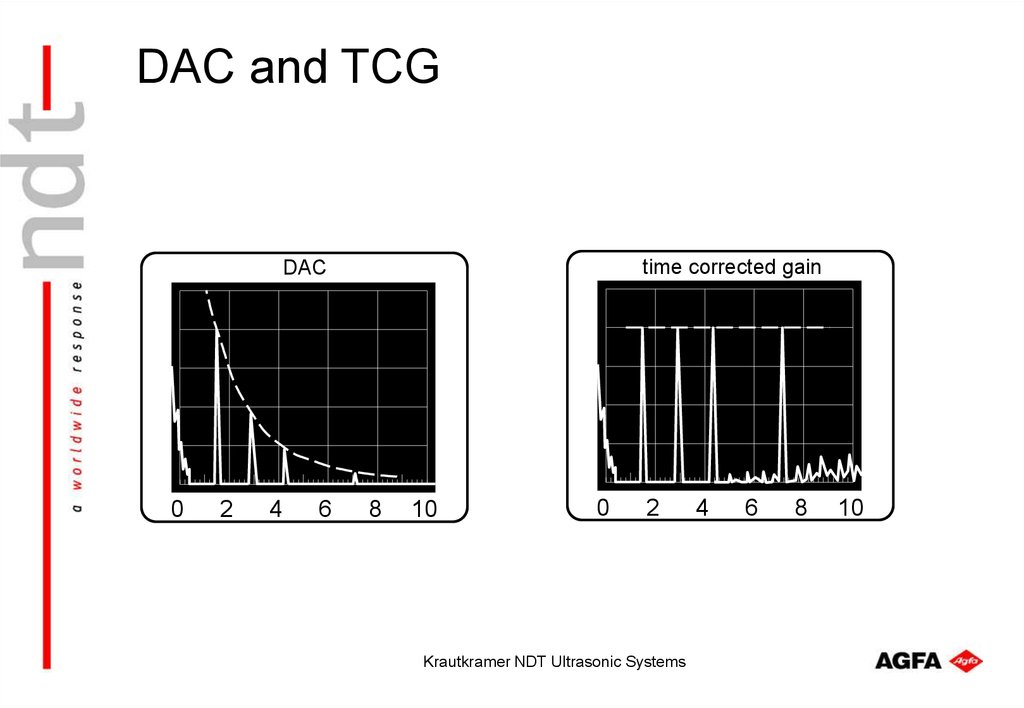
71. DAC and TCG
time corrected gainDAC
0
2
4
6
8
10
0
2
Krautkramer NDT Ultrasonic Systems
4
6
8
10











 physics


