Similar presentations:
Basic of Digital Audio
1.
NB. Please install Adobe Audition CC 2014 on your notebook2.
2.1 Basic of Digital AudioBasic of Sound
Sound: a travelling wave that is an oscillation of pressure
transmitted through a solid, liquid, or air, composed of
frequencies within the range of hearing.
A
Period
Amplitude
t
Essential
Properties
Amplitude: the magnitude of change during one oscillation.
Period: the time interval between two successive occurrences of a
recurrent event.
Frequency: the number of occurrences of a repeating event per unit
time.
2-2
3.
How sound waves interactWhen two or more sound waves meet, they add to
and subtract from each other.
4.
Sound FrequencyInfrasonic
wave
Supersonic
f(Hz)
wave
20 kHz
Audible sound
20 Hz
Speech Signal Frequency 300Hz-3kHz
CD-DA
FM Radio
AM Radio
Tel.
Frequency
Band
10 20 50
200
3.4 k
7 k 15 k 20 k
f(Hz)
2-4
5.
2.2 Audio DigitalizationAudio signals
Analog Signal: an electrical representation of sound
originated by microphone, tape head. Loudspeakers or
headphones convert an electrical audio signal into sound.
Digital Signal: a discrete-time signal for which not only
the time but also the amplitude has discrete values
6.
Lifecycle of sound in Multimedia System7.
Procedure of audio digitalizationAnalog
Signal
A/D ADC
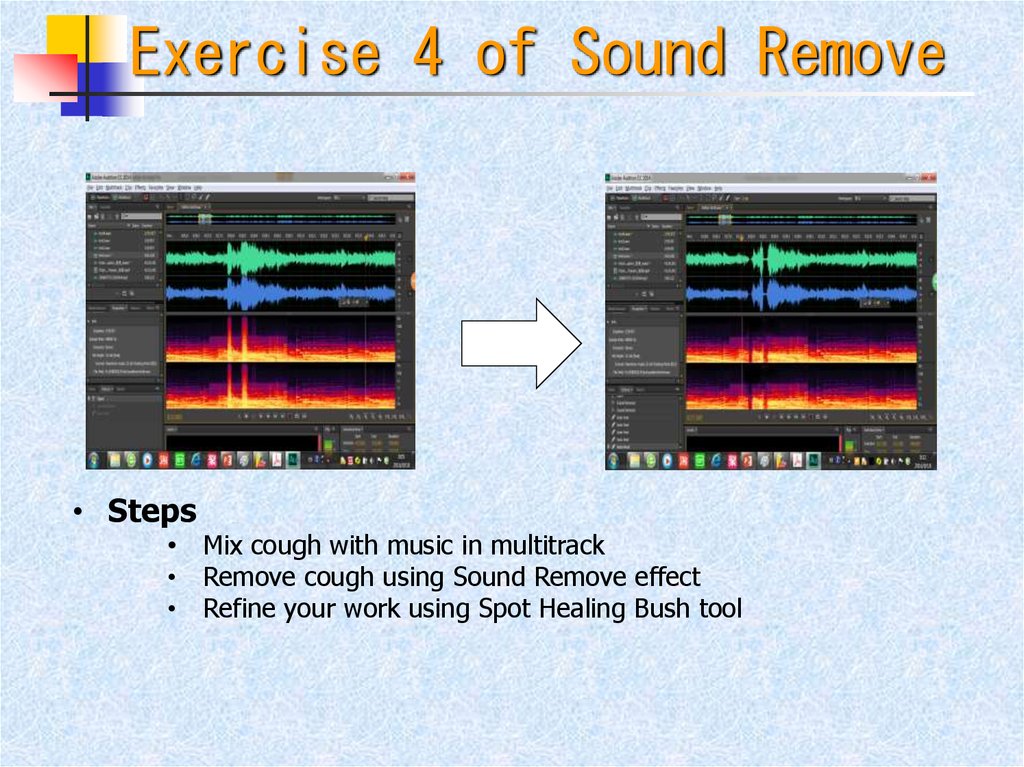
D/A DAC
(Nature World)
Analog
Signal
Sampling
Digital
Signal
(Computer)
Quantization
Coding
Digital
Signal
conversion to a stream of numbers, and preferably
these numbers should be integers for efficiency.
8.
Procedure of audio digitalizationSampling means dividing continuous time into discrete time
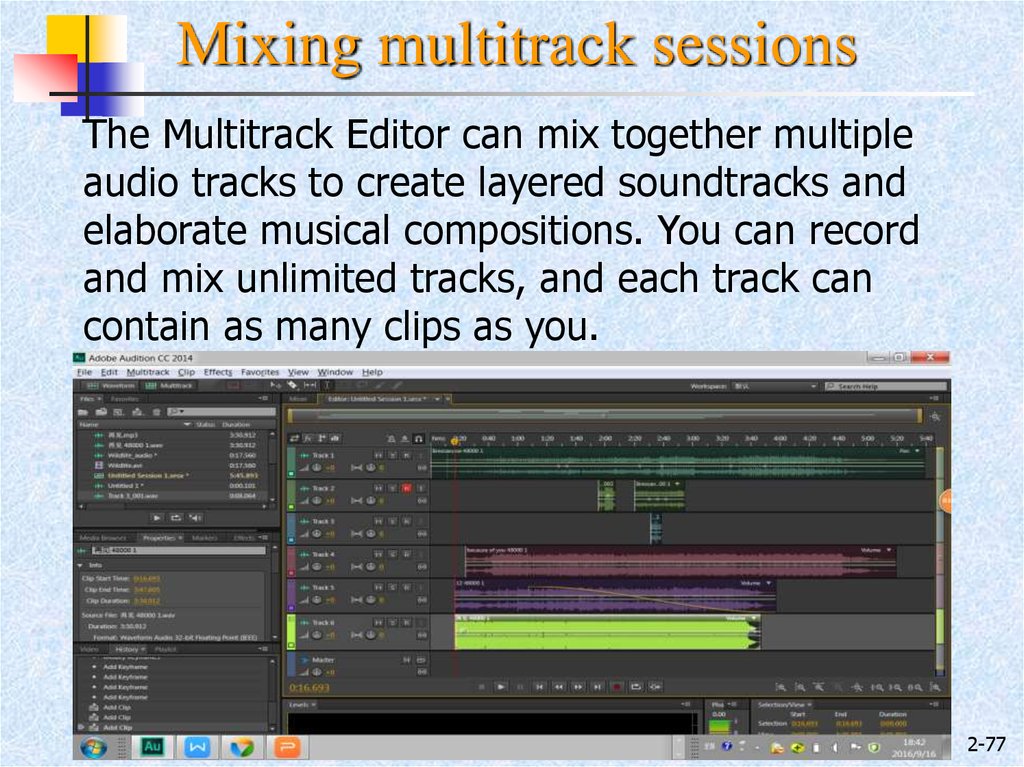
Quantization means measuring the amplitude at fixed interval
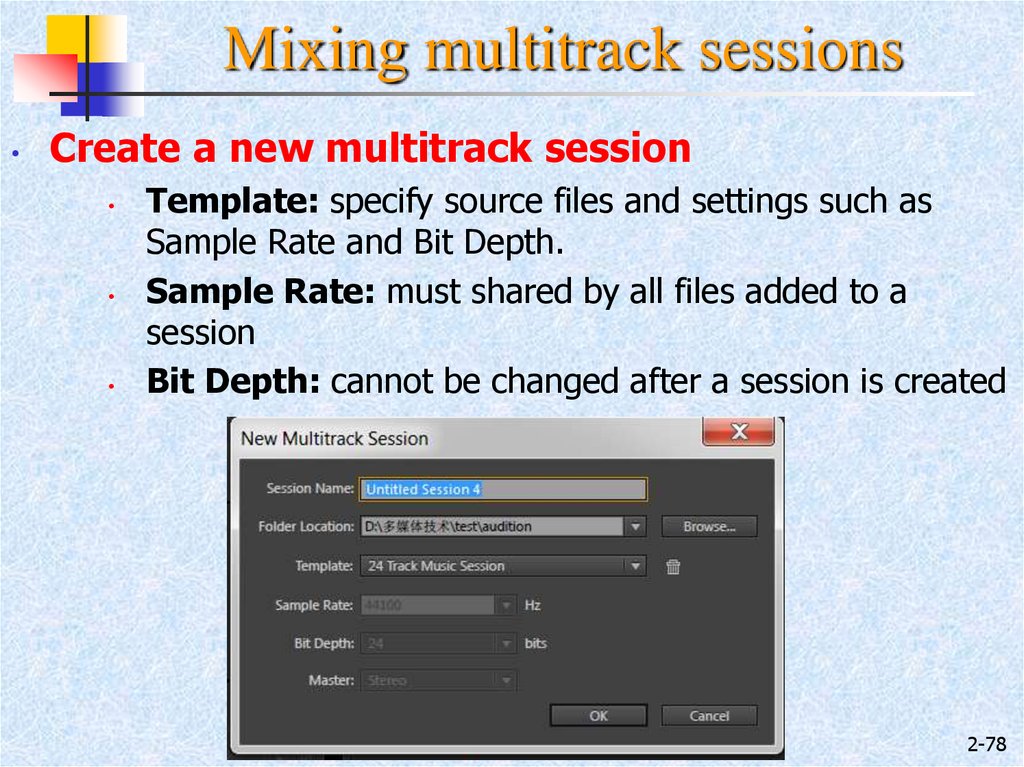
Coding means forming a digital sequence in accordance with
certain rules
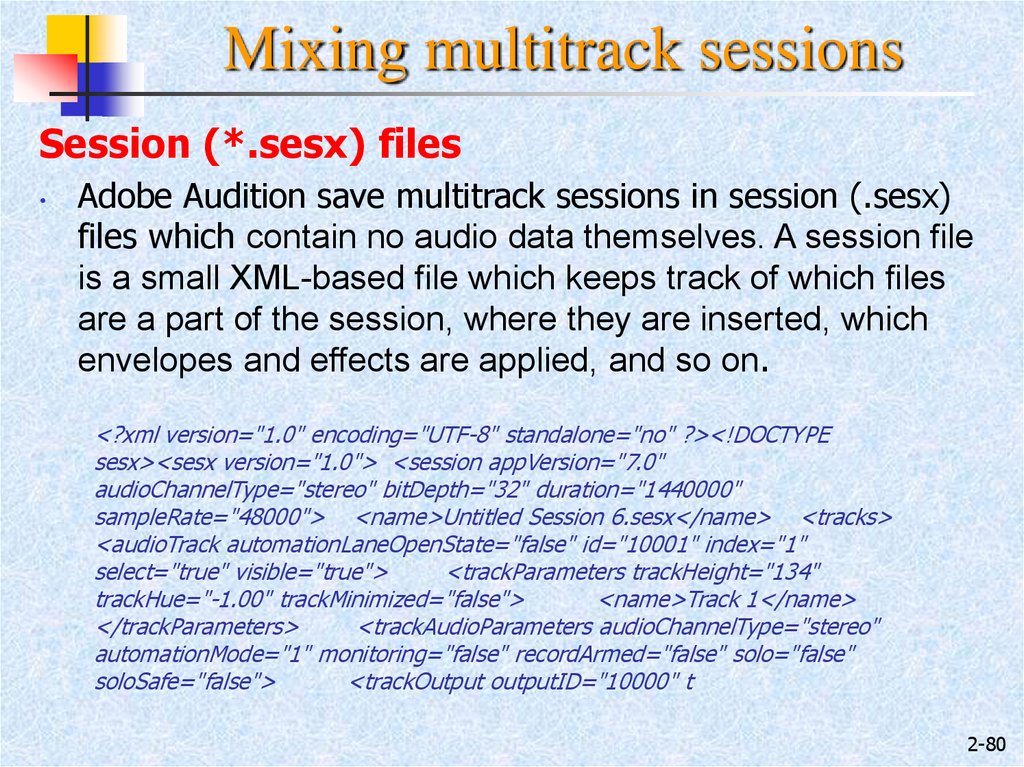
Continuous Analog Waveform
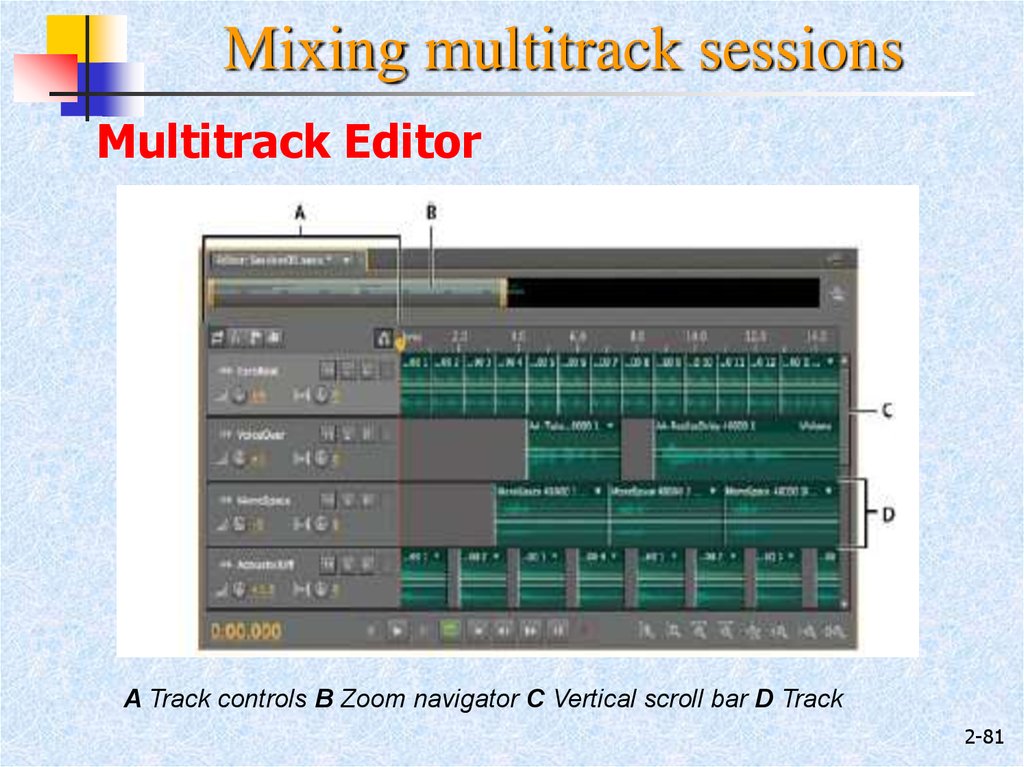
Sampling
Quantization
Illustration
Coding: 10100100…1110001000
Discretized Audio
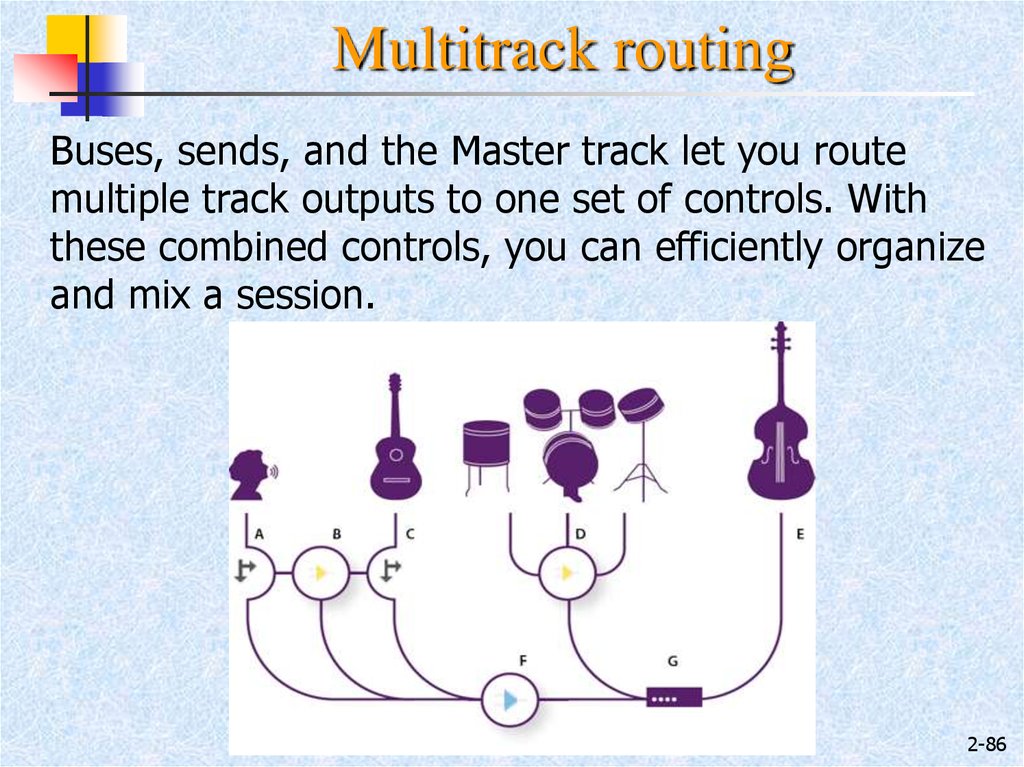
9.
Understanding sample rateSample rate indicates the number of digital snapshots taken
of an audio signal each second. This rate determines the
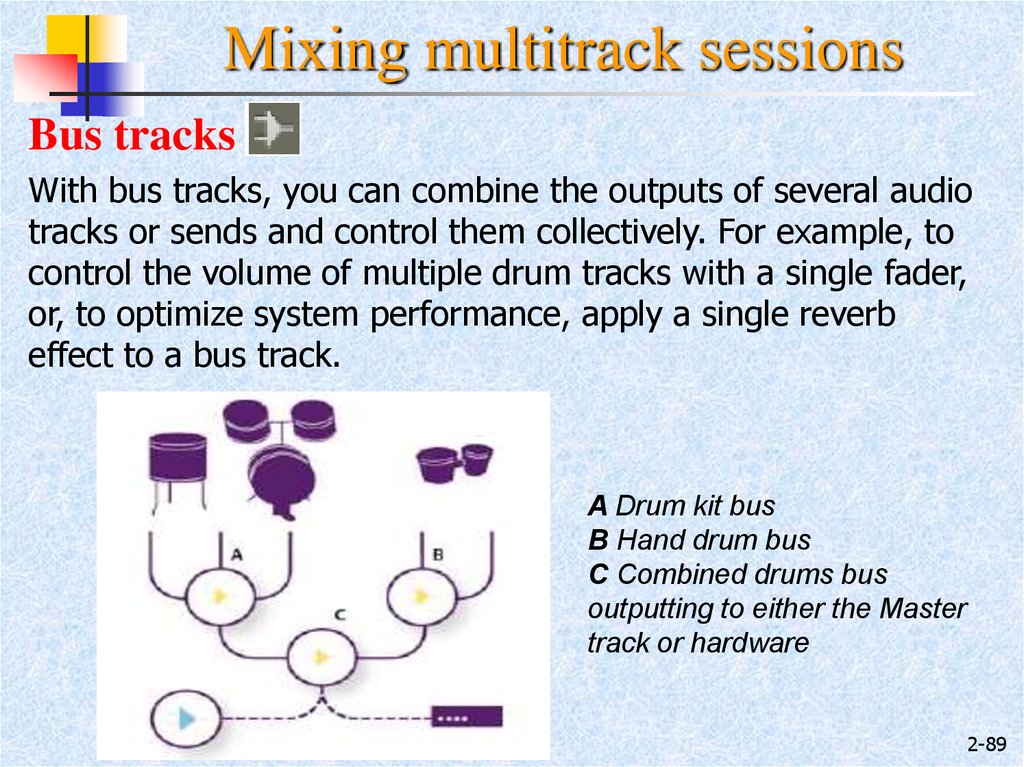
frequency range of an audio file. The higher the sample rate,
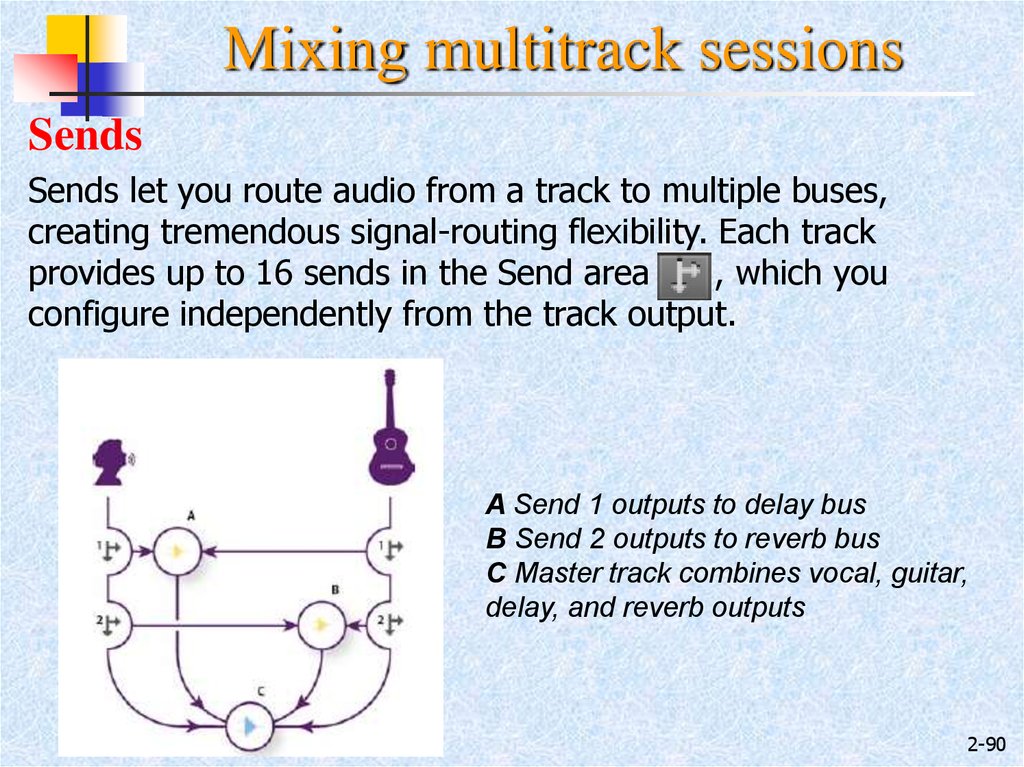
the closer the shape of the digital waveform is to that of the
original analog waveform.
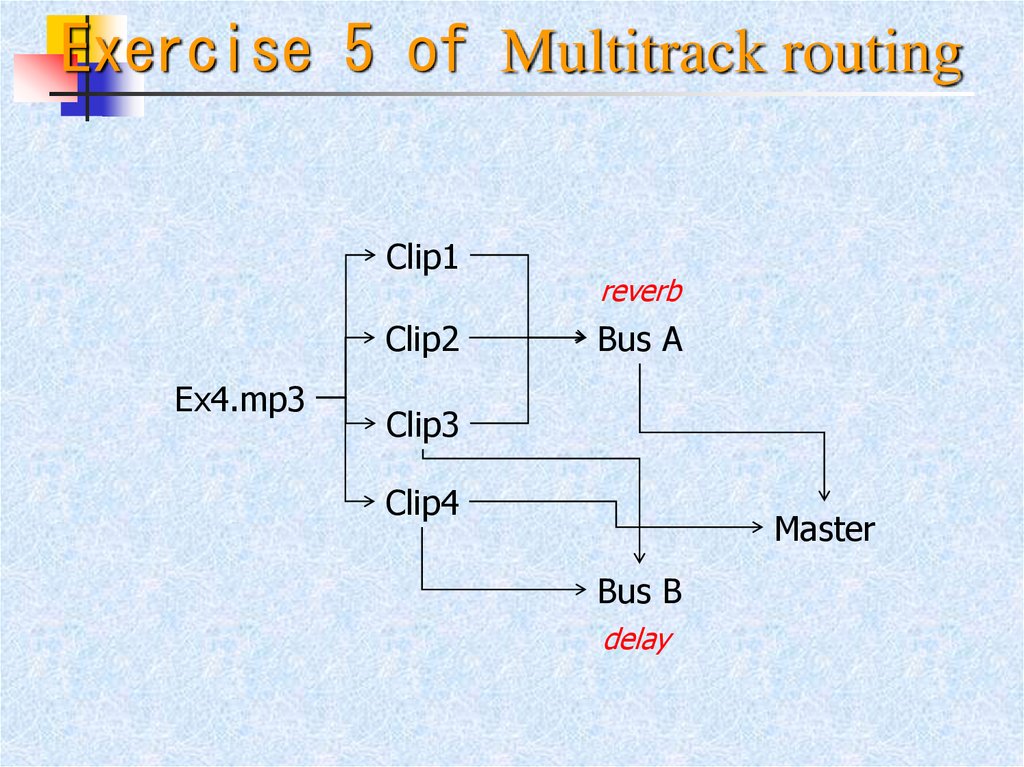
10.
Understanding sample rateTo reproduce a given frequency, the sample rate must be at least twice
that frequency. For example, CDs have a sample rate of 44,100 samples
per second, so they can reproduce frequencies up to 22,050 Hz, which is
just beyond the limit of human hearing, 20,000 Hz.
2-10
11.
Understanding bit depthWhen a sound wave is sampled, each sample is
assigned the amplitude value closest to the original
wave’s amplitude. Higher bit depth provides more
possible amplitude values, producing greater dynamic
range, a lower noise floor, and higher fidelity.
12.
dB(Decibel)dB is commonly used in acoustics as a unit of sound
volume. 0dB is the quietest sound our ear can hear,
120dB will cause permanent damage to our ear.
13.
scale)dBFS(dB relative to full scale) is a unit of
measurement for amplitude levels in digital systems.
The level of 0 dBFS is assigned to the maximum
possible digital level.
14.
Affects of Data SizeData Size =Sample Rate×Bit Size×#Channel/8(Byte/s)
Sample Rate
(kHz)
11.025
22.05
44.1
Data Size(KB/s)
Bit Size
(bit)
Mono
Stereo
8
10.77
21.53
16
21.53
43.07
8
21.53
43.07
16
43.07
86.13
8
43.07
86.13
16
86.13
172.27
2-14
15.
2.3 Audio File FormatAn audio file format is a file format for storing digital
audio data on a computer system.
An audio file usually contains a header indicating
sample rate, bit depth etc(metadata), and then a large
number of digital audio data.
2-15
16.
Format typesThe bit layout of the audio data (excluding metadata) is
called the audio coding format and can be uncompressed.
It is important to distinguish between audio file(container)
format and audio coding format.
A coding format and a file format are usually defined in one
compression standard, so most audio file formats support
only one type of audio
Audio File
(Audio File Format)
Audio Data
(Audio Coding Format)
2-16
17.
Typical Audio File Formats*.WAV Standard audio file container format used mainly in
Windows PCs. Commonly used for storing uncompressed (PCM),
CD-quality sound files (large in size). (see music.wav)
*.MP3 Defined in MPEG-1 Audio Layer-3. It is the most common
sound file format used today.(Not to be confused with MPEG-3.)
*.AAC Part of MPEG-2 and MPEG-4. Designed to be the successor
of the MP3 format. Default file format for YouTube, iPhone, iPod,
iPad, iTunes etc.
*.WMA(Windows Media Audio) owned by Microsoft. Designed
with Digital Rights Management (DRM) abilities for copy
protection.
*.OGG A patent-free, open source container format supporting a
variety of coding format
*.APE For a lossless audio compression format. Take up several
times as much space as lossy compression formats. (see CDImage.ape) 2-17
18.
DRM Dataflow Diagram19.
2.4 Digital Audio Acquisition and ProcessingAudio Acquisition
i) Sound Recorder Software(eg. Sound Recorder in Win 7)
ii) Recording Studio
iii) Audio CD, Audio Tape(eg. Window Media
Player>Ripping)
iv) Digital Audio Library
Audio Processing
i) Audio Edition, Mixing
ii) Noise Reduction
iii) Modulation, Delay, Echo Effects
2-19
20.
2.5 Digital Audio Compression StandardsIntroduction to Digital Audio Compression
Input Audio Signal
Encoder
Storage/
Transmission
Decoder
Output Audio Signal
Compression Encoding: the process of
encoding information using fewer bits than
the original representation would use.
Audio compression relies on the facts:
Information Redundancy in Sound.
Human auditory system is not accurate within the
width of a critical band (perceived loudness and
audibility of a frequency).
2-20
21.
Categories of Audio Compression StandardsLossless Compression
less space without losing any information.
compression ratio of about 2:1
Lossy Compression
greater reductions in file size
reduction in audio quality
most standards offer a range of degrees of compression,
generally measured in bit rate
2-21
22.
Comparison between common audio formats2-23
23.
MP31993, MPEG-1 Audio Layer III
a digital audio coding format which uses a form of
lossy data compression
more commonly referred to as MP3
designed by the Moving Picture Experts Group
(MPEG) as part of its MPEG-1 standard and later
extended in the MPEG-2 standard.
Compared to CD quality digital audio(44kKz,
16bit), MP3 compression commonly achieves 75 to
95% reduction in size.
CD:1.4Mb/s, MP3:128Kb/s
2-24
24.
2.6 Sound Card and Electroacoustic EquipmentSound Card
An internal expansion card that facilitates input and
output of audio signals to and from a computer under
control of computer programs..
2-25
25.
Integrated sound hardware on PC motherboardsIn the late 1990s many computer manufacturers began
to replace plug-in soundcards with a "codec" chip
integrated into the motherboard.
The integrated sound system is often still referred to as
a "sound card".
The best plug-in cards, which use better and more
expensive components, can achieve higher quality than
integrated sound.
2-26
26.
Architecture of Sound CardMixer receives inputs from both external connectors and D/A. It
selects or mutes, amplifies these signals, adds them together,
and finally routes the result to both external output connectors
and A/D. (see Mixer in Win7)
Loudspeaker out
Microphone in
Mixer
Line in
Line out
A/D & D/A
Audio Processor
CD Interface
Music Synthesizer
MIDI
Card bus Interface
Computer Bus
2-27
27.
Audio CodecA single chip in soundcard
• encodes analog audio as digital signals and decodes digital
back into analog.
• compress and decompress digital audio data according to a
given audio coding format. (may used by audio processing
software and multimedia players)
2-28
28.
Device Driver• A low-level program that controls a device attached to a
computer.
• Provides a software interface to hardware devices,
enable operating systems to access hardware
functions without needing to know details of the
hardware being used.
Multimedia Applications
Multimedia Develop Tools
Multimedia Operating System
Multimedia Drivers
The main purpose of Device
drivers is to provide abstraction
by acting as translator between
a hardware device and the
operating systems that use it
2-29
Multimedia Hardware System
29.
General Characteristicsi) Recording, editing, and playback of digital audio file.
ii) Controlling and mixing sounds from different sources.
iii) Compression and decompression in recording and playback.
iv) Music Synthesis
v) Support MIDI interface
It can be used in multimedia applications such as
music composition, audio editing, presentation,
education, entertainment (games) , etc
2-30
30.
ExampleEnjoy multi-channel cinematic sound
Many sound cards come with 5.1 channel outputs so you can
connect to your existing multi-channel speakers with ease.
2-31
31.
ExampleIndependent input sources
Many sound cards come with independent line-in and
microphone connectors, which allow you to plug in two
different audio sources to your PC.
You can plug in your MP3 player and sing along, while
recording your singing session for your friends to enjoy!
2-32
32.
Quality ParametersAudio
Performance
Sample Rate
11.025 kHz (Speech)
22.05 kHz (Music)
44.1 kHz (Hi-Fi)
Bit Size
8 bits/256 (Speech)
16 bits/65 536 (Hi-Fi)
SNR(Signal-to-noise ratio) >80db
2-34
33.
Quality ParametersConnectivity
Input line in jack, microphone in jack
Output headphone, mono, 2 channels(Stereo)、
2.1/4.1/5.1 Channels (Surround)
2-35
34.
Quality ParametersProcessor
CODEC (Dependent of CPU, Cheap)
DSP(Independent of CPU)
2-36
35.
2.7 Electric Music and MIDIWhat is MIDI?
MIDI (Musical Instrument Digital Interface): a technology
to synthesize music using electronic equipment.
MIDI Standards
An industry-standard that enables electronic musical
instruments, computers and other electronic equipment to
communicate and synchronize with each other.
2-37
36.
MIDI Working ProgressSound Card
MIDI
Instrument
MIDI Interface
Synthesizer
Sequencer
MIDI File
Loudspeaker
PC
There are actually three components in MIDI standard,
which are the communications Protocol (language), the
Connector (hardware interface) and a distribution format
called Standard MIDI Files.
2-38
37.
MIDI Protocol (language)The MIDI protocol is an entire music description
language in binary form like CPU machine
language instructions for musical instruments. .
MIDI language carries event messages that specify
notation, pitch and velocity, control signals for
parameters such as volume, vibrato, and etc.
2-39
38.
MIDI ConnectorMIDI connector is a 5-pin DIN connector used to
send MIDI messages .
A single MIDI link can carry up to sixteen channels
of information, each of which can be routed to a
separate device. So MIDI allows multiple
instruments to be played from a single controller
which makes stage setups much more portable.
2-40
39.
MIDI FileWhen MIDI messages are stored on disks, they are
commonly saved in the Standard MIDI file format.
MIDI file does not contain the actual sound, but only
commands(like musical notation) to make the
sounds, so it use a thousand times less disk space than
the equivalent recorded audio.
Example: midi_sample.mid
2-41
40.
MIDI SequencerSequencer is the key component for MIDI music
creation.
A MIDI Sequencer (or simply sequencer) is a device
or application software that can record, edit, or play
back music, by handling note and performance
information in MIDI
2-42
41.
ExampleMIDI is easy for modification and manipulation
Drum sample 1
Drum sample 2
Bass sample 1
Bass sample 2
A combination of the previous four files,
with piano, jazz guitar, a hi-hat and four
extra measures added to complete the
short song, in A minor
2-43
42.
2.8 Adobe AuditionAudio Processing Software
(formerly Cool Edit Pro)
Audio Editing
Audio Effects
Multitrack Processing
Burning Audio CD
2-44
43.
History1990s, Syntrillium Software, Cool Edit,
2003, Adobe purchased Cool Edit Pro, Adobe Audition 1
2006, 2007 Adobe Audition 2, 3
2011, 2012 Adobe Audition 4, 5(CS5.5, CS6 as part of
Adobe Creative Suite)
2013, 2014, 2015 Adobe Audition 6, 7, 8(CC, CC2014,
CC2015)
44.
Creative CloudWith the introduction of Creative Cloud branding, Adobe's
licensing scheme was changed to that of software as a service
and the "CS" suffixes were replaced with "CC".
Adobe Creative Cloud allows licensed users to download,
install, and update apps. You can also sync files and fonts,
and showcase and discover creative work in community.
45.
WorkspaceA View buttons and toolbar B Editor panel with zoom navigator at top C Various
other panels D Status bar
2-48
46.
WorkspaceWaveform and Multitrack Editors
To edit individual files, use the Waveform Editor. To mix
multiple files and integrate them with video, use the
Multitrack Editor.
The Waveform and Multitrack editors use different
editing methods, and each has unique advantages.
2-49
47.
WorkspaceWaveform Editor Panel
A
F
B
C
Waveform Editor Panel
D
F
G
E
A Navigator B Timeline Ruler C Waveform Display D Spectral Display
E Zoom Button F Current-Time Indicator/Display G Play Buttons
2-50
48.
WorkspaceWaveform Display
Quiet audio has both lower peaks and lower valleys than loud
audio.
Channels can be viewed as layered or uniquely colored.
View > Waveform Channels
2-51
49.
WorkspaceSpectral Display
This view lets you analyze audio data to see which frequencies are
most prevalent. Brighter colors represent greater amplitude
components. Colors range from dark blue (low-amplitude
frequencies) to bright yellow (high-amplitude frequencies).
The spectral display is perfect for removing unwanted sounds,
such as coughs and other artifacts.
50.
WorkspaceZoom audio
Zoom into a specific time range
Extend or shorten the displayed range
In either the zoom navigator or the timeline ruler, right-click and drag
Drag the left or right edge of the highlighted area in the zoom navigator
Using zoom button in the Editor panel
2-53
51.
WorkspaceNavigating time and playing audio
Navigate by scrolling
Navigate with the Selection/View panel
Current-time indicator(CTI) lets you start
playback or recording at a specific point
2-54
52.
Importing, recording, and playingCreating and opening files
Create a new, blank audio file
Open existing audio files
Append audio files to another
Extracting audio from CDs
Importing with the Files panel
The Files panel displays a list of audio files for easy access
Import files into the Files panel
Change displayed metadata in the Files panel
2-56
53.
Importing, recording, and playingRecording audio
You can record audio from a microphone or any device
you can plug into the Line In port of a sound card.
Set audio inputs
Create or open a file
Click the Record button
to start and stop recording
NB. When recording in noisy environments, record a few
seconds of representative background noise that can be
used as a noise print later on.
2-57
54.
Importing, recording, and playingMonitoring recording and playback levels
To monitor the amplitude of incoming and outgoing
signals during recording and playback, we use level
meters.
If amplitude is too low, sound quality is reduced; if
amplitude is too high, clipping occurs and produces
distortion.
2-58
55.
Importing, recording, and playingAdjust recording levels for recording device
Adjust levels if recordings are too quiet (causing unwanted
noise) or too loud (causing distortion).
To get the best sounding results, record audio as loud as
possible without clipping.
When setting recording levels, watch the meters, and try to
keep the loudest peaks in the yellow range below -3 dB
2-59
56.
Editing AudioSelecting audio for playing, copying, cutting,
(mix)pasting, and deleting
Select time ranges using Time Selection tool
Select spectral ranges using free-form selection tools
A Marquee
B Lasso
C Paintbrush
57.
Editing AudioRemove artifacts automatically
For the quickest repair of small, individual audio artifacts like
isolated clicks or pops, use the Spot Healing Brush .
Example:
coughinmusic.wav
A Before
B After
58.
Editing AudioAdjust amplitude using amplitude control
By default, the visual amplitude control appears in a heads-up
display (HUD) that floats over all waveforms
Example: tooquite.wav
59.
Editing AudioHistory Panel
The History panel lets you instantly revert back to any
previous change.
60.
Editing AudioEDIT>Converting sample types
Convert the sample rate of a file
Convert a waveform between
surround, stereo, and mono
Change the bit depth of a file
61.
Exercise1 of Edit Audioex1File3: “I did
finished my
work on
Saturday”
ex1File1: “I
finished my
work on
Monday”
ex1File2: “I did
not do my work on
Saturday”
• Steps
Open ex1File1 and ex1File2
Find and Copy “did” in ex1File2
Paste on ex1File1
Delete “Monday” in ex1File1
Find and Copy “Saturday” in ex1File2
Paste on ex1File1
Save as ex1File3
62.
Editing AudioWorking with markers using mark panel
Markers (sometimes called cues) are locations that you define
in a waveform. A marker can be either a point or a range
Either press the M key, or click the Add Marker button
in the
Markers panel.
Double-click a marker in the Markers panel to move the current-time
indicator to that marker and select the area for range markers.
A Marker point
B Marker range
63.
Editing AudioPlaylists
A playlist is an arrangement of marker ranges that you can
play back in any order. A playlist lets you try different versions
of an arrangement before you commit to edits.
Create a playlist
Drag the range markers to the Playlist panel
64.
Applying EffectsApply individual effects
From any submenu in the Effects menu, choose an effect.
Click the Preview button
, and then edit settings as
needed.
To compare original audio to processed audio, select and
deselect the Power button
.
To apply the changes to the audio data, click Apply.
Example:
Convolution reverb
65.
Applying EffectsApply groups of effects
The Effects Rack lets you insert, edit, and reorder up to 16
effects, optimize input, output and mix levels.
A Rack Preset controls
B Effect slots
C Level controls
D Main Power button
66.
Applying EffectsAbout process effects
These processing-intensive effects can be applied only
individually, so they aren’t accessible in the Effects Rack.
67.
Applying EffectsUse effect presets
Many effects provide presets that let you store and recall
favorite settings. In addition to effect-specific presets, the
Effects Rack provides rack presets that store groups of
effects and settings.
68.
Applying EffectsGenerate a simple waveform
Choose Effects > Generate > Tones to create a simple
waveform using several amplitude- and frequency-related
settings.
69.
Applying EffectsGenerate Noise
Generating noise is useful for creating soothing sounds like
waterfalls and for generating signals that can be used to
check out the frequency response of a speaker, microphone,
or other audiosystem component.
Place the cursor where you want to insert the noise. Or, if you
want to replace part of the existing waveform, select the desired
range of audio data.
Choose Effects > Generate > Noise.
70.
Applying EffectsReverb effects
In a room, sound bounces off the walls, ceiling, and floor on the way to
your ears as a sonic surrounding that creates an impression of space. This
reflected sound is called reverb. Reverb effects can be used to simulate a
variety of room environments.
Impulse Specifies a file
that simulates an acoustic
space.
71.
Applying EffectsBackground Noise Reduction
The Noise Reduction effect dramatically reduces background
and broadband noise with a minimal reduction in signal quality.
This effect can remove a combination of noise, including tape
hiss, microphone background noise, power-line hum, or any
noise that is constant throughout a waveform.
In the Waveform Editor, select a range that contains only noise
and is at least half a second long.
Effects > Noise Reduction/Restoration > Capture Noise Print.
In the Editor panel, select the range from which you want to
remove noise.
Choose Effects > Noise Reduction/Restoration > Noise Reduction.
72.
Exercise3 of Noise ReductionEx2.wav
“I finished my
work on Monday”
• Steps
+ Noise
“I finished my
work on Monday”
Create audio file
Record “I finished my work on Monday”
Mix with noise
Open ex2.wav
Select a range that contains only noise and is
at least half a second long.
Effects > Noise Reduction/Restoration >
Capture Noise Print.
Select the range from which you want to
remove noise.
Choose Effects > Noise Reduction/Restoration
> Noise Reduction
73.
Mixing multitrack sessionsThe Multitrack Editor can mix together multiple
audio tracks to create layered soundtracks and
elaborate musical compositions. You can record
and mix unlimited tracks, and each track can
contain as many clips as you.
2-77
74.
Mixing multitrack sessionsCreate a new multitrack session
Template: specify source files and settings such as
Sample Rate and Bit Depth.
Sample Rate: must shared by all files added to a
session
Bit Depth: cannot be changed after a session is created
2-78
75.
Mixing multitrack sessionsInsert an audio file into a track
Place CTI at the desired time position in a track.
Choose Multitrack > Insert File.
The inserted file becomes an audio clip on the selected track.
Record an audio clip on multiple tracks by
overdubbing
Click the Arm For Record buttons for the tracks,
Click the Record button to start and stop recording.
Each recording becomes a new audio clip on a track.
2-79
76.
Mixing multitrack sessionsSession (*.sesx) files
Adobe Audition save multitrack sessions in session (.sesx)
files which contain no audio data themselves. A session file
is a small XML-based file which keeps track of which files
are a part of the session, where they are inserted, which
envelopes and effects are applied, and so on.
<?xml version="1.0" encoding="UTF-8" standalone="no" ?><!DOCTYPE
sesx><sesx version="1.0"> <session appVersion="7.0"
audioChannelType="stereo" bitDepth="32" duration="1440000"
sampleRate="48000"> <name>Untitled Session 6.sesx</name> <tracks>
<audioTrack automationLaneOpenState="false" id="10001" index="1"
select="true" visible="true">
<trackParameters trackHeight="134"
trackHue="-1.00" trackMinimized="false">
<name>Track 1</name>
</trackParameters>
<trackAudioParameters audioChannelType="stereo"
automationMode="1" monitoring="false" recordArmed="false" solo="false"
soloSafe="false">
<trackOutput outputID="10000" t
2-80
77.
Mixing multitrack sessionsMultitrack Editor
A Track controls B Zoom navigator C Vertical scroll bar D Track
2-81
78.
Mixing multitrack sessionsArranging and editing tracks
Add or delete tracks
Name tracks
Move tracks
Mute and solo tracks
Set track output volume
….
2-82
79.
Mixing multitrack sessionsEditing multitrack clips
Move a clip
Copy a clip
Remove a selected range from clips
Trimming and extending clips
position the cursor over the left or right edge of the clip and
drag clip edges
Split clips
….
2-83
80.
Mixing multitrack sessionsExport multitrack mixdown files
After you finish mixing a session, you can export all or
part of it in a variety of common formats.
Choose File > Export > Multitrack Mixdown.
2-84
81.
Exercise 4 of Sound Remove• Steps
• Mix cough with music in multitrack
• Remove cough using Sound Remove effect
• Refine your work using Spot Healing Bush tool
82.
Multitrack routingBuses, sends, and the Master track let you route
multiple track outputs to one set of controls. With
these combined controls, you can efficiently organize
and mix a session.
2-86
83.
Mixing multitrack sessionsAudio tracks
Audio tracks contain either imported audio or clips recorded in
the current session. These tracks offer the widest range of
controls, letting you specify inputs and outputs, apply effects
and equalization, route audio to sends and buses, and
automate mixes.
2-87
84.
Mixing multitrack sessionsAssign audio inputs and outputs to tracks
In the Inputs/Outputs area
following:
of the Editor panel, do the
From the Input menu, choose a hardware input.
From the Output menu, choose a bus, the Master track, or a hardware
output.
2-88
85.
Mixing multitrack sessionsBus tracks
With bus tracks, you can combine the outputs of several audio
tracks or sends and control them collectively. For example, to
control the volume of multiple drum tracks with a single fader,
or, to optimize system performance, apply a single reverb
effect to a bus track.
A Drum kit bus
B Hand drum bus
C Combined drums bus
outputting to either the Master
track or hardware
2-89
86.
Mixing multitrack sessionsSends
Sends let you route audio from a track to multiple buses,
creating tremendous signal-routing flexibility. Each track
provides up to 16 sends in the Send area
, which you
configure independently from the track output.
A Send 1 outputs to delay bus
B Send 2 outputs to reverb bus
C Master track combines vocal, guitar,
delay, and reverb outputs
2-90
87.
Mixing multitrack sessionsMaster track
The Master track , which is the last in each session, lets you
easily combine the outputs of multiple tracks and buses and
control them with a single fader. A session always contains one
Master track. The Master track can’t directly connect to audio
inputs, or output to sends or buses; it can only output directly
to hardware ports.
2-91
88.
Exercise 5 of Multitrack routingClip1
Clip2
Ex4.mp3
reverb
Bus A
Clip3
Clip4
Master
Bus B
delay
89.
Summary☆Audio Digitalization, Music Symbolization
☆Three Essentials of Digital Audio, Audio File
Formats
☆Digital Audio Compression Standards and
Software
☆Sound Card and Electroacoustic Equipment
☆Electric Music and MIDI
☆Audio Processing Software: Audition
2-93


 electronics


