


 mechanics
Similar presentations:


T1X HVAC repair instruction for replacement of temperature(mixing) damper
1.
T1X HVAC更换温度 混合 风门维修作业指导书T1X HVAC repair instruction for replacement of temperature(mixing) damper
2.
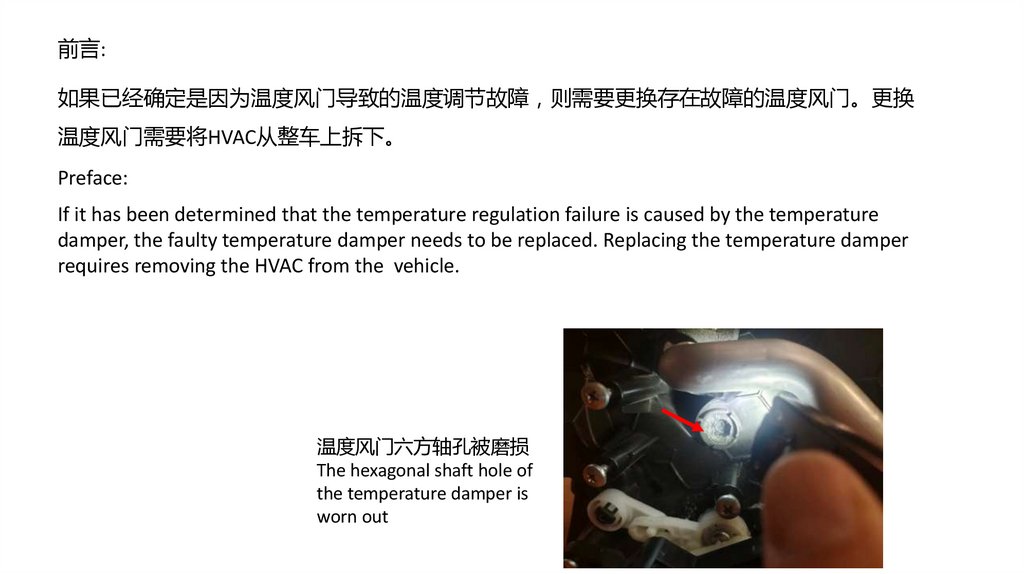
前言:如果已经确定是因为温度风门导致的温度调节故障 则需要更换存在故障的温度风门。更换
温度风门需要将HVAC从整车上拆下。
Preface:
If it has been determined that the temperature regulation failure is caused by the temperature
damper, the faulty temperature damper needs to be replaced. Replacing the temperature damper
requires removing the HVAC from the vehicle.
温度风门六方轴孔被磨损
The hexagonal shaft hole of
the temperature damper is
worn out
3.
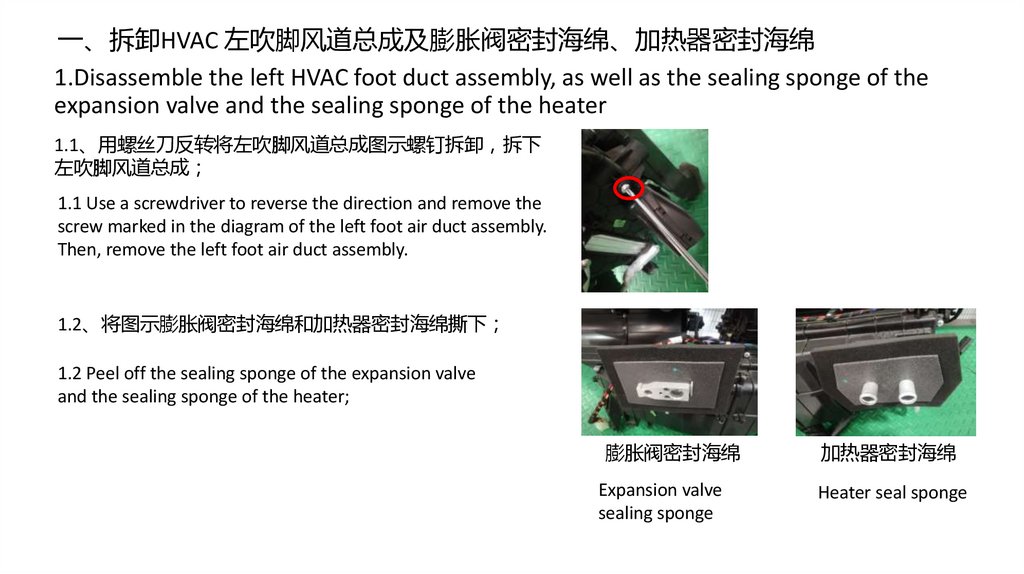
一、拆卸HVAC 左吹脚风道总成及膨胀阀密封海绵、加热器密封海绵1.Disassemble the left HVAC foot duct assembly, as well as the sealing sponge of the
expansion valve and the sealing sponge of the heater
1.1、用螺丝刀反转将左吹脚风道总成图示螺钉拆卸 拆下
左吹脚风道总成
1.1 Use a screwdriver to reverse the direction and remove the
screw marked in the diagram of the left foot air duct assembly.
Then, remove the left foot air duct assembly.
1.2、将图示膨胀阀密封海绵和加热器密封海绵撕下
1.2 Peel off the sealing sponge of the expansion valve
and the sealing sponge of the heater;
膨胀阀密封海绵
加热器密封海绵
Expansion valve
sealing sponge
Heater seal sponge
4.
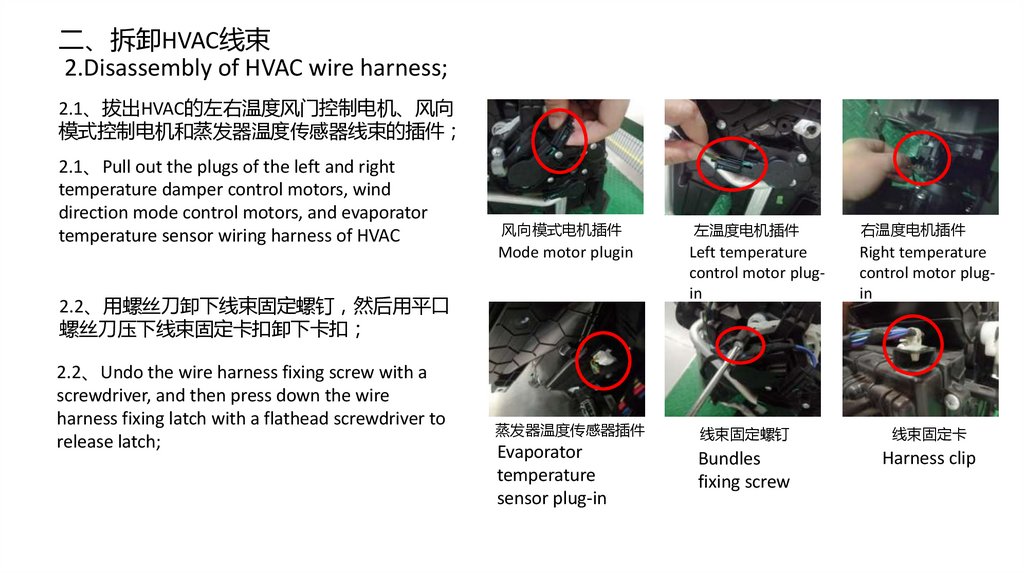
二、拆卸HVAC线束2.Disassembly of HVAC wire harness;
2.1、拔出HVAC的左右温度风门控制电机、风向
模式控制电机和蒸发器温度传感器线束的插件
2.1、Pull out the plugs of the left and right
temperature damper control motors, wind
direction mode control motors, and evaporator
temperature sensor wiring harness of HVAC
风向模式电机插件
左温度电机插件
右温度电机插件
Mode motor plugin
Left temperature
control motor plugin
Right temperature
control motor plugin
蒸发器温度传感器插件
线束固定螺钉
线束固定卡
Evaporator
temperature
sensor plug-in
Bundles
fixing screw
Harness clip
2.2、用螺丝刀卸下线束固定螺钉 然后用平口
螺丝刀压下线束固定卡扣卸下卡扣
2.2、Undo the wire harness fixing screw with a
screwdriver, and then press down the wire
harness fixing latch with a flathead screwdriver to
release latch;
5.
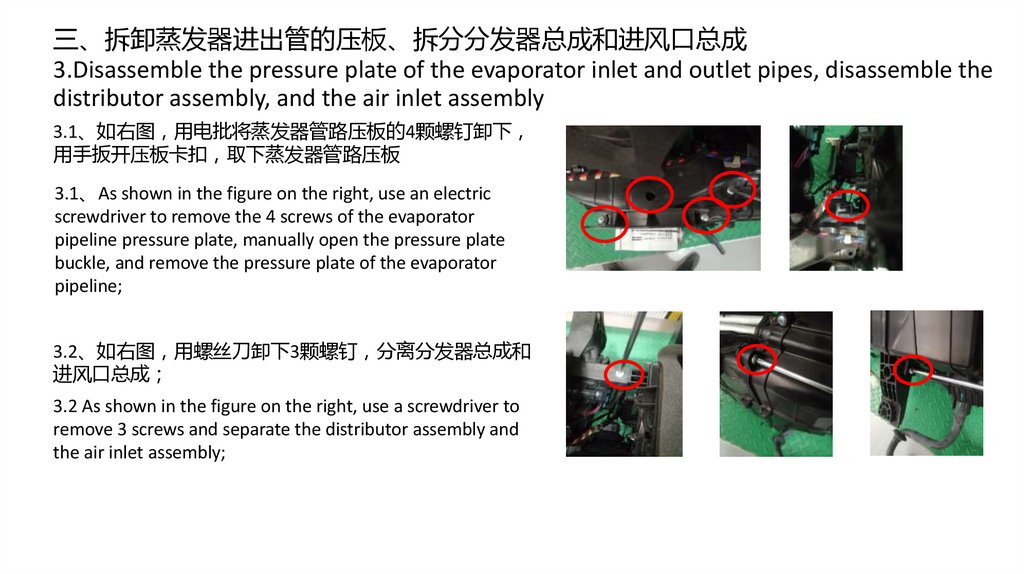
三、拆卸蒸发器进出管的压板、拆分分发器总成和进风口总成3.Disassemble the pressure plate of the evaporator inlet and outlet pipes, disassemble the
distributor assembly, and the air inlet assembly
3.1、如右图 用电批将蒸发器管路压板的4颗螺钉卸下
用手扳开压板卡扣 取下蒸发器管路压板
3.1、As shown in the figure on the right, use an electric
screwdriver to remove the 4 screws of the evaporator
pipeline pressure plate, manually open the pressure plate
buckle, and remove the pressure plate of the evaporator
pipeline;
3.2、如右图 用螺丝刀卸下3颗螺钉 分离分发器总成和
进风口总成
3.2 As shown in the figure on the right, use a screwdriver to
remove 3 screws and separate the distributor assembly and
the air inlet assembly;
6.
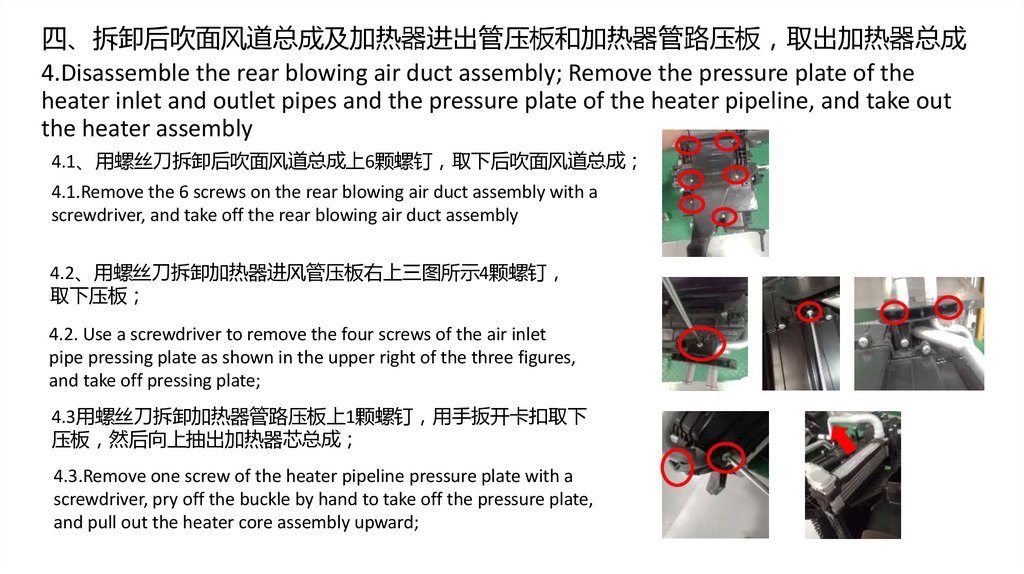
四、拆卸后吹面风道总成及加热器进出管压板和加热器管路压板 取出加热器总成4.Disassemble the rear blowing air duct assembly; Remove the pressure plate of the
heater inlet and outlet pipes and the pressure plate of the heater pipeline, and take out
the heater assembly
4.1、用螺丝刀拆卸后吹面风道总成上6颗螺钉 取下后吹面风道总成
4.1.Remove the 6 screws on the rear blowing air duct assembly with a
screwdriver, and take off the rear blowing air duct assembly
4.2、用螺丝刀拆卸加热器进风管压板右上三图所示4颗螺钉
取下压板
4.2. Use a screwdriver to remove the four screws of the air inlet
pipe pressing plate as shown in the upper right of the three figures,
and take off pressing plate;
4.3用螺丝刀拆卸加热器管路压板上1颗螺钉 用手扳开卡扣取下
压板 然后向上抽出加热器芯总成
4.3.Remove one screw of the heater pipeline pressure plate with a
screwdriver, pry off the buckle by hand to take off the pressure plate,
and pull out the heater core assembly upward;
7.
五、拆卸出风口过渡风道总成、右吹脚风道总成及蒸发器传感器卡扣5. Disassemble the outlet transition air duct assembly, the right blower foot air duct
assembly, and the evaporator sensor clip.
5.1、用手扳开出风口过渡风道总成4个卡扣 两边各2个
卡扣 取下风道总成
5.1、Unscrew the air outlet transition air duct assembly by
hand, 4 clamps (2 clamps on each side), and remove the air
duct;
5.2、用螺丝刀卸下右吹脚风道总成上螺钉 取下右吹脚
风道总成
5.2、Remove the screws on the right blower foot air duct
assembly with a screwdriver, and take off the right blower
foot air duct assembly
5.3、然后用平口螺丝刀压下蒸发器传感器卡扣卸下卡扣。
5.3、Then press down the evaporator sensor latch with a
flathead screwdriver to remove the latch
8.
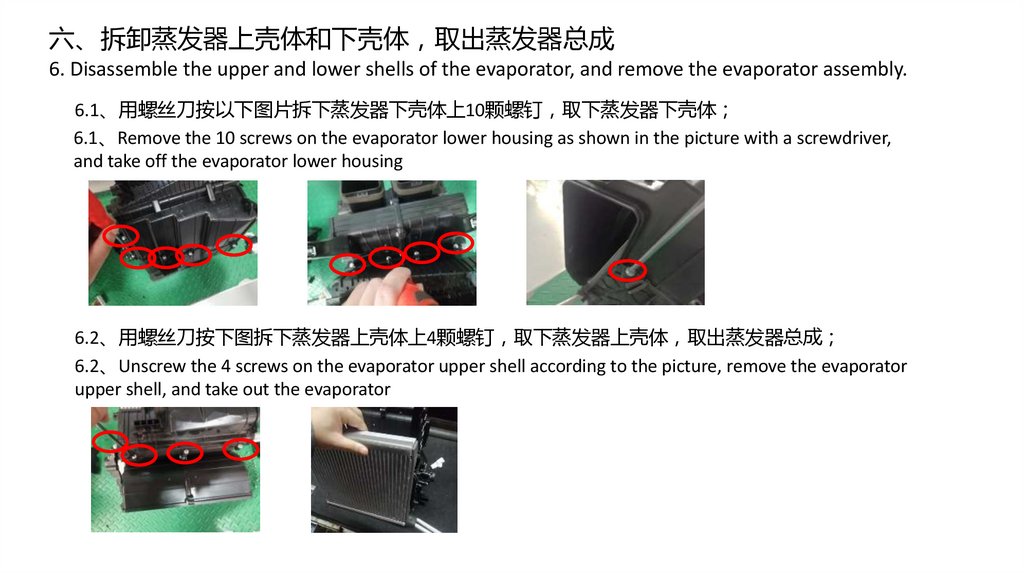
六、拆卸蒸发器上壳体和下壳体 取出蒸发器总成6. Disassemble the upper and lower shells of the evaporator, and remove the evaporator assembly.
6.1、用螺丝刀按以下图片拆下蒸发器下壳体上10颗螺钉 取下蒸发器下壳体
6.1、Remove the 10 screws on the evaporator lower housing as shown in the picture with a screwdriver,
and take off the evaporator lower housing
6.2、用螺丝刀按下图拆下蒸发器上壳体上4颗螺钉 取下蒸发器上壳体 取出蒸发器总成
6.2、Unscrew the 4 screws on the evaporator upper shell according to the picture, remove the evaporator
upper shell, and take out the evaporator
9.
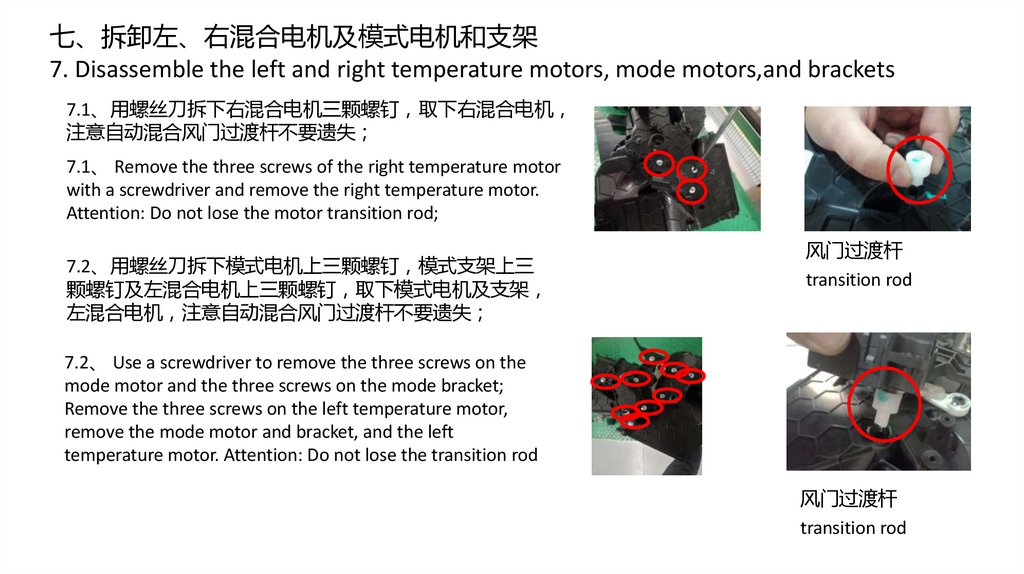
七、拆卸左、右混合电机及模式电机和支架7. Disassemble the left and right temperature motors, mode motors,and brackets
7.1、用螺丝刀拆下右混合电机三颗螺钉 取下右混合电机
注意自动混合风门过渡杆不要遗失
7.1、 Remove the three screws of the right temperature motor
with a screwdriver and remove the right temperature motor.
Attention: Do not lose the motor transition rod;
7.2、用螺丝刀拆下模式电机上三颗螺钉 模式支架上三
颗螺钉及左混合电机上三颗螺钉 取下模式电机及支架
左混合电机 注意自动混合风门过渡杆不要遗失
风门过渡杆
transition rod
7.2、 Use a screwdriver to remove the three screws on the
mode motor and the three screws on the mode bracket;
Remove the three screws on the left temperature motor,
remove the mode motor and bracket, and the left
temperature motor. Attention: Do not lose the transition rod
风门过渡杆
transition rod
10.
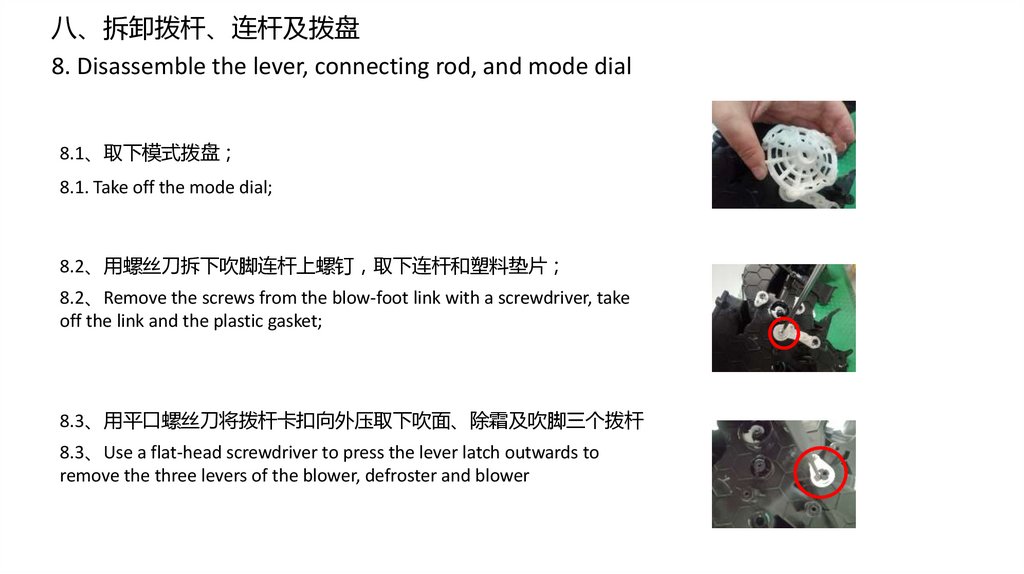
八、拆卸拨杆、连杆及拨盘8. Disassemble the lever, connecting rod, and mode dial
8.1、取下模式拨盘
8.1. Take off the mode dial;
8.2、用螺丝刀拆下吹脚连杆上螺钉 取下连杆和塑料垫片
8.2、Remove the screws from the blow-foot link with a screwdriver, take
off the link and the plastic gasket;
8.3、用平口螺丝刀将拨杆卡扣向外压取下吹面、除霜及吹脚三个拨杆
8.3、Use a flat-head screwdriver to press the lever latch outwards to
remove the three levers of the blower, defroster and blower
11.
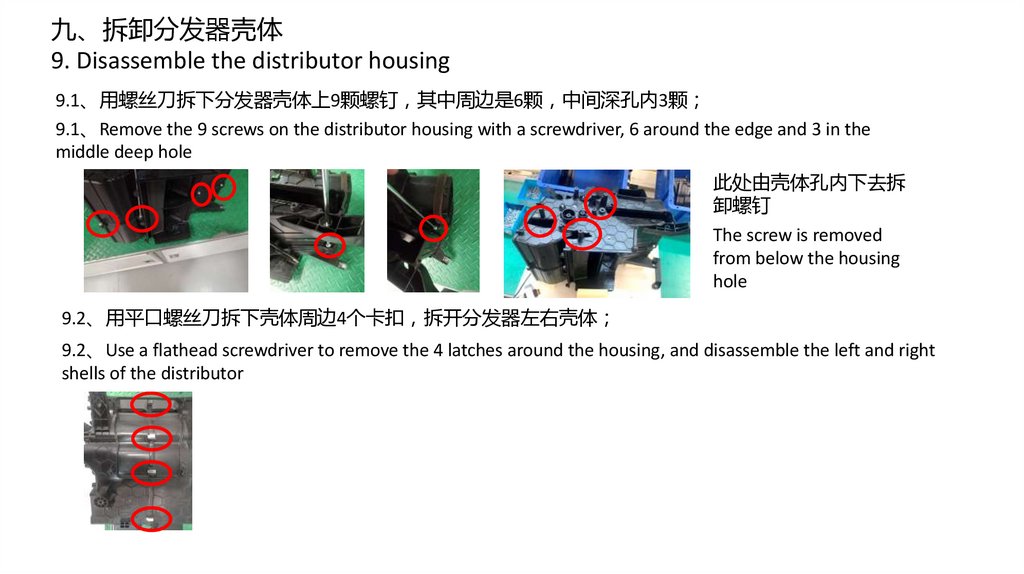
九、拆卸分发器壳体9. Disassemble the distributor housing
9.1、用螺丝刀拆下分发器壳体上9颗螺钉 其中周边是6颗 中间深孔内3颗
9.1、Remove the 9 screws on the distributor housing with a screwdriver, 6 around the edge and 3 in the
middle deep hole
此处由壳体孔内下去拆
卸螺钉
The screw is removed
from below the housing
hole
9.2、用平口螺丝刀拆下壳体周边4个卡扣 拆开分发器左右壳体
9.2、Use a flathead screwdriver to remove the 4 latches around the housing, and disassemble the left and right
shells of the distributor
12.
九、拆卸分发器壳体9. Disassemble the distributor housing
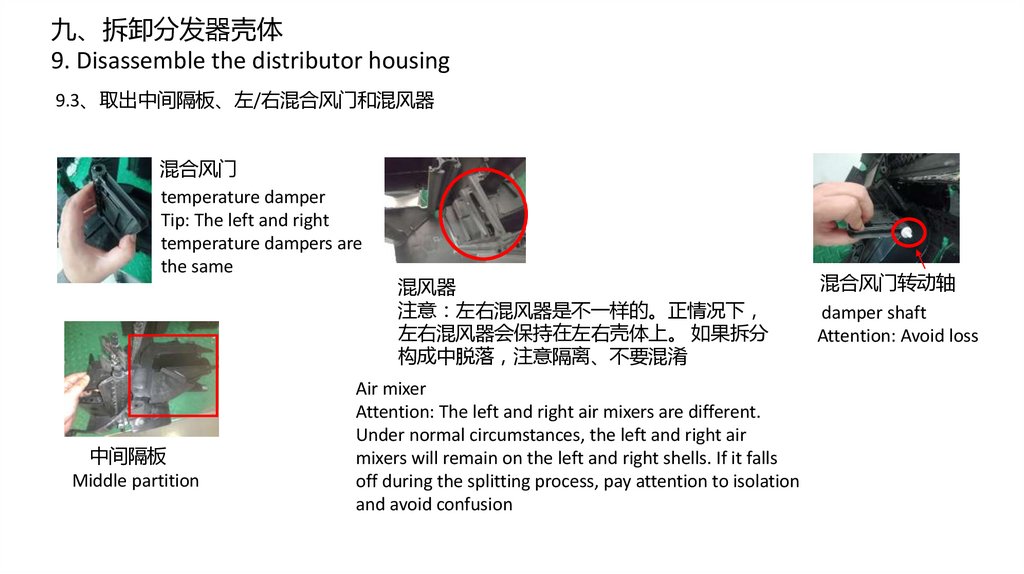
9.3、取出中间隔板、左/右混合风门和混风器
混合风门
temperature damper
Tip: The left and right
temperature dampers are
the same
中间隔板
Middle partition
混风器
注意 左右混风器是不一样的。正情况下
左右混风器会保持在左右壳体上。 如果拆分
构成中脱落 注意隔离、不要混淆
Air mixer
Attention: The left and right air mixers are different.
Under normal circumstances, the left and right air
mixers will remain on the left and right shells. If it falls
off during the splitting process, pay attention to isolation
and avoid confusion
混合风门转动轴
damper shaft
Attention: Avoid loss
13.
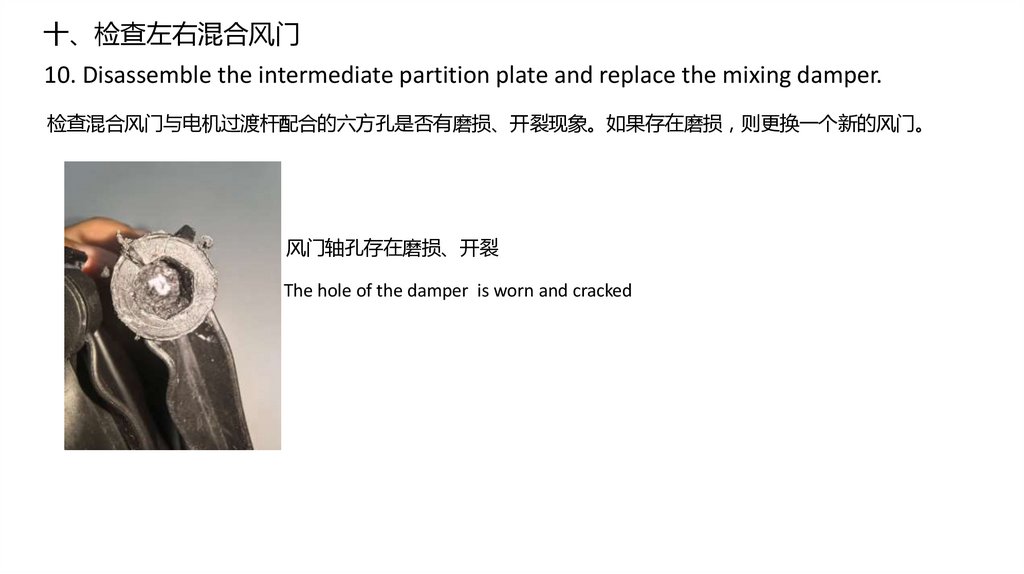
十、检查左右混合风门10. Disassemble the intermediate partition plate and replace the mixing damper.
检查混合风门与电机过渡杆配合的六方孔是否有磨损、开裂现象。如果存在磨损 则更换一个新的风门。
风门轴孔存在磨损、开裂
The hole of the damper is worn and cracked
14.
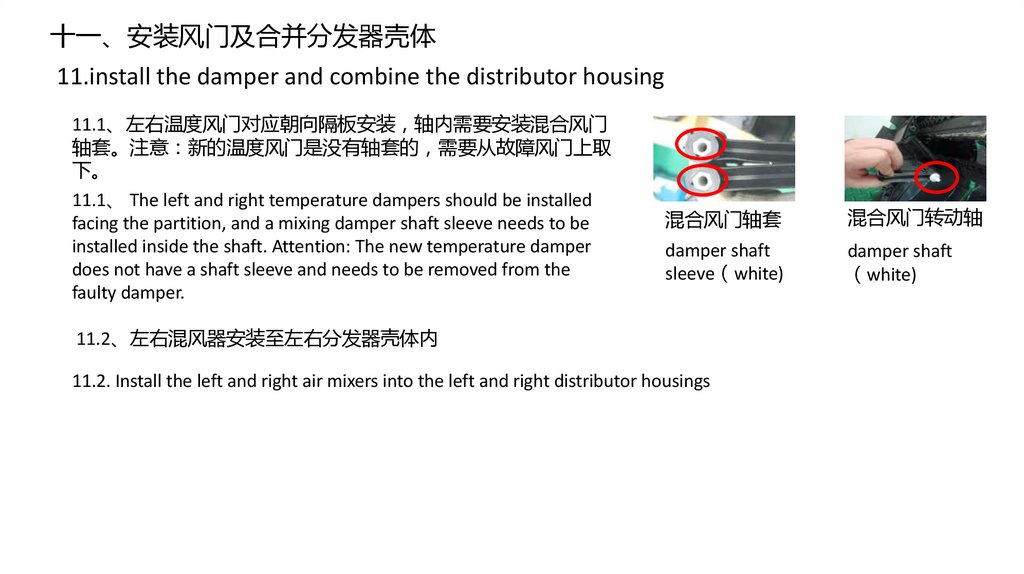
十一、安装风门及合并分发器壳体11.install the damper and combine the distributor housing
11.1、左右温度风门对应朝向隔板安装 轴内需要安装混合风门
轴套。注意 新的温度风门是没有轴套的 需要从故障风门上取
下。
11.1、 The left and right temperature dampers should be installed
facing the partition, and a mixing damper shaft sleeve needs to be
installed inside the shaft. Attention: The new temperature damper
does not have a shaft sleeve and needs to be removed from the
faulty damper.
混合风门轴套
混合风门转动轴
damper shaft
sleeve white)
damper shaft
white)
11.2、左右混风器安装至左右分发器壳体内
11.2. Install the left and right air mixers into the left and right distributor housings
15.
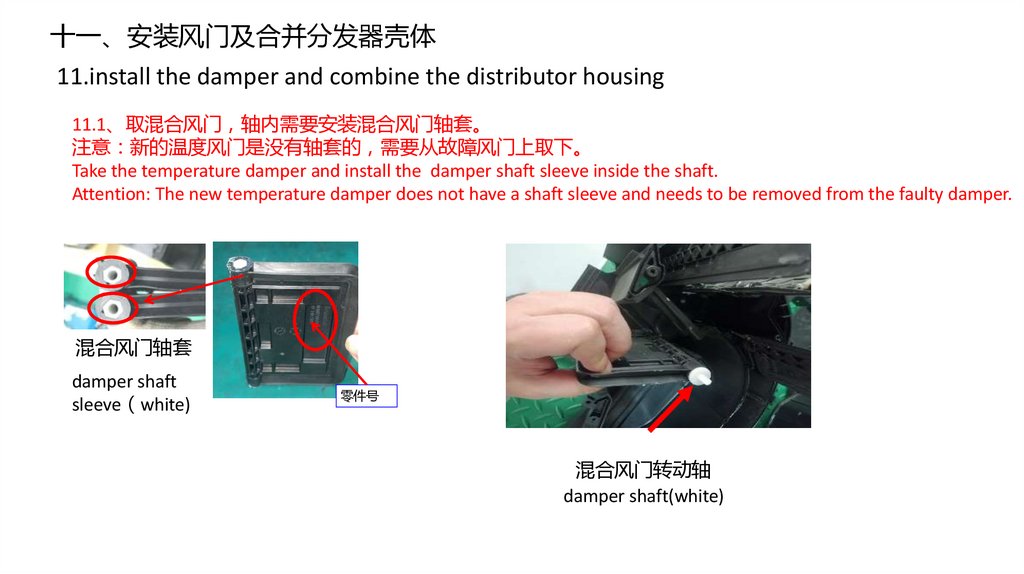
十一、安装风门及合并分发器壳体11.install the damper and combine the distributor housing
11.1、取混合风门 轴内需要安装混合风门轴套。
注意 新的温度风门是没有轴套的 需要从故障风门上取下。
Take the temperature damper and install the damper shaft sleeve inside the shaft.
Attention: The new temperature damper does not have a shaft sleeve and needs to be removed from the faulty damper.
混合风门轴套
damper shaft
sleeve white)
零件号
混合风门转动轴
damper shaft(white)
16.
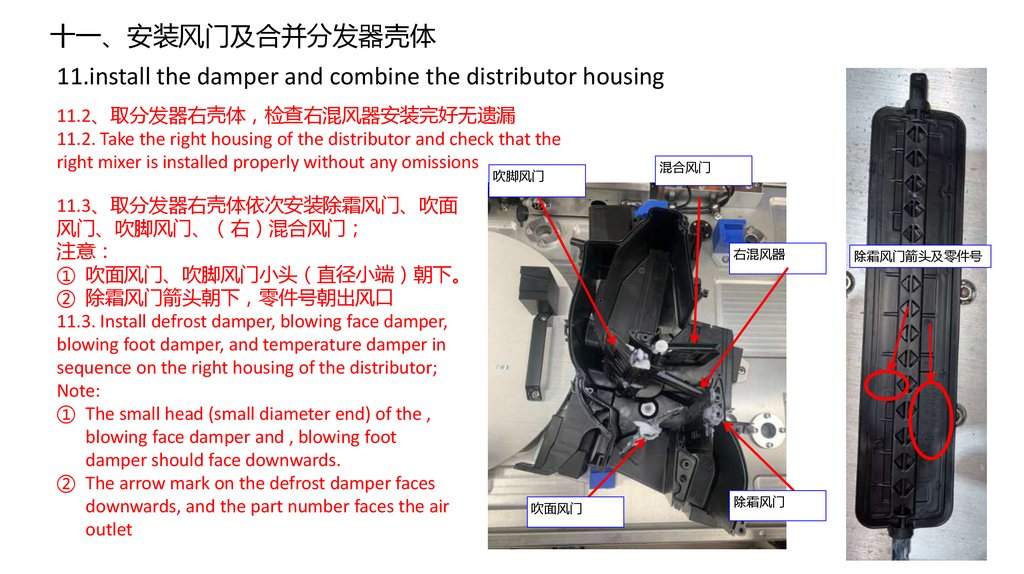
十一、安装风门及合并分发器壳体11.install the damper and combine the distributor housing
11.2、取分发器右壳体 检查右混风器安装完好无遗漏
11.2. Take the right housing of the distributor and check that the
right mixer is installed properly without any omissions
吹脚风门
11.3、取分发器右壳体依次安装除霜风门、吹面
风门、吹脚风门、 右 混合风门
注意
① 吹面风门、吹脚风门小头 直径小端 朝下。
② 除霜风门箭头朝下 零件号朝出风口
11.3. Install defrost damper, blowing face damper,
blowing foot damper, and temperature damper in
sequence on the right housing of the distributor;
Note:
① The small head (small diameter end) of the ,
blowing face damper and , blowing foot
damper should face downwards.
② The arrow mark on the defrost damper faces
downwards, and the part number faces the air
outlet
混合风门
右混风器
吹面风门
除霜风门
除霜风门箭头及零件号
17.
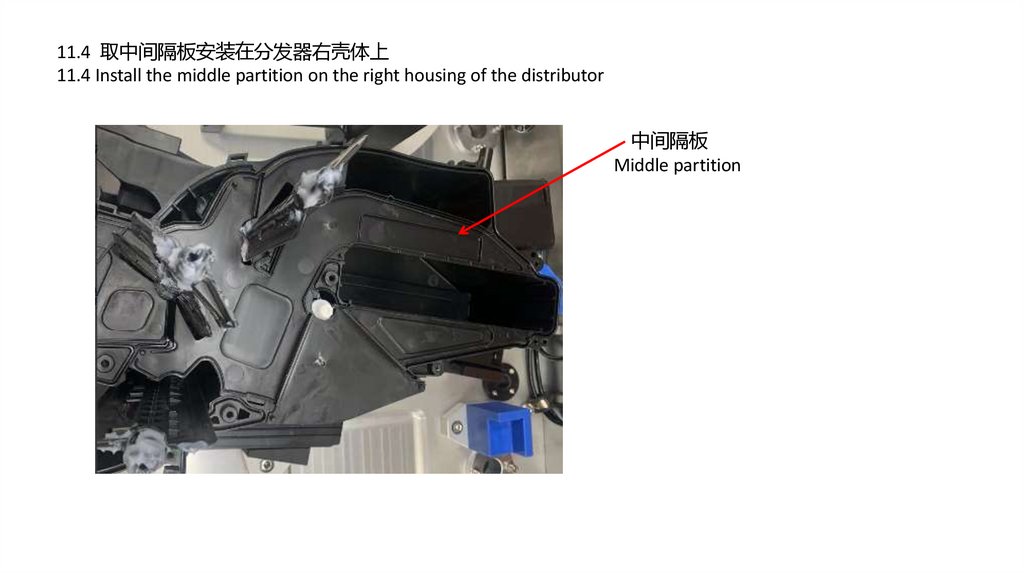
11.4 取中间隔板安装在分发器右壳体上11.4 Install the middle partition on the right housing of the distributor
中间隔板
Middle partition
18.
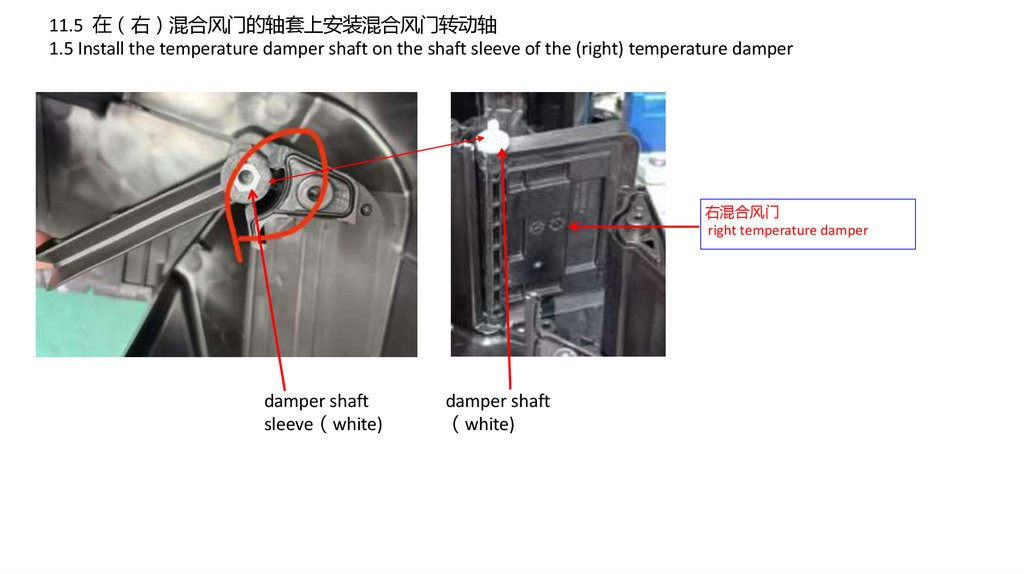
11.5 在 右 混合风门的轴套上安装混合风门转动轴1.5 Install the temperature damper shaft on the shaft sleeve of the (right) temperature damper
右混合风门
right temperature damper
damper shaft
sleeve white)
damper shaft
white)
19.
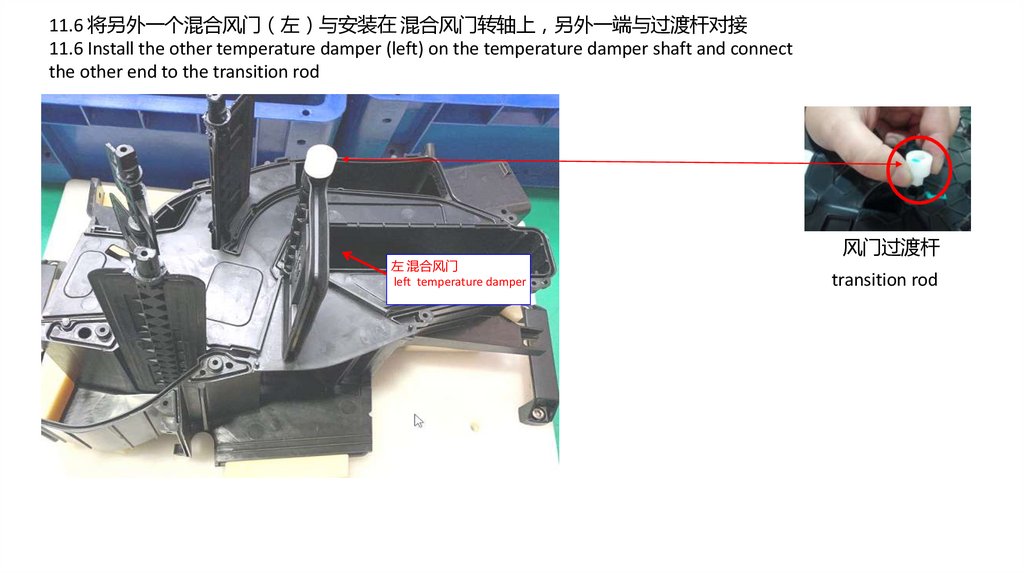
11.6 将另外一个混合风门 左 与安装在 混合风门转轴上 另外一端与过渡杆对接11.6 Install the other temperature damper (left) on the temperature damper shaft and connect
the other end to the transition rod
左 混合风门
left temperature damper
风门过渡杆
transition rod
20.
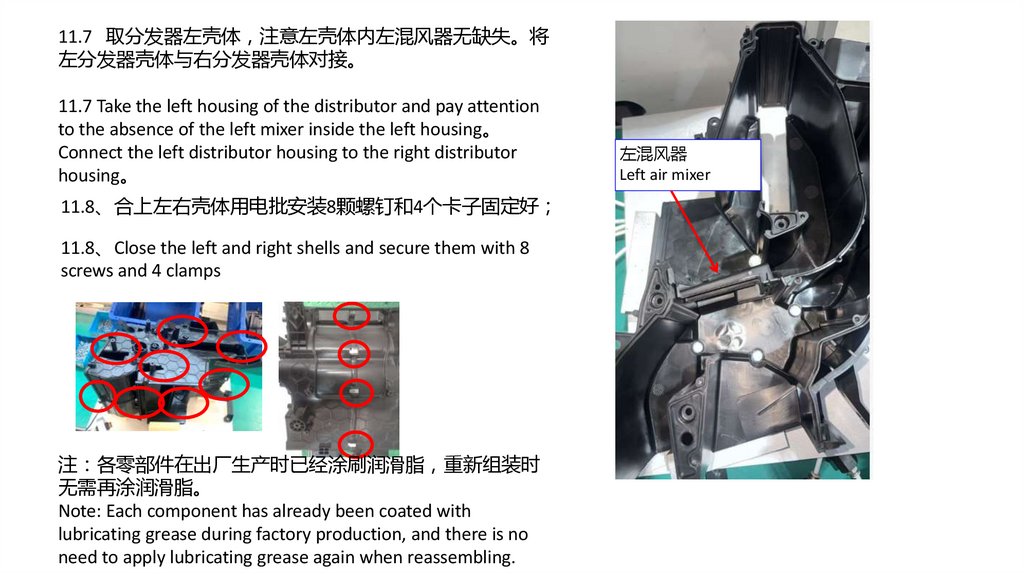
11.7 取分发器左壳体 注意左壳体内左混风器无缺失。将左分发器壳体与右分发器壳体对接。
11.7 Take the left housing of the distributor and pay attention
to the absence of the left mixer inside the left housing。
Connect the left distributor housing to the right distributor
housing。
11.8、合上左右壳体用电批安装8颗螺钉和4个卡子固定好
11.8、Close the left and right shells and secure them with 8
screws and 4 clamps
注 各零部件在出厂生产时已经涂刷润滑脂 重新组装时
无需再涂润滑脂。
Note: Each component has already been coated with
lubricating grease during factory production, and there is no
need to apply lubricating grease again when reassembling.
左混风器
Left air mixer
21.
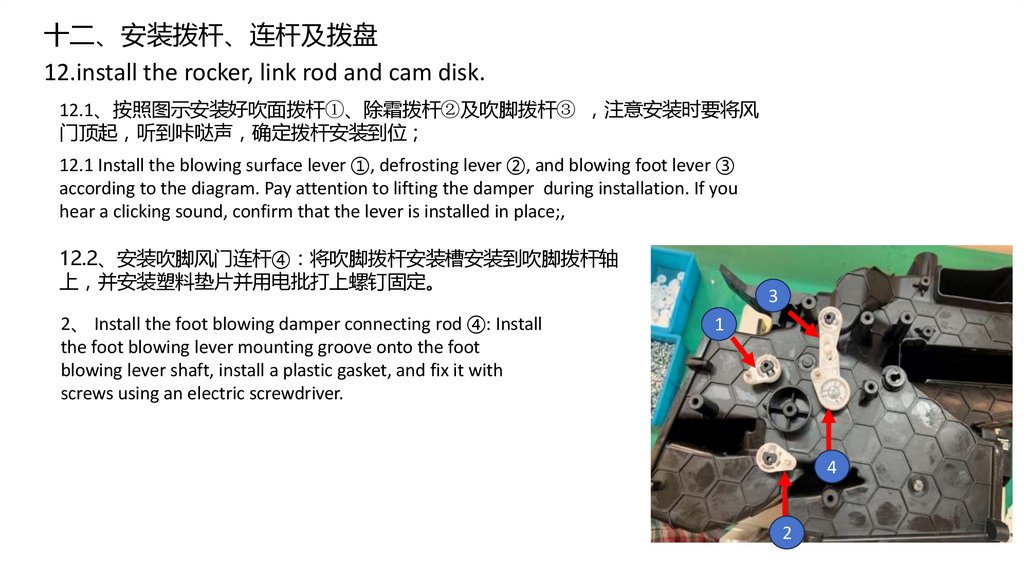
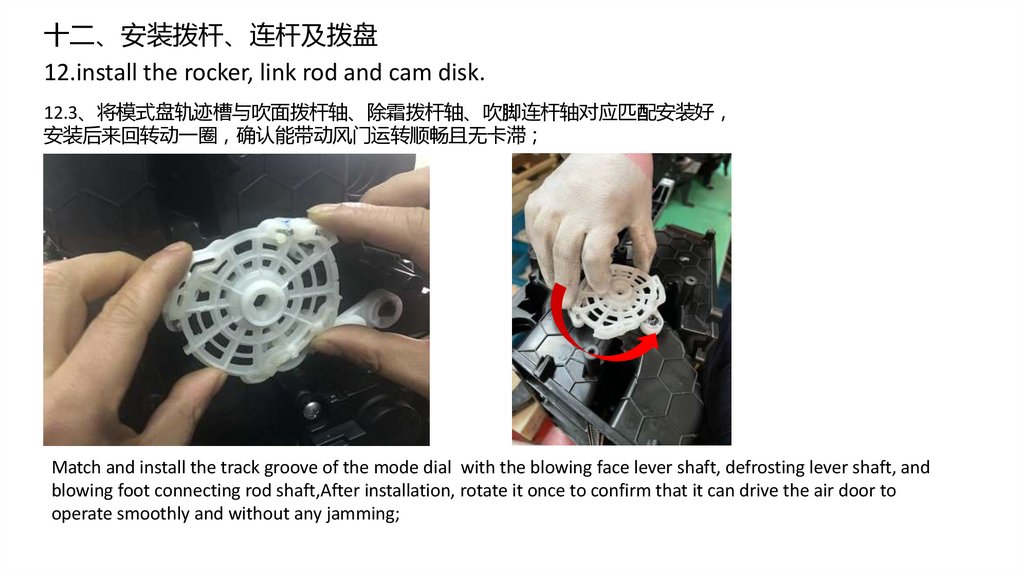
十二、安装拨杆、连杆及拨盘12.install the rocker, link rod and cam disk.
12.1、按照图示安装好吹面拨杆①、除霜拨杆②及吹脚拨杆③ 注意安装时要将风
门顶起 听到咔哒声 确定拨杆安装到位
12.1 Install the blowing surface lever ①, defrosting lever ②, and blowing foot lever ③
according to the diagram. Pay attention to lifting the damper during installation. If you
hear a clicking sound, confirm that the lever is installed in place;,
12.2、安装吹脚风门连杆④ 将吹脚拨杆安装槽安装到吹脚拨杆轴
上 并安装塑料垫片并用电批打上螺钉固定。
2、 Install the foot blowing damper connecting rod ④: Install
the foot blowing lever mounting groove onto the foot
blowing lever shaft, install a plastic gasket, and fix it with
screws using an electric screwdriver.
3
1
4
2
22.
十二、安装拨杆、连杆及拨盘12.install the rocker, link rod and cam disk.
12.3、将模式盘轨迹槽与吹面拨杆轴、除霜拨杆轴、吹脚连杆轴对应匹配安装好
安装后来回转动一圈 确认能带动风门运转顺畅且无卡滞
Match and install the track groove of the mode dial with the blowing face lever shaft, defrosting lever shaft, and
blowing foot connecting rod shaft,After installation, rotate it once to confirm that it can drive the air door to
operate smoothly and without any jamming;
23.
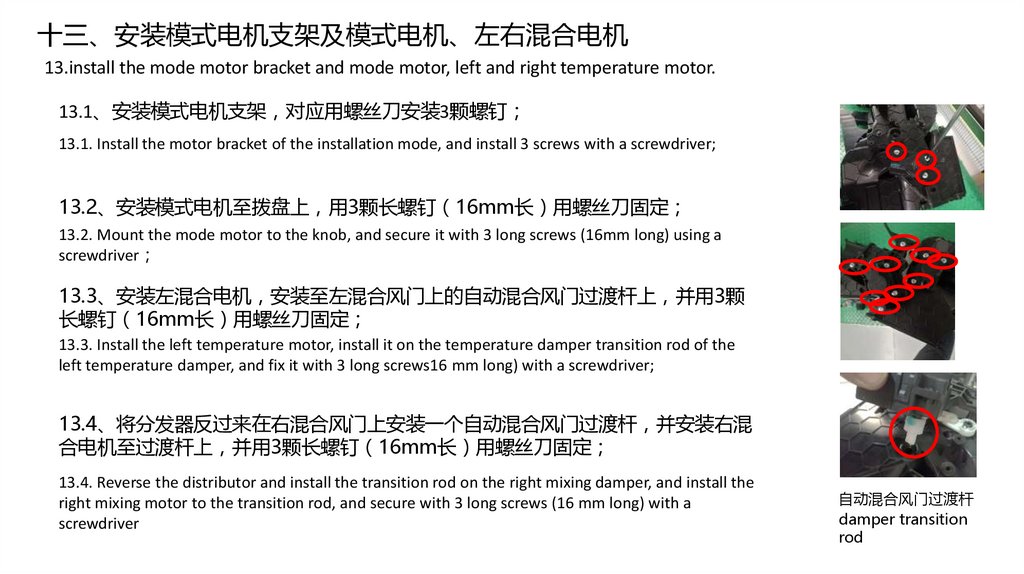
十三、安装模式电机支架及模式电机、左右混合电机13.install the mode motor bracket and mode motor, left and right temperature motor.
13.1、安装模式电机支架 对应用螺丝刀安装3颗螺钉
13.1. Install the motor bracket of the installation mode, and install 3 screws with a screwdriver;
13.2、安装模式电机至拨盘上 用3颗长螺钉 16mm长 用螺丝刀固定
13.2. Mount the mode motor to the knob, and secure it with 3 long screws (16mm long) using a
screwdriver
13.3、安装左混合电机 安装至左混合风门上的自动混合风门过渡杆上 并用3颗
长螺钉 16mm长 用螺丝刀固定
13.3. Install the left temperature motor, install it on the temperature damper transition rod of the
left temperature damper, and fix it with 3 long screws16 mm long) with a screwdriver;
13.4、将分发器反过来在右混合风门上安装一个自动混合风门过渡杆 并安装右混
合电机至过渡杆上 并用3颗长螺钉 16mm长 用螺丝刀固定
13.4. Reverse the distributor and install the transition rod on the right mixing damper, and install the
right mixing motor to the transition rod, and secure with 3 long screws (16 mm long) with a
screwdriver
自动混合风门过渡杆
damper transition
rod
24.
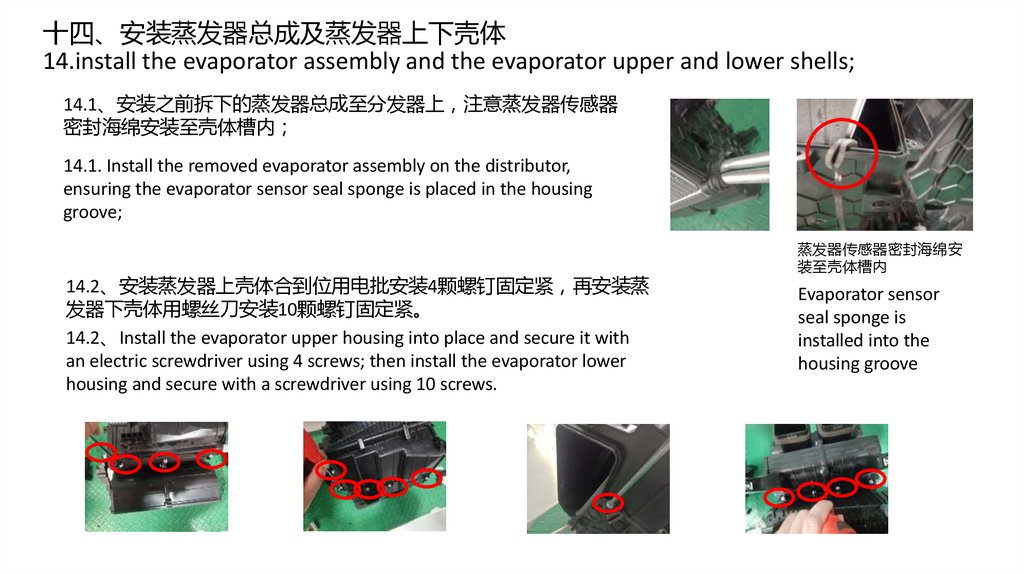
十四、安装蒸发器总成及蒸发器上下壳体14.install the evaporator assembly and the evaporator upper and lower shells;
14.1、安装之前拆下的蒸发器总成至分发器上 注意蒸发器传感器
密封海绵安装至壳体槽内
14.1. Install the removed evaporator assembly on the distributor,
ensuring the evaporator sensor seal sponge is placed in the housing
groove;
蒸发器传感器密封海绵安
装至壳体槽内
14.2、安装蒸发器上壳体合到位用电批安装4颗螺钉固定紧 再安装蒸
发器下壳体用螺丝刀安装10颗螺钉固定紧。
14.2、Install the evaporator upper housing into place and secure it with
an electric screwdriver using 4 screws; then install the evaporator lower
housing and secure with a screwdriver using 10 screws.
Evaporator sensor
seal sponge is
installed into the
housing groove
25.
十五、安装右吹脚风道总成 加热器总成及加热器管路压板、加热器进出水管压板15. Install the right blow foot air duct assembly, heater assembly and heater pipe pressure plate, heater
inlet and outlet pipe pressure plate.
15.1、安装右吹脚风道总成并用电批安装1颗螺钉固定紧 并将蒸发
器传感器接口卡入分发器壳体上
15.1. Install the right blowing foot air duct assembly and tighten it with
an electric screwdriver with 1 screw, and plug the evaporator sensor
interface into the housing;
15.2、将之前拆卸的加热器总成安装至分发器内并用电批打上4颗螺
钉安装加热器进出水管压板 再安装加热器管路压板卡扣安装到位
并用电批打上1颗螺钉固定紧
15.2、Install the previously dismantled heater assembly into the
distributor and tighten the 4 screws with an electric screwdriver to install
the heater inlet and outlet pipe pressure, then install the heater pipe
pressure plate latch into place and tighten it with 1 screw with an electric
screwdriver
26.
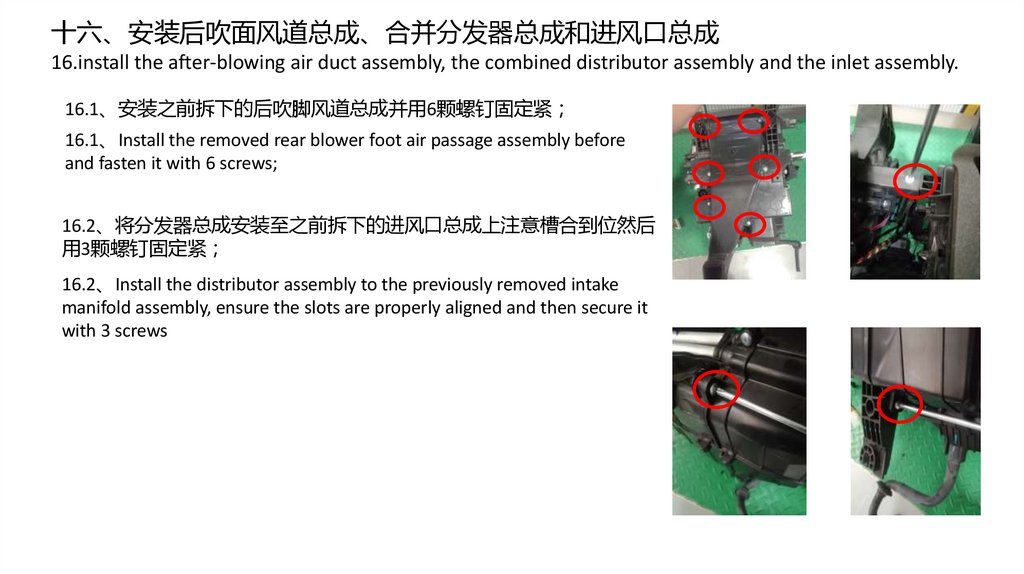
十六、安装后吹面风道总成、合并分发器总成和进风口总成16.install the after-blowing air duct assembly, the combined distributor assembly and the inlet assembly.
16.1、安装之前拆下的后吹脚风道总成并用6颗螺钉固定紧
16.1、Install the removed rear blower foot air passage assembly before
and fasten it with 6 screws;
16.2、将分发器总成安装至之前拆下的进风口总成上注意槽合到位然后
用3颗螺钉固定紧
16.2、Install the distributor assembly to the previously removed intake
manifold assembly, ensure the slots are properly aligned and then secure it
with 3 screws
27.
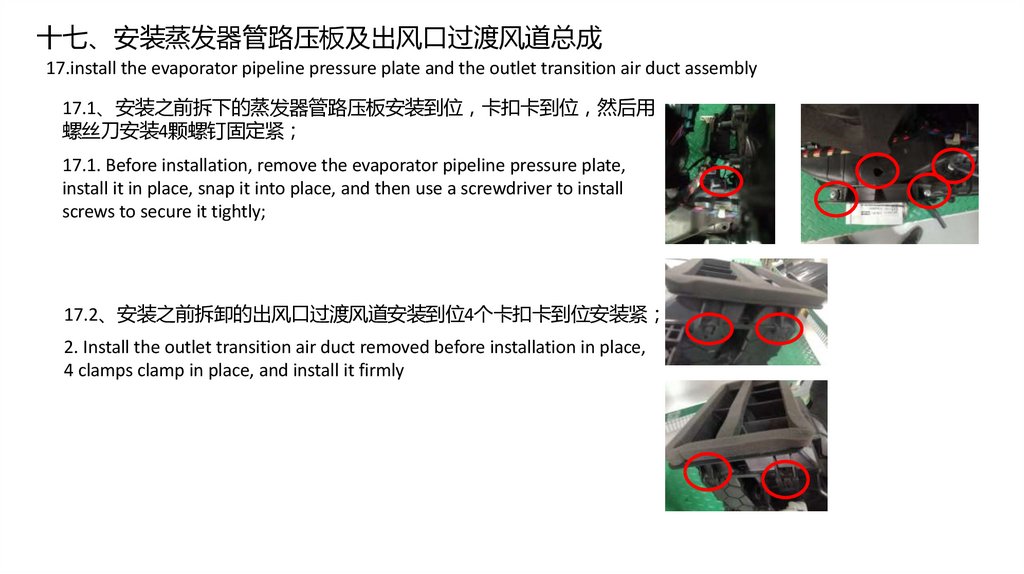
十七、安装蒸发器管路压板及出风口过渡风道总成17.install the evaporator pipeline pressure plate and the outlet transition air duct assembly
17.1、安装之前拆下的蒸发器管路压板安装到位 卡扣卡到位 然后用
螺丝刀安装4颗螺钉固定紧
17.1. Before installation, remove the evaporator pipeline pressure plate,
install it in place, snap it into place, and then use a screwdriver to install
screws to secure it tightly;
17.2、安装之前拆卸的出风口过渡风道安装到位4个卡扣卡到位安装紧
2. Install the outlet transition air duct removed before installation in place,
4 clamps clamp in place, and install it firmly
28.
十八、安装总成线束18. Assemble the main harness;
18.1、安装模式电机、左混合电机插件安装到位 听到咔哒声
回拉无脱落
18.1. The installation mode motor, left temperature motor plug-in
is in place, a click is heard, and there is no detachment when
pulled back
18.2、用螺丝刀安装1颗螺钉固定线束固定卡到模式电机支架上
18.2、Install 1 screw with a screwdriver to fix the wire harness
fixing clip to the mode motor bracket;
模式微电机插件
Pattern micro motor
plug-in
左混合微电机插件
Left mixing micro motor
plug-in
右混合微电机插件
Right mixed micro
motor plug-in
蒸发器传感器插件
Evaporator sensor plugin
18.3、安装线束卡子至壳体孔内到位
18.3. Install the wire harness clip into the housing hole to the right
position;
18.4、安装右混合电机插件及蒸发器传感器插件安装到位 听
到咔哒声 回拉无脱落
18.4、Install the right mixed motor plug-in and the evaporator
sensor plug-in in place, hear a click, and there is no detachment
when back;
29.
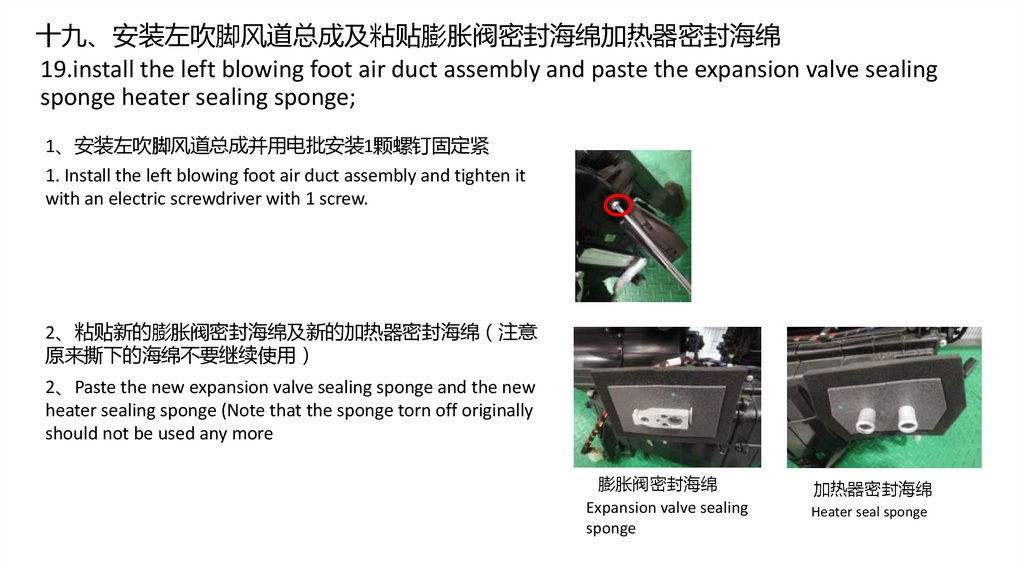
十九、安装左吹脚风道总成及粘贴膨胀阀密封海绵加热器密封海绵19.install the left blowing foot air duct assembly and paste the expansion valve sealing
sponge heater sealing sponge;
1、安装左吹脚风道总成并用电批安装1颗螺钉固定紧
1. Install the left blowing foot air duct assembly and tighten it
with an electric screwdriver with 1 screw.
2、粘贴新的膨胀阀密封海绵及新的加热器密封海绵 注意
原来撕下的海绵不要继续使用
2、Paste the new expansion valve sealing sponge and the new
heater sealing sponge (Note that the sponge torn off originally
should not be used any more
膨胀阀密封海绵
Expansion valve sealing
sponge
加热器密封海绵
Heater seal sponge
30.
二十、将HVAC 安装在整车上 加注制冷剂和冷却液20. Install HVAC on the vehicle and add refrigerant and coolant
二十一、测试温度调节是否正常
21. Test whether the temperature regulation is normal