


 software
Similar presentations:

")


")


Working with layers. Computer image processing in a raster graphics system (topic 1.3)
1.
Topic 1.3 Working with layersSection 1. Computer image processing
in a raster graphics system
2.
1 Concept of image layer2 Types of layers and their features
3 Operations with layers
4 Managing layers using the Layers palette
5 Layer opacity
6 Layer blending modes
7 Layer lock
8 Transforming layer contents
9 Layer effects
3.
1 Concept of image layer4.
Image layersThe advantages of computer graphics include the ability to
place image fragments separately from each other.
This is what image layers are for.
5.
Image layersTo understand the purpose of layers, you need to imagine that
image fragments are located on separate transparent sheets.
When the sheets are superimposed on each other, you can see
a complete image.
Sheets can be moved, rotated, swapped - and each time the
image will look new.
6.
Image layersAll operations with layers (creating, deleting, changing the
order, merging, etc.) are controlled using the Layers palette,
Layer Comps and the Layer menu bar command.
When you paste an object from the clipboard or drag a
selection from another document, Adobe Photoshop
automatically creates a new layer for that object.
7.
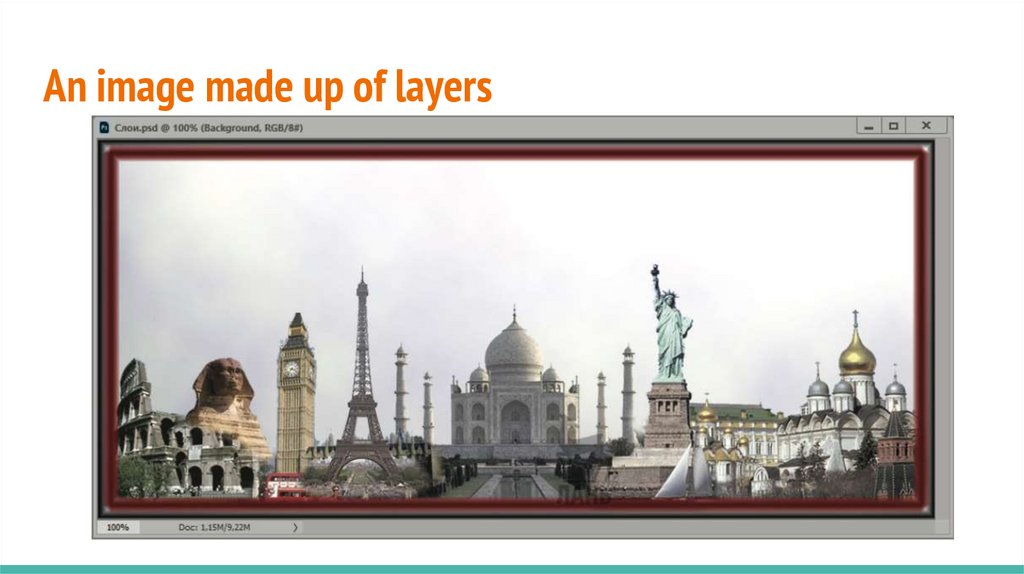
An image made up of layers8.
Image layersSelecting objects in raster graphics is a rather difficult task.
Layers are one way to make it easier to work with objects in
raster images.
Layers allow you to achieve all sorts of effects when creating
and editing images.
9.
Image layersA complete image can be visually “assembled” from different
objects placed at different levels/layers.
By placing different objects on different layers, we can easily
select them.
10.
Working with layersAn image in Adobe Photoshop can contain multiple layers.
Layers allow you to divide an entire drawing into independent
parts, each of which can be edited and moved separately
without affecting the others.
Any installation, collage of photographs, effects, shadows of
objects, etc. impossible to create without knowing how to work
with multi-layered images
11.
Layers are essential when working with:digital painting,
creating banners,
print layouts,
web design,
any montage or collage of images.
12.
Photoshop Minute13.
2 Types of layers and their features14.
Background layerIf the background layer is locked for movement (a lock icon is
visible next to it), you need to double-click the left key on the
layer icon, the program will offer to create a new one from the
Background layer and give it a name, then press the OK key,
the layer is no longer locked, easily moved and can be
transformed.
15.
Background layerThe background is usually locked in the hope that you won't
move or scale it.
16.
Background layerWhen you create an image, it contains a special opaque layer Background.
You can add new layers on top.
17.
Background layerIn images with transparent areas, there is no background layer
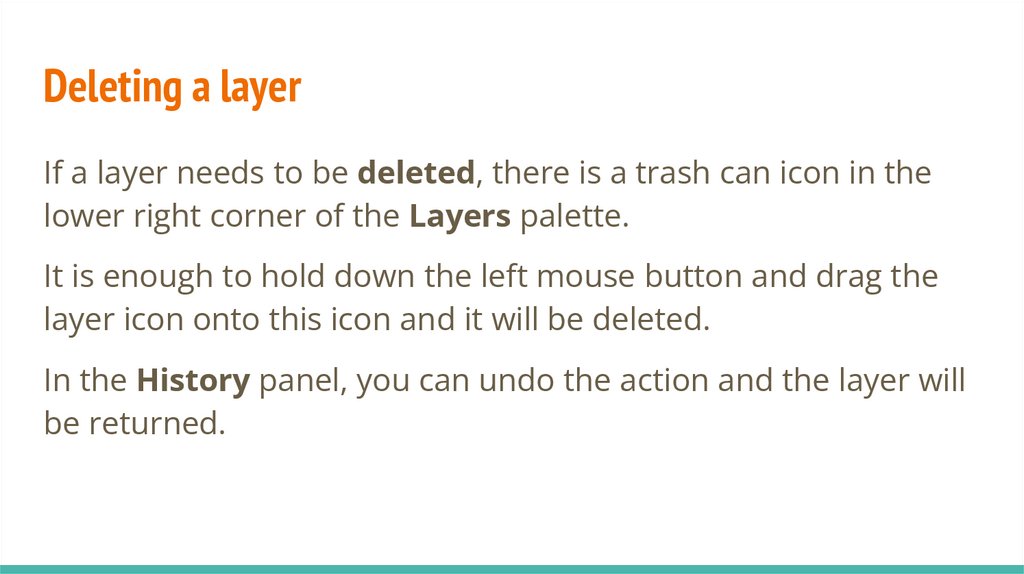
(it is removed or converted to a regular layer).
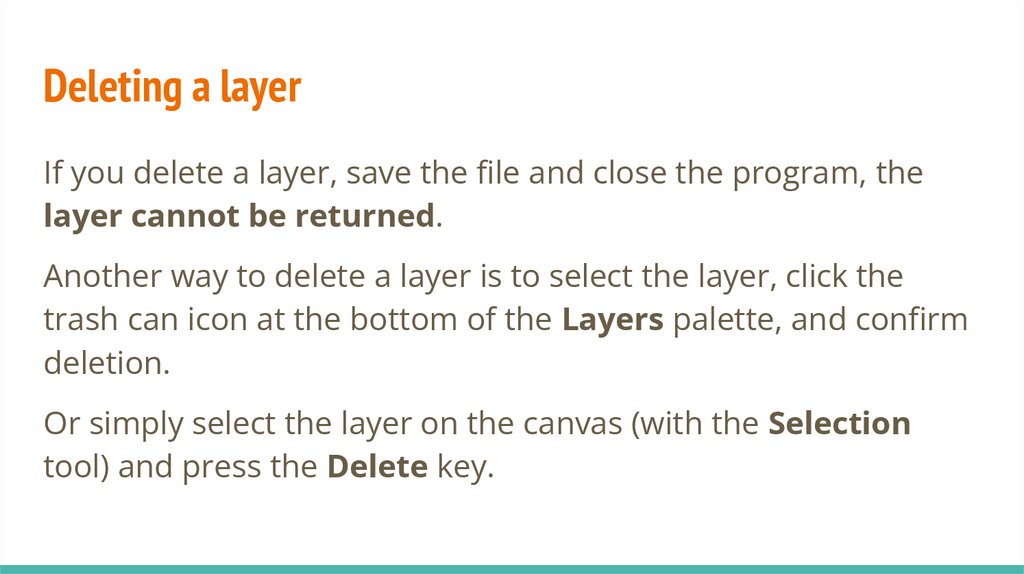
The layers are superimposed on each other, and the image is
displayed on the screen as if viewed from above: through the
transparent areas of the top layer, the layers below are visible.
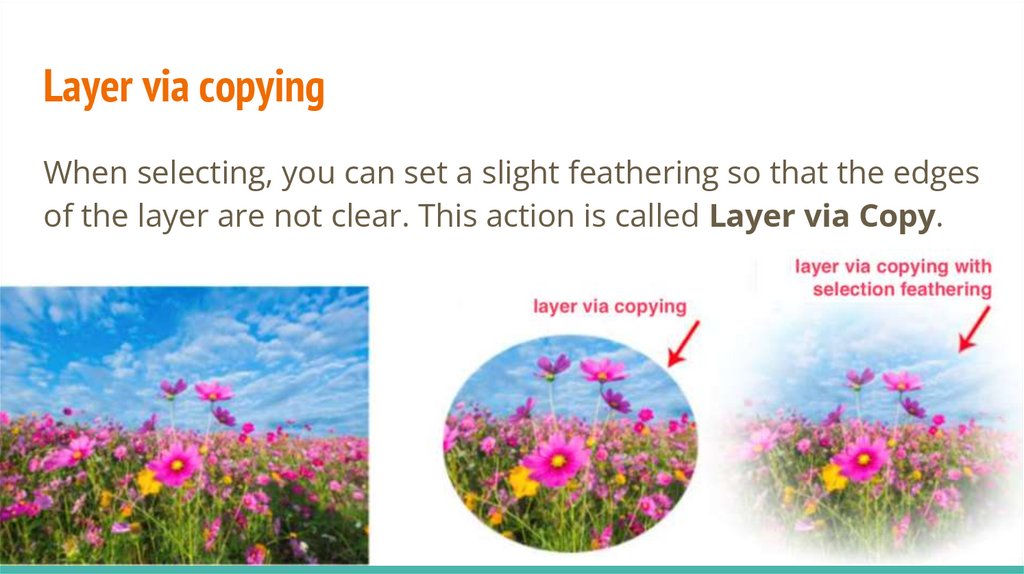
18.
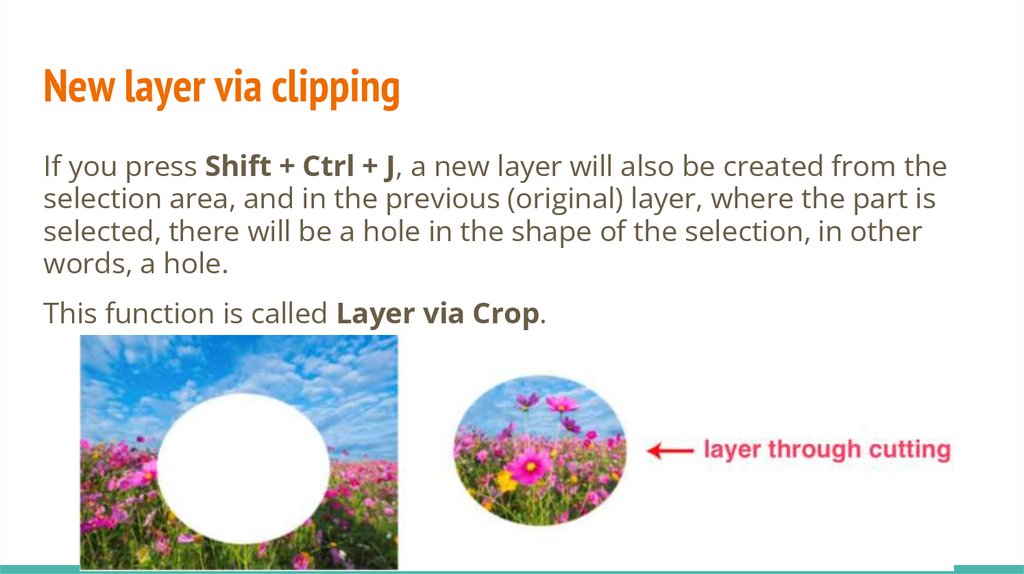
Layer TypesAdobe Photoshop supports working with the following types of
layers:
pixel (the image itself),
outline,
text,
corrections
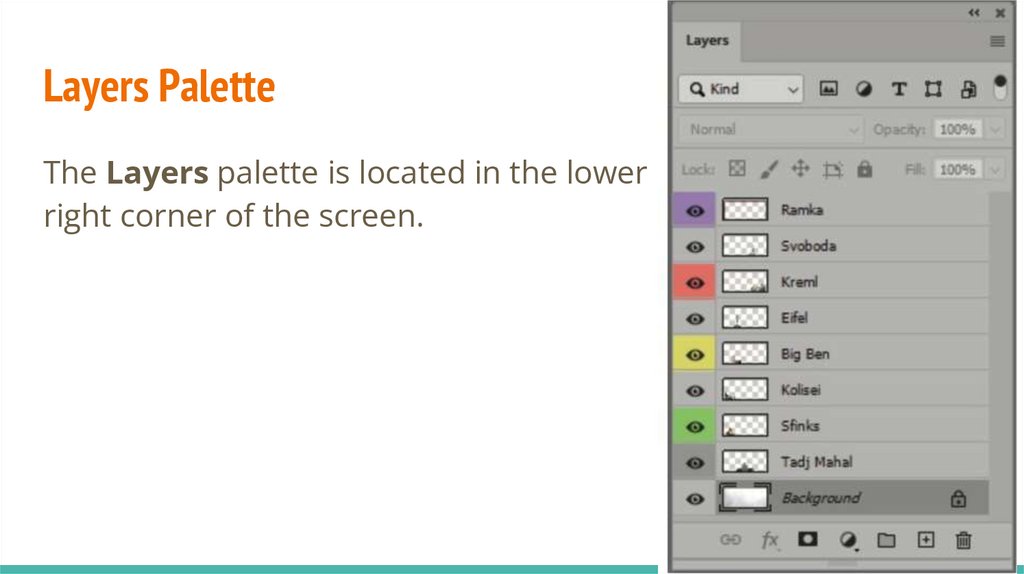
and smart objects.
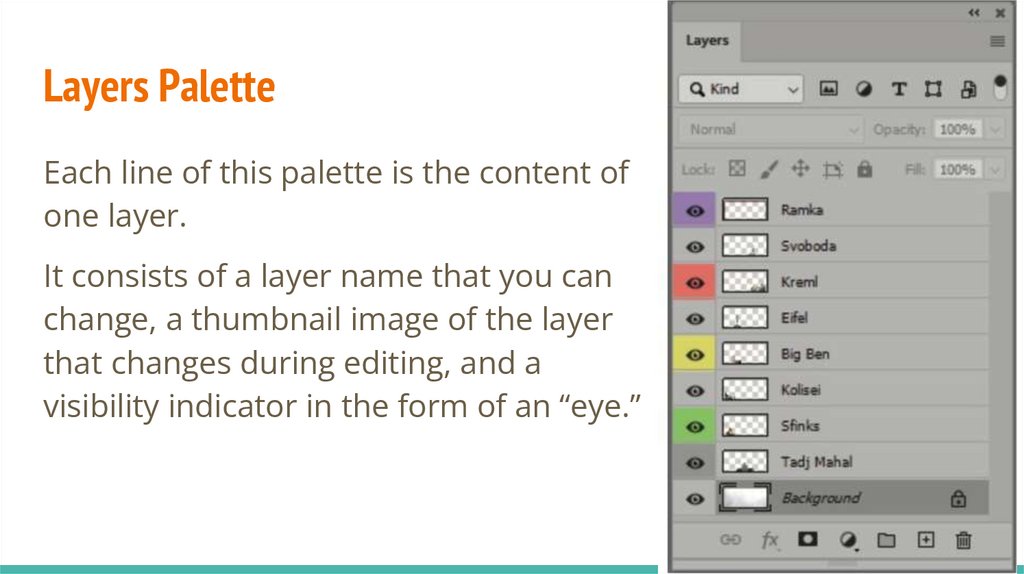
19.
Adjustment (Subordinate) LayerThe adjustment layer does not contain an image, but performs
some operation on the pixels of the image below it:
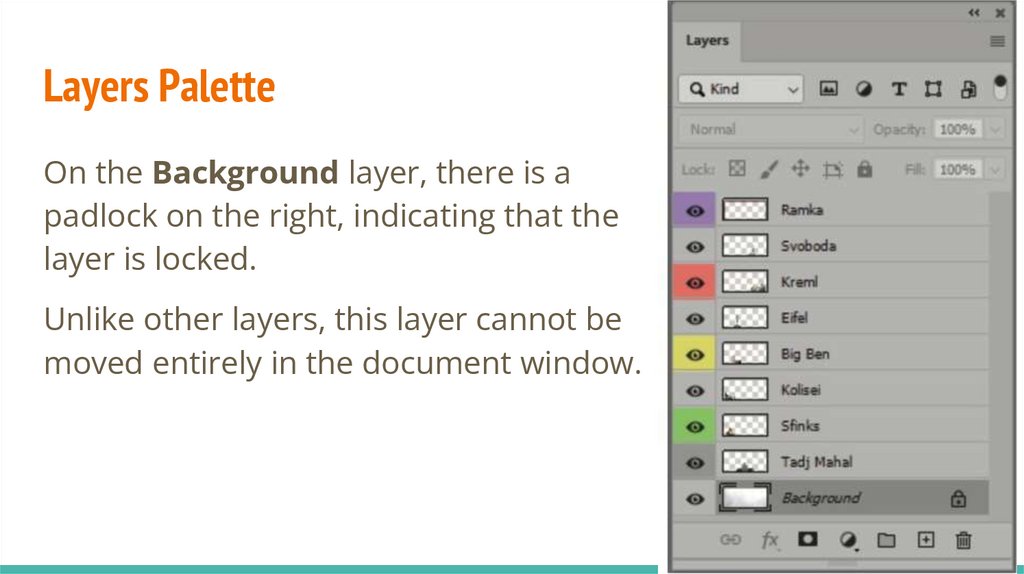
changing levels,
curves,
brightness,
contrast,
color shades.
20.
AdvantageThe advantage is that the original image on the bottom layer is
not changed and you can always start working from the original
drawing by removing the adjustment layers.
21.
Adjustment (Subordinate) LayerSometimes fill layers are used to correct an image, which can
contain a:
● uniform,
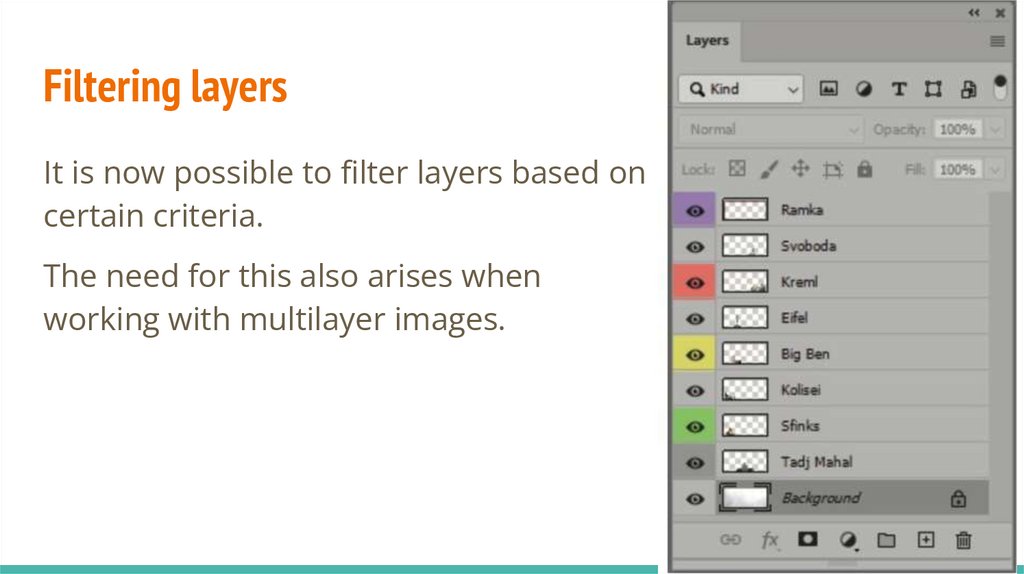
● gradient,
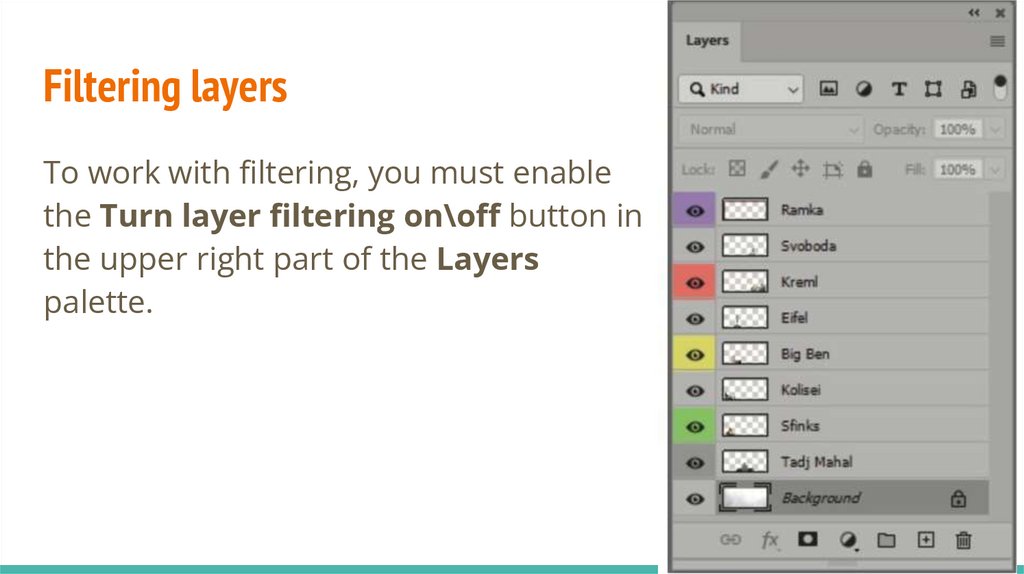
● or patterned fill.
22.
Adjustment (Subordinate) LayerWhen you create an adjustment or fill layer, a mask layer
associated with it is automatically created.
23.
To create an adjustment layer (fill layer) use:● command Layer ⇒ New Adjustment (Fill) Layer;
● New Fill or Adjustment Layer
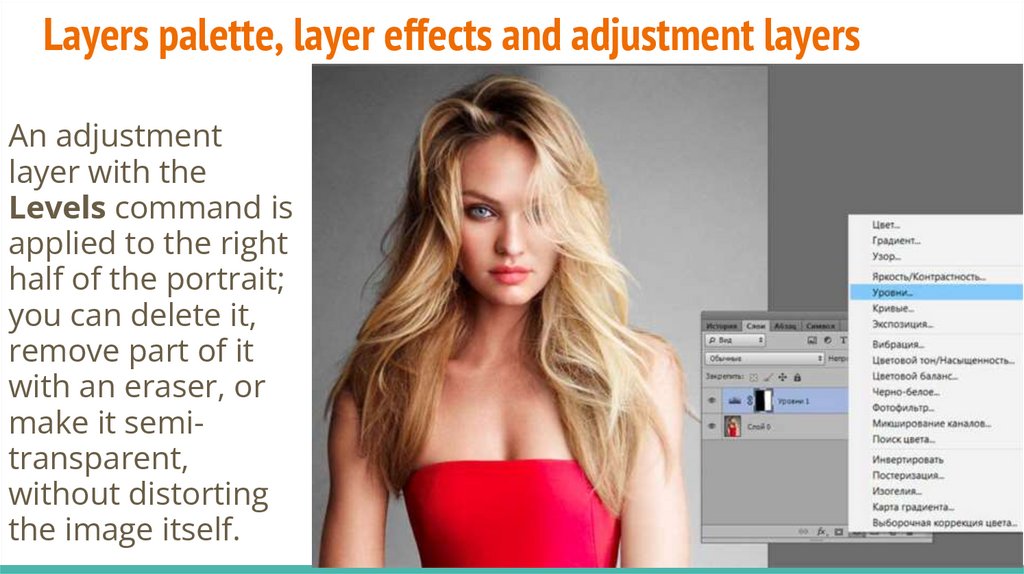
button in the Layers
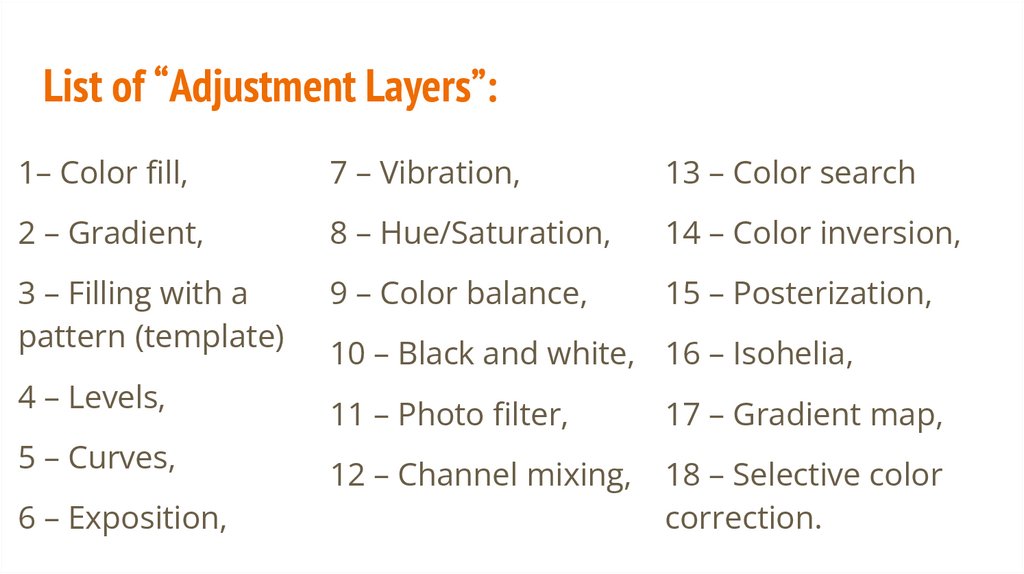
palette.
24.
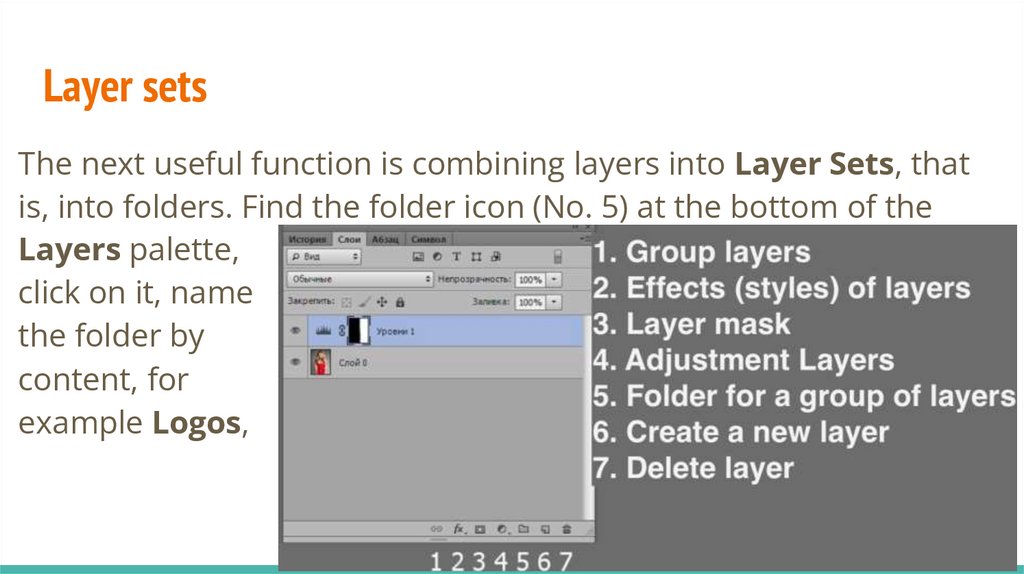
Text layerText in Adobe Photoshop is inserted as a separate layer in
vector format and displayed in the Layers palette.
All text layers are designated by the letter T.
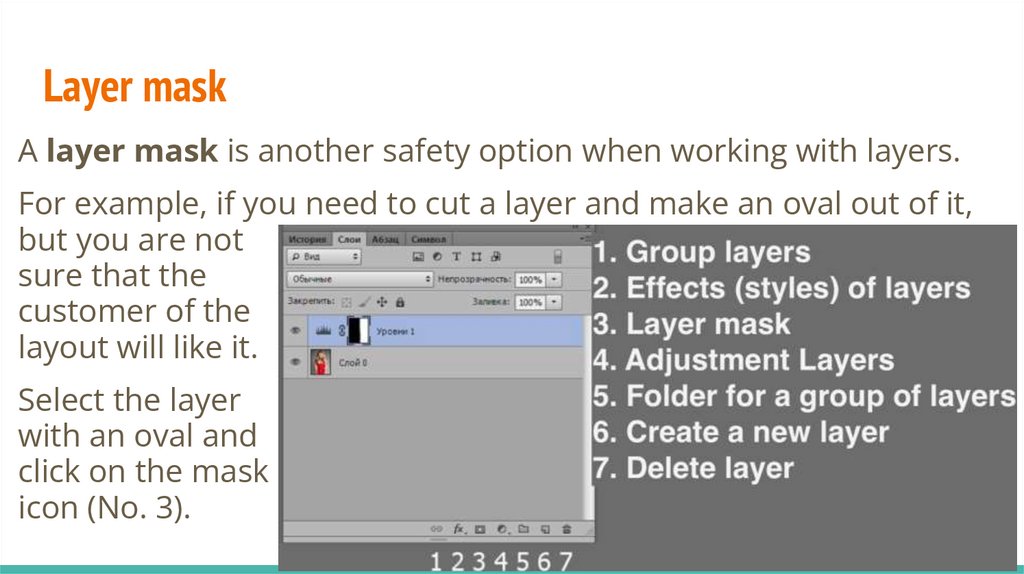
To create inscriptions, there are four tools that are associated
with one button and the T key.
25.
The following tools are used to create inscriptions:● Horizontal Type;
● Vertical Type;
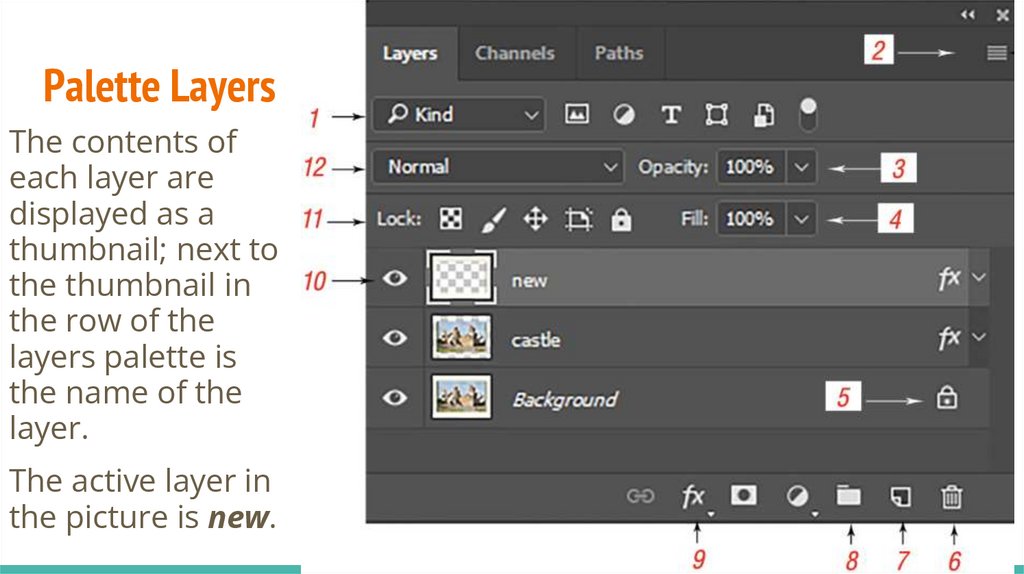
● Horizontal/Vertical Type Mask – сreates a selection that
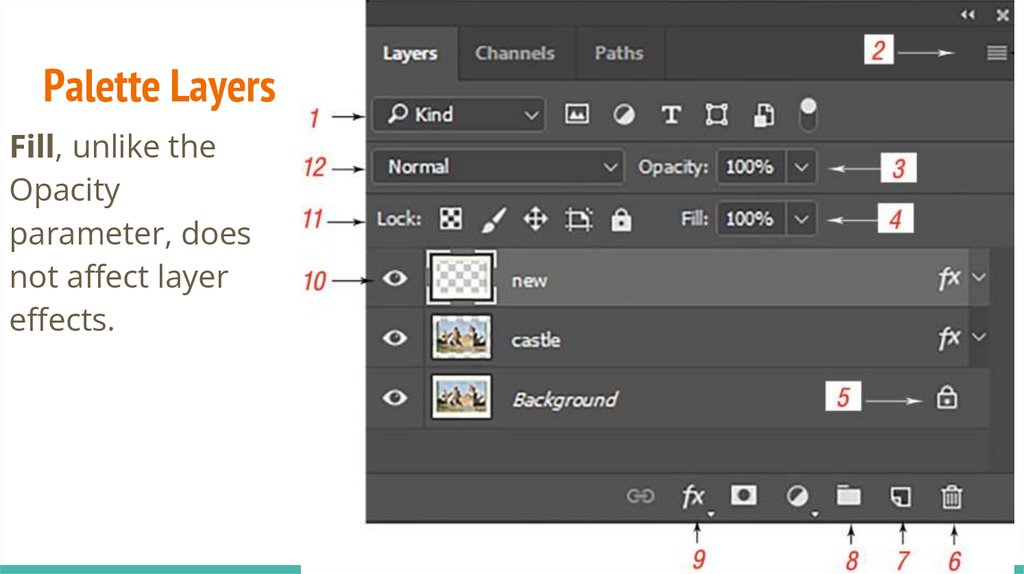
follows the shape of the text.
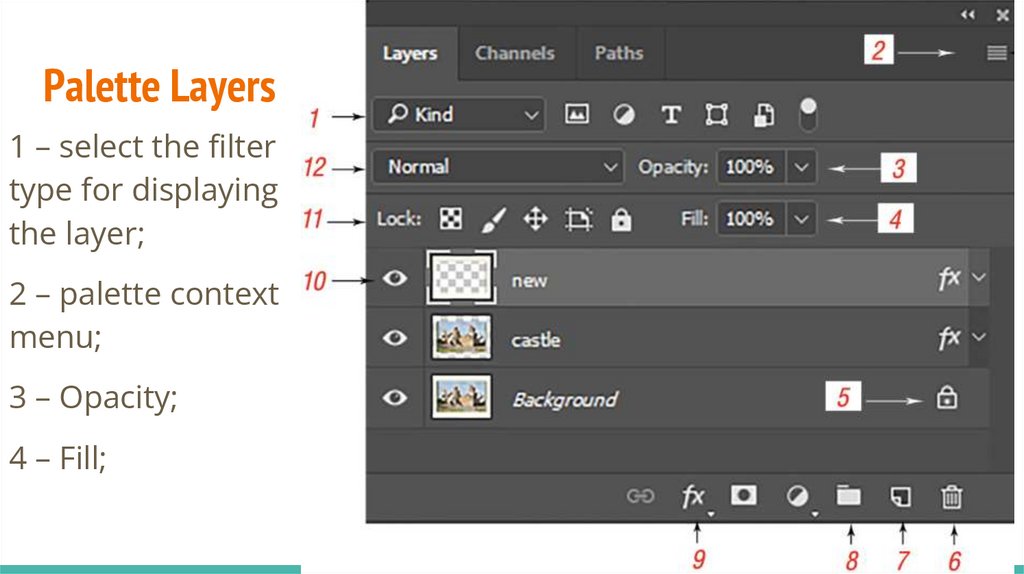
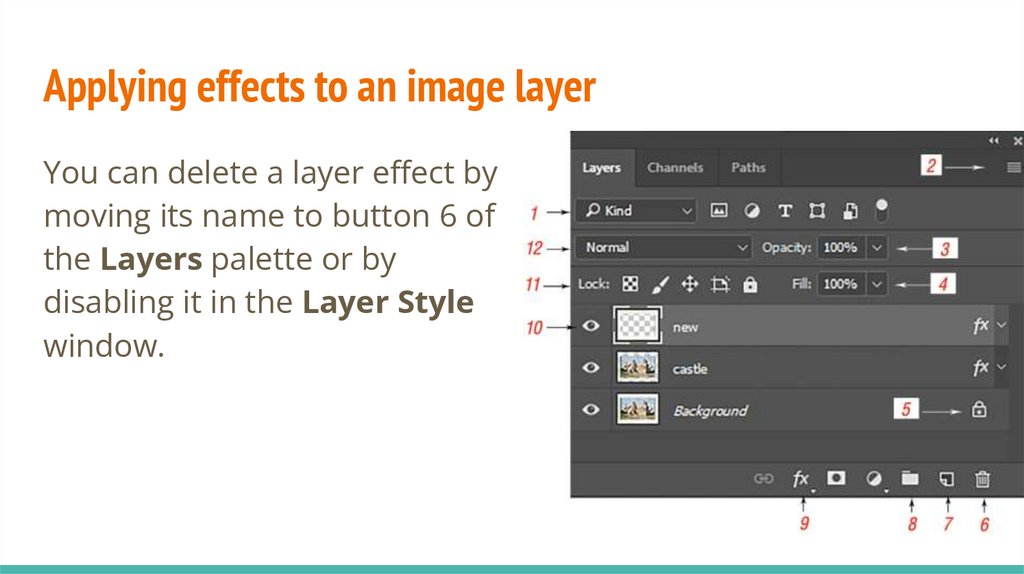
26.
Text layerYou can then fill this area (for example, with a pattern), change
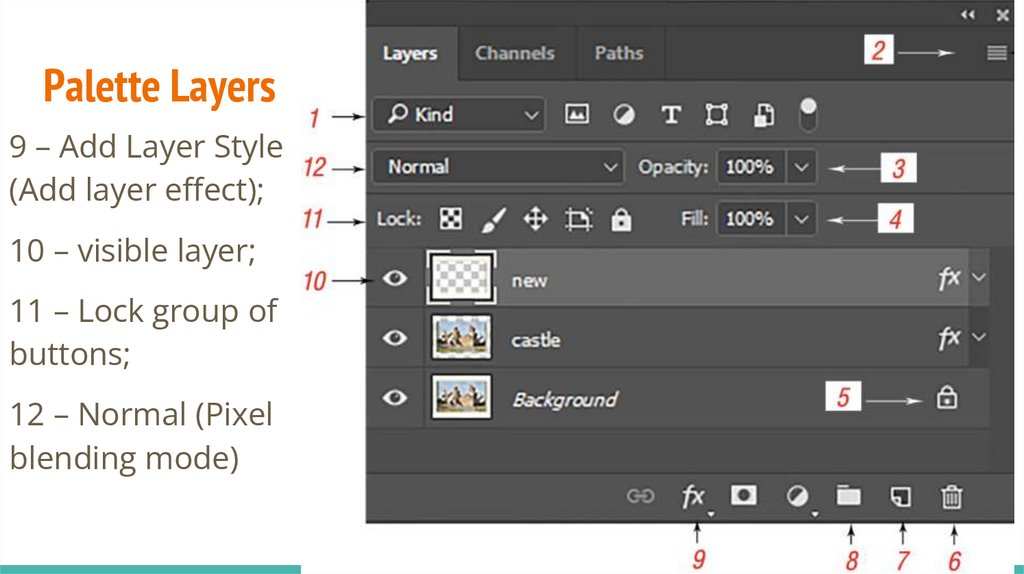
its properties (tone, brightness, etc.), move and transform the
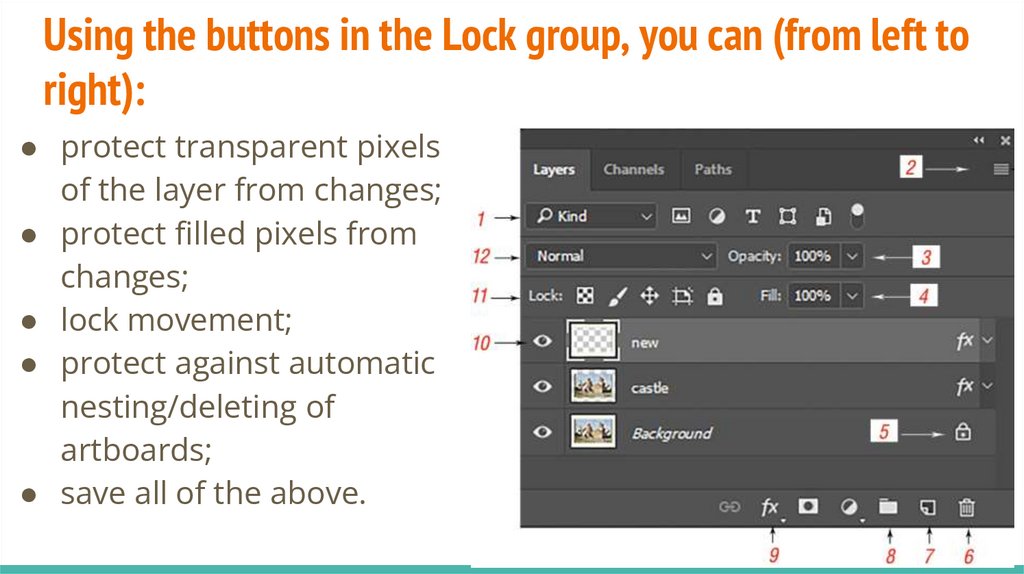
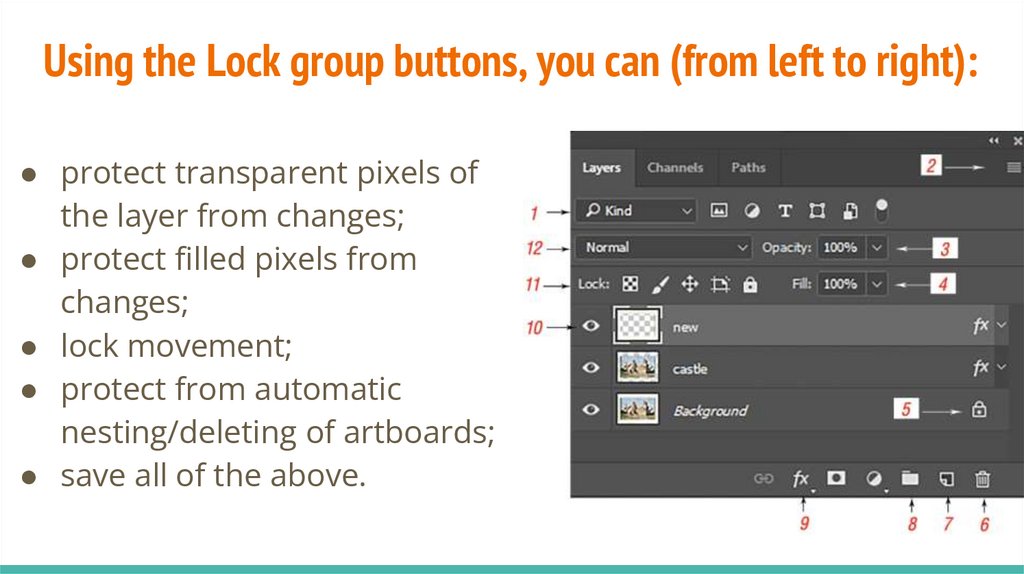
boundaries of the selected area and the area itself.
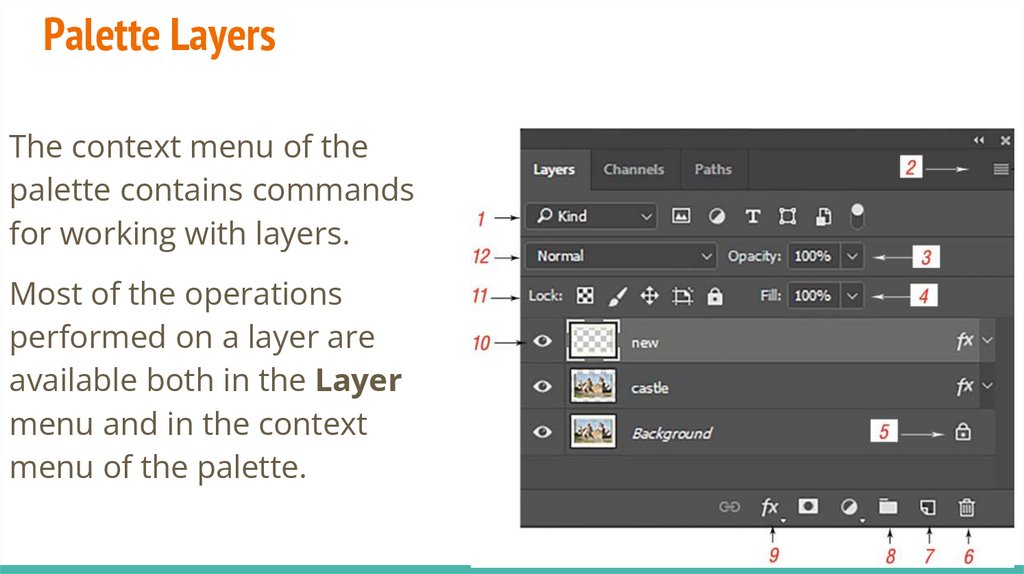
When using text masks, a new layer is not created.
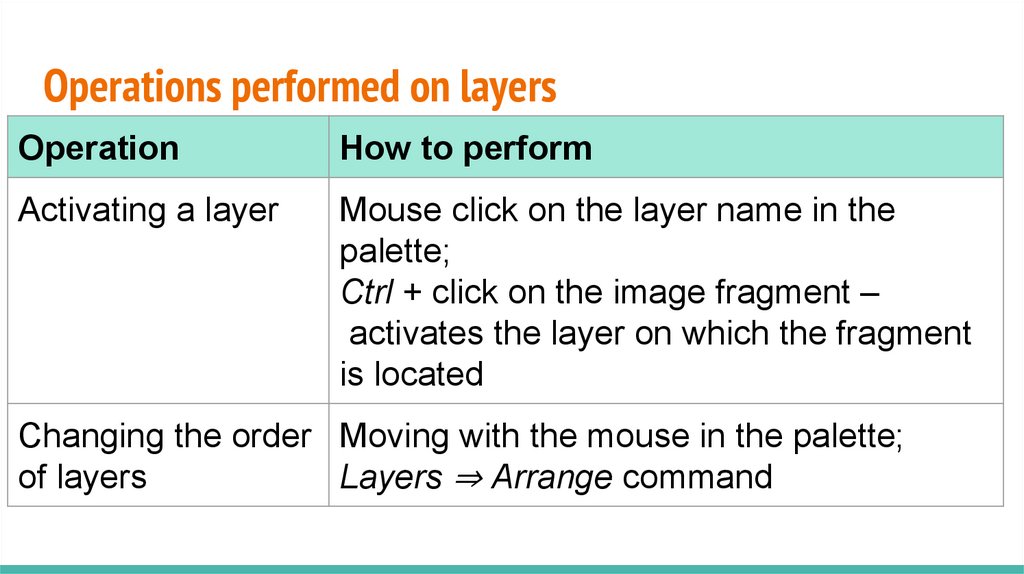
27.
You can enter text in two ways:● click on the image where the text is inserted and enter it;
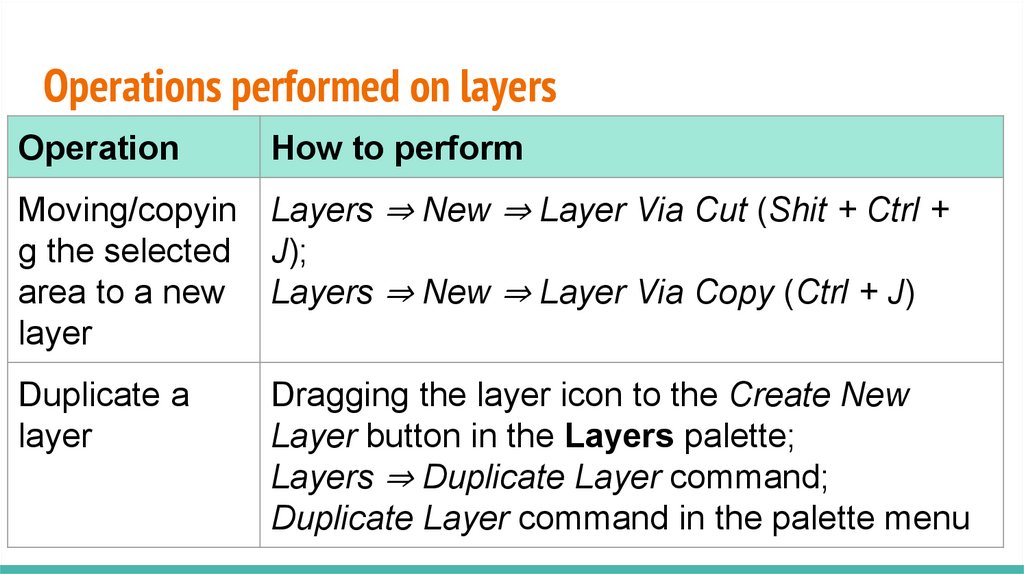
● select a rectangular area to place multi-line text (text block),
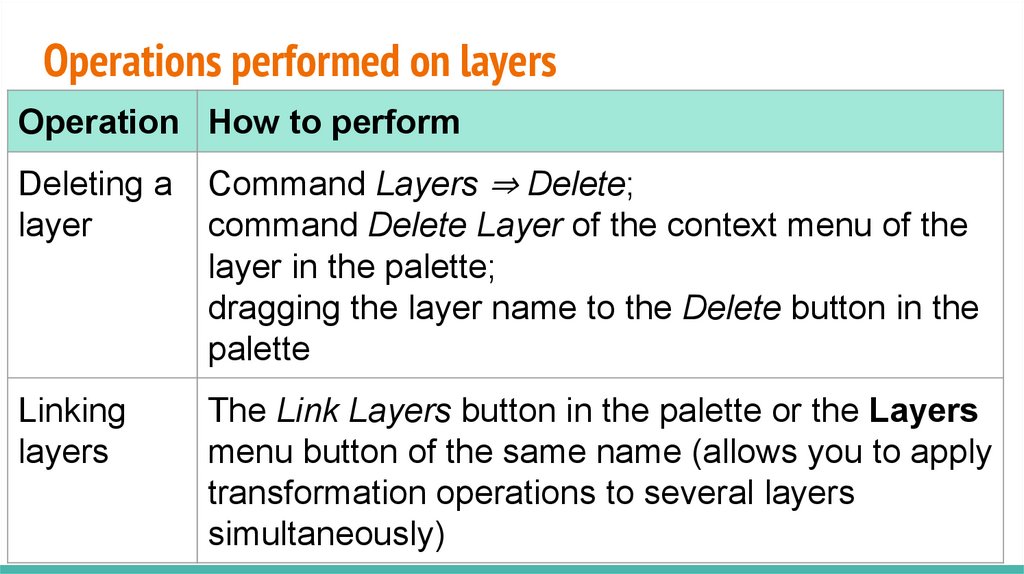
and then enter the text.
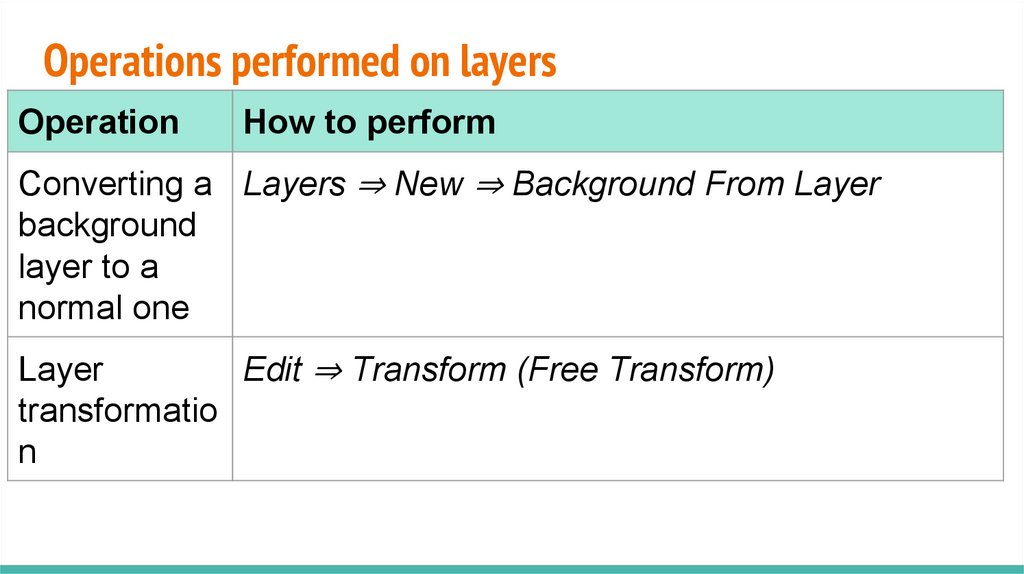
Moving to another line is performed automatically; to move
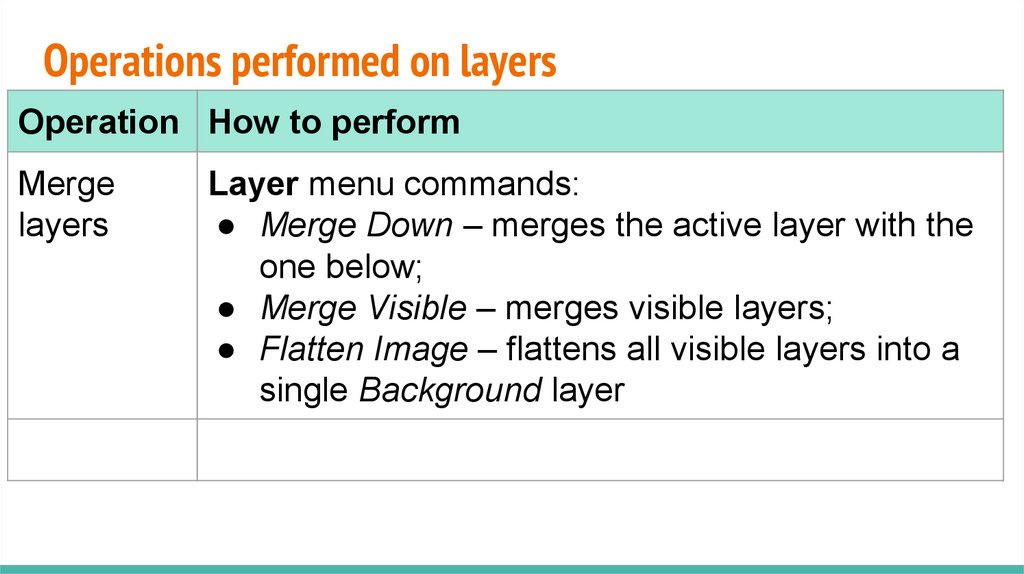
ahead early, you need to press Shift + Enter.
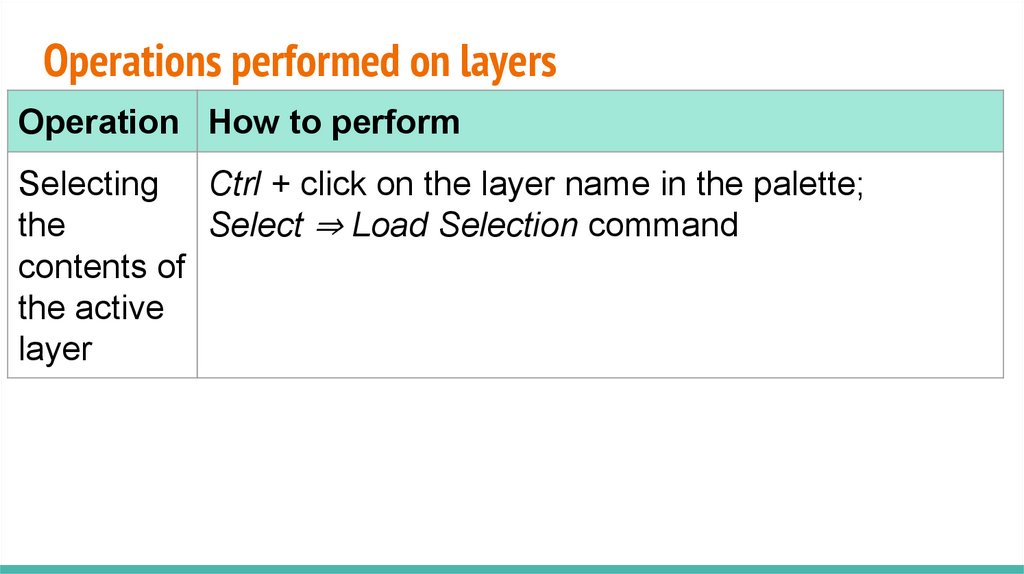
The size and position of the bounding box can be changed at
any time.
28.
Text layerTo fix the entered text, press the Enter key or the button
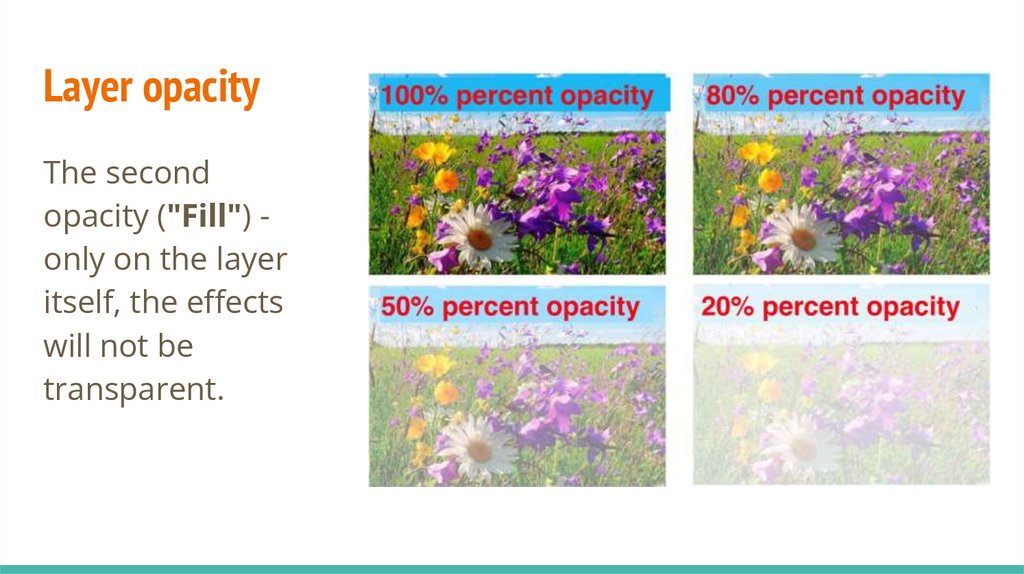
the right side of the tool's properties panel.
You can also simply select another tool.
To cancel text entry, click on the button
key
or press the Esc
on
29.
Text layerEffects and styles apply to text layers just like regular layers.
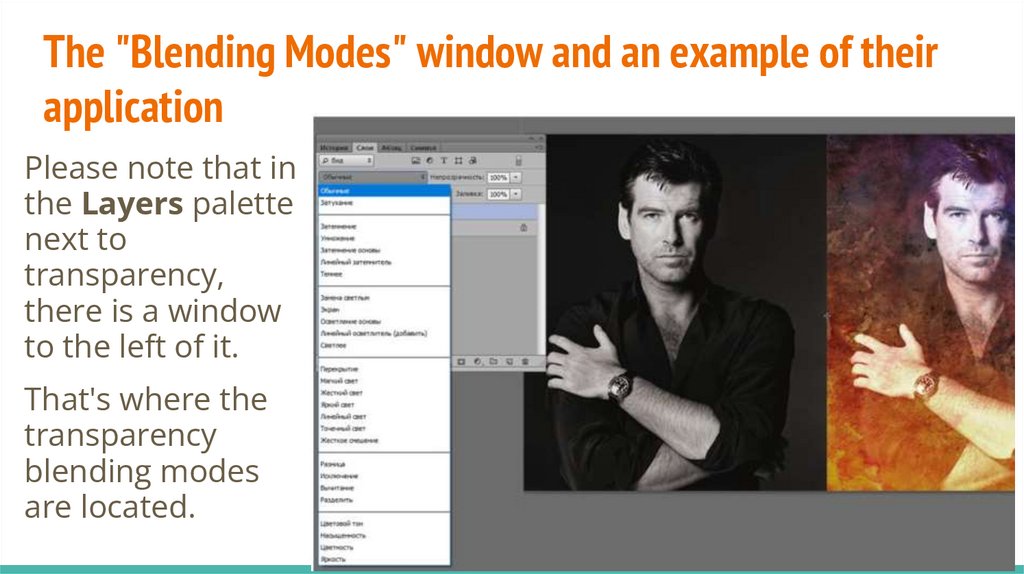
Text parameters are set in the properties panel.
The properties (parameters) of the text can be changed at any
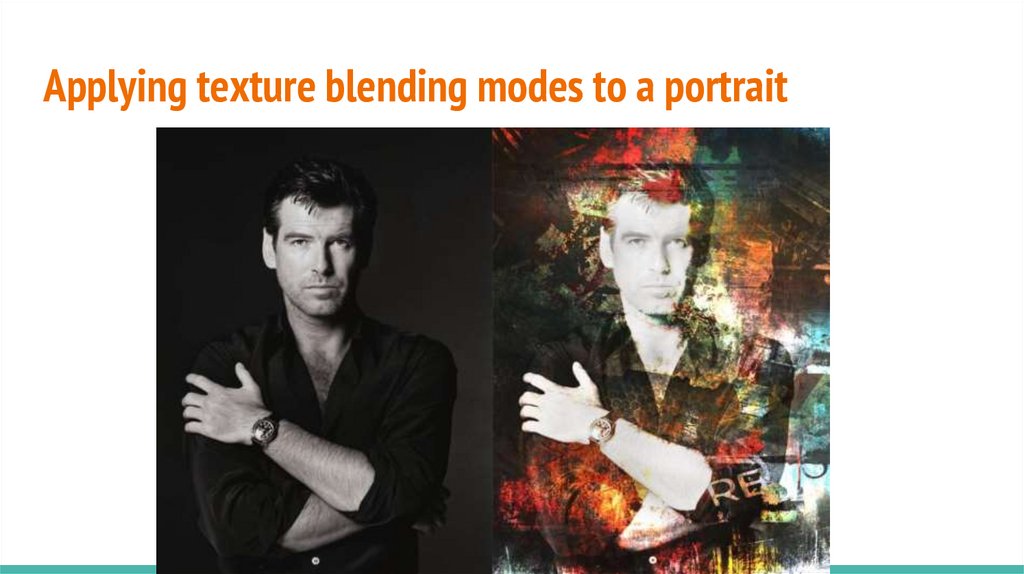
time, both for all and for some (selected) letters.
30.
Text layerIn order to change the text or its properties, you need to
activate the corresponding text layer in the Layers palette, turn
on the Type tool and click in the text area in the picture.
A blinking text cursor indicates that the text can be edited, just
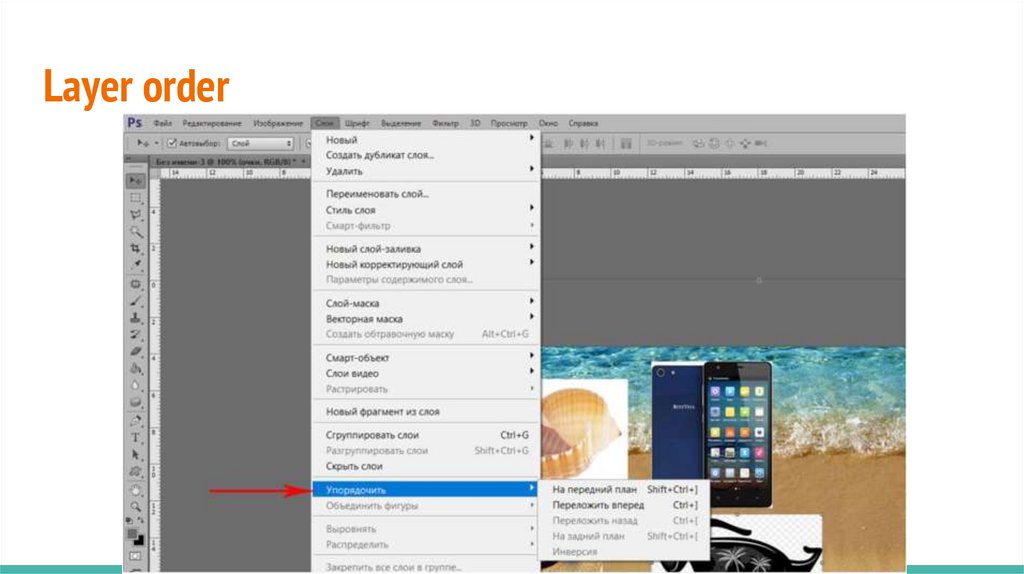
like in a word processor.
31.
Text layerAdvanced character formatting options are available in the
Character palette, opened with the button
(Ctrl + T keys).
The paragraph formatting options found in the Paragraph
palette apply only to text blocks, with the exception of
alignment.
32.
Text layerText can be rotated, reflected, transformed using the Edit ⇒
Free Transform and Edit ⇒ Transform commands, except for
the Distort and Perspective operations.
33.
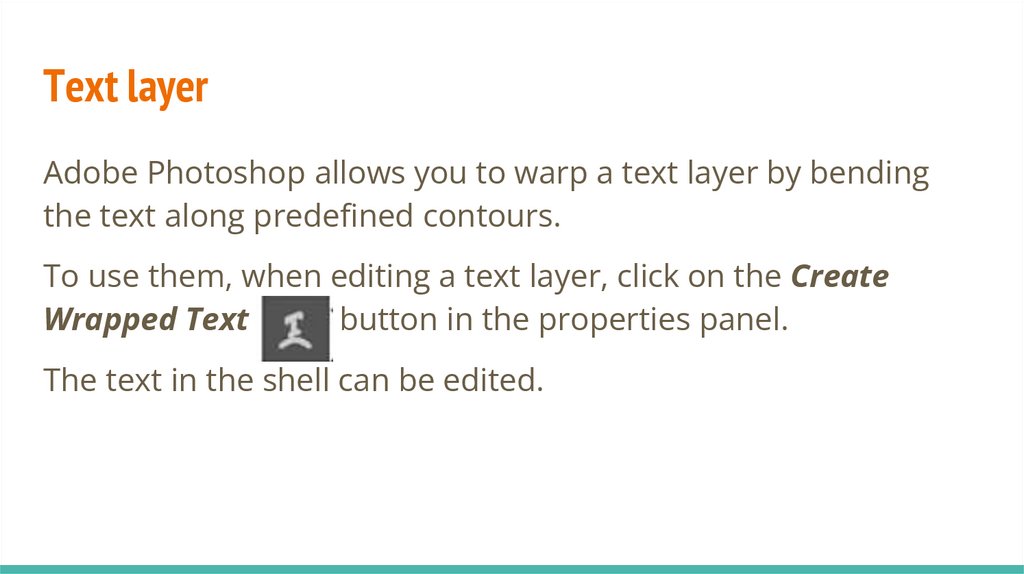
Text layerAdobe Photoshop allows you to warp a text layer by bending
the text along predefined contours.
To use them, when editing a text layer, click on the Create
Wrapped Text
button in the properties panel.
The text in the shell can be edited.
34.
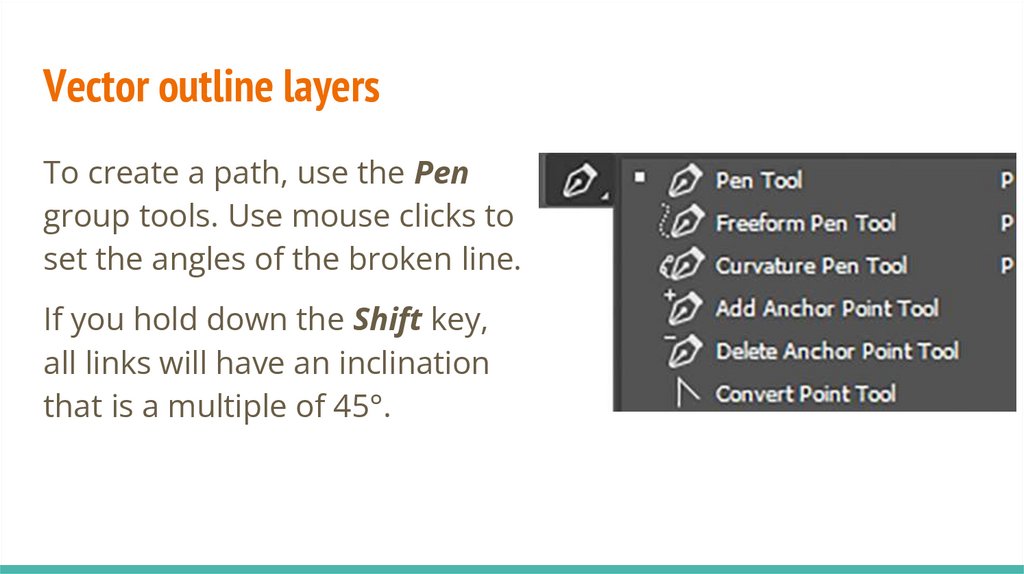
Vector outline layersTo create a path, use the Pen
group tools. Use mouse clicks to
set the angles of the broken line.
If you hold down the Shift key,
all links will have an inclination
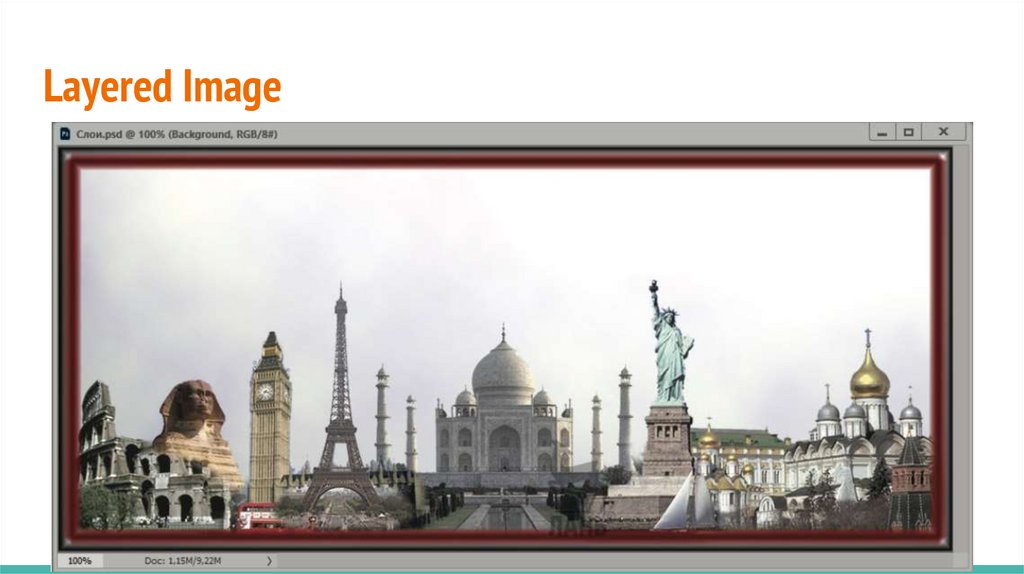
that is a multiple of 45°.
35.
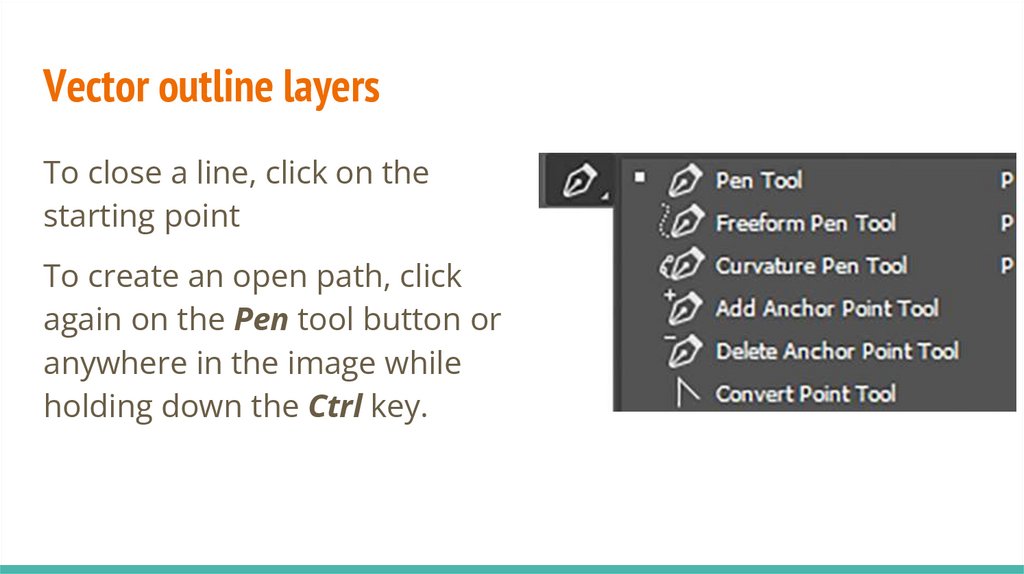
Vector outline layersTo close a line, click on the
starting point
To create an open path, click
again on the Pen tool button or
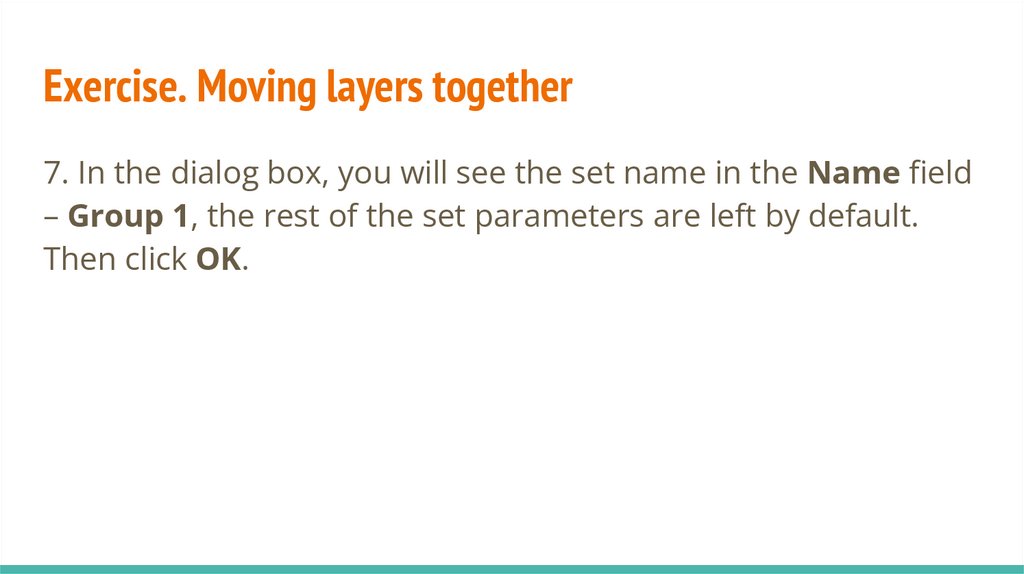
anywhere in the image while
holding down the Ctrl key.
36.
Contour application modes:1. Shape (Contour layers) - layers of a special type, consisting
of fill and contours that act as a mask.
2. Patch (Regular contours) are service objects that exist
inside the document, but are invisible. Selected areas are
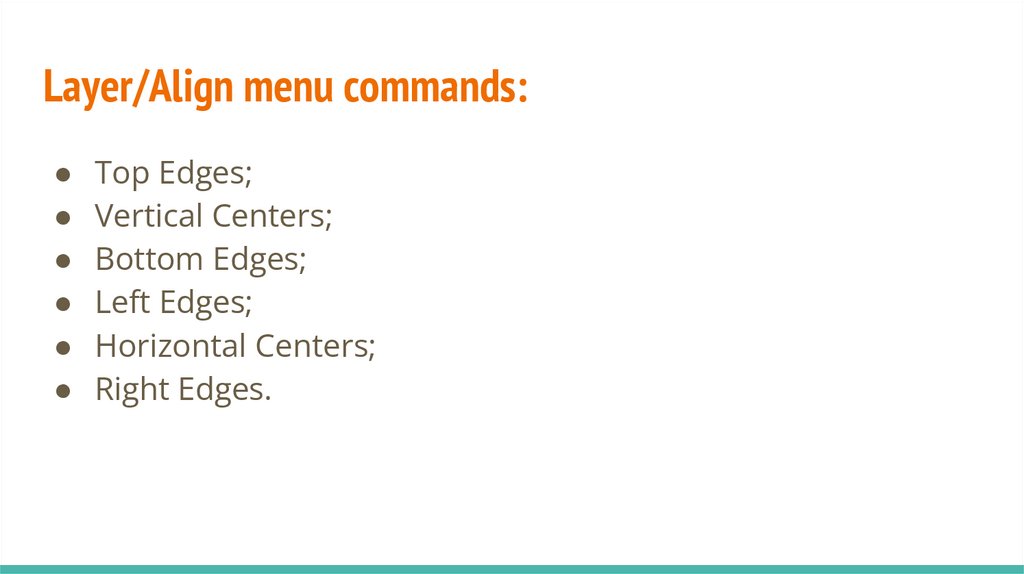
created based on the contours.
3. Pixels - creating a selected area of a given shape without
creating a layer or path.
37.
Vector outline layersTo apply drawing tools or filters to layers that contain vector
content (a text layer, an outline layer, or a vector mask), you
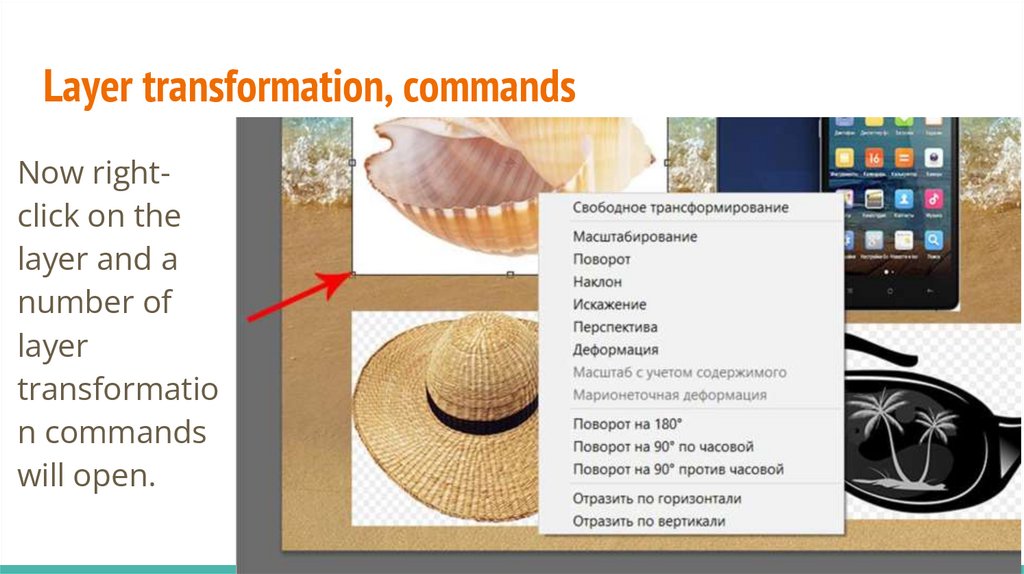
must rasterize the layer using the menu command Layer ⇒
Rasterize or Rasterize Layer in Layers palette menu.
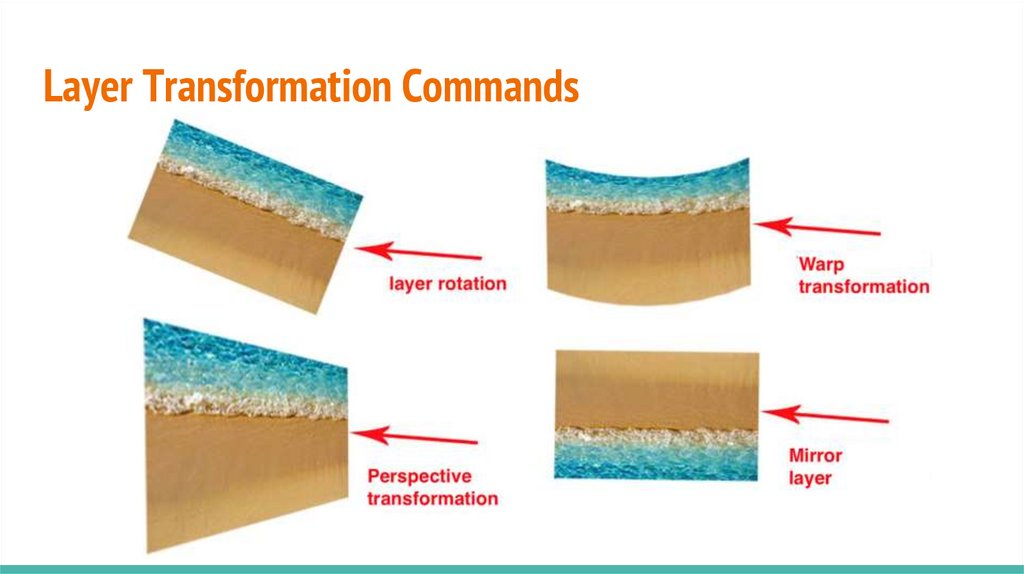
After this operation, the text or outline cannot be edited.
38.
Smart objectsSmart objects are layers that contain data from raster or
vector images.
Smart objects preserve the original contents of the image with
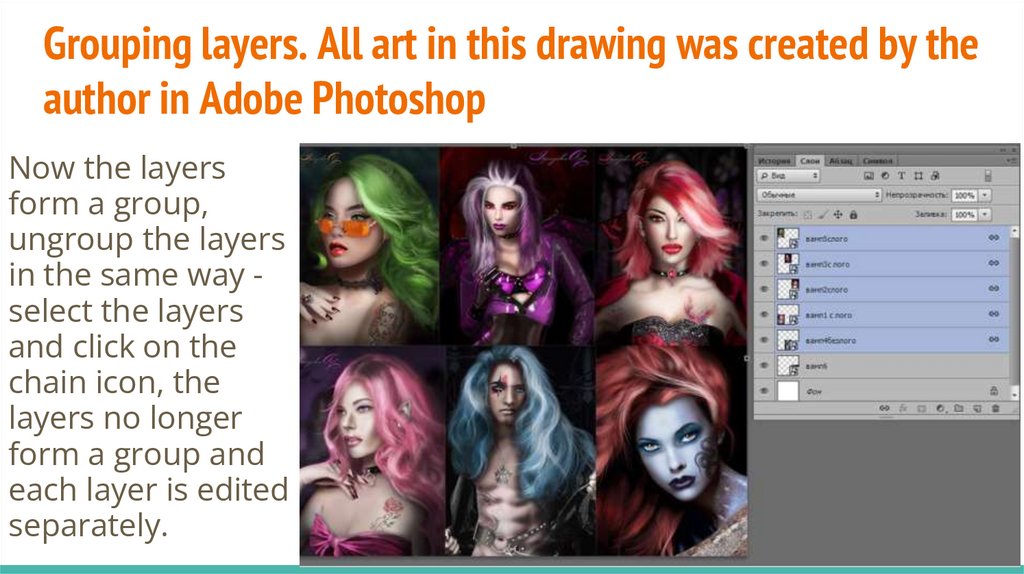
all the original characteristics, allowing for reversible editing of
the layer,
39.
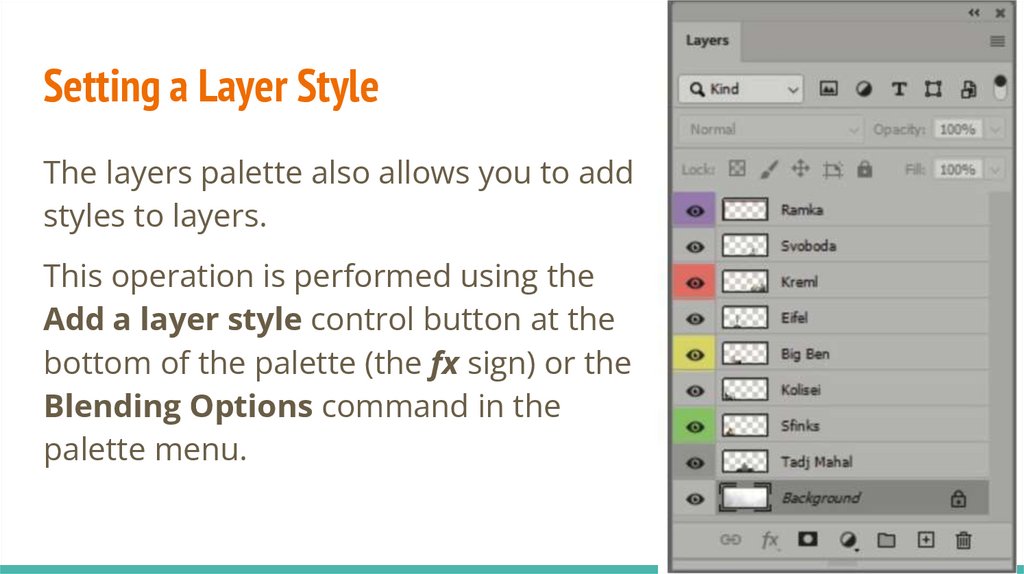
Reversible layer editing:● transformation. You can scale, rotate, skew, warp a layer,
apply a perspective transform, or custom warp to it without
losing the original image data or quality;
● applying filters. You can change the settings of filters applied
to smart objects at any time;
● working with vector data, such as vector images from Adobe
Illustrator, that would otherwise have to be rasterized.
40.
A smart object can be created:● from a regular layer using the Convert to Smart Objects
context menu command or the Smart Objects ⇒ Convert to
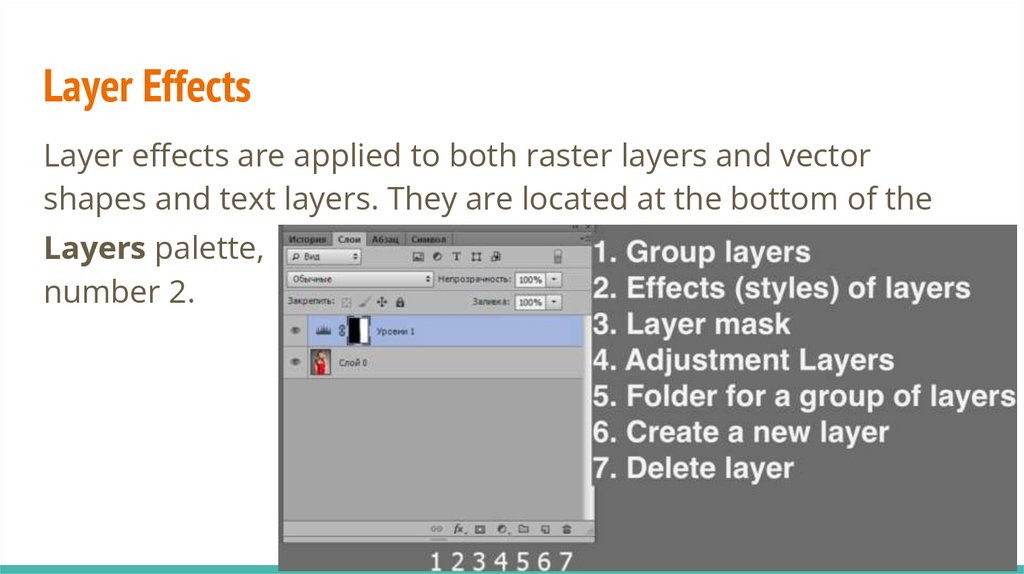
Smart Objects command in the Layer menu;
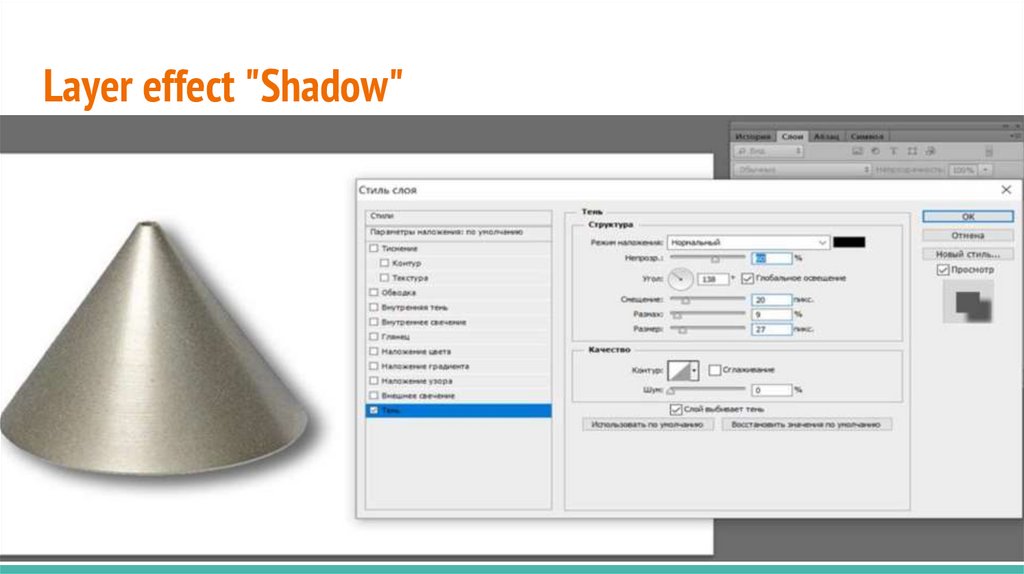
● automatically when you move an image file to an open
Adobe Photoshop document.
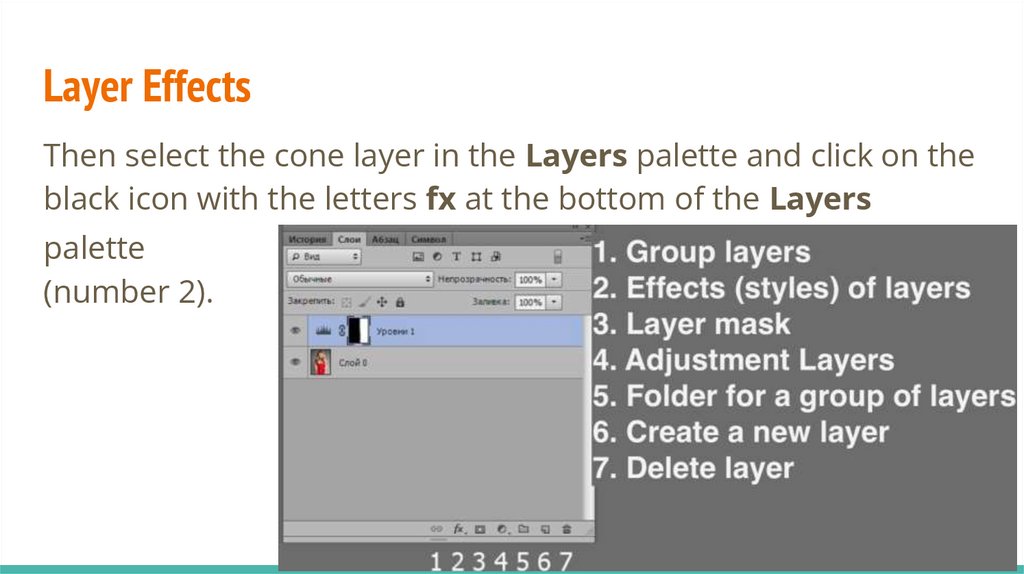
41.
Smart objectThese two methods allow you to create related objects.
Whenever a change is made to a copy or the original, the same
changes will occur to the second object, as well as to other
copies, if any.
You can create an unlinked smart object using the copy method
using the command Layer ⇒ Smart Objects ⇒ Nev Smart
Objects via Copy.
42.
Smart objectTo edit the contents of a smart object, just double-click on its
icon, make the necessary changes and press the key
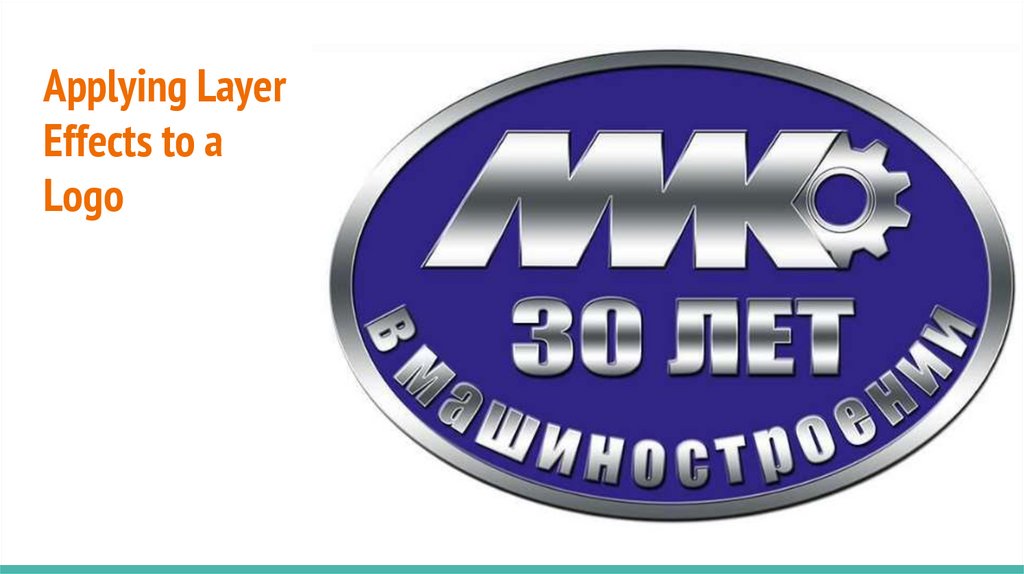
combination Ctrl + S to save the changes.
43.
Smart objectYou can convert a Smart Object to a regular layer (Rasterize
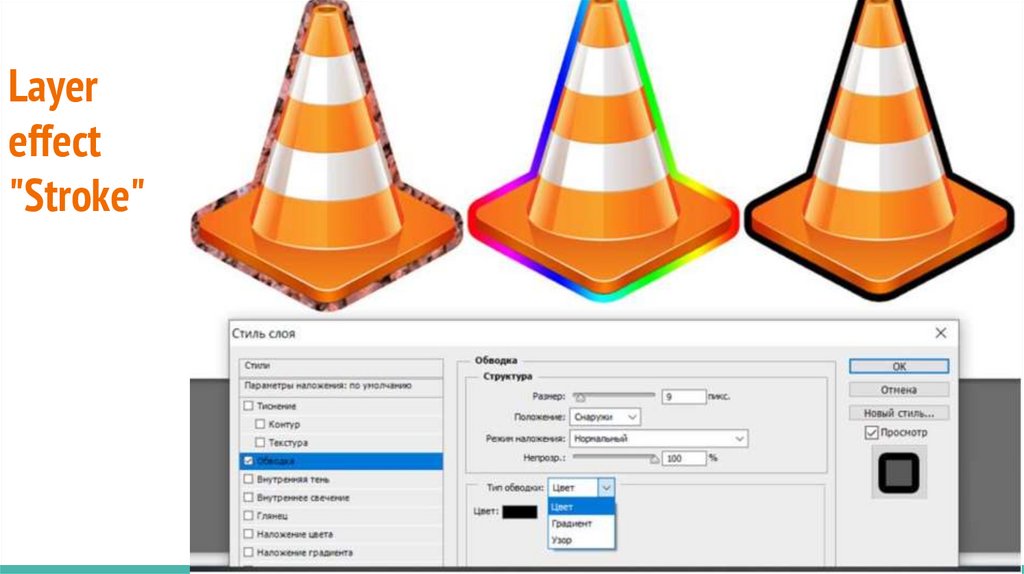
Layer command) if you no longer need to edit its data.
Once a smart object is rasterized, transformations, warps, and
filters applied to it cannot be changed.
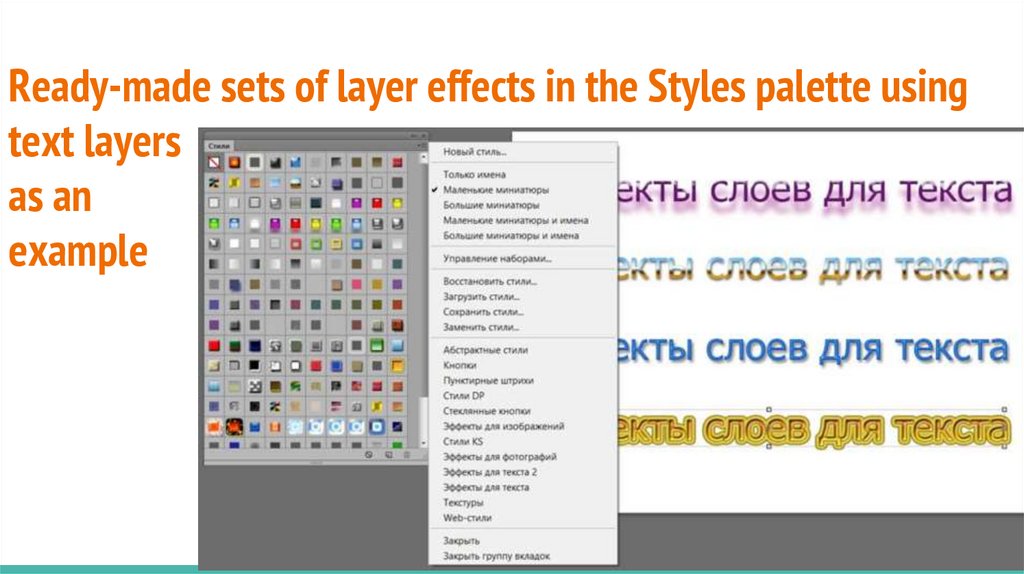
44.
3 Operations with layers45.
Changing the order of objectsObjects on layers overlap each other in the order in which they
appear in the Layers palette: the top layer in the palette is on
top of the others and in the document.
46.
Changing the order of objectsTo change the order in which objects are stacked on top of each
other, just swap the layers in the palette.
To change the position of a layer in the palette, click on its
name, drag it up or down, and drop it on the name of the layer
under which you want to paste it.
47.
Adobe Photoshop automatically creates layers when you:● transfer selected areas from another image into one
document;
● paste objects from the clipboard;
● enter text using the Type tool (Text);
● draw vector objects with the Pen tool or special tools for
drawing vector shapes.
48.
Creating and deleting layersYou can create a layer yourself using the palette menu
command New Layer or the menu command Layer / New /
Layer.
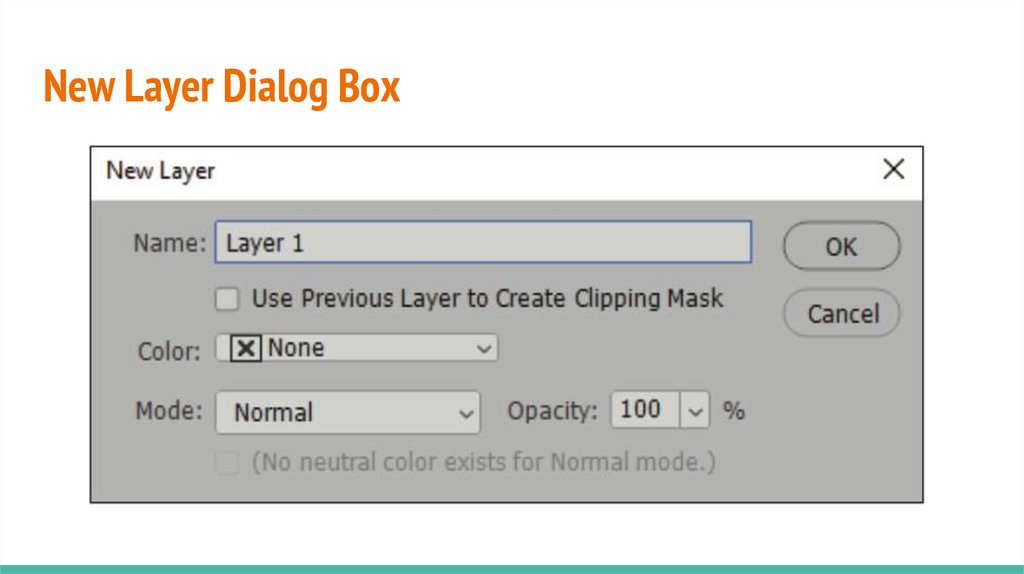
49.
New Layer Dialog Box50.
New Layer Dialog BoxIn the dialog box, enter the name of the layer, and use the
Opacity slider to set the degree of transparency of the layer.
In the Mode rollout, you set the color mixing mode (leave the
Normal mode for now).
51.
New Layer Dialog BoxIn the Color rollout, you can select the color with which this
layer will be marked in the palette.
In the Layers.psd document, some layers are marked with
colored lines.
By default, layers are not marked in any way.
52.
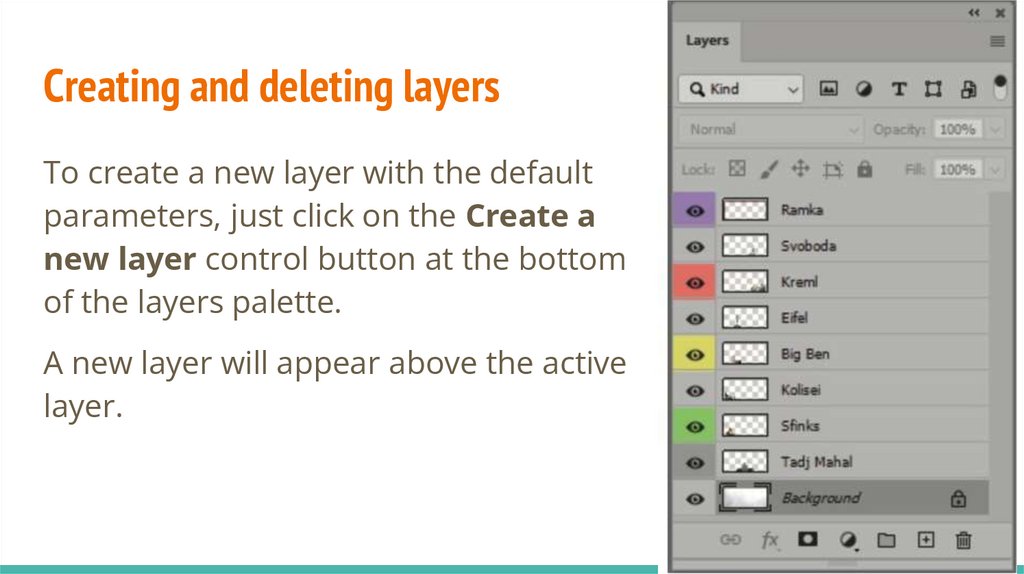
Creating and deleting layersTo create a new layer with the default
parameters, just click on the Create a
new layer control button at the bottom
of the layers palette.
A new layer will appear above the active
layer.
53.
Creating and deleting layersTo transfer any object from a single-layer image to a new layer,
you first need to select it, and then you can proceed in different
ways.
If you need to cut an object, you need to execute the command
Layer / New / Layer Via Cut (Layer / New / Layer by cutting).
To copy an object to a new layer, use the Layer Via Copy
command.
54.
Creating and deleting layersYou can move an object to a new layer via the clipboard.
To do this, select it and execute the Edit/Cut or Edit/Copy
commands.
In the first case, the object is cut out, and in the second, it is
only copied.
55.
Creating and deleting layersTo insert an object on a new layer, use the Edit/Paste
command.
The object from the clipboard is pasted in the center of the
document window and a new layer is automatically created.
56.
Creating and deleting layersYou can move objects between documents by placing their
windows side by side and dragging the selected objects with the
Move tool.
In all cases, when Photoshop itself creates layers for objects, it
gives them the standard names Layer N, where N is the layer
number.
57.
Creating and deleting layersTo rename a layer, double-click on its name while holding down
the Alt key, or execute the menu bar command Layer/Rename
Layer.
In the line with the name of the layer in the Layers palette,
enter a new name in the Name field.
58.
Creating a New LayerIn the Layers palette, next to the trash can icon (to the left of
the trash can), there is a “Create a new layer” icon (the icon
depicts a square with a curled corner).
A new - empty (transparent) layer will be created above the
layer that is selected in the Layers palette.
59.
Creating a New LayerAn empty layer is necessary in your work; you can make fills or
brush strokes in it, which will easily transform and move across
the canvas.
If you just paint a layer, it will be impossible to move the brush
stroke without touching the photo.
60.
Creating layers. PracticeOpen the “File” menu, create a new image, set the size to
600X800 pixels, resolution 72 pixels per inch.
Next, open the file with the image of the sea.
61.
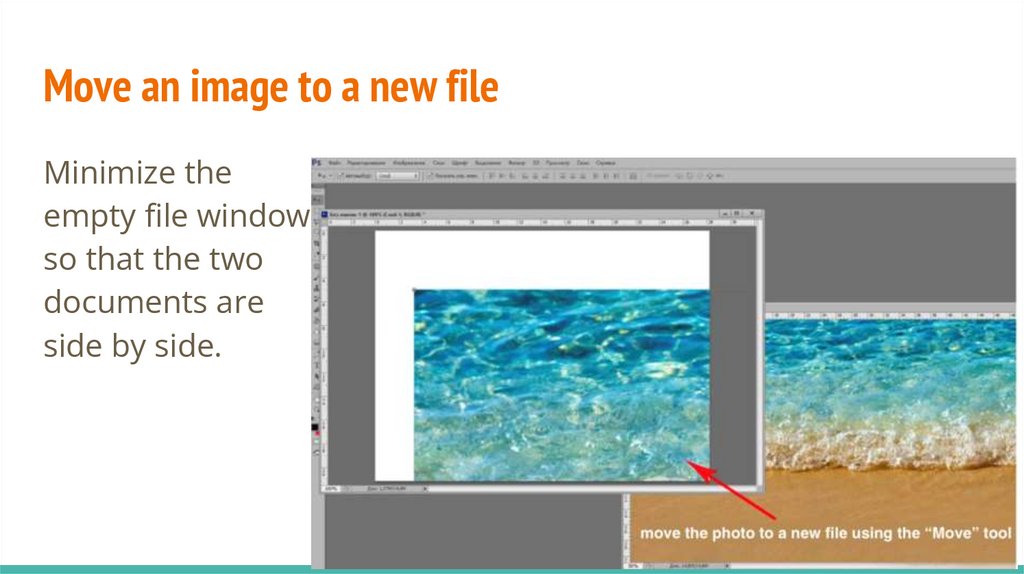
Move an image to a new fileMinimize the
empty file window
so that the two
documents are
side by side.
62.
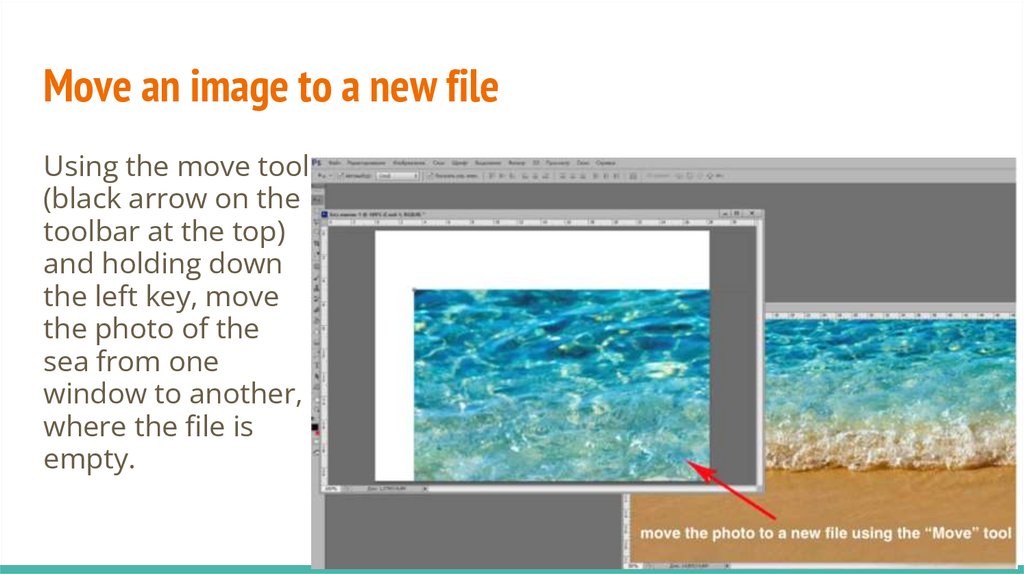
Move an image to a new fileUsing the move tool
(black arrow on the
toolbar at the top)
and holding down
the left key, move
the photo of the
sea from one
window to another,
where the file is
empty.
63.
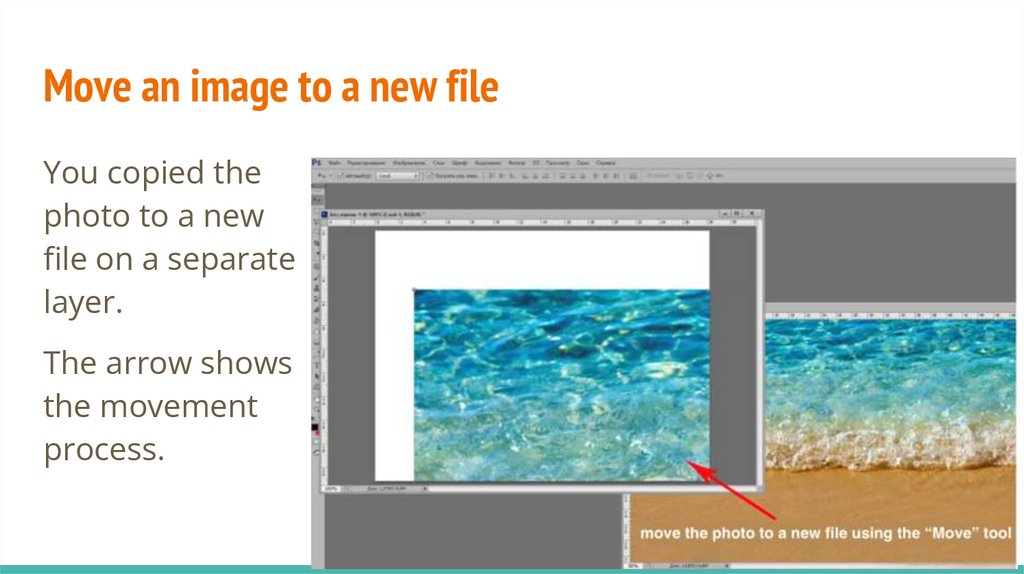
Move an image to a new fileYou copied the
photo to a new
file on a separate
layer.
The arrow shows
the movement
process.
64.
Creating layers. PracticeUsing the Move tool, move the remaining images for the banner
(palm tree, glasses, phone, hat, shell).
As a result, you should have a banner.
65.
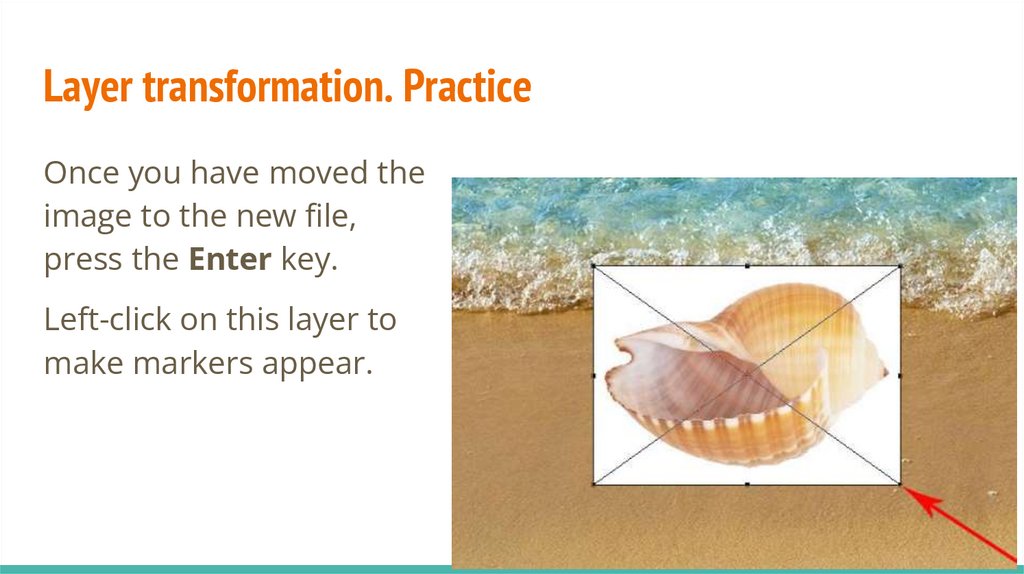
Layer transformation. PracticeOnce you have moved the
image to the new file,
press the Enter key.
Left-click on this layer to
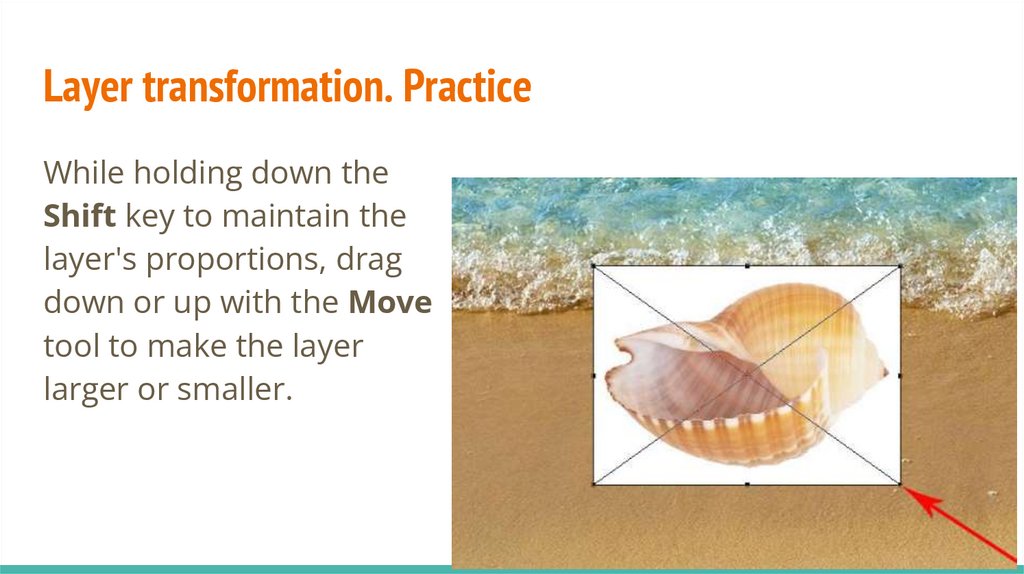
make markers appear.
66.
Layer transformation. PracticeWhile holding down the
Shift key to maintain the
layer's proportions, drag
down or up with the Move
tool to make the layer
larger or smaller.
67.
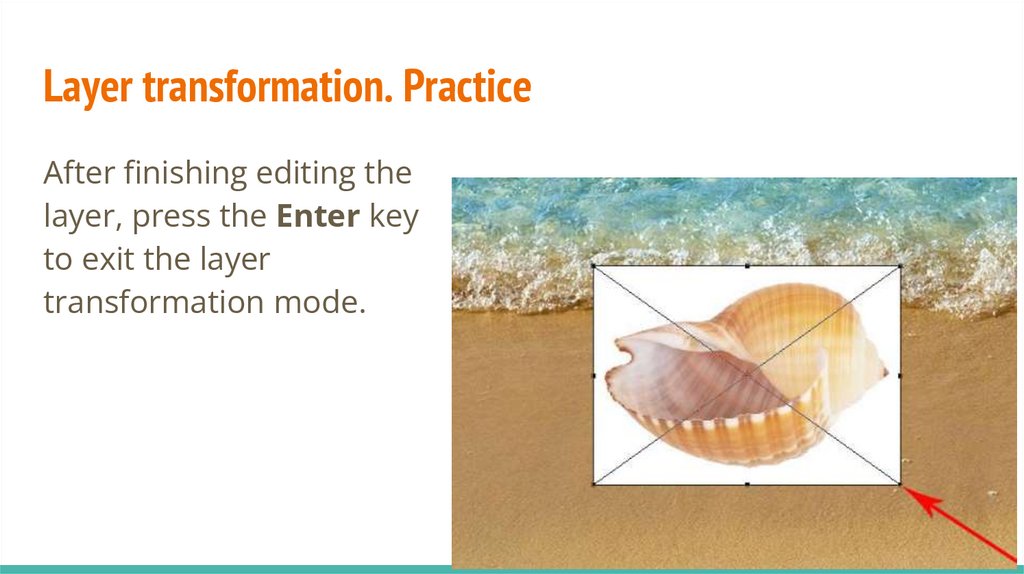
Layer transformation. PracticeAfter finishing editing the
layer, press the Enter key
to exit the layer
transformation mode.
68.
Layer transformation. PracticeIf markers do not appear when you click on a layer, check the
boxes in the properties panel:
● “Auto Select”,
● “Layer”
● and “Show Controls”.
69.
Layer transformation. PracticeIf the moved image has a background, then you need to select it
using selection tools (for example, Rectangular Lasso or Magic
Wand) and press the Delete key.
To make the layer have feathered edges when selecting, set the
feathering, or in a multi-layered image, you can apply the
Eraser tool with a soft brush to this layer.
70.
Layer transformation. PracticeIf the program reports that this is a smart object and it is not
directly editable, you need to rasterize the layer.
This can be done in the menu Layers – Rasterize – Smart
Object (or simply click on the smart layer with the Brush tool
and press Ok).
71.
Automatic creation of a new layer occurs when placing aselected area from another image:
● using the clipboard using methods common in MS Windows;
● moving a layer from one image to another using the mouse
with the Move tool activated.
72.
Working with layersIf there are a lot of layers, you may need to put things in order
in the layers palette - organize the layers into folders.
A layer group is created.
You can place any number of layers and other folders in it.
This group of layers can then be collapsed (for a compact
display) and, accordingly, expanded to show its contents.
73.
Working with layersYou can create an empty layer group using the Create New
Group button in the Layers palette.
To place layers in it, you need to select the layer in the palette
with the mouse and move it to the group icon.
74.
Working with layersIt is advisable to first select layers using the Shift (adjacent) or
Ctrl (non-adjacent) key.
You can also use the menu command Layers ⇒ New ⇒ Group
Layers to create a group (Ctrl + G).
75.
Associated layers and layer setsTo perform common actions on multiple layers, it's best to link them
together, for example to move or transform them as a whole, or to
align them horizontally or vertically.
To link multiple layers together, select them and then click the chain
icon at the bottom of the palette.
When selected, a chain image appears in the thumbnails of linked
layers.
To unlink a layer, simply click the link chain icon at the bottom of the
palette again.
76.
Merging and deleting layersAdding each layer increases the file size.
Therefore, when some layers have become unnecessary, you
need to merge them into one layer or delete them.
To merge multiple layers into one, first select them.
Then execute the Merge Layers command from the Layers
palette menu.
77.
Merging and deleting layersIt's even easier to merge layers that are currently visible.
To do this, simply execute the palette menu command Merge
Visible.
If you need to merge two adjacent layers, use the Merge Down
command.
78.
Merging and deleting layersIf you need to merge all the layers of the image, including the
background one, that is, make the image completely flat,
execute the command from the Flatten Image palette menu.
This operation is usually performed when preparing an image
for printing.
79.
Deleting a layerIf a layer needs to be deleted, there is a trash can icon in the
lower right corner of the Layers palette.
It is enough to hold down the left mouse button and drag the
layer icon onto this icon and it will be deleted.
In the History panel, you can undo the action and the layer will
be returned.
80.
Deleting a layerIf you delete a layer, save the file and close the program, the
layer cannot be returned.
Another way to delete a layer is to select the layer, click the
trash can icon at the bottom of the Layers palette, and confirm
deletion.
Or simply select the layer on the canvas (with the Selection
tool) and press the Delete key.
81.
Copying a layerBy dragging an existing layer's icon onto the Create New Layer
icon, you'll get a copy of the layer.
82.
Layer via copyingOften a copy of a layer needs to be created not from the entire
layer, but from a selected area (copy part of the layer).
To do this, select part of the layer using the selection tools and
press Ctrl + J, a separate layer will be created from the selected
area.
It is always created as a copy in a new layer, while the donor
layer remains unchanged.
83.
Layer via copyingWhen selecting, you can set a slight feathering so that the edges
of the layer are not clear. This action is called Layer via Copy.
84.
New layer via clippingIf you press Shift + Ctrl + J, a new layer will also be created from the
selection area, and in the previous (original) layer, where the part is
selected, there will be a hole in the shape of the selection, in other
words, a hole.
This function is called Layer via Crop.
85.
Renaming layersDouble-clicking on the layer name selects the conditional name
Layer 1 and you can type your name on the keyboard (in
Russian or English).
I recommend naming layers by their content, for example:
Glasses, Hat, Phone, etc.
86.
Renaming layersWhile you have few layers, for example only five, you can
handle them without any problems, but when there are thirty
or a hundred of them, it will be difficult to navigate if the layer
does not have a normal name.
Layer icons are small and not very convenient for displaying a
layer, so it’s a good idea to name them so that you yourself
understand what kind of layer it is.
87.
Layer VisibilityOpposite each layer in the layers palette there is an Eye icon the visibility of the layer.
Click on it and the layer will disappear, that is, it is not deleted,
but only ceased to be visible.
This is convenient when you need to work with one layer and
remove the rest from visibility so as not to be distracted by
them.
88.
Photoshop Minute89.
4 Managing layers using the Layers palette90.
Layers PaletteThe Layers palette is located in the lower
right corner of the screen.
91.
Layers PaletteEach line of this palette is the content of
one layer.
It consists of a layer name that you can
change, a thumbnail image of the layer
that changes during editing, and a
visibility indicator in the form of an “eye.”
92.
Layers PaletteA chain and padlock symbol may appear to the right of the
name, indicating that the layer is locked or locked for any
changes.
93.
Layers PaletteLocking is done in the lock line at the top of the palette.
Linking layers is done using the chain icon in the bottom control
line of the palette.
The size of the thumbnails is adjusted through the palette
menu with the Palette Options line.
94.
Layers PaletteWhen you create a new document, it has only one layer - the
background layer. This layer is called Background and has
special properties.
It is always at the very bottom of the layer stack and cannot be
moved higher.
Unlike other layers, it cannot have transparent pixels.
The checkered background marks the transparent areas of the
layer.
95.
Layers PaletteOn the Background layer, there is a
padlock on the right, indicating that the
layer is locked.
Unlike other layers, this layer cannot be
moved entirely in the document window.
96.
Layers PaletteAll locks can be removed if you simply
rename the layer, giving it any other
name.
To do this, double-click on its name while
holding down the Alt key and enter a new
name in the Name field.
97.
Layers PaletteThe first column contains the layer's visibility indicator.
If it has an eye icon, the layer is visible, if it has a square, the
layer is invisible.
To make a layer invisible, click on the eye icon.
98.
Layers PaletteTo simultaneously turn off the visibility of adjacent layers, you
can click on the top one and drag the pointer down through all
indicators.
They will all turn off at the same time, and you can turn on all
layers in the same way.
99.
Layers PaletteAny layer except the background one can be made partially
transparent.
To do this, use the Opacity slider at the top of the palette.
At values less than 100%, objects lying on the lower layers will
be visible through the object.
The Fill slider adjusts the transparency of filled layers.
100.
Layers PaletteThe Mode rollout sets the paint mixing mode when overlaying
one color on another.
All changes can be made only in the active layer.
The name of the layer will appear in the title bar of the
document window.
101.
Layers PaletteThere is a more convenient way to select a layer using the Move
tool.
To do this, right-click on the object.
102.
Layers PaletteA context menu will appear nearby with a list of all layers that
have opaque pixels in this location.
Click on the name of the desired layer and you can immediately
work with it.
Let's do a few exercises to get a feel for what a layer is.
103.
Layer Comps PaletteThe Layer Comps palette is designed for working with
multilayer images, in which you often have to work with the
same groups of layers.
This palette allows you to save image states with layers turned
on and off, with changes in the position of layers, i.e. different
compositions for a group of layers.
104.
Composition of layers. Practice1. Call the Window/Layer Comps palette for the open
document.
2. Go to the Layer Comps palette, select New Layer Comps
from the palette menu, and in the dialog box you can set
the name of the initial composition.
3. Go to the Layers palette, turn off several arbitrary layers.
105.
Composition of layers. Practice4 Return to the Layer Comps palette, select the New Layer
Comps command from the palette menu again and set a new
layer composition.
5 Alternately click on the rectangular visibility indicators of the
two created variants of the layer composition of the Layer
Comps palette.
106.
Composition of layers. PracticeYou will see that for each line
the composition of layers in the
open document window
changes.
107.
Filtering layersIt is now possible to filter layers based on
certain criteria.
The need for this also arises when
working with multilayer images.
108.
Filtering layersTo work with filtering, you must enable
the Turn layer filtering on\off button in
the upper right part of the Layers
palette.
109.
Filtering layersIn the Kind window, you can select the sorting type from the
drop-down list: Name, Effect, Mode, Attribute, Color.
To the right of the Kind window are icons for filtering
110.
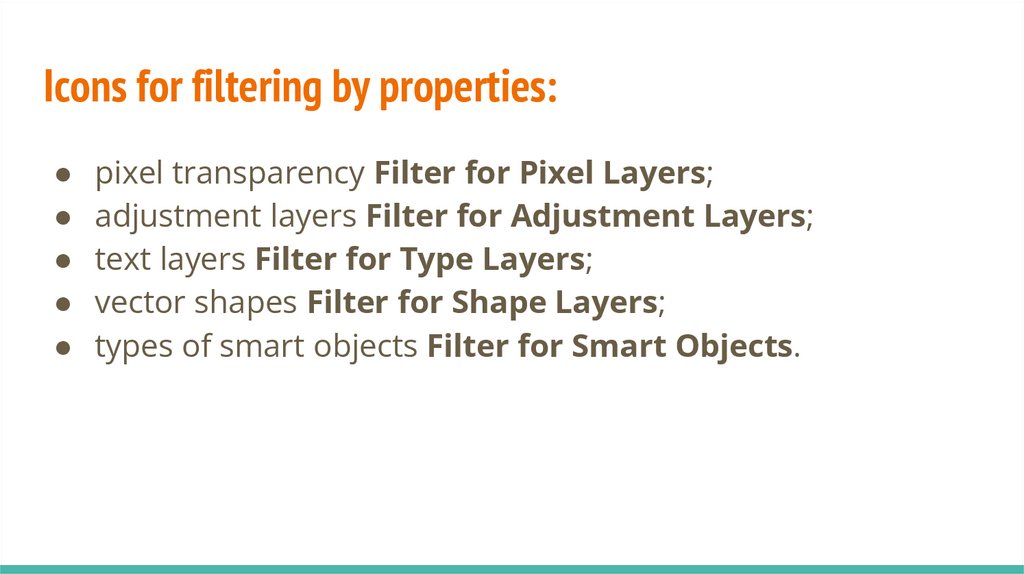
Icons for filtering by properties:pixel transparency Filter for Pixel Layers;
adjustment layers Filter for Adjustment Layers;
text layers Filter for Type Layers;
vector shapes Filter for Shape Layers;
types of smart objects Filter for Smart Objects.
111.
Working with layersIn addition to regular raster layers, Adobe Photoshop has
vector layers.
That is, those that can be adjusted (edited).
They weigh practically nothing, do not increase the file size, but
make it possible to apply tone and color correction without
distorting the pixels
112.
Adjustment LayersIn the usual case, if you apply the Levels command to an image
and save the file, then the next day there is no way to return to
the original version, the pixels are irrevocably distorted.
113.
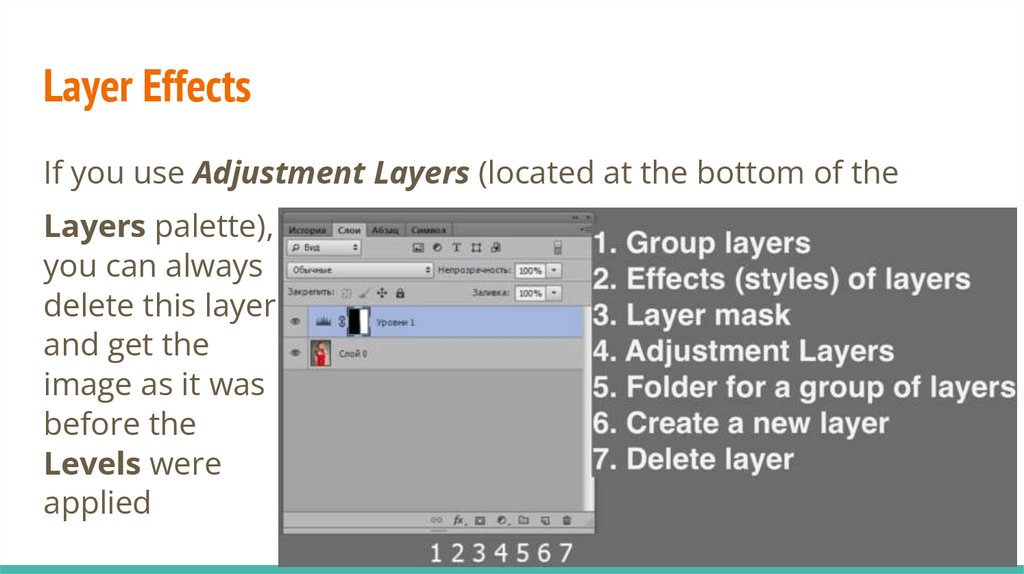
Layer EffectsIf you use Adjustment Layers (located at the bottom of the
Layers palette),
you can always
delete this layer
and get the
image as it was
before the
Levels were
applied
114.
Adjustment LayersIt is also convenient to apply translucency to the adjustment
layer and thereby weaken the impact of Levels.
Correction layers are a good way to be on the safe side and
provide greater mobility when working on tone and color
correction.
115.
Layers palette, layer effects and adjustment layersAn adjustment
layer with the
Levels command is
applied to the right
half of the portrait;
you can delete it,
remove part of it
with an eraser, or
make it semitransparent,
without distorting
the image itself.
116.
List of “Adjustment Layers”:1– Color fill,
7 – Vibration,
13 – Color search
2 – Gradient,
8 – Hue/Saturation,
14 – Color inversion,
3 – Filling with a
pattern (template)
9 – Color balance,
15 – Posterization,
4 – Levels,
5 – Curves,
6 – Exposition,
10 – Black and white, 16 – Isohelia,
11 – Photo filter,
17 – Gradient map,
12 – Channel mixing,
18 – Selective color
correction.
117.
Adjustment LayersEach command can be opened in a new layer.
The layer will be positioned above the selected layer in the
Layers palette and will affect all layers below.
118.
Layer setsThe next useful function is combining layers into Layer Sets, that
is, into folders. Find the folder icon (No. 5) at the bottom of the
Layers palette,
click on it, name
the folder by
content, for
example Logos,
119.
Layer setsA new folder will be created.
Hold down the left mouse button and move the layers to the
folder icon, click on the gray triangle in front of the folder to
close the folder.
120.
Layer setsThis is convenient when working with a large number of layers
(more than 20).
For web design and digital painting, where there are 200 layers
or more when creating a layout, this function can be very
convenient.
You can move and delete layer sets.
If you need to remove a layer from a folder, move its icon to the
folder icon.
121.
Layer maskA layer mask is another safety option when working with layers.
For example, if you need to cut a layer and make an oval out of it,
but you are not
sure that the
customer of the
layout will like it.
Select the layer
with an oval and
click on the mask
icon (No. 3).
122.
Layer maskA vector mask layer will appear on top of the layer, which will
make everything that is not included in the oval transparent.
If you change your mind, delete the mask icon (it’s next to the
layer icon) to the trash and select the Discard option in the
window that opens.
The layer will return to its original shape.
123.
Photoshop Minute124.
The concept of a layer and operations on layersThe Layers palette and Layer menu commands are used to
work with layers.
125.
Palette LayersThe Layers palette
(F7 key) displays a
list of image layers
from bottom to
top: the
background layer
in the lowest
position.
126.
Palette LayersThe contents of
each layer are
displayed as a
thumbnail; next to
the thumbnail in
the row of the
layers palette is
the name of the
layer.
The active layer in
the picture is new.
127.
Palette LayersFill, unlike the
Opacity
parameter, does
not affect layer
effects.
128.
Palette Layers1 – select the filter
type for displaying
the layer;
2 – palette context
menu;
3 – Opacity;
4 – Fill;
129.
Palette Layers5 – locked layer;
6 – Delete;
7 – Create New
Layer;
8 – Create New
Group;
130.
Palette Layers9 – Add Layer Style
(Add layer effect);
10 – visible layer;
11 – Lock group of
buttons;
12 – Normal (Pixel
blending mode)
131.
Using the buttons in the Lock group, you can (from left toright):
● protect transparent pixels
of the layer from changes;
● protect filled pixels from
changes;
● lock movement;
● protect against automatic
nesting/deleting of
artboards;
● save all of the above.
132.
Palette LayersThe context menu of the
palette contains commands
for working with layers.
Most of the operations
performed on a layer are
available both in the Layer
menu and in the context
menu of the palette.
133.
Operations performed on layersOperation
How to perform
Activating a layer
Mouse click on the layer name in the
palette;
Ctrl + click on the image fragment –
activates the layer on which the fragment
is located
Changing the order Moving with the mouse in the palette;
of layers
Layers ⇒ Arrange command
134.
Operations performed on layersOperation How to perform
Renaming
a layer
Double-click on the layer name in the palette;
menu command Layers ⇒ Layer Properties
Creating a
new layer
Create New Layer button of the palette;
Layers ⇒ New command (Shift + Ctrl + N);
New Layer command of the palette menu
135.
Operations performed on layersOperation
How to perform
Moving/copyin Layers ⇒ New ⇒ Layer Via Cut (Shit + Ctrl +
g the selected J);
area to a new Layers ⇒ New ⇒ Layer Via Copy (Ctrl + J)
layer
Duplicate a
layer
Dragging the layer icon to the Create New
Layer button in the Layers palette;
Layers ⇒ Duplicate Layer command;
Duplicate Layer command in the palette menu
136.
Operations performed on layersOperation How to perform
Deleting a
layer
Command Layers ⇒ Delete;
command Delete Layer of the context menu of the
layer in the palette;
dragging the layer name to the Delete button in the
palette
Linking
layers
The Link Layers button in the palette or the Layers
menu button of the same name (allows you to apply
transformation operations to several layers
simultaneously)
137.
Operations performed on layersOperation
How to perform
Converting a Layers ⇒ New ⇒ Background From Layer
background
layer to a
normal one
Layer
Edit ⇒ Transform (Free Transform)
transformatio
n
138.
Operations performed on layersOperation How to perform
Merge
layers
Layer menu commands:
● Merge Down – merges the active layer with the
one below;
● Merge Visible – merges visible layers;
● Flatten Image – flattens all visible layers into a
single Background layer
139.
Operations performed on layersOperation How to perform
Selecting Ctrl + click on the layer name in the palette;
the
Select ⇒ Load Selection command
contents of
the active
layer
140.
Layout Layer GroupsSeveral layers can be grouped in such a way that the bottom
layer acts as a mask for the top layer.
When the bottom layer is transparent, the top layers are
hidden; where it is opaque, the contents of the other layers are
visible.
141.
Methods for creating masked (layout) layer groups:● Layer ⇒ Create Clipping Mask command – the top layer must
be active;
● Ctrl + G combination – the top layer is active;
● mouse click + Alt on the dividing line between layers.
142.
Layout Layer GroupsTo ungroup layers, execute the command Layer ⇒ Release
Clipping Mask or press the key combination Shift + Ctrl + G (the
top layer must be active).
143.
5 Layer Opacity144.
Layer transparencyThe program allows you to set the layer transparency, that is,
make pixels semi-transparent with a specified transparency
percentage.
145.
Layer transparencyIn the Layers palette, in the upper right corner, there are two
windows - Opacity and Fill, through both of these functions
you can set a certain percentage of transparency for the layer.
The first Opacity will affect the layer and layer effects (for
example, the Shadow effect).
146.
Layer opacityThe second
opacity ("Fill") only on the layer
itself, the effects
will not be
transparent.
147.
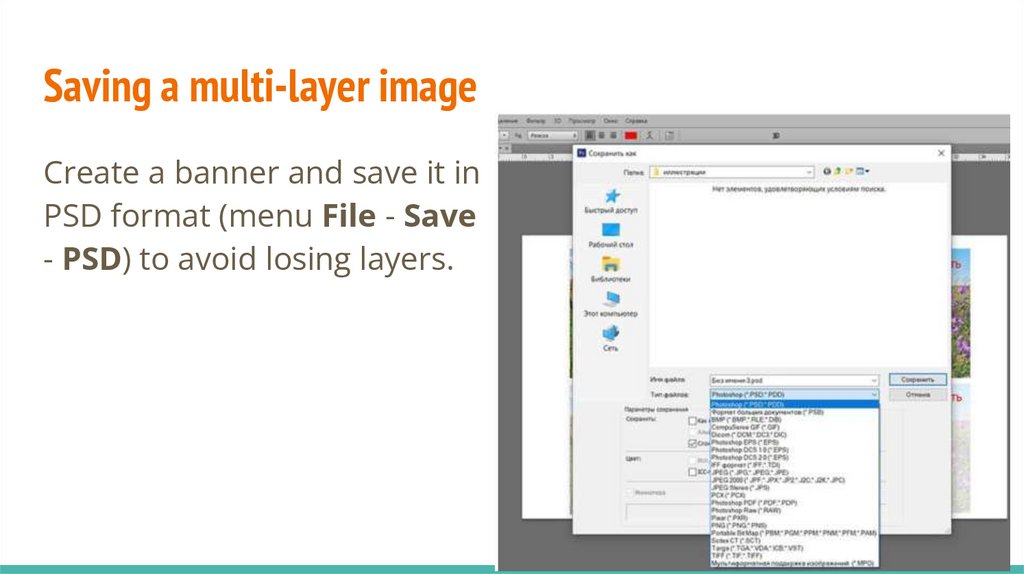
Saving a multi-layer imageCreate a banner and save it in
PSD format (menu File - Save
- PSD) to avoid losing layers.
148.
Homework:149.
Complete the task on working with layers:Create a banner from several layers.
150.
Transparency Blending ModesAdobe Photoshop has another powerful designer tool in its
arsenal – “Transparency Blending Modes”.
151.
The "Blending Modes" window and an example of theirapplication
Please note that in
the Layers palette
next to
transparency,
there is a window
to the left of it.
That's where the
transparency
blending modes
are located.
152.
Transparency Blending ModesUsing simple transparency makes all pixels equally transparent.
But Transparency Modes, on the contrary, leave some pixels
transparent, some not, as a result one image overlaps another
partially, creating wonderful effects.
That is, we are talking about mixing the colors of the pixels
located in the upper layer with the color of the pixels in the
lower layer.
153.
Algorithm for applying transparency blending modesOpen the file from the homework - portrait, move the second
file to it - texture (optional).
If the texture is small, stretch it to the entire canvas size.
154.
Algorithm for applying transparency blending modesOpen the file - portrait, move the second file to it - texture
(optional).
If the texture is small, stretch it to the entire canvas size.
Now open the window in the upper left corner of the Layers
palette, where it says Normal (to the left of Opacity) and set
the blending mode to Darker, then Lighter, Overlay, etc., until
you get an interesting effect
155.
Applying texture blending modes to a portrait156.
Transparency Blending ModesYou can copy the texture layer (or add another texture) and
place it below the portrait layer, so the portrait layer will be
between the two texture layers.
Now apply different blending modes to all three layers.
157.
Transparency Blending ModesFill does not affect layer effects, unlike the Opacity parameter
158.
6 Layer blending modes159.
Layer orderYou will change the order of the layers from the Layers
palette, holding the layer icon, move it down or up.
Also in the Layers menu (the top line of the program) there is a
Arrange command, in it you can change the order of the
arrangement, and there are hot keys for all actions, you can use
them.
Ctrl + ] - forward, Ctrl + [ - back.
160.
Layer order161.
Layer orderIn order to select a layer and switch from one layer to another
without accessing the Layers palette, you need to click on the
Move tool on the toolbar and check the Automatic layer
selection and Show controls boxes on the properties panel.
Now click on the desired layer on the canvas and it will be
selected.
162.
Layer Blending ModesBy default, each new layer has a Normal blending mode.
When a layer is set to a mode other than Normal, the pixels of
the active layer and the underlying layers interact and allow you
to either adjust the image or create interesting effects.
In Adobe Photoshop, layer blending modes are grouped
according to the effects they create.
163.
Layer Blending Modes1. Basic modes are similar to the previously discussed pixel
blending modes when painting with a brush:
● in Normal and Dissolve modes, the pixels of the underlying
layer are completely replaced at 100% opacity;
● when the opacity is reduced, the pixels of the lower layer
either show through the pixels of the upper layer (Normal)
or partially replace them (Dissolve).
164.
2. Darken modes – ignores white:● Darken – the color of the current layer or the underlying
layer is selected as the resulting color, depending on which
is darker, i.e. on the current layer for each channel, brighter
pixels are replaced by darker pixels of the underlying layer,
while darker pixels remain unchanged;
165.
2. Darken modes – ignores white:● Multiply – the color value of the current layer is multiplied
by the color value of the layer below.
The resulting color is always a darker color.
Multiplying any color value by black produces black.
Multiplying any color value by white produces the same color;
166.
2. Darken modes – ignores white:● Color Burn – Uses the dark areas of the top layer to darken
the layer below.
Mixing with white produces no change;
● Linear Burn – in each channel, the base color is replaced
with a darker color to reflect the blend color as a result of
the brightness reduction.
Mixing with white does not produce any change;
167.
2. Darken modes – ignores white:● Darker Color – Similar to Darken, but compares all color
channels and then selects the color with the lowest value.
168.
3. Lightening modes (Lighten) - ignores black:● Lighten – does the opposite of Darken by comparing the
brightness of the pixels in the top and bottom layers on a
per-channel basis and writing the lighter pixels into the
resulting color;
169.
3. Lightening modes (Lighten) - ignores black:● Screen – Performs the same calculations as Multiply, but
uses inverted values to reveal the final result.
This mode brightens the image.
It can be used to lighten dark photos by duplicating and setting
the top layer to this mode;
170.
3. Lightening modes (Lighten) - ignores black:● Color Dodge – Similar to Screen, but the black on the top
layer does not affect the result.
The base color is replaced with a brighter color to reflect the
blend color by reducing the contrast between the two colors;
171.
3. Lightening modes (Lighten) - ignores black:● Linear Dodge (Add) – colors are combined by increasing
brightness, light colors are replaced by lighter ones.
It is a combination of Screen and Color Dodge modes;
● Lighter Color – This mode works opposite to Darker Color,
displaying the color with the highest value.
172.
4. Contrast modes (Contrast) - ignores the 50% graycolor, except for the Hard Mix mode:
● Overlay – evenly mixes the colors of both layers, filters out
the light parts and multiplies the dark ones.
At low transparency levels, it is similar to Normal, but with
more intense colors;
173.
4. Contrast modes (Contrast) - ignores the 50% graycolor, except for the Hard Mix mode:
● Soft Light – This mode lightens and darkens the colors of
the underlying layers depending on the color of the current
layer.
If the current layer's color (light source) is lighter than 50% gray,
the image becomes lighter, as if dodged.
If the color is darker than 50% gray, the image becomes darker,
as if burnt.
The effect is similar to shining a spotlight on the image;
174.
4. Contrast modes (Contrast) - ignores the 50% graycolor, except for the Hard Mix mode:
● Hard Light – this mode multiplies or lightens the colors
depending on the color of the current layer. The effect is
similar to shining a sharp spotlight on an image;
175.
4. Contrast modes (Contrast) - ignores the 50% graycolor, except for the Hard Mix mode:
● Vivid Light – this mode darkens or lightens the color by
increasing or decreasing the contrast depending on the
color of the current layer.
If the color (light source) is lighter than 50% gray, the image
becomes lighter by decreasing the contrast.
If the color (light source) is darker than 50% gray, the image
becomes darker by increasing the contrast;
176.
4. Contrast modes (Contrast) - ignores the 50% graycolor, except for the Hard Mix mode:
● Linear Light – this mode darkens or lightens the color by
increasing or decreasing the brightness depending on the
color of the current layer.
If the top layer is bright, the bottom layer will be lightened, if it
is dark, it will be darkened;
177.
4. Contrast modes (Contrast) - ignores the 50% graycolor, except for the Hard Mix mode:
● Pin Light – this mode replaces the color depending on the
color of the current layer.
This mode can produce different results; it works by moving the
colors in the image depending on whether the active layer is
light or dark;
178.
4. Contrast modes (Contrast) - ignores the 50% graycolor, except for the Hard Mix mode:
● Hard Mix – adds the red, green, and blue color channel
values to the RGB values of the primary color.
If the resulting value for any channel is 255 or greater, the
channel is assigned a value of 255, otherwise – 0.
179.
4. Contrast modes (Contrast) - ignores the 50% graycolor, except for the Hard Mix mode:
Therefore, for all mixed color pixels, the values of the red,
green, and blue channels will be equal to 0 or 255.
All pixels are replaced by the primary additive colors (red,
green, or blue), white, or black.
180.
5. Comparative modes - the final image directly dependson the difference in the color of the layers:
● Difference – uses subtraction of the top layer from the
bottom.
If the pixel on the top layer is white, the pixel on the bottom
layer is inverted.
If the pixel on the top layer is black, the pixel on the bottom
layer is not changed.
If the pixel on the top layer is the same as the bottom layer, the
result is a black pixel, i.e. matching colors will be black;
181.
5. Comparative modes - the final image directly dependson the difference in the color of the layers:
● Exclusion – similar to Difference, but with less contrast;
● Subtract – subtracts 8-bit colors from the base channels of
each pixel on each layer.
If the result is negative, black is displayed;
● Divide – divides the colors of the top and bottom images by
each other.
182.
6. HSL modes:● Hue – combines the hue of the top layer with the saturation
and luminosity of the bottom layer;
● Saturation – combines the saturation of the top layer with
the hue and luminosity of the bottom layer;
● Color – combines the hue and saturation of the top layer
with the luminosity of the bottom layer;
● Luminosity – combines the luminosity of the top layer with
the hue and saturation of the bottom layer.
183.
7 Layer Lock184.
Layered Image185.
Exercise. Locking layers1. Create an image consisting of layers as shown above.
Select the Tadj Mahal layer with the Move tool and move it
around.
The Taj Mahal will move according to your command to where
you want it to go.
186.
Exercise. Locking layers2. Enable the move lock by clicking on the crossed arrows icon
(move sign) in the palette lock line.
Now try to move the layer.
Unfortunately, you will not be able to do this, and a message
will appear on the screen warning that the layer is locked.
The lock sign (the rightmost one) in the lock line enables all
locks at once.
187.
Exercise. Locking layers3. Select the Brush tool and draw something in front of the Taj
Mahal fountain without releasing the mouse button.
4. Turn on the color pixel lock by clicking on the brush icon in
the lock line.
Now try drawing again.
You are unlikely to succeed.
Therefore, remove all locks for further work.
188.
Using the Lock group buttons, you can (from left to right):● protect transparent pixels of
the layer from changes;
● protect filled pixels from
changes;
● lock movement;
● protect from automatic
nesting/deleting of artboards;
● save all of the above.
189.
8 Transforming layer contents190.
Exercise. Moving layers together1. Click on the Kolisei layer in the layers palette, making it
active.
To link it, for example, to the Sphinx, select them one by one
while holding down the Ctrl key, then click on the chain icon at
the bottom of the palette.
The chain icon will appear on the layer thumbnails.
2. Select the Move tool and move this pair around the canvas.
You will see that they move together.
191.
Exercise. Moving layers together3. Next, we combine these linked layers into a group (if you
wish, you can attach another object to them).
4. This method is especially effective if the document has a lot
of layers. Groups are usually stored in the palette in a closed
form, so you do not even see the names of the layers that make
them up, but only the group name. By clicking on the group
name, you select the entire group.
192.
Exercise. Moving layers together5. Now you can treat it as a layer.
If you need to change something in one of its layers, you
expand the group and deal with individual layers.
6. To combine related layers into a group, select them and
execute the command from the palette menu New Group from
Layers.
193.
Exercise. Moving layers together7. In the dialog box, you will see the set name in the Name field
– Group 1, the rest of the set parameters are left by default.
Then click OK.
194.
An open group in the Layers palette8. A line with the group name will appear in
the Layers palette, and the names of the
three layers will disappear.
To open the group, click on the triangle to
the left of the set name.
Clicking it again will close the group again.
You will find the layers that disappeared
inside the group.
195.
Exercise. Moving layers together9. Layers can be rearranged within a group in the same way as
usual.
To remove a layer from a group, simply drag it to the place
where you want to insert it among the regular layers.
To add a new layer to a group, drag its name inside the open
group and drop it on the name of the layer under which you
want to insert it.
196.
Aligning and distributing linked layersObjects on linked layers can be aligned relative to the active
layer or relative to a selection.
They can also be evenly distributed vertically or horizontally.
To align them relative to each other, select one of these layers
in the Layers palette and choose the Layer/Align menu
command.
197.
Layer/Align menu commands:Top Edges;
Vertical Centers;
Bottom Edges;
Left Edges;
Horizontal Centers;
Right Edges.
198.
Aligning and distributing linked layersUniform distribution is performed using the Layer/Distribute
menu, which has exactly the same commands.
199.
Aligning and distributing linked layersFor the same purposes, you can use the buttons on the control
panel by selecting the Move tool.
The buttons have the same names, and their appearance
clearly indicates how exactly they align and distribute.
200.
Exercise. Aligning and distributing objects1. In the open document, each object is on its own layer.
Link all layers except the background layer.
1. First, align the objects on the layers to the bottom edge of
the canvas.
Click the Align Bottom Edges button in the Move tool control
panel.
201.
Exercise. Aligning and distributing objects3. Now distribute the objects so that their centers are at an
equal distance from each other.
Click on the Distribute Horizontal Centers button.
4. Check out the other operations presented in the control
panel of this tool.
202.
Layer TransformationLeft-click on the layer corner marker and you will enter the Free
Transform mode.
203.
Layer transformation, commandsNow rightclick on the
layer and a
number of
layer
transformatio
n commands
will open.
204.
Layer TransformationHere you can scale the layer, rotate it by placing the mouse
pointer outside the frame, or apply Perspective, Skew, Warp
the layer and flip it vertically and horizontally.
After editing (transforming the layer), you need to press the
Enter key to exit the layer transformation mode
205.
Layer Transformation Commands206.
Merge layersAfter you have created layer effects and used textures, you
need to save the file.
Save a multi-layer image in PSD format (menu File - Save).
If you need to create a file in a format that does not support
layers (small size), for example JEPG, you need to merge (flatten)
the layers into one.
207.
Merge layersThis should be done in the menu Layers - Merge.
All layers will be merged into one layer. This is usually done
when preparing layouts for printing.
Sometimes it is necessary to merge 2-3 layers to apply filters or
tone/color correction to them.
For those layers that are arranged in order, the function Ctrl + E
(merge with the lower layer) is used, and the upper one of
the required layers should be selected.
208.
Merge layersIf the layers you want to merge are not in order, click on the eye
next to the unnecessary layer and press Shift + Ctrl + E (merge
with visible), all layers where the eye icon remains will merge.
(Instead of hotkeys, you can merge visible layers in the Layers
menu - Merge with visible command).
209.
Group layersSometimes it is convenient to group or link layers together for
joint editing (movement, scaling, transformation, etc.).
To do this, select the desired layers in the Layers palette with
the Ctrl key and click the chain icon - it is located at the bottom
of the Layers palette.
210.
Grouping layers. All art in this drawing was created by theauthor in Adobe Photoshop
Now the layers
form a group,
ungroup the layers
in the same way select the layers
and click on the
chain icon, the
layers no longer
form a group and
each layer is edited
separately.
211.
Homework:Complete the task on working with layers: perform artistic
processing of a portrait using blending modes.
The task includes examples.
The original photo is a portrait without effects and textures.
212.
9 Layer effects213.
Setting a Layer StyleThe layers palette also allows you to add
styles to layers.
This operation is performed using the
Add a layer style control button at the
bottom of the palette (the fx sign) or the
Blending Options command in the
palette menu.
214.
Layer Style dialog boxAt the top of
this window
there is a
section called
Blending
Options.
215.
Setting a Layer StyleThe layer style settings window will open immediately on the
settings page of the selected effect.
You can turn off the display of any effect or all effects at once.
To do this, click on the eye icon in the line of the corresponding
effect in the layers palette.
216.
Setting a Layer StyleEffects created in this way are rigidly linked to the layer.
All effects can be edited at any time after they have been
applied.
To do this, double-click on the Effects line of the selected layer.
217.
The dialog box for setting the layer style contains thefollowing effects:
● Bevel and Emboss, the most versatile effect that imitates
different reliefs;
● Stroke, creates a colored border of a given width around an
object;
● Inner Shadow, creates a shadow inside an object, making it
embossed;
218.
The dialog box for setting the layer style contains thefollowing effects:
● Inner Glow, creates a glow inside the object;
● Satin, creates an imitation of a shiny silk surface using
complex shadows;
● Color Overlay, paints the entire object with a solid fill of a
specified color;
219.
The dialog box for setting the layer style contains thefollowing effects:
Gradient Overlay, creates a gradient fill for the layer;
Pattern Overlay, creates a pattern fill;
Outer Glow, creates a glow around objects;
Drop Shadow, sets the location of the shadow, its color,
size, blur, etc.
220.
Independent workUse the Layer style window to test the effects described above
on the document layers.
221.
Photoshop Minute222.
Layer effects allow you to create stunning effects:shadow,
contour,
relief,
texture overlay,
gloss,
etc.
223.
Layer EffectsLayer effects are applied to both raster layers and vector
shapes and text layers. They are located at the bottom of the
Layers palette,
number 2.
224.
Layer effect "Shadow"225.
Layer EffectsLook closely at the fig.
The cone in the photo has a shadow, it is made using the
Shadow effect.
To create such a shadow, you need to select the object (cone)
from the background, delete the background.
Name the layer Cone.
Create a new layer under it, fill it with white.
226.
Layer EffectsThen select the cone layer in the Layers palette and click on the
black icon with the letters fx at the bottom of the Layers
palette
(number 2).
227.
Layer effect "Shadow"228.
Layer effect "Shadow"In the window that opens, select the Shadow effect and adjust
the shadow in the Layer Style window - the right side of the
picture.
229.
The shadow effect has many settings:set the blending mode to Normal,
Opacity to 60%,
angle to 138,
shadow offset to 20 pixels,
spread to 9%,
size to 27 pixels.
230.
Layer EffectsIn the preview in the Layer Styles window on the right – the
location of the shadow will be displayed on the gray square.
231.
Layer EffectsFeel free to experiment and change the settings to get the
shadow you need.
You can add noise, the shadow will look like randomly splashed
gray pixels.
232.
Layer EffectsOpen the Contours setting and select different shadow
contours.
The shadow color does not necessarily have to be black, it can
be any other (defined in the window at the top, next to
Blending mode).
233.
Layer EffectsThe following effects are set up in approximately the same way:
● Inner Shadow,
● Inner Glow,
● Outer Glow.
234.
Layer EffectsYou can apply several effects at once, or just one.
235.
Layer EffectsIn the Layer Styles there is an effect called Emboss.
It gives the impression of a three-dimensional object by placing
shadows along the inner contour of the layer.
236.
Layer EffectsIn the Layer Styles there is an effect called Emboss.
It gives the impression of a three-dimensional object by placing
shadows along the inner contour of the layer.
237.
Applying LayerEffects to a
Logo
238.
It is very easy to apply such effects as:● Color Overlay,
● Gradient Overlay,
● Pattern Overlay.
239.
Layer EffectsThese effects allow you to apply a color, texture, or gradient
and easily change it without deleting the layer.
You can also reduce the effect by applying layer translucency (in
the Layer Styles settings).
240.
Layer effect "Stroke"This effect is necessary when you need to create a stroke or
outline for a layer.
Before applying this effect, select the object from the
background and delete the background.
The stroke can be a solid color, gradient or pattern.
The width of the outline is adjusted in the Stroke effect
settings.
241.
Layereffect
"Stroke"
242.
Ready-made sets of layer stylesLayer Styles hide a powerful creative set of tools.
Study them carefully - the ability to apply effects to a photo is a
big plus for a designer.
243.
Ready-made sets of layer stylesOpen the Styles palette, it is in the Window menu.
There is a set of ready-made Styles taken from the Layer
Effects window.
Apply ready-made styles to the layer and watch – a set of effects
will appear next to the layer in the Layers palette, click on them
and edit each one individually as you need.
244.
Ready-made sets of layer stylesYou can click on the eye icon to see what the layer looks like
without the effect.
Deleting an effect is easy - drag it to the trash can icon at the
bottom of the Layers palette, the action is the same as deleting
a regular layer.
245.
Ready-made sets of layer stylesReady-made styles are wonderfully applied to text.
246.
Ready-made sets of layer stylesYou can load layer sets by clicking on the button that opens the
Styles palette menu (upper right corner of the palette window).
At the bottom of the window are style sets for text, web design,
etc.
247.
Ready-made sets of layer effects in the Styles palette usingtext layers
as an
example
248.
Photoshop Minute249.
You can apply special effects to a layer:Drop Shadow,
Inner Shadow,
Outer Glow
и др.
250.
Applying effects to an image layerA layer effect automatically affects all opaque pixels on a layer
and is updated when you add, change, or delete pixels from the
layer.
Effects are applied and edited using the Layer Style dialog box,
where you can also set additional pixel blending options.
251.
You can open the Layer Style window using:Layer ⇒ Layer Style commands;
Add Layer Style buttons in the Layers palette;
Blending Options commands in the layer context menu;
Double-click on the layer thumbnail.
252.
Applying effects to an image layerIn the Layers palette, effects are displayed as a list under the
layer to which they are applied.
253.
Applying effects to an image layerYou can delete a layer effect by
moving its name to button 6 of
the Layers palette or by
disabling it in the Layer Style
window.
254.
Applying effects to an image layerTo remove all effects of the currently active layer, use the Layer
Style ⇒ Clear Layer Style command from the Layer menu or the
layer context menu.
255.
Applying effects to an image layerA style is a combination of one or more layer effects.
To add a style to the current layer, click the style icon in the
Styles palette.