Similar presentations:


Mini Saturn V
1.
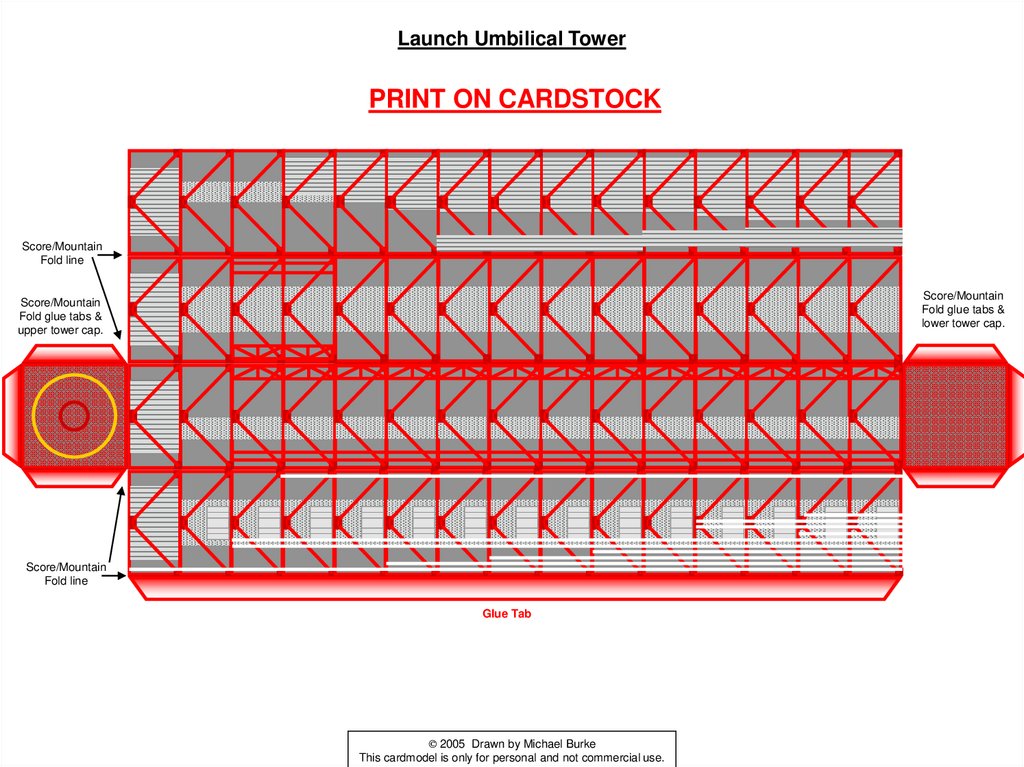
Launch Umbilical TowerPRINT ON CARDSTOCK
Score/Mountain
Fold line
Score/Mountain
Fold glue tabs &
lower tower cap.
Score/Mountain
Fold glue tabs &
upper tower cap.
Score/Mountain
Fold line
Glue Tab
© 2005 Drawn by Michael Burke
This cardmodel is only for personal and not commercial use.
2.
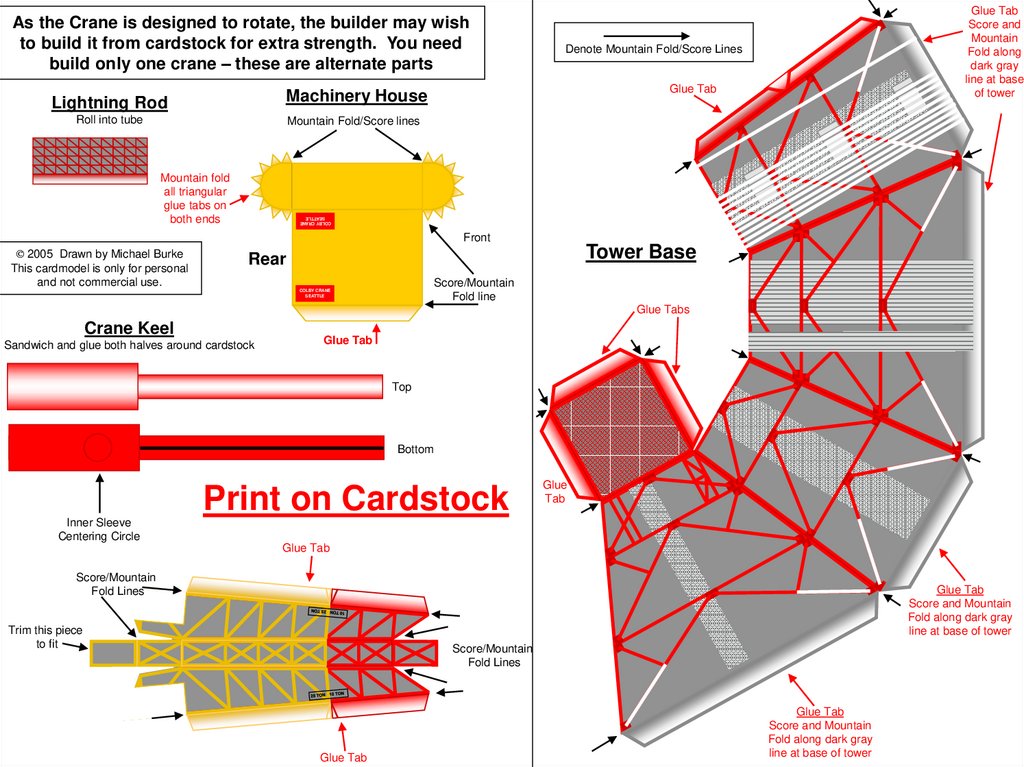
As the Crane is designed to rotate, the builder may wishto build it from cardstock for extra strength. You need
build only one crane – these are alternate parts
Denote Mountain Fold/Score Lines
Glue Tab
Machinery House
Lightning Rod
Roll into tube
Glue Tab
Score and
Mountain
Fold along
dark gray
line at base
of tower
Mountain Fold/Score lines
Mountain fold
all triangular
glue tabs on
both ends
COLBY CRANE
SEATTLE
Front
© 2005 Drawn by Michael Burke
This cardmodel is only for personal
and not commercial use.
Tower Base
Rear
Score/Mountain
Fold line
COLBY CRANE
SEATTLE
Glue Tabs
Crane Keel
Sandwich and glue both halves around cardstock
Glue Tab
Top
Bottom
Print on Cardstock
Glue
Tab
Inner Sleeve
Centering Circle
Glue Tab
Score/Mountain
Fold Lines
Glue Tab
Score and Mountain
Fold along dark gray
line at base of tower
Trim this piece
to fit
Score/Mountain
Fold Lines
Glue Tab
Glue Tab
Score and Mountain
Fold along dark gray
line at base of tower
3.
PRINT ON CARDSTOCK1
1
1
SIDE 3
SIDE 3
1
SIDE 2
SIDE 4
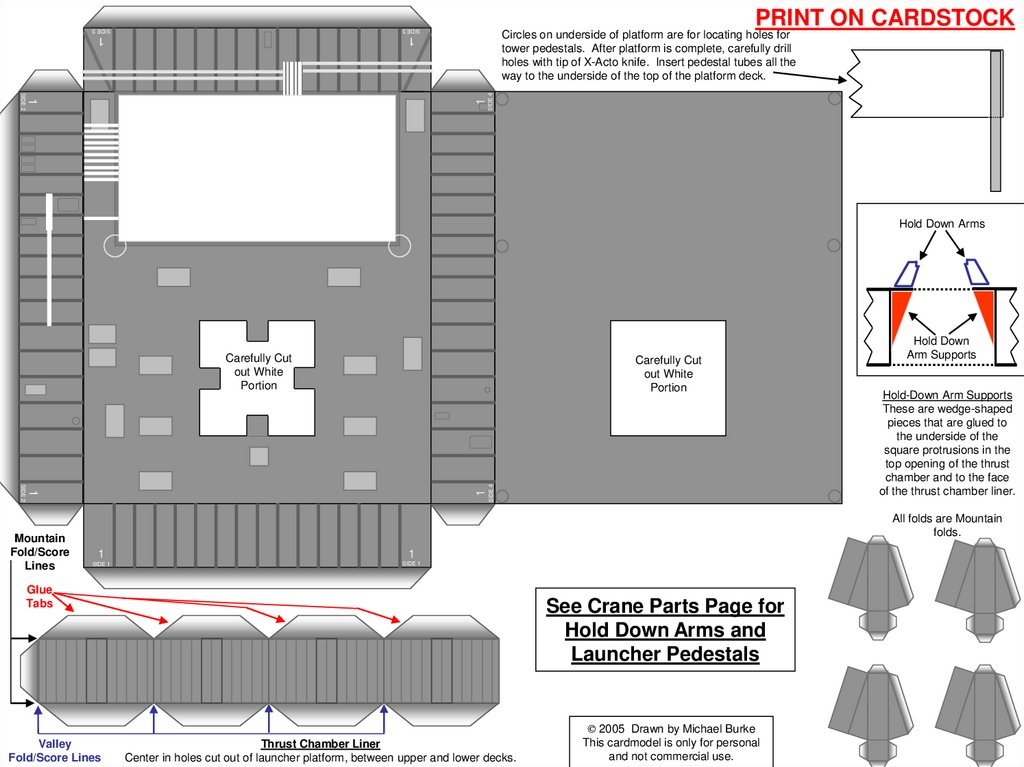
Circles on underside of platform are for locating holes for
tower pedestals. After platform is complete, carefully drill
holes with tip of X-Acto knife. Insert pedestal tubes all the
way to the underside of the top of the platform deck.
Hold Down Arms
Carefully Cut
out White
Portion
1
1
SIDE 2
Mountain
Fold/Score
Lines
SIDE 4
Carefully Cut
out White
Portion
Hold Down
Arm Supports
Hold-Down Arm Supports
These are wedge-shaped
pieces that are glued to
the underside of the
square protrusions in the
top opening of the thrust
chamber and to the face
of the thrust chamber liner.
All folds are Mountain
folds.
1
1
SIDE 1
SIDE 1
Glue
Tabs
Valley
Fold/Score Lines
See Crane Parts Page for
Hold Down Arms and
Launcher Pedestals
Thrust Chamber Liner
Center in holes cut out of launcher platform, between upper and lower decks.
© 2005 Drawn by Michael Burke
This cardmodel is only for personal
and not commercial use.
4.
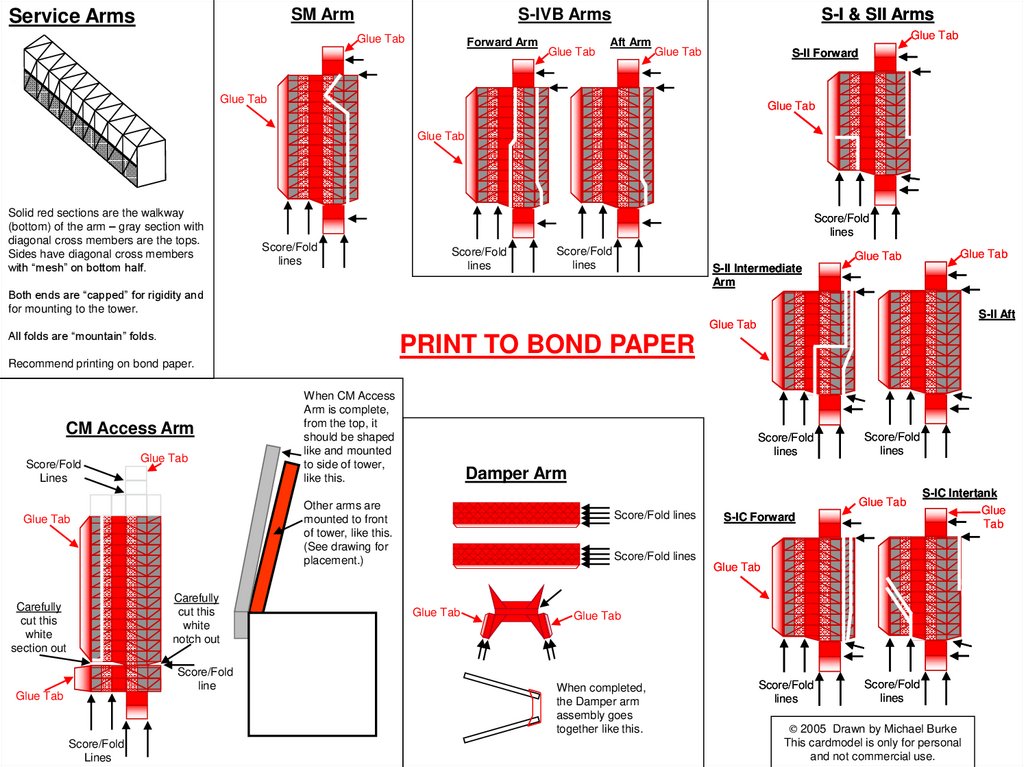
SM ArmService Arms
S-IVB Arms
Glue Tab
Forward Arm
Glue Tab
S-I & SII Arms
Aft Arm
Glue Tab
Glue Tab
S-II Forward
Glue Tab
Glue Tab
Glue Tab
Solid red sections are the walkway
(bottom) of the arm – gray section with
diagonal cross members are the tops.
Sides have diagonal cross members
with “mesh” on bottom half.
Score/Fold
lines
Score/Fold
lines
Score/Fold
lines
Score/Fold
lines
Glue Tab
Glue Tab
S-II Intermediate
Arm
Both ends are “capped” for rigidity and
for mounting to the tower.
S-II Aft
Glue Tab
All folds are “mountain” folds.
PRINT TO BOND PAPER
Recommend printing on bond paper.
CM Access Arm
Score/Fold
Lines
Glue Tab
Carefully
cut this
white
notch out
Score/Fold
line
Glue Tab
Score/Fold
Lines
Score/Fold
lines
Score/Fold
lines
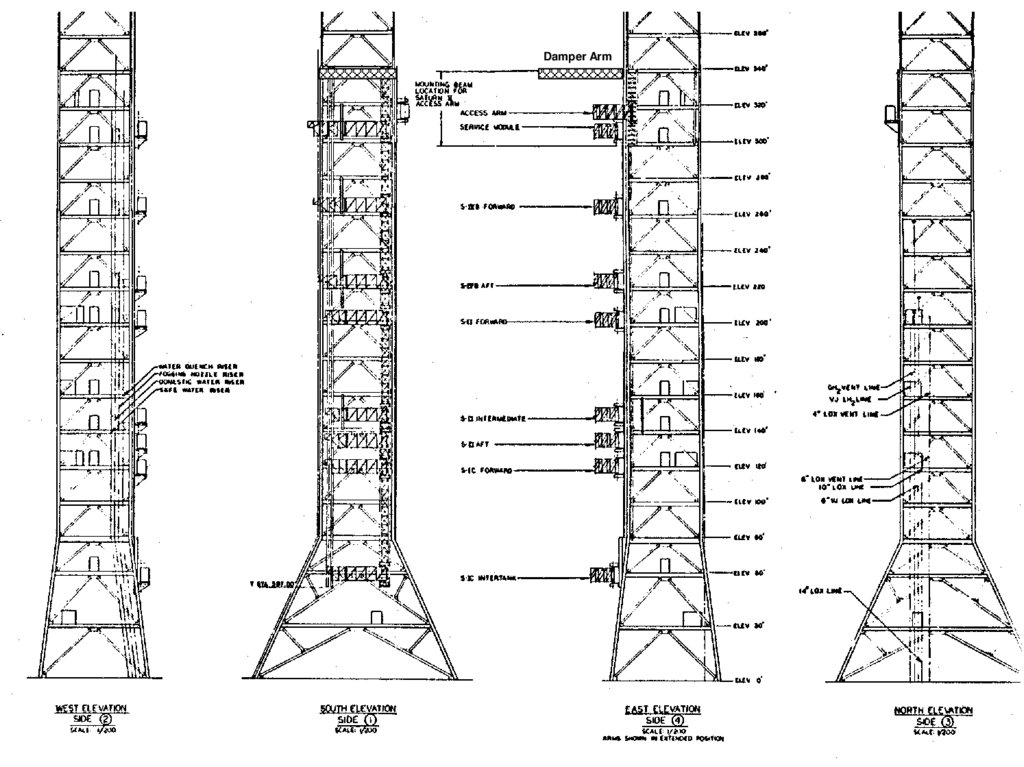
Damper Arm
Glue Tab
Other arms are
mounted to front
of tower, like this.
(See drawing for
placement.)
Glue Tab
Carefully
cut this
white
section out
When CM Access
Arm is complete,
from the top, it
should be shaped
like and mounted
to side of tower,
like this.
Score/Fold lines
S-IC Forward
S-IC Intertank
Glue
Tab
Score/Fold lines
Glue Tab
Glue Tab
Glue Tab
When completed,
the Damper arm
assembly goes
together like this.
Score/Fold
lines
Score/Fold
lines
© 2005 Drawn by Michael Burke
This cardmodel is only for personal
and not commercial use.
5.
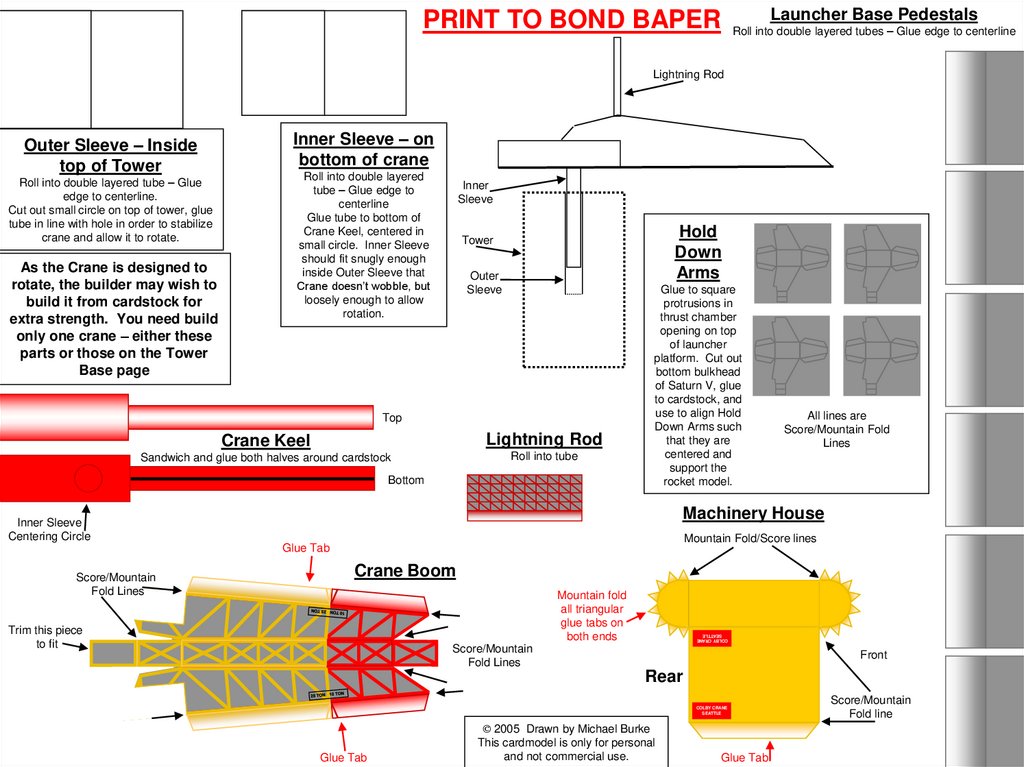
PRINT TO BOND BAPERLauncher Base Pedestals
Roll into double layered tubes – Glue edge to centerline
Lightning Rod
Outer Sleeve – Inside
top of Tower
Roll into double layered tube – Glue
edge to centerline.
Cut out small circle on top of tower, glue
tube in line with hole in order to stabilize
crane and allow it to rotate.
As the Crane is designed to
rotate, the builder may wish to
build it from cardstock for
extra strength. You need build
only one crane – either these
parts or those on the Tower
Base page
Inner Sleeve – on
bottom of crane
Roll into double layered
tube – Glue edge to
centerline
Glue tube to bottom of
Crane Keel, centered in
small circle. Inner Sleeve
should fit snugly enough
inside Outer Sleeve that
Crane doesn’t wobble, but
loosely enough to allow
rotation.
Inner
Sleeve
Hold
Down
Arms
Tower
Outer
Sleeve
Top
Crane Keel
Lightning Rod
Sandwich and glue both halves around cardstock
Roll into tube
Bottom
Glue to square
protrusions in
thrust chamber
opening on top
of launcher
platform. Cut out
bottom bulkhead
of Saturn V, glue
to cardstock, and
use to align Hold
Down Arms such
that they are
centered and
support the
rocket model.
Machinery House
Inner Sleeve
Centering Circle
Mountain Fold/Score lines
Glue Tab
Crane Boom
Mountain fold
all triangular
glue tabs on
both ends
Trim this piece
to fit
COLBY CRANE
SEATTLE
Score/Mountain
Fold Lines
All lines are
Score/Mountain Fold
Lines
Score/Mountain
Fold Lines
Front
Rear
COLBY CRANE
SEATTLE
Glue Tab
© 2005 Drawn by Michael Burke
This cardmodel is only for personal
and not commercial use.
Glue Tab
Score/Mountain
Fold line
6.
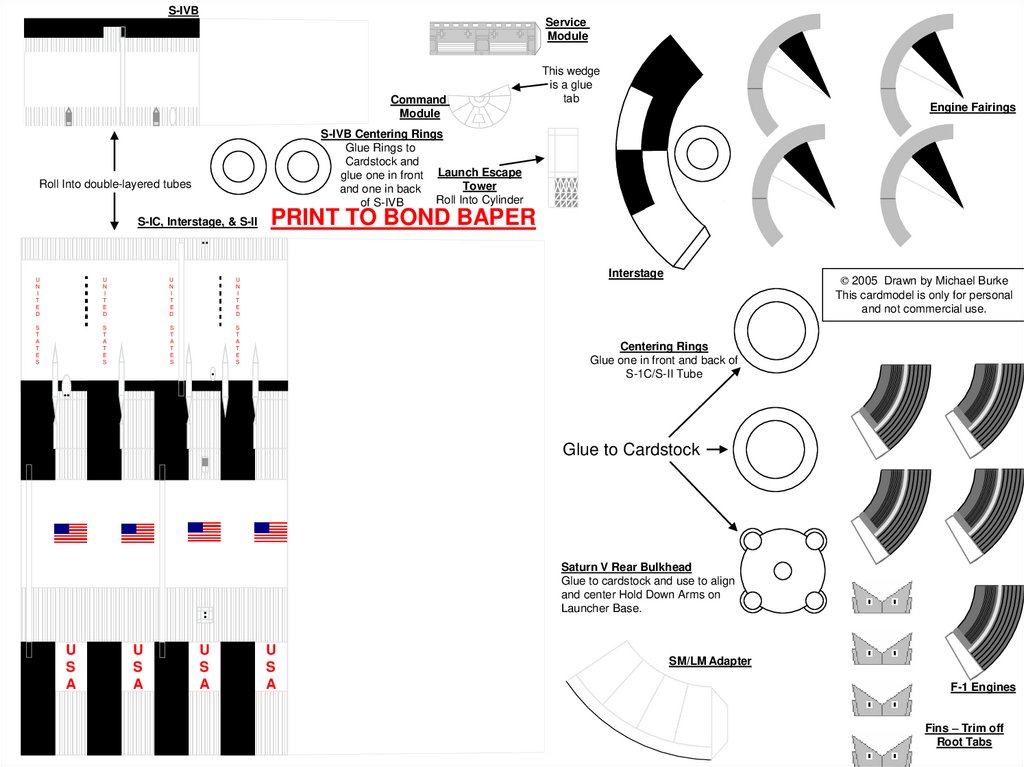
S-IVBService
Module
Command
Module
This wedge
is a glue
tab
Engine Fairings
S-IVB Centering Rings
Glue Rings to
Cardstock and
glue one in front Launch Escape
Tower
and one in back
Roll Into Cylinder
of S-IVB
Roll Into double-layered tubes
S-IC, Interstage, & S-II
U
N
I
T
E
D
U
N
I
T
E
D
U
N
I
T
E
D
U
N
I
T
E
D
S
T
A
T
E
S
S
T
A
T
E
S
S
T
A
T
E
S
S
T
A
T
E
S
PRINT TO BOND BAPER
Interstage
© 2005 Drawn by Michael Burke
This cardmodel is only for personal
and not commercial use.
Centering Rings
Glue one in front and back of
S-1C/S-II Tube
Glue to Cardstock
Saturn V Rear Bulkhead
Glue to cardstock and use to align
and center Hold Down Arms on
Launcher Base.
U
S
A
U
S
A
U
S
A
U
S
A
SM/LM Adapter
F-1 Engines
Fins – Trim off
Root Tabs