


 astronomy
Similar presentations:
")

Voyager spaceprobe
1. Voyager Spaceprobe 1:48 scale
Voyager Spaceprobe1:48 scale
Read all the instructions and review the parts sheets before starting. Note the red stars for aligning the HGA dish, support base, and main bus with the RTG
mounting. Score all fold lines and cut out the parts.
High Gain Antenna (HGA): overlap the HGA dish to form a shallow cone, printed side inward. Glue the top (white) and bottom (shaded) of the support base back to
back – do not glue the supporting truss pieces together yet. Roll the support base ring into a circle and glue. Bend one set of tabs inward and glue to the top (white
side) of the support base – carefully forming a circle. When dry, bend the remaining tabs inward and glue on the main dish, carefully centering the dish and aligning
the glue seam on the main dish with the wide support truss on the base. Roll and glue the feed horn into a cone and glue its small end to the blue circle in the center
of the support base. Overlap and glue the reflector to form a shallow cone and glue to the underside (non-printed side) of the reflector tripod. Color the backs of the
tripod legs black, then bend down (away from the printed side) to form the tripod. Glue one leg to the HGA dish aligned with the seam and the support base rim.
Glue the other legs to the dish symmetrically. Roll and glue the low gain antenna into a cylinder and secure to the blue circle on top of the reflector tripod. Finally,
bend the support base truss legs down at a 90 degree angle and glue the front/back layers together – this will form a stronger structure than if you glued them earlier.
Main bus: fold and secure the sides of the bus to form a decagon. When dry, fold down the bus bottom panel and secure to close the box. Optional - Overlap and
glue the fuel tank ends to form shallow cones – printed side out. Glue one to the top of the main bus covering the printed gray circle; glue the other to the bottom of
the booster attachment truss – covering the gray circle.
Radio-isotope Thermoelectric Generator (RTG) – [technique courtesy Vaughn Hoxie’s New Horizons model]: fold the RTG into pleats as indicated, apply glue to the
inside of the fins’ folds, and secure. When dry, roll into a cylinder overlapping the two end flats and secure. Attach the black disks to cap the ends, carefully
maintaining a circular cross section for the RTG body. If using light/medium card stock, do not remove the material inside the truss members to maintain strength.
–
Truss: fold the large mounting truss away from the printed side and attach the wide end to the main bus placing the corners flat on the two dots on the top
surface of the bus (removing the center section of the wide end of the truss may make attachment easier). Secure the tip of the other end to the lower edge
of the main bus at the dot between bus panels 3 and 4. Bend up the magnetometer canister support that’s inside the wide end of the truss. Fold the smaller
outer mounting truss toward its printed side. Glue the center tab over the fold on the inner truss. Bend the “ears” down, then fold in and secure the tabs to
the lower section of the inner truss to hold the angle shown. Fold the triangle at the outer end of the truss upward, parallel with the sides of the main bus and
secure in position with the tab at the tip of the upper portion of the outer truss. Glue the RTG body to the end of the truss, refer to the diagram for details.
Instruments: fold the instrument arm into a square beam and secure. Bend the two outer truss legs downward and secure to the dots on the inner edge of the top of
the main bus by panels 8 and 9. Glue the tip of the center truss member to the dot on the top of the main bus between panels 8 and 9. Secure the wide end of the
arm support to the bottom of the instrument arm and to the base of the truss arm on panel 8 to hold the arm level (or trim the arm support to fit from the instrument
arm to the edge of the main bus between panels 8 & 9 for a more robust attachment). This is simplified from the actual spacecraft structure (see spacecraft line
drawing).
–
Fold the star trackers, plasma/wave, cosmic ray, charged particle, imaging, and scan platform experiments into boxes and secure. Drill out the blue circles in
the plasma/wave box to insert wires later. Roll the scan platform axle, charged particle extension, photopolarimeter, and IR telescope into cylinders and
secure. Bend down the supports on the plasma experiment. Secure the instruments to the arm as indicated. Note the dotted lines on the imaging and scan
platform boxes for alignment on the axle.
HGA assembly: attach the HGA truss arms to the top of the main bus. The corners of the wide truss attach to the dots on panels 3 and 4, next to the RTG truss
arms. The narrow trusses attach to the inside edge of the bus (gray area) along panels 7 and 10.
Remaining instruments: attach the plasma/wave antenna mount in the indicated position above the RTG mount – the box will overhang the edge of the bus. Insert
the wires for the antenna after the rest of the model is complete. Attach the star trackers in the indicated positions above panel 5 with the circles outward, they
should overhang the bus by about 1/8 inch. Fold the dark tabs inward and secure the white angular plate on top of the bus, using the line above panel 7.
MAG Boom: Fold and secure the magnetometer boom into a triangular beam and glue the sensor into the outer end of the boom. Cut out the blue triangle on the
MAG canister, then roll and glue the rectangle into a cylinder and glue the attached circles to cap the ends. Glue the canister to the top of the plasma/wave antenna
mount and the semi-circular mounting on the RTG truss – the end with the triangular hole goes outward. Insert the mag boom into the canister using the triangular
hole after the rest of the model is complete.
Booster attachment truss: bend the struts downward (toward the printed side) and secure the unprinted side to the bottom of the bus over the rectangle – apply glue
only to the short edges of the rectangle to allow later attachment to a stand. Glue the top corners of the radiator to the outside of the narrow truss facing the scan
platform. Bend the attachment truss on the bottom of the radiator down (away from the printed side) and attach to the narrow truss where the legs join – this will hold
the radiator out at an angle.
Stand: drill a small hole in the center of a dowel and fasten the dowel to your base platform. Straighten a paper clip or other stiff wire. Bend a ½ inch loop in one
end. Bend the straight section of wire to fit in the hole in the dowel. Slip the wire loop between the bottom of the main bus and booster attachment truss above the
wide legs to support the model.
2.
VoyagerReflector – attach to underside
of tripod
Reflector tripod
1:48 scale
cut
High gain antenna
roll
Discard
Feed horn
1 inch
Low gain antenna
Main dish
remove
FOLD
Support base ring
RTG
P
RTG
Valley fold
Mountain fold
Valley fold
Repeat …
Support base
BUS
Glue to cardstock
BOTTOM
FOLD
MAG
RTG folds
Glue to underside of support base
GLUE
REMOVE
WHITE
SPACE
REMOVE
WHITE
SPACE
MAG canister
mount - optional
MAG boom
Copyright 2009, John Jogerst. Not for commercial use. For personal or educational use only
GLUE
BOTTOM
MAG canister
MAG sensor-end of boom
GLUE
FOLD
GLUE
3.
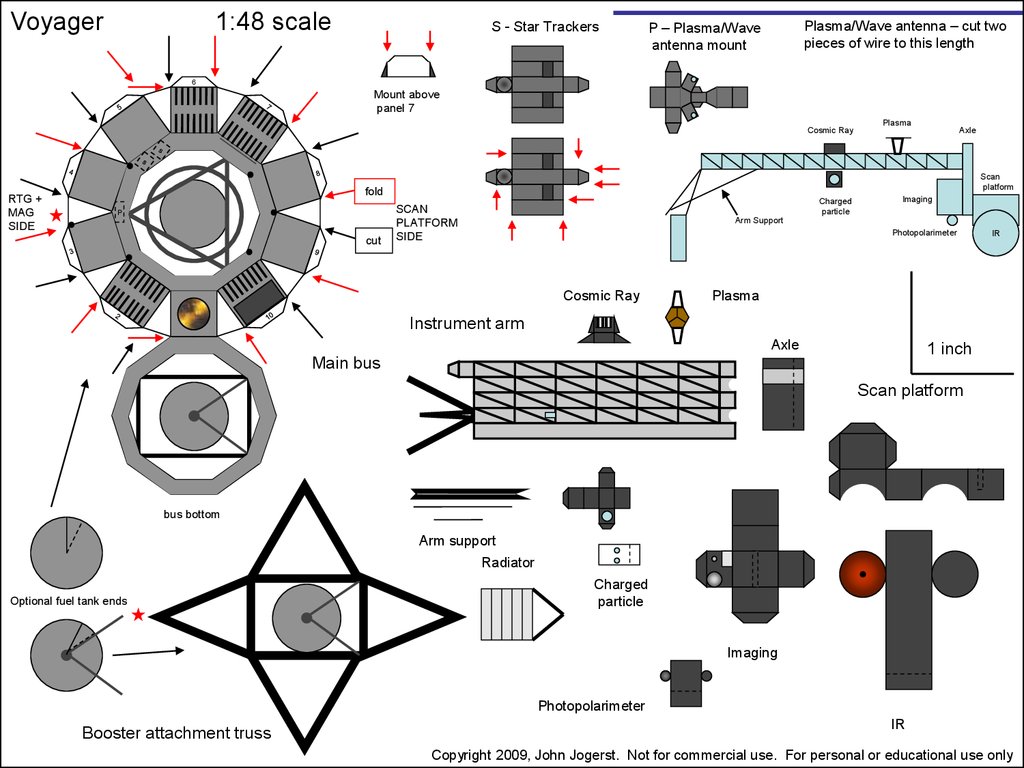
Voyager1:48 scale
S - Star Trackers
Plasma/Wave antenna – cut two
pieces of wire to this length
P – Plasma/Wave
antenna mount
6
Mount above
panel 7
Cosmic Ray
RTG +
MAG
SIDE
cut
Axle
Scan
platform
fold
P
Plasma
Charged
particle
SCAN
PLATFORM
SIDE
Imaging
Arm Support
Photopolarimeter
Cosmic Ray
IR
Plasma
Instrument arm
Axle
1 inch
Main bus
Scan platform
bus bottom
Arm support
Radiator
Optional fuel tank ends
Charged
particle
Imaging
Photopolarimeter
Booster attachment truss
IR
Copyright 2009, John Jogerst. Not for commercial use. For personal or educational use only
4.
Voyager 1 Jupiter/SaturnVoyager 2 Jupiter/Saturn/Uranus/Nepture
Both launched 1977
Voyager 1 currently 10 billion miles out
Voyager 2 at 8 billion miles
Line drawing – enlarge
for more detail
1:48 scale
Model support wire
DOWEL
Slip loop between bottom of main bus
and booster attachment truss.
BASE