


 electronics
Similar presentations:


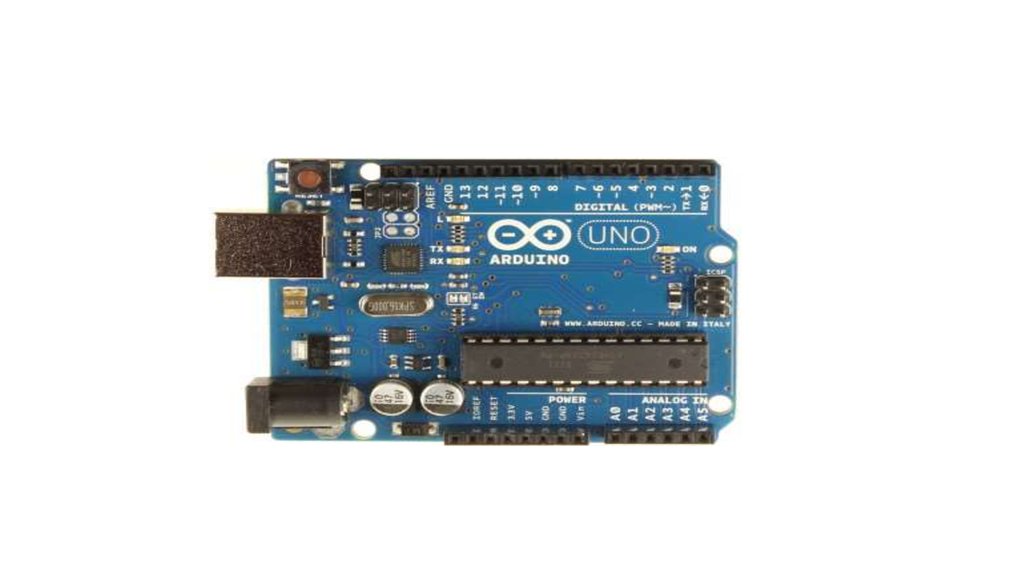
Arduino Uno. Цифровые контакты ввода-вывода. Широтно-импульсная модуляция
1. Лекция №9
Arduino UnoЦифровые контакты ввода-вывода
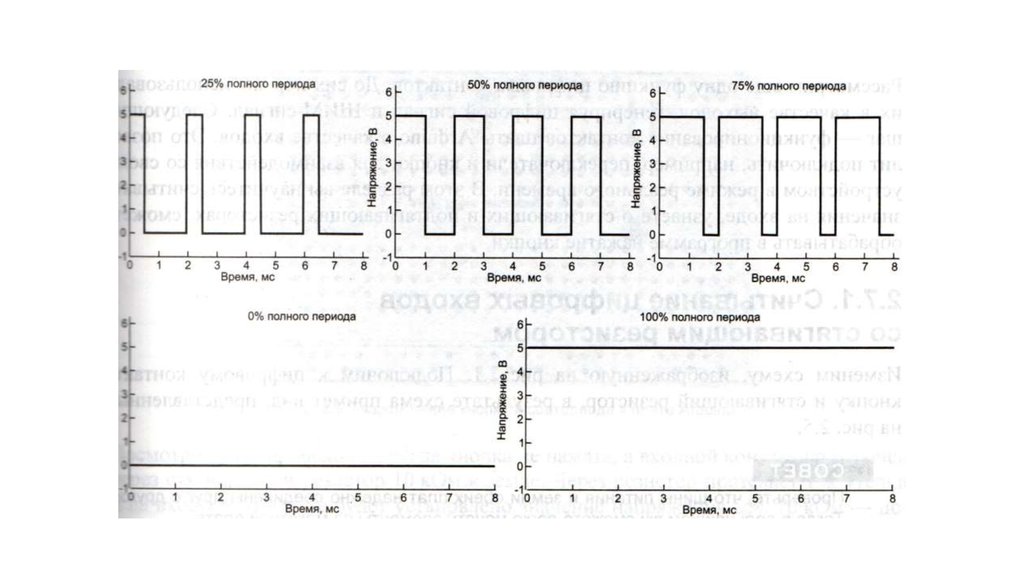
Широтно-импульсная модуляция
2. Первая программа
Задача:Необходимо заставить мигать светодиод, расположенный на плате.
Этот светодиод подключен к цифровому контакту 13.
3.
4.
5. Программа часть 1
/*Blink
Turns on an LED on for one second, then off for one second,
repeatedly.
This example code is in the public domain.
*/
// Pin 13 has an LED connected on most Arduino boards.
// give it a name:
6. Часть 2
int led = 13;// the setup routine runs once when you press reset:
void setup() {
// initialize the digital pin as an output.
pinMode(led, OUTPUT);
}
7. Часть 3
// the loop routine runs over and over again forever:void loop() {
digitalWrite(led, HIGH); // turn the LED on (HIGH is the voltage level)
delay(1000);
// wait for a second
digitalWrite(led, LOW); // turn the LED off by making the voltage
LOW
delay(1000);
// wait for a second
}
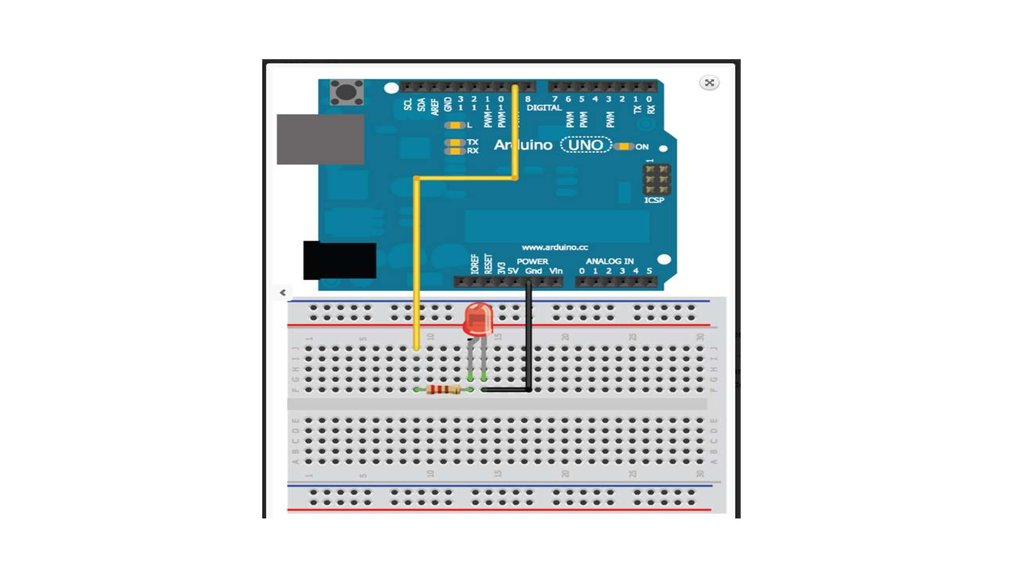
8. Подключение внешнего светодиода
9.
10. Конфигурация контактов
const int LED=9;//define LED for pin 9
void setup()
{
pinMode (LED, OUTPUT); //Set the LED pin as an output
digitalWrite(LED, HIGH); //Set the LED pin high
}
void loop()
{
//we are not doing anything in the loop!
}
11. Изменение частоты мигания светодиода
const int LED=9;//define LED for Pin 9
void setup()
{
pinMode (LED, OUTPUT); //Set the LED pin as an output
}
void loop()
{
for (int i=100; i<=1000; i=i+100)
{
digitalWrite(LED, HIGH);
delay(i);
digitalWrite(LED, LOW);
delay(i);
}
}
12. Изменение яркости светодиода
const int LED=9; //define LED for Pin 9void setup()
{
pinMode (LED, OUTPUT); //Set the LED pin as an output
}
void loop()
{
for (int i=0; i<256; i++)
{
analogWrite(LED, i);
delay(10);
}
for (int i=255; i>=0; i--)
{
analogWrite(LED, i);
delay(10);
}
}
13.
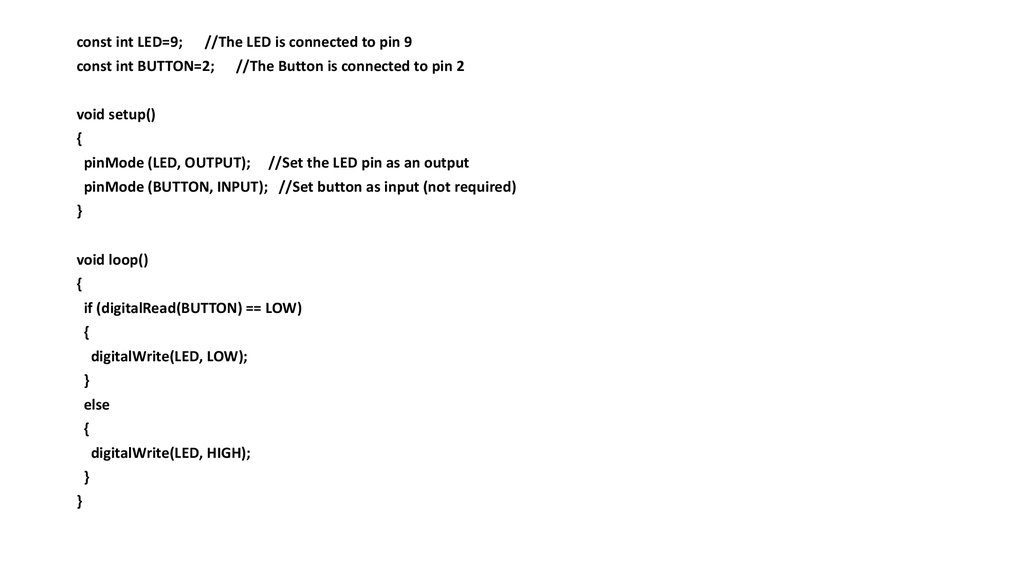
14. Считывание данных с цифровых контактов
15.
const int LED=9;//The LED is connected to pin 9
const int BUTTON=2;
//The Button is connected to pin 2
void setup()
{
pinMode (LED, OUTPUT);
//Set the LED pin as an output
pinMode (BUTTON, INPUT); //Set button as input (not required)
}
void loop()
{
if (digitalRead(BUTTON) == LOW)
{
digitalWrite(LED, LOW);
}
else
{
digitalWrite(LED, HIGH);
}
}
16. Устранение дребезга контактов часть1
const int LED=9;//The LED is connected to pin 9
const int BUTTON=2;
//The Button is connected to pin 2
boolean lastButton = LOW; //Variable containing the previous button state
boolean currentButton = LOW; //Variable containing the current button state
boolean ledOn = false;
//The present state of the LED (on/off)
void setup()
{
pinMode (LED, OUTPUT); //Set the LED pin as an output
pinMode (BUTTON, INPUT); //Set button as input (not required)
}
17. Часть 2
boolean debounce(boolean last){
boolean current = digitalRead(BUTTON);
//Read the button state
if (last != current)
//if it's different…
{
delay(5);
//wait 5ms
current = digitalRead(BUTTON);
//read it again
}
return current;
//return the current value
}
18. Часть 3
void loop(){
currentButton = debounce(lastButton);
//read debounced state
if (lastButton == LOW && currentButton == HIGH) //if it was pressed…
{
ledOn = !ledOn;
//toggle the LED value
}
lastButton = currentButton;
//reset button value
digitalWrite(LED, ledOn);
}
19. Управление RBG-светодиодом
20. Часть 1
const int BLED=9; //Blue LED on Pin 9const int GLED=10; //Green LED on Pin 10
const int RLED=11; //Red LED on Pin 11
const int BUTTON=2; //The Button is connected to pin 2
boolean lastButton = LOW; //Last Button State
boolean currentButton = LOW; //Current Button State
int ledMode = 0;
//Cycle between LED states
21. Часть 2
void setup(){
pinMode (BLED, OUTPUT); //Set Blue LED as Output
pinMode (GLED, OUTPUT); //Set Green LED as Output
pinMode (RLED, OUTPUT); //Set Red LED as Output
pinMode (BUTTON, INPUT); //Set button as input (not required)
}
22. Часть 3
boolean debounce(boolean last){
boolean current = digitalRead(BUTTON);
//Read the button state
if (last != current)
//if it's different...
{
delay(5);
//wait 5ms
current = digitalRead(BUTTON);
//read it again
}
return current;
//return the current value
}
23. Часть 4
void setMode(int mode){
//RED
if (mode == 1)
{
digitalWrite(RLED, HIGH);
digitalWrite(GLED, LOW);
digitalWrite(BLED, LOW);
}
//GREEN
else if (mode == 2)
{
digitalWrite(RLED, LOW);
digitalWrite(GLED, HIGH);
digitalWrite(BLED, LOW);
}
24. Часть 5
//BLUEelse if (mode == 3)
{
digitalWrite(RLED, LOW);
digitalWrite(GLED, LOW);
digitalWrite(BLED, HIGH);
}
//PURPLE (RED+BLUE)
else if (mode == 4)
{
analogWrite(RLED, 127);
analogWrite(GLED, 0);
analogWrite(BLED, 127);
}
25. Часть 6
//TEAL (BLUE+GREEN)else if (mode == 5)
{
analogWrite(RLED, 0);
analogWrite(GLED, 127);
analogWrite(BLED, 127);
}
//ORANGE (GREEN+RED)
else if (mode == 6)
{
analogWrite(RLED, 127);
analogWrite(GLED, 127);
analogWrite(BLED, 0);
}
26. Часть 7
//WHITE (GREEN+RED+BLUE)else if (mode == 7)
{
analogWrite(RLED, 85);
analogWrite(GLED, 85);
analogWrite(BLED, 85);
}
//OFF (mode = 0)
else
{
digitalWrite(RLED, LOW);
digitalWrite(GLED, LOW);
digitalWrite(BLED, LOW);
}
}
27. Часть 8
void loop(){
currentButton = debounce(lastButton);
//read debounced state
if (lastButton == LOW && currentButton == HIGH) //if it was pressed...
{
ledMode++;
//increment the LED value
}
lastButton = currentButton;
//reset button value
//if you’ve cycled through the different options, reset the counter to 0
if (ledMode == 8) ledMode = 0;
setMode(ledMode);
//change the LED state
}