
 internet
Similar presentations:


 Part of Cybersecurity")

Failure Cases by User’s Fault and the Recommended Guidelines
1.
【 Probe 】Failure Cases by User’s Fault
and the Recommended Guidelines
Health & Medical Equipment Business
2.
Contents1. System/Probe Configuration
2. User’s Fault Type
3. Failure Cases and Recommended Guide
[Appendix] Probe Care Video
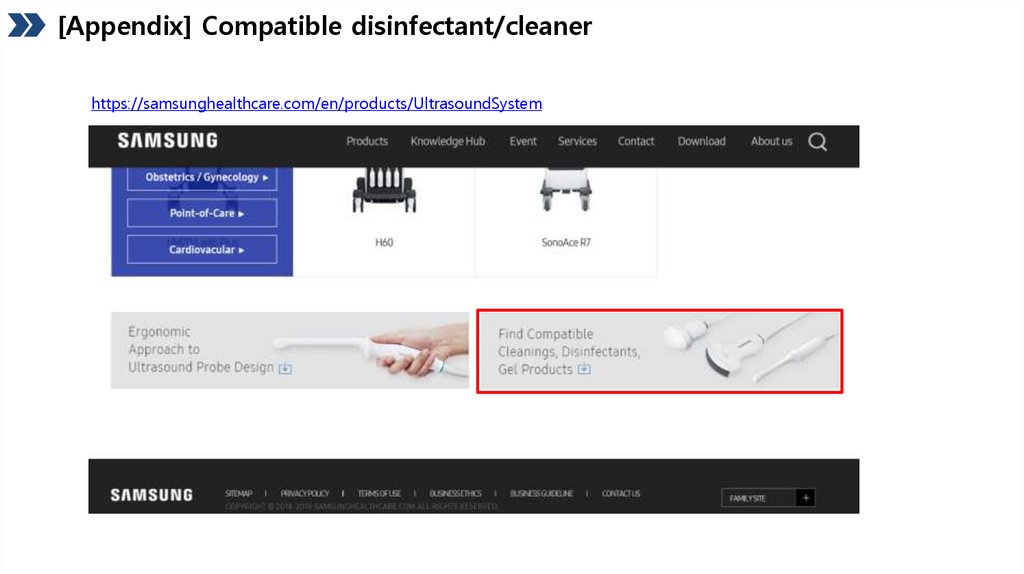
[Appendix] Compatible disinfectant/cleaner
3.
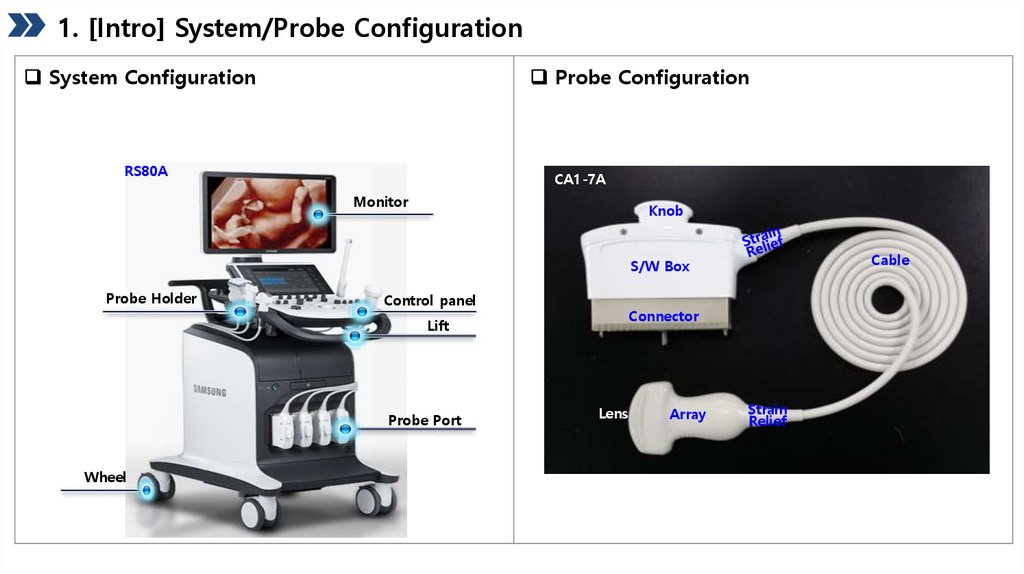
1. [Intro] System/Probe ConfigurationSystem Configuration
Probe Configuration
RS80A
CA1-7A
Monitor
Knob
Cable
S/W Box
Probe Holder
Control panel
Connector
Lift
Probe Port
Wheel
Lens
Array
Strain
Relief
4.
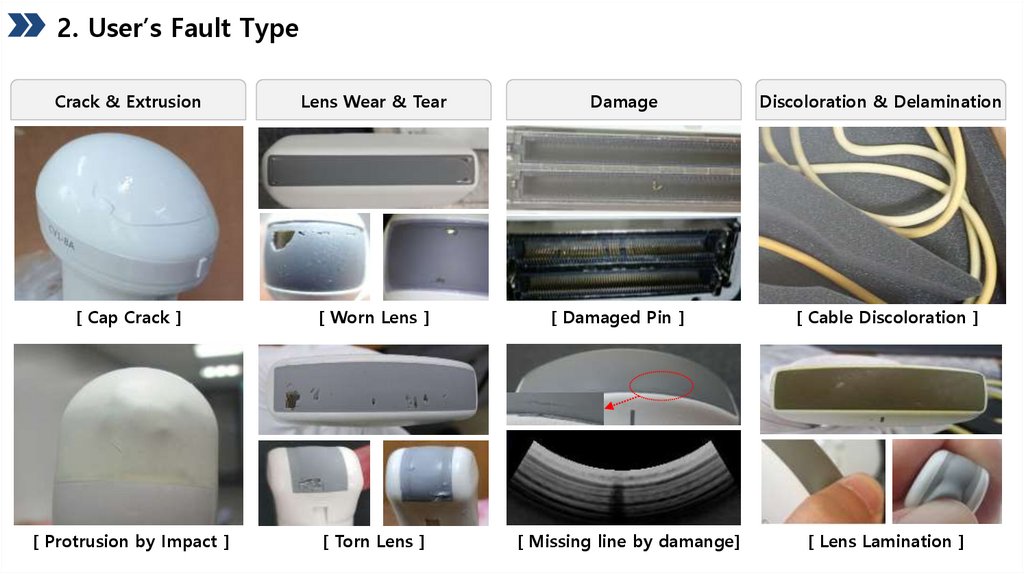
2. User’s Fault TypeCrack & Extrusion
Lens Wear & Tear
Damage
Discoloration & Delamination
[ Cap Crack ]
[ Worn Lens ]
[ Damaged Pin ]
[ Cable Discoloration ]
[ Protrusion by Impact ]
[ Torn Lens ]
[ Missing line by damange]
[ Lens Lamination ]
5.
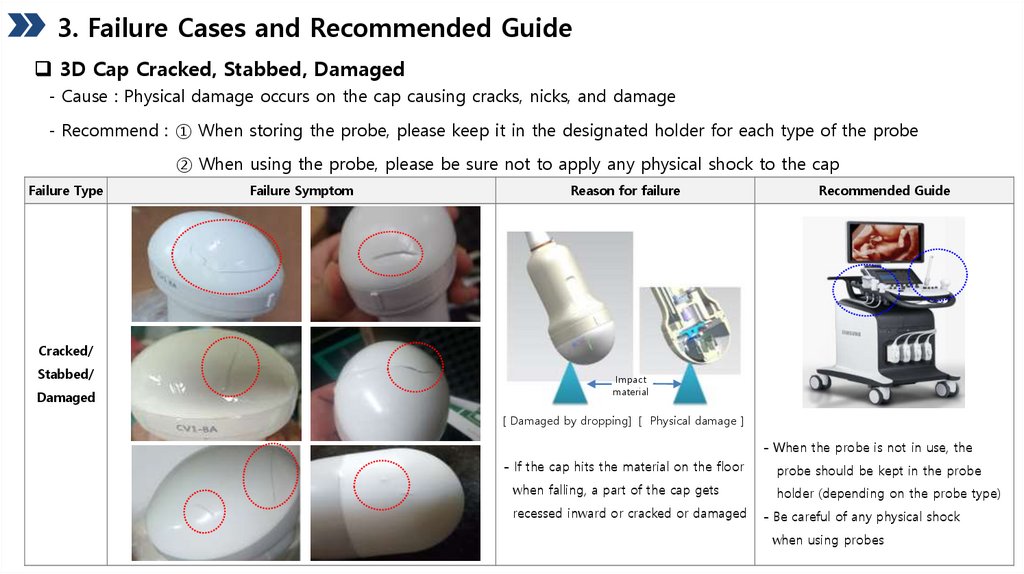
3. Failure Cases and Recommended Guide3D Cap Cracked, Stabbed, Damaged
- Cause : Physical damage occurs on the cap causing cracks, nicks, and damage
- Recommend : ① When storing the probe, please keep it in the designated holder for each type of the probe
② When using the probe, please be sure not to apply any physical shock to the cap
Failure Type
Failure Symptom
Reason for failure
Recommended Guide
Cracked/
Stabbed/
Damaged
Impact
material
[ Damaged by dropping] [ Physical damage ]
- When the probe is not in use, the
- If the cap hits the material on the floor
probe should be kept in the probe
when falling, a part of the cap gets
holder (depending on the probe type)
recessed inward or cracked or damaged
- Be careful of any physical shock
when using probes
6.
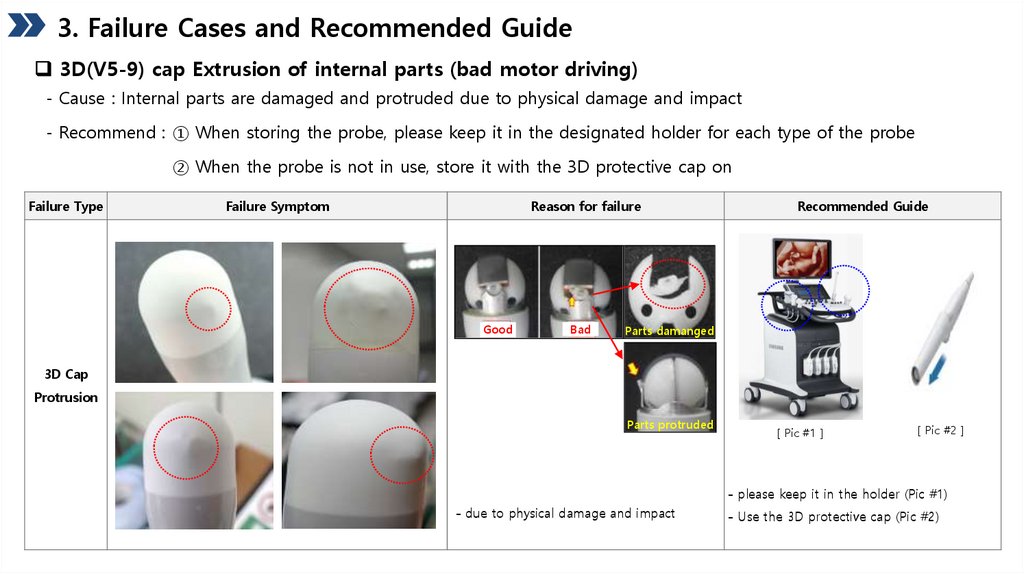
3. Failure Cases and Recommended Guide3D(V5-9) cap Extrusion of internal parts (bad motor driving)
- Cause : Internal parts are damaged and protruded due to physical damage and impact
- Recommend : ① When storing the probe, please keep it in the designated holder for each type of the probe
② When the probe is not in use, store it with the 3D protective cap on
Failure Type
Failure Symptom
Reason for failure
Good
Bad
Recommended Guide
Parts damanged
3D Cap
Protrusion
Parts protruded
[ Pic #1 ]
[ Pic #2 ]
- please keep it in the holder (Pic #1)
- due to physical damage and impact
- Use the 3D protective cap (Pic #2)
7.
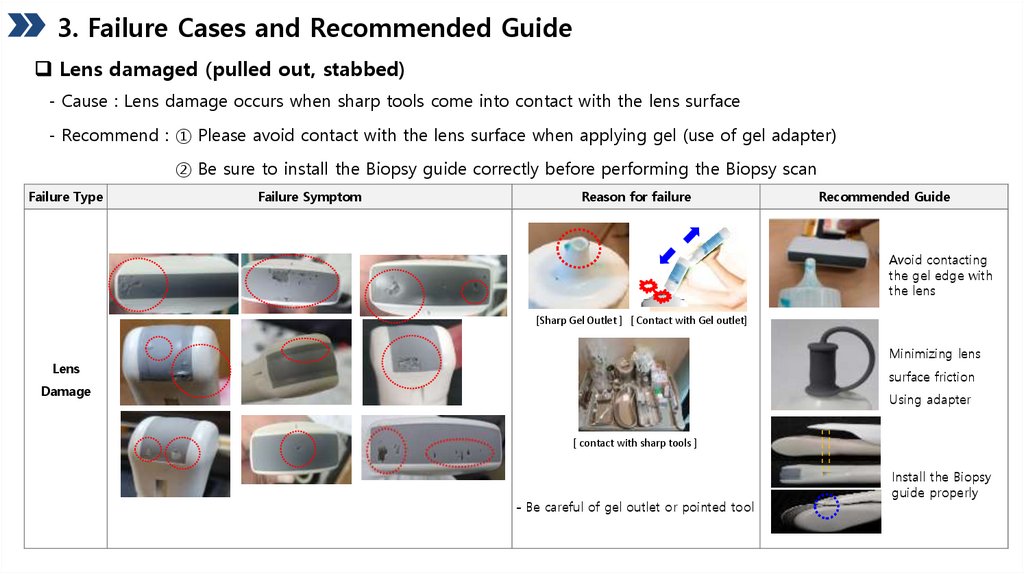
3. Failure Cases and Recommended GuideLens damaged (pulled out, stabbed)
- Cause : Lens damage occurs when sharp tools come into contact with the lens surface
- Recommend : ① Please avoid contact with the lens surface when applying gel (use of gel adapter)
② Be sure to install the Biopsy guide correctly before performing the Biopsy scan
Failure Type
Failure Symptom
Reason for failure
Recommended Guide
Avoid contacting
the gel edge with
the lens
[Sharp Gel Outlet ] [ Contact with Gel outlet]
Minimizing lens
Lens
surface friction
Damage
Using adapter
[ contact with sharp tools ]
- Be careful of gel outlet or pointed tool
Install the Biopsy
guide properly
8.
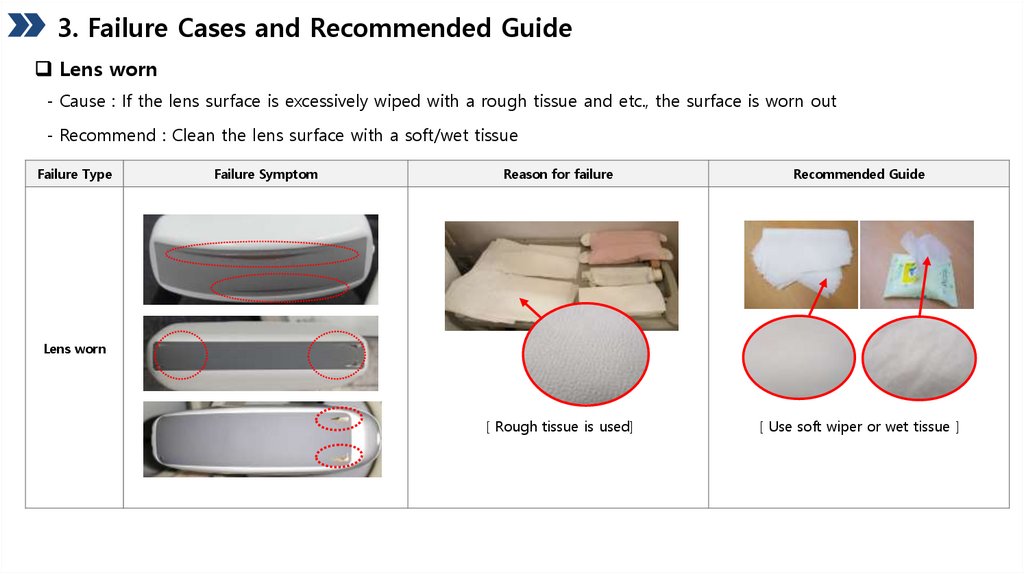
3. Failure Cases and Recommended GuideLens worn
- Cause : If the lens surface is excessively wiped with a rough tissue and etc., the surface is worn out
- Recommend : Clean the lens surface with a soft/wet tissue
Failure Type
Failure Symptom
Reason for failure
Recommended Guide
[ Rough tissue is used]
[ Use soft wiper or wet tissue ]
Lens worn
9.
3. Failure Cases and Recommended GuideLens delamination & discoloration
- Cause : Non-recommended disinfectant (povidone iodine) penetrates into the lens surface and decreases the adhesion
- Recommend : ① Use of our recommended disinfectants ② Prevention of disinfectant penetration using probe cover
Failure Type
Failure Symptom
delamination
delamination
/discoloration
delamination
Reason for failure
Recommended Guide
[ Utilizing the Probe Cover ]
discoloration
discoloration
[Non-recommended]
[povidone iodine]
①
②
delamination
discoloration
discoloration
delamination
disinfectant
Penetration
① Wash with water
② Remove the water
with a towel
- When using povidone iodine, use a probe
cover to prevent the penetration
- Please use recommended disinfectants
https://samsunghealthcare.com/en/products/UltrasoundSystem
10.
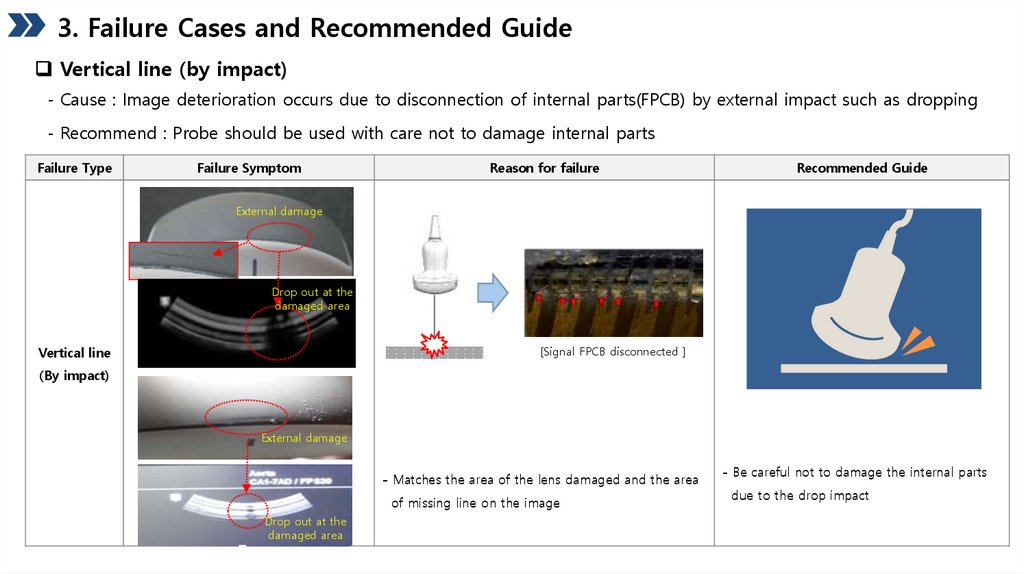
3. Failure Cases and Recommended GuideVertical line (by impact)
- Cause : Image deterioration occurs due to disconnection of internal parts(FPCB) by external impact such as dropping
- Recommend : Probe should be used with care not to damage internal parts
Failure Type
Failure Symptom
Reason for failure
Recommended Guide
External damage
Drop out at the
damaged area
[Signal FPCB disconnected ]
Vertical line
(By impact)
External damage
- Matches the area of the lens damaged and the area
of missing line on the image
Drop out at the
damaged area
- Be careful not to damage the internal parts
due to the drop impact
11.
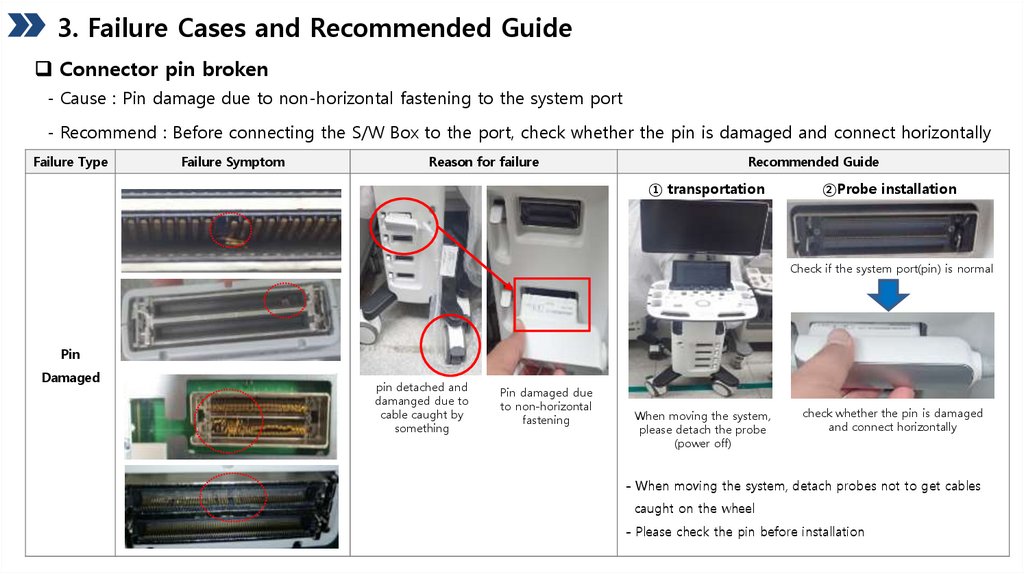
3. Failure Cases and Recommended GuideConnector pin broken
- Cause : Pin damage due to non-horizontal fastening to the system port
- Recommend : Before connecting the S/W Box to the port, check whether the pin is damaged and connect horizontally
Failure Type
Failure Symptom
Reason for failure
Recommended Guide
① transportation
②Probe installation
Check if the system port(pin) is normal
Pin
Damaged
pin detached and
damanged due to
cable caught by
something
Pin damaged due
to non-horizontal
fastening
When moving the system,
please detach the probe
(power off)
check whether the pin is damaged
and connect horizontally
- When moving the system, detach probes not to get cables
caught on the wheel
- Please check the pin before installation
12.
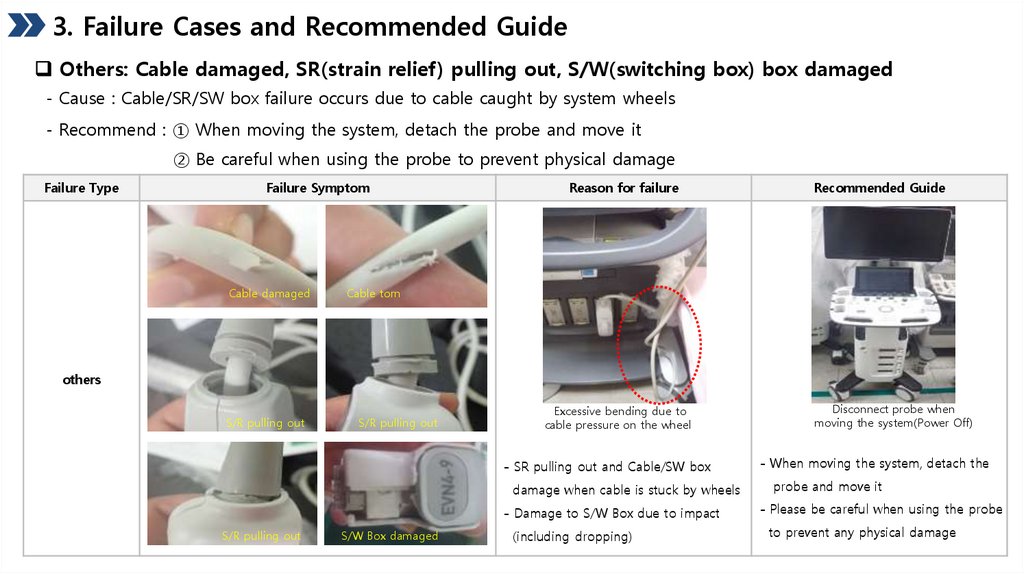
3. Failure Cases and Recommended GuideOthers: Cable damaged, SR(strain relief) pulling out, S/W(switching box) box damaged
- Cause : Cable/SR/SW box failure occurs due to cable caught by system wheels
- Recommend : ① When moving the system, detach the probe and move it
② Be careful when using the probe to prevent physical damage
Failure Type
Failure Symptom
Cable damaged
Reason for failure
Recommended Guide
Cable torn
others
S/R pulling out
S/R pulling out
Excessive bending due to
cable pressure on the wheel
- SR pulling out and Cable/SW box
damage when cable is stuck by wheels
S/R pulling out
S/W Box damaged
Disconnect probe when
moving the system(Power Off)
- When moving the system, detach the
probe and move it
- Damage to S/W Box due to impact
- Please be careful when using the probe
(including dropping)
to prevent any physical damage
13.
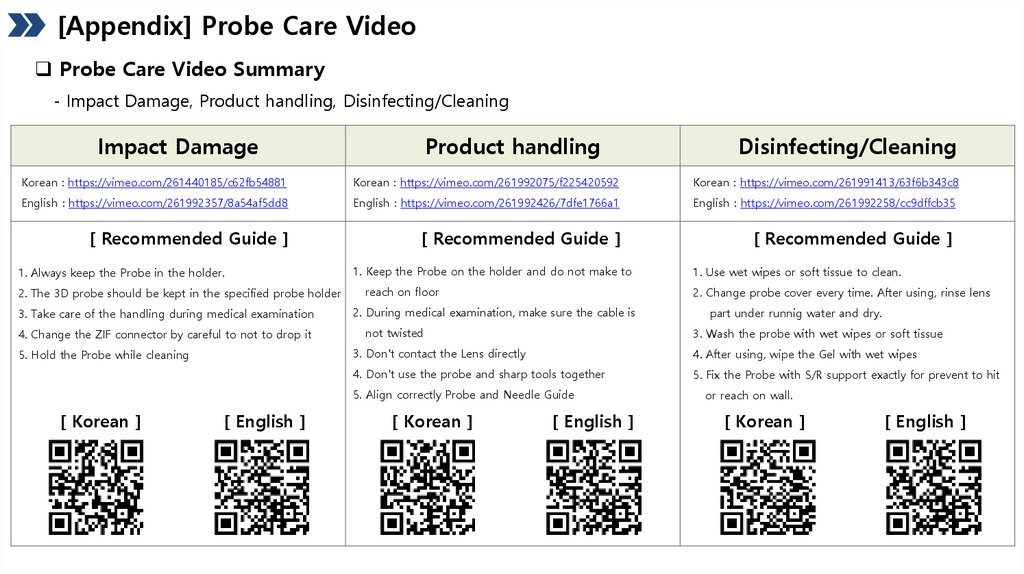
[Appendix] Probe Care VideoProbe Care Video Summary
- Impact Damage, Product handling, Disinfecting/Cleaning
Impact Damage
Product handling
Disinfecting/Cleaning
Korean : https://vimeo.com/261440185/c62fb54881
Korean : https://vimeo.com/261992075/f225420592
Korean : https://vimeo.com/261991413/63f6b343c8
English : https://vimeo.com/261992357/8a54af5dd8
English : https://vimeo.com/261992426/7dfe1766a1
English : https://vimeo.com/261992258/cc9dffcb35
[ Recommended Guide ]
[ Recommended Guide ]
[ Recommended Guide ]
1. Always keep the Probe in the holder.
2. The 3D probe should be kept in the specified probe holder
3. Take care of the handling during medical examination
4. Change the ZIF connector by careful to not to drop it
5. Hold the Probe while cleaning
1. Keep the Probe on the holder and do not make to
reach on floor
2. Change probe cover every time. After using, rinse lens
2. During medical examination, make sure the cable is
not twisted
[ English ]
part under runnig water and dry.
3. Wash the probe with wet wipes or soft tissue
3. Don't contact the Lens directly
4. After using, wipe the Gel with wet wipes
4. Don't use the probe and sharp tools together
5. Fix the Probe with S/R support exactly for prevent to hit
5. Align correctly Probe and Needle Guide
[ Korean ]
1. Use wet wipes or soft tissue to clean.
[ Korean ]
[ English ]
or reach on wall.
[ Korean ]
[ English ]
14.
[Appendix] Compatible disinfectant/cleanerhttps://samsunghealthcare.com/en/products/UltrasoundSystem