


 industry
Similar presentations:


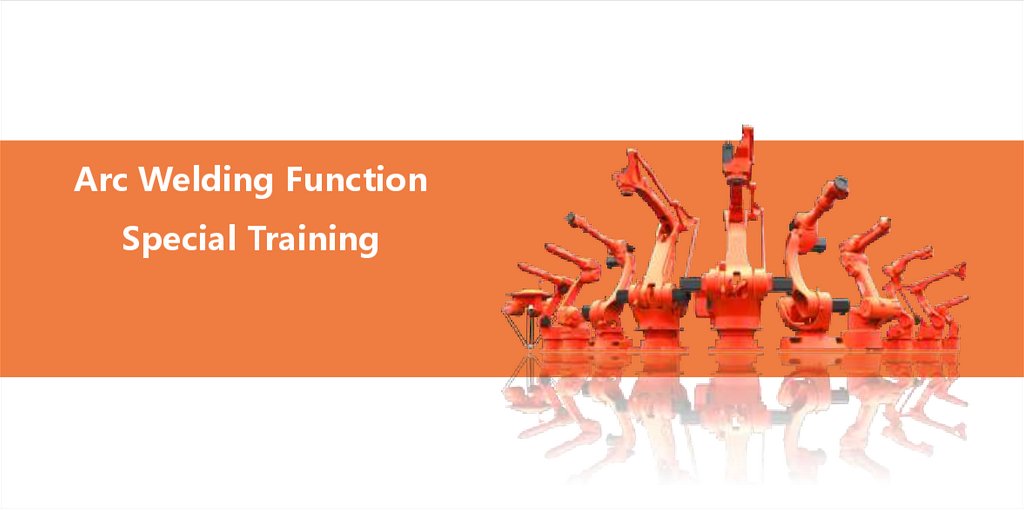
Arc Welding Function
1.
Arc Welding FunctionSpecial Training
2.
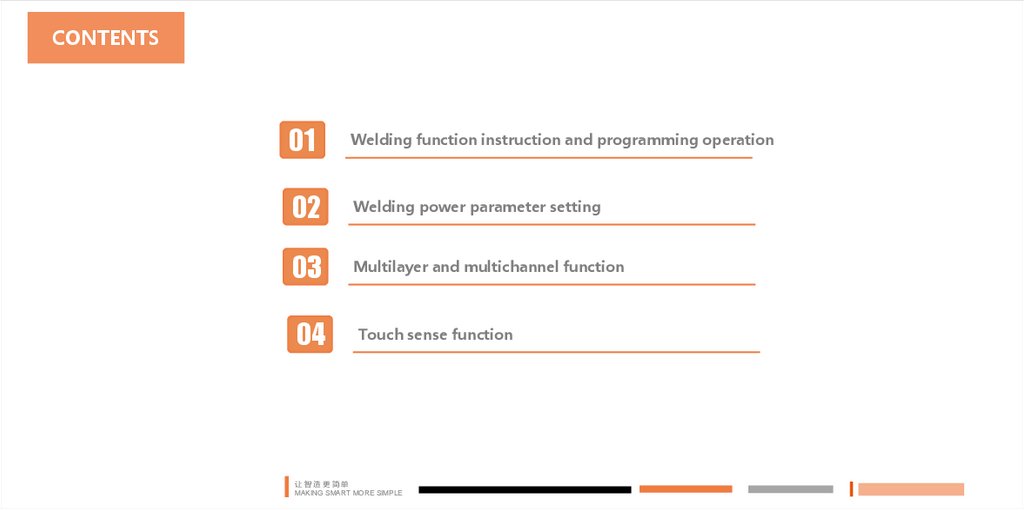
CONTENTS01
Welding function instruction and programming operation
02
Welding power parameter setting
03
Multilayer and multichannel function
04
Touch sense function
让智造更简单
MAKING SMART MORE SIMPLE
3.
PART 01Welding Function Instruction and
Programming Operation
让智造更简单
MAKING SMART MORE SIMPLE
4.
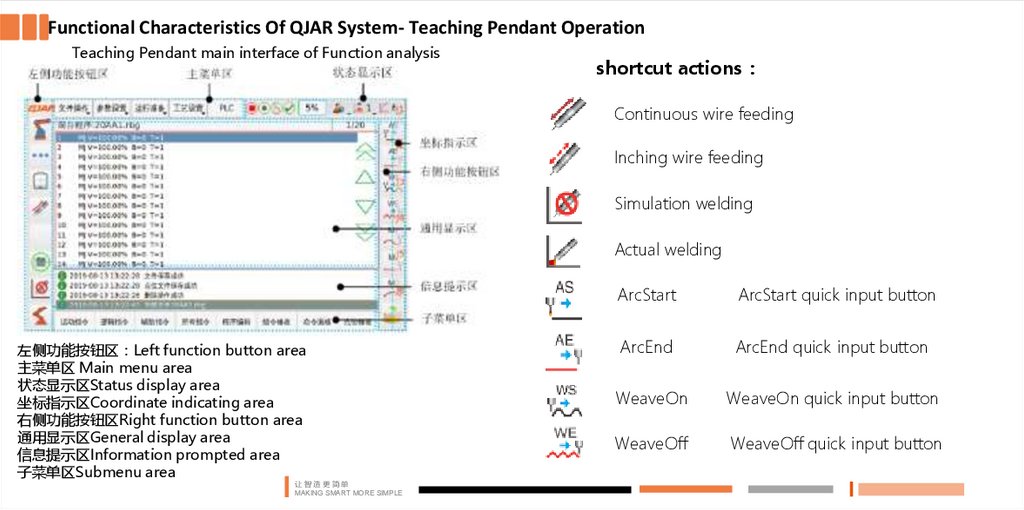
Functional Characteristics Of QJAR System- Teaching Pendant OperationTeaching Pendant main interface of Function analysis
shortcut actions
Continuous wire feeding
Inching wire feeding
Simulation welding
Actual welding
左侧功能按钮区 Left function button area
主菜单区 Main menu area
状态显示区Status display area
坐标指示区Coordinate indicating area
右侧功能按钮区Right function button area
通用显示区General display area
信息提示区Information prompted area
子菜单区Submenu area
让智造更简单
MAKING SMART MORE SIMPLE
ArcStart
ArcStart quick input button
ArcEnd
ArcEnd quick input button
WeaveOn
WeaveOn quick input button
WeaveOff
WeaveOff quick input button
5.
Functional Characteristics Of QJAR System- Basic process packageRobot welding process software - Easy to operate
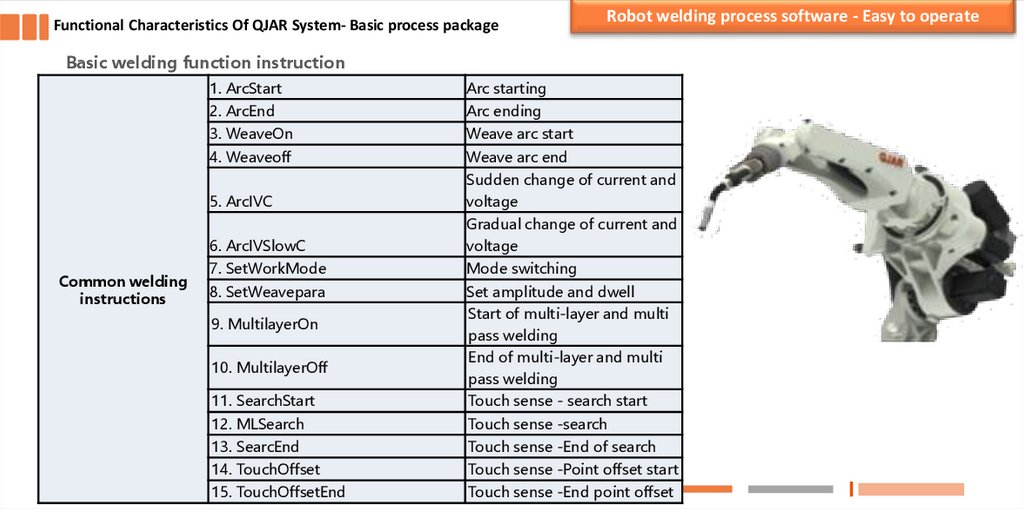
Basic welding function instruction
Common welding
instructions
1. ArcStart
Arc starting
2. ArcEnd
Arc ending
3. WeaveOn
Weave arc start
4. Weaveoff
Weave arc end
5. ArcIVC
Sudden change of current and
voltage
6. ArcIVSlowC
Gradual change of current and
voltage
7. SetWorkMode
Mode switching
8. SetWeavepara
Set amplitude and dwell
Start of multi-layer and multi
pass welding
End of multi-layer and multi
pass welding
9. MultilayerOn
10. MultilayerOff
11. SearchStart
Touch sense - search start
12. MLSearch
Touch sense -search
13. SearcEnd
Touch sense -End of search
14. TouchOffset
Touch sense -Point offset start
让智造更简单
MAKING SMART MORE SIMPLE
15. TouchOffsetEnd
Touch sense -End point offset
6.
Functional Characteristics Of QJAR System- Basic process packageQJAR system has powerful welding application function process software, which can meet
the welding process requirements in different environments
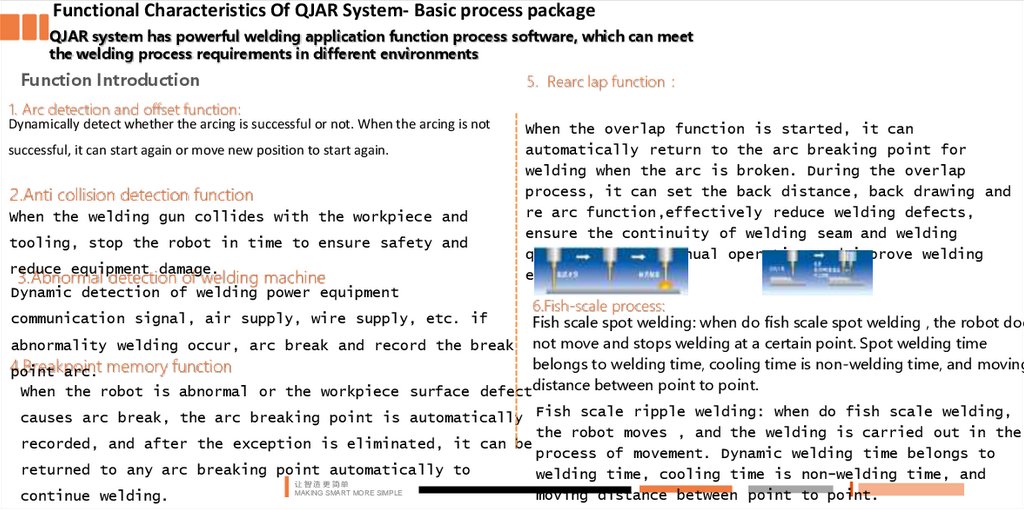
Function Introduction
1. Arc detection and offset function:
Dynamically detect whether the arcing is successful or not. When the arcing is not
successful, it can start again or move new position to start again.
2.Anti collision detection function
When the welding gun collides with the workpiece and
tooling, stop the robot in time to ensure safety and
reduce equipment damage.
3.Abnormal detection of welding machine
Dynamic detection of welding power equipment
5. Rearc lap function
When the overlap function is started, it can
automatically return to the arc breaking point for
welding when the arc is broken. During the overlap
process, it can set the back distance, back drawing and
re arc function,effectively reduce welding defects,
ensure the continuity of welding seam and welding
quality, reduce manual operation and improve welding
efficiency.
6.Fish-scale process:
Fish scale spot welding: when do fish scale spot welding , the robot doe
abnormality welding occur, arc break and record the break not move and stops welding at a certain point. Spot welding time
belongs to welding time, cooling time is non-welding time, and moving
4.Breakpoint
point arc. memory function
When the robot is abnormal or the workpiece surface defectdistance between point to point.
causes arc break, the arc breaking point is automatically Fish scale ripple welding: when do fish scale welding,
the robot moves , and the welding is carried out in the
recorded, and after the exception is eliminated, it can be
process of movement. Dynamic welding time belongs to
returned to any arc breaking point automatically to
welding time, cooling time is non-welding time, and
让智造更简单
MAKING SMART MORE SIMPLE
moving distance between point to point.
continue welding.
communication signal, air supply, wire supply, etc. if
7.
Functional Characteristics Of QJAR System- Basic process packageFunction Introduction
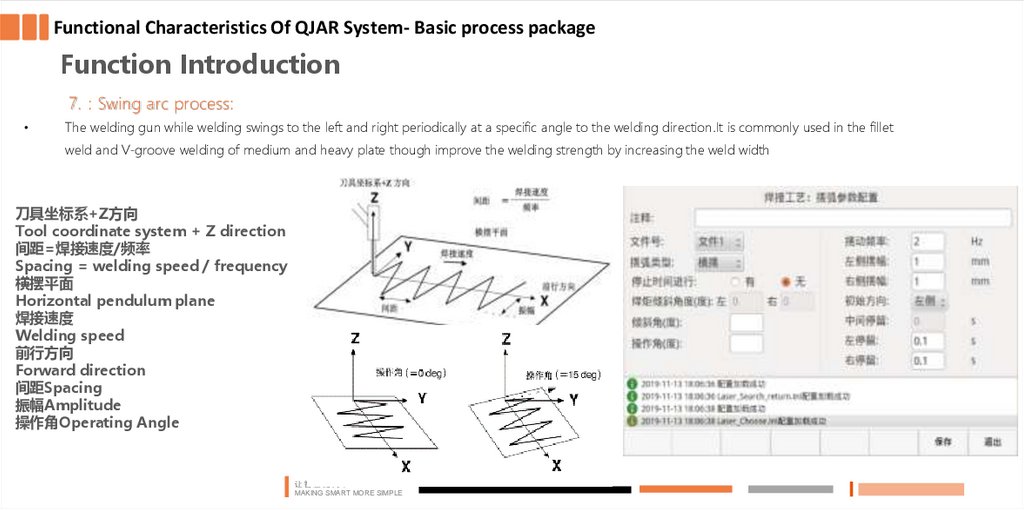
7. Swing arc process:
The welding gun while welding swings to the left and right periodically at a specific angle to the welding direction.It is commonly used in the fillet
weld and V-groove welding of medium and heavy plate though improve the welding strength by increasing the weld width
刀具坐标系+Z方向
Tool coordinate system + Z direction
间距=焊接速度/频率
Spacing = welding speed / frequency
横摆平面
Horizontal pendulum plane
焊接速度
Welding speed
前行方向
Forward direction
间距Spacing
振幅Amplitude
操作角Operating Angle
让智造更简单
MAKING SMART MORE SIMPLE
8.
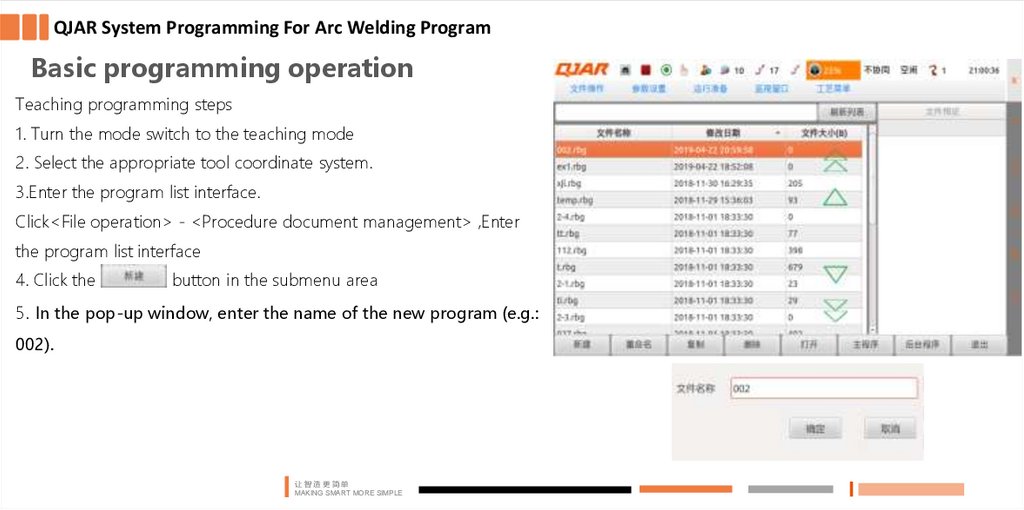
QJAR System Programming For Arc Welding ProgramBasic programming operation
Teaching programming steps
1. Turn the mode switch to the teaching mode
2. Select the appropriate tool coordinate system.
3.Enter the program list interface.
Click<File operation> - <Procedure document management> ,Enter
the program list interface
4. Click the
button in the submenu area
5. In the pop-up window, enter the name of the new program (e.g.:
002).
让智造更简单
MAKING SMART MORE SIMPLE
9.
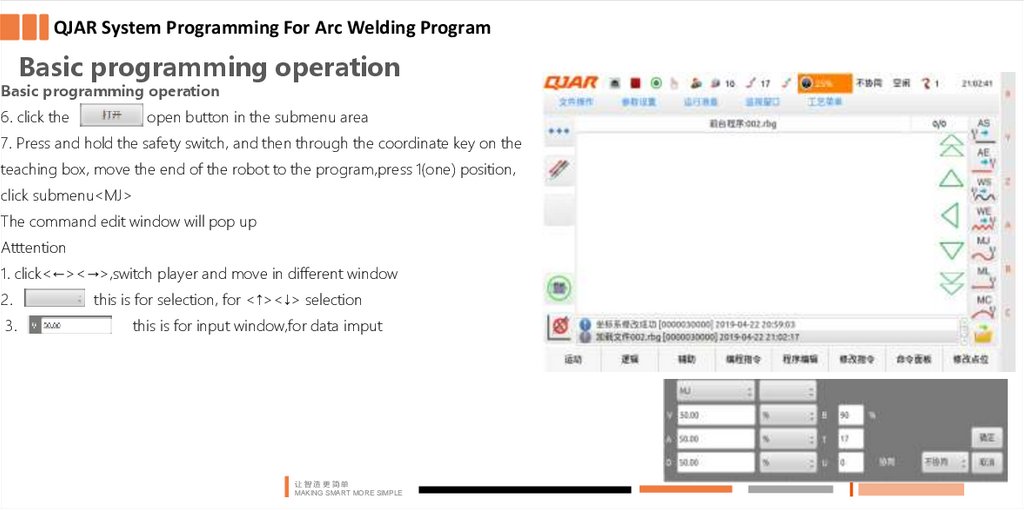
QJAR System Programming For Arc Welding ProgramBasic programming operation
Basic programming operation
6. click the
open button in the submenu area
7. Press and hold the safety switch, and then through the coordinate key on the
teaching box, move the end of the robot to the program,press 1(one) position,
click submenu<MJ>
The command edit window will pop up
Atttention
1. click<←><→>,switch player and move in different window
2.
3.
this is for selection, for <↑><↓> selection
this is for input window,for data imput
让智造更简单
MAKING SMART MORE SIMPLE
10.
QJAR System Programming For Arc Welding ProgramBasic programming operation
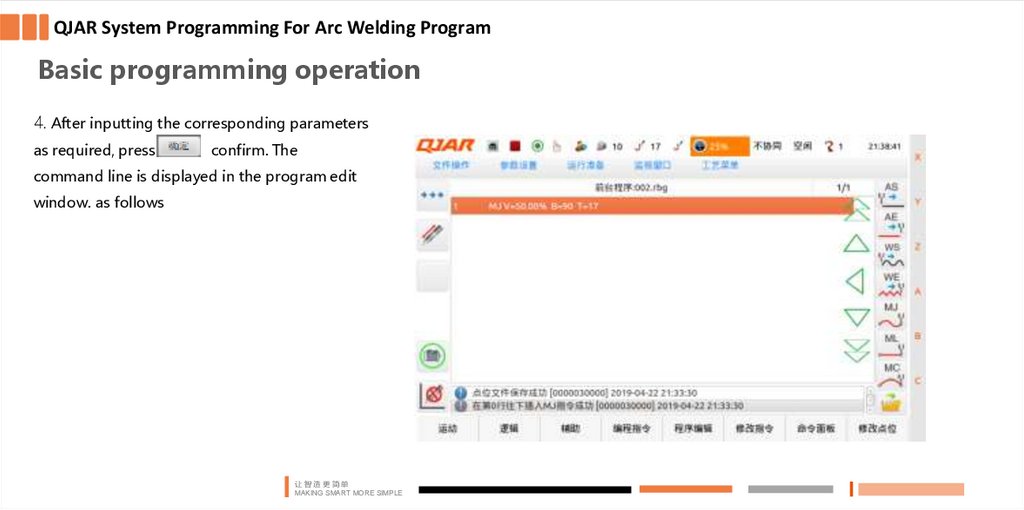
4. After inputting the corresponding parameters
as required, press
confirm. The
command line is displayed in the program edit
window. as follows
让智造更简单
MAKING SMART MORE SIMPLE
11.
QJAR System Programming For Arc Welding ProgramBasic programming operation
Click < programming instruction > - <arc welding
Instruction > - < arcstart >, and the following window will
pop up.
After entering the corresponding parameters as required, click the
confirm key,
and the command line will be displayed in the
program editing window.
让智造更简单
MAKING SMART MORE SIMPLE
12.
QJAR System Programming For Arc Welding ProgramBasic programming operation
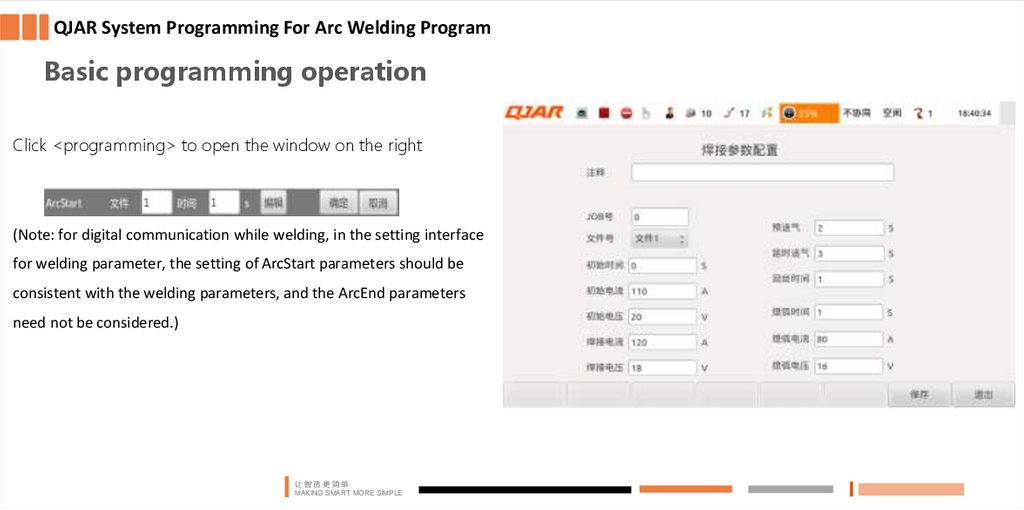
Click <programming> to open the window on the right
(Note: for digital communication while welding, in the setting interface
for welding parameter, the setting of ArcStart parameters should be
consistent with the welding parameters, and the ArcEnd parameters
need not be considered.)
让智造更简单
MAKING SMART MORE SIMPLE
13.
QJAR System Programming For Arc Welding ProgramBasic programming operation
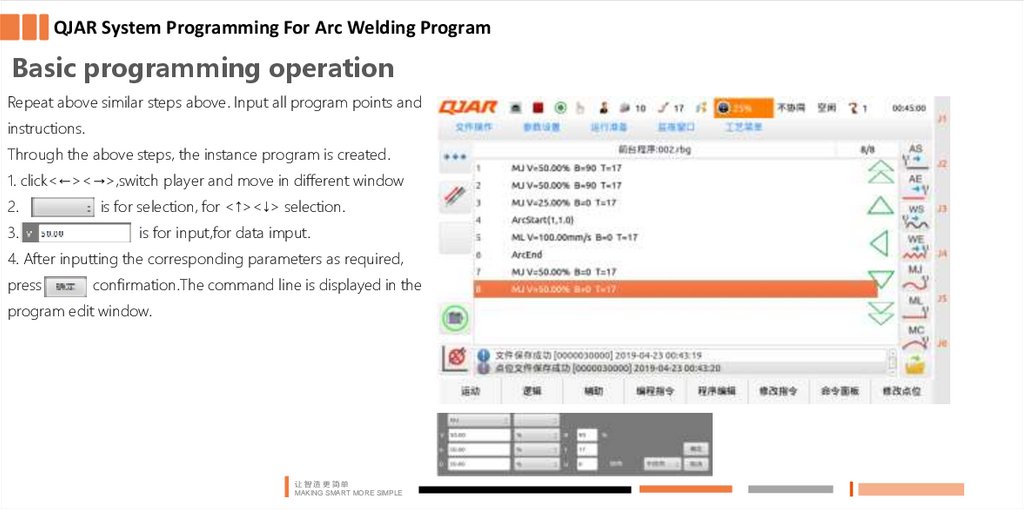
Repeat above similar steps above. Input all program points and
instructions.
Through the above steps, the instance program is created.
1. click<←><→>,switch player and move in different window
2.
is for selection, for <↑><↓> selection.
3.
is for input,for data imput.
4. After inputting the corresponding parameters as required,
press
confirmation.The command line is displayed in the
program edit window.
让智造更简单
MAKING SMART MORE SIMPLE
14.
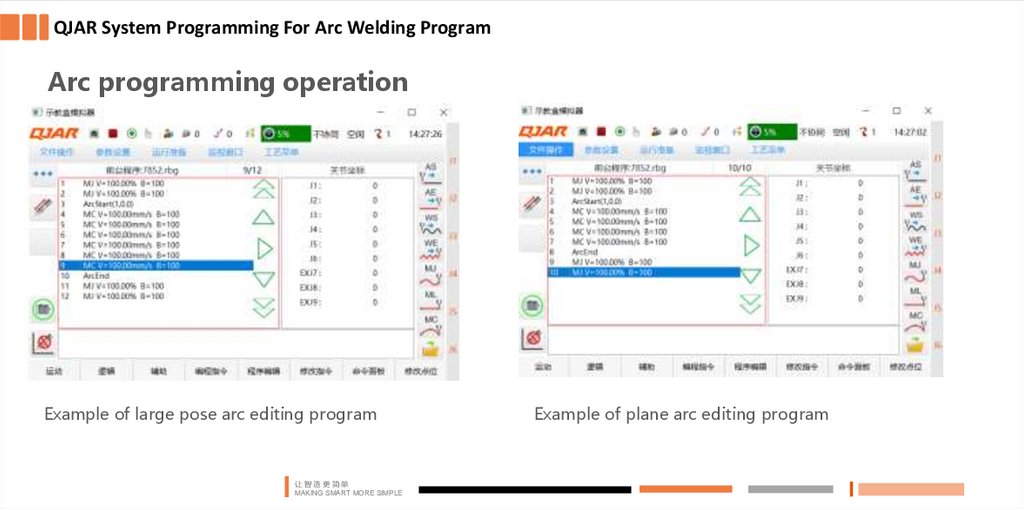
QJAR System Programming For Arc Welding ProgramArc programming operation
Example of large pose arc editing program
让智造更简单
MAKING SMART MORE SIMPLE
Example of plane arc editing program
15.
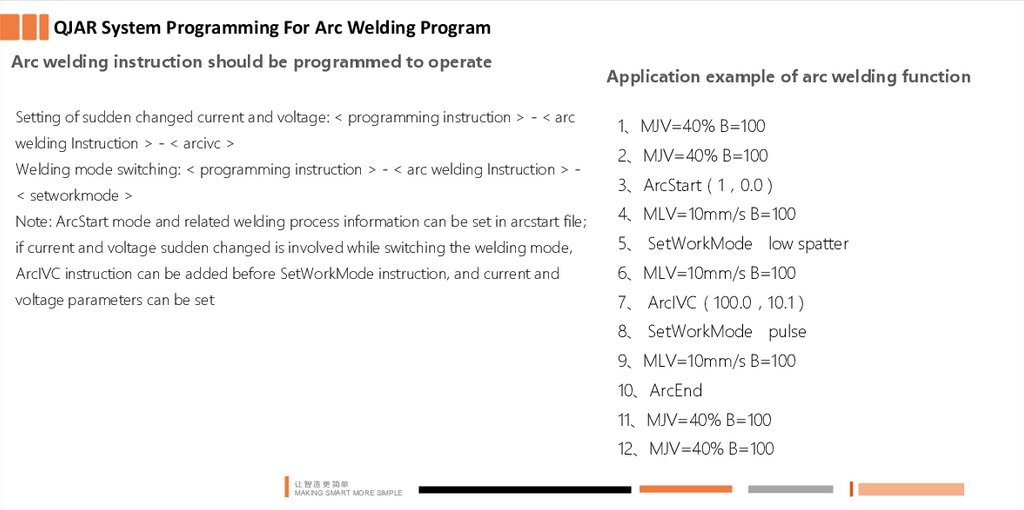
QJAR System Programming For Arc Welding ProgramArc welding instruction should be programmed to operate
Setting of sudden changed current and voltage: < programming instruction > - < arc
welding Instruction > - < arcivc >
Welding mode switching: < programming instruction > - < arc welding Instruction > < setworkmode >
Application example of arc welding function
1、MJV=40% B=100
2、MJV=40% B=100
3、ArcStart 1 0.0
Note: ArcStart mode and related welding process information can be set in arcstart file;
4、MLV=10mm/s B=100
if current and voltage sudden changed is involved while switching the welding mode,
5、 SetWorkMode low spatter
ArcIVC instruction can be added before SetWorkMode instruction, and current and
6、MLV=10mm/s B=100
voltage parameters can be set
7、 ArcIVC 100.0 10.1
8、 SetWorkMode pulse
9、MLV=10mm/s B=100
10、ArcEnd
11、MJV=40% B=100
12、MJV=40% B=100
让智造更简单
MAKING SMART MORE SIMPLE
16.
PART 02Arc welding power source
communication and application setting
让智造更简单
MAKING SMART MORE SIMPLE
17.
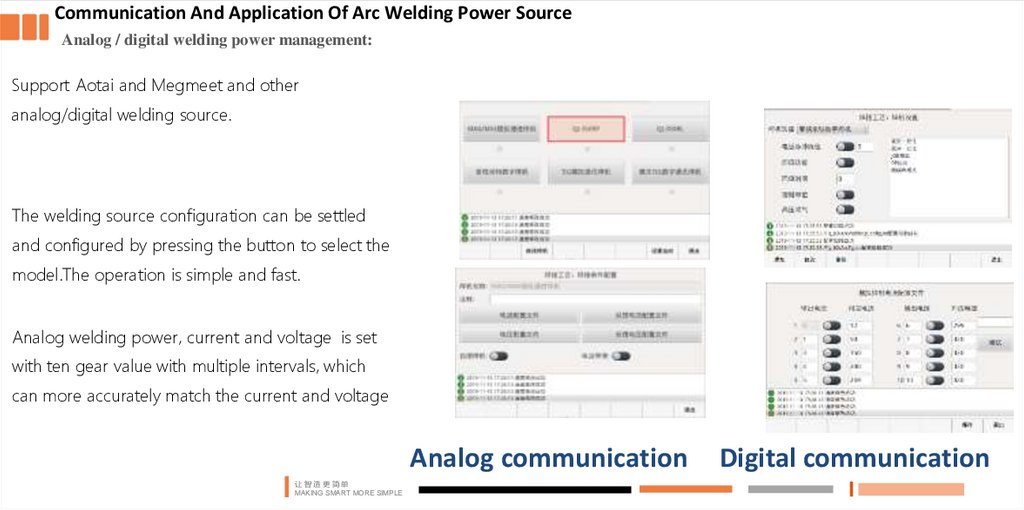
Communication And Application Of Arc Welding Power SourceAnalog / digital welding power management:
Support Aotai and Megmeet and other
analog/digital welding source.
The welding source configuration can be settled
and configured by pressing the button to select the
model.The operation is simple and fast.
Analog welding power, current and voltage is set
with ten gear value with multiple intervals, which
can more accurately match the current and voltage
Analog communication
让智造更简单
MAKING SMART MORE SIMPLE
Digital communication
18.
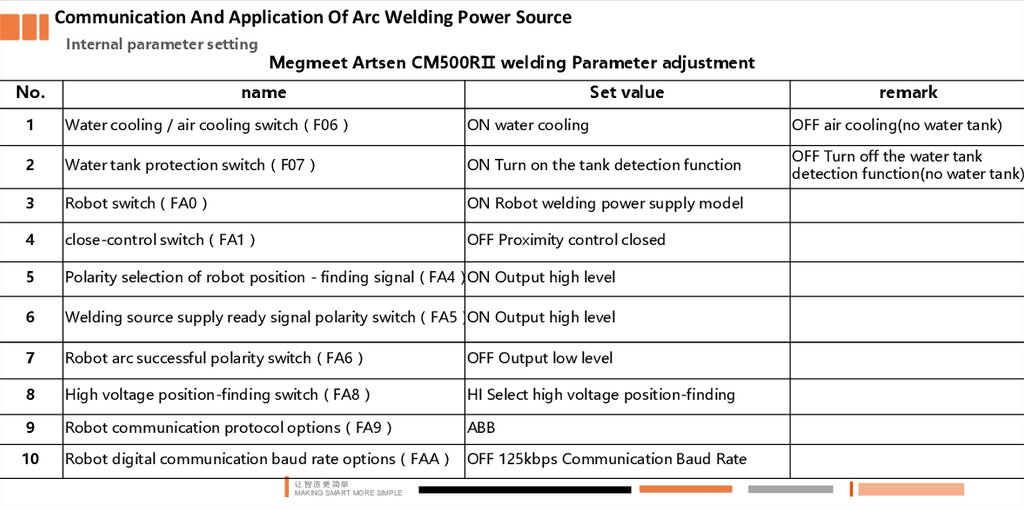
Communication And Application Of Arc Welding Power SourceInternal parameter setting
No.
Megmeet Artsen CM500RⅡ welding Parameter adjustment
name
Set value
remark
1
Water cooling / air cooling switch F06
ON water cooling
OFF air cooling(no water tank)
2
Water tank protection switch F07
ON Turn on the tank detection function
OFF Turn off the water tank
detection function(no water tank)
3
Robot switch FA0
ON Robot welding power supply model
4
close-control switch FA1
OFF Proximity control closed
5
Polarity selection of robot position - finding signal FA4 ON Output high level
6
Welding source supply ready signal polarity switch FA5 ON Output high level
7
Robot arc successful polarity switch FA6
OFF Output low level
8
High voltage position-finding switch FA8
HI Select high voltage position-finding
9
Robot communication protocol options FA9
ABB
10
Robot digital communication baud rate options FAA OFF 125kbps Communication Baud Rate
让智造更简单
MAKING SMART MORE SIMPLE
19.
PART 03Multilayer and multipass arc welding
function
让智造更简单
MAKING SMART MORE SIMPLE
20.
Multilayer and multipass arc welding functionMultilayer and multichannel arc welding function introduction
The multi-layer welding function has the following two functions
Memory and reproduction function of welding path: This is a function of
storing the compensation data obtained by tracking sensors such as arc
sensor in the memory called "path data", which should be used for the
second welding after the first time.
Welding path offset function: This is a function based on the data of the
position register to offset the welding path after the second layer on the
whole. At this time, the offset method is a special method for multi-layer
welding function.
让智造更简单
MAKING SMART MORE SIMPLE
21.
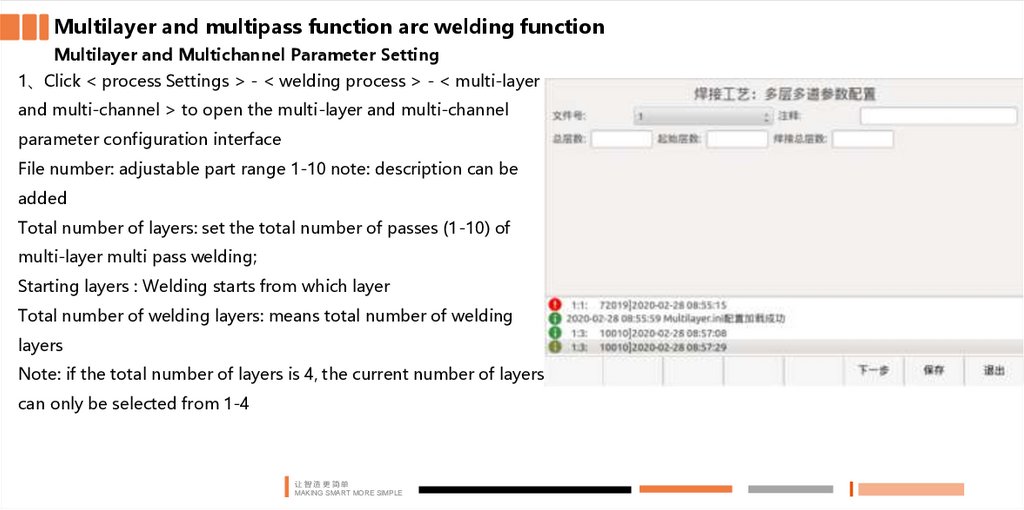
Multilayer and multipass function arc welding functionMultilayer and Multichannel Parameter Setting
1、Click < process Settings > - < welding process > - < multi-layer
and multi-channel > to open the multi-layer and multi-channel
parameter configuration interface
File number: adjustable part range 1-10 note: description can be
added
Total number of layers: set the total number of passes (1-10) of
multi-layer multi pass welding;
Starting layers : Welding starts from which layer
Total number of welding layers: means total number of welding
layers
Note: if the total number of layers is 4, the current number of layers
can only be selected from 1-4
让智造更简单
MAKING SMART MORE SIMPLE
22.
Multilayer and multipass function arc welding functionMultilayer and Multichannel Parameter Setting
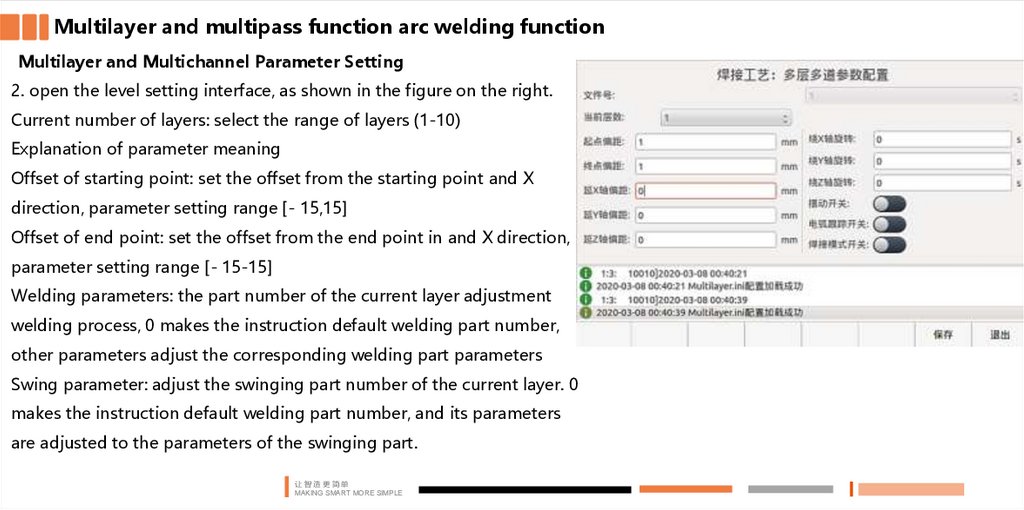
2. open the level setting interface, as shown in the figure on the right.
Current number of layers: select the range of layers (1-10)
Explanation of parameter meaning
Offset of starting point: set the offset from the starting point and X
direction, parameter setting range [- 15,15]
Offset of end point: set the offset from the end point in and X direction,
parameter setting range [- 15-15]
Welding parameters: the part number of the current layer adjustment
welding process, 0 makes the instruction default welding part number,
other parameters adjust the corresponding welding part parameters
Swing parameter: adjust the swinging part number of the current layer. 0
makes the instruction default welding part number, and its parameters
are adjusted to the parameters of the swinging part.
让智造更简单
MAKING SMART MORE SIMPLE
23.
Multilayer and multipass function arc welding functionMultilayer and Multichannel Parameter Setting
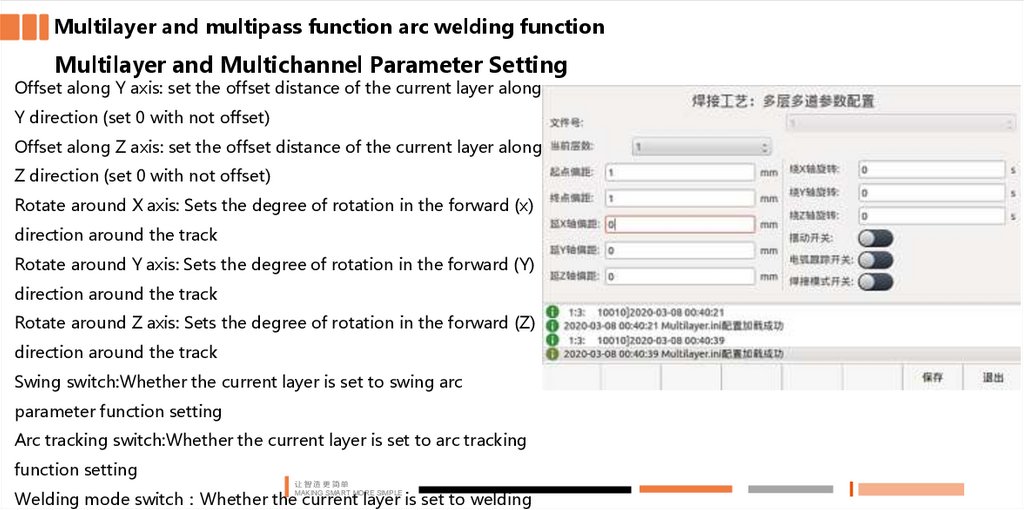
Offset along Y axis: set the offset distance of the current layer along
Y direction (set 0 with not offset)
Offset along Z axis: set the offset distance of the current layer along
Z direction (set 0 with not offset)
Rotate around X axis: Sets the degree of rotation in the forward (x)
direction around the track
Rotate around Y axis: Sets the degree of rotation in the forward (Y)
direction around the track
Rotate around Z axis: Sets the degree of rotation in the forward (Z)
direction around the track
Swing switch:Whether the current layer is set to swing arc
parameter function setting
Arc tracking switch:Whether the current layer is set to arc tracking
function setting
让智造更简单
MAKING SMART MORE SIMPLE
Welding mode switch Whether the current layer is set to welding
24.
Multilayer and multipass function arc welding functionMultilayer and multichannel coordinate system direction
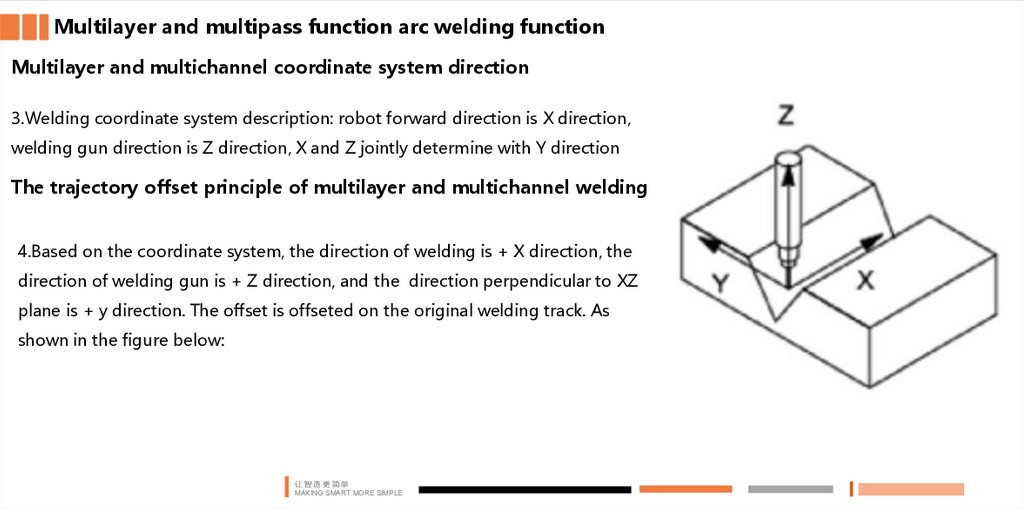
3.Welding coordinate system description: robot forward direction is X direction,
welding gun direction is Z direction, X and Z jointly determine with Y direction
The trajectory offset principle of multilayer and multichannel welding
4.Based on the coordinate system, the direction of welding is + X direction, the
direction of welding gun is + Z direction, and the direction perpendicular to XZ
plane is + y direction. The offset is offseted on the original welding track. As
shown in the figure below:
让智造更简单
MAKING SMART MORE SIMPLE
25.
Multilayer and multipass arc welding function9. ArcStart(1,1) // Arc starting welding
Multilayer and multichannel Procedural programming
10. Weaveon(1) // Weave start
11. ArcTrackStart(1) // Arc tracking begins
1. MJ V=40.00% B=0 T=1
12. ML V=8mm/s B=0 T=1 // Weld seam
2. MJ V=40.00% B=0 T=1
13. ML V=8mm/s B=0 T=1 // Weld seam
3. VA10=0
14. MC V=8mm/s B=0 T=1 // Circular arc welding
4. WHILE(VA10<3)
5. INC VA10 // VA10 Automatic plus one
6. MultilayerOn(1)// Multi-layer, multi-pass art start
7. MJ V=80% B=0 T=1
8. ML V=100.00mm/s B=0 T=1 // The starting point of the weld
(this procedure must not be omitted and should be in the same
line as the starting point and not too far apart, otherwise it may
cause calculation errors. The program can only be ML with a speed
of 100, too small a speed does not move noticeably, it is almost
motionless).
让智造更简单
MAKING SMART MORE SIMPLE
seam
15. MC V=8mm/s B=0 T=1 // Circular arc welding
seam
16. ArcTrackEnd // End of arc tracking
17. Weaveoff // End of swing
18. ArcEnd // End of welding
19. MultilayerOff // End of multi-layered multi-pass
work
20. ML V=200mm/s B=100 T=1 // Transition point
21. MJ V=80% B=100 T=1 // Transition point
26.
Multilayer and multipass arc welding functionMultilayer and multichannel Procedural programming
22. MJ V=80% B=0 T=1 // Transition point
23. ENDWHILE
Note: In this program, the coordinate system follows the x-axis (x+) in the direction of the weld, the y-axis (y+)
perpendicular to the weld and the z-axis (z+) in the direction of the gun lift. When teaching, the number of layers is set
to the current number of layers, then the number of layers shown during teaching is the current set number of layers.
让智造更简单
MAKING SMART MORE SIMPLE
27.
PART 04Touch Sense
Function
让智造更简单
MAKING SMART MORE SIMPLE
28.
Touch Sense FunctionIntroduction for Touch Sense Function
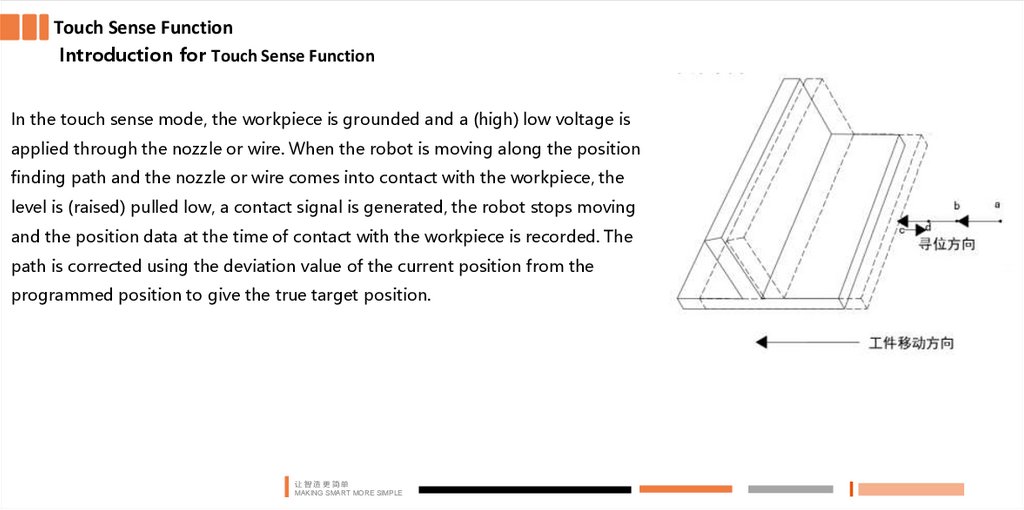
In the touch sense mode, the workpiece is grounded and a (high) low voltage is
applied through the nozzle or wire. When the robot is moving along the position
finding path and the nozzle or wire comes into contact with the workpiece, the
level is (raised) pulled low, a contact signal is generated, the robot stops moving
and the position data at the time of contact with the workpiece is recorded. The
path is corrected using the deviation value of the current position from the
programmed position to give the true target position.
让智造更简单
MAKING SMART MORE SIMPLE
29.
Touch Sense FunctionDB15
Definition of analog communication
definition
1
GND
2
annealed wire
The analog welding machine feedback the signal to the robot and
3
GND
connects it to pin 13 of DB15. The robot connects the welding
4
gas checking
signal to IO terminal Y12 (R2 interface IO board)
5
GND
6
arcstart signal
7
GND
8
wire feed
9
AGND
10
output current
11
output voltage
12
——
13
position-findling feedback
14
arcstart successful signal
15
24V
GND
IO板
让智造更简单
MAKING SMART MORE SIMPLE
Y12 Pin seek start
30.
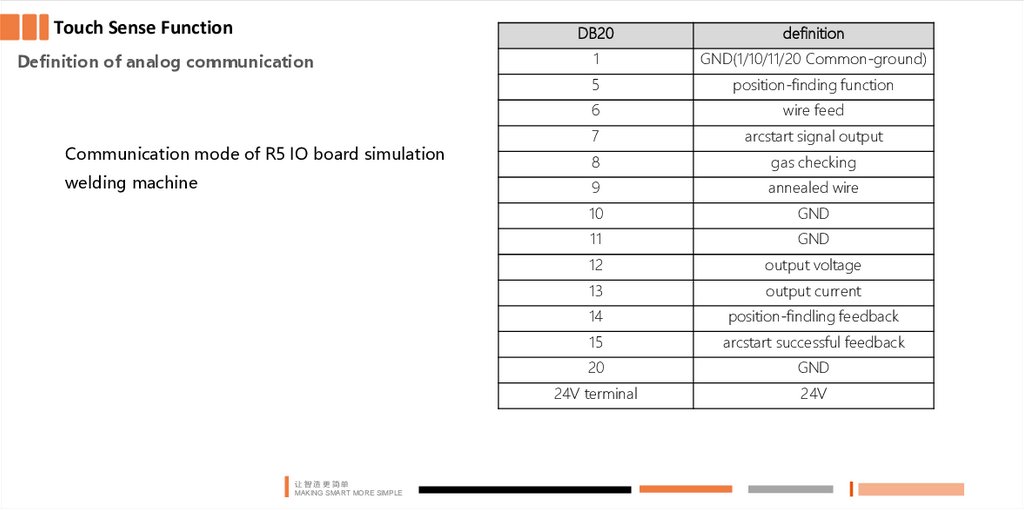
Touch Sense FunctionDefinition of analog communication
Communication mode of R5 IO board simulation
welding machine
让智造更简单
MAKING SMART MORE SIMPLE
DB20
definition
1
GND(1/10/11/20 Common-ground)
5
position-finding function
6
wire feed
7
arcstart signal output
8
gas checking
9
annealed wire
10
GND
11
GND
12
output voltage
13
output current
14
position-findling feedback
15
arcstart successful feedback
20
GND
24V terminal
24V
31.
Touch Sense FunctionParameter setting
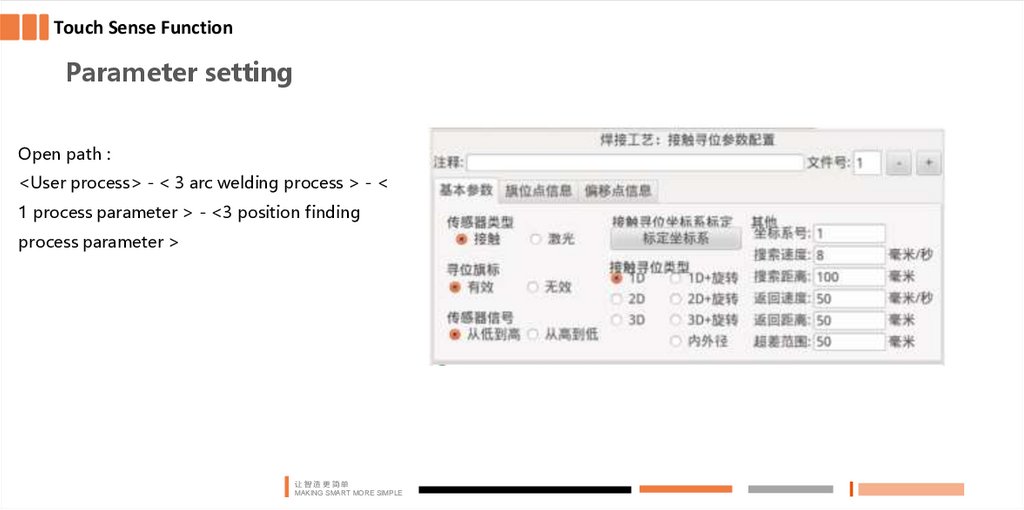
Open path :
<User process> - < 3 arc welding process > - <
1 process parameter > - <3 position finding
process parameter >
让智造更简单
MAKING SMART MORE SIMPLE
32.
Touch Sense functionParameter setting
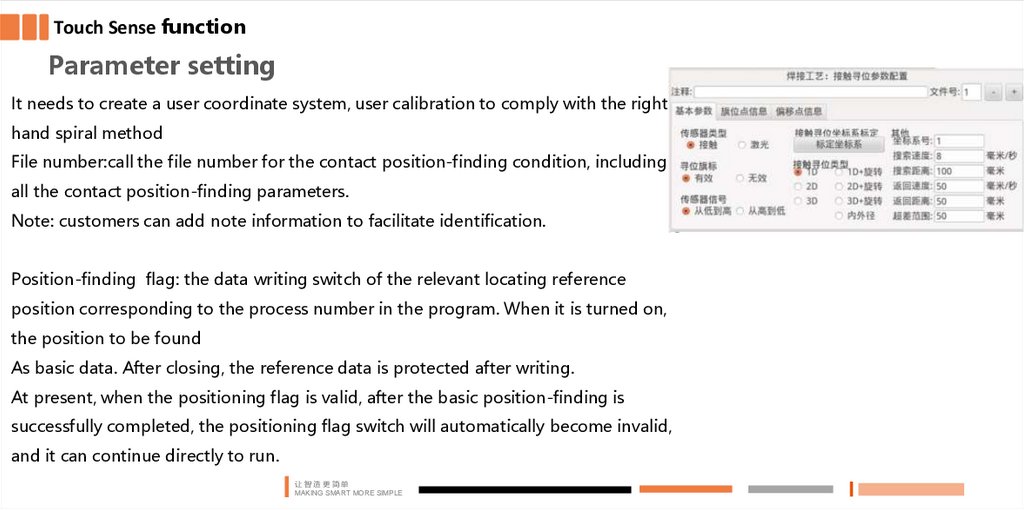
It needs to create a user coordinate system, user calibration to comply with the righthand spiral method
File number:call the file number for the contact position-finding condition, including
all the contact position-finding parameters.
Note: customers can add note information to facilitate identification.
Position-finding flag: the data writing switch of the relevant locating reference
position corresponding to the process number in the program. When it is turned on,
the position to be found
As basic data. After closing, the reference data is protected after writing.
At present, when the positioning flag is valid, after the basic position-finding is
successfully completed, the positioning flag switch will automatically become invalid,
and it can continue directly to run.
让智造更简单
MAKING SMART MORE SIMPLE
33.
Touch Sense FunctionParameter setting
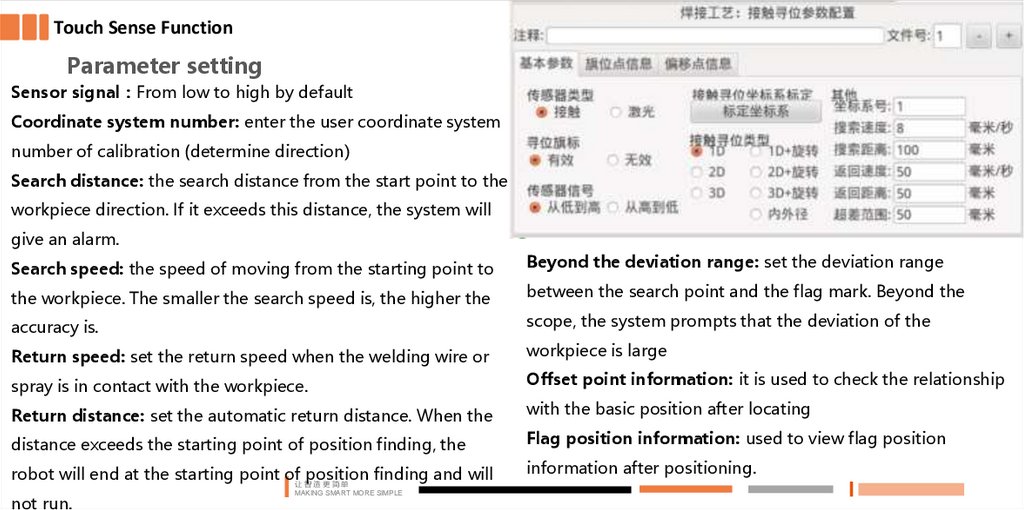
Sensor signal From low to high by default
Coordinate system number: enter the user coordinate system
number of calibration (determine direction)
Search distance: the search distance from the start point to the
workpiece direction. If it exceeds this distance, the system will
give an alarm.
Search speed: the speed of moving from the starting point to
Beyond the deviation range: set the deviation range
the workpiece. The smaller the search speed is, the higher the
between the search point and the flag mark. Beyond the
accuracy is.
scope, the system prompts that the deviation of the
Return speed: set the return speed when the welding wire or
workpiece is large
spray is in contact with the workpiece.
Offset point information: it is used to check the relationship
Return distance: set the automatic return distance. When the
with the basic position after locating
distance exceeds the starting point of position finding, the
Flag position information: used to view flag position
robot will end at the starting point of让 智position
finding and will
造更简单
information after positioning.
not run.
MAKING SMART MORE SIMPLE
34.
Touch Sense Function1D Function details
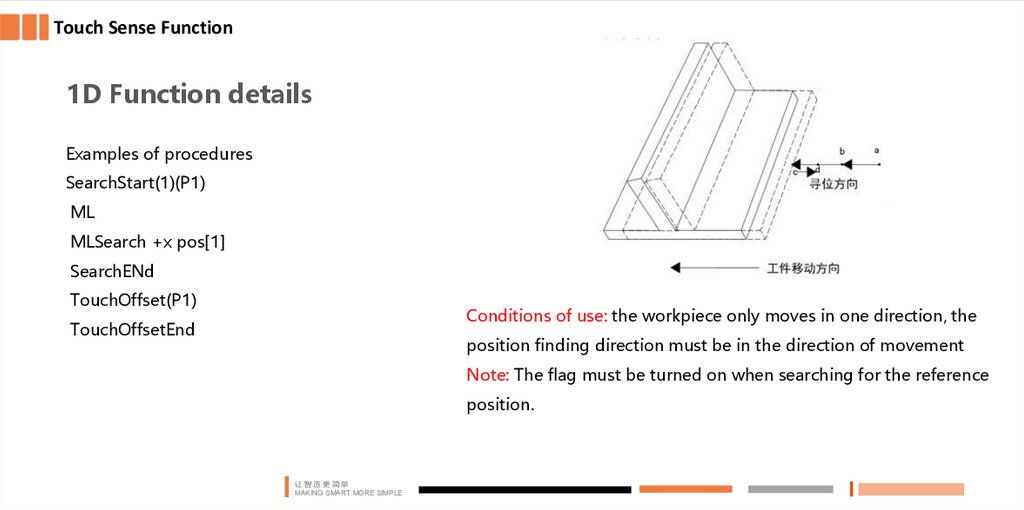
Examples of procedures
SearchStart(1)(P1)
ML
MLSearch +x pos[1]
SearchENd
TouchOffset(P1)
Conditions of use: the workpiece only moves in one direction, the
TouchOffsetEnd
position finding direction must be in the direction of movement
Note: The flag must be turned on when searching for the reference
position.
让智造更简单
MAKING SMART MORE SIMPLE
35.
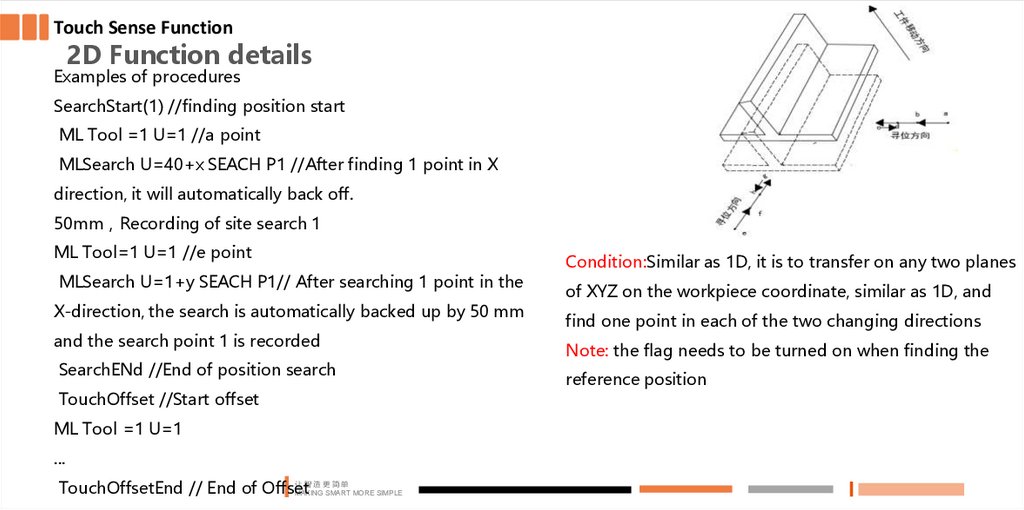
Touch Sense Function2D Function details
Examples of procedures
SearchStart(1) //finding position start
ML Tool =1 U=1 //a point
MLSearch U=40+x SEACH P1 //After finding 1 point in X
direction, it will automatically back off.
50mm Recording of site search 1
ML Tool=1 U=1 //e point
MLSearch U=1+y SEACH P1// After searching 1 point in the
X-direction, the search is automatically backed up by 50 mm
and the search point 1 is recorded
SearchENd //End of position search
TouchOffset //Start offset
ML Tool =1 U=1
...
让智造更简单
TouchOffsetEnd // End of Offset
MAKING SMART MORE SIMPLE
Condition:Similar as 1D, it is to transfer on any two planes
of XYZ on the workpiece coordinate, similar as 1D, and
find one point in each of the two changing directions
Note: the flag needs to be turned on when finding the
reference position
36.
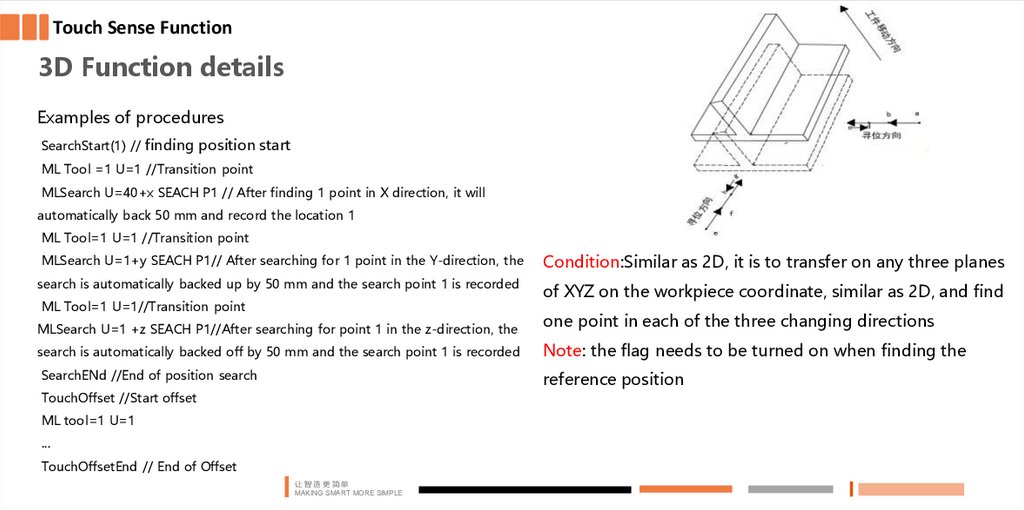
Touch Sense Function3D Function details
Examples of procedures
SearchStart(1) // finding position start
ML Tool =1 U=1 //Transition point
MLSearch U=40+x SEACH P1 // After finding 1 point in X direction, it will
automatically back 50 mm and record the location 1
ML Tool=1 U=1 //Transition point
MLSearch U=1+y SEACH P1// After searching for 1 point in the Y-direction, the
search is automatically backed up by 50 mm and the search point 1 is recorded
ML Tool=1 U=1//Transition point
MLSearch U=1 +z SEACH P1//After searching for point 1 in the z-direction, the
search is automatically backed off by 50 mm and the search point 1 is recorded
SearchENd //End of position search
Condition:Similar as 2D, it is to transfer on any three planes
of XYZ on the workpiece coordinate, similar as 2D, and find
one point in each of the three changing directions
Note: the flag needs to be turned on when finding the
reference position
TouchOffset //Start offset
ML tool=1 U=1
...
TouchOffsetEnd // End of Offset
让智造更简单
MAKING SMART MORE SIMPLE
37.
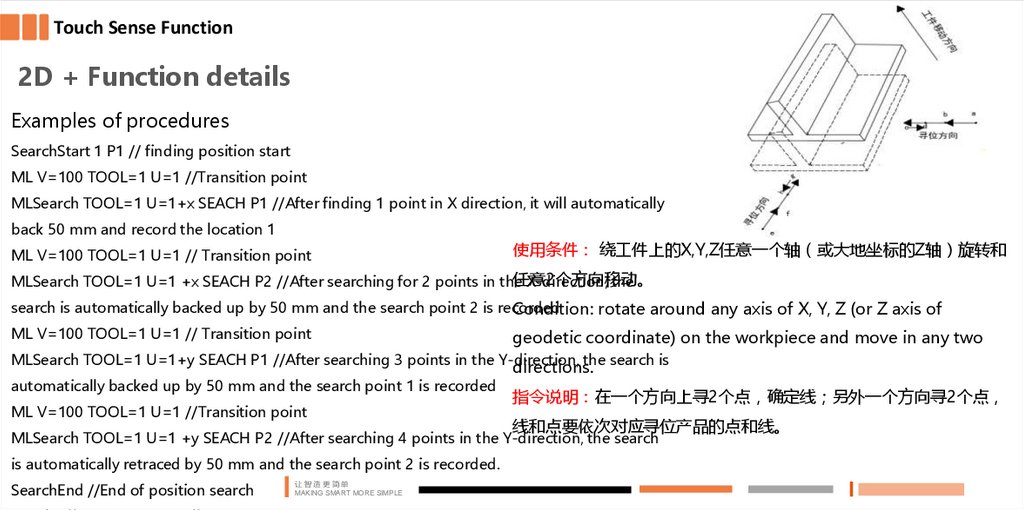
Touch Sense Function2D + Function details
Examples of procedures
SearchStart 1 P1 // finding position start
ML V=100 TOOL=1 U=1 //Transition point
MLSearch TOOL=1 U=1+x SEACH P1 //After finding 1 point in X direction, it will automatically
back 50 mm and record the location 1
ML V=100 TOOL=1 U=1 // Transition point
使用条件 绕工件上的X,Y,Z任意一个轴 或大地坐标的Z轴 旋转和
任意2个方向移动。
MLSearch TOOL=1 U=1 +x SEACH P2 //After searching for 2 points in the
X-direction, the
search is automatically backed up by 50 mm and the search point 2 is recorded
Condition: rotate around any axis of X, Y, Z (or Z axis of
ML V=100 TOOL=1 U=1 // Transition point
geodetic coordinate) on the workpiece and move in any two
MLSearch TOOL=1 U=1+y SEACH P1 //After searching 3 points in the Y-direction, the search is
automatically backed up by 50 mm and the search point 1 is recorded
ML V=100 TOOL=1 U=1 //Transition point
directions.
指令说明 在一个方向上寻2个点 确定线 另外一个方向寻2个点
线和点要依次对应寻位产品的点和线。
MLSearch TOOL=1 U=1 +y SEACH P2 //After searching 4 points in the Y-direction, the search
is automatically retraced by 50 mm and the search point 2 is recorded.
SearchEnd //End of position search
让智造更简单
MAKING SMART MORE SIMPLE
38.
Touch Sense Function2D + Function details
Examples of procedures
SearchStart 1 P1 // finding position start
ML V=100 TOOL=1 U=1 //Transition point
MLSearch TOOL=1 U=1+x SEACH P1 //After finding 1 point in X direction, it will automatically back 50 mm and record the location 1
ML V=100 TOOL=1 U=1 // Transition point
MLSearch TOOL=1 U=1 +x SEACH P2 //After searching for 2 points in the X-direction, the search is automatically backed up by 50 mm and the
search point 2 is recorded
ML V=100 TOOL=1 U=1 // Transition point
MLSearch TOOL=1 U=1+y SEACH P1 //After searching 3 points in the Y-direction, the search is automatically backed up by 50 mm and the search
point 1 is recorded
ML V=100 TOOL=1 U=1 //Transition point
MLSearch TOOL=1 U=1 +y SEACH P2 //After searching 4 points in the Y-direction, the search is automatically retraced by 50 mm and the search
point 2 is recorded.
SearchEnd //End of position search
TouchOffset P[1] //Start offset P1
ML V=100 TOOL=1 U=1
……
//Offset data section
TouchOffsetEnd // End of Offset
让智造更简单
MAKING SMART MORE SIMPLE
39.
Touch Sense Function3D + Function details
Examples of procedures
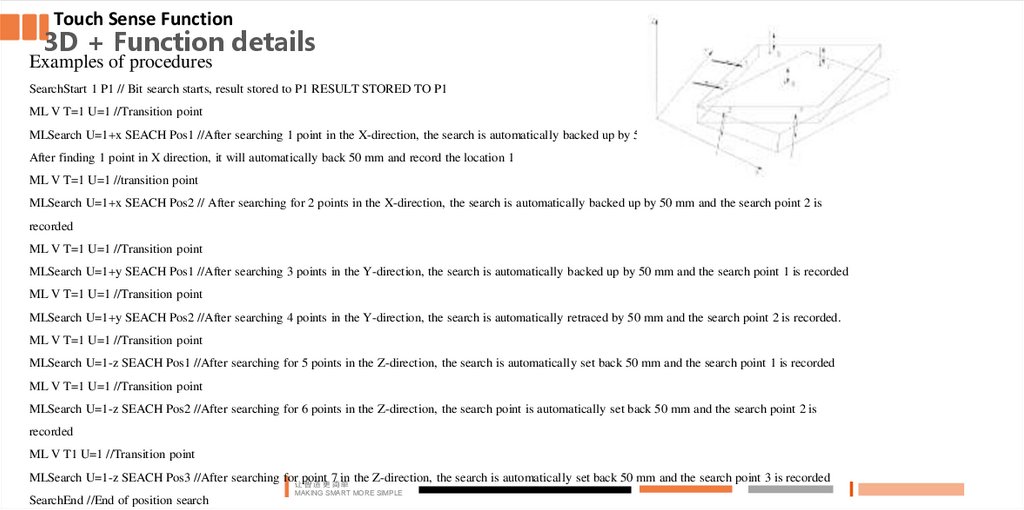
SearchStart 1 P1 // Bit search starts, result stored to P1 RESULT STORED TO P1
ML V T=1 U=1 //Transition point
MLSearch U=1+x SEACH Pos1 //After searching 1 point in the X-direction, the search is automatically backed up by 50 mm and the search point 1 is recorded
After finding 1 point in X direction, it will automatically back 50 mm and record the location 1
ML V T=1 U=1 //transition point
MLSearch U=1+x SEACH Pos2 // After searching for 2 points in the X-direction, the search is automatically backed up by 50 mm and the search point 2 is
recorded
ML V T=1 U=1 //Transition point
MLSearch U=1+y SEACH Pos1 //After searching 3 points in the Y-direction, the search is automatically backed up by 50 mm and the search point 1 is recorded
ML V T=1 U=1 //Transition point
MLSearch U=1+y SEACH Pos2 //After searching 4 points in the Y-direction, the search is automatically retraced by 50 mm and the search point 2 is recorded.
ML V T=1 U=1 //Transition point
MLSearch U=1-z SEACH Pos1 //After searching for 5 points in the Z-direction, the search is automatically set back 50 mm and the search point 1 is recorded
ML V T=1 U=1 //Transition point
MLSearch U=1-z SEACH Pos2 //After searching for 6 points in the Z-direction, the search point is automatically set back 50 mm and the search point 2 is
recorded
ML V T1 U=1 //Transition point
MLSearch U=1-z SEACH Pos3 //After searching for让point
7 in the Z-direction, the search is automatically set back 50 mm and the search point 3 is recorded
智造更简单
SearchEnd //End of position search
MAKING SMART MORE SIMPLE
40.
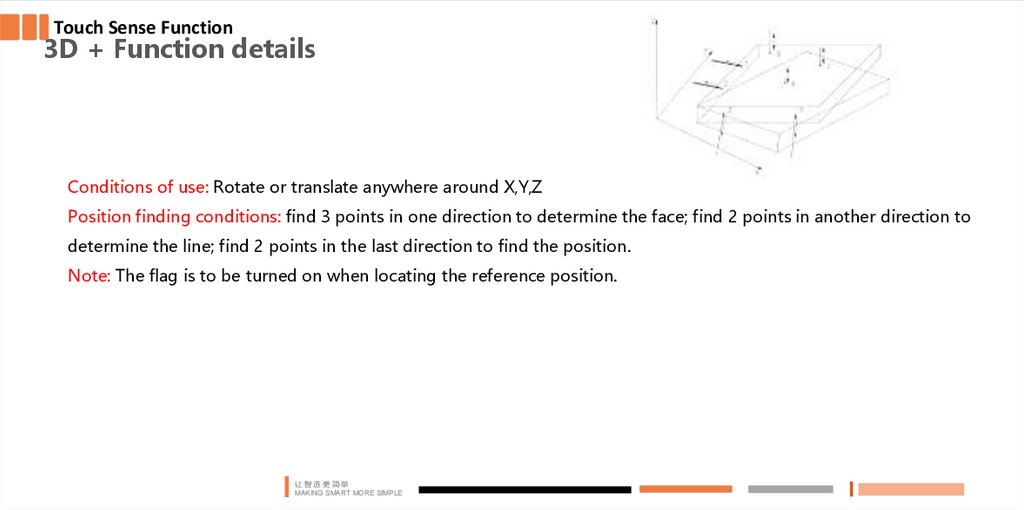
Touch Sense Function3D + Function details
Conditions of use: Rotate or translate anywhere around X,Y,Z
Position finding conditions: find 3 points in one direction to determine the face; find 2 points in another direction to
determine the line; find 2 points in the last direction to find the position.
Note: The flag is to be turned on when locating the reference position.
让智造更简单
MAKING SMART MORE SIMPLE
41.
Touch Sense FunctionDetailed explanation of internal and external diameter positioning function
Examples of procedures
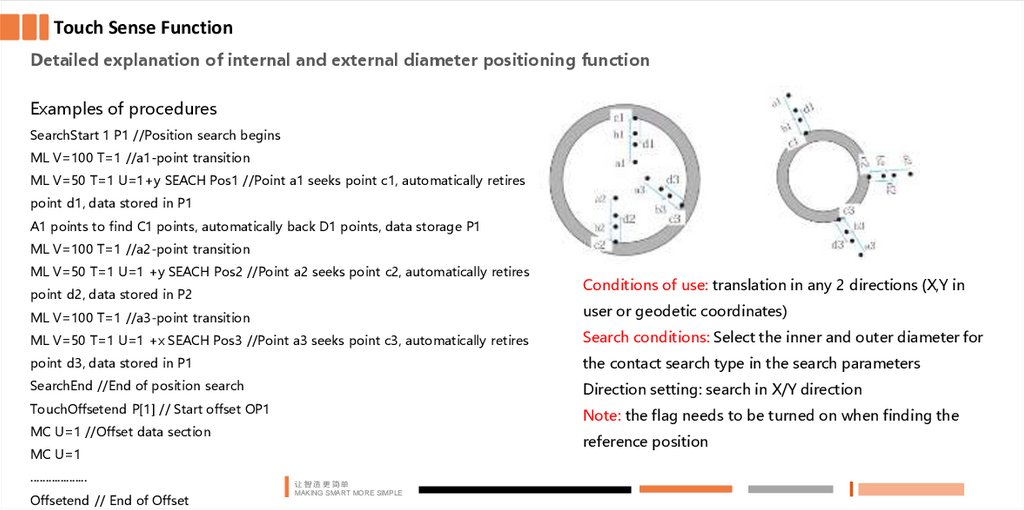
SearchStart 1 P1 //Position search begins
ML V=100 T=1 //a1-point transition
ML V=50 T=1 U=1+y SEACH Pos1 //Point a1 seeks point c1, automatically retires
point d1, data stored in P1
A1 points to find C1 points, automatically back D1 points, data storage P1
ML V=100 T=1 //a2-point transition
ML V=50 T=1 U=1 +y SEACH Pos2 //Point a2 seeks point c2, automatically retires
point d2, data stored in P2
Conditions of use: translation in any 2 directions (X,Y in
ML V=100 T=1 //a3-point transition
user or geodetic coordinates)
ML V=50 T=1 U=1 +x SEACH Pos3 //Point a3 seeks point c3, automatically retires
Search conditions: Select the inner and outer diameter for
point d3, data stored in P1
the contact search type in the search parameters
SearchEnd //End of position search
Direction setting: search in X/Y direction
TouchOffsetend P[1] // Start offset OP1
Note: the flag needs to be turned on when finding the
MC U=1 //Offset data section
reference position
MC U=1
...................
Offsetend // End of Offset
让智造更简单
MAKING SMART MORE SIMPLE
42.
感谢大家的聆听让智造更简单
MAKING SMART MORE SIMPLE
Thanks for your listening!