


 Construction
Similar presentations:


Instruction Manual LX-LC200 toyota ANDROID INTERFACE
1.
Instruction ManualLX-LC200 toyota
ANDROID INTERFACE
DATE.
2019.01.28
Firmware Version
INTERFACE
Korea Auto Parts
www.kaptrade.com
Main
2018.11.28
Sub
2018.03.28
tw23
2018.04.26
2.
[ANDROID INTERFACE] ROiK-LXCOMPONENTS – LC200
LX
Capacitive Touch Cable
Universal Cable
IR Cable
Speaker
External GLONASS
GPS Antenna
WiFi/BT Antenna x 2
MIC
Key Pad
GVIF OLD TYPE)
Power Toyota
AV Cable
Power Default
3.
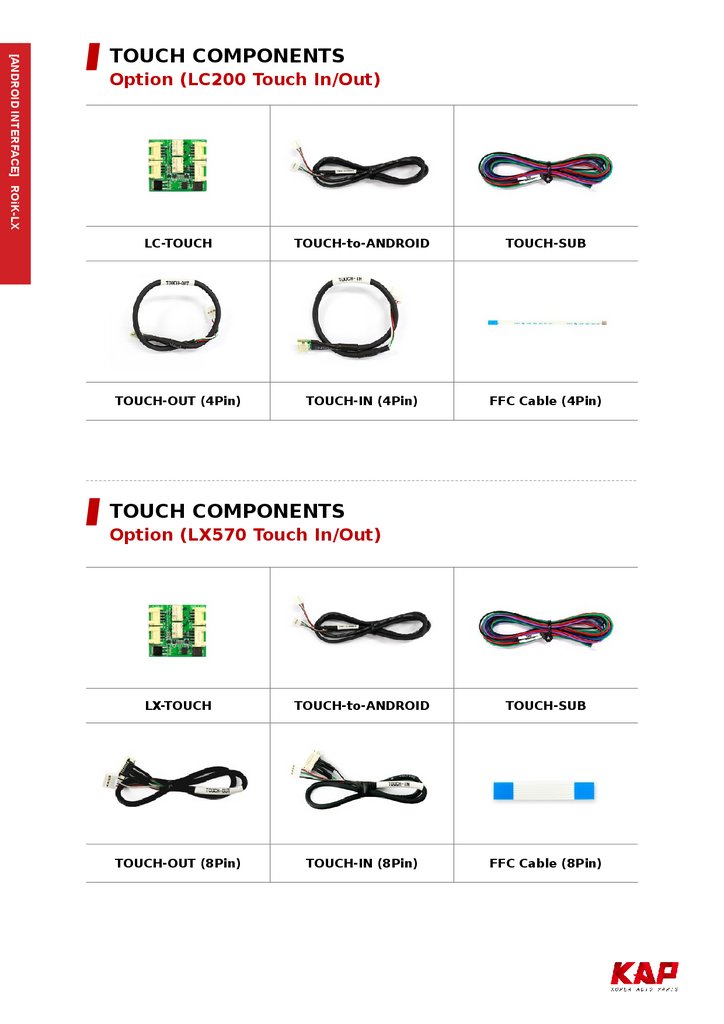
[ANDROID INTERFACE] ROiK-LXTOUCH COMPONENTS
Option (LC200 Touch In/Out)
LC-TOUCH
TOUCH-to-ANDROID
TOUCH-SUB
TOUCH-OUT (4Pin)
TOUCH-IN (4Pin)
FFC Cable (4Pin)
TOUCH COMPONENTS
Option (LX570 Touch In/Out)
LX-TOUCH
TOUCH-to-ANDROID
TOUCH-SUB
TOUCH-OUT (8Pin)
TOUCH-IN (8Pin)
FFC Cable (8Pin)
4.
[ANDROID INTERFACE] ROiK-LXSPEC
※ ANDROID
OS
CPU
Android 7.1.2(Nougat)
Six-Core 64bit Server Class Cortex-A72 Core @2.0Ghz,
Mali-T860 Quad-Core GPU (Total Ten-Core)
VPN
Memory
USB
USB 3.0
Wireless
H.264/H.265/VP9 up to 4Kx2K@60fps (4K Video)
2GB DDR3
USB2.0 High Speed Port x 1
USB3.0 5.0Gbps Port x 1
2.4GHz/5GHz Dual-Band WiFi,
Support 802.11a/b/g/n/ac, Bluetooth 4.1
GPS
HDMI OUT
Speaker
I/O
Ublox8 GPS(GLONASS/BEIDOU/GALILEO/QZSS/SBAS)
HDMI 2.0, Support maximum 4K@60Hz display
2W
Mic (voice recognition),
Temperature
-20°C ~ 80°C
Operating
-15°C ~ 70°C
※ INTERFACE
Input Spec.
1 x HDMI IN (1280x720),
2 x A/V Input ( external video source )
1 x CVBS ( Front Camera )
1 x CVBS ( Rear Camera )
Output Spec.
1 x Audio L/R Output
1 x LVDS Output ( LCD Operation )
Power Spec.
Input Power : 12V DC ~ 24V DC
Consumption Power : 12 Watt Max
I/O
Input : 10P Dip Switch
Output : 12V Output ( 3A Max )
DVB-T IR ( Remote Control )
DVD IR ( Remote Control )
5.
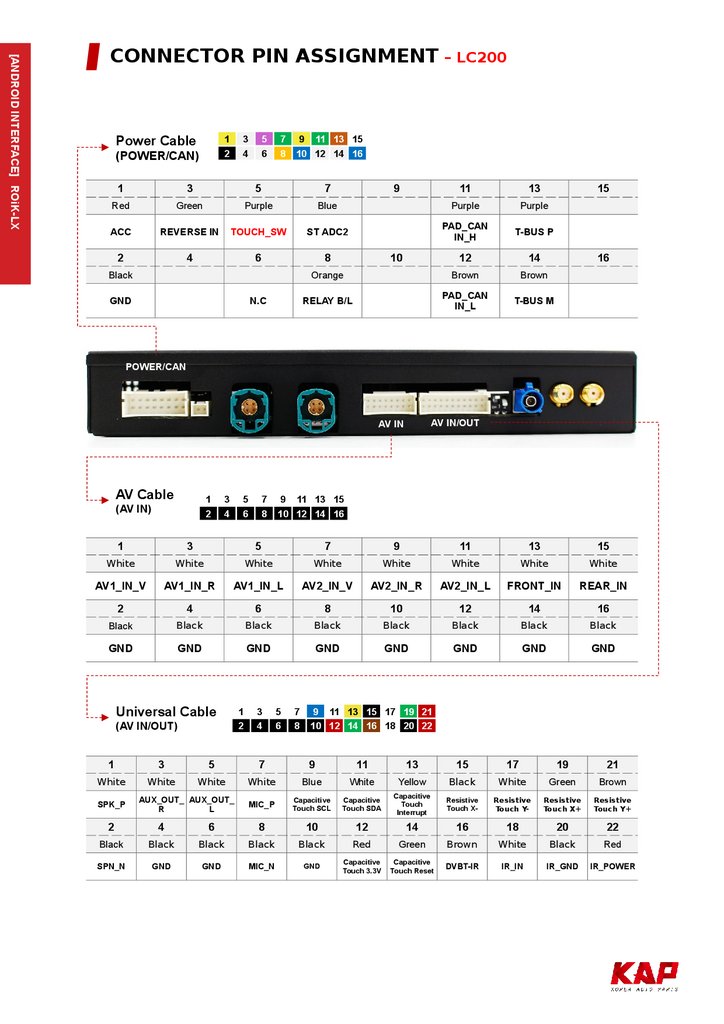
[ANDROID INTERFACE] ROiK-LXCONNECTOR PIN ASSIGNMENT – LC200
Power Cable
1
2
(POWER/CAN)
3
4
5
6
7
8
9 11 13 15
10 12 14 16
1
3
5
7
Red
Green
Purple
ACC
REVERSE IN
2
4
11
13
Blue
Purple
Purple
TOUCH_SW
ST ADC2
PAD_CAN
IN_H
T-BUS P
6
8
12
14
Orange
Brown
Brown
RELAY B/L
PAD_CAN
IN_L
T-BUS M
Black
GND
N.C
9
10
15
16
POWER/CAN
AV IN/OUT
AV IN
AV Cable
1
2
(AV IN)
3
4
5
6
7
8
9 11 13 15
10 12 14 16
1
3
5
7
9
11
13
15
White
White
White
White
White
White
White
White
AV1_IN_V
AV1_IN_R
AV1_IN_L
AV2_IN_V
AV2_IN_R
AV2_IN_L
FRONT_IN
REAR_IN
2
4
6
8
10
12
14
16
Black
Black
Black
Black
Black
Black
Black
Black
GND
GND
GND
GND
GND
GND
GND
GND
Universal Cable
(AV IN/OUT)
1
White
SPK_P
1
2
3
4
5
6
7
8
9 11 13 15 17 19 21
10 12 14 16 18 20 22
3
5
7
White
White
White
Blue
White
Yellow
Black
White
Green
Brown
MIC_P
Capacitive
Touch SCL
Capacitive
Touch SDA
Capacitive
Touch
Interrupt
Resistive
Touch X-
Resistive
Touch Y-
Resistive
Touch X+
Resistive
Touch Y+
12
14
16
18
20
22
AUX_OUT_ AUX_OUT_
R
L
9
11
13
15
17
19
21
2
4
6
8
10
Black
Black
Black
Black
Black
Red
Green
Brown
White
Black
Red
GND
Capacitive
Touch 3.3V
Capacitive
Touch Reset
DVBT-IR
IR_IN
IR_GND
IR_POWER
SPN_N
GND
GND
MIC_N
6.
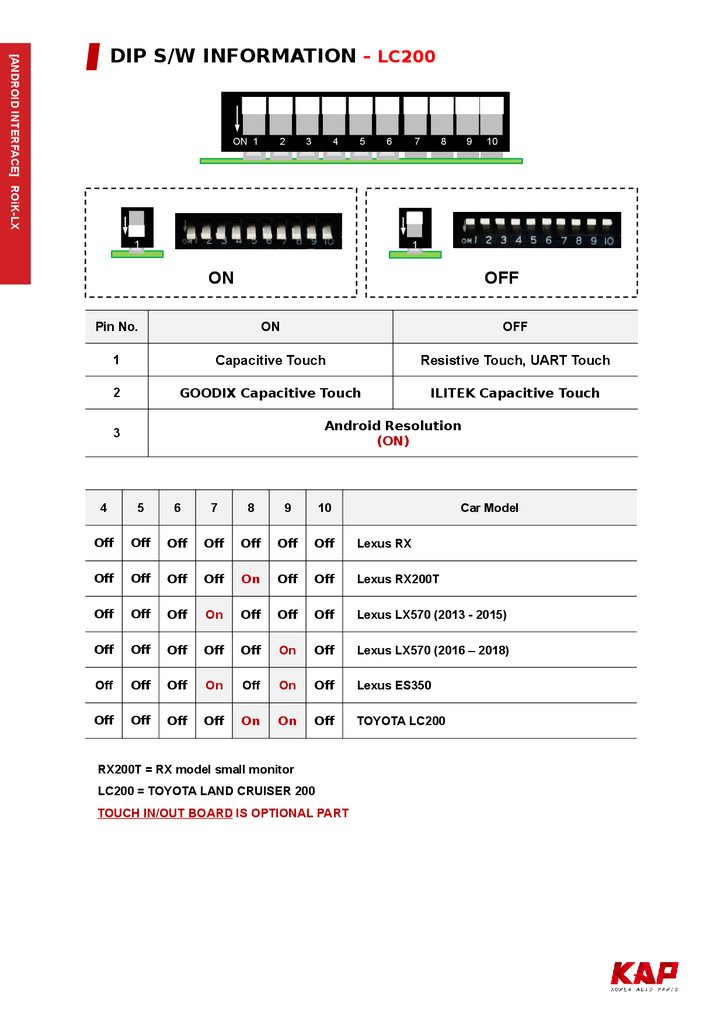
[ANDROID INTERFACE] ROiK-LXDIP S/W INFORMATION – LC200
ON 1
2
3
4
5
6
1
7
8
9
10
1
ON
OFF
Pin No.
ON
OFF
1
Capacitive Touch
Resistive Touch, UART Touch
2
GOODIX Capacitive Touch
ILITEK Capacitive Touch
Android Resolution
(ON)
3
4
5
6
7
8
9
10
Off
Off
Off
Off
Off
Off
Off
Lexus RX
Off
Off
Off
Off
On
Off
Off
Lexus RX200T
Off
Off
Off
On
Off
Off
Off
Lexus LX570 (2013 - 2015)
Off
Off
Off
Off
Off
On
Off
Lexus LX570 (2016 – 2018)
Off
Off
Off
On
Off
On
Off
Lexus ES350
Off
Off
Off
Off
On
On
Off
TOYOTA LC200
RX200T = RX model small monitor
LC200 = TOYOTA LAND CRUISER 200
TOUCH IN/OUT BOARD IS OPTIONAL PART
Car Model
7.
[ANDROID INTERFACE] ROiK-LXDIP S/W INFORMATION
ON 1
1
ON
2
2
ON 1
ON
2
OFF
Pin No.
On
Off
1
N.C.
N.C.
Use External GPS Antenna
Use Car GPS Cable
(DIP S/W 2 Must ON)
(Option)
2
8.
[ANDROID INTERFACE] ROiK-LXPOWER CABLE INFORMATION – LC200
Power Cable w/o NAVI
Power Cable Default
LEXUS IN
ATYPE
LEXUS OUT
BTYPE
GVIF OLD TYPE
9.
[ANDROID INTERFACE] ROiK-LXSCREEN VIEW
1
2
3
4
6
7
8
5
9
10
11
13
1
NAVIGATION
Quick icon for Navigation Application
2
Multimedia
Quick icon for Multimedia Application
3
Music Player
Music player Widget
4
File Manager
Quick icon for File Manager Application
5
APPS
Application List
6
Back Button
Return
7
Home Button
Home
8
Multitasking
1. Multitasking
2. PIP Mode by Long Press
9
APP Shortcut
Quick icon
10
Sound
Volume control
11
WiFi
Open Wifi setting screen
12
Settings
Open Android Settings
13
Zoom Tool
Screen Zoom in / out
※ This icon will show when car monitor have “Resistive Touch”,
12
10.
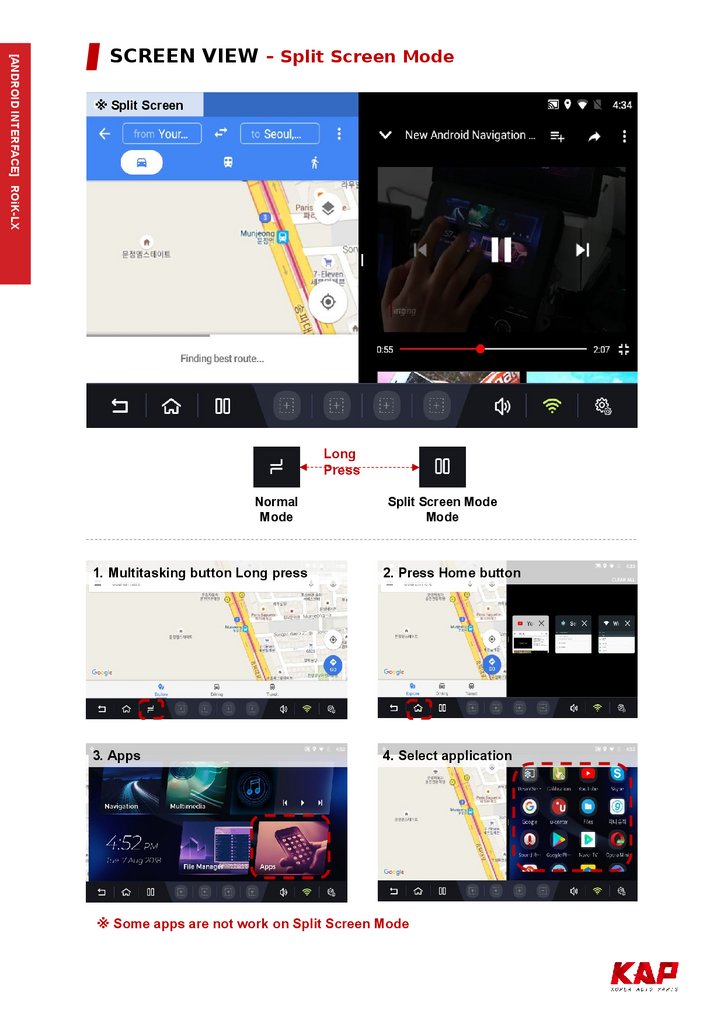
[ANDROID INTERFACE] ROiK-LXSCREEN VIEW – Split Screen Mode
※ Split Screen
Long
Press
Normal
Mode
Split Screen Mode
Mode
1. Multitasking button Long press
2. Press Home button
3. Apps
4. Select application
※ Some apps are not work on Split Screen Mode
11.
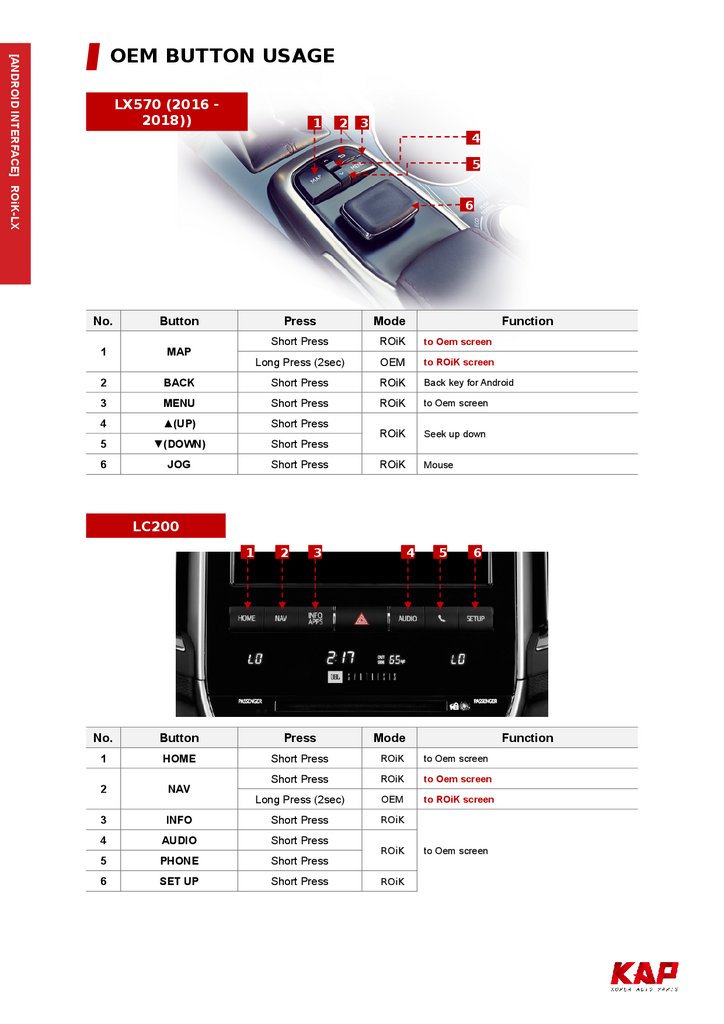
[ANDROID INTERFACE] ROiK-LXOEM BUTTON USAGE
LX570 (2016 2018))
1
2
3
4
5
6
No.
Button
Press
Mode
1
MAP
2
Function
Short Press
ROiK
to Oem screen
Long Press (2sec)
OEM
to ROiK screen
BACK
Short Press
ROiK
Back key for Android
3
MENU
Short Press
ROiK
to Oem screen
4
▲(UP)
Short Press
5
▼(DOWN)
Short Press
ROiK
Seek up down
6
JOG
Short Press
ROiK
Mouse
LC200
1
2
3
4
5
6
No.
Button
Press
Mode
1
HOME
Short Press
ROiK
to Oem screen
2
NAV
Short Press
ROiK
to Oem screen
Long Press (2sec)
OEM
to ROiK screen
3
INFO
Short Press
ROiK
4
AUDIO
Short Press
5
PHONE
Short Press
6
SET UP
Short Press
ROiK
ROiK
Function
to Oem screen
12.
[ANDROID INTERFACE] ROiK-LXOEM BUTTON USAGE
1
RX200T
2
3
4
Turn the wheel to the
right quickly and the
buzzer sounds.
Activate drag function,
press again to cancel
No.
Button
Press
Mode
Function
1
AUDIO
Short Press
ROiK
to Oem screen
2
MENU
Short Press
ROiK
to Oem screen
3
BACK
Long Press (2sec)
OEM
to ROiK screen
4
DIAL
Short Press
ROiK
Mouse
LX570 (2013 2015)
1
2
3
4
5
6
No.
Button
Press
Mode
1
HOME
Short Press
ROiK
to Oem screen
2
AUDIO
Short Press
ROiK
to Oem screen
3
HOME
Short Press
ROiK
to Oem screen
Short Press
ROiK
to Oem screen
Long Press (2sec)
OEM
to ROiK screen
Long Press (2sec)
HDMI
to ROiK screen
4
NAV
7
Function
5
INFO
Short Press
ROiK
to Oem screen
6
PHONE
Short Press
ROiK
to Oem screen
7
SETUP
Short Press
ROiK
to Oem screen
13.
Originalcable
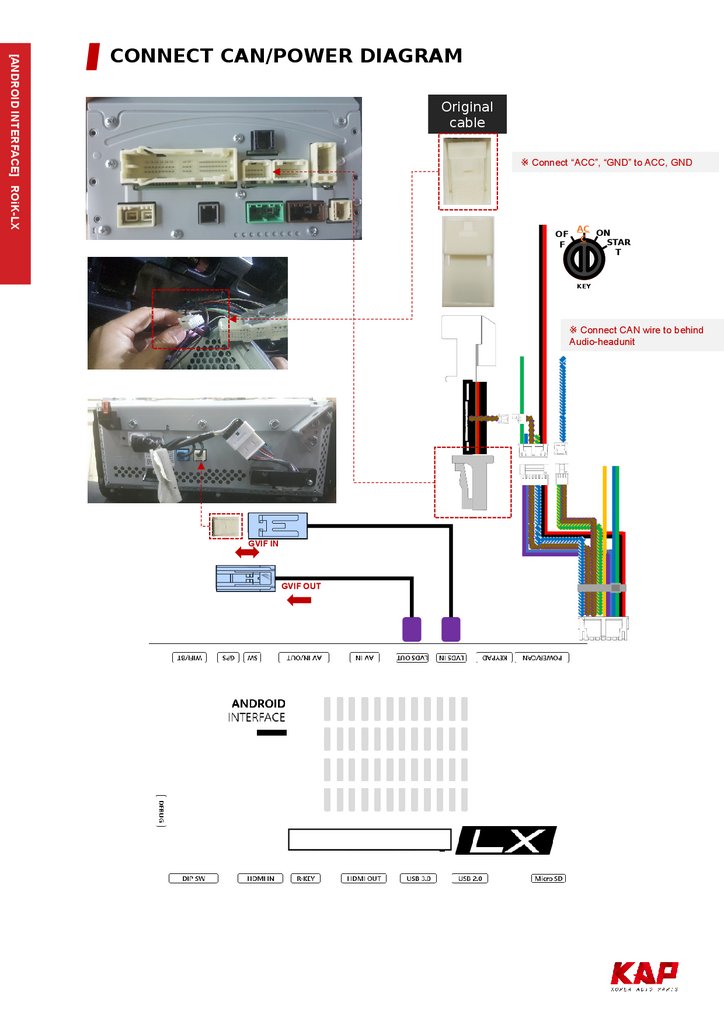
※ Connect “ACC”, “GND” to ACC, GND
OF
F
AC ON
C
STAR
T
KEY
※ Connect CAN wire to behind
Audio-headunit
LEXUS-A100 w/o
NAVI - 2
[ANDROID INTERFACE] ROiK-LX
CONNECT CAN/POWER DIAGRAM
GVIF IN
GVIF OUT
14.
[ANDROID INTERFACE] ROiK-LXCONNECT CAN/POWER CONNECTOR
Remove original connector.
Connect supplied connector to audio and original connector.
LX570(2016 - 2018), RX
LC200
CAN High
CAN Low
CAN High
CAN Low
CAN Low
CAN High
※ Depending on the type of vehicle, the position of “can” may be different.
• Connect ‘CAN High/Low" to the original connector from supplied connector
ES350
ES350
CAN High
CAN Low
TOYOTA Bus
1
2
3
4
5
6
7
8
9 11 13 15
10 12 14 16
※ Please connect power of interface to ACC.
※ If connect to BAT. There is case of that Rear camera would
be not working.
• Connect supplied connector to connector on HeadUnit
• Connect ‘CAN High/Low" to the original connector from supplied connector
15.
[ANDROID INTERFACE] ROiK-LXCONNECT CAN/POWER CONNECTOR
Remove original connector.
Connect supplied connector to audio and original connector.
RX200T
RX200T
CAN High
CAN Low
CAN Low
CAN High
※ Depending on the type of vehicle, the position of “can” may be different.
Connect ‘CAN High/Low" to the original connector from supplied connector
LX570 (2013 - 2015)
LX570 (2013 - 2015)
CAN High
CAN Low
TOYOTA Bus
※ Please connect power of interface to ACC.
※ If connect to BAT. There is case of that Rear camera would be not working.
• Connect supplied connector to connector on HeadUnit
• Connect ‘CAN High/Low" to the original connector from supplied connector
16.
[ANDROID INTERFACE] ROiK-LXTOUCH CABLE DIAGRAM – LC200 / LX570
C4
20276AWM
TOUCH-OUT
C4
20276AWM
TOUCH-OUT
Monitor Out FFC Cable
Original FFC Cable
1
2
3
4
C
4
1
2
C
3 4
4
2
C4
2
TOUCH-SUB
ACC IN
GND
12V OUT
TOUCH-IN
AWM 20276 4C
12V OUT_RES
TOUCH SW
TOUCH-to-ANDROID
4
3
2
1
TOUCH-OUT
TOUCH-to-ANDROID
C
4
AWM 20276 4C
C
4
AWM 20276 4C
SPEAKER
GIVF-LEXUS-A50
AUX OUT L
AUX OUT R
MIC
DVB-T IR
CAP-TOUCH
RES-TOUCH
IR IN
POWER/CAN
DEBUG1
KEYPAD
GVIF IN/OUT
AV IN
AV IN/OUT
GPS
WIFI/BT
ANDROID INTERFACE
1
2
3
4
SD SOLT
HDMI IN
5VUSBPOWER
KEY
DIP S/W
USB2
USB1
2
02
76AWM
H
TO
UC
-O
UT
2
02
76AWM
TOUC
H-O
UT
DEBUG2
LEXUS
C
4
※ Cut Purple Wire And then Connect this wire to green wire “TOUCH_SW”
17.
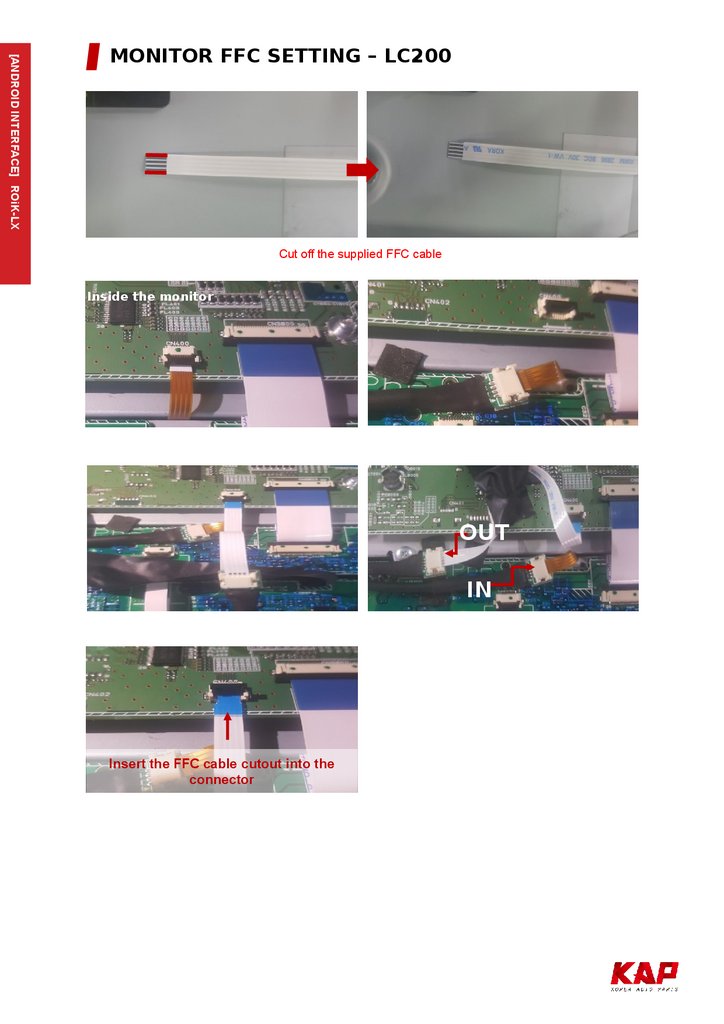
[ANDROID INTERFACE] ROiK-LXMONITOR FFC SETTING – LC200
Cut off the supplied FFC cable
Inside the monitor
OUT
IN
Insert the FFC cable cutout into the
connector
18.
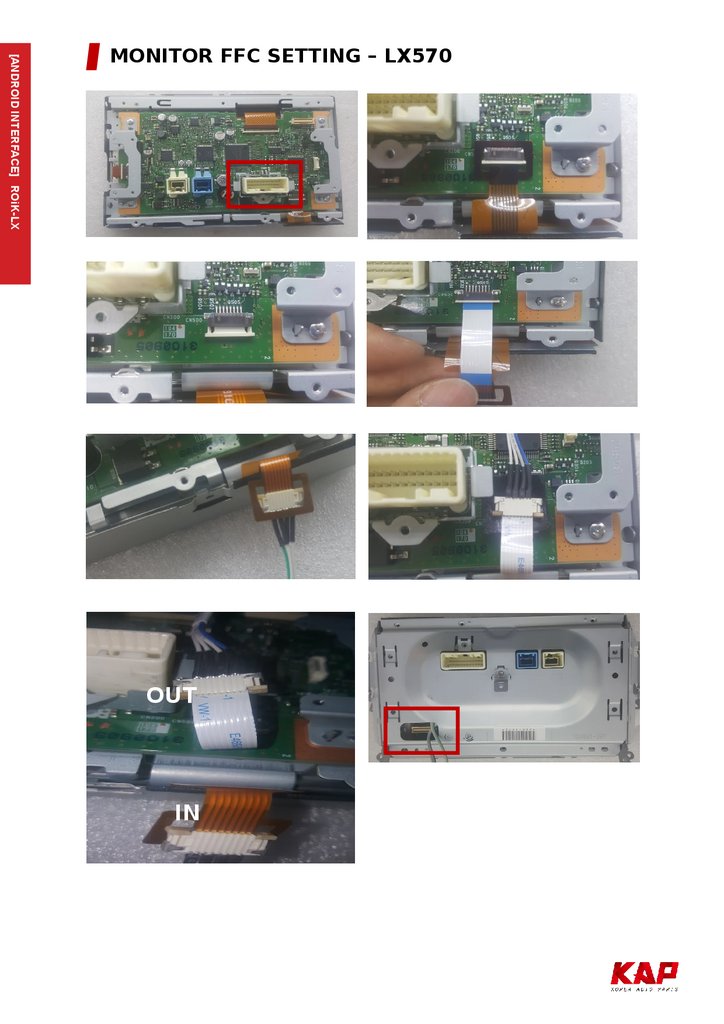
[ANDROID INTERFACE] ROiK-LXMONITOR FFC SETTING – LX570
OUT
IN
19.
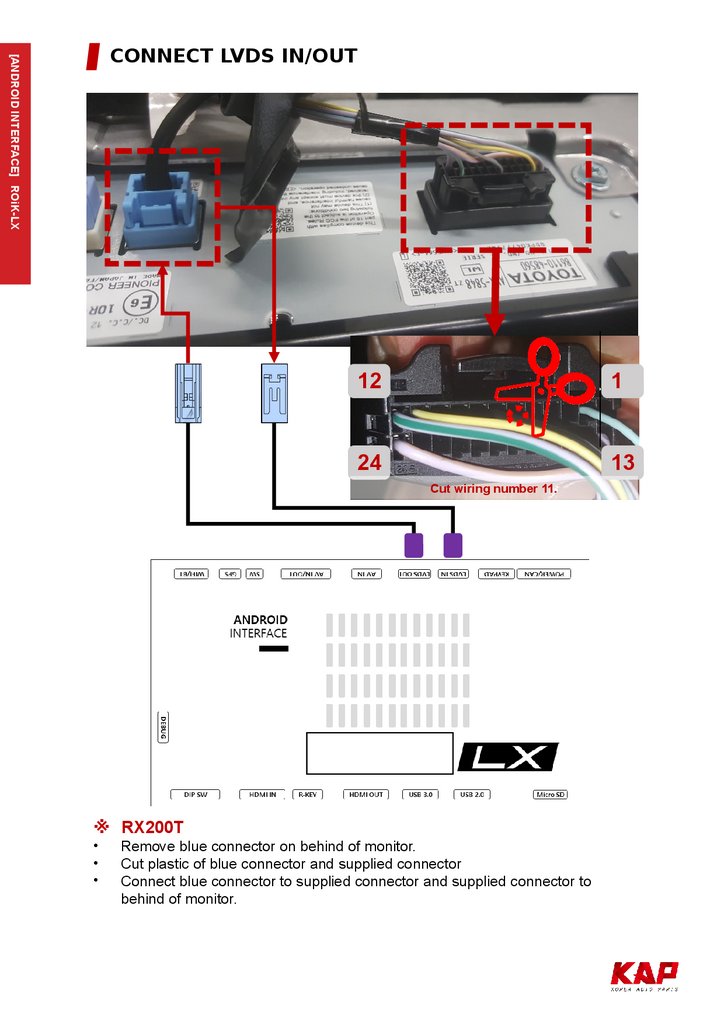
[ANDROID INTERFACE] ROiK-LXCONNECT LVDS IN/OUT
Need to cut plastic
Need to cut plastic
Remove white connector on behind of monitor.
Cut plastic of white connector and supplied connector
Connect white connector to supplied connector and supplied connector to behind of monitor.
Car Model
GVIF IN/OUT Connector Color Behind Monitor
Lexus RX
White
Lexus LX570 (2013 – 2015)
Blue
Lexus LX570 (2016 – 2018)
White
Lexus RX200T
Blue
Lexus ES350
Blue
Toyota LC200
White
※ Different In/Out GVIF according to Car Model
20.
[ANDROID INTERFACE] ROiK-LXCONNECT LVDS IN/OUT
12
1
24
13
Cut wiring number 11.
※ RX200T
Remove blue connector on behind of monitor.
Cut plastic of blue connector and supplied connector
Connect blue connector to supplied connector and supplied connector to
behind of monitor.
21.
A2
4
1
3
4 3
2 1
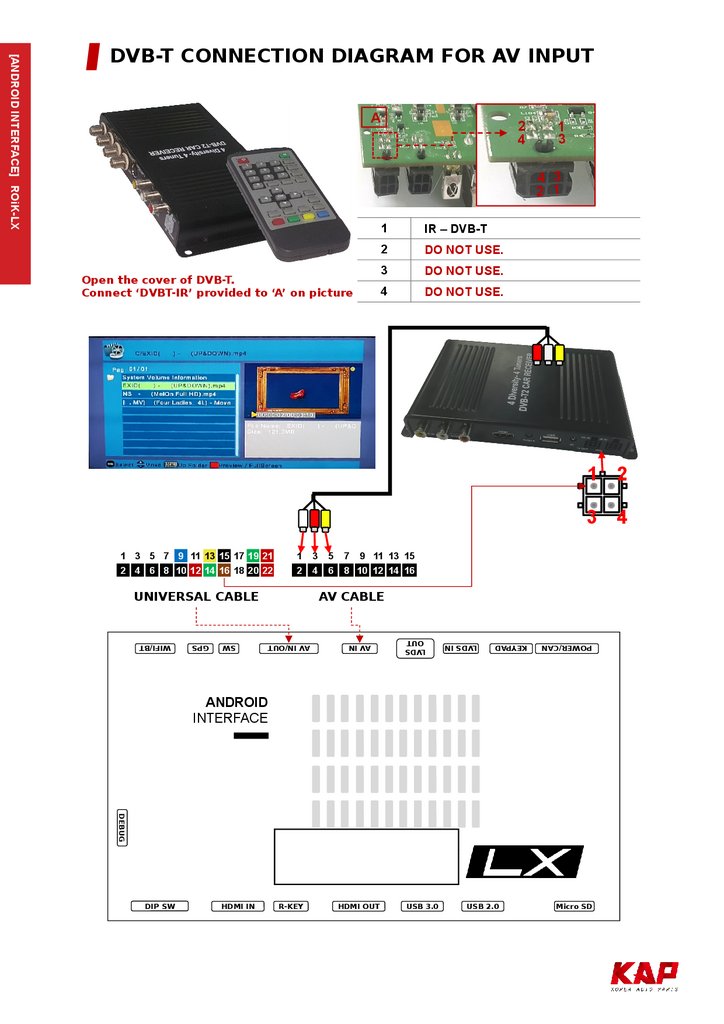
Open the cover of DVB-T.
Connect ‘DVBT-IR’ provided to ‘A’ on picture
1
IR – DVB-T
2
DO NOT USE.
3
DO NOT USE.
4
DO NOT USE.
1 2
3 4
1 3 5 7 9 11 13 15 17 19 21
2 4 6 8 10 12 14 16 18 20 22
1
2
5
6
7 9 11 13 15
8 10 12 14 16
AV CABLE
KEYPAD
LVDS IN
LVDS
OUT
AV IN
UNIVERSAL CABLE
3
4
POWER/CAN
AV IN/OUT
SW
GPS
WIFI/BT
[ANDROID INTERFACE] ROiK-LX
DVB-T CONNECTION DIAGRAM FOR AV INPUT
ANDROID
INTERFACE
DEBUG
DIP SW
HDMI IN
R-KEY
HDMI OUT
USB 3.0
USB 2.0
Micro SD
22.
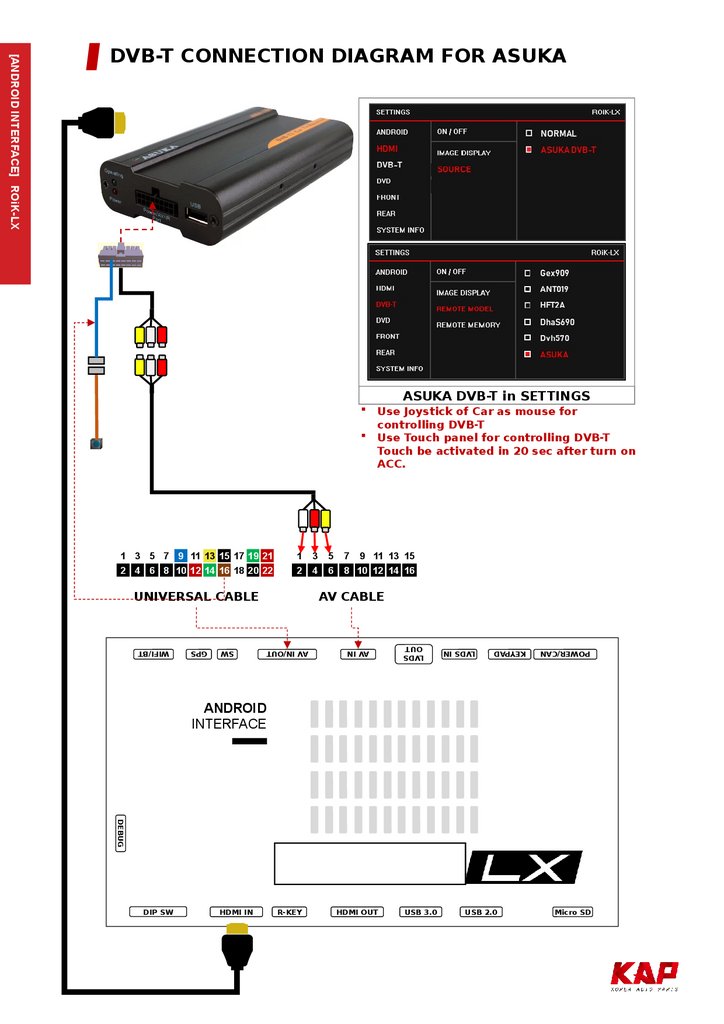
ASUKA DVB-T in SETTINGS1 3 5 7 9 11 13 15 17 19 21
2 4 6 8 10 12 14 16 18 20 22
1
2
5
6
7 9 11 13 15
8 10 12 14 16
AV CABLE
KEYPAD
LVDS IN
LVDS
OUT
AV IN
UNIVERSAL CABLE
3
4
Use Joystick of Car as mouse for
controlling DVB-T
Use Touch panel for controlling DVB-T
Touch be activated in 20 sec after turn on
ACC.
POWER/CAN
AV IN/OUT
SW
GPS
WIFI/BT
[ANDROID INTERFACE] ROiK-LX
DVB-T CONNECTION DIAGRAM FOR ASUKA
ANDROID
INTERFACE
DEBUG
DIP SW
HDMI IN
R-KEY
HDMI OUT
USB 3.0
USB 2.0
Micro SD
23.
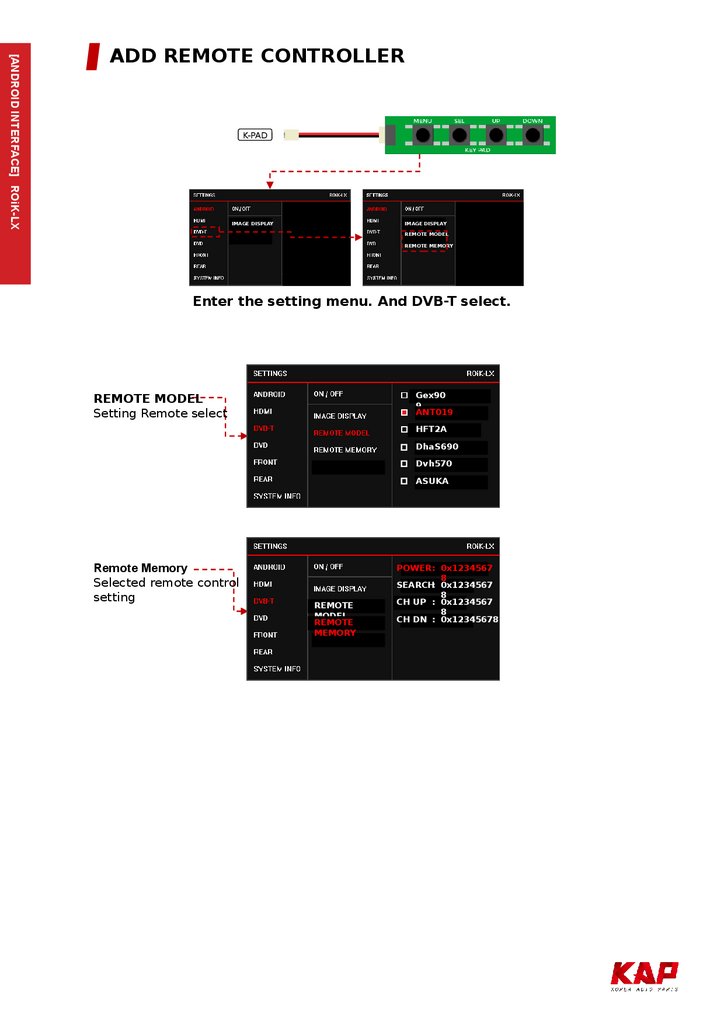
[ANDROID INTERFACE] ROiK-LXADD REMOTE CONTROLLER
K-PAD
IMAGE DISPLAY
IMAGE DISPLAY
REMOTE MODEL
REMOTE MEMORY
Enter the setting menu. And DVB-T select.
REMOTE MODEL
Setting Remote select
IMAGE DISPLAY
Gex90
9
ANT019
HFT2A
REMOTE MEMORY
DhaS690
Dvh570
ASUKA
Remote Memory
Selected remote control
setting
POWER : 0x1234567
8
SEARCH: 0x1234567
IMAGE DISPLAY
8
CH UP : 0x1234567
REMOTE
8
MODEL
REMOTE MEMORY CH DN : 0x12345678
REMOTE
MEMORY
24.
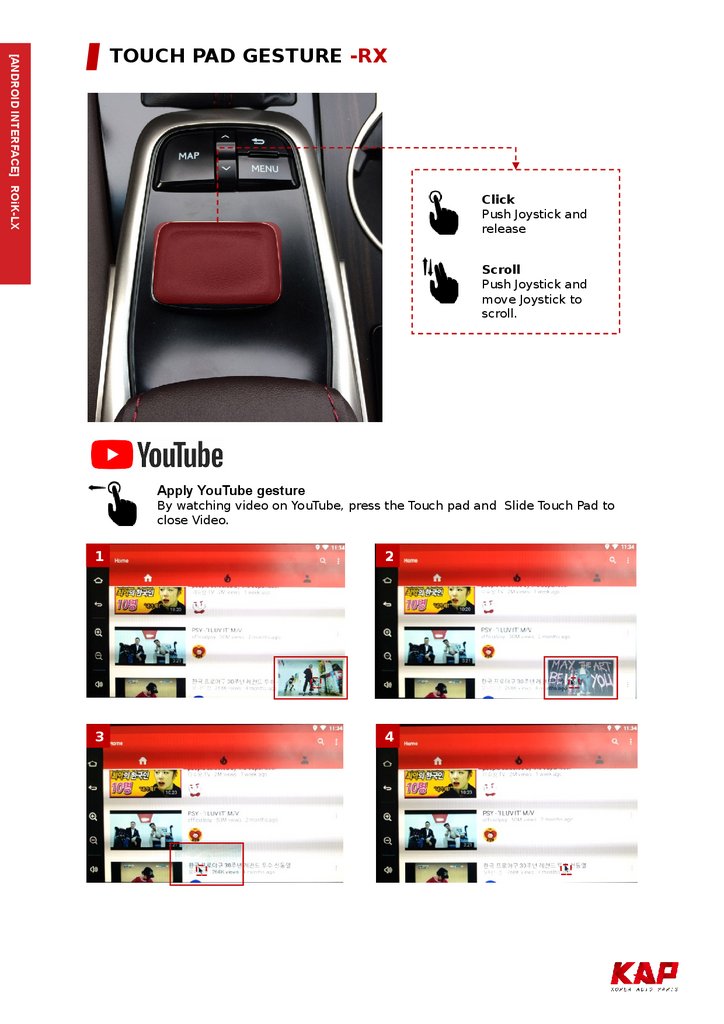
[ANDROID INTERFACE] ROiK-LXTOUCH PAD GESTURE -RX
Click
Push Joystick and
release
Scroll
Push Joystick and
move Joystick to
scroll.
Apply YouTube gesture
By watching video on YouTube, press the Touch pad and Slide Touch Pad to
close Video.
1
2
3
4
25.
※ Headrest Monitor (HDMI Out)HDMI
POWER/CAN
KEYPAD
LVDS IN
LVDS
OUT
AV IN
AV IN/OUT
SW
GPS
WIFI/BT
[ANDROID INTERFACE] ROiK-LX
HEADREST MONITOR
ANDROID
INTERFACE
DEBUG
DIP SW
HDMI IN
R-KEY
HDMI OUT
USB 3.0
USB 2.0
Micro SD
26.
[ANDROID INTERFACE] ROiK-LXDEVICE SETTINGS
No.
Button
Function
1
RESET SETTINGS
Reset settings to default
2
RESTART DEVICE
System Reboot
3
External Speaker
Turn on/off external speaker
4
Softkey Enable
Use soft key or disable (Floating button when disabled)
5
Softkey Position
Soft key position setting (side, bottom)
6
Softkey Auto Hiding
Set softkey auto-hide time
7
Zoom Button Enable
Enable or Disable the Zoom Button on the Soft Key
8
Startup App
Select Startup APP
9
Cooling Fan
Turn on / off Cooling Fan
10
HDMI OUT
Turn on / off HDMI Out
11
Digital Out
Settings
(Developer menu) DIGITAL LVDS only,
Screen Settings - Position, Brightness, Contrast, Sharpness
12
Touch Calibration
Touch Calibration ( for UART Touch )
13
Set User Boot Logo
File Format : PNG, JPG, BMP
Image Size : 1280 X 720 pixel
14
Upgrade Device
(Hidden menu) Firmware update is available.
27.
[ANDROID INTERFACE] ROiK-LXDEVICE SETTINGS – CALIBRATION (Capacitive,
Resistive)
※ Capacitive touch panel no need set calibration
Device Settings > Touch Calibration
※ Press “Recovery Key” for 2 sec to set calibration
Calibration mode
Press and hold the center of '+‘, 5 times.
DEVICE SETTINGS - USER LOGO UPDATE
Set User Boot Logo Activate
1. Device Setting
2. Click ‘Set Use Boot Logo’ and select boot logo image.
※ File Format : PNG, JPG, BMP
※ Image Size : 1280px X 720px
28.
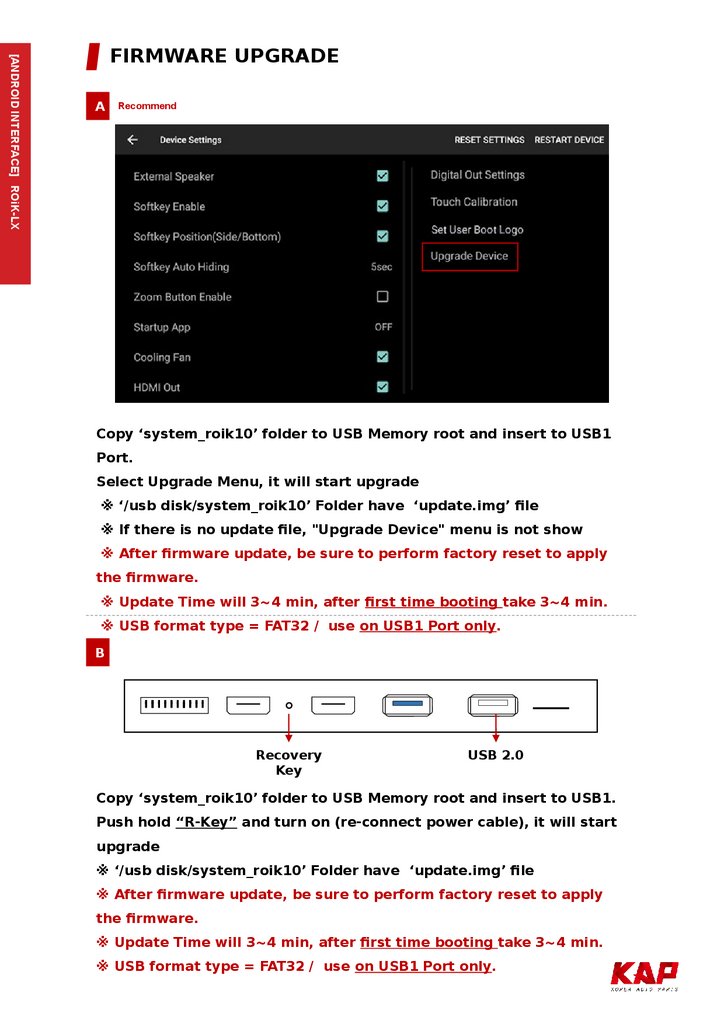
[ANDROID INTERFACE] ROiK-LXFIRMWARE UPGRADE
A
Recommend
Copy ‘system_roik10’ folder to USB Memory root and insert to USB1
Port.
Select Upgrade Menu, it will start upgrade
※ ‘/usb disk/system_roik10’ Folder have ‘update.img’ file
※ If there is no update file, "Upgrade Device" menu is not show
※ After firmware update, be sure to perform factory reset to apply
the firmware.
※ Update Time will 3~4 min, after first time booting take 3~4 min.
※ USB format type = FAT32 / use on USB1 Port only.
B
Recovery
Key
USB 2.0
Copy ‘system_roik10’ folder to USB Memory root and insert to USB1.
Push hold “R-Key” and turn on (re-connect power cable), it will start
upgrade
※ ‘/usb disk/system_roik10’ Folder have ‘update.img’ file
※ After firmware update, be sure to perform factory reset to apply
the firmware.
※ Update Time will 3~4 min, after first time booting take 3~4 min.
※ USB format type = FAT32 / use on USB1 Port only.
29.
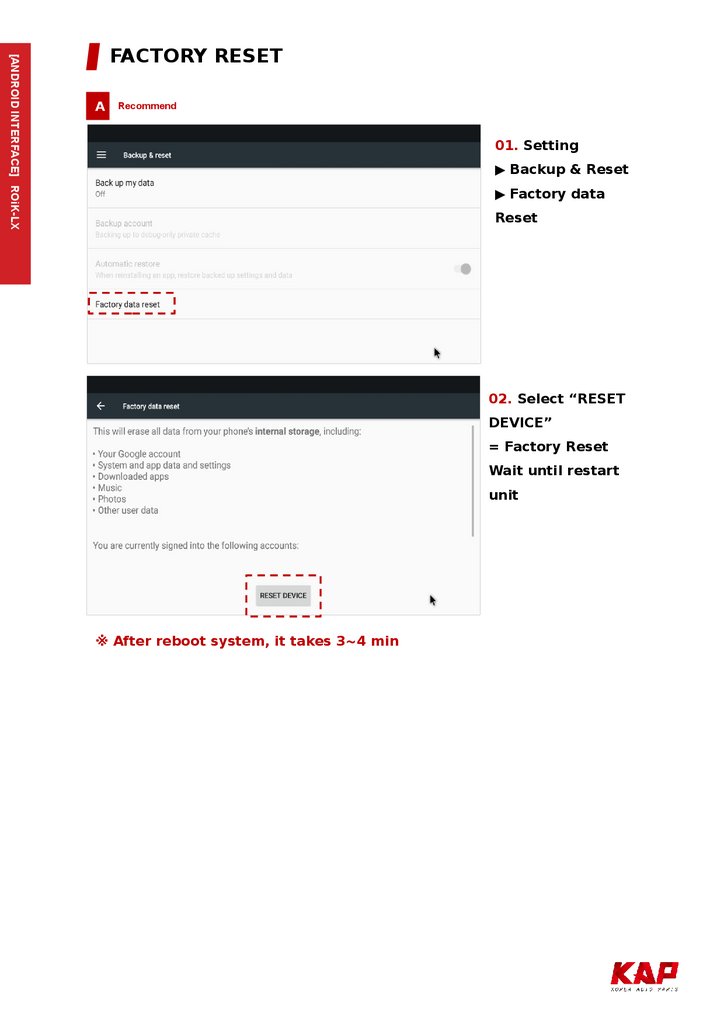
[ANDROID INTERFACE] ROiK-LXFACTORY RESET
A
Recommend
01. Setting
▶ Backup & Reset
▶ Factory data
Reset
02. Select “RESET
DEVICE”
= Factory Reset
Wait until restart
unit
※ After reboot system, it takes 3~4 min
30.
POWER/CANKEYPAD
LVDS IN
LVDS
OUT
AV IN
AV IN/OUT
SW
GPS
WIFI/BT
[ANDROID INTERFACE] ROiK-LX
INTERFACE SETTING
ANDROID
INTERFACE
DEBUG
DIP SW
MENU
HDMI IN
R-KEY
Enter the setting menu
SEL
Select setting menu
UP
Moving Up
DOWN
Moving Down
HDMI OUT
USB 3.0
USB 2.0
Micro SD
31.
POWER/CANKEYPAD
LVDS IN
LVDS
OUT
AV IN
AV IN/OUT
SW
GPS
WIFI/BT
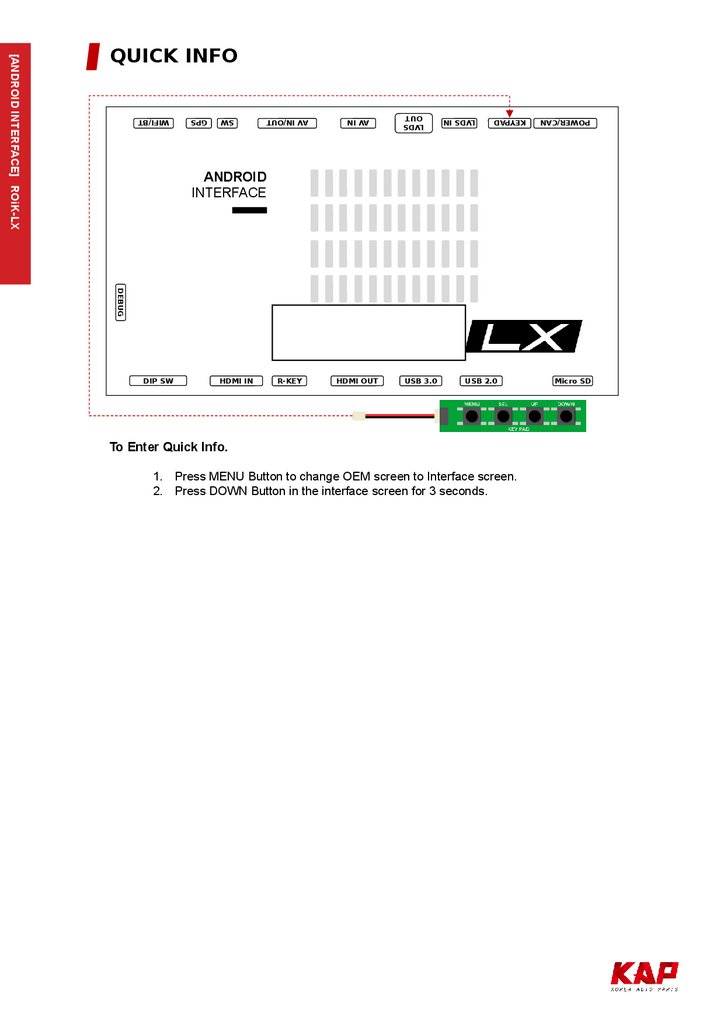
[ANDROID INTERFACE] ROiK-LX
QUICK INFO
ANDROID
INTERFACE
DEBUG
DIP SW
HDMI IN
R-KEY
HDMI OUT
USB 3.0
USB 2.0
To Enter Quick Info.
1. Press MENU Button to change OEM screen to Interface screen.
2. Press DOWN Button in the interface screen for 3 seconds.
Micro SD
32.
A-912 RM Tera-Tower2, 201Songpa-Daero, Songpa-gu, Seoul, Korea
T. (+82) 6204-0912
F. (+82) 6204-0913
E. kap@kaptrader.com