
 advertising
Similar presentations:


")

")


IQVIA Global Product Management
1.
IQVIA GLOBAL PRODUCT MANAGEMENTEnhanced Views (Entity360) Product Vision
© 2021. All rights reserved. IQVIA ® is a registered trademark of IQVIA Inc. in the United States, the European Union, and various other countries.
2.
Table of Contents+Product Vision
+Data Steward Flow
+Administrator Flow
+Analyst Flow
2
3.
Product Vision• Create a flexible product feature that enables our customers to configure and deploy dynamic data views on subject
areas, e.g.
3
4.
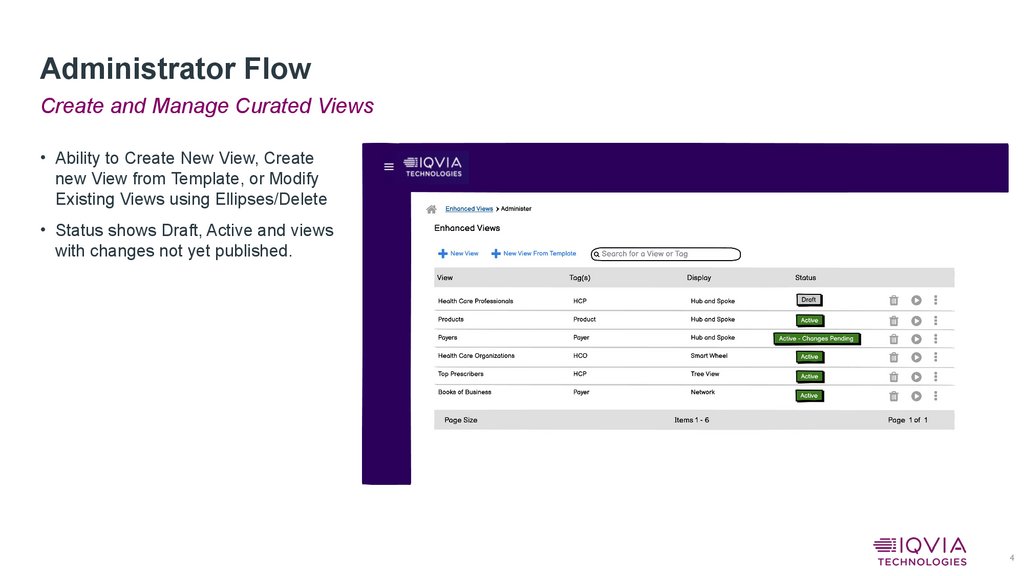
Administrator FlowCreate and Manage Curated Views
• Ability to Create New View, Create
new View from Template, or Modify
Existing Views using Ellipses/Delete
• Status shows Draft, Active and views
with changes not yet published.
4
5.
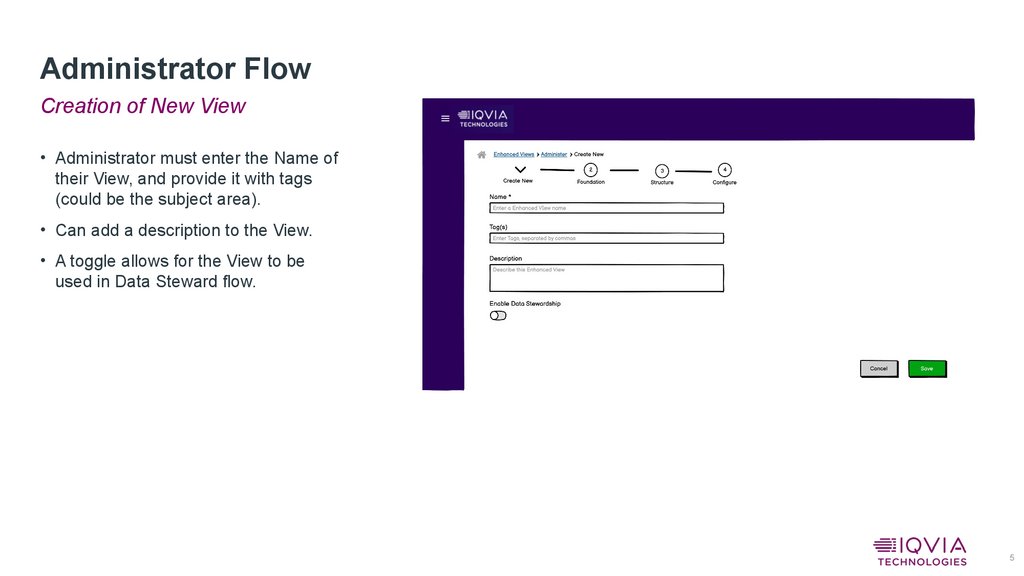
Administrator FlowCreation of New View
• Administrator must enter the Name of
their View, and provide it with tags
(could be the subject area).
• Can add a description to the View.
• A toggle allows for the View to be
used in Data Steward flow.
5
6.
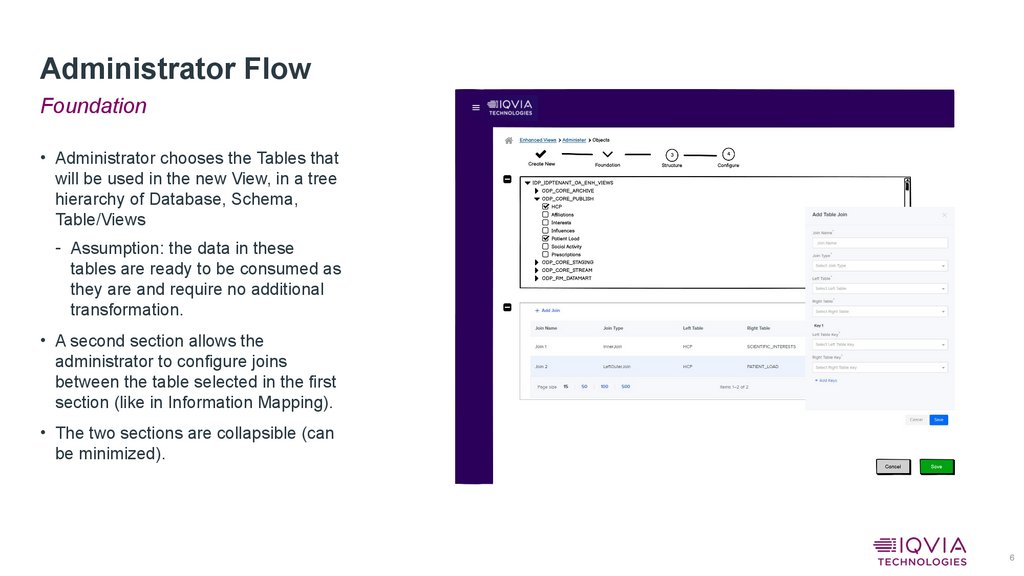
Administrator FlowFoundation
• Administrator chooses the Tables that
will be used in the new View, in a tree
hierarchy of Database, Schema,
Table/Views
- Assumption: the data in these
tables are ready to be consumed as
they are and require no additional
transformation.
• A second section allows the
administrator to configure joins
between the table selected in the first
section (like in Information Mapping).
• The two sections are collapsible (can
be minimized).
6
7.
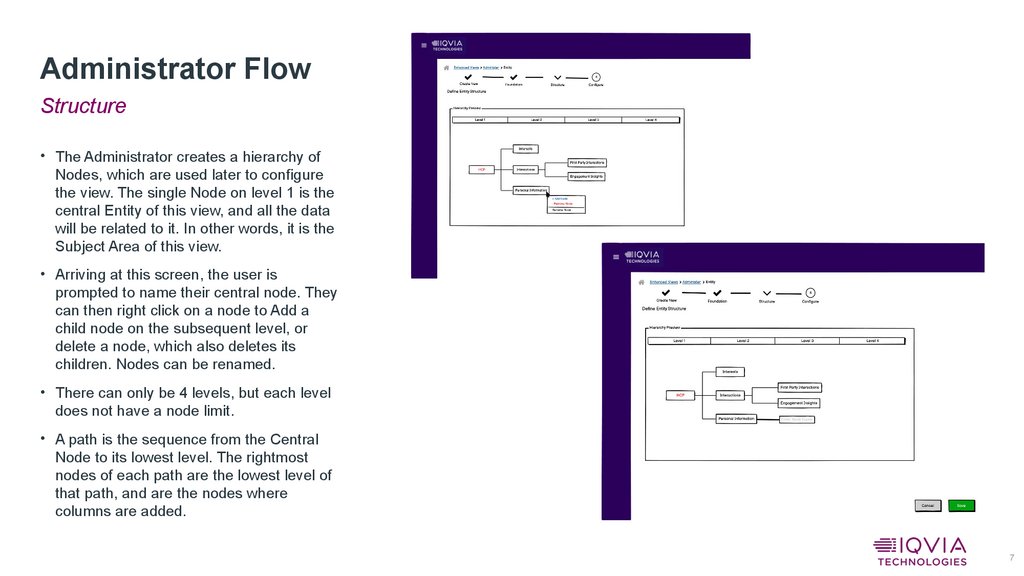
Administrator FlowStructure
• The Administrator creates a hierarchy of
Nodes, which are used later to configure
the view. The single Node on level 1 is the
central Entity of this view, and all the data
will be related to it. In other words, it is the
Subject Area of this view.
• Arriving at this screen, the user is
prompted to name their central node. They
can then right click on a node to Add a
child node on the subsequent level, or
delete a node, which also deletes its
children. Nodes can be renamed.
• There can only be 4 levels, but each level
does not have a node limit.
• A path is the sequence from the Central
Node to its lowest level. The rightmost
nodes of each path are the lowest level of
that path, and are the nodes where
columns are added.
7
8.
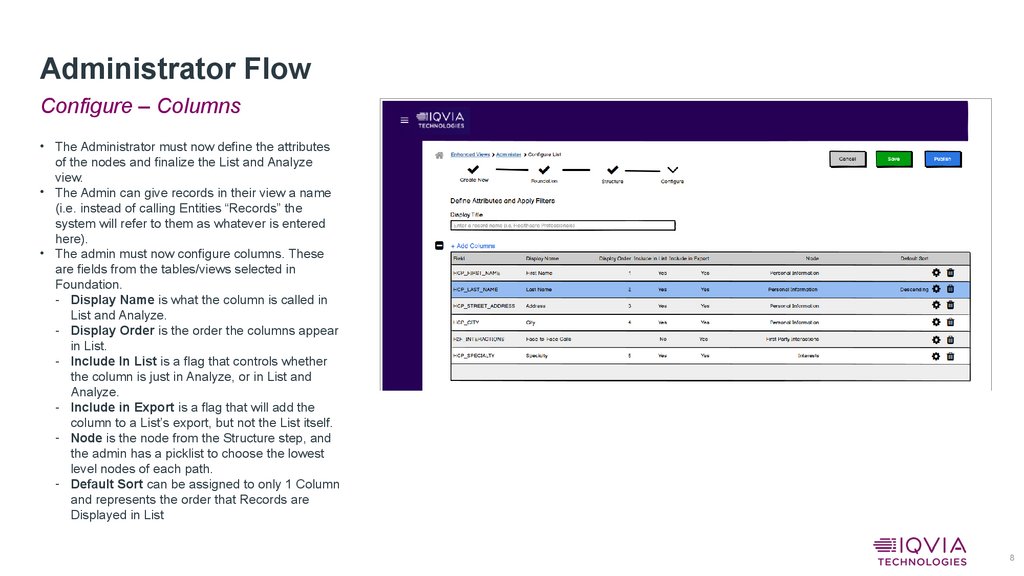
Administrator FlowConfigure – Columns
• The Administrator must now define the attributes
of the nodes and finalize the List and Analyze
view.
• The Admin can give records in their view a name
(i.e. instead of calling Entities “Records” the
system will refer to them as whatever is entered
here).
• The admin must now configure columns. These
are fields from the tables/views selected in
Foundation.
- Display Name is what the column is called in
List and Analyze.
- Display Order is the order the columns appear
in List.
- Include In List is a flag that controls whether
the column is just in Analyze, or in List and
Analyze.
- Include in Export is a flag that will add the
column to a List’s export, but not the List itself.
- Node is the node from the Structure step, and
the admin has a picklist to choose the lowest
level nodes of each path.
- Default Sort can be assigned to only 1 Column
and represents the order that Records are
Displayed in List
8
9.
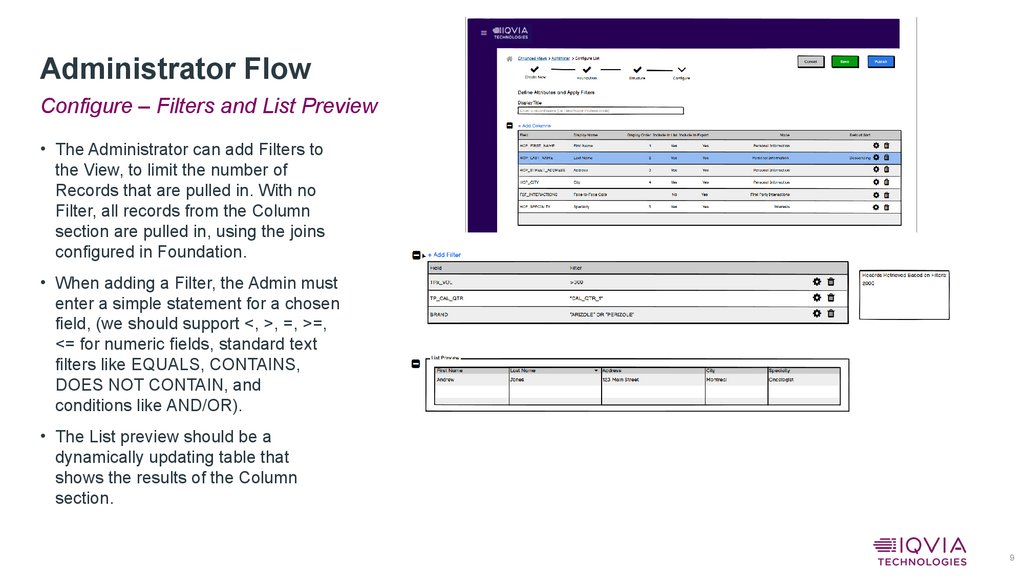
Administrator FlowConfigure – Filters and List Preview
• The Administrator can add Filters to
the View, to limit the number of
Records that are pulled in. With no
Filter, all records from the Column
section are pulled in, using the joins
configured in Foundation.
• When adding a Filter, the Admin must
enter a simple statement for a chosen
field, (we should support <, >, =, >=,
<= for numeric fields, standard text
filters like EQUALS, CONTAINS,
DOES NOT CONTAIN, and
conditions like AND/OR).
• The List preview should be a
dynamically updating table that
shows the results of the Column
section.
9
10.
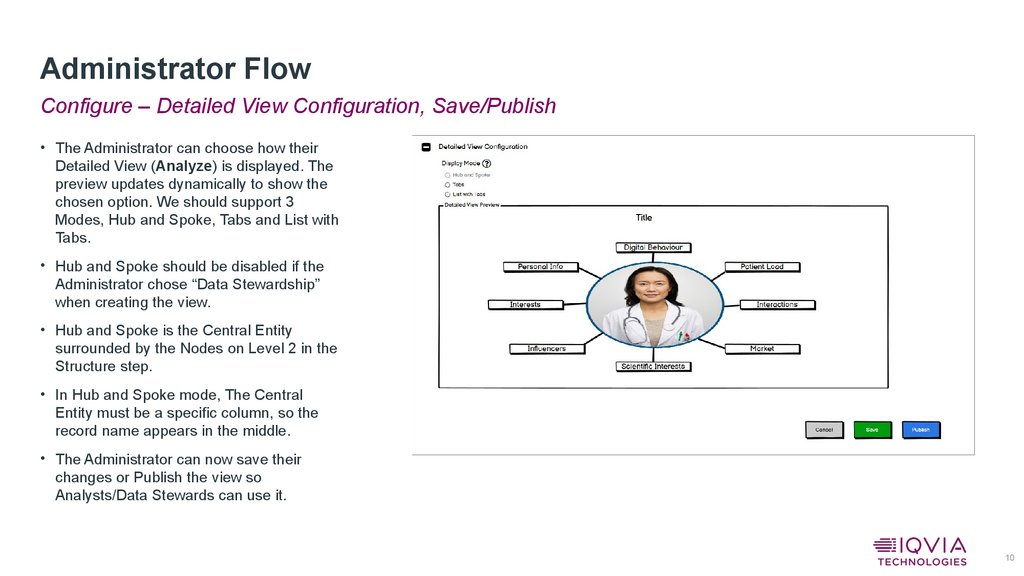
Administrator FlowConfigure – Detailed View Configuration, Save/Publish
• The Administrator can choose how their
Detailed View (Analyze) is displayed. The
preview updates dynamically to show the
chosen option. We should support 3
Modes, Hub and Spoke, Tabs and List with
Tabs.
• Hub and Spoke should be disabled if the
Administrator chose “Data Stewardship”
when creating the view.
• Hub and Spoke is the Central Entity
surrounded by the Nodes on Level 2 in the
Structure step.
• In Hub and Spoke mode, The Central
Entity must be a specific column, so the
record name appears in the middle.
• The Administrator can now save their
changes or Publish the view so
Analysts/Data Stewards can use it.
10
11.
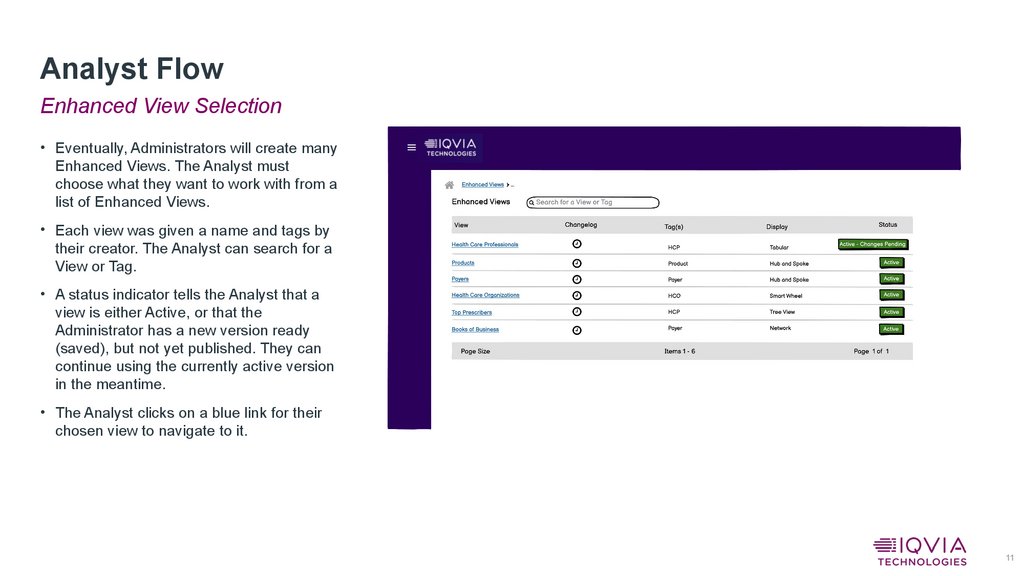
Analyst FlowEnhanced View Selection
• Eventually, Administrators will create many
Enhanced Views. The Analyst must
choose what they want to work with from a
list of Enhanced Views.
• Each view was given a name and tags by
their creator. The Analyst can search for a
View or Tag.
• A status indicator tells the Analyst that a
view is either Active, or that the
Administrator has a new version ready
(saved), but not yet published. They can
continue using the currently active version
in the meantime.
• The Analyst clicks on a blue link for their
chosen view to navigate to it.
11
12.
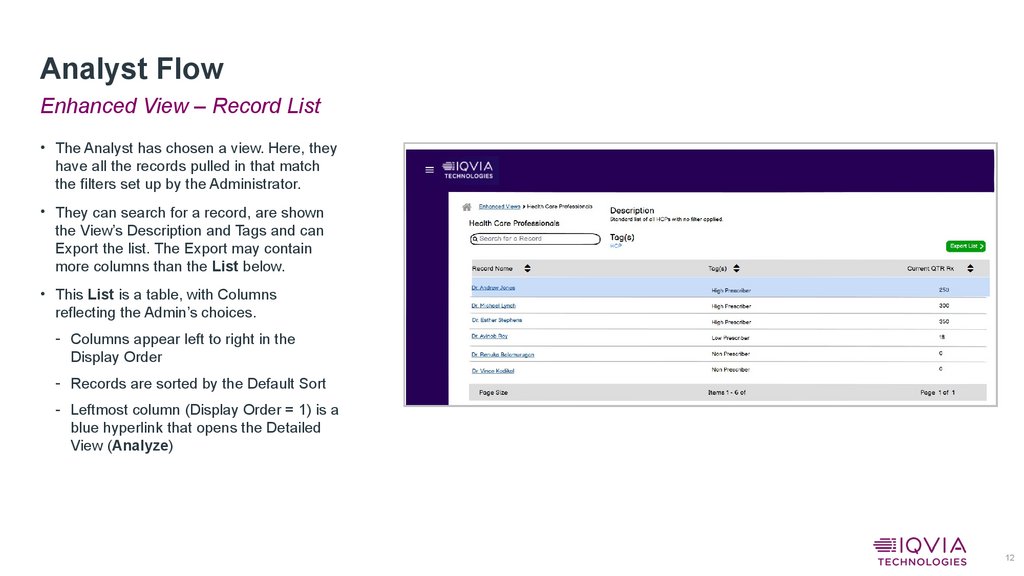
Analyst FlowEnhanced View – Record List
• The Analyst has chosen a view. Here, they
have all the records pulled in that match
the filters set up by the Administrator.
• They can search for a record, are shown
the View’s Description and Tags and can
Export the list. The Export may contain
more columns than the List below.
• This List is a table, with Columns
reflecting the Admin’s choices.
- Columns appear left to right in the
Display Order
- Records are sorted by the Default Sort
- Leftmost column (Display Order = 1) is a
blue hyperlink that opens the Detailed
View (Analyze)
12
13.
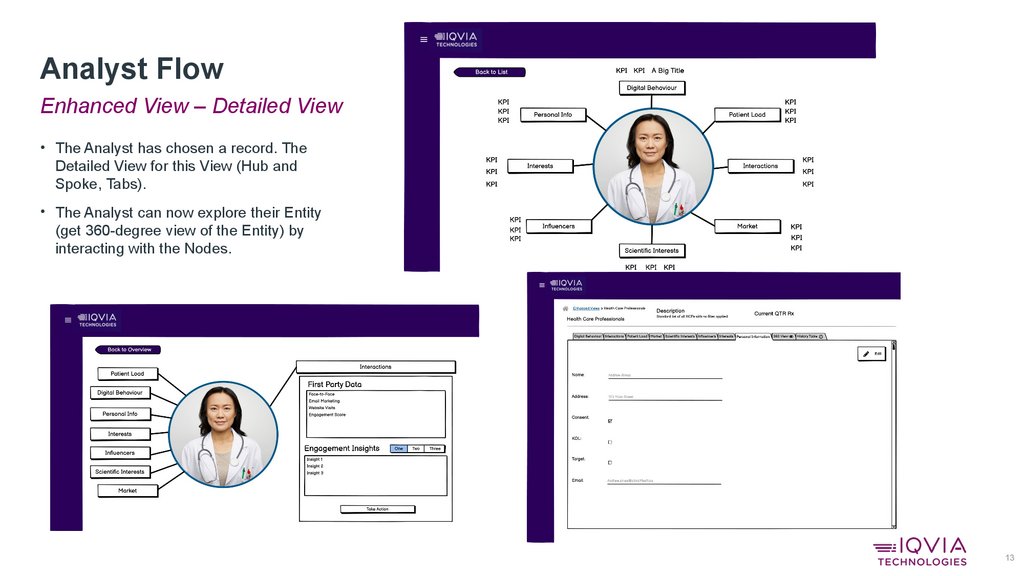
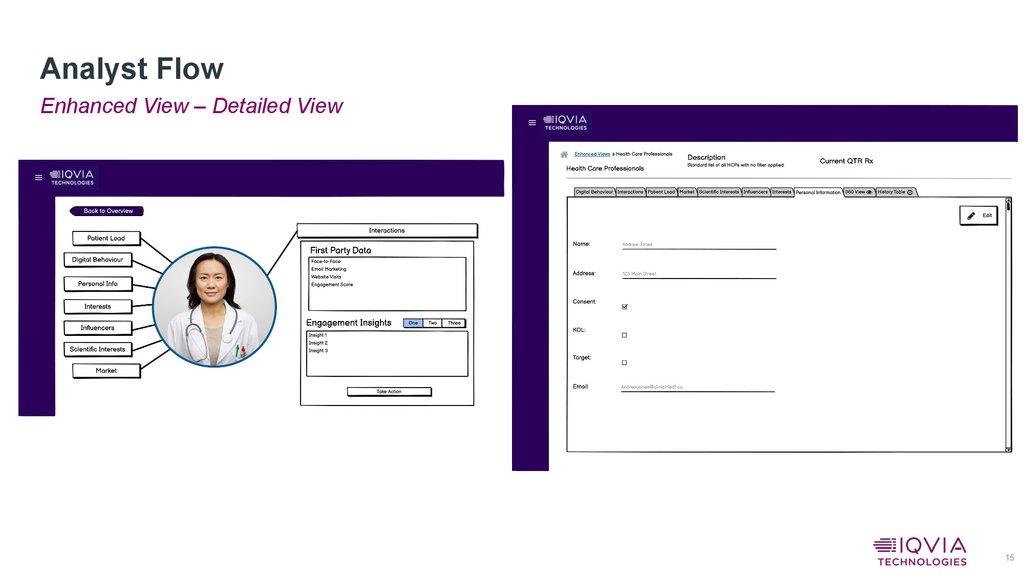
Analyst FlowEnhanced View – Detailed View
• The Analyst has chosen a record. The
Detailed View for this View (Hub and
Spoke, Tabs).
• The Analyst can now explore their Entity
(get 360-degree view of the Entity) by
interacting with the Nodes.
13
14.
Analyst FlowEnhanced View – Detailed View
14
15.
Analyst FlowEnhanced View – Detailed View
15
16.
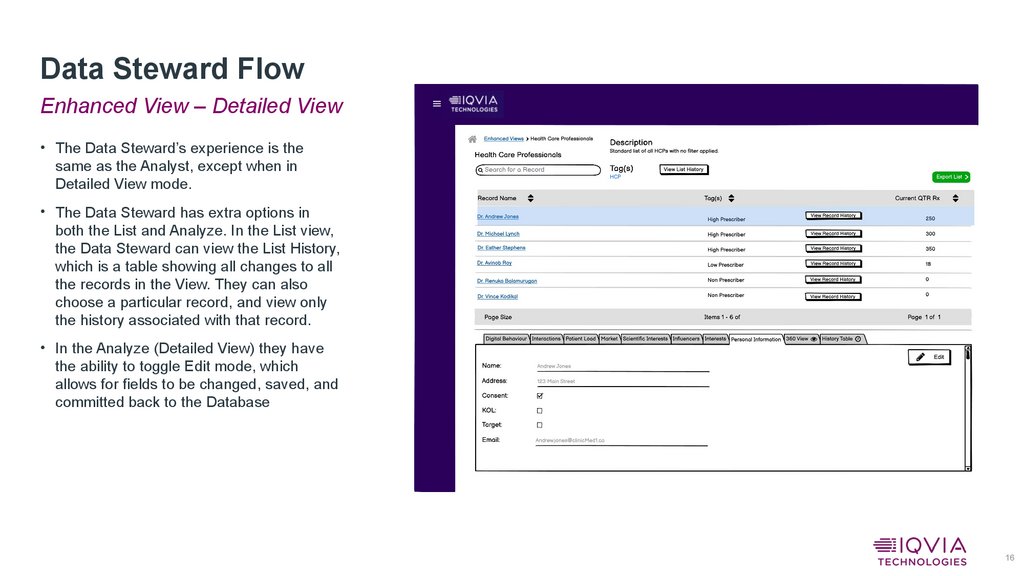
Data Steward FlowEnhanced View – Detailed View
• The Data Steward’s experience is the
same as the Analyst, except when in
Detailed View mode.
• The Data Steward has extra options in
both the List and Analyze. In the List view,
the Data Steward can view the List History,
which is a table showing all changes to all
the records in the View. They can also
choose a particular record, and view only
the history associated with that record.
• In the Analyze (Detailed View) they have
the ability to toggle Edit mode, which
allows for fields to be changed, saved, and
committed back to the Database
16