
 informatics
Similar presentations:


")


WUWOW Meeting Center (WMC) Training
1.
WUWOW Meeting Center(WMC) Training
2.
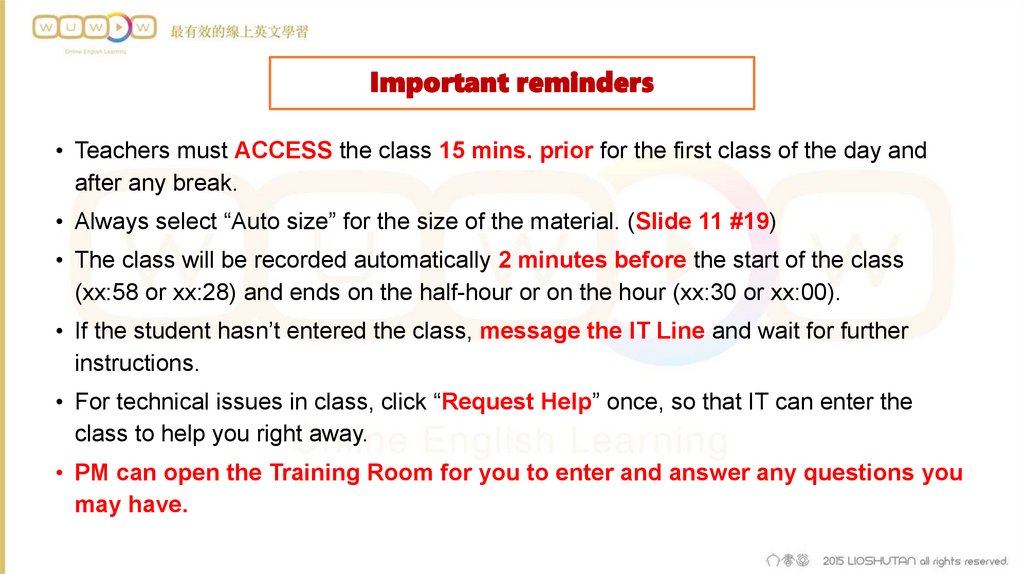
Important reminders• Teachers must ACCESS the class 15 mins. prior for the first class of the day and
after any break.
• Always select “Auto size” for the size of the material. (Slide 11 #19)
• The class will be recorded automatically 2 minutes before the start of the class
(xx:58 or xx:28) and ends on the half-hour or on the hour (xx:30 or xx:00).
• If the student hasn’t entered the class, message the IT Line and wait for further
instructions.
• For technical issues in class, click “Request Help” once, so that IT can enter the
class to help you right away.
• PM can open the Training Room for you to enter and answer any questions you
may have.
3.
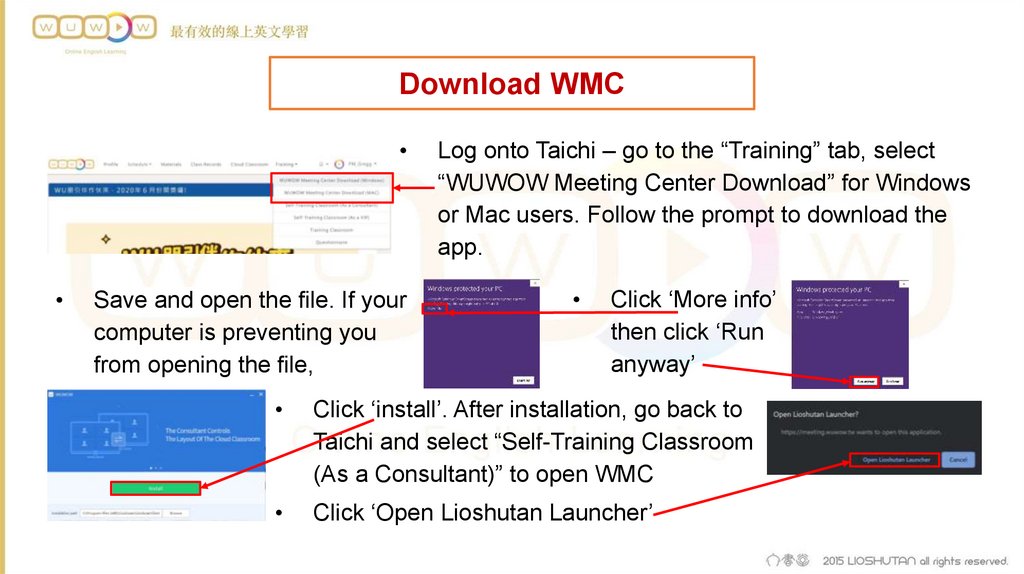
Download WMCSave and open the file. If your
computer is preventing you
from opening the file,
Log onto Taichi – go to the “Training” tab, select
“WUWOW Meeting Center Download” for Windows
or Mac users. Follow the prompt to download the
app.
Click ‘More info’
then click ‘Run
anyway’
Click ‘install’. After installation, go back to
Taichi and select “Self-Training Classroom
(As a Consultant)” to open WMC
Click ‘Open Lioshutan Launcher’
4.
WUWOW Meeting Center1.
2.
3.
4.
5.
6.
7.
8.
9.
10.
11.
12.
13.
14.
Menu – WMC menu
Mute – mute your mic
Presenter – to be Presenter/Quit presenter
Share – share documents, screen, etc.
Record – records the class onto your computer
More – more features
Switch Layout – select various meeting layout
Request Help – for help with any technical
difficulty or problems
About – info re WMC
Attendees – reflects the names of students in
the room
Documents – reflects all the materials that
have been uploaded and saved
Chat – send chat to other attendees
Classroom information – reflects info of the
room and your device
Video – see your own video and other
attendees’ videos
1
10
12
2
11
4
3
13
5
6
7
14
8
9
5.
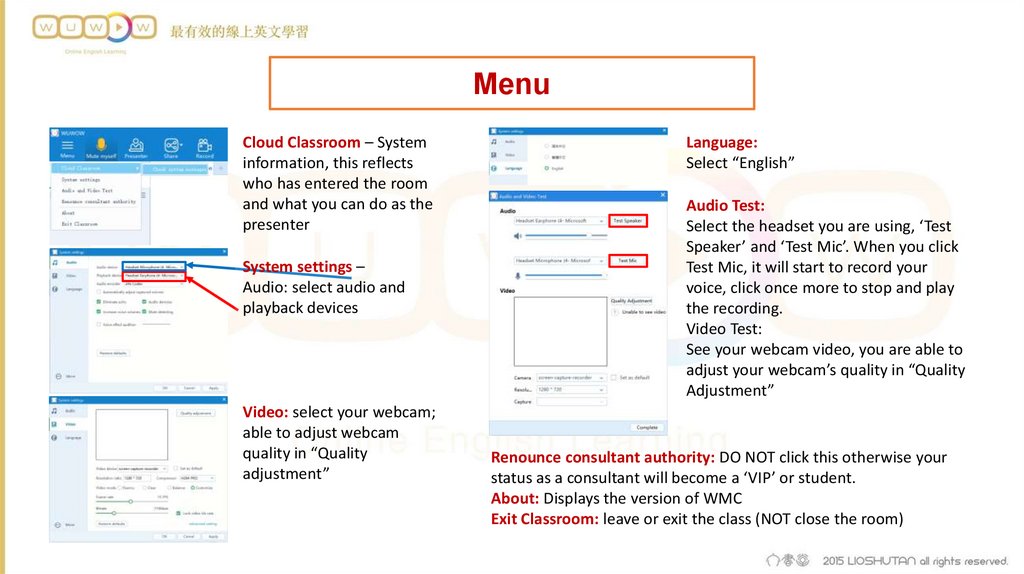
MenuCloud Classroom – System
information, this reflects
who has entered the room
and what you can do as the
presenter
System settings –
Audio: select audio and
playback devices
Video: select your webcam;
able to adjust webcam
quality in “Quality
adjustment”
Language:
Select “English”
Audio Test:
Select the headset you are using, ‘Test
Speaker’ and ‘Test Mic’. When you click
Test Mic, it will start to record your
voice, click once more to stop and play
the recording.
Video Test:
See your webcam video, you are able to
adjust your webcam’s quality in “Quality
Adjustment”
Renounce consultant authority: DO NOT click this otherwise your
status as a consultant will become a ‘VIP’ or student.
About: Displays the version of WMC
Exit Classroom: leave or exit the class (NOT close the room)
6.
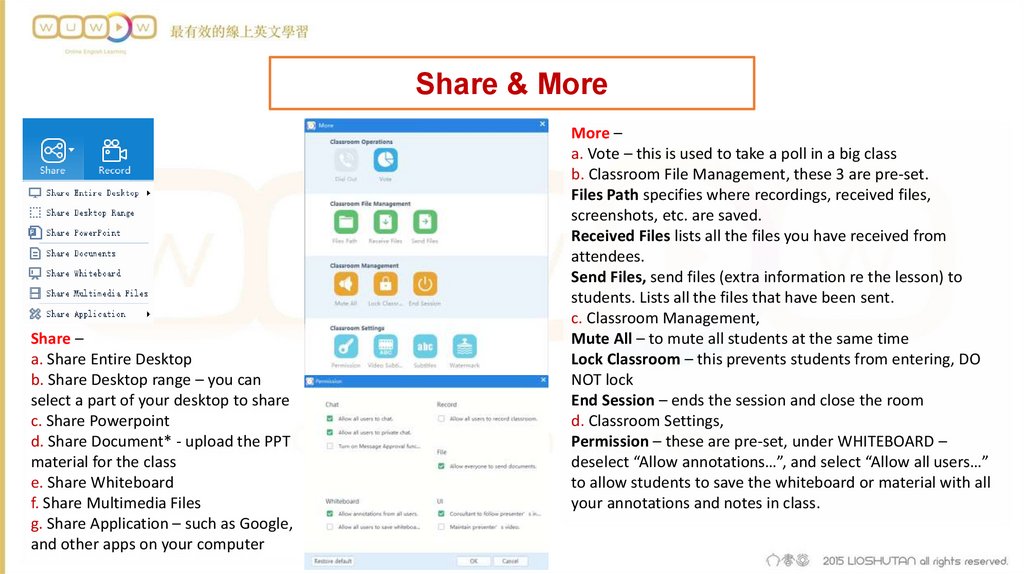
Share & MoreShare –
a. Share Entire Desktop
b. Share Desktop range – you can
select a part of your desktop to share
c. Share Powerpoint
d. Share Document* - upload the PPT
material for the class
e. Share Whiteboard
f. Share Multimedia Files
g. Share Application – such as Google,
and other apps on your computer
More –
a. Vote – this is used to take a poll in a big class
b. Classroom File Management, these 3 are pre-set.
Files Path specifies where recordings, received files,
screenshots, etc. are saved.
Received Files lists all the files you have received from
attendees.
Send Files, send files (extra information re the lesson) to
students. Lists all the files that have been sent.
c. Classroom Management,
Mute All – to mute all students at the same time
Lock Classroom – this prevents students from entering, DO
NOT lock
End Session – ends the session and close the room
d. Classroom Settings,
Permission – these are pre-set, under WHITEBOARD –
deselect “Allow annotations…”, and select “Allow all users…”
to allow students to save the whiteboard or material with all
your annotations and notes in class.
7.
SharePic. a
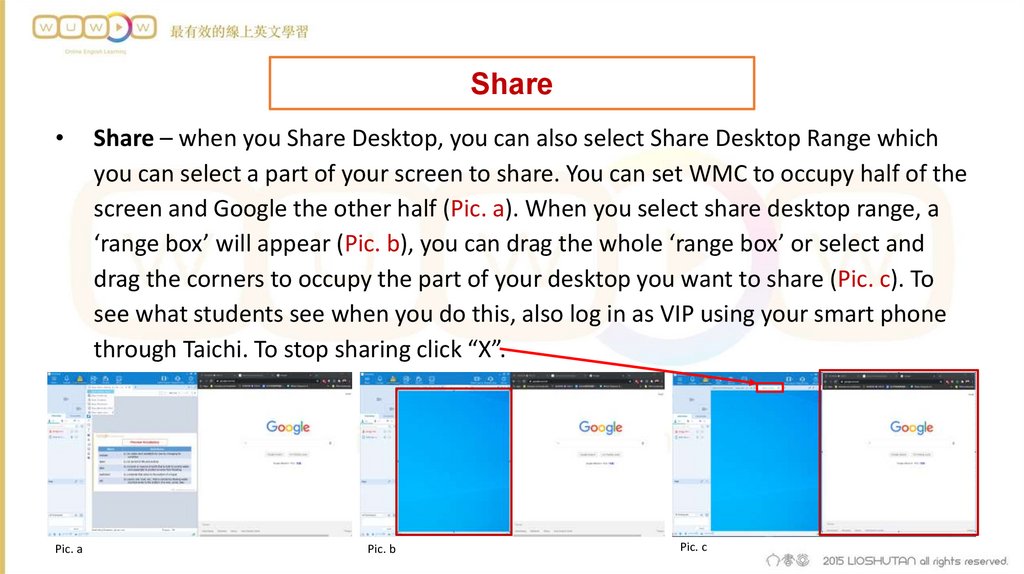
Share – when you Share Desktop, you can also select Share Desktop Range which
you can select a part of your screen to share. You can set WMC to occupy half of the
screen and Google the other half (Pic. a). When you select share desktop range, a
‘range box’ will appear (Pic. b), you can drag the whole ‘range box’ or select and
drag the corners to occupy the part of your desktop you want to share (Pic. c). To
see what students see when you do this, also log in as VIP using your smart phone
through Taichi. To stop sharing click “X”.
Pic. b
Pic. c
8.
Attendees1
2
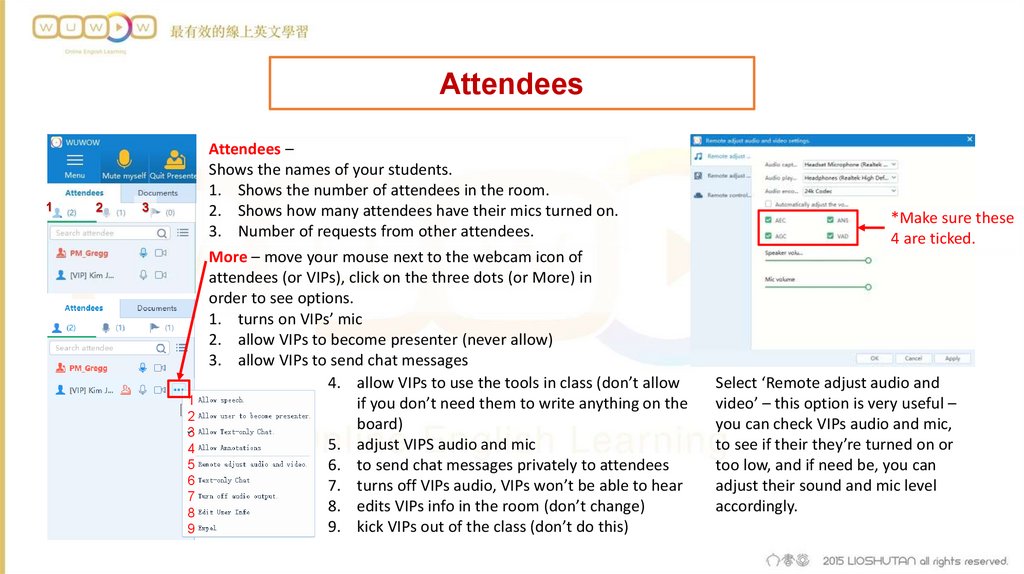
Attendees –
Shows the names of your students.
1. Shows the number of attendees in the room.
2. Shows how many attendees have their mics turned on.
3. Number of requests from other attendees.
3
1
2
3
4
5
6
7
8
9
More – move your mouse next to the webcam icon of
attendees (or VIPs), click on the three dots (or More) in
order to see options.
1. turns on VIPs’ mic
2. allow VIPs to become presenter (never allow)
3. allow VIPs to send chat messages
4. allow VIPs to use the tools in class (don’t allow
if you don’t need them to write anything on the
board)
5. adjust VIPS audio and mic
6. to send chat messages privately to attendees
7. turns off VIPs audio, VIPs won’t be able to hear
8. edits VIPs info in the room (don’t change)
9. kick VIPs out of the class (don’t do this)
*Make sure these
4 are ticked.
Select ‘Remote adjust audio and
video’ – this option is very useful –
you can check VIPs audio and mic,
to see if their they’re turned on or
too low, and if need be, you can
adjust their sound and mic level
accordingly.
9.
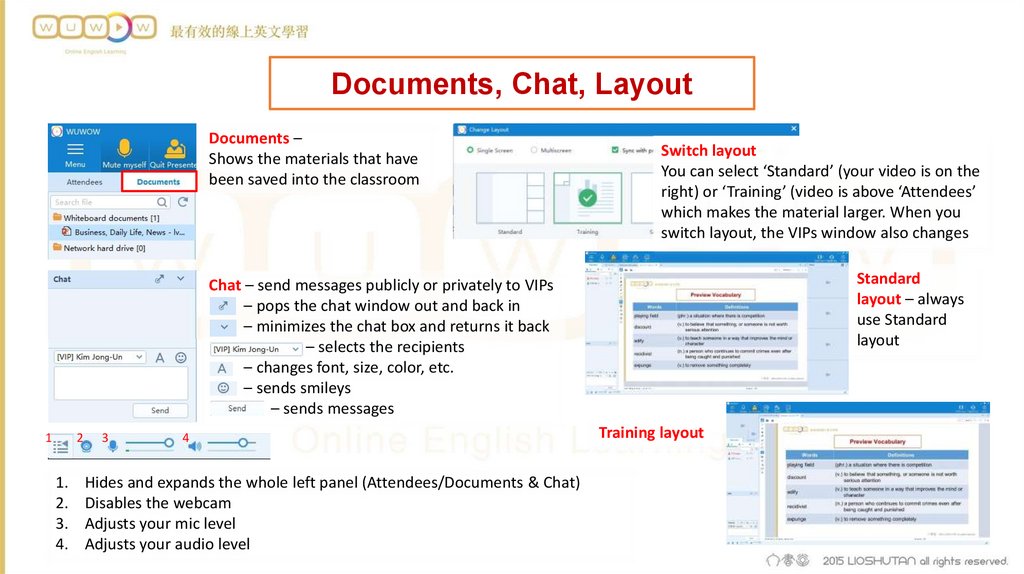
Documents, Chat, LayoutDocuments –
Shows the materials that have
been saved into the classroom
Switch layout
You can select ‘Standard’ (your video is on the
right) or ‘Training’ (video is above ‘Attendees’
which makes the material larger. When you
switch layout, the VIPs window also changes
Standard
layout – always
use Standard
layout
Chat – send messages publicly or privately to VIPs
– pops the chat window out and back in
– minimizes the chat box and returns it back
– selects the recipients
– changes font, size, color, etc.
– sends smileys
– sends messages
1
2
1.
2.
3.
4.
3
4
Hides and expands the whole left panel (Attendees/Documents & Chat)
Disables the webcam
Adjusts your mic level
Adjusts your audio level
Training layout
10.
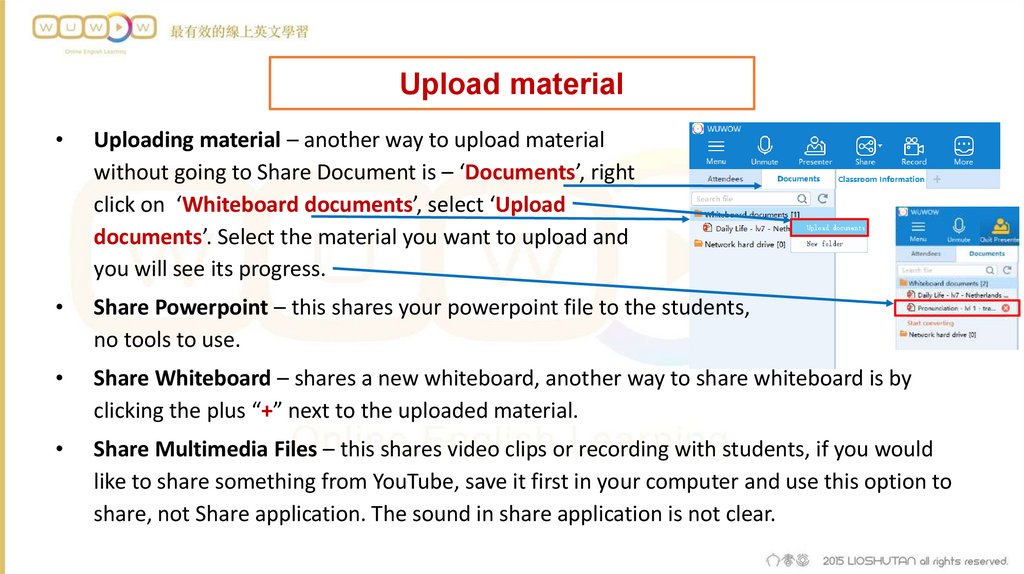
Upload materialUploading material – another way to upload material
without going to Share Document is – ‘Documents’, right
click on ‘Whiteboard documents’, select ‘Upload
documents’. Select the material you want to upload and
you will see its progress.
Share Powerpoint – this shares your powerpoint file to the students,
no tools to use.
Share Whiteboard – shares a new whiteboard, another way to share whiteboard is by
clicking the plus “+” next to the uploaded material.
Share Multimedia Files – this shares video clips or recording with students, if you would
like to share something from YouTube, save it first in your computer and use this option to
share, not Share application. The sound in share application is not clear.
11.
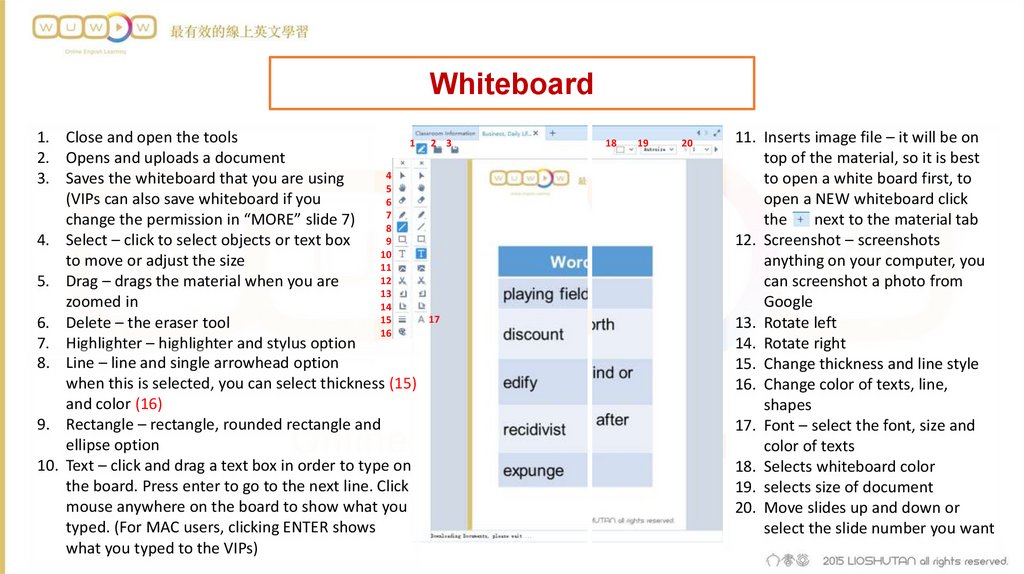
Whiteboard1. Close and open the tools
1
2. Opens and uploads a document
4
3. Saves the whiteboard that you are using
5
(VIPs can also save whiteboard if you
6
7
change the permission in “MORE” slide 7)
8
9
4. Select – click to select objects or text box
10
to move or adjust the size
11
12
5. Drag – drags the material when you are
13
zoomed in
14
15
6. Delete – the eraser tool
16
7. Highlighter – highlighter and stylus option
8. Line – line and single arrowhead option
when this is selected, you can select thickness (15)
and color (16)
9. Rectangle – rectangle, rounded rectangle and
ellipse option
10. Text – click and drag a text box in order to type on
the board. Press enter to go to the next line. Click
mouse anywhere on the board to show what you
typed. (For MAC users, clicking ENTER shows
what you typed to the VIPs)
2 3
17
18
19
20
11. Inserts image file – it will be on
top of the material, so it is best
to open a white board first, to
open a NEW whiteboard click
the
next to the material tab
12. Screenshot – screenshots
anything on your computer, you
can screenshot a photo from
13. Rotate left
14. Rotate right
15. Change thickness and line style
16. Change color of texts, line,
shapes
17. Font – select the font, size and
color of texts
18. Selects whiteboard color
19. selects size of document
20. Move slides up and down or
select the slide number you want