Similar presentations:
Advance BBMA
1.
2. Advance BBMA
Multiple Time Frame – Ema50 Re-entry situationEma50 is a strong indicator for Trend, can be down or uptrend. In advance
BBMA, we can use BB and Ema50 as a Re-entry signal
BBEMA – is a Re-entry situation, to see it, we use only TWO time frames
There’s 3 Re-entry BBEMA situations
1.
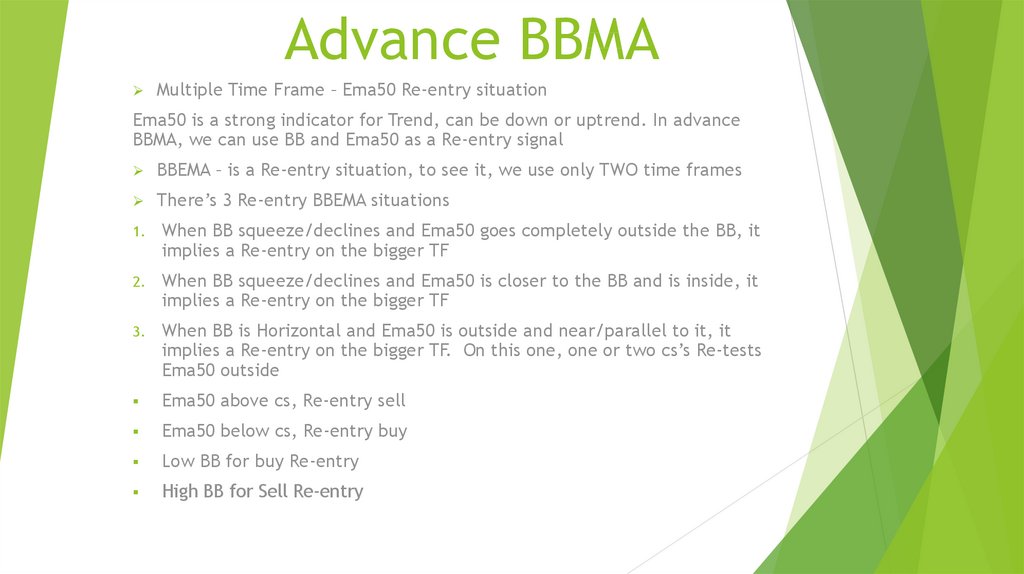
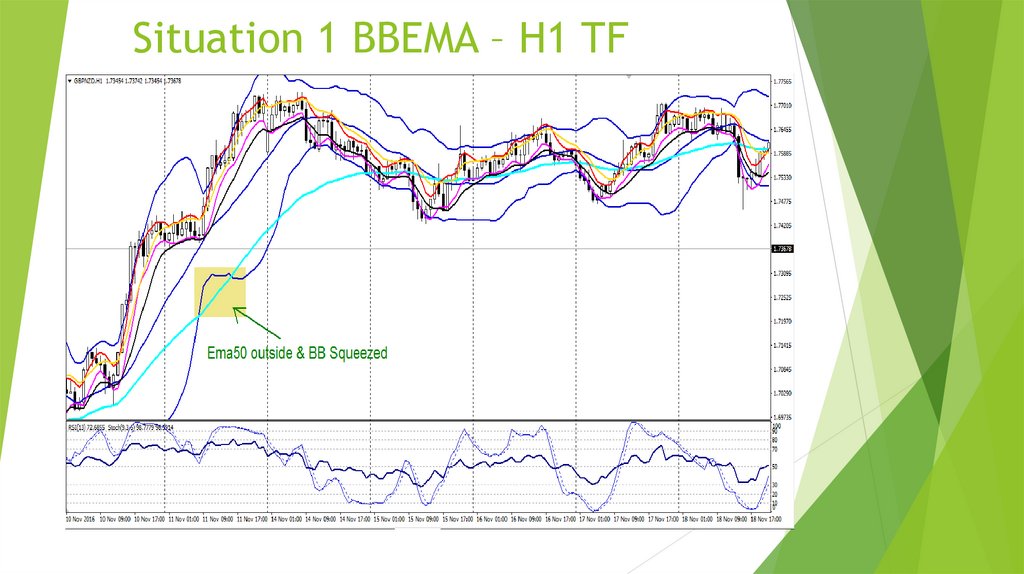
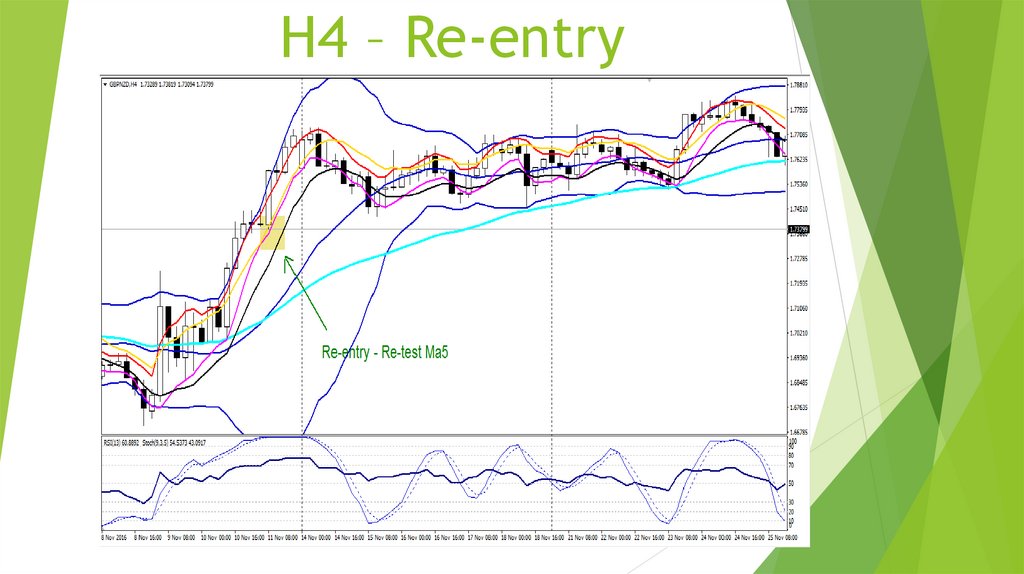
When BB squeeze/declines and Ema50 goes completely outside the BB, it
implies a Re-entry on the bigger TF
2.
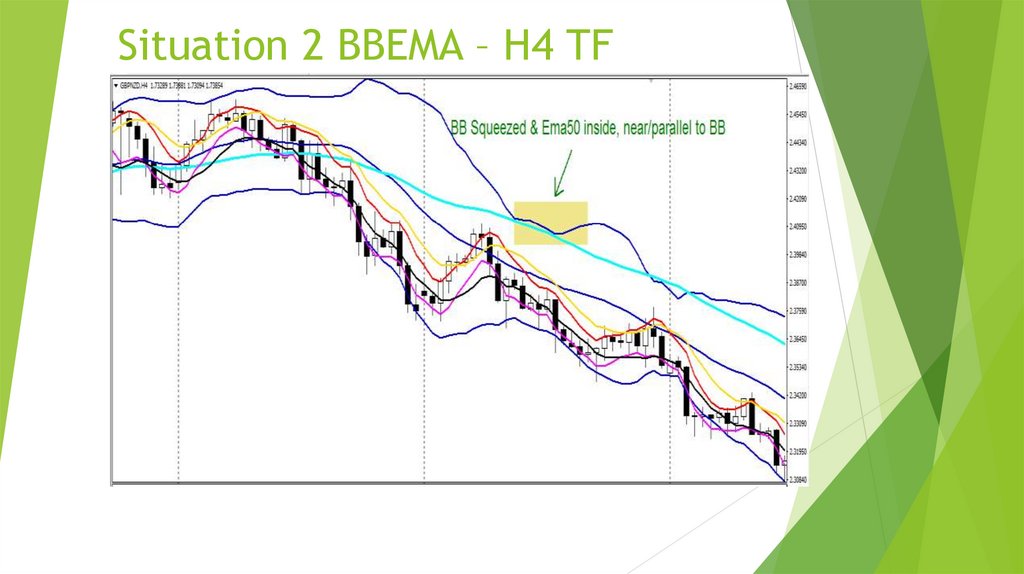
When BB squeeze/declines and Ema50 is closer to the BB and is inside, it
implies a Re-entry on the bigger TF
3.
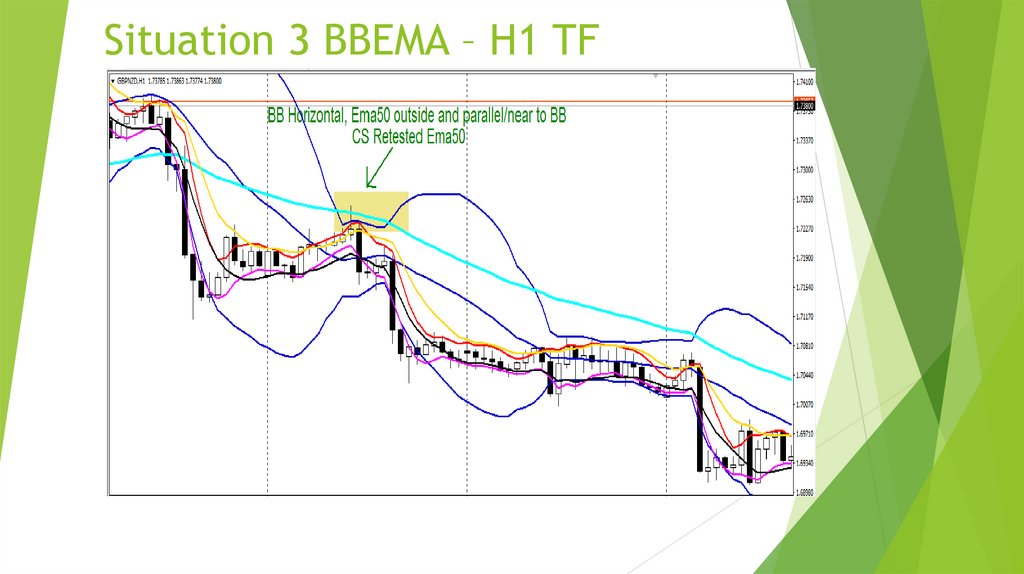
When BB is Horizontal and Ema50 is outside and near/parallel to it, it
implies a Re-entry on the bigger TF. On this one, one or two cs’s Re-tests
Ema50 outside
Ema50 above cs, Re-entry sell
Ema50 below cs, Re-entry buy
Low BB for buy Re-entry
High BB for Sell Re-entry
3. Situation 1 BBEMA – H1 TF
4. H4 – Re-entry
5. Situation 2 BBEMA – H4 TF
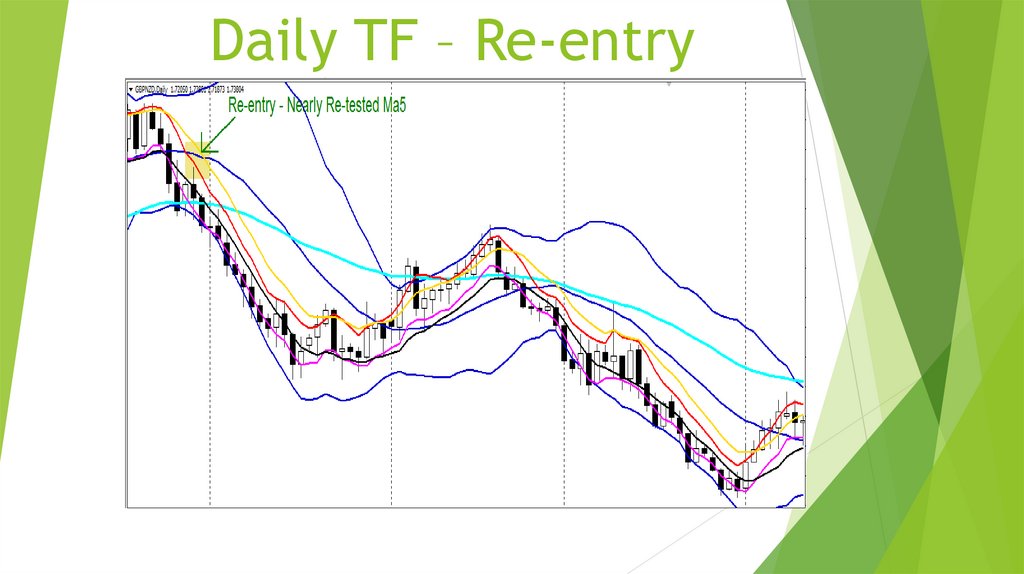
6. Daily TF – Re-entry
7. Situation 3 BBEMA – H1 TF
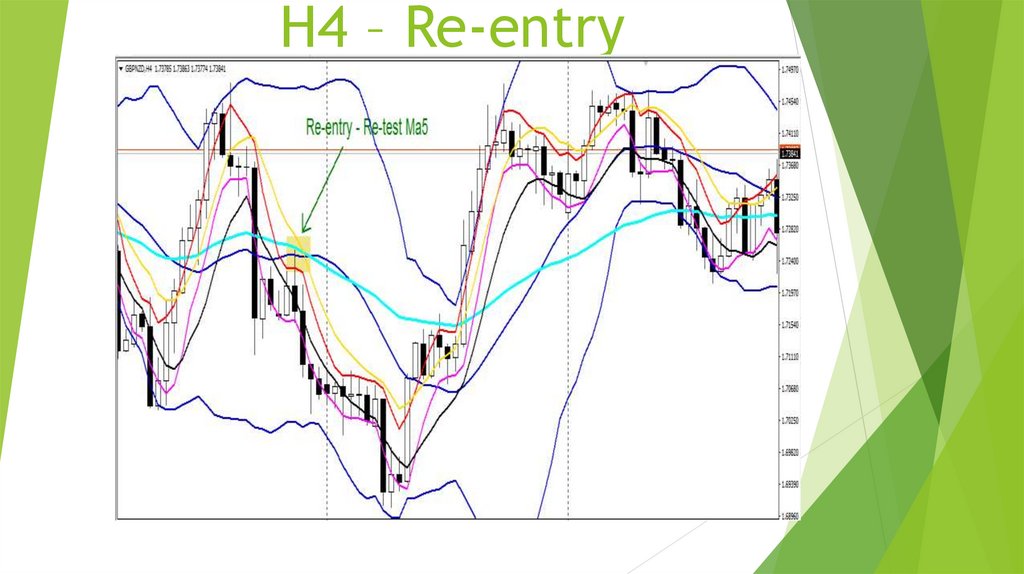
8. H4 – Re-entry
9. Multiple TF; Major and Manor Movement
This Movement is for tracking down 80-90% unfinished trend. To spot theMovement, we have Markings. There are 3 main signals/features to spot
major and manor movement reversals.
1.
Sideways market = BB Horizontal
2.
MLV or when the market is Sideways and meet with Mid BB
3.
Sideways market and gives us a Re-entry
How to see Major & Manor or SOP
Daily – Marking, if you get any of the 3 features(sometimes the market will
touch ma5/10)
- For direction (to see trend, use Ema50 if it’s a Downtrend or
Uptrend
- For TP, when the markets touches Ma5/10
H4 – Confirmation TF
- also for TP
H1 – Entry TF
- Apply basic BBMA diagram/7 steps for entry
10. Example; Major (weekly – H1 but manor is from H1-m1)
This is the standard SOP of the MovementDaily – Feature/marking, BB horizontal = sideways market
- Tp when market touch Ma5
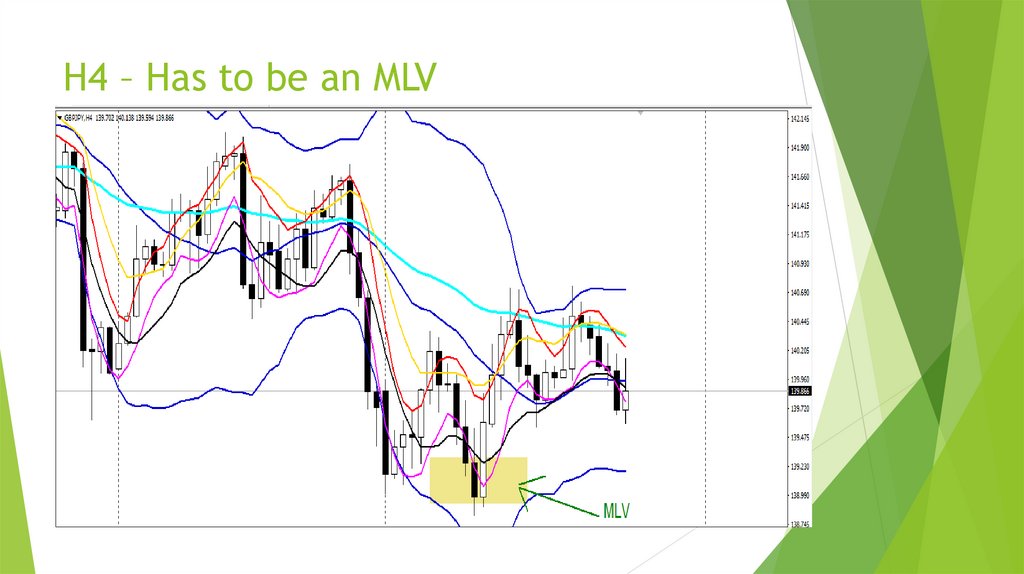
H4 – Has to be an MLV
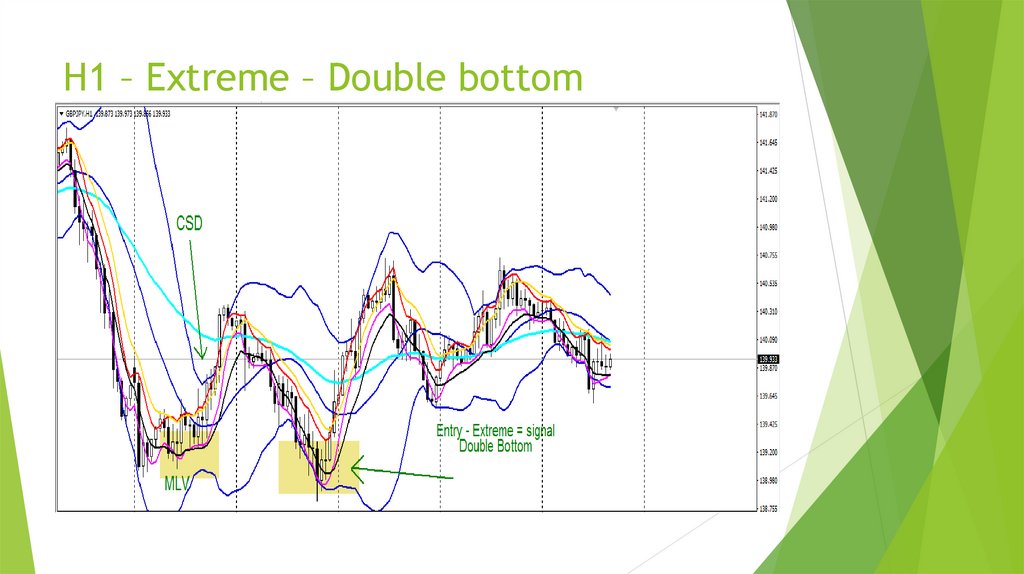
H1 – if there’s an Extreme, it’s a bonus. But compulsory signal you have to see
is MLV and CSD and enter on Re-entry (sometimes there won’t be a R-entry,
the market will retest the previous low/high or create a double top/bottom)
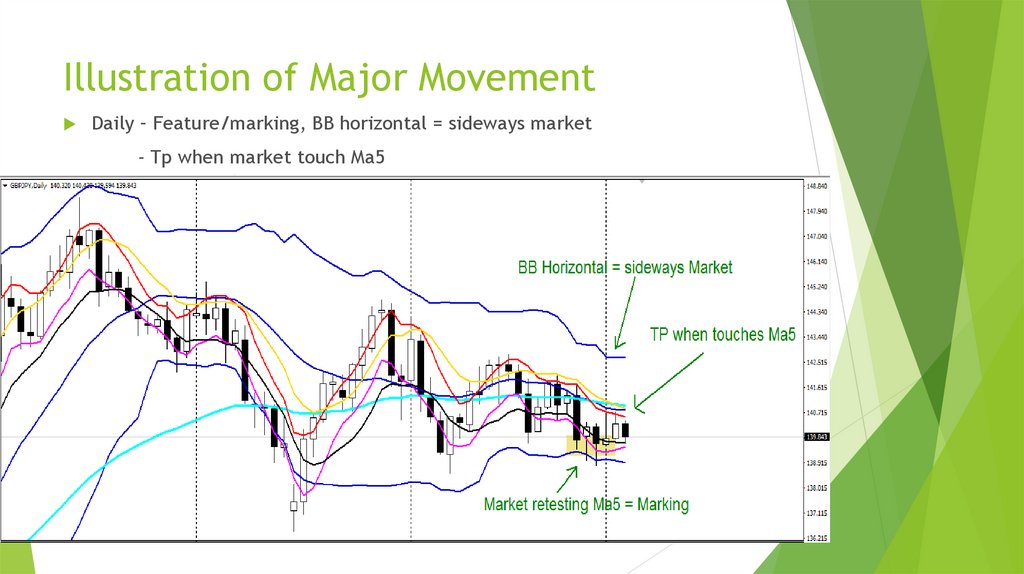
11. Illustration of Major Movement
Daily – Feature/marking, BB horizontal = sideways market- Tp when market touch Ma5
12. H4 – Has to be an MLV
13. H1 – Extreme – Double bottom
14. Extreme “C” signal
Extreme “c” is more of a hidden Re-entryWe see it using Ma5/10, when candles sticks and close outside of it
This helps us to see a strong Momentum in the market
SOP of Extreme “C”
I.
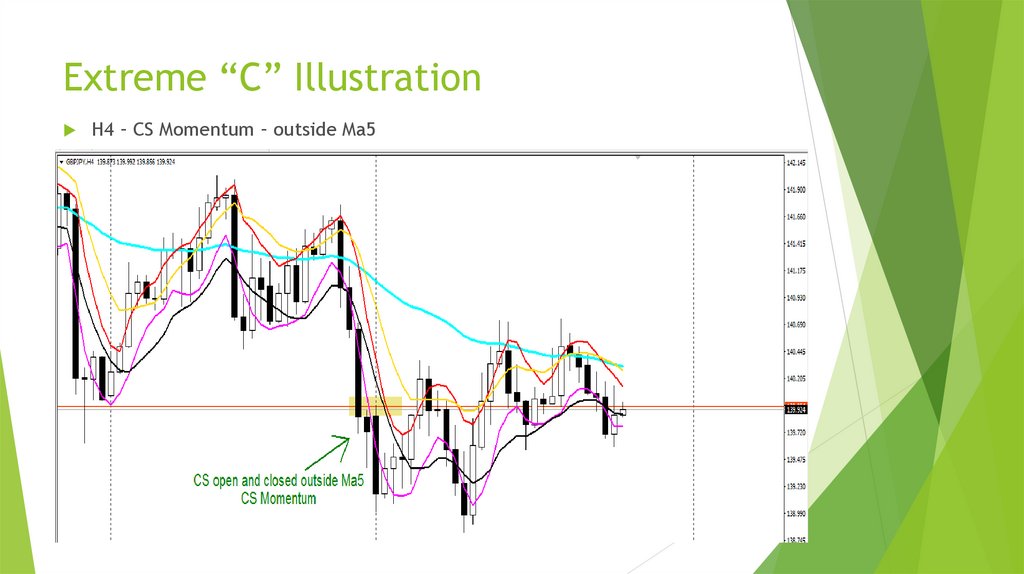
Big Tf, a candle will be outside of Ma5/10, acting as a CS Momentum
II.
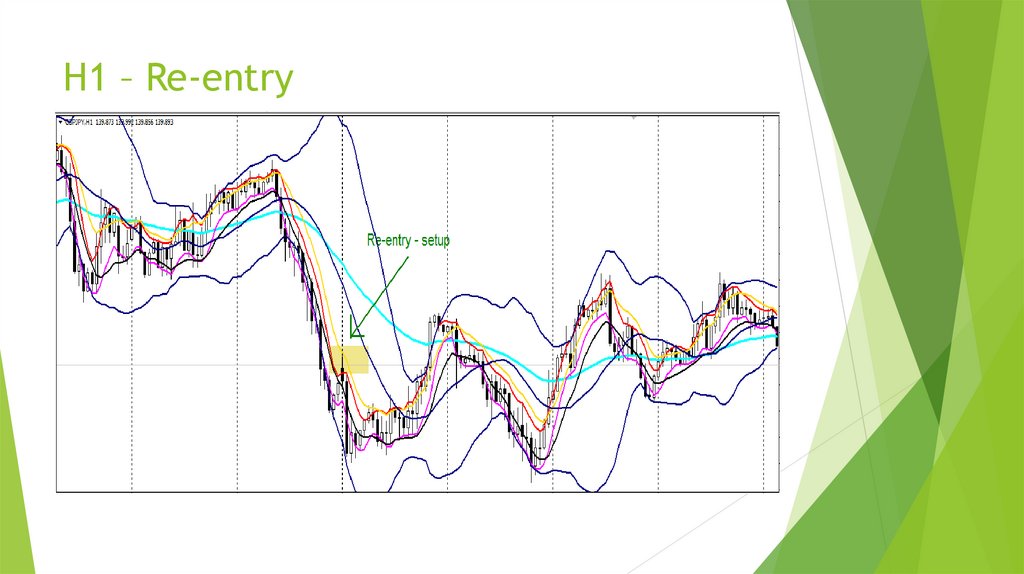
Middle Tf, we need to see a Re-entry
III.
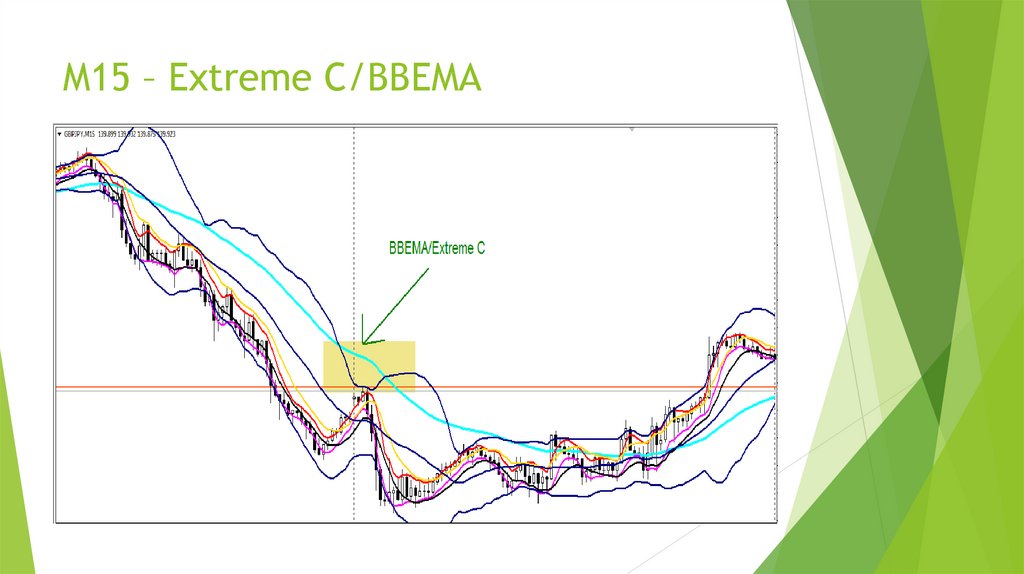
Smaller Tf, we have to see an Extreme C/BBEMA (Ema50 Re-entry situation)
15. Extreme “C” Illustration
H4 – CS Momentum – outside Ma516. H1 – Re-entry
17. M15 – Extreme C/BBEMA
18. Diamond Setup
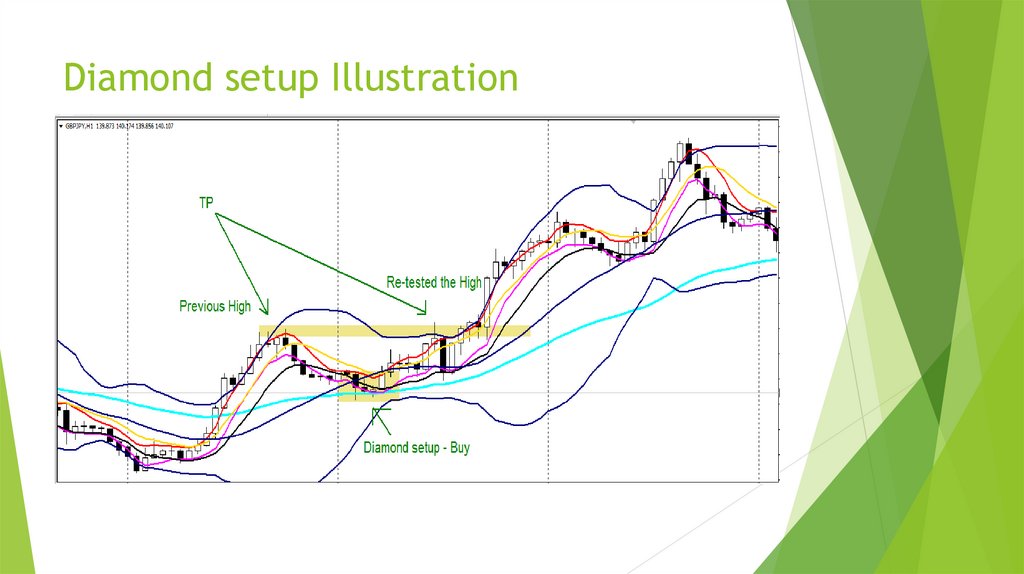
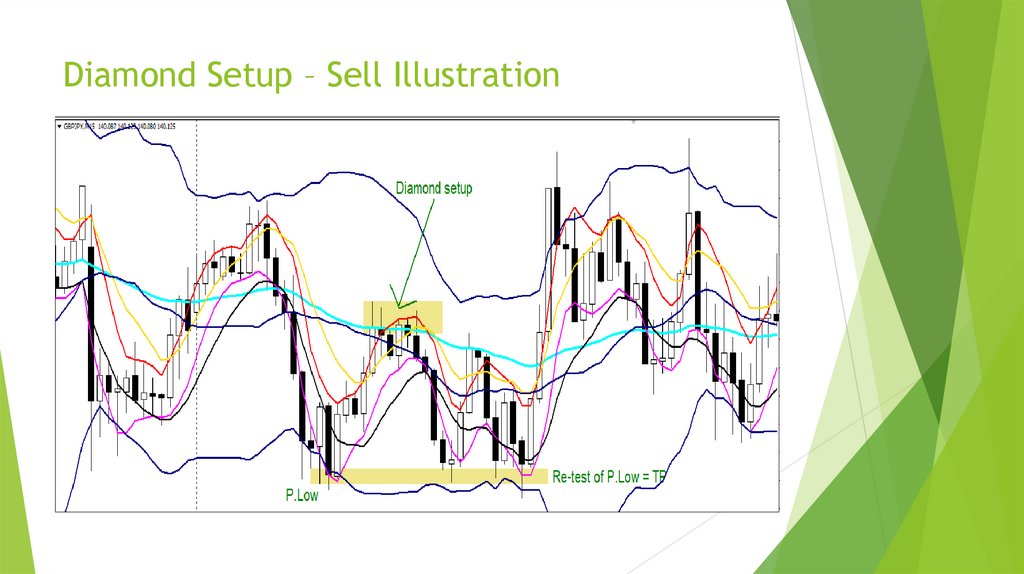
Diamond Setup is 100% accurate.It happens when Ma5/10, Ema50 are parallel to Mid BB, it shouldn’t be far
from Mid BB
There should be 3 cs to re-retest/reject Ema50 and enter on the forth one.
Sometimes you get less cs retesting/rejecting
You Tp when the market reach previous Low/High
If there was an extreme before, the Diamond setup will be very
SL 10 pips away
For Buy, Ema50 should be below Mid BB
For Sell, Ema50 should be above Mid BB
19. Diamond setup Illustration
20. Diamond Setup – Sell Illustration
21. Golden Setup
Golden Setup is a powerful Re-entry situationThere’s Two kinds of Golden Setup
I.
Golden Setup that has Extreme “C”
II.
Golden Setup that has Ema50/BBEMA situation
For Golden Setup, we use Four Time Frames
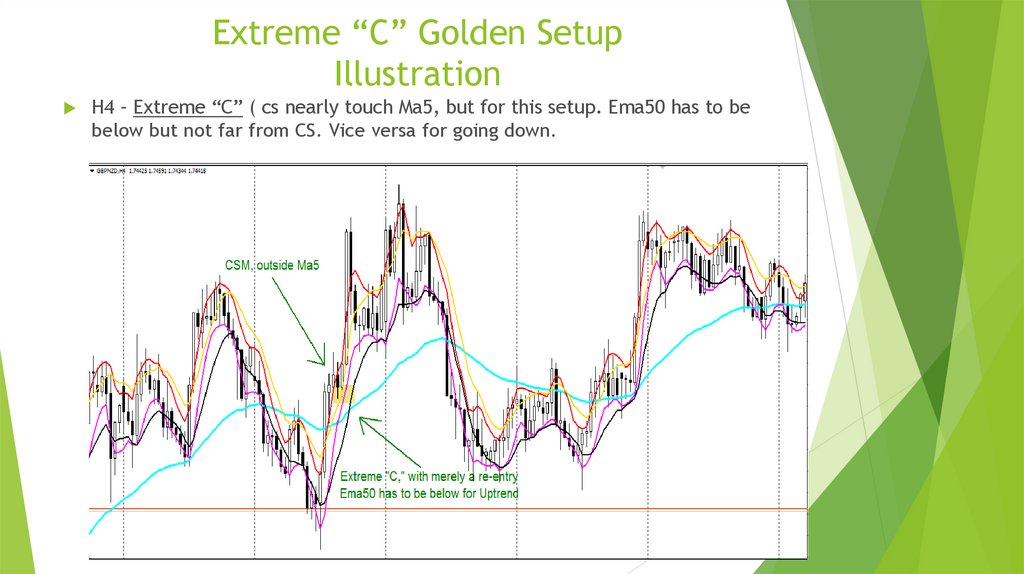
22. Extreme “C” Golden Setup Illustration
H4 – Extreme “C” ( cs nearly touch Ma5, but for this setup. Ema50 has to bebelow but not far from CS. Vice versa for going down.
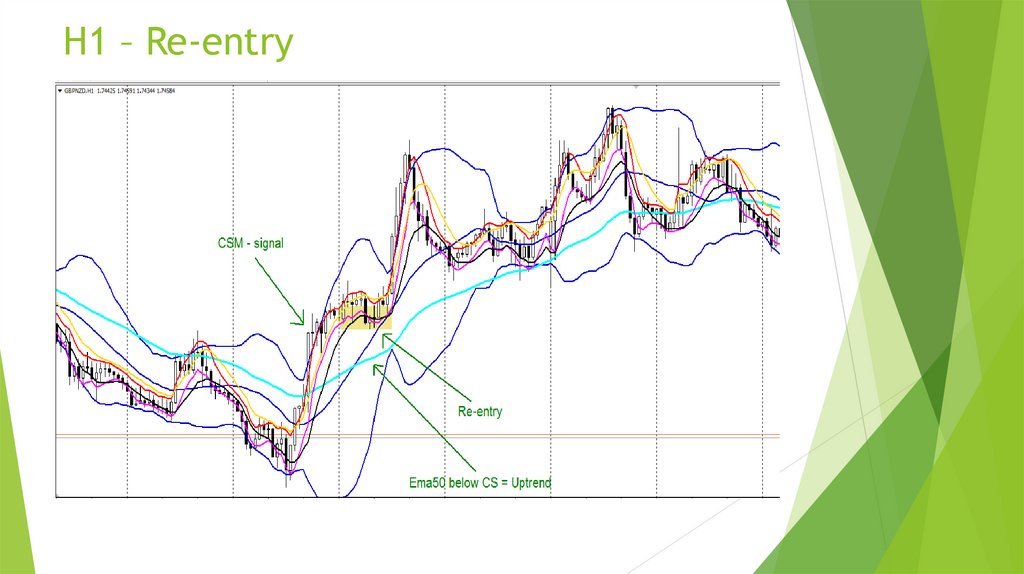
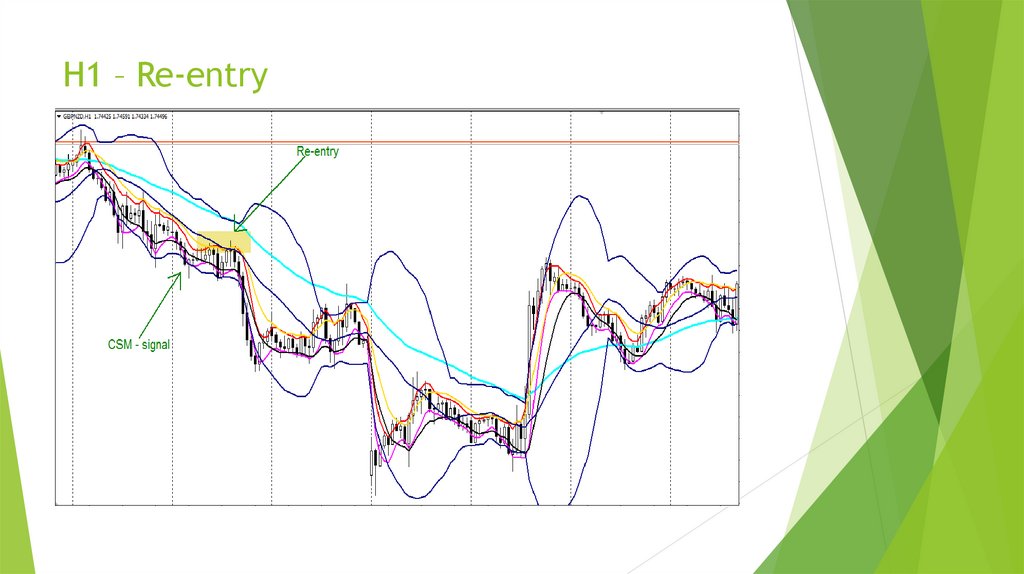
23. H1 – Re-entry
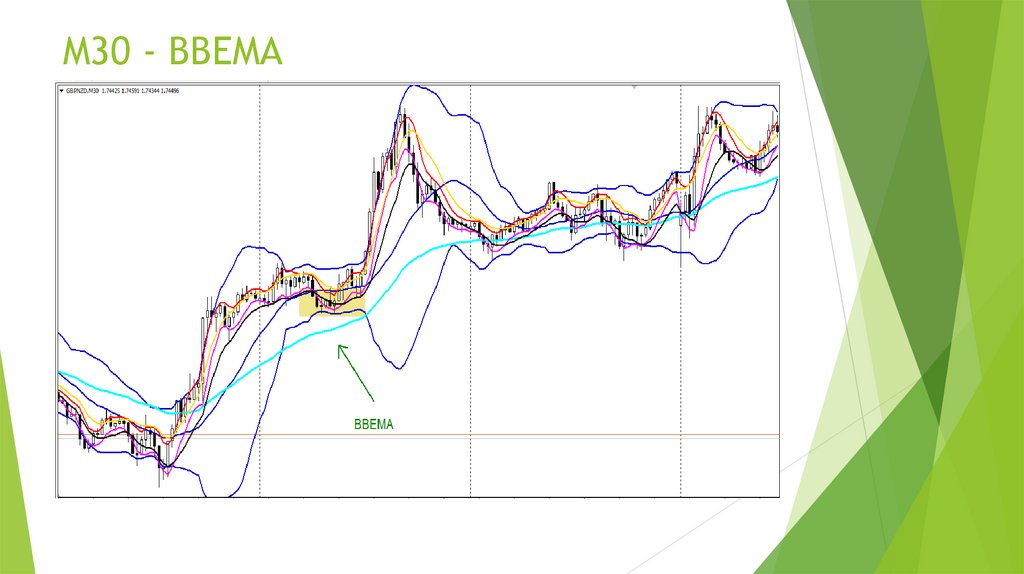
24. M30 - BBEMA
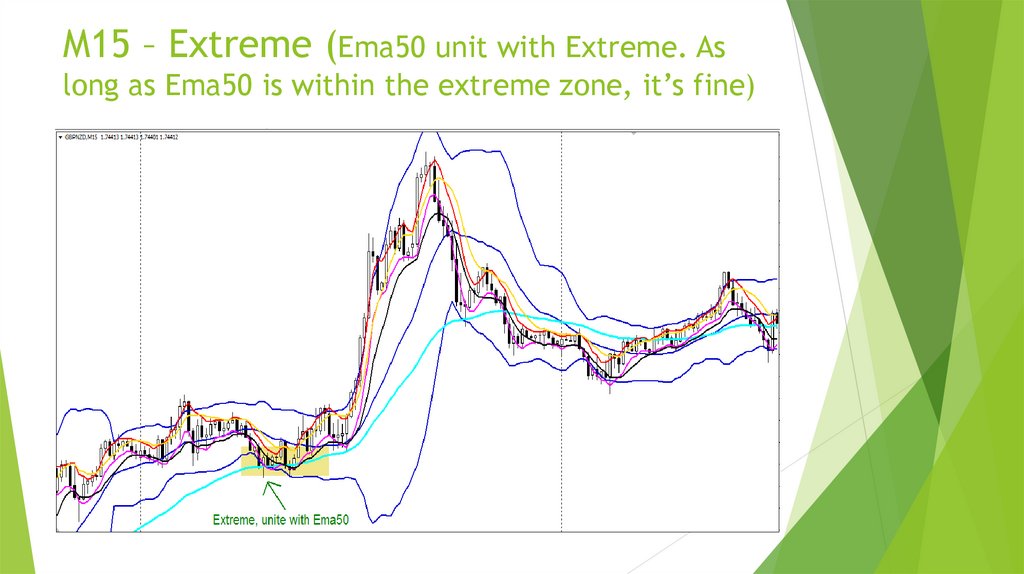
25. M15 – Extreme (Ema50 unit with Extreme. As long as Ema50 is within the extreme zone, it’s fine)
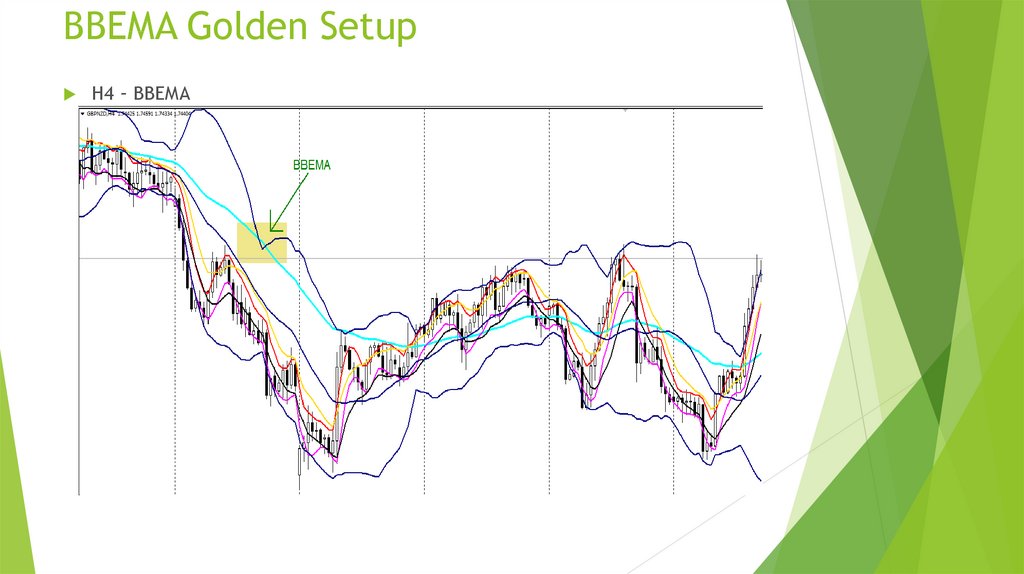
26. BBEMA Golden Setup
H4 – BBEMA27. H1 – Re-entry
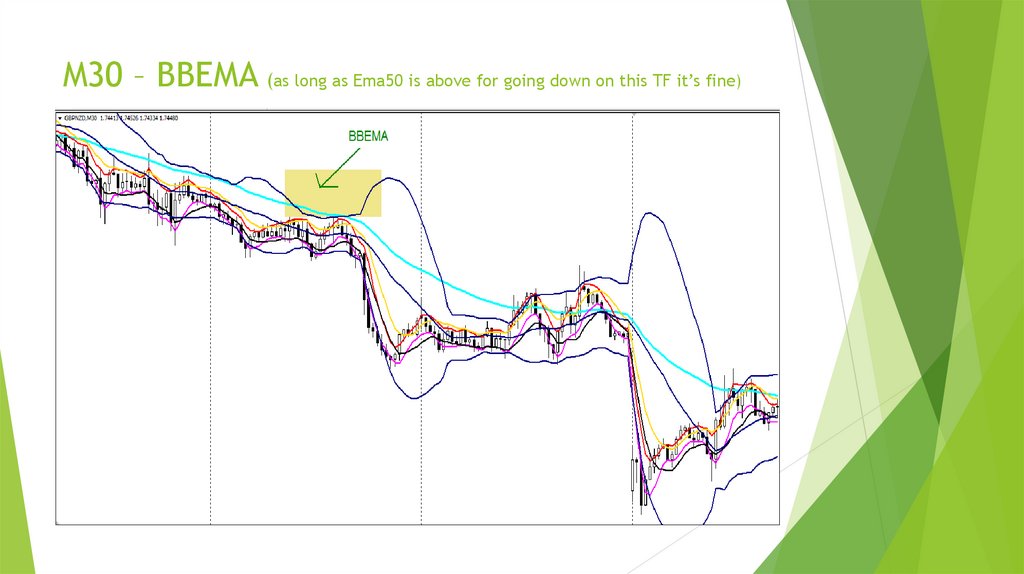
28. M30 – BBEMA (as long as Ema50 is above for going down on this TF it’s fine)
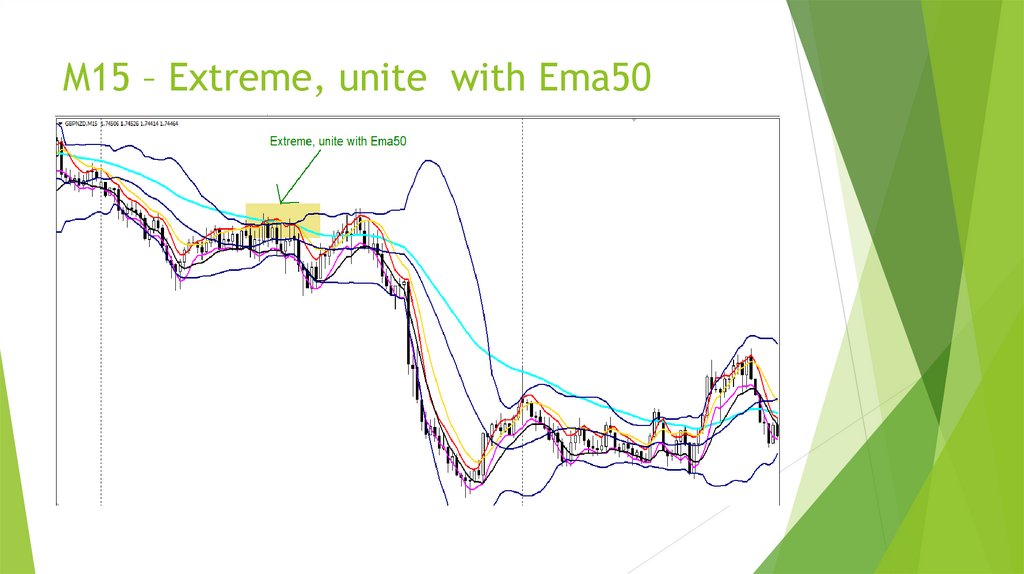
29. M15 – Extreme, unite with Ema50
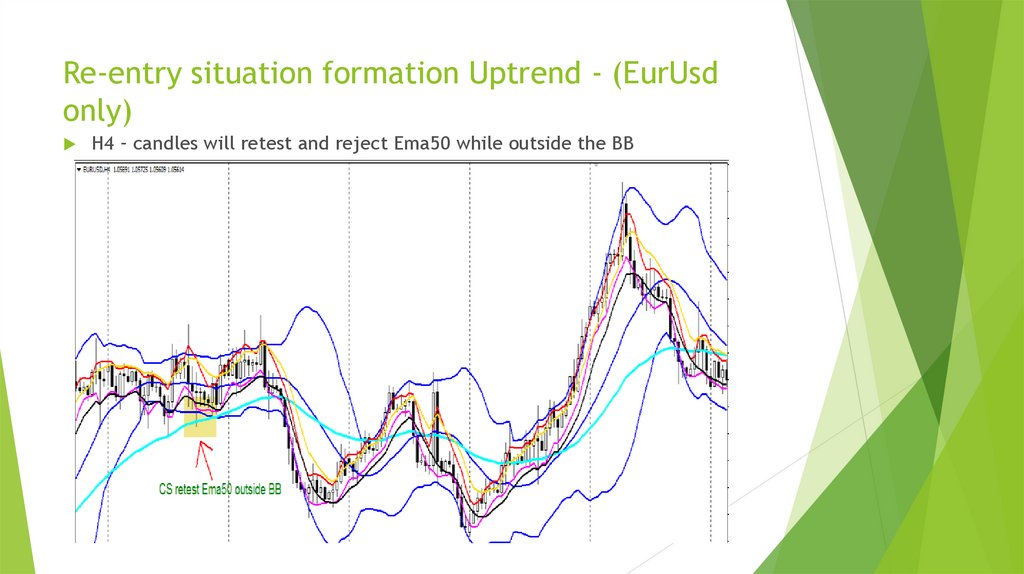
30. Re-entry situation formation Uptrend - (EurUsd only)
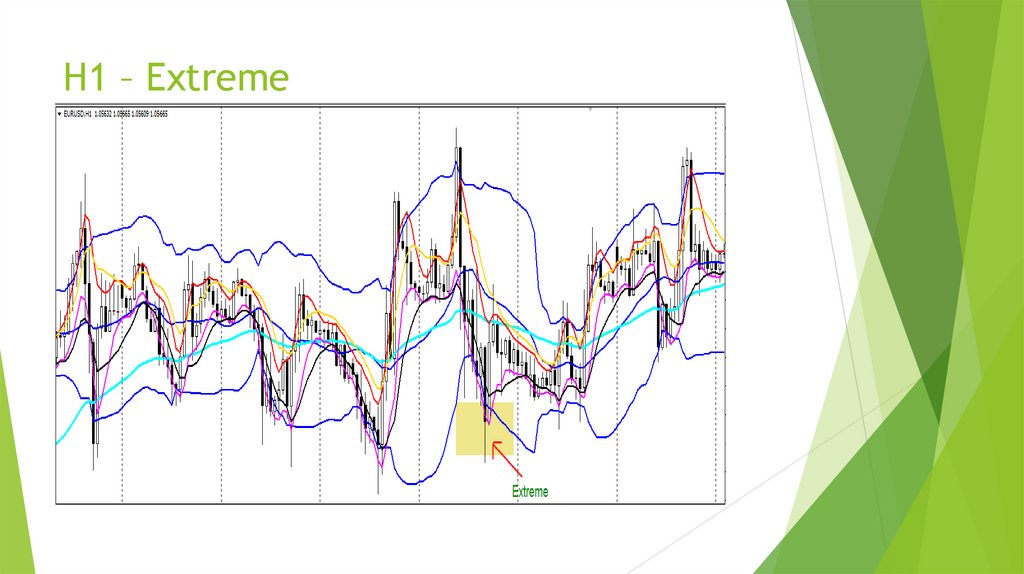
H4 – candles will retest and reject Ema50 while outside the BB31. H1 – Extreme
32. M15 – There has to be an Extreme
Icouldn’t go back on M15 where
there was an Extreme because it’s
too far.
33. Setup RMR
Ifthere’s no REM (Re-entry –
Extreme – MLV) there’ll be a setup
called RMR which is a Re-entry –
MLV – Re-entry.

 informatics


