

 electronics
Similar presentations:


")
Video wall controller spec
1.
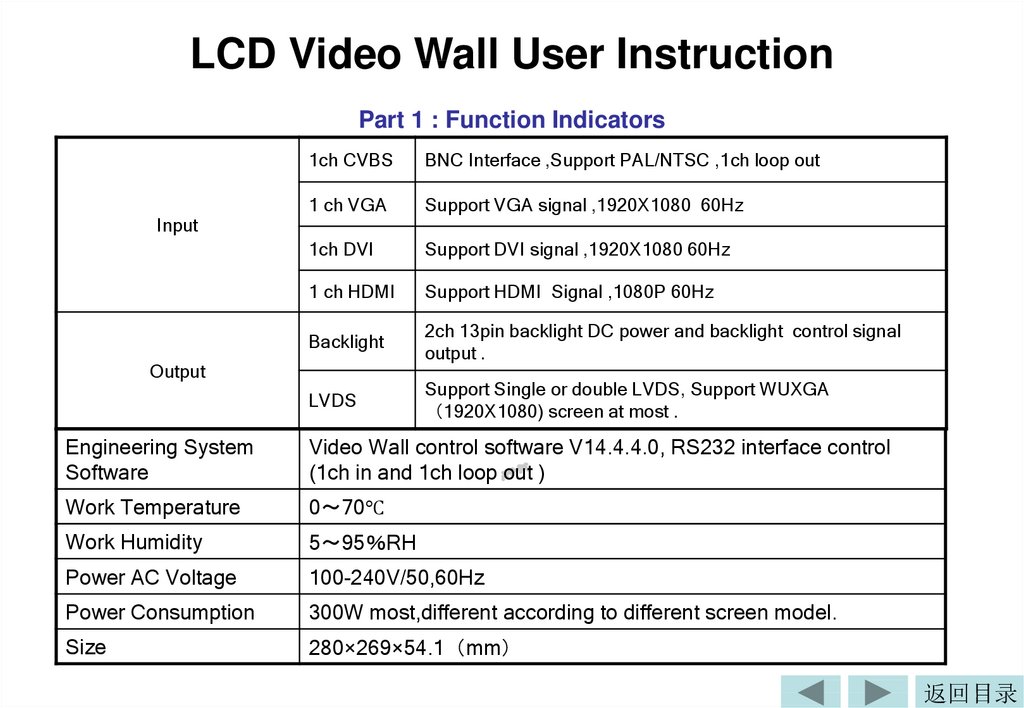
LCD Video Wall User InstructionPart 1 : Function Indicators
Input
1ch CVBS
BNC Interface ,Support PAL/NTSC ,1ch loop out
1 ch VGA
Support VGA signal ,1920X1080 60Hz
1ch DVI
Support DVI signal ,1920X1080 60Hz
1 ch HDMI
Support HDMI Signal ,1080P 60Hz
Backlight
2ch 13pin backlight DC power and backlight control signal
output .
LVDS
Support Single or double LVDS, Support WUXGA
1920X1080) screen at most .
Output
Engineering System
Software
Video Wall control software V14.4.4.0, RS232 interface control
(1ch in and 1ch loop out )
Work Temperature
0 70℃
Work Humidity
5 95 RH
Power AC Voltage
100-240V/50,60Hz
Power Consumption
300W most,different according to different screen model.
Size
280×269×54.1 mm
返回目录
2.
Function :• Full hardware architecture Without CPU and Operation system;
• Start-upTime less than 6ms;
• No risk of virus infection,good safety;
• Integrated multi-channel video signal source types Composite video, VGA, DVI, HDMI;
• Composite video can loop out
• With USB updating interface, quick and simple update;
• Embedded 3D Video Light separation circuit unit
• Embedded 3D progressive normalization process and frame rate conversion circuit unit;
• Embedded 3D digital signal noise reduction unit;
• supports drive to 1920X1080 LCD screen;
• RS232 Serial Remote Control; each unit support 1ch in and 1ch out ;
• Can continue to work 24 hours a day;
• Easy operation with controller software
Features:
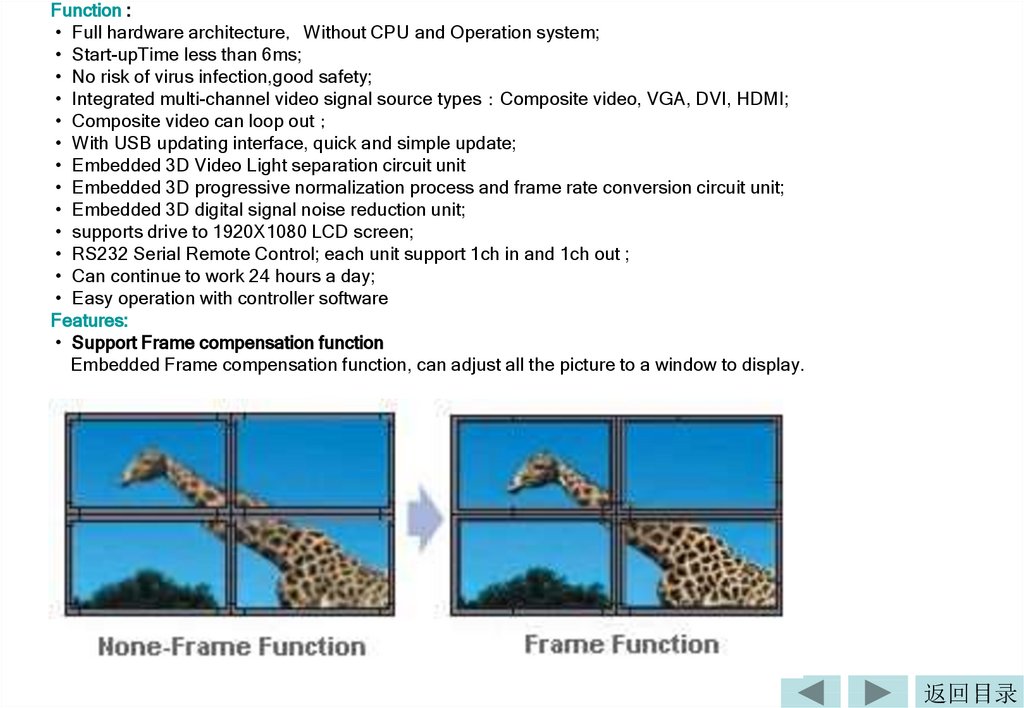
• Support Frame compensation function
Embedded Frame compensation function, can adjust all the picture to a window to display.
返回目录
3.
• Thermostatically controlled fanEmbedded Thermostatically controlled fan,can adjust the fan's
operation according to the actural temperature to make sure the long life of usage .
• Word-Editing Function
This special word-editing function,have single screen,splicing screen display,the Word size,
Color,Play speed、Play/Stop and etc.function can be changed acording to your application.
• Software updated automatically via USB
With a USB Interface,You can update the software via USB.Only save the updated software to
the USB and insert to the USB interface,After Re-AC,the controller will check the software
and updated automatically.
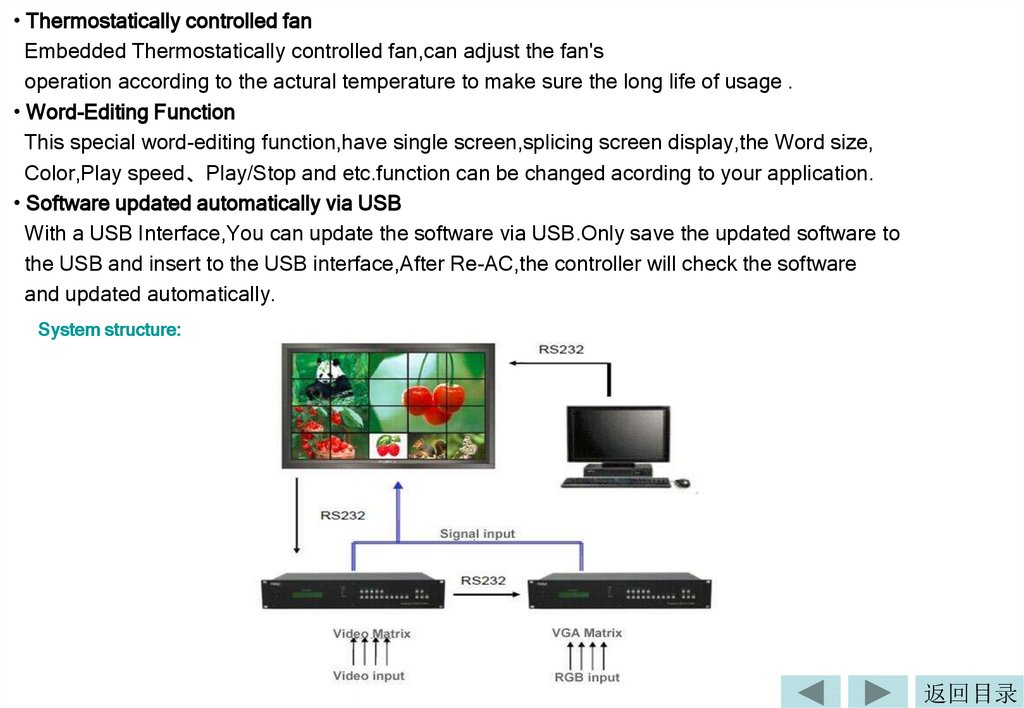
System structure:
返回目录
4.
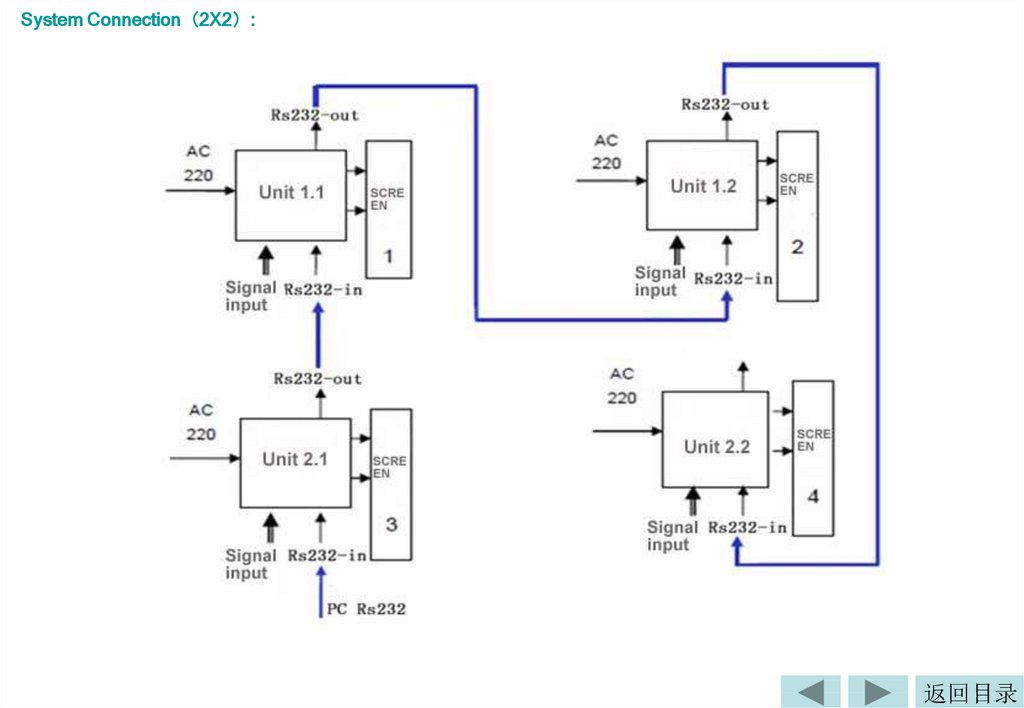
System Connection 2X2 :返回目录
5.
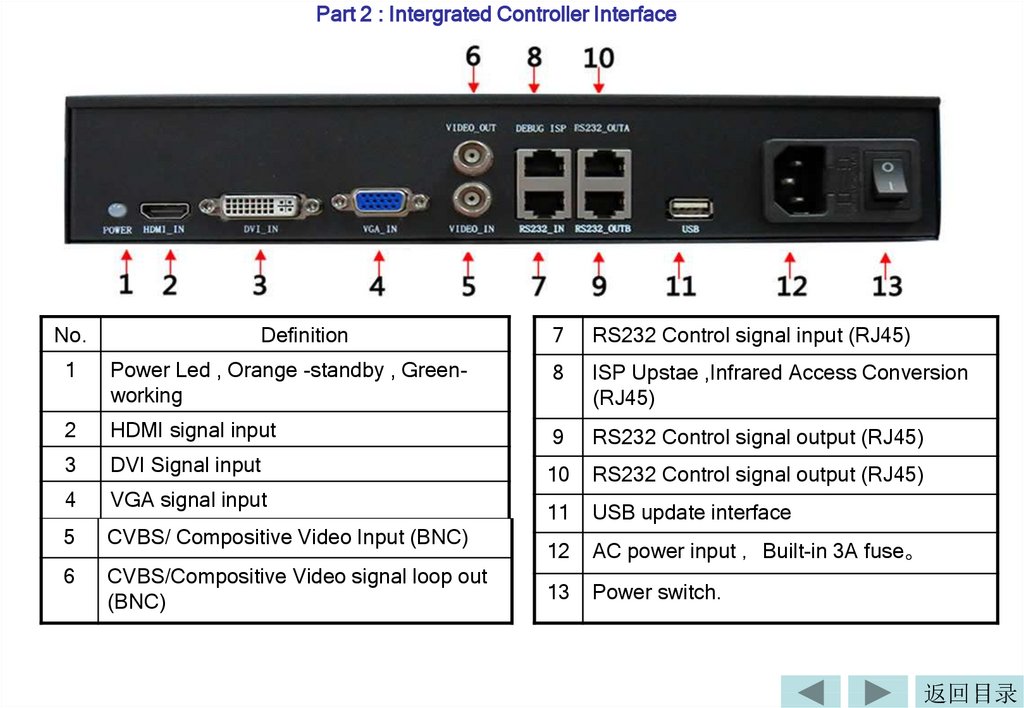
Part 2 : Intergrated Controller InterfaceNo.
Definition
7
RS232 Control signal input (RJ45)
1
Power Led , Orange -standby , Greenworking
8
ISP Upstae ,Infrared Access Conversion
(RJ45)
2
HDMI signal input
9
RS232 Control signal output (RJ45)
3
DVI Signal input
10
RS232 Control signal output (RJ45)
4
VGA signal input
11
USB update interface
5
CVBS/ Compositive Video Input (BNC)
12
AC power input Built-in 3A fuse。
6
CVBS/Compositive Video signal loop out
(BNC)
13
Power switch.
返回目录
6.
Part 3:Control Software InstructionSoftware Operating Environment
Operation system: Windows 98/2000/ NT/XP/WIN7/ WIN8/WIN8.1/WIN10/Vista
Minimum CPU Pentium 133Mhz
RAM 128MB
Graphics Card Standard VGA More than 256 color display mode
Hard disk: 10M typical installation
Serial communication port Standard RS232 communication interface or compatible models.
Other equipment: mouse
The steps of running the software
1,Open the the power switch , the power LED is on :
Green color system is on ; Orange system is standby
2,Find the software , click LCD_CONTROL.exe , Software login window appears:
Input the user password and click login , the default password is : 2076
返回目录
7.
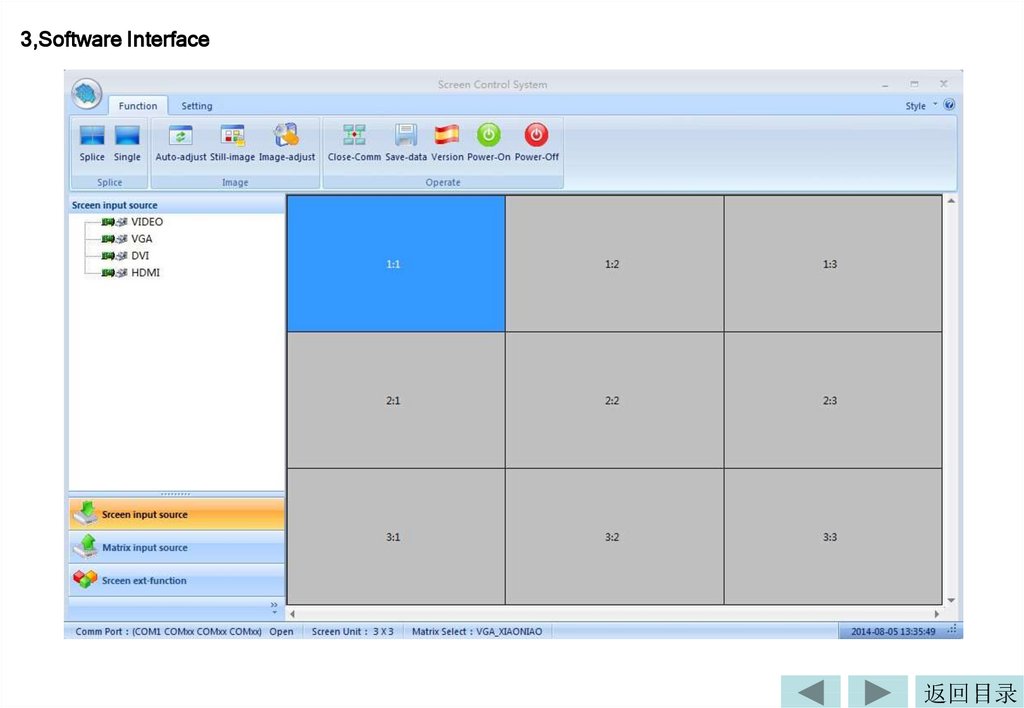
3,Software Interface返回目录
8.
HDMI cable connection for matrix deviceall the monitor's HDMI port should connected with the HDMI output port on the
matrix device, and there is a order
1:1 connect to HDMI output 1
1:2 connect to HDMI output 2
1:3 connect to HDMI output 3
2:1 connect to HDMI output 4
2:2 connect to HDMI output 5
......
返回目录
9.
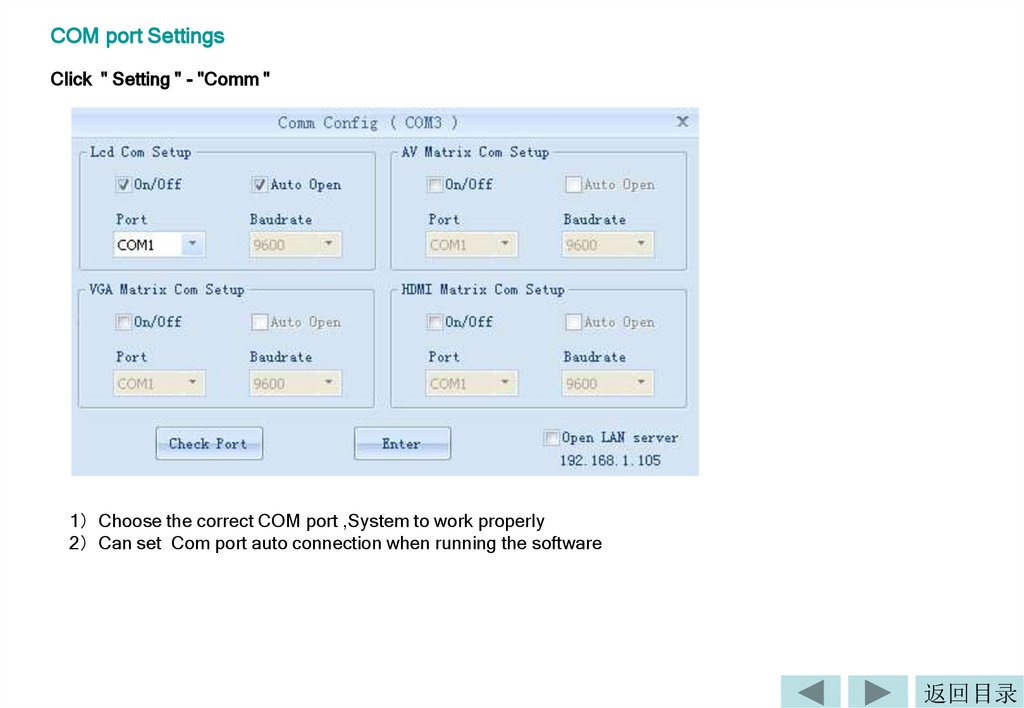
COM port SettingsClick " Setting " - "Comm "
1 Choose the correct COM port ,System to work properly
2 Can set Com port auto connection when running the software
返回目录
10.
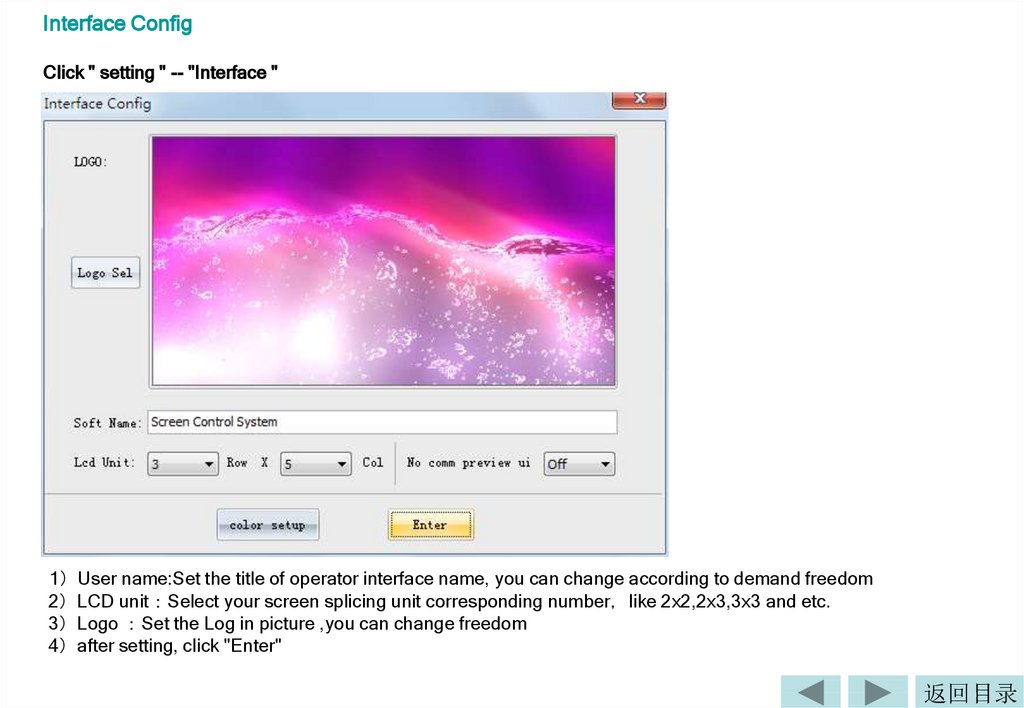
Interface ConfigClick " setting " -- "Interface "
1 User name:Set the title of operator interface name, you can change according to demand freedom
2 LCD unit Select your screen splicing unit corresponding number like 2x2,2x3,3x3 and etc.
3 Logo Set the Log in picture ,you can change freedom
4 after setting, click "Enter"
返回目录
11.
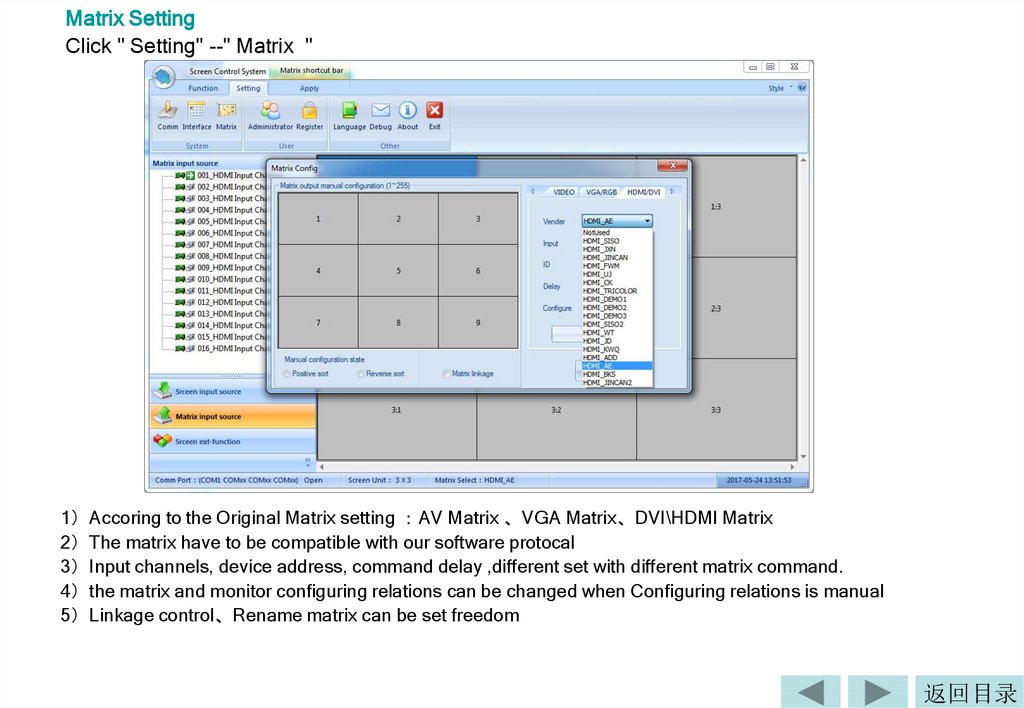
Matrix SettingClick " Setting" --" Matrix "
1 Accoring to the Original Matrix setting AV Matrix 、VGA Matrix、DVI\HDMI Matrix
2 The matrix have to be compatible with our software protocal
3 Input channels, device address, command delay ,different set with different matrix command.
4 the matrix and monitor configuring relations can be changed when Configuring relations is manual
5 Linkage control、Rename matrix can be set freedom
返回目录
12.
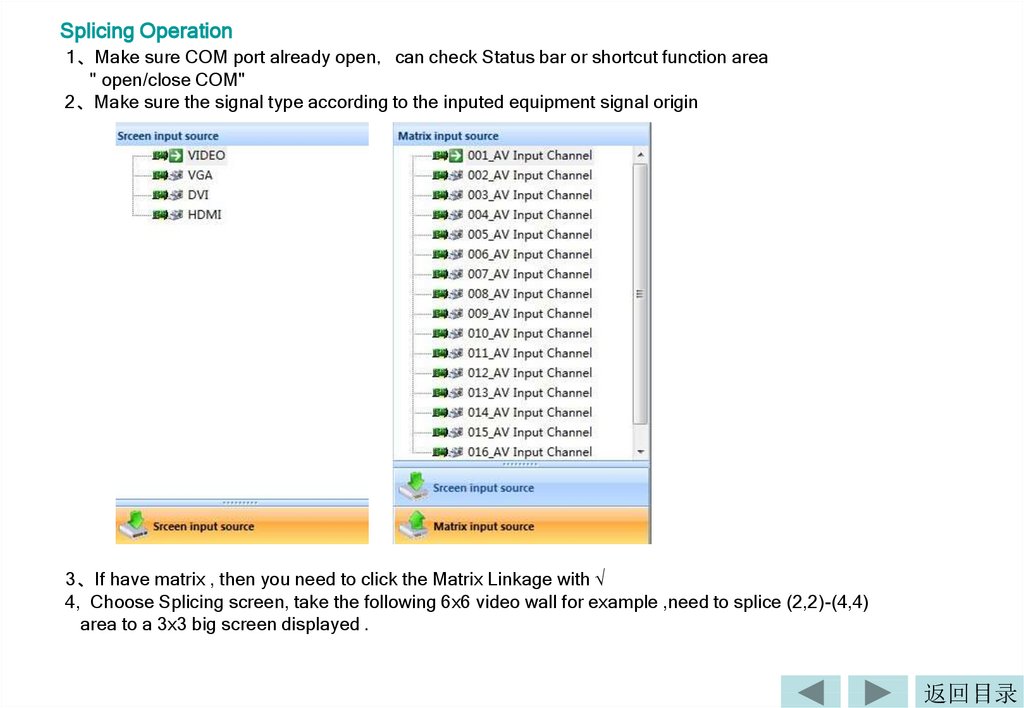
Splicing Operation1、Make sure COM port already open can check Status bar or shortcut function area
" open/close COM"
2、Make sure the signal type according to the inputed equipment signal origin
3、If have matrix , then you need to click the Matrix Linkage with √
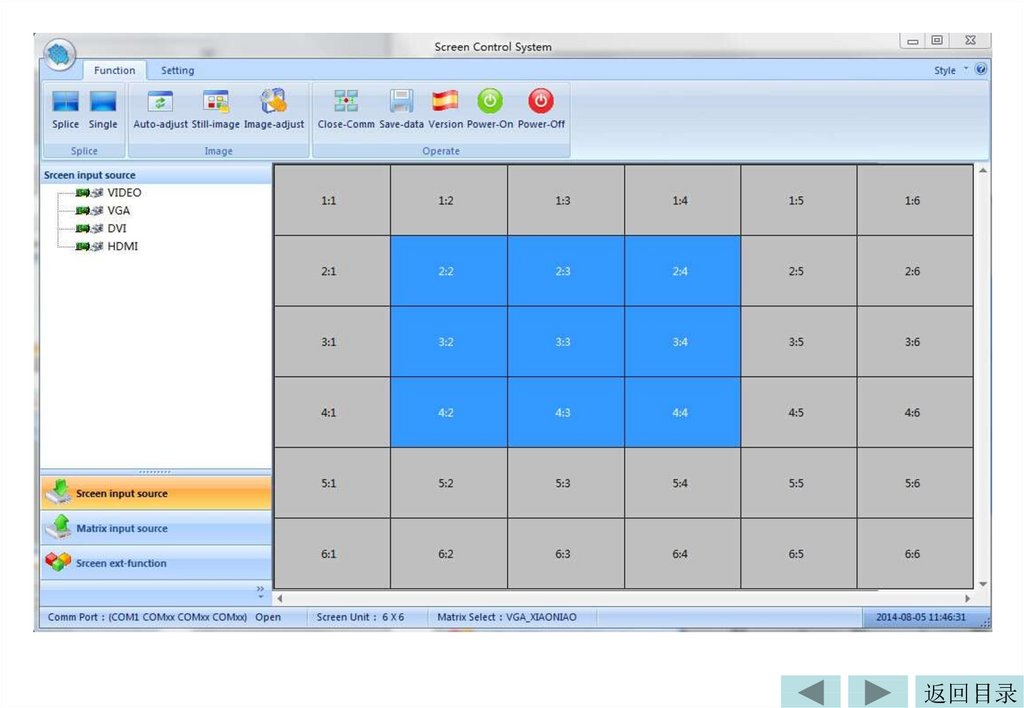
4, Choose Splicing screen, take the following 6x6 video wall for example ,need to splice (2,2)-(4,4)
area to a 3x3 big screen displayed .
返回目录
13.
返回目录14.
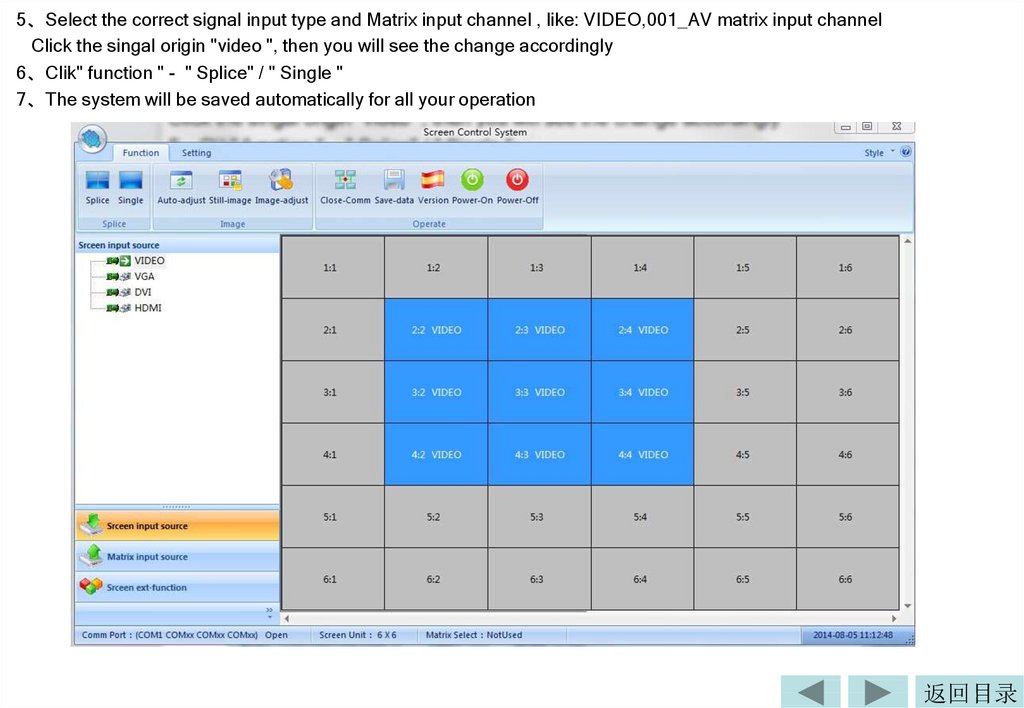
5、Select the correct signal input type and Matrix input channel , like: VIDEO,001_AV matrix input channelClick the singal origin "video ", then you will see the change accordingly
6、Clik" function " - " Splice" / " Single "
7、The system will be saved automatically for all your operation
返回目录
15.
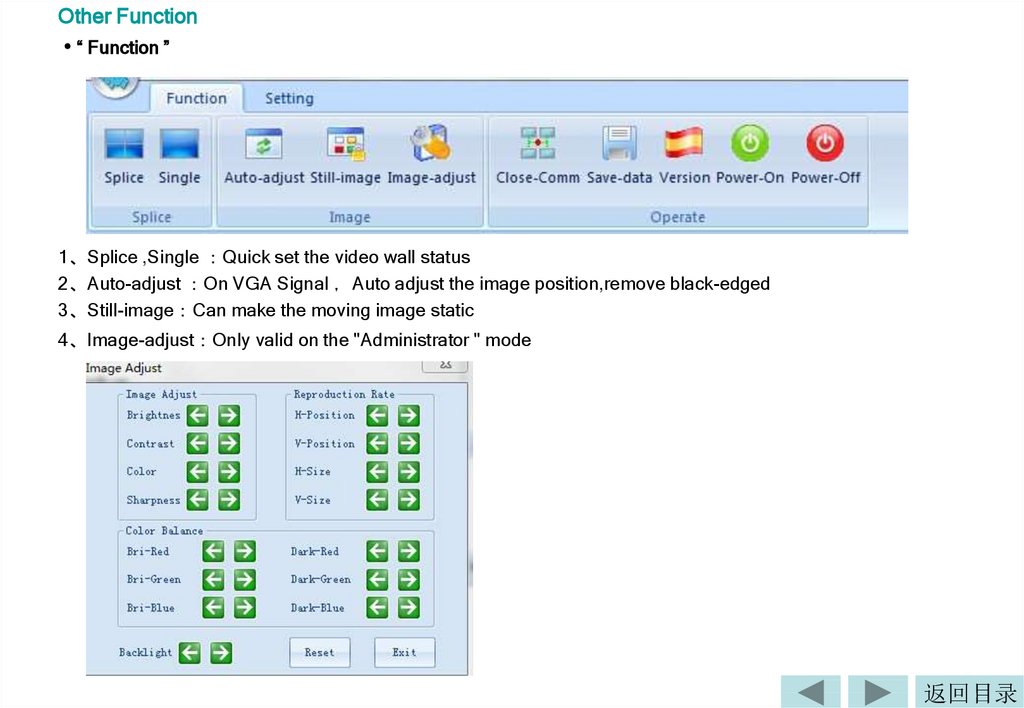
Other Function• “ Function ”
1、Splice ,Single Quick set the video wall status
2、Auto-adjust On VGA Signal Auto adjust the image position,remove black-edged
3、Still-image Can make the moving image static
4、Image-adjust Only valid on the "Administrator " mode
返回目录
16.
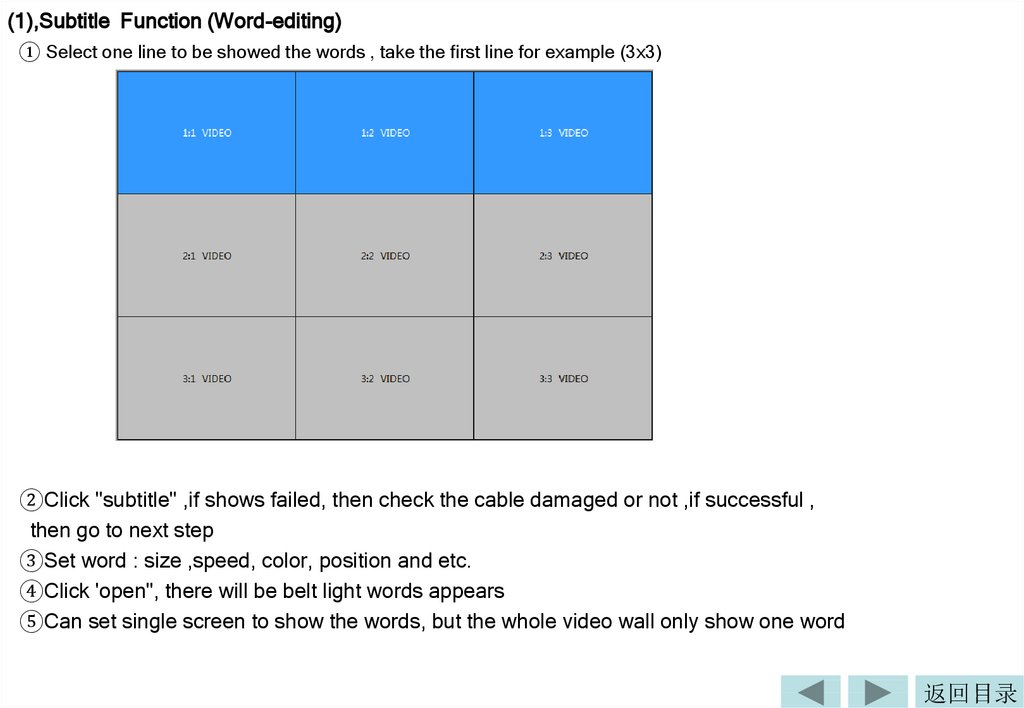
(1),Subtitle Function (Word-editing)① Select one line to be showed the words , take the first line for example (3x3)
②Click "subtitle" ,if shows failed, then check the cable damaged or not ,if successful ,
then go to next step
③Set word : size ,speed, color, position and etc.
④Click 'open", there will be belt light words appears
⑤Can set single screen to show the words, but the whole video wall only show one word
返回目录
17.
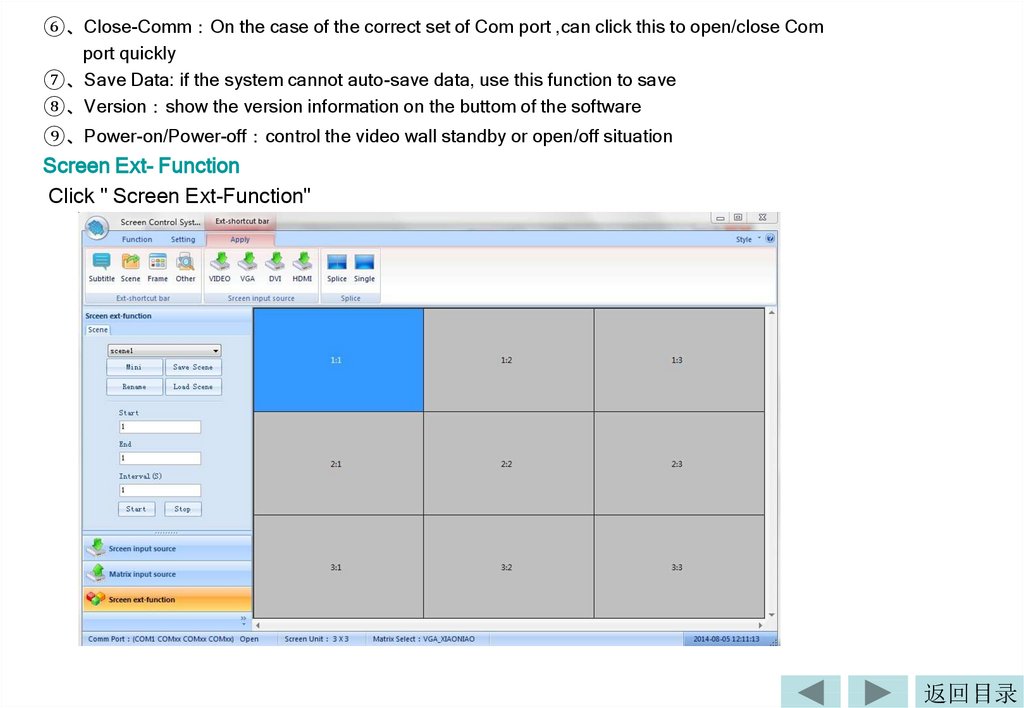
⑥、Close-Comm On the case of the correct set of Com port ,can click this to open/close Comport quickly
⑦、Save Data: if the system cannot auto-save data, use this function to save
⑧、Version show the version information on the buttom of the software
⑨、Power-on/Power-off control the video wall standby or open/off situation
Screen Ext- Function
Click " Screen Ext-Function"
返回目录
18.
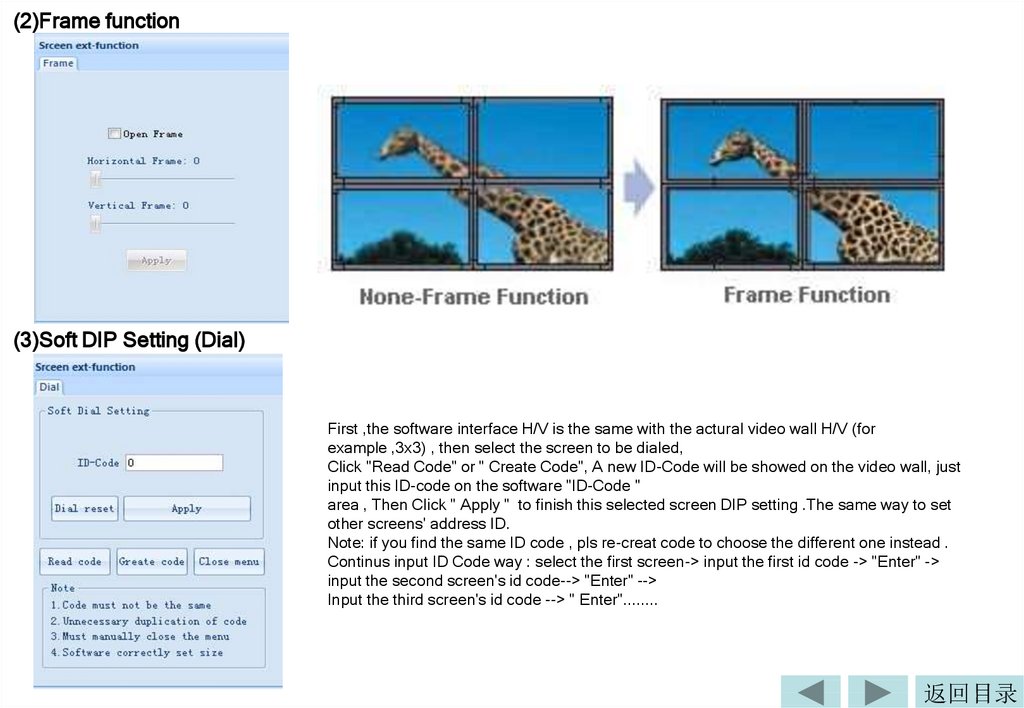
(2)Frame function(3)Soft DIP Setting (Dial)
First ,the software interface H/V is the same with the actural video wall H/V (for
example ,3x3) , then select the screen to be dialed,
Click "Read Code" or " Create Code", A new ID-Code will be showed on the video wall, just
input this ID-code on the software "ID-Code "
area , Then Click " Apply " to finish this selected screen DIP setting .The same way to set
other screens' address ID.
Note: if you find the same ID code , pls re-creat code to choose the different one instead .
Continus input ID Code way : select the first screen-> input the first id code -> "Enter" ->
input the second screen's id code--> "Enter" -->
Input the third screen's id code --> " Enter"........
返回目录
19.
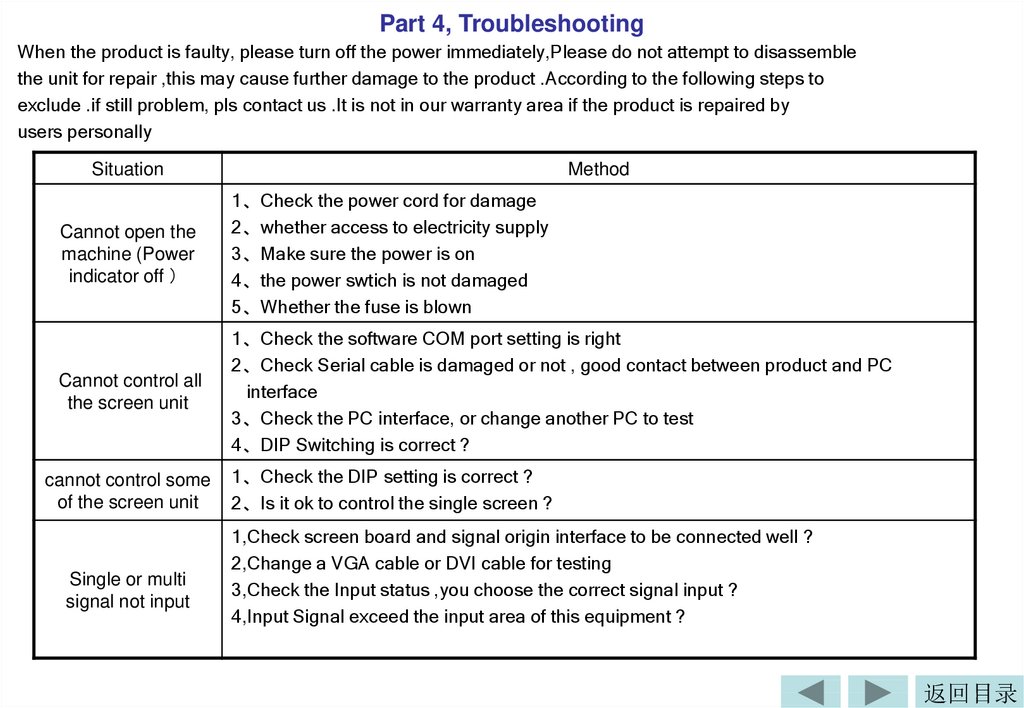
Part 4, TroubleshootingWhen the product is faulty, please turn off the power immediately,Please do not attempt to disassemble
the unit for repair ,this may cause further damage to the product .According to the following steps to
exclude .if still problem, pls contact us .It is not in our warranty area if the product is repaired by
users personally
Situation
Method
Cannot open the
machine (Power
indicator off
1、Check the power cord for damage
2、whether access to electricity supply
3、Make sure the power is on
4、the power swtich is not damaged
5、Whether the fuse is blown
Cannot control all
the screen unit
1、Check the software COM port setting is right
2、Check Serial cable is damaged or not , good contact between product and PC
interface
3、Check the PC interface, or change another PC to test
4、DIP Switching is correct ?
cannot control some
of the screen unit
Single or multi
signal not input
1、Check the DIP setting is correct ?
2、Is it ok to control the single screen ?
1,Check screen board and signal origin interface to be connected well ?
2,Change a VGA cable or DVI cable for testing
3,Check the Input status ,you choose the correct signal input ?
4,Input Signal exceed the input area of this equipment ?
返回目录
20.
Part 5: PerformanceWork Temperature -15℃-65℃
Work Humidity Relative humidity less than 95%
Power consumption ≤300W Depends on the screen model and size
Supply Voltage 95V AC-250V AC
Composite video format PAL、NTSC、SECAM
Composite Video Peak 1Vp-p
Control way RS-232 RJ45
VGA input WUXGA 1920*1080
DVI input WUXGA 1920*1080
Screen resolution support WUXGA 1920*1080 Dual: 10bit
Thermostatically controlled fan Automatic control
Part 6: Safety Precautions
1, Please read this manual carefully
2, Keep this manual for future use
3, Make sure the supply voltage is 220V before using
4, Don't cover or step on the power cord
5, Pls power off before make some changes for this controller
6, Pls ask the maintainer to check for the following situation:
a, power line or switch is broken
b, the system cannot work properly
c, the equipment is broken。
d,the equipment has obvious cracks
返回目录