Similar presentations:
Tool and Spindle Calibration
1. Autodesk ® PowerMill ® Robot Tool & Spindle calibration
Autodesk ® PowerMill ® RobotTool & Spindle calibration
2.
AutodeskPowerMill
2018
2017 Autodesk Inc. All Rights Reserved. Except where otherwise permitted by Autodesk Inc, this publication, or parts thereof, may not be
reproduced in any form, by any method, for any purpose.
Certain materials included in this publication are reprinted with the permission of the copyright holder.
Trademarks
The following are registered trademarks or trademarks of Autodesk Inc., and/or its subsidiaries and/or affiliates in the USA and other countries: 123D,
3ds Max, Alias, ArtCAM, ATC, AutoCAD LT, AutoCAD, Autodesk, the Autodesk logo, Autodesk 123D, Autodesk Homestyler, Autodesk Inventor,
Autodesk MapGuide, Autodesk Streamline, AutoLISP, AutoSketch, AutoSnap, AutoTrack, Backburner, Backdraft, Beast, BIM 360, Burn, Buzzsaw,
CADmep, CAiCE, CAMduct, Civil 3D, Combustion, Communication Specification, Configurator 360, Constructware, Content Explorer, Creative Bridge,
Dancing Baby (image), DesignCenter, DesignKids, DesignStudio, Discreet, DWF, DWG, DWG (design/logo), DWG Extreme, DWG TrueConvert, DWG
TrueView, DWGX, DXF, Ecotect, Ember, ESTmep, FABmep, Face Robot, FBX, FeatureCAM, Fempro, Fire, Flame, Flare, Flint, ForceEffect, FormIt
360, Freewheel, Fusion 360, Glue, Green Building Studio, Heidi, Homestyler, HumanIK, i-drop, ImageModeler, Incinerator, Inferno, InfraWorks,
Instructables, Instructables (stylized robot design/logo), Inventor, Inventor HSM, Inventor LT, Lustre, Maya, Maya LT, MIMI, Mockup 360, Moldflow
Plastics Advisers, Moldflow Plastics Insight, Moldflow, Moondust, MotionBuilder, Movimento, MPA (design/logo), MPA, MPI (design/logo), MPX
(design/logo), MPX, Mudbox, Navisworks, ObjectARX, ObjectDBX, Opticore, P9, PartMaker, Pier 9, Pixlr, Pixlr-o-matic, PowerInspect, PowerMill,
PowerShape, Productstream, Publisher 360, RasterDWG, RealDWG, ReCap, ReCap 360, Remote, Revit LT, Revit, RiverCAD, Robot, Scaleform,
Showcase, Showcase 360, SketchBook, Smoke, Socialcam, Softimage, Spark & Design, Spark Logo, Sparks, SteeringWheels, Stitcher, Stone,
StormNET, TinkerBox, Tinkercad, Tinkerplay, ToolClip, Topobase, Toxik, TrustedDWG, T-Splines, ViewCube, Visual LISP, Visual, VRED, Wire,
Wiretap, WiretapCentral, XSI
All other brand names, product names or trademarks belong to their respective holders.
Disclaimer
THIS PUBLICATION AND THE INFORMATION CONTAINED HEREIN IS MADE AVAILABLE BY AUTODESK, INC. "AS IS." AUTODESK, INC.
DISCLAIMS ALL WARRANTIES, EITHER EXPRESS OR IMPLIED, INCLUDING BUT NOT LIMITED TO ANY IMPLIED WARRANTIES OF
MERCHANTABILITY OR FITNESS FOR A PARTICULAR PURPOSE REGARDING THESE MATERIALS.
3. Why to calibrate a spindle?
Robots need to be taught about tools in order to know the tool tip location.During the teaching procedure, the robot determines where the tool tip
center point is, in relation to its 6th axis workplane (in the case where the
spindle is mounted on the robot).
This procedure must be repeated for each tool. This means that each tool
will contain errors due to the inaccuracy of the teaching process.
Teaching the same tool twice will not give the same result. This is because
the process is very visual, so the user will always introduce “human errors”.
Any errors incurred during the teaching stage will be dramatically amplified
and will reduce machining accuracy.
The spindle calibration procedure has several key benefits:
It helps to improve machining accuracy
It reduces setup times
It removes the need to physically teach each tool
With this functionality, the robot is closer in behavior to a CNC machine.
4. Objectives
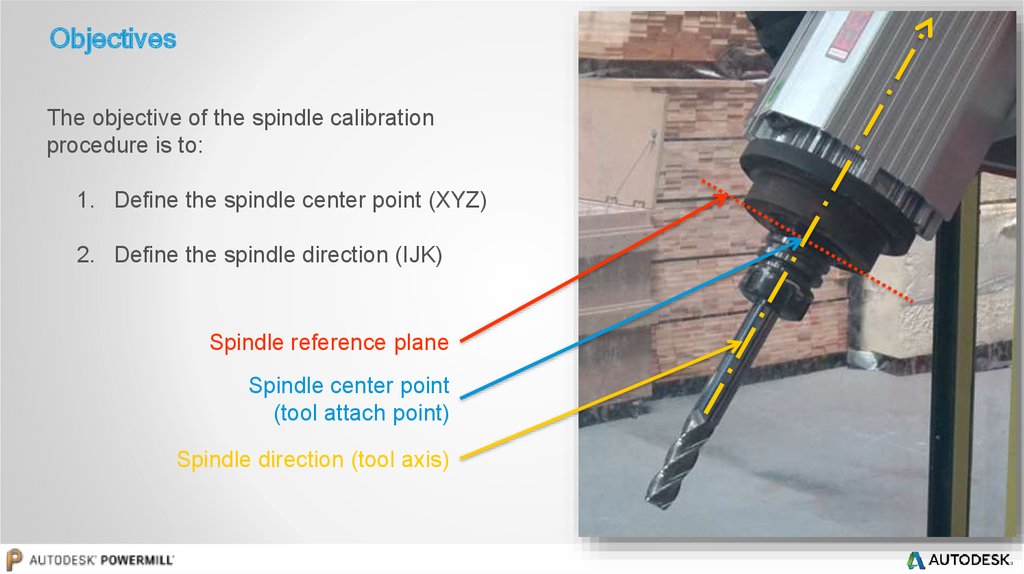
The objective of the spindle calibrationprocedure is to:
1. Define the spindle center point (XYZ)
2. Define the spindle direction (IJK)
Spindle reference plane
Spindle center point
(tool attach point)
Spindle direction (tool axis)
5. Requirements to perform a spindle calibration
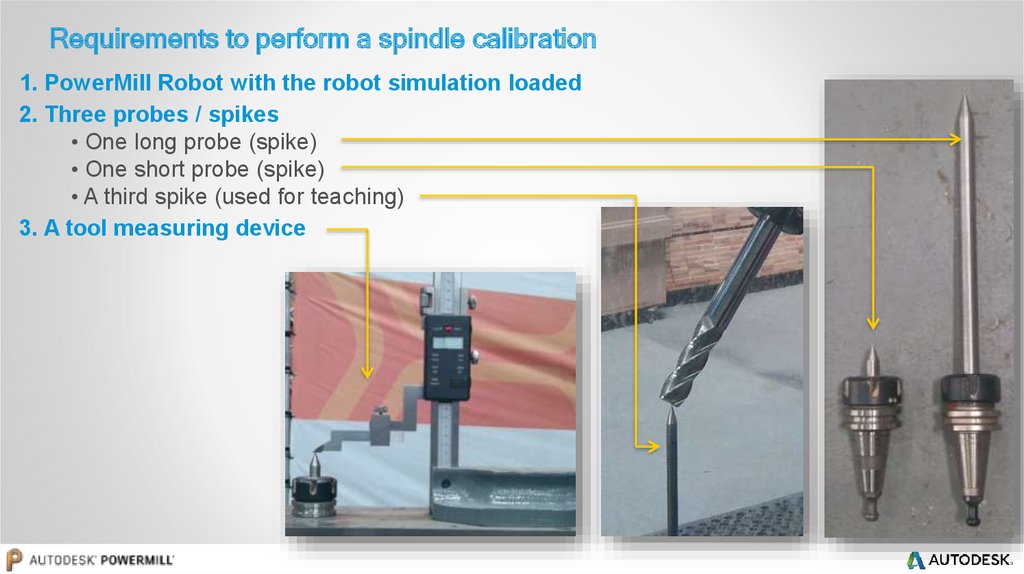
1. PowerMill Robot with the robot simulation loaded2. Three probes / spikes
• One long probe (spike)
• One short probe (spike)
• A third spike (used for teaching)
3. A tool measuring device
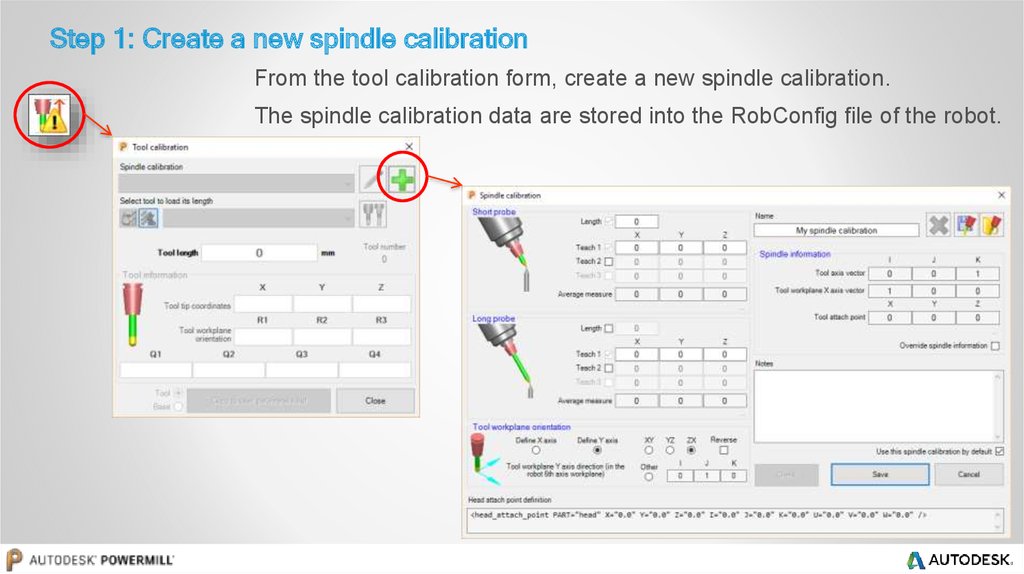
6. Step 1: Create a new spindle calibration
From the tool calibration form, create a new spindle calibration.The spindle calibration data are stored into the RobConfig file of the robot.
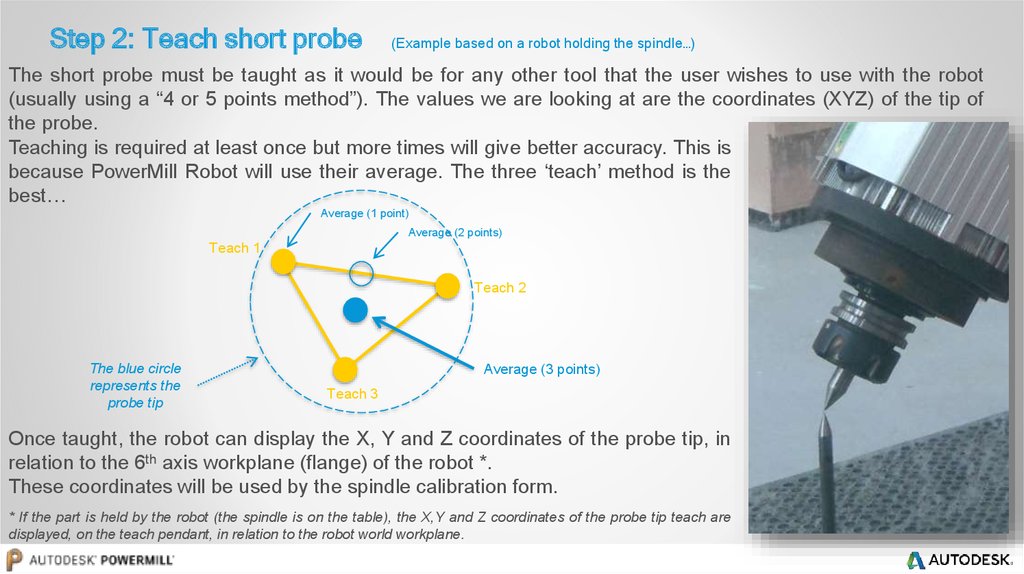
7. Step 2: Teach short probe (Example based on a robot holding the spindle…)
The short probe must be taught as it would be for any other tool that the user wishes to use with the robot(usually using a “4 or 5 points method”). The values we are looking at are the coordinates (XYZ) of the tip of
the probe.
Teaching is required at least once but more times will give better accuracy. This is
because PowerMill Robot will use their average. The three ‘teach’ method is the
best…
Average (1 point)
Average (2 points)
Teach 1
Teach 2
The blue circle
represents the
probe tip
Average (3 points)
Teach 3
Once taught, the robot can display the X, Y and Z coordinates of the probe tip, in
relation to the 6th axis workplane (flange) of the robot *.
These coordinates will be used by the spindle calibration form.
* If the part is held by the robot (the spindle is on the table), the X,Y and Z coordinates of the probe tip teach are
displayed, on the teach pendant, in relation to the robot world workplane.
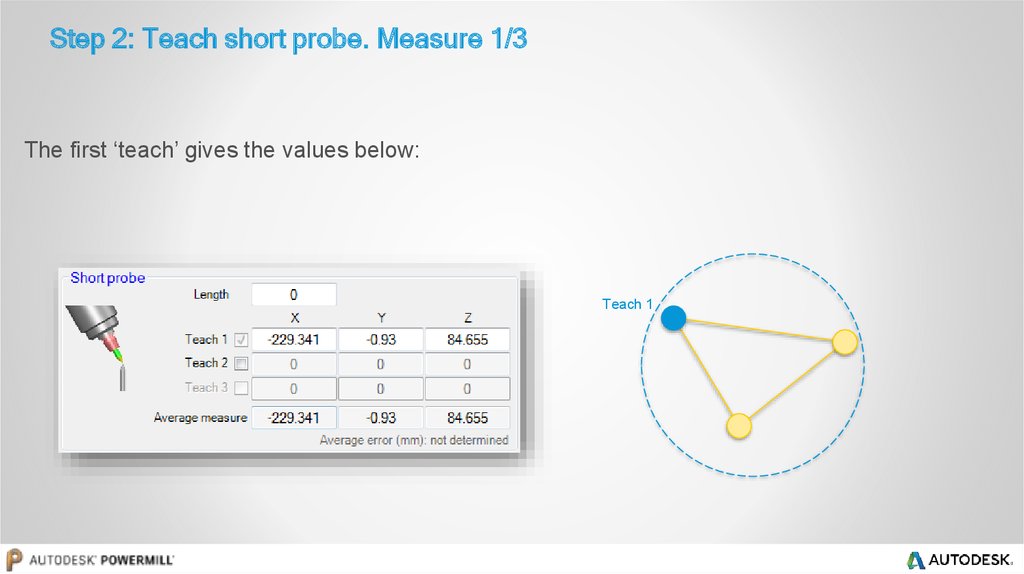
8. Step 2: Teach short probe. Measure 1/3
The first ‘teach’ gives the values below:Teach 1
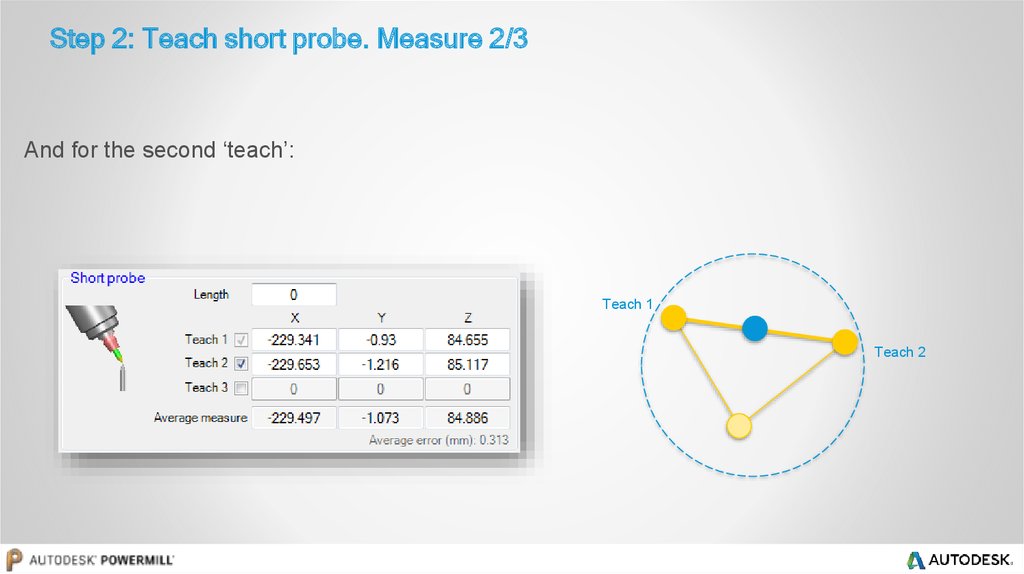
9. Step 2: Teach short probe. Measure 2/3
And for the second ‘teach’:Teach 1
Teach 2
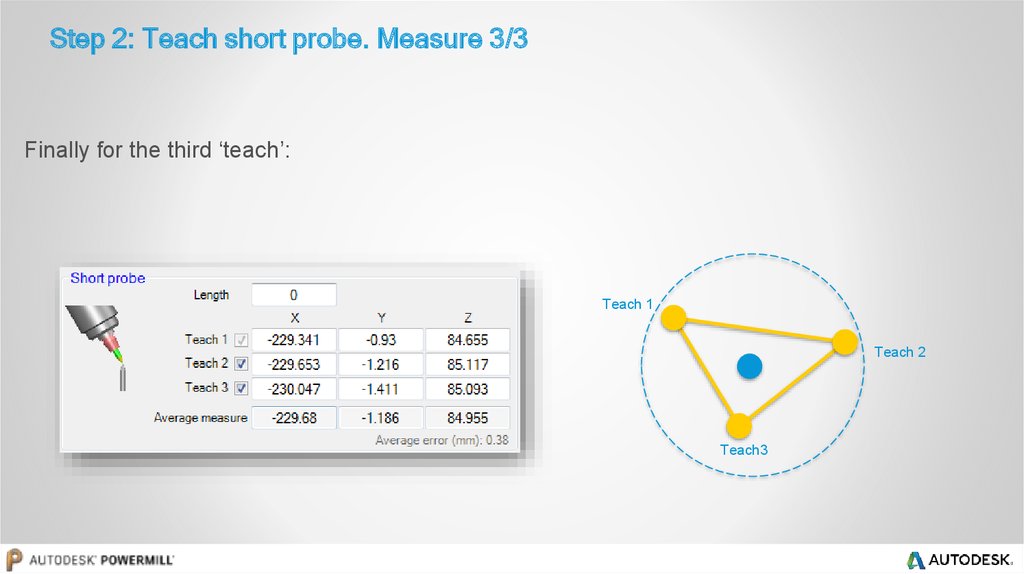
10. Step 2: Teach short probe. Measure 3/3
Finally for the third ‘teach’:Teach 1
Teach 2
Teach3
11. Step 3: Measure short probe length
The short probe length is then measured with thetool measuring device. The value can then be
entered into the calibration form:
Reference surface
137.493
12. Step 4: Measure long probe
The short probe method is repeated with the long probe…Average (1 point)
Average (2 points)
Teach 1
Teach 2
The blue circle
represents the
probe tip
Average (3 points)
Teach 3
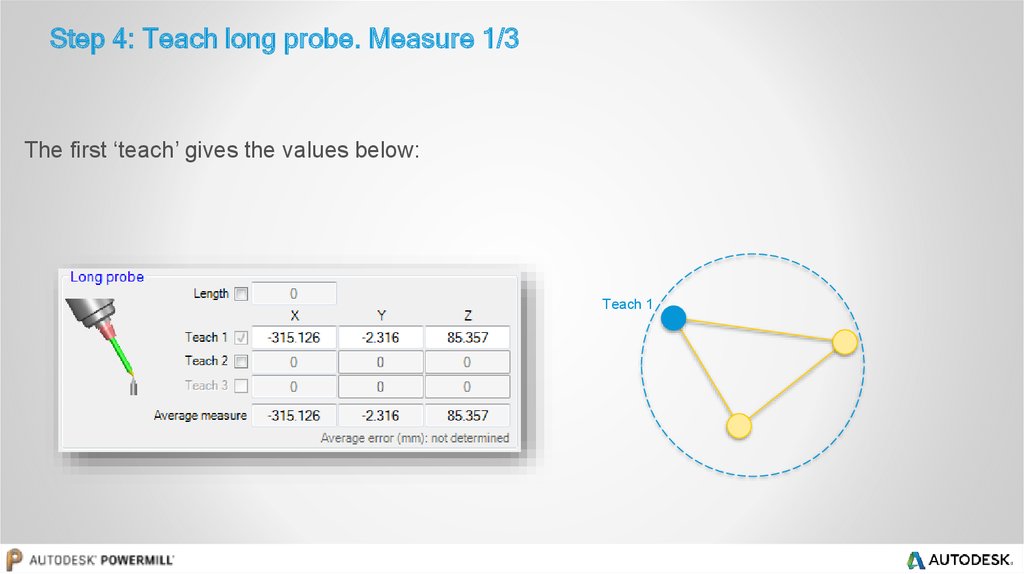
13. Step 4: Teach long probe. Measure 1/3
The first ‘teach’ gives the values below:Teach 1
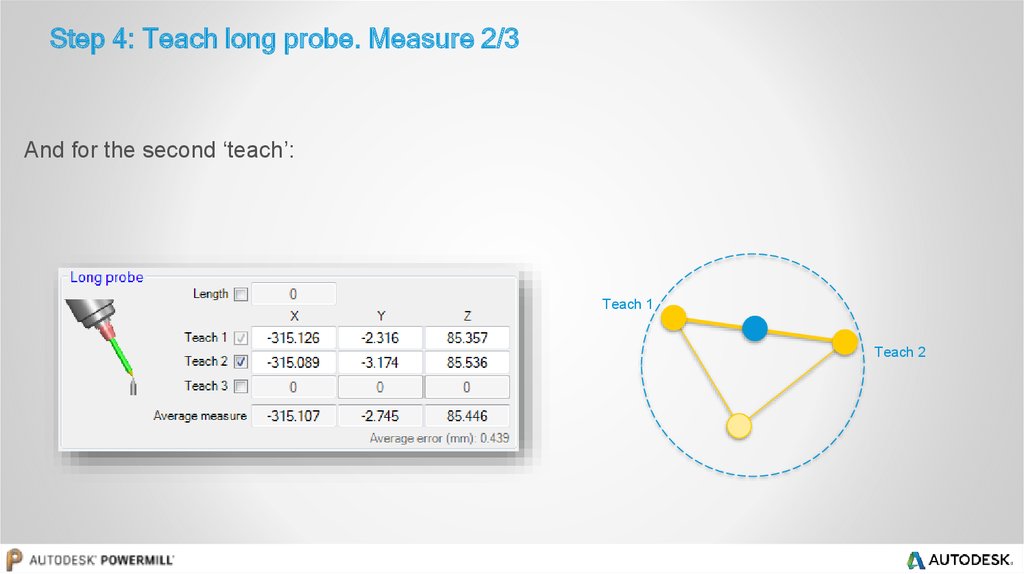
14. Step 4: Teach long probe. Measure 2/3
And for the second ‘teach’:Teach 1
Teach 2
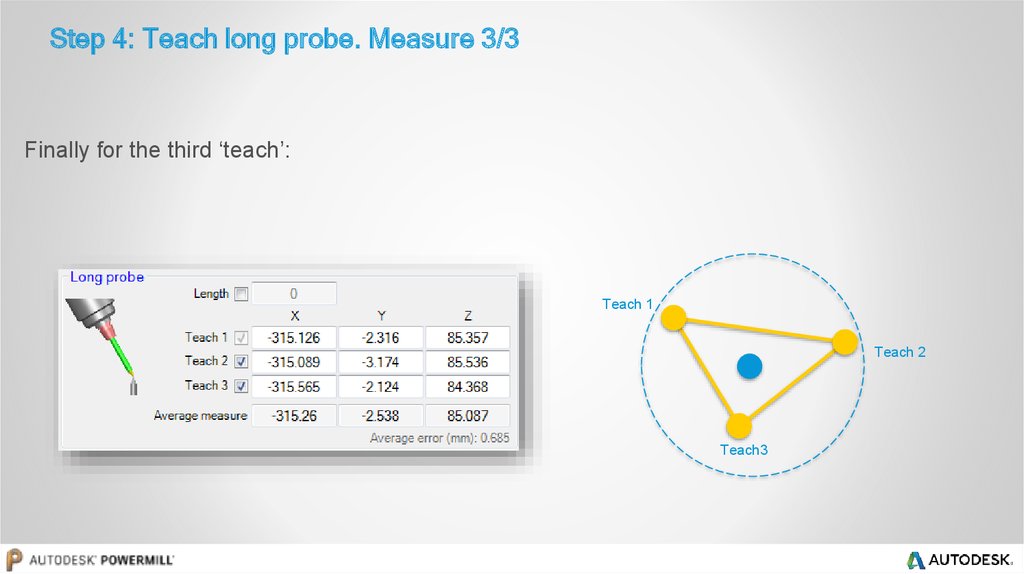
15. Step 4: Teach long probe. Measure 3/3
Finally for the third ‘teach’:Teach 1
Teach 2
Teach3
16. Step 5: Measure long probe length
Optionally, the long probe length can be measuredwith the tool measuring device. The value can then
be entered into the calibration form:
If this is not used, the “Length” field must remain
unchecked!
Reference surface
222.915
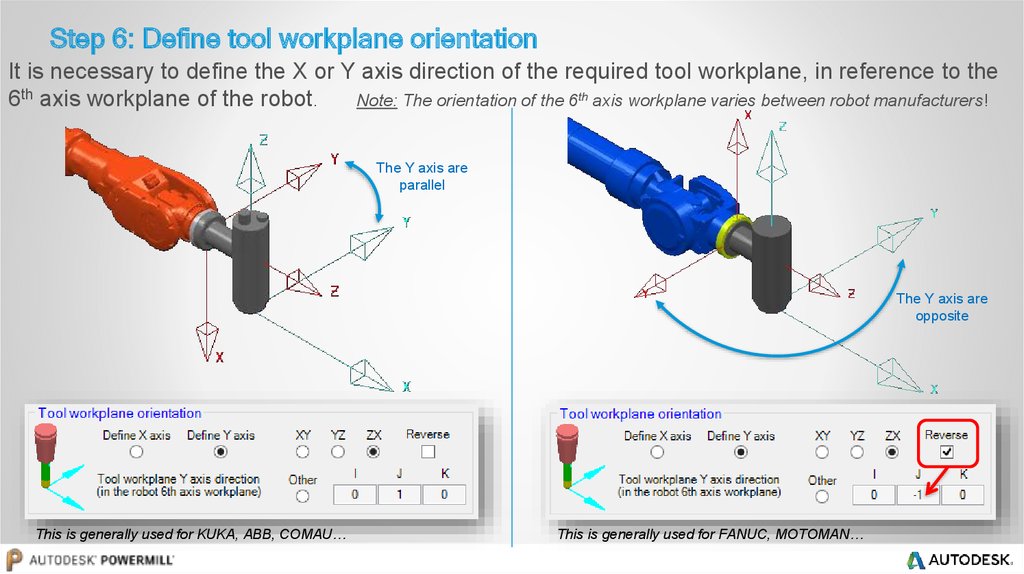
17. Step 6: Define tool workplane orientation
It is necessary to define the X or Y axis direction of the required tool workplane, in reference to the6th axis workplane of the robot.
Note: The orientation of the 6th axis workplane varies between robot manufacturers!
The Y axis are
parallel
The Y axis are
opposite
This is generally used for KUKA, ABB, COMAU…
This is generally used for FANUC, MOTOMAN…
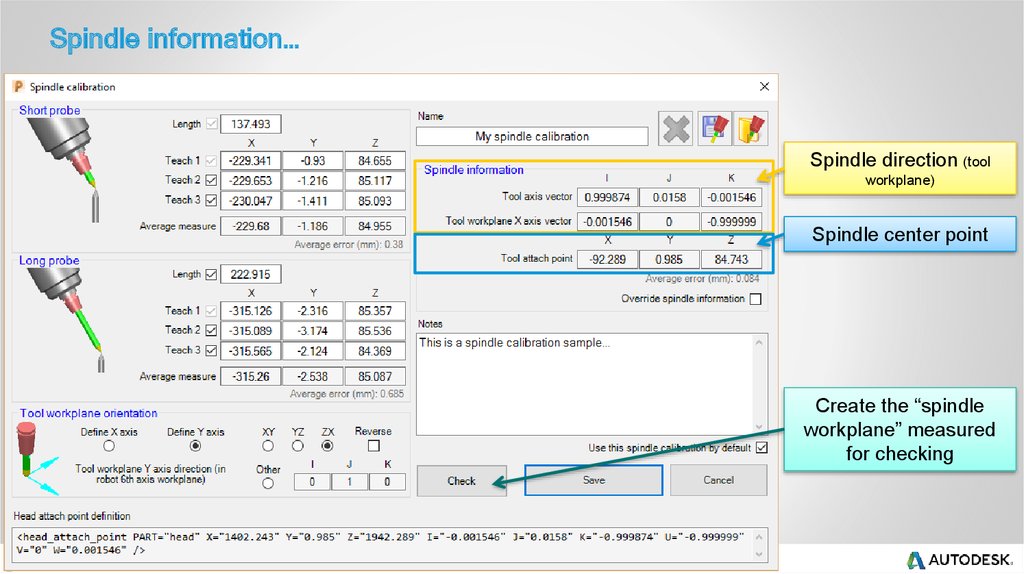
18. Spindle information…
Spindle direction (toolworkplane)
Spindle center point
Create the “spindle
workplane” measured
for checking
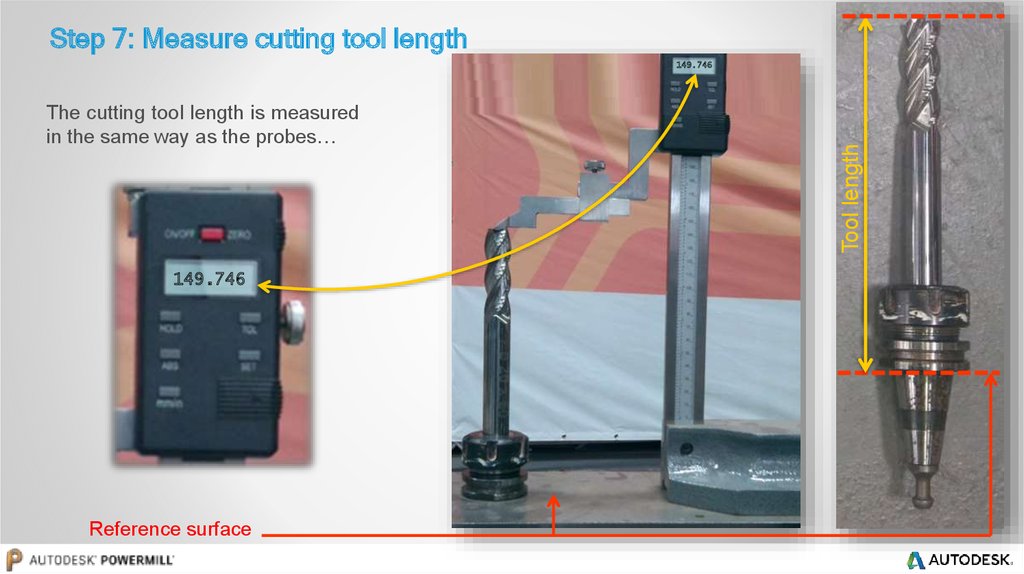
19. Step 7: Measure cutting tool length
The cutting tool length is measuredin the same way as the probes…
149.746
Reference surface
Tool length
149.746
20. Tool information is displayed
149.746This information should go
in the robot controller or in
the robot program.
In this case the tool length was
149.746 mm
The coordinates are
referring to the robot 6th
axis workplane (flange) as
the spindle is mounted on
the robot (for this
example)
Values are displayed in the
robot manufacturer specific
convention
(Euler/Quaternion/…)
21. Tool length database
Tool length can be stored in the tool length database as described below:Tool length database
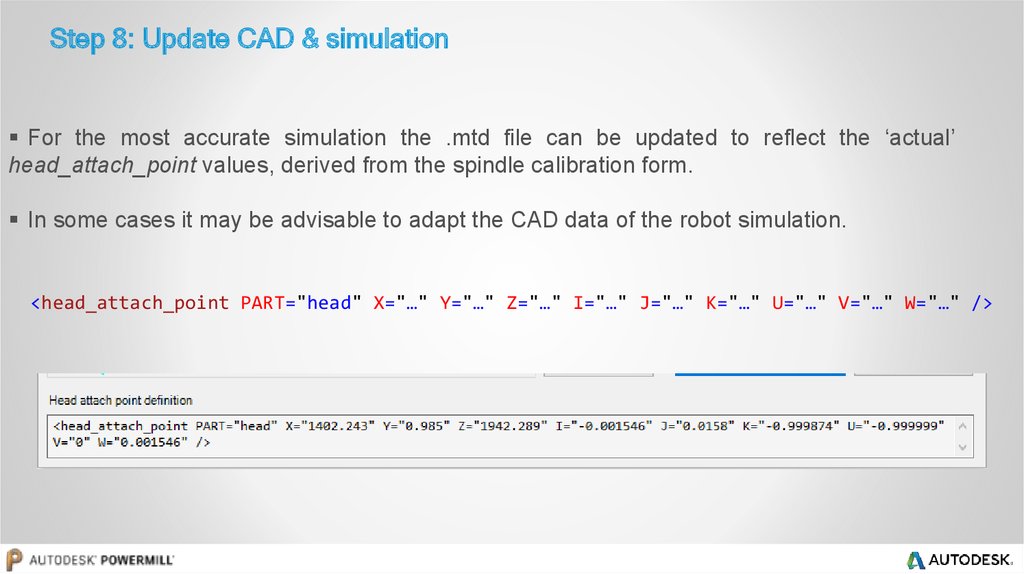
22. Step 8: Update CAD & simulation
Step 8: Update CAD & simulationFor the most accurate simulation the .mtd file can be updated to reflect the ‘actual’
head_attach_point values, derived from the spindle calibration form.
In some cases it may be advisable to adapt the CAD data of the robot simulation.
<head_attach_point PART="head" X="…" Y="…" Z="…" I="…" J="…" K="…" U="…" V="…" W="…" />
23. Autodesk ® PowerMill ® Robot Part on robot / External static spindle
24. Part-on-robot / External static spindle
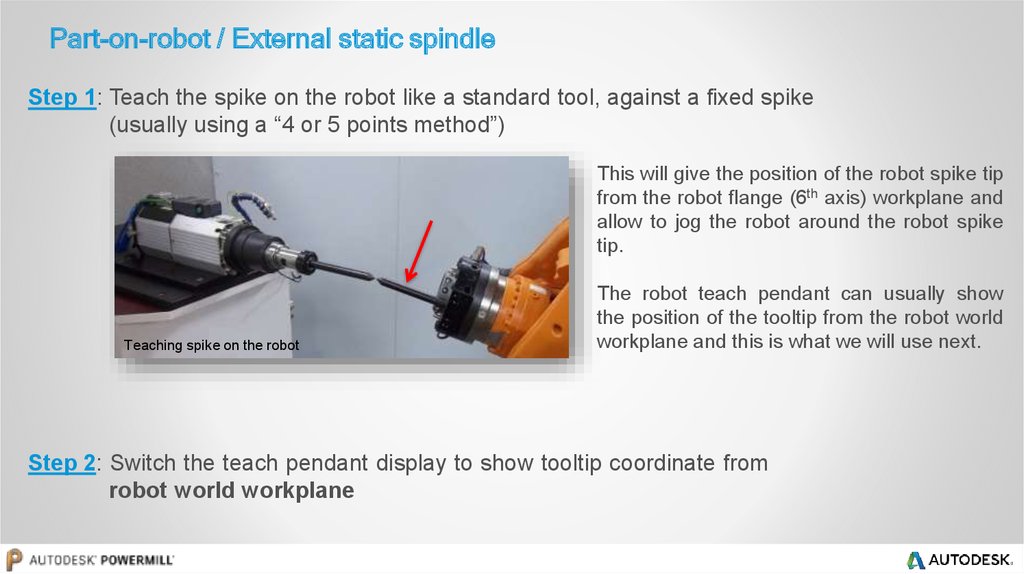
Step 1: Teach the spike on the robot like a standard tool, against a fixed spike(usually using a “4 or 5 points method”)
This will give the position of the robot spike tip
from the robot flange (6th axis) workplane and
allow to jog the robot around the robot spike
tip.
Teaching spike on the robot
The robot teach pendant can usually show
the position of the tooltip from the robot world
workplane and this is what we will use next.
Step 2: Switch the teach pendant display to show tooltip coordinate from
robot world workplane
25. Part-on-robot / External static spindle
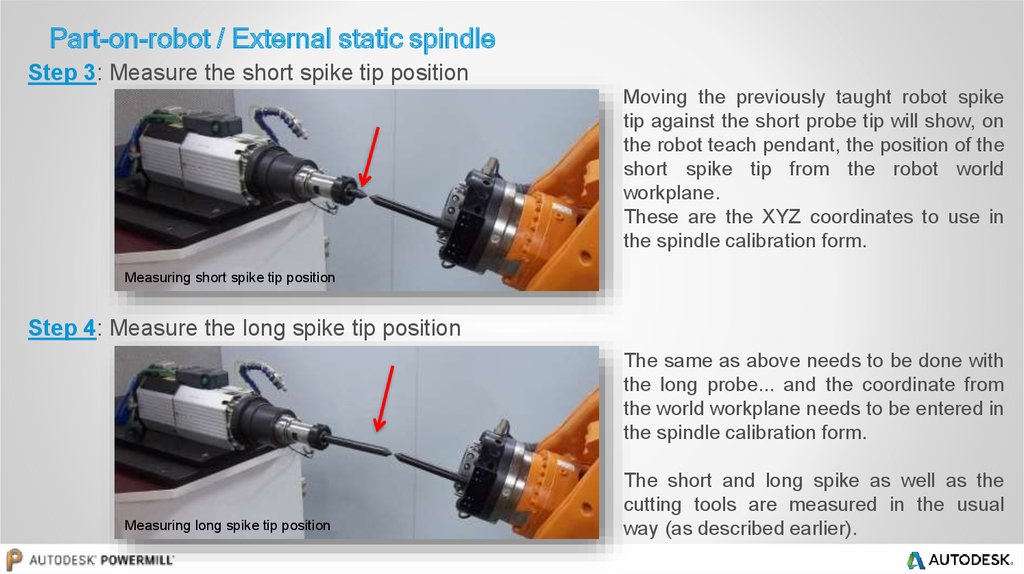
Step 3: Measure the short spike tip positionMoving the previously taught robot spike
tip against the short probe tip will show, on
the robot teach pendant, the position of the
short spike tip from the robot world
workplane.
These are the XYZ coordinates to use in
the spindle calibration form.
Measuring short spike tip position
Step 4: Measure the long spike tip position
The same as above needs to be done with
the long probe... and the coordinate from
the world workplane needs to be entered in
the spindle calibration form.
Measuring long spike tip position
The short and long spike as well as the
cutting tools are measured in the usual
way (as described earlier).
26.
Autodesk and the Autodesk logo are registered trademarks or trademarks of Autodesk, Inc., and/or its subsidiaries and/or affi liates in the USA and/or other countries. All other brand names, product names, or trademarks belong to their respective holders.Autodesk reserves the right to alter product and services offerings, and specifications and pricing at any time without notice, and is not responsible for typographical or graphical errors that may appear in this document.
© 2016 Autodesk. All rights reserved.







 industry


