


 electronics
Similar presentations:


Haema TX. Introduction, Operations & Maintenance
1.
Haema TX Introduction, Operations &Maintenance
Customer Service Department
www.medcaptain.com
To be captain in the medical device industry
2.
ContentIntroduction
Operations
Maintenance
© Medcaptain 2022 All rights reserved.
2
3.
Part 01Introduction
4.
OverviewSpecs:
• Test channels: 12
• Sample loading capacity: 30 tubes (3 sample racks)
• Reaction cups: 60 pcs (2 racks of cups)
• Cleaning fluid: ≈120 tests
• Waste bin capacity: 100 tests
Features:
• Fully-automated testing, load sample tube with caps on
• Refrigeration and swirling for reagents
• Results interpretation on report
© Medcaptain 2022 All rights reserved.
4
5.
Appearance1
9
8
2
7
6
3
5
4
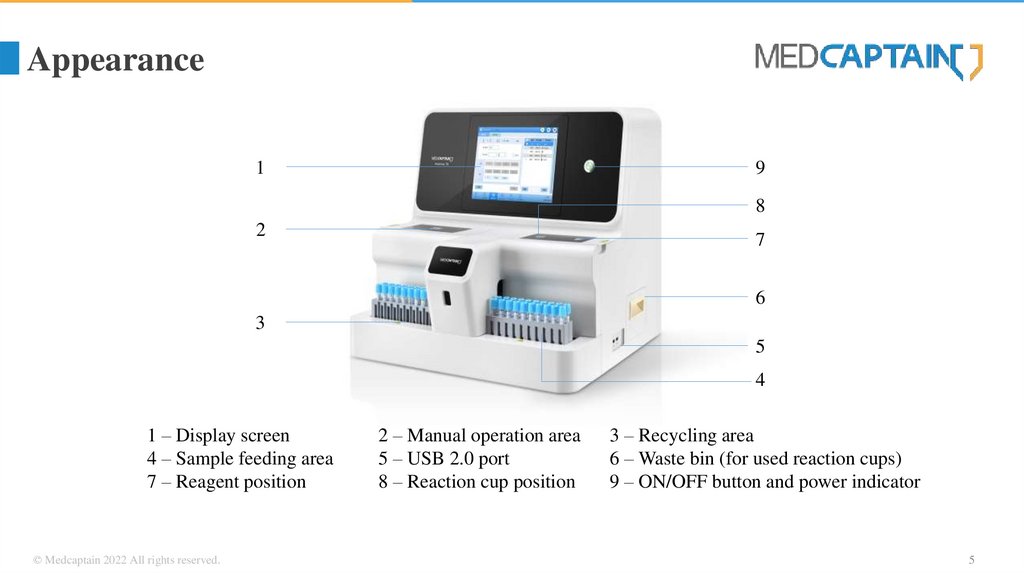
1 – Display screen
4 – Sample feeding area
7 – Reagent position
© Medcaptain 2022 All rights reserved.
2 – Manual operation area
5 – USB 2.0 port
8 – Reaction cup position
3 – Recycling area
6 – Waste bin (for used reaction cups)
9 – ON/OFF button and power indicator
5
6.
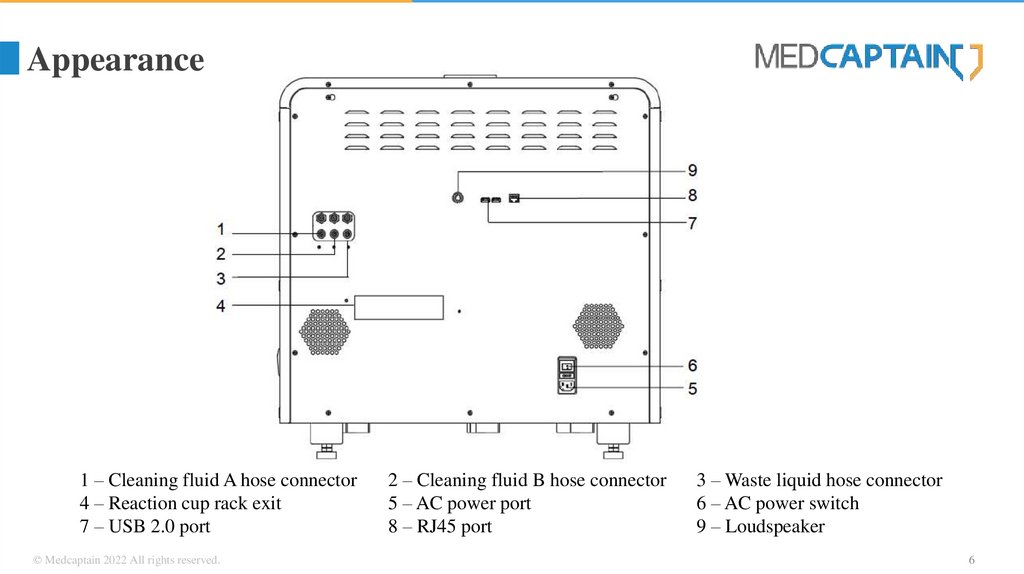
Appearance1 – Cleaning fluid A hose connector
4 – Reaction cup rack exit
7 – USB 2.0 port
© Medcaptain 2022 All rights reserved.
2 – Cleaning fluid B hose connector
5 – AC power port
8 – RJ45 port
3 – Waste liquid hose connector
6 – AC power switch
9 – Loudspeaker
6
7.
Basic principlesBlood and reagent added to reaction cup
Inner part of reaction cup rotate at certain angle
Coagulation starts, impeding rotation motion,
amplitude of laser beam decreases. Decreased amount
converted to graph → Thromboelastogram
© Medcaptain 2022 All rights reserved.
7
8.
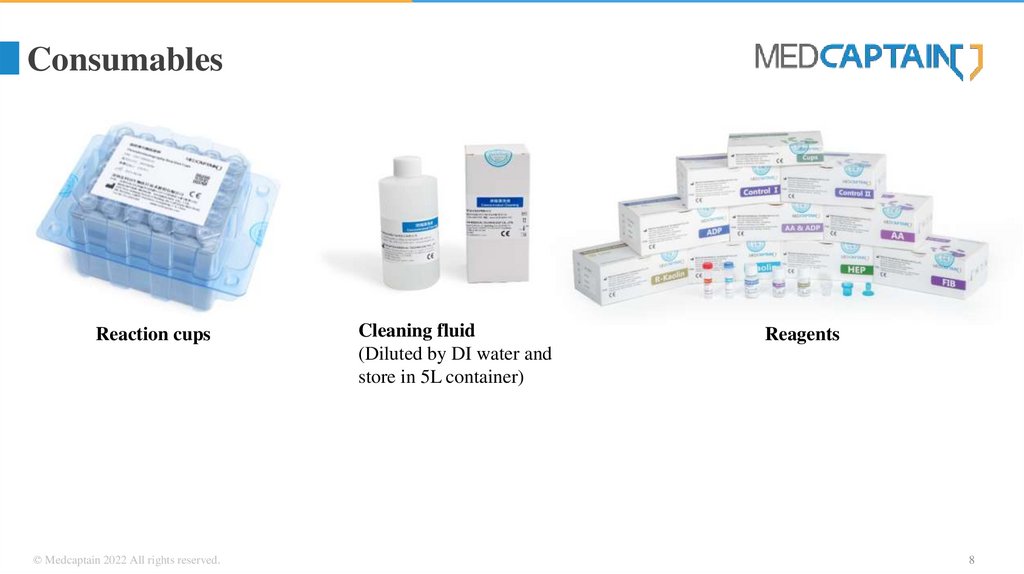
ConsumablesReaction cups
© Medcaptain 2022 All rights reserved.
Cleaning fluid
(Diluted by DI water and
store in 5L container)
Reagents
8
9.
Part 02Operations
10.
Add reagents①
②
③
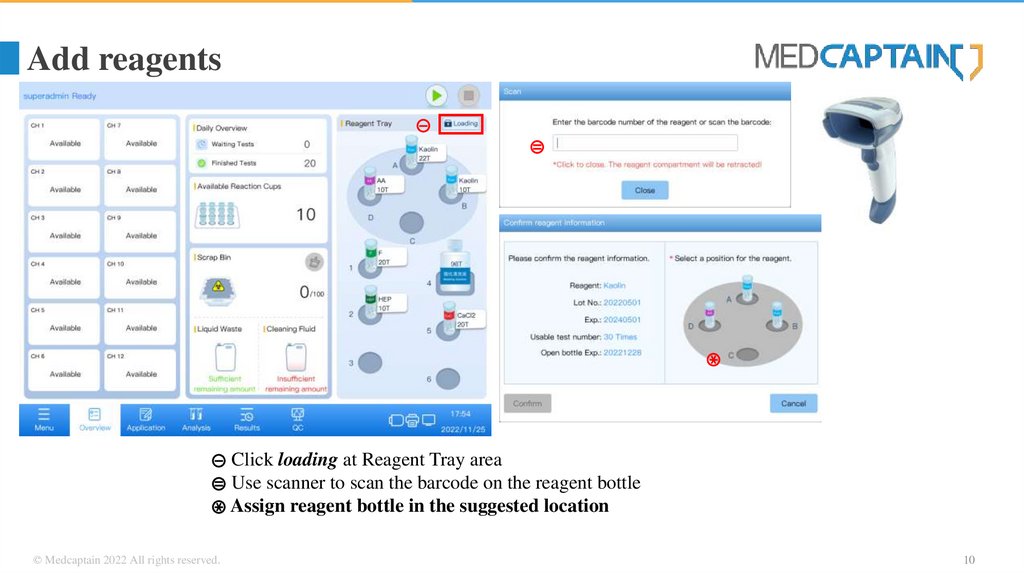
① Click loading at Reagent Tray area
② Use scanner to scan the barcode on the reagent bottle
③ Assign reagent bottle in the suggested location
© Medcaptain 2022 All rights reserved.
10
11.
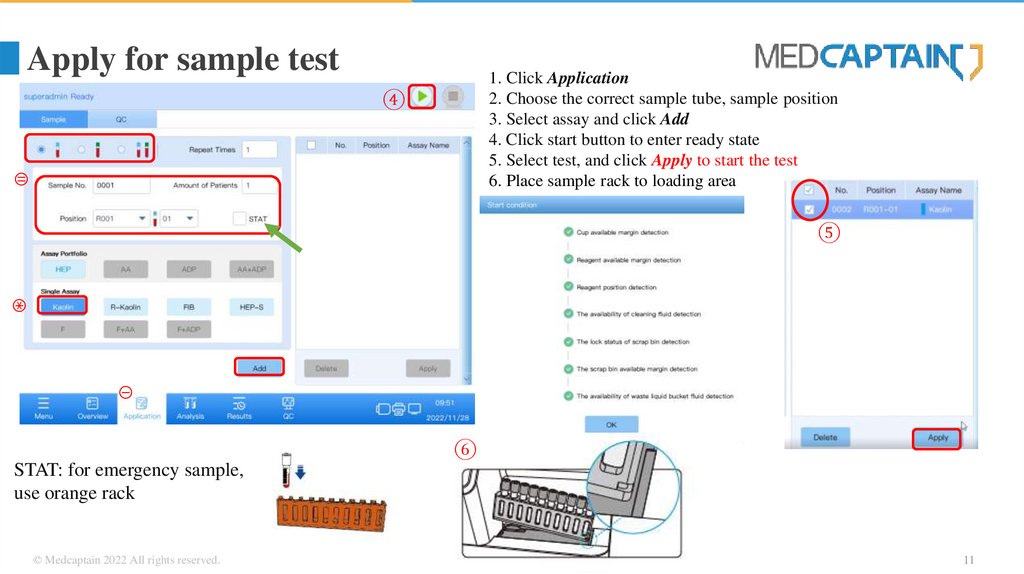
Apply for sample test1. Click Application
2. Choose the correct sample tube, sample position
3. Select assay and click Add
4. Click start button to enter ready state
5. Select test, and click Apply to start the test
6. Place sample rack to loading area
④
②
⑤
③
①
⑥
STAT: for emergency sample,
use orange rack
© Medcaptain 2022 All rights reserved.
11
12.
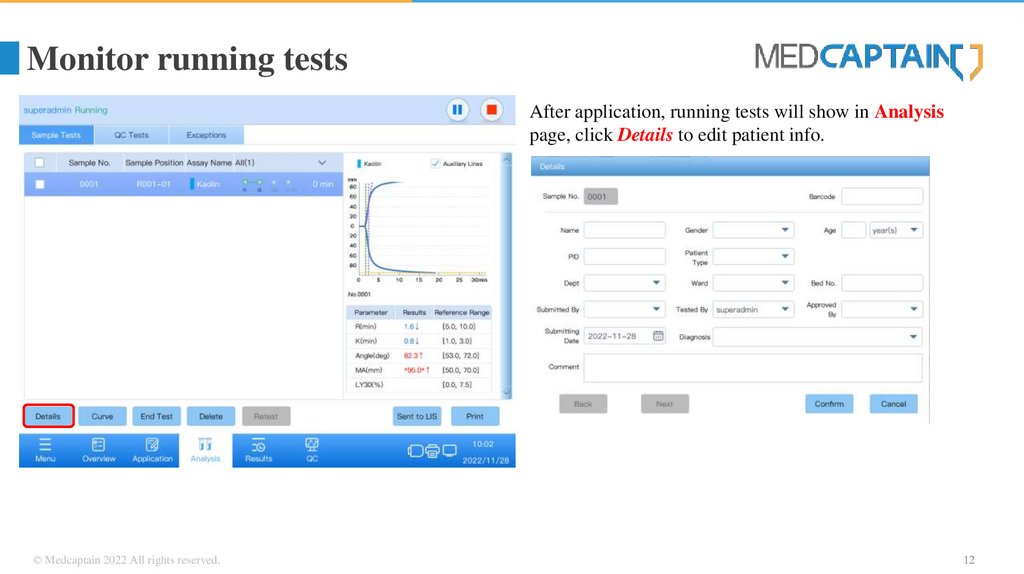
Monitor running testsAfter application, running tests will show in Analysis
page, click Details to edit patient info.
© Medcaptain 2022 All rights reserved.
12
13.
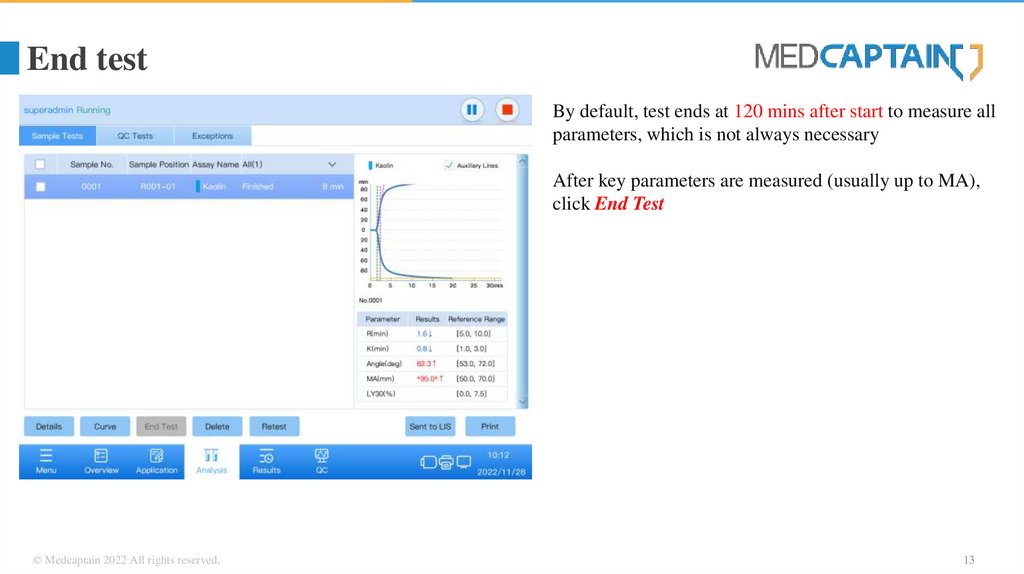
End testBy default, test ends at 120 mins after start to measure all
parameters, which is not always necessary
After key parameters are measured (usually up to MA),
click End Test
© Medcaptain 2022 All rights reserved.
13
14.
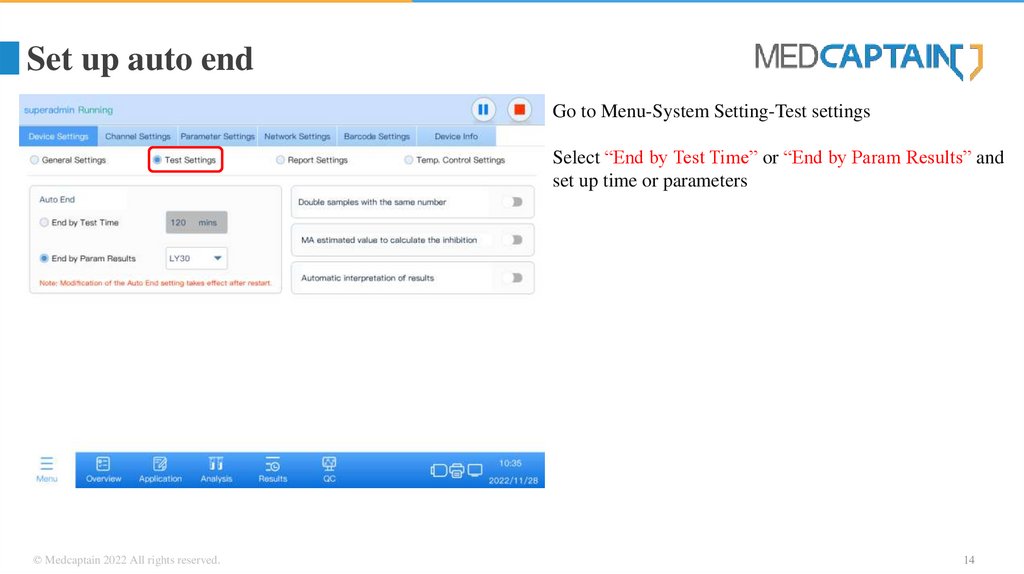
Set up auto endGo to Menu-System Setting-Test settings
Select “End by Test Time” or “End by Param Results” and
set up time or parameters
© Medcaptain 2022 All rights reserved.
14
15.
PrintingGo to Analysis or Results page to print (Recommend HP
LaserJet Pro P1108, HP DeskJet 1110, HP DeskJet 1111,
and HP DeskJet 1112)
© Medcaptain 2022 All rights reserved.
15
16.
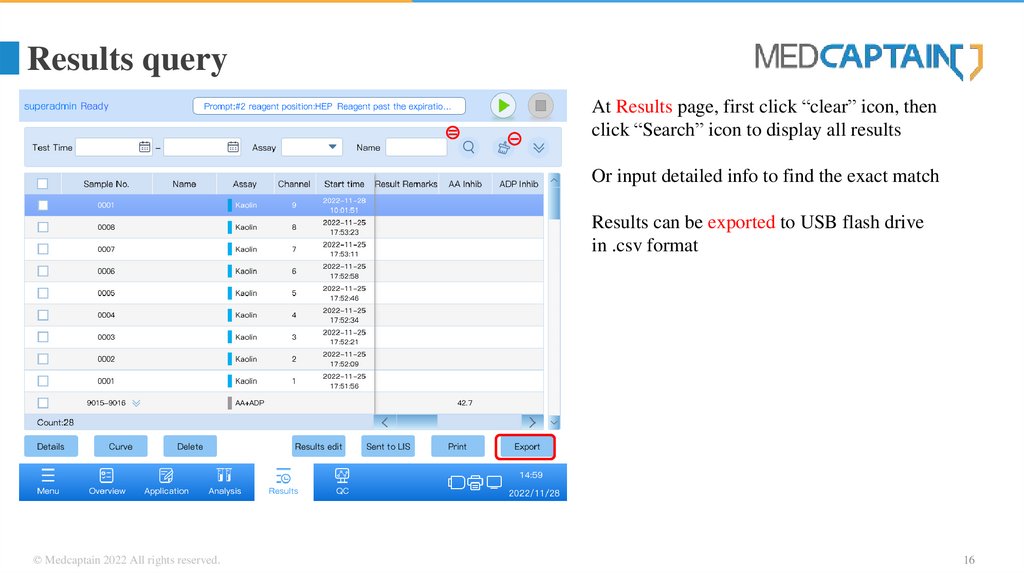
Results query②
①
At Results page, first click “clear” icon, then
click “Search” icon to display all results
Or input detailed info to find the exact match
Results can be exported to USB flash drive
in .csv format
© Medcaptain 2022 All rights reserved.
16
17.
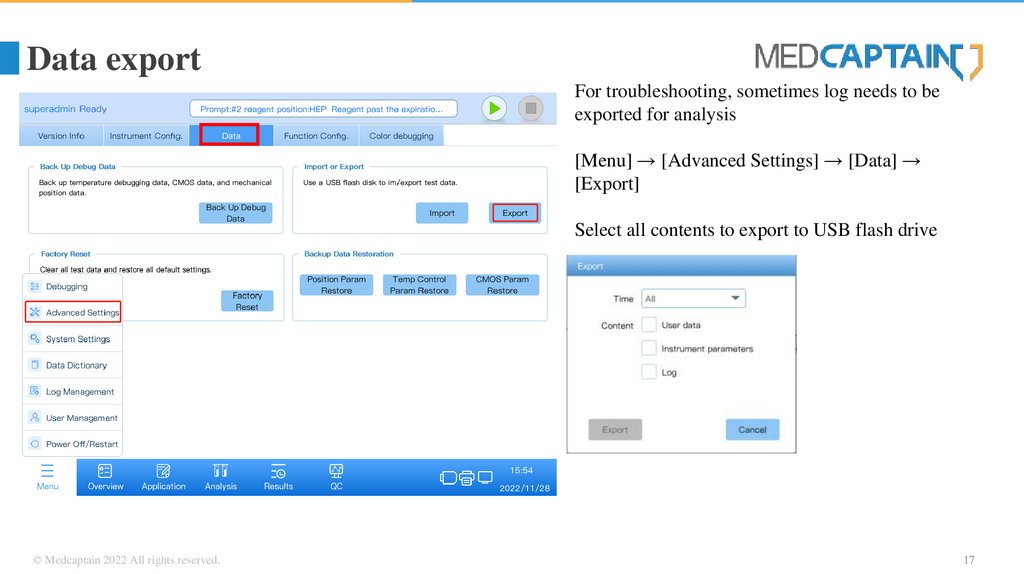
Data exportFor troubleshooting, sometimes log needs to be
exported for analysis
[Menu] → [Advanced Settings] → [Data] →
[Export]
Select all contents to export to USB flash drive
© Medcaptain 2022 All rights reserved.
17
18.
Part 03Maintenance
19.
Maintenance planTo ensure that the instrument operates under optimum operating conditions, the instrument
requires regular maintenance, follow the maintenance schedule below:
1.
Daily maintenance
2.
Monthly maintenance
3.
Annual maintenance
© Medcaptain 2022 All rights reserved.
19
20.
Daily maintenance21.
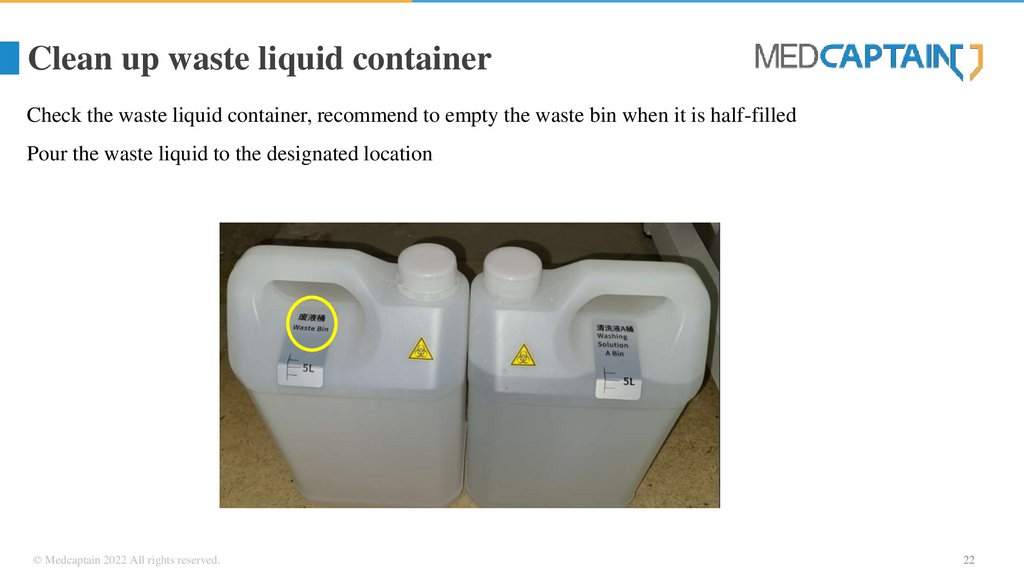
Clean up waste binAfter last test finished at the end of day, check the status of
the waste bin. Empty the waste bin and replace the
container/bio-hazard bag
© Medcaptain 2022 All rights reserved.
21
22.
Clean up waste liquid containerCheck the waste liquid container, recommend to empty the waste bin when it is half-filled
Pour the waste liquid to the designated location
© Medcaptain 2022 All rights reserved.
22
23.
Cleaning surface1.
When cleaning the surface of the equipment, use a soft and lint-free gauze immersed in a neutral or
weak alkaline cleaner (Water or Soapy water, pH 7.0~10.5). After the gauze is fully wet, wring it out
until no liquid drips, and wipe the surface of the equipment.
2.
All sides of the equipment should be wiped in sequence until the contamination is removed from the
equipment surface.
3.
During the wiping process, ensure that the edges and corners of the device are cleaned.
4.
Reagent positions, cuvette positions, sample positions, waste bins, cuvette rack exits, and manual
operation areas also need to be carefully wiped.
5.
Use a dry, lint-free gauze to remove residual detergent solution.
© Medcaptain 2022 All rights reserved.
23
24.
Monthly maintenance25.
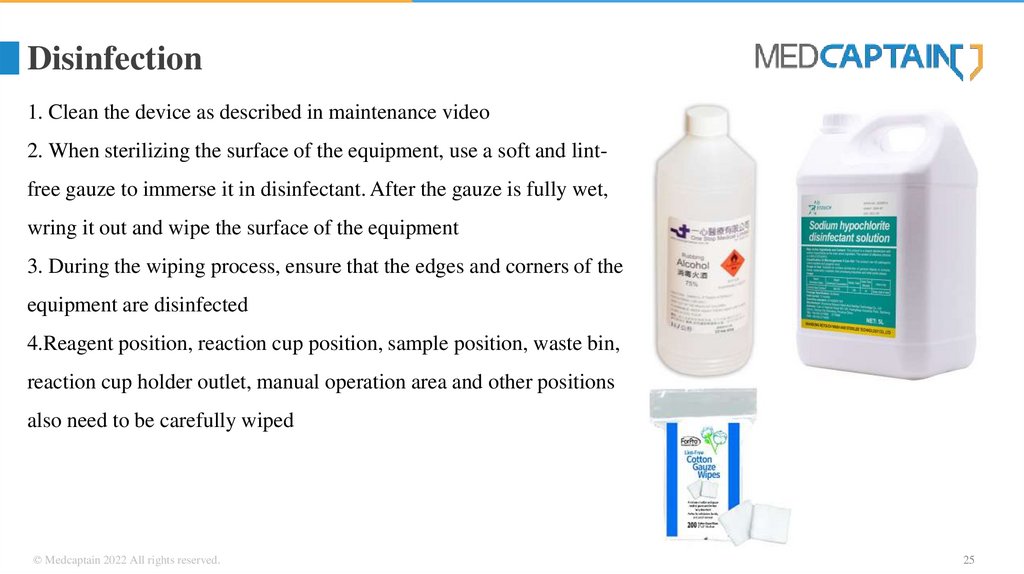
Disinfection1. Clean the device as described in maintenance video
2. When sterilizing the surface of the equipment, use a soft and lintfree gauze to immerse it in disinfectant. After the gauze is fully wet,
wring it out and wipe the surface of the equipment
3. During the wiping process, ensure that the edges and corners of the
equipment are disinfected
4.Reagent position, reaction cup position, sample position, waste bin,
reaction cup holder outlet, manual operation area and other positions
also need to be carefully wiped
© Medcaptain 2022 All rights reserved.
25
26.
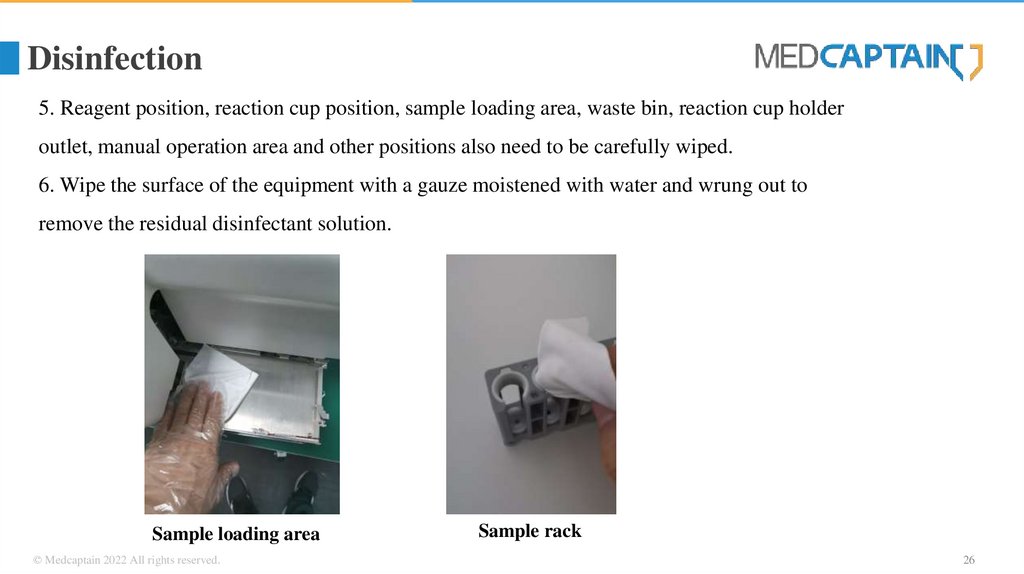
Disinfection5. Reagent position, reaction cup position, sample loading area, waste bin, reaction cup holder
outlet, manual operation area and other positions also need to be carefully wiped.
6. Wipe the surface of the equipment with a gauze moistened with water and wrung out to
remove the residual disinfectant solution.
Sample loading area
© Medcaptain 2022 All rights reserved.
Sample rack
26
27.
Check appearance & power cordAppearance inspection: There are no cracks and damages.
Key operation: The keys are pressed smoothly and effectively.
Pipe joints: no leakage or looseness.
Check the appearance of the power cord.
Check if TX can be power on/off normally
© Medcaptain 2022 All rights reserved.
27
28.
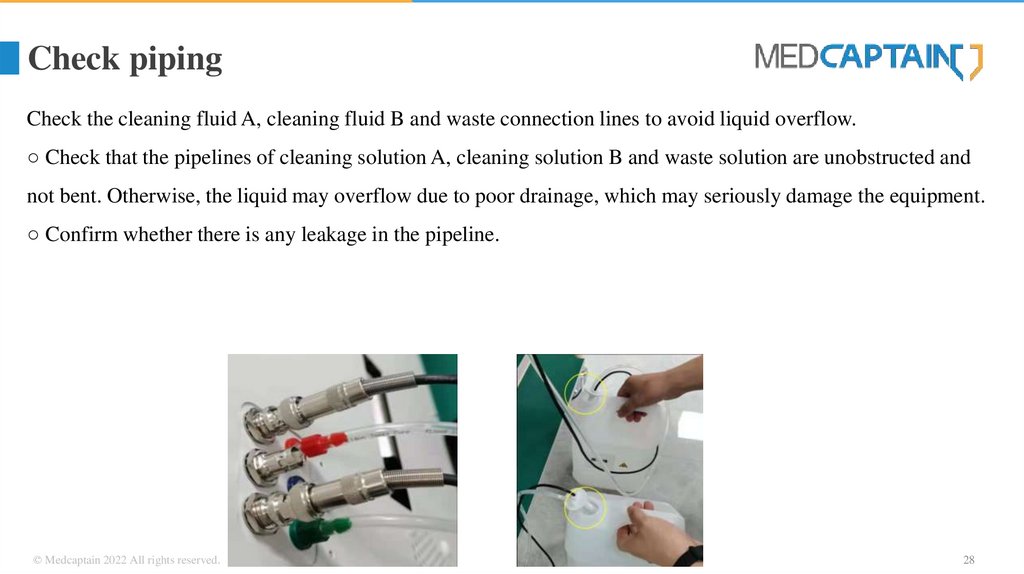
Check pipingCheck the cleaning fluid A, cleaning fluid B and waste connection lines to avoid liquid overflow.
○ Check that the pipelines of cleaning solution A, cleaning solution B and waste solution are unobstructed and
not bent. Otherwise, the liquid may overflow due to poor drainage, which may seriously damage the equipment.
○ Confirm whether there is any leakage in the pipeline.
© Medcaptain 2022 All rights reserved.
28
29.
Annual maintenance30.
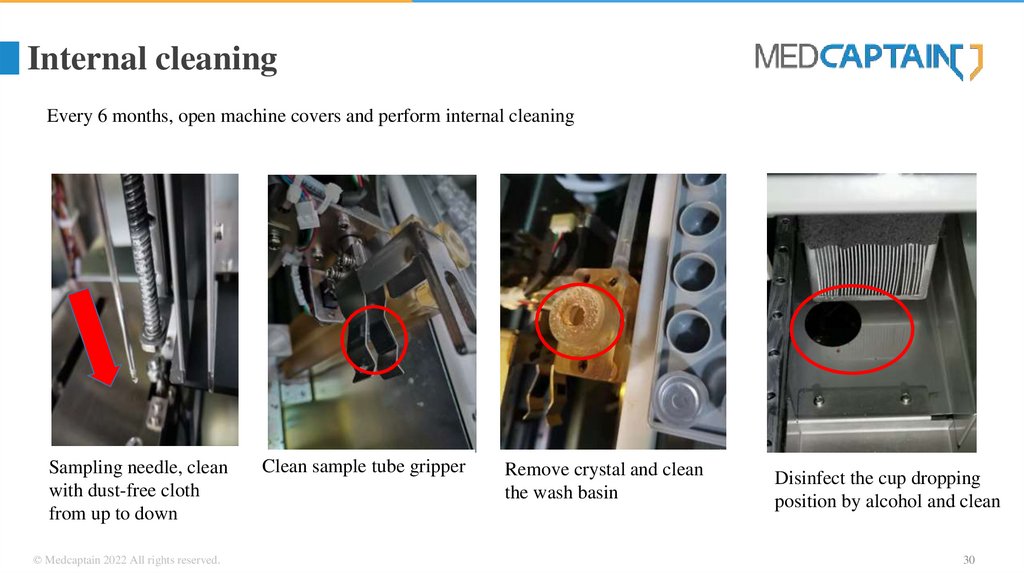
Internal cleaningEvery 6 months, open machine covers and perform internal cleaning
Sampling needle, clean
with dust-free cloth
from up to down
© Medcaptain 2022 All rights reserved.
Clean sample tube gripper
Remove crystal and clean
the wash basin
Disinfect the cup dropping
position by alcohol and clean
30
31.
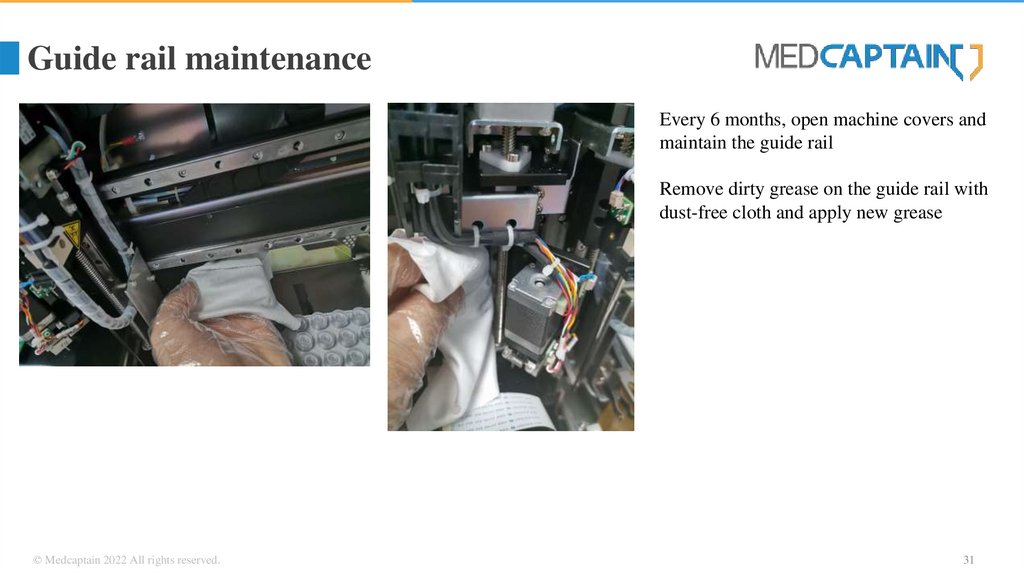
Guide rail maintenanceEvery 6 months, open machine covers and
maintain the guide rail
Remove dirty grease on the guide rail with
dust-free cloth and apply new grease
© Medcaptain 2022 All rights reserved.
31
32.
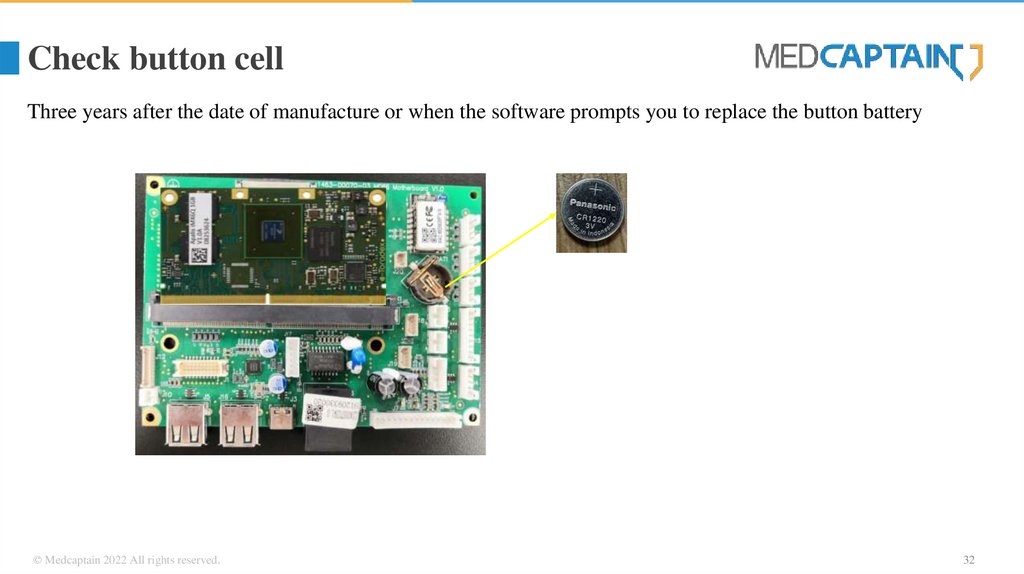
Check button cellThree years after the date of manufacture or when the software prompts you to replace the button battery
© Medcaptain 2022 All rights reserved.
32
33.
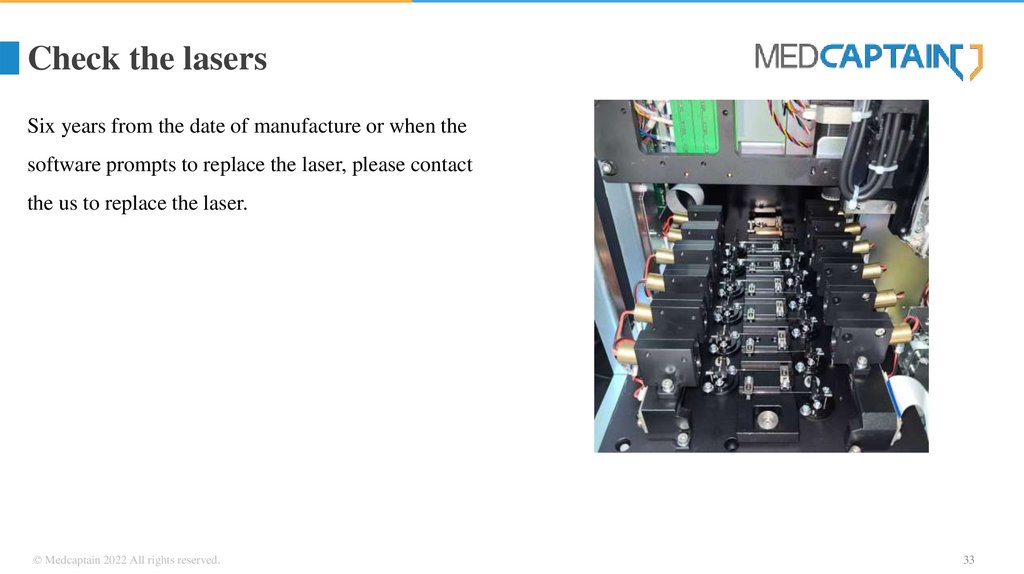
Check the lasersSix years from the date of manufacture or when the
software prompts to replace the laser, please contact
the us to replace the laser.
© Medcaptain 2022 All rights reserved.
33