


 programming
Similar presentations:


. Очереди")


Linked List
1.
Linked List2.
Array LimitationsWhat are the limitations of an array, as a data
structure?
1. Fixed size
2. Physically stored in consecutive memory locations
3. To insert or delete items, may need to shift data
3.
List Overview1. Basic operations of linked lists
Insert, find, delete, print, etc.
2. Variations of linked lists
1. Linear Linked list
2. Circular linked lists
3. Doubly linked lists
4.
Conceptual DiagramSingly-Linked List
front
head
head pointer "defines" the linked list
(note that it is not a node)
these are nodes
data
data
data
.
5.
Advantages of Linked Lists• The items do not have to be stored in consecutive
memory locations: the successor can be anywhere
physically
– can insert and delete items without shifting data
– can increase the size of the data structure easily
• Linked lists can grow dynamically (i.e. at run time) – the
amount of memory space allocated can grow and shrink
as needed
6.
Disadvantages of Linked Lists• A linked list will use more memory storage than arrays.
It has more memory for an additional linked field or next
pointer field.
• Arrays elements can be randomly accessed by giving the
appropriate index, while linked list elements cannot
randomly accessed.
• Binary search cannot be applied in a linked list.
• A linked list takes more time in traversing of elements.
7.
Nodes• A linked list is an ordered sequence of items called nodes
– A node is the basic unit of representation in a linked list
• A node in a singly linked list consists of two fields:
– A data portion
– A link (pointer) to the next node in the structure
• The first item (node) in the linked list is accessed via a
front or head pointer
– The linked list is defined by its head (this is its starting point)
4-7
8.
Linked List OperationsFollowing are linked list operations:
Add an item to the linked list
Delete an item from the linked list
• Add an item to the linked list
– We have 3 situations to consider:
• insert a node at the front
• insert a node in the middle( at particular position)
• insert a node at the end
• Delete an item from the linked list
– We have 3 situations to consider:
• delete the node at the front
• delete any interior node
• delete the last node
9.
A Simple Linked List ClassWe use two classes: Node and List
Declare Node class for the nodes
– data: int-type data in this example
– next: a pointer to the next node in the list
class Node {
public:
int info;
Node* next;
};
// data
// pointer to next
10.
A Simple Linked List ClassDeclare List, which contains
– head: a pointer to the first node in the list.
Since the list is empty initially, head is set to NULL
– Operations on List
class List {
public:
List(void) {head = NULL;}// constructor
~List(void);
// destructor
private:
Node* head;
};
11.
A Simple Linked List ClassOperations of List
– IsEmpty: determine whether or not the list is empty
– InsertNode: insert a new node at a particular position
– FindNode: find a node with a given value
– DeleteNode: delete a node with a given value
– DisplayList: print all the nodes in the list
12.
Inserting a new node• Possible cases of InsertNode
1. Insert into an empty list
2. Insert in front
3. Insert at back
4. Insert in middle
• But, in fact, only need to handle two cases
– Insert as the first node (Case 1 and Case 2)
– Insert in the middle or at the end of the list (Case 3
and Case 4)
13.
Insertion at the StartIt is just a 2-step algorithm which is performed as follows
Assume
• node points to the new node to be inserted
• front points to the first node of the linked list
1. Make the new node point to the first node
(i.e. the node that front points to)
2. Make front point to the new node
(i.e the node that node points to)
14.
Inserting a Node at the Frontnode
node points to the new node to be inserted,
front points to the first node of the linked list
front
node
1.
Make the new node point to the first node (i.e.
the node that front points to)
front
node
front
2. Make front point to the new node (i.e the
node that node points to)
15.
Algorithmvoid insert_beg(int val)
{ node *temp=new node;
temp->info=val;
If(head==NULL)
{ head=temp;
temp->next=NULL}
else{
temp->next=head;
head=temp; }
}
16.
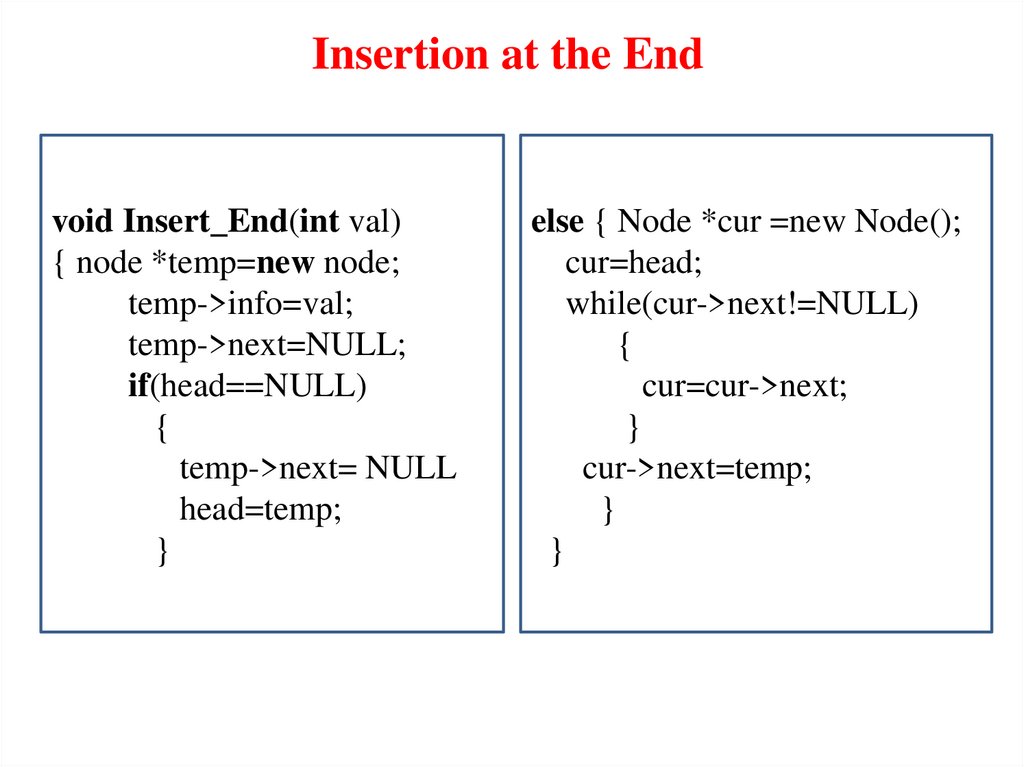
Insertion at the Endvoid Insert_End(int val)
{ node *temp=new node;
temp->info=val;
temp->next=NULL;
if(head==NULL)
{
temp->next= NULL
head=temp;
}
else { Node *cur =new Node();
cur=head;
while(cur->next!=NULL)
{
cur=cur->next;
}
cur->next=temp;
}
}
17.
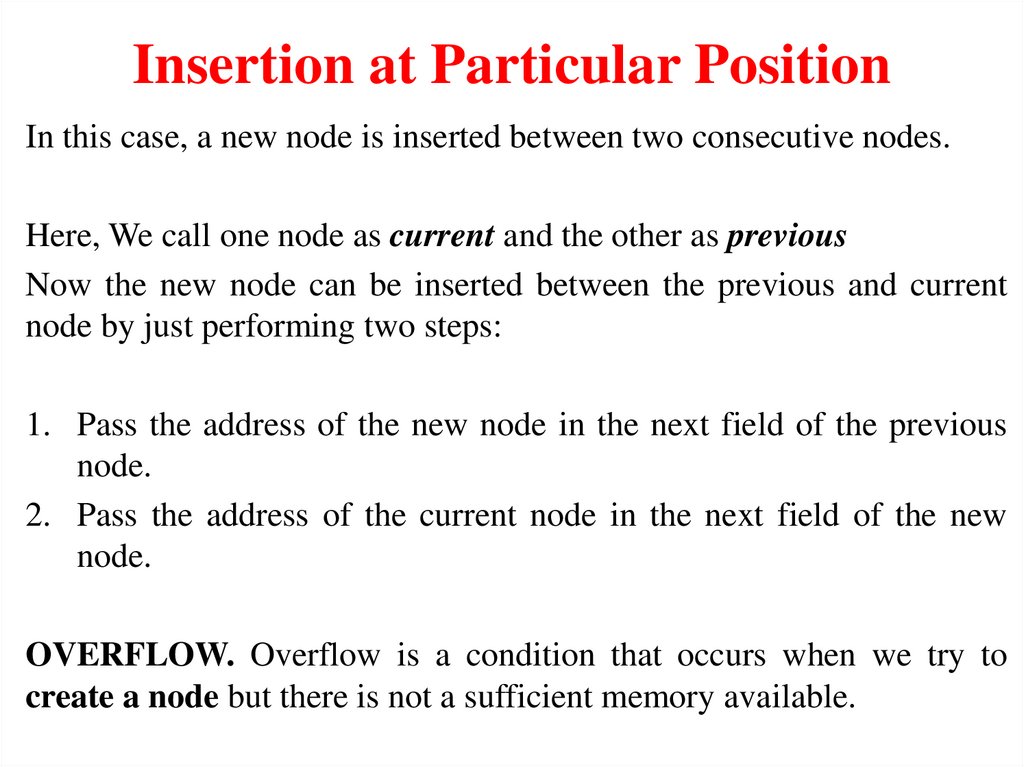
Insertion at Particular PositionIn this case, a new node is inserted between two consecutive nodes.
Here, We call one node as current and the other as previous
Now the new node can be inserted between the previous and current
node by just performing two steps:
1. Pass the address of the new node in the next field of the previous
node.
2. Pass the address of the current node in the next field of the new
node.
OVERFLOW. Overflow is a condition that occurs when we try to
create a node but there is not a sufficient memory available.
18.
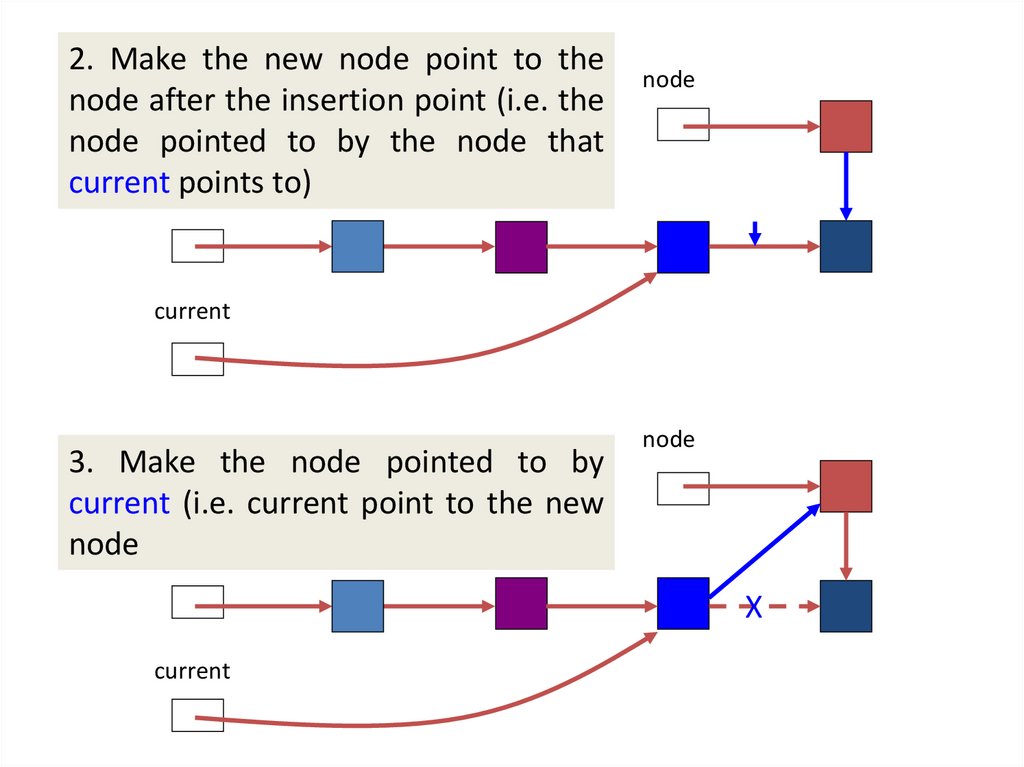
Inserting a Node in the MiddleLet's insert the new node after the
third node in the linked list
front
1. Locate the node preceding the
insertion point , since it will have to be
modified (make current point to it)
front
current
node
insertion point
node
19.
2. Make the new node point to thenode after the insertion point (i.e. the
node pointed to by the node that
currentfront
points to)
node
current
3. Make the node pointed to by
current (i.e. current point to the new
node front
node
X
current
20.
Algorithmvoid insert_position(int pos, int val)
{ node *pre;
node *cur;
node *temp=new node;
temp->data=val;
cur=head;
for(int i=1;i<pos;i++)
{ pre=cur; cur=cur->next; }
pre->next=temp;
temp->next=cur; }
21.
Algorithm--Insertion after a specific valuevoid insert_specificValue(int sp_val, int data)
{ node *pre;
node *cur;
node *temp=new node;
temp->data=data;
cur=head;
while (cur->data!= sp_val)
{ pre=cur; cur=cur->next; }
temp->next=cur;
pre->next=temp;
}
22.
Comparison --- Insertion in between two nodesvoid insert_position(int pos, int val)
{ node *pre;
node *cur;
node *temp=new node;
temp->data=val;
cur=head;
for(int i=1;i<pos;i++)
{ pre=cur; cur=cur->next; }
pre->next=temp;
temp->next=cur; }
void insert_specificValue(int sp_val, int data)
{ node *pre;
node *cur;
node *temp=new node;
temp->data=data;
cur=head;
while (cur->data!= sp_val)
{ pre=cur; cur=cur->next; }
temp->next=cur;
pre->next=temp;
}
23.
Deleting a Node from a Linked ListWe will consider three cases and then see how deletion is done in each case.
Case 1: The first node is deleted.
Case 2: The last node is deleted.
Case 3: The node after a given node is deleted.
UNDERFLOW.
A condition that occurs when we try to delete a node from an empty linked list
This happens when Head = NULL or when there are no more nodes to delete.
Note that when we delete a node from a linked list, we actually have to free the
memory occupied by that node. The memory is returned to the free pool so that it
can be used to store other programs and data.
24.
Deleting the First Node from a Linked ListTo delete a node from the beginning of the list, then the following changes
will be done in the linked list
Step 1: check if the linked list exists or not.
If Head = NULL, then there are no nodes in the list and the control is
transferred to the last statement of the algorithm. (UNDERFLOW)
Step 2: However, if there are nodes in the linked list,
A pointer variable PTR is set to point to the first node of the list.
(i.e. initialize PTR with Head that stores the address of the first node )
Step 3: Head is made to point to the next node in sequence
Step 4: Finally, the memory occupied by the node pointed by PTR (initially
the first node of the list) is freed and returned to the free pool.
25.
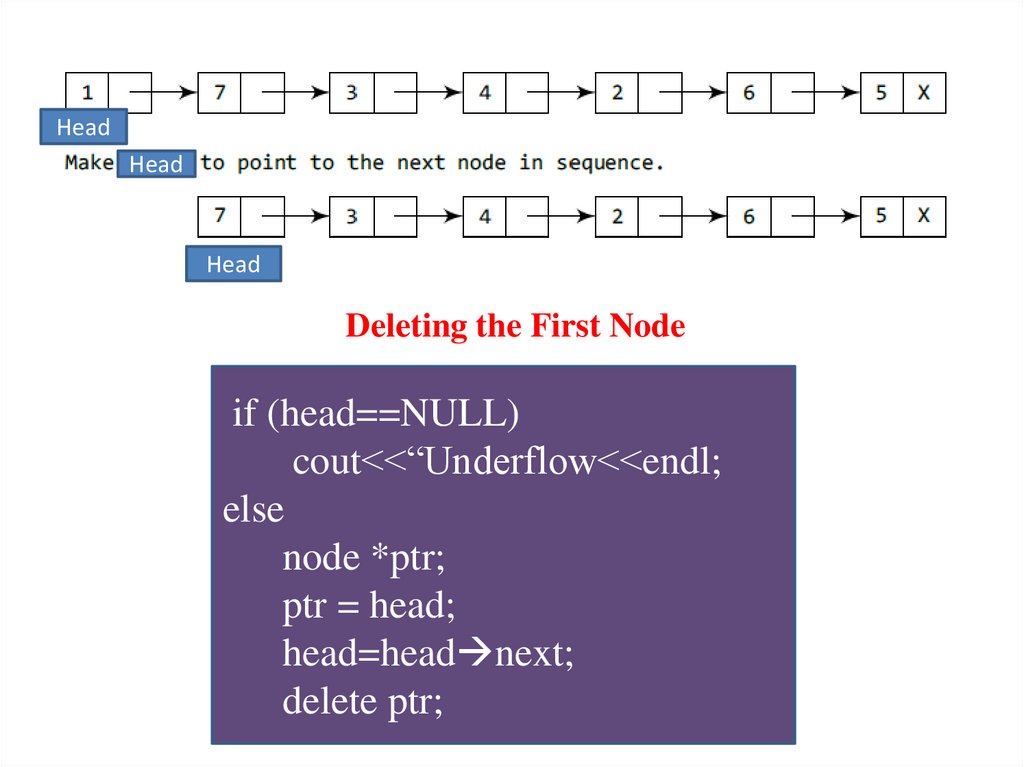
HeadHead
Head
Deleting the First Node
if (head==NULL)
cout<<“Underflow<<endl;
else
node *ptr;
ptr = head;
head=head next;
delete ptr;
26.
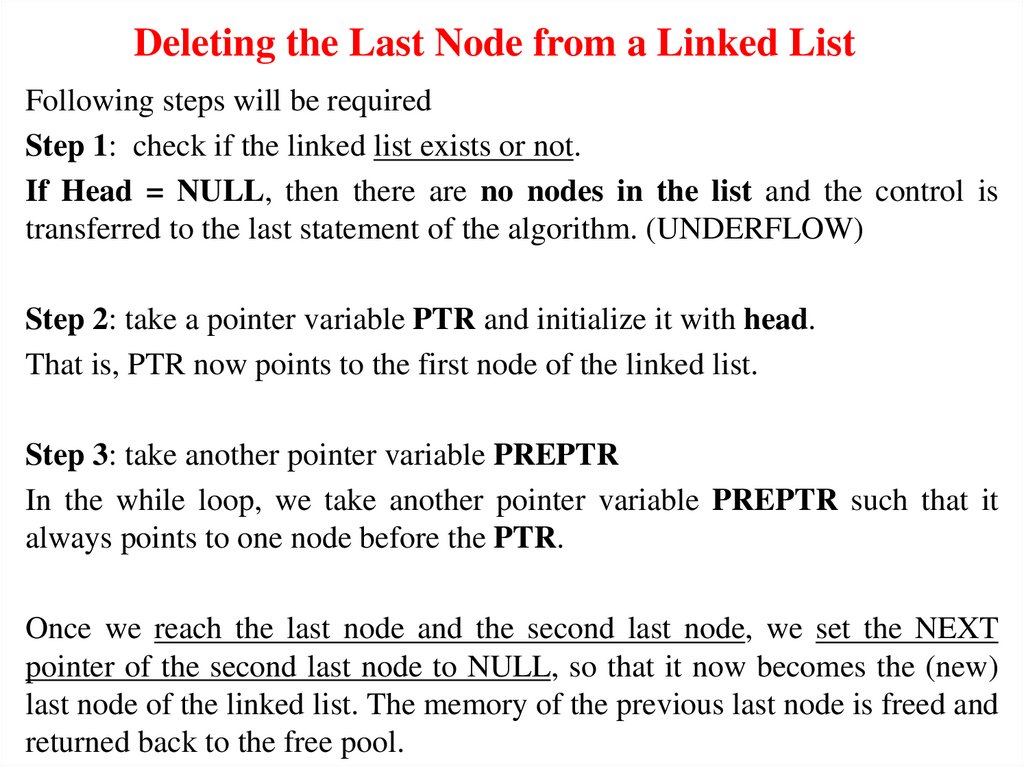
Deleting the Last Node from a Linked ListFollowing steps will be required
Step 1: check if the linked list exists or not.
If Head = NULL, then there are no nodes in the list and the control is
transferred to the last statement of the algorithm. (UNDERFLOW)
Step 2: take a pointer variable PTR and initialize it with head.
That is, PTR now points to the first node of the linked list.
Step 3: take another pointer variable PREPTR
In the while loop, we take another pointer variable PREPTR such that it
always points to one node before the PTR.
Once we reach the last node and the second last node, we set the NEXT
pointer of the second last node to NULL, so that it now becomes the (new)
last node of the linked list. The memory of the previous last node is freed and
returned back to the free pool.
27.
NOTE: Here START means Head.28.
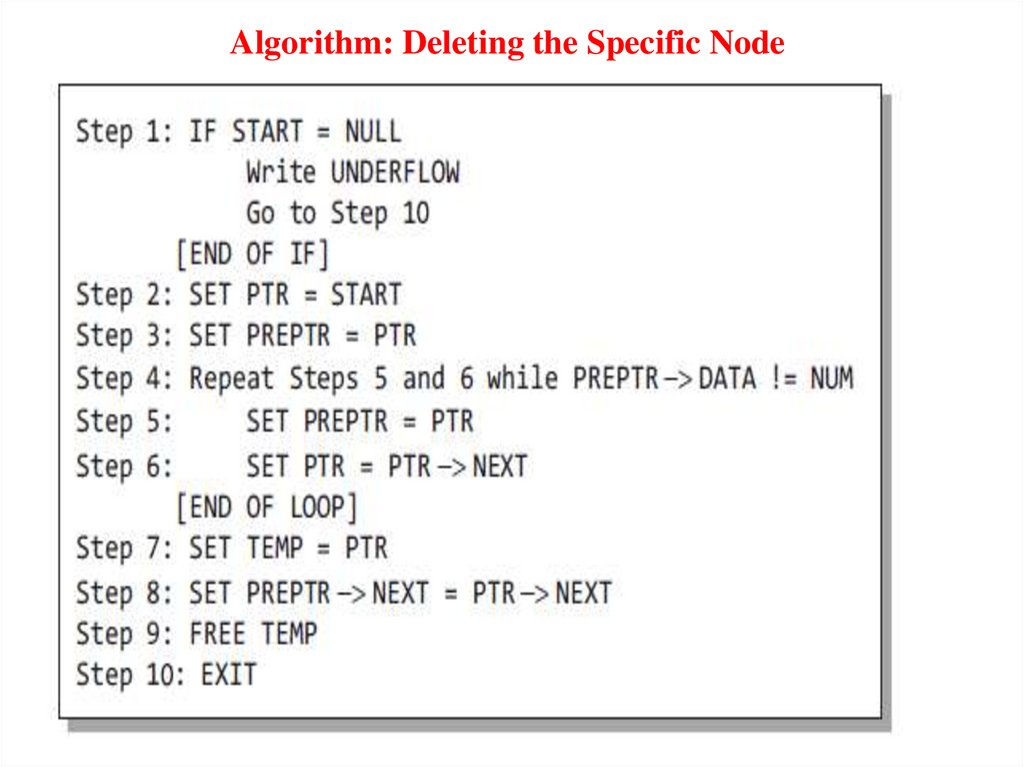
Deleting the Specific Node in a Linked ListThen the following changes will be done in the linked list:
Step 1: check if the linked list exists or not.
If START = NULL, it signifies that there are no nodes in the list and
the control is transferred to the last statement of the algorithm.
Step 2: we take a pointer variable PTR and initialize it with START.
That is, PTR now points to the first node of the linked list. In the
while loop, we take another pointer variable PREPTR such that it
always points to one node before the PTR.
Once we reach the node containing VAL and the node succeeding it,
we set the next pointer of the node containing VAL to the address
contained in next field of the node preceeding it. The memory of the
node succeeding the given node is freed and returned back to the free
pool.