


 physics
Similar presentations:


: application on meteorological balloons, long duration balloons")


")


")
Canopy Course USPA B-License
1.
Canopy CourseUSPA B-License
2.
IntroductionBasic Aerodynamics & How the Canopy Flies.
Canopy Design
Wingloading and it’s effects.
Downsizing progression.
Gear Maintenance.
Break-off, Tracking and Opening.
Canopy Flight and Avoiding Collisions with Others.
Landing Patterns and Adjustments.
The Landing Flare.
Hop and Pop Code.
Jumps 1 – 5
Safety and Awareness.
3.
Basic AerodynamicsHow the Canopy Flies:
The A lines (located at the front of the canopy) are
slightly shorter than the B lines. The B lines shorter
than C lines, and C lines are shorter than the D lines.
This design creates what is known as an angle of
incidence.
Essentially the angle of incidence is a tilt (trim) in the
canopy created by the manufacturer.
Flatter trim will let a canopy fly further, steeper trim
increases descent rate.
The angle of incidence is produced by design and
does not change unless you initiate that change by
pulling on the front or rear risers, altering the trim
not the shape.
4.
Basic AerodynamicsHow the Canopy Flies:
The angle of attack is the angle of the chord line to the relative wind.
Flaring is the only way to make a change in a canopy’s angle of attack.
Flaring the canopy, changes the shape of the canopy, causing the relative air
to hit the canopy at a different angle and thus changing the angle of attack.
5.
Basic AerodynamicsHow the Canopy Flies Con’t:
The glide angle is the angle that the canopy moves across the sky.
Example; In a no wind scenario, a canopy in full flight through the air.
Any change in configuration will change the glide of a canopy.
Deep brakes and front risers will steepen the glide angle.
Rear Risers and ¾ brakes will extend the glide path.
6.
Basic AerodynamicsHow the Canopy Flies:
What holds you in the air when flying your canopy is a result of
Lift and Drag.
Lift:
Drag: The friction (disruption) produced to the airflow as the
Air is forced into the cells giving the canopy its rigidity and
in turn, giving you Lift. When flaring, forward speed is briefly
converted to lift.
canopy flies through the air creates drag. Drag can be reduced
using collapsible pilot chutes, sliders, thinner lines, etc.
Lift and Drag are both results of airflow over the wing.
The more
speed, the more lift and drag.
For a wing to move forward in the air, it needs a force
propelling it. Your Weight (gravity) is this force as it pulls down
on the canopy.
The more
weight under the canopy, the more speed.
7.
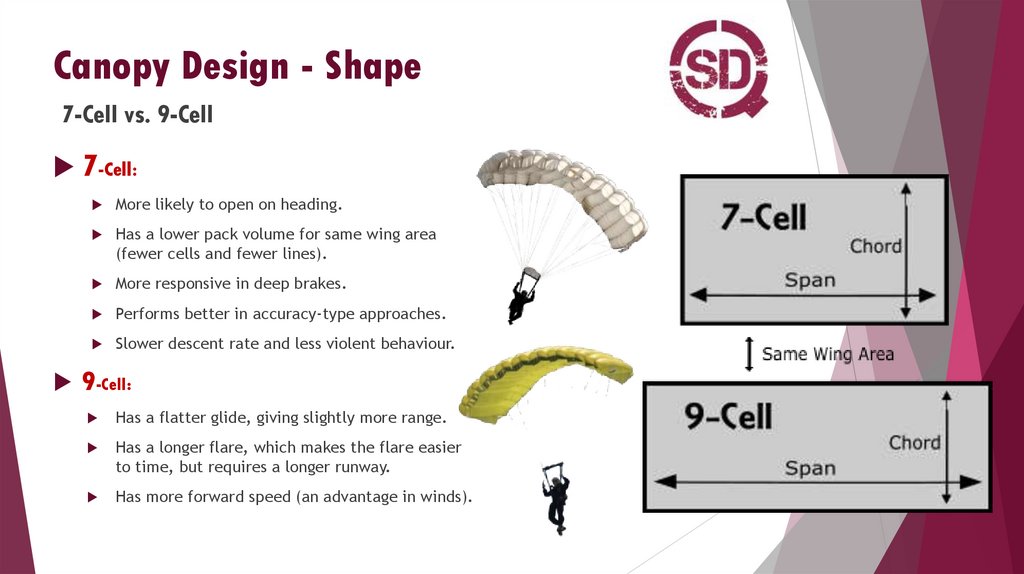
Canopy Design - Shape7-Cell vs. 9-Cell
7-Cell:
More likely to open on heading.
Has a lower pack volume for same wing area
(fewer cells and fewer lines).
More responsive in deep brakes.
Performs better in accuracy-type approaches.
Slower descent rate and less violent behaviour.
9-Cell:
Has a flatter glide, giving slightly more range.
Has a longer flare, which makes the flare easier
to time, but requires a longer runway.
Has more forward speed (an advantage in winds).
8.
Canopy DesignTapered vs. Elliptical
Semi-elliptical (Tapered)
Generally more responsive than rectangular ones.
Lighter toggle pressure and turn easier.
Feel surprisingly agile.
Ideal for jumpers who want a larger, more forgiving
canopy that is still fun to fly.
Suitable for intermediate/experienced canopy pilots.
Elliptical (Highly Tapered):
Much more responsive than any other type.
Turn faster and require less input to start a turn.
Reacts to harness inputs easily.
Exciting to fly, but can be very unforgiving.
Only suitable for advanced, aggressive canopy pilots.
9.
Canopy Design - FabricF-111 vs. Zero-Porosity
F-111
Standard parachute nylon in the 80’s and early 90’s was F-111.
Less expensive and easier to work than zero porosity fabrics, which means F-111 parachutes are much
cheaper.
Easier to pack as air escapes easier, however, they wear out sooner.
F-111 canopy at its prime for about 300 jumps, works well for another 300 jumps.
Few F-111 canopies are any good after 1,000 jumps.
Zero-Porosity
A coated fabric that has taken over the market since mid-90’s.
Fabric is more expensive and harder to work with, making them more expensive to purchase.
Hold their shape better and less air passes through the fabrics, hence; better flight characteristics than a
similar F-111.
Last much longer, if taken care of, they may still fly well after 1,000 jumps.
More difficult to pack as the air doesn’t escape as well as F-111.
Fun Fact – Most skydivers call “Low-Porosity” material “F-111”, although this is actually the brand name for a type of fabric that is
no longer manufactured. Most “F-111” canopies jumped today are actually made from Low-Porosity material.
10.
Canopy Design - LinesDacron vs. Microline (Spectra)
Dacron
The thick type; increases pack volume.
Less expensive.
Creates more drag.
Easy to handle, pack and stow.
Normally provides soft openings.
Good for canopy relative work.
Microline (or Spectra)
The thin type; reduces pack volume.
More expensive.
Reduces drag because it’s thinner, giving approximately 5% performance
increase.
Does not stretch as much, but means it can cause harder opening shocks.
Lines can shrink unevenly over time.
Not good for canopy relative work.
11.
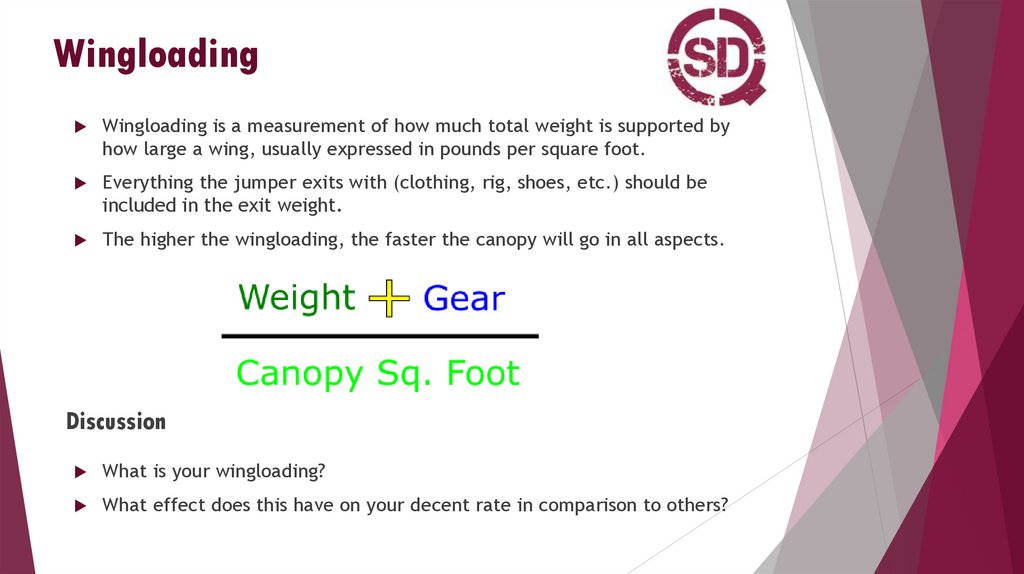
WingloadingWingloading is a measurement of how much total weight is supported by
how large a wing, usually expressed in pounds per square foot.
Everything the jumper exits with (clothing, rig, shoes, etc.) should be
included in the exit weight.
The higher the wingloading, the faster the canopy will go in all aspects.
Discussion
What is your wingloading?
What effect does this have on your decent rate in comparison to others?
12.
WingloadingJump Range
License
Maximum Allowed WingLoad
0 – 25
NonLicensed
0.8
25 - 100
A-B License
1.1
101 – 200
B-C License
1.3
201 – 400
C License
1.4
401 – 600
C-D License
1.5
601 - 800
D License
1.6
801 – 1,000
D License
1.7
Over 1,000
D License
Use Proper Judgement
Relevant Variables:
Density Altitude Compensation:
Lower wing loading required for
each increment of 2,500 feet of
altitude above sea level.
Currency – Lower 0.1 point for
less than 100 jumps per year.
Lower 0.2 points for less than 50
jumps per year.
Canopy Design – Lower 0.1 point
for fully elliptical canopies.
Note – fully elliptical canopies
are not allowed for jumpers
with less than 200 jumps.
13.
DownsizingDownsizing Progression:
Before moving to a smaller size canopy, a jumper should be familiar and comfortable with the
following landing manoeuvres on his or her current canopy:
landing flare from full, natural-speed flight.
flaring for landing from slow (braked) flight.
consistent soft, stand-up landings within 32 feet of a planned target in a variety of wind conditions,
including downwind.
beginning to flare, turning to ten-degree bank, and returning to wings-level before landing.
Downsize increments on the same canopy design
above 230 square feet, 30 square feet
from 229 to 150 square feet, 20 square feet
from 149 to 120 square feet, 15 square feet
below 120 square feet in smaller increments
New design elements (transition to elliptical or cross-braced canopies) require a step over before a
downsize.
14.
Gear MaintenanceEnvironment:
Dirt degrades fabric, lines and
slider.
Ultraviolet rays degrade nylon
(florescent lighting 50% of sun
damage).
Water distorts binding and
reinforcement tapes.
Pilot Chute, Slider & Lines:
Pilot chute centre lines shrink with use.
Lines wear as slider creates friction
moving down the lines and sitting on
risers.
Brakes lines wear over time. Shrinkage
(Spectra) and stretching (Dacron).
Packing for an on-heading opening:
Risers must be even!
Bag must be symmetrical!
Line stow placement and tension!
24 inches of unstowed line (elbow to shoulder).
If you are unstable while pulling, it doesn’t matter how well you pack!
15.
Break Off, Tracking & OpeningBreak-Off and Tracking
1.
Determine the breakoff altitude for the group PRIOR to the jump!
2.
Communicate that plan with everyone.
3.
Breakoff IMMEDIATELY at break off altitude.
Do not wait for others to break off first.
Do not try to get one last point.
4.
Make small adjustments to maximize horizontal distance as you track.
5.
Look from side to side to ensure adequate separation and direction from
others.
16.
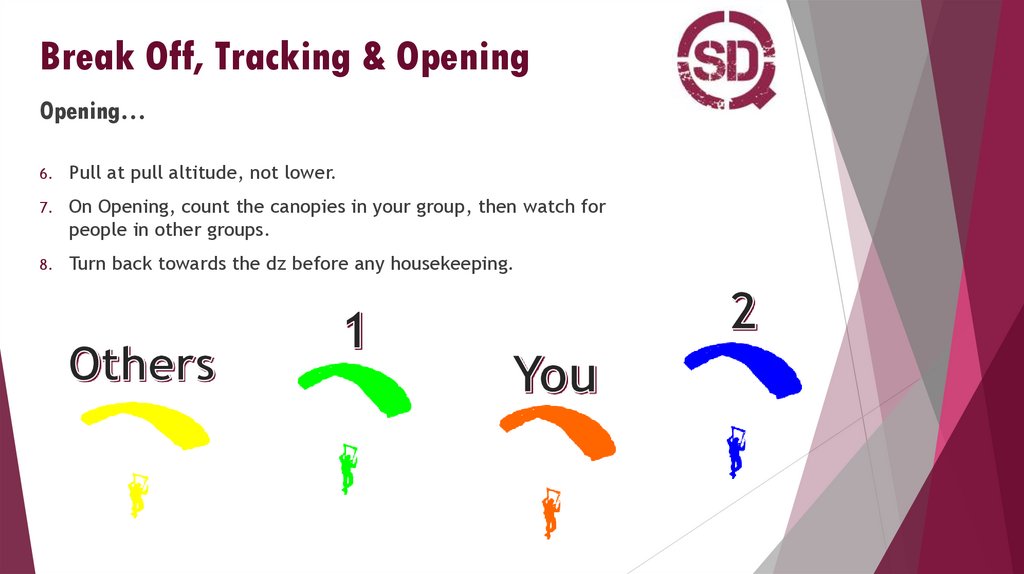
Break Off, Tracking & OpeningOpening…
6.
Pull at pull altitude, not lower.
7.
On Opening, count the canopies in your group, then watch for
people in other groups.
8.
Turn back towards the dz before any housekeeping.
17.
Landing PatternsDetermine landing pattern prior to jump:
Know the wind conditions.
Know the dz landing pattern rules.
The goal of a landing pattern:
To land safely.
Avoid Collisions with others.
Constantly look around.
Maximize vertical separation.
Fly predictably.
Make it easy for others to see you.
Avoid Collisions with the ground.
Landing Priorities!
18.
Canopy FlightThroughout your canopy flight, always maintain awareness of…
1.
Other Canopies.
2.
Your altitude.
3.
Your location.
19.
Canopy FlightAs soon as it’s safe to do so, head toward your holding area.
Identify your landing target and
your final, base and downwind
entry points.
Final - 300 ft.
Base - 600 ft.
If you are not sure you will get to
your holding area by your target
altitude, use the half-way down,
half-way there rule of thumb.
Target
Example; If you are at 4,000 feet
and trying to get to your holding
area by 2,000 feet, you should be
halfway there by 3,000 feet.
If not, you probably won’t make it
and should select alternate
landing points that are
achievable.
Downwind -1000 ft.
4,000
3,000
2,000
20.
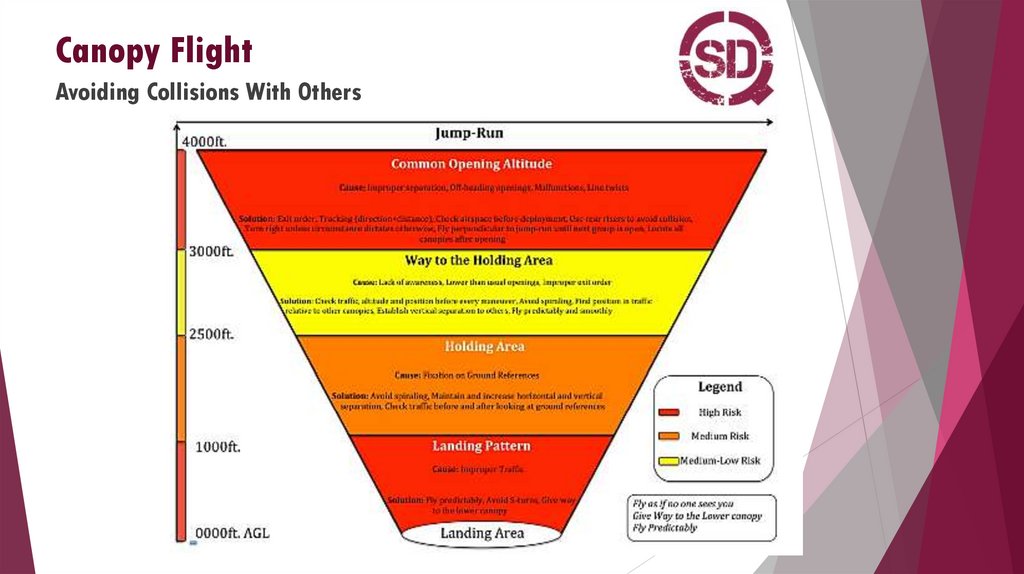
Canopy FlightAvoiding Collisions With Others
Maximize vertical separation
Identify your place in the landing
order.
Allow faster descending canopies
below you to stay below you.
Allow slower descending canopies
above you to stay above you.
If faster descending canopies are
above you, consider letting them
pass you.
If slower descending canopies are
below you, consider passing them to
fit into the natural order.
Slowest Descent
Medium Descent
Fastest Descent
21.
Canopy FlightAvoiding Collisions With Others
Fly as predictably as possible.
As you head to your holding area, fly straight and level as much as
possible.
Avoid spiralling.
It causes you to descend below faster flying canopies (interrupting
natural landing order).
It’s unpredictable.
Reduces your awareness of others.
Make it easy for others to see you.
Fly clear, straight and level pattern with minimal turns and changes as
much as possible.
Get to airspace where others can see you.
Head to holding area right away and practise manoeuvres there rather
than wasting time and maybe not making it back in time.
Stop canopy work by 2,500 feet and start preparing for landing pattern.
If you’re concerned about the unpredictable behaviour of another
skydiver, keep an eye on them and stay clear. Also keep an eye on all
other canopies in the air.
22.
Canopy FlightAvoiding Collisions With Others
23.
Canopy FlightAdjustments in landing patterns…
Always plan to fly your intended pattern.
If heading to next entry point
600 ft
higher than intended:
From ¼ brakes, return to full flight to increase decent
rate.
Or, consider taking the current leg out wider to lose
more altitude.
If heading to next entry point
300 ft
lower than intended:
Use ½ brakes in a tail wind, rear risers in a head wind
to decrease your decent rate.
Or, consider cutting the corner of your base leg to
shorten your total pattern length.
Or, choose a different target and different landing
points altogether.
1,000 ft
24.
Canopy FlightAdjustments in landing patterns…
Things to avoid during your landing pattern:
Unpredictable and you cannot see canopies
behind you.
S-turns!
Always prioritize altitude over position when
making turns. It’s better to change your
target than make a low turn to hit the
original one.
180 degree (hook turns)!
600 ft
Low turns!
300 ft
Bleeding off altitude with S-turns is
unpredictable for other canopies in the air.
Spiralling!
Also Unpredictable. Most dropzones
recommend avoiding spiralling altogether.
1,000 ft
25.
Canopy FlightThe Landing Flare
Always start your flare under a
level wing.
This means turning high enough to allow your wing to level out before
starting your flare.
Maintain your airspeed by keeping your arms up until it’s time to
flare.
Look forward rather than looking down at the ground.
Helpful to find references near the ground to judge flare height.
Ie. Wind socks, buildings, etc.
Two stage flare:
Start flare about 12-15 feet above the ground (one canopy height).
Pull toggles just below shoulders until the canopy levels off.
Time this stage so you get to level flight just above the ground.
As canopy loses speed, gradually finish flaring starting around head
height.
Rather than trying to reach the ground as soon as possible, try to fly
your canopy as long as possible before letting your feet touch the
ground.
26.
Hop N’ Pop CodeExit Order
Establish the exit order prior to the jump; smallest canopy and highest wingloading first, biggest canopy and
lowest wingloading last.
Exit Separation
Leave 5-10 seconds between exits (use 45 degree angle trick).
Post Deployment Checklist
1.
Canopy – Check your canopy for malfunctions.
2.
Traffic – Check for other canopies, use rear risers for avoidance, count other canopies in the air.
3.
Altitude – Know your altitude, assess sufficient altitude to perform canopy manoeuvres, always stay altitude
aware!
4.
Position – Check your position in relation to the dropzone and intended flight plan.
Vertical Separation Below 2,000 Feet
Maintain exit order for landing.
Create more vertical separation by using different flight modes:
Pilots out first fly faster with toggles up.
Pilots out in the middle fly in quarter brakes.
Pilots out last fly slower in half brakes.
Always return to full flight on final approach – toggles up!
Landing Pattern
Always have a flight plan and fly a predictable landing patter.
Know and follow the dropzone rules regarding landing direction.
27.
Jump 1Evaluation / Accuracy Jump
First jump in this course follows the discussion of the ground school topics.
Accuracy and landing skills are evaluated.
1.
Demonstration of a straight-in approach and natural-speed landing provides to
evaluate of flaring and landing skills.
2.
Each jumper should try for a target, with the first priority being a good landing
from a straight-in approach.
Inspection of the canopy’s steering lines while in full flight, with the brakes
released.
1.
2.
The steering lines on most canopies should bow slightly behind the back of the
canopy and it’s suspension lines, while in full flight.
For jumpers who use front risers, the steering lines should have enough slack that
the riser can be pulled with the toggle in hand and still not deflect the tail of the
canopy.
28.
Jump 1Let’s Jump!!!
29.
Jump 2Flaring and Riser Turns
Flaring:
While turning or landing your parachute, the location of your body in relation to the
canopy changes.
In a turn, momentum swings your body out from under the canopy.
During the recovery arc, your body begins to swing back under the canopy.
On final approach in natural flight your body is below the center of the canopy.
During initial flare, using toggles or rear risers, the canopy rocks slightly behind the
jumper, raising the nose in relation to the tail and temporarily increasing lift (higher
angle of attack).
Pulling the toggles gradually further adds drag on the tail, keeping the canopy at the
correct angle and providing the most lift for the remainder of the flare.
Effective flare techniques with emphasis on finishing the flare
30.
Jump 2Flaring and Riser Turns
Under canopy:
1.
Flare the canopy 5 times while observing the wing throughout the flare.
Pay particular attention to your relative position under the canopy during the various stages of the flare.
Feel for the “sweet spot” (the point at which the canopy levels out)
2.
Repeat the 5 practice flares
phase of the practice flare.
3.
Check altitude, position and traffic, and initiate
2 alternating 90-degree turns using rear risers.
4.
Check altitude, position and traffic, and initiate
2 alternating 180-degree turns using rear risers.
5.
Check altitude, position and traffic, and initiate
2 alternating 360-degree turns using rear risers.
with eyes closed, paying close attention to the physical sensation during each
Jumpers must stop any riser manoeuvre at 2,000 feet or higher above the ground.
On landing:
Make a straight-in approach facing into the wind, with minimal input for the last ten seconds before the
landing flare.
Practice an effective flaring technique, focusing on a smooth finish.
Focus on flying your canopy as long as possible before allowing your feet to touch the ground, and finish the
flare completely even after your feet first touch the ground.
31.
Jump 2Let’s Jump!!!
32.
Jump 3Stalls
Explained:
Stalls are not caused by low airspeed, they’re caused by an extremely high angle of attack.
If you keep pulling the nose of the canopy up, eventually the air can’t follow the curve of your
wing, resulting in reduction of lift and drag, and then gravity takes over causing your canopy to
collapse.
Dynamic Stall:
Typically occur during landing,
after the jumper performs a
dynamic nose-up pitch
manoeuvre. Holding the toggles
down, it’s the moment when the
jumper’s body swings back
under the canopy.
Aerodynamic Stall:
Performed normally with rear
risers. Occur when the nose of
the parachute is too high in
relation to the relative wind and
the wing is no longer able to
generate lift over the top skin.
Full Ram-Air Stall:
Normally performed with toggles.
Occur when the trailing edge of the
wing is pulled below the level of the
nose. The toggle version makes the
parachute look like a taco (not
recommended on some canopy
models).
33.
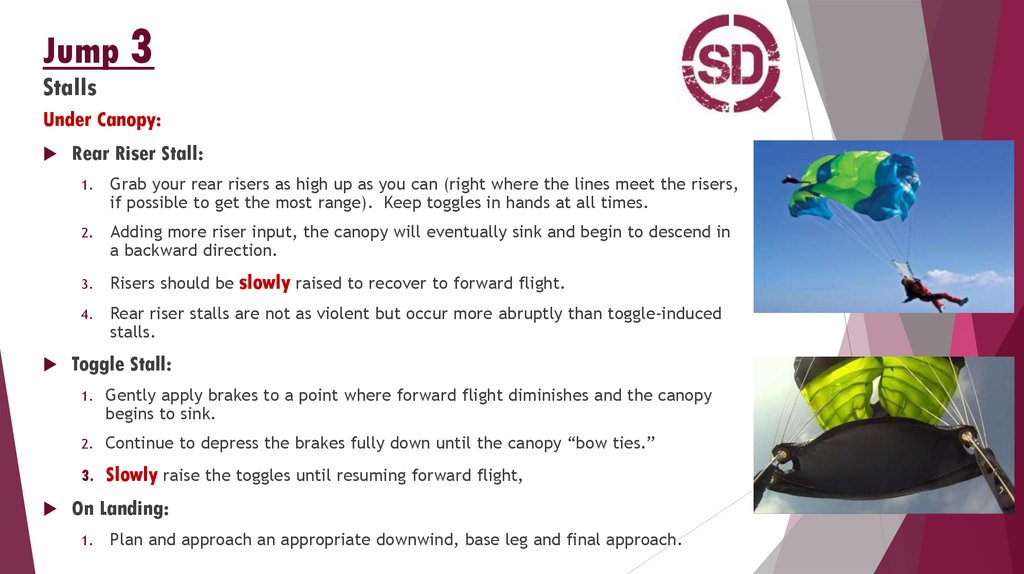
Jump 3Stalls
Under Canopy:
Rear Riser Stall:
1.
Grab your rear risers as high up as you can (right where the lines meet the risers,
if possible to get the most range). Keep toggles in hands at all times.
2.
Adding more riser input, the canopy will eventually sink and begin to descend in
a backward direction.
3.
Risers should be
4.
Rear riser stalls are not as violent but occur more abruptly than toggle-induced
stalls.
slowly raised to recover to forward flight.
Toggle Stall:
1.
Gently apply brakes to a point where forward flight diminishes and the canopy
begins to sink.
2.
Continue to depress the brakes fully down until the canopy “bow ties.”
3.
Slowly raise the toggles until resuming forward flight,
On Landing:
1.
Plan and approach an appropriate downwind, base leg and final approach.
34.
Jump 3Stalls
Purpose:
To increase awareness of the slow-flight range of your canopy.
To learn to recover from a stall with minimum loss of altitude.
To understand when you are no longer maximizing forward glide.
To learn how to prevent high-speed stalls (particularly for highperformance canopy pilots).
35.
Jump 3Let’s Jump!!!
36.
Jump 4Flat turns and cross-wind landings
Explained:
Reasons for Flying in Brakes:
1.
Vertical separation from canopy traffic
2.
Slow forward speed and descent rate
3.
Returning from a long spot
4.
Flat turns as a defence tool at low altitudes
Effect of Brakes on glide:
1.
Slower forward speed
2.
Lower descent rate.
3.
Change in glide:
The pilot needs to experiment to determine the change in glide path at different degrees of flying in
brakes.
Most modern nine-cell canopies fly flatter when a slight amount of brakes are applied.
Some lower-aspect canopies are designed to sink for a classic accuracy approach, which is less effective
when performed under a higher-aspect ratio canopy in low-wind conditions.
37.
Jump 4Flat turns and cross-wind landings
Under Canopy:
1.
Practice flaring 2 times from each the quarter, half, and three-quarter-braked positions, and
focus on making an effective flare from each position.
2.
Practice braked turns:
a)
Pull your toggles down to just below the bottom of your rib cage and hold this for six seconds so the
canopy reaches a steady state.
b)
Lower one toggle to turn in one direction (flat turn).
c)
Raise one toggle to turn in the opposite direction (negative turn).
d)
Combine both b) and c) in a scissor motion (reverse turns).
On Landing:
3.
Fly a landing pattern that allows for a crosswind final approach and landing.
4.
On final approach, focus on crosswind corrections necessary to avoid crabbing.
5.
May require pulling the upwind toggle deeper than the downwind toggle to stay in the same
direction and to reduce ground speed upon landing.
38.
Jump 4Let’s Jump!!!
39.
Jump 5Long Spot
Projected landing point:
1.
Discover how to locate the point on the ground the parachute will reach while flying at
natural speed.
2.
Altering the glide using brakes and rear risers:
a)
3.
Minimize the drag.
Collapse the slider.
Pull legs up, arms in, and arch to reduce air resistance.
Loosen the chest strap to improve glide.
b)
If holding brakes, reducing fatigue by hooking your thumbs in the harness. (Be careful not to hook onto
your cutaway or reserve ripcord handles.)
c)
Decide by 1,500 feet about a new landing area.
Allow enough altitude for the final turn.
Expect the winds to weaken as you get lower.
Choose an alternate landing area if necessary, and follow off-field landing
recommendations
40.
Jump 5Long Spot
Under Canopy:
1.
Exit the aircraft at 5,000 feet AGL at least 2 miles upwind of the main landing area.
2.
Determine the glide path of the canopy and the landing point using the projected
landing point to determine the point on the ground which is neither rising or sinking.
3.
Alter the glide
4.
a)
using brakes
b)
using rear risers
c)
comparison of effectiveness
If the intended landing area cannot be reached by an altitude which allows for a safe
landing, a reasonable alternative should be used.
On Landing:
Follow the flight plan and continue to work on effective flaring.
41.
Jump 5Let’s Jump!!!
42.
Safety and AwarenessSimple safety points before EVERY skydive:
1.
Check your gear thoroughly, starting with the AAD.
2.
Check the conditions with your own eyes!
3.
Check conditions with your own EARS!
4.
Check windsock, weather forecast, clouds, speed and direction. Take time to watch canopies from previous loads.
Ask the skydivers on the last load what the conditions were. What direction and speed is the jump run?
Make a plan for your canopy flight!
Use information gathered to make a plan for your skydive. Where should you be exiting? What areas will be
affected by turbulance? Are the conditions within my personal limits?
5.
Have your dive plan ready before the skydive and stick to it!
6.
Count and assess the other jumpers on the load!
7.
Look before you jump!
8.
How many people are jumping out of the plane? Count these when open! What is the experience and wingloading
of the other jumpers? Ensure you don’t arrive at your landing pattern with a lot of other canopies, stay on brakes
if needed!
It’s your life, don’t trust other jumpers or the “light”.
Create your own space for your landing pattern!
So many skydivers spiral down erratically causing no end of problems for themselves and other jumpers. Watch
experienced jumpers in the air, most of their flight is conservative with very few spirals.