


")


 internet
 software
Similar presentations:


Cybersafety. Games. Localization
1. CyberSafety Games Localization
CONTENT:Materials
Localization steps
Localizing Maps
Localizing In-Game Slides
Localizing In-Game Texts
2. CyberSafety Game Materials are:
Maps and chipsGame Server
Materials used during the
training
Presentations shown to
people
3. Maps
3 mapsPrinted on A2
On a durable
material, like
film
4. CyberSafety Games Server
• Web-Server contain all the logics of the gameInfo-panel (visible to all teams)
Player’s panel
run on the players PC
Trainer Panel
to C&C the training
5.
Rules presentationShown to participants before and
after the gaming part
6.
In-Game SlidesShown to participants from the
CyberSafety Games server, during
the gaming part
7. Omega legend
Given to participants during thegame, as a hints for making bets
2-sided A4
8. Takeaways
Given to participants after thetraining
30-pages 2-sided A5 brochure
Co-Branded with the customer
name
9. Exercise materials
Given to participants during thetraining, to make exercises
Various size
Some materials are multiple-use,
made on durable materials,
some are given to participants to
retain and are on a plain paper
10. Localization
Keep the name “Kaspersky CyberSafetyGames” – it’s a brand.
Do not translate it.
11. Localization sequence
Translate Maps
–
–
Create online versions of Map and load into the CSGames server
Translate CSGames Rules presentation
Translate Slides from CSGames In-Game Slides
–
Training map
Office, Airport, Conference Room
and upload them into CSGames Server
Translate Messages in the CSGames Server
Translate Takeaways
Translate Omega Legend
Translate training materials:
–
–
–
Criminal plagues
Form 1 / Form2
Risk cards
12. Localizing CSGames Maps
Important notice:Players are 100% dependent on the content of the maps when
playing. If they can’t get the picture right, they lose the score and
get angry.
So every map should be 100% bullet-proof with each small detail
that can help players to understand where the threat is and why.
13. Names
• Change (not translate!) all names to typicallocal people names
– Keep the same names in Maps,
and in the Omega Legend
– Don’t‘ forget “small details” like
emails of people in the screenshots
and scenes
14. Screenshots
• Change realphishing/malicious emails
screenshots for the
same/similar examples of
malicious mails, etc – but in
the local language.
• Don’t translate screenshots,
use typical local malicious
examples
Use examples which match to the
“Red flags” on the corresponding
Slide from “InGame slides” (slide
23, suspicious email – signs for the
zone 11)
15. Change all non-Omega names mentioned on the Maps also
• Here “John Doe” standsfor English euphemism
of “non-existing
person”.
• Don’t translate /keep
“John Doe”
• Substitute with local
euphemism of “nonexisting person”
Same for zone9 – substitute “Henry Johnson” to illustrate that this is “known
person”. Refer to the corresponding “In-Game Slides” to learn what the picture
should demonstrate (Slides 1-2 “malicious email for zones 1-9)
16. Don’t loose the meaning when translating
• Zone 3 – its essential that itis a online game
championship, outside of
office hours, in the
computer club, outside of
office.
• Substitute the address
(Lexington st.) to be local,
but keep the meaning of the
whole zone
17. Production of Maps after localization
PRODUCTION OF MAPSAFTER LOCALIZATION
18. MAP elements
CanvasCanvas
Canvas
Canvas
Canvas
Main area with
all risk zones
Risk zones with
numbers
19. Output 1. Map for printing - no canvas, Marked risk zones, A2
Instruction:• Open document in .ai
• Make active Layer 1 and Layer 2
• Set centering A2 size paper in
Document Setup
• Save fragment in pdf or tiff
format for further printing
-
Print on A2 size
20. Output 2. Map for software - with Canvas but without risk zone markers (png)
4928Instruction:
• Open document in .ai
• Make active Layer 1 only
(but not Layer 2)
• Export file to Photoshop
• Set resolution 7366 x 4928
pixels
• Save in PNG format
7366
21. Upload Map to Server
• Upload PNG file• Set the “Margins” to be xxx
and yyy
• Verify the rectangle on the
screen includes all areas with
Zones, and not the “canvas
space” around it, where
there is a picture but no
meaningful zones.
22. Verify or Correct Zones on the maps
• Open each and every Zone ofthe Map
• Verify that Zone on the Maps
shows exactly in the same
place where the zone is on the
printed map.
• Modify the Zone coordinates
and sizes, if necessary
– Please ensure all zones are the
same size
• DO NOT MODIFY ANYTHING
ELSE IN THE ZONE FIELDS
23.
Making Slides for CyberSafetyGames
Translate
Upload to CSGames Server
Embed into the CSGames Takeaways
24.
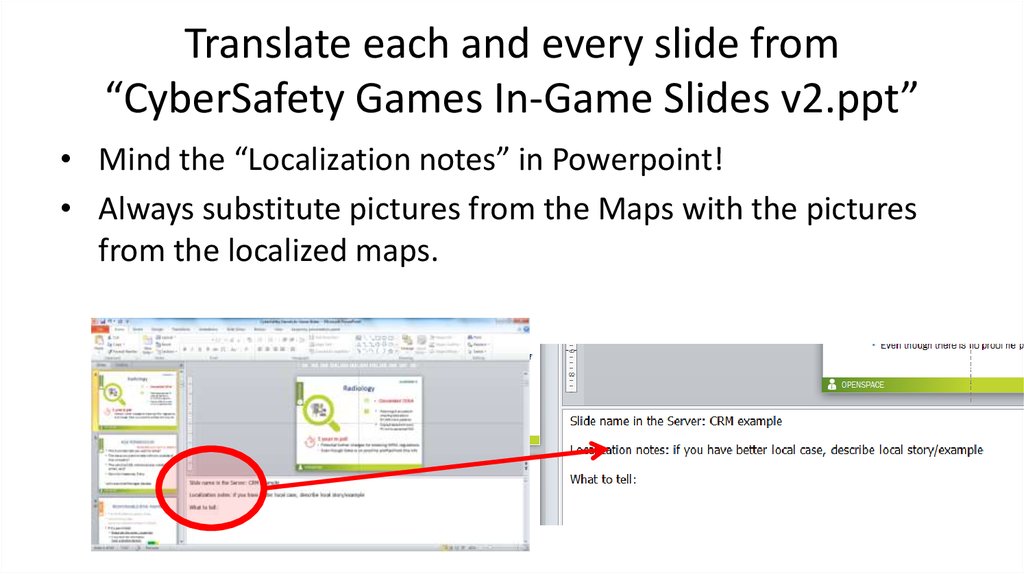
Translate each and every slide from“CyberSafety Games In-Game Slides v2.ppt”
• Mind the “Localization notes” in Powerpoint!
• Always substitute pictures from the Maps with the pictures
from the localized maps.
25.
• Save as PPT for future edits• Save As PNG
(choose “save Every slide” option, and set 220ppi resolution)
• Slides should be named SlideXX (1..63) (Powerpoint will do
it itself)
• Uploading slides into CSGames server
(see next pages)
26.
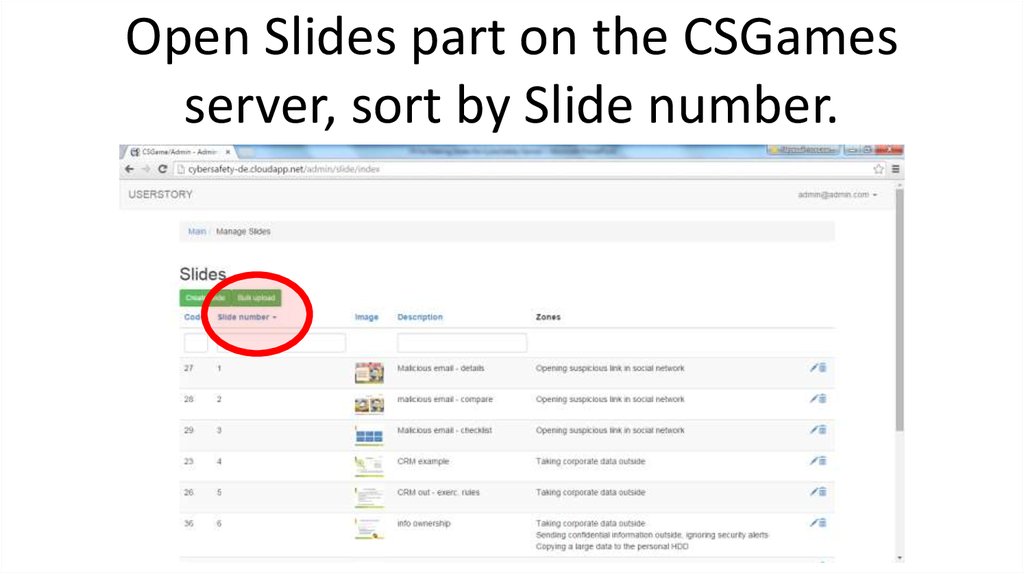
Open Slides part on the CSGamesserver, sort by Slide number.
27.
Open each Slidefor editing
• Note the slide
number XX
• Select the
corresponding
SlideXX PNG file
instead of English
image
• Do not edit anything
else in the Slide
record
• “Update”
28. Double-check yourself
• In the “In-Game Slides.PPT”,each slide is also marked
where it should go on the
CSGames server
• in Notes, read “Slide name
in the Server”.
• It should be the same, as
“Description” field of the
Slide on the CSGames
server
29.
Insert Slides texts into TakeawaysChange screenshots to
localized
Insert texts from slides
into “Title” and
“Checklists” of the
takeaways
30. Translate Messages in the CSGames Server
Substitute each and every textentry in the “Texts and
Settings” in the dedicated
CSGames server (“Value”
field)
Don’t change any other
parameters/settings
Do not change non-text
settings (like Colors, timers)
Do not change “Is language” field – keep it
blank
31. Translate Messages in the CSGames Server
Substitute each and everyeditable text field
for each and every Exercise in
the “Exercises” section of the
CSGames server
Don’t change any non-text
parameters, specially timers
32. Translate Messages in the CSGames Server
Open MapOpen each Zone for editing
Change the name of the Zone
for each and every Map (only
field “Situation description”)
Save
Don’t change any other
parameters
33. DO NOT EDIT THE FOLLOWING SERVER SECTIONS :
DO NOT EDIT THE FOLLOWING
SERVER SECTIONS :
Security Domains
Criminals
Sounds
Scenarios
Tickets
Basic settings
Generally, do not change any fields,
except texts and images
34. Testing your CSGames server localizations
• On the CyberSafety Games Server, open the Trainer’s panel• Use the Game named “Test Game” and Play it
• Then in TrainerView, open Team 1 (click on it to open in new window) and
Info panel (click on it to open new window)
• You are ready to see how your localization looks for the user
• Any time you can “restart the game” and start the testing over
35. Testing your CSGames server localizations
• Open trainer panel, run “Test Game”make each and every step by clicking
Next
• Look at what appears on the Team1
screen and on the Information screen
on each step of the training
• If you don’t like how your localization
work, open Administration panel,
and change relevant Texts, Exercise
texts, Slides, etc- and refresh Team1
and InfoPanel, and do this until you
are satisfied with the results.
36.
Thank you for your contributionVyacheslav.borilin@kaspersky.com
Please mind I am OOF
23.07 – 20.08.2015