Similar presentations:
Open WorkShop. Rhapsody in C++
1.
Open WorkShopRhapsody in C++ V7.1
Version May 07
© Telelogic 1999-2007
1
© Telelogic 1999-2007 Open WorkShop RiCpp 7.1 - Version May 2007
© Telelogic AB
2. Agenda
29:30 – 10:00
Install Rhapsody
10:00 – 10:30
Welcome & Introduction
10:30 – 11:00
MDD using UML and Rhapsody
11:00 – 12:00
Testing the Environment - “Hello World”
12:00 – 12:15
Coffee Break
12:15 – 13:30
Exercise: Building a Stopwatch
13:30 – 14:30
Lunch
14:30 – 16:00
Design, Relations, Building, Debugging
16:00 – 16:15
Coffee Break
16:15 – 17:00
Webify Toolkit, Threads, ReporterPLUS
17:00 – 18:00
Open Session / Questions & Answers
© Telelogic 1999-2007 Open WorkShop RiCpp 7.1 - Version May 2007
© Telelogic AB
3.
Install Rhapsody3
© Telelogic 1999-2007 Open WorkShop RiCpp 7.1 - Version May 2007
© Telelogic AB
4. Install Rhapsody
41.)
Insert the CD containing Rhapsody into your CD-ROM drive.
If your computer does not auto-run the Rhapsody installer, open an explorer window on your CD
drive and double-click on setup.exe.
2.)
For each installation page:
–
–
–
–
Welcome
License
Edition
Languages
click Next
click Yes if you agree with the terms
click Next for Development Edition
check “C++” (and “C”) and click Next
–
Environments
select your available environment (Visual Studio 6.0, .NET or Borland)
and press next
–
Acrobat Reader (opt.) your choice… and click Next
–
Destination
–
–
–
–
Add-on
check ReporterPlus and Gateway and click Next
Type
keep ‘Typical’ and click Next
Folder
click Next (i.e. Rhapsody)
Click the Finish button when done.
3.)
Rhapsody License:
–
Copy the file license.dat into the /Rhapsody/flexlm/ folder.
enter correct path(s) for environment(s) and install path and click Next
© Telelogic 1999-2007 Open WorkShop RiCpp 7.1 - Version May 2007
© Telelogic AB
5.
Welcome & Introduction5
© Telelogic 1999-2007 Open WorkShop RiCpp 7.1 - Version May 2007
© Telelogic AB
6. Welcome
6© Telelogic 1999-2007 Open WorkShop RiCpp 7.1 - Version May 2007
© Telelogic AB
7.
Telelogic I-Logix Today• Incorporated 1983/1988
• 1000+ employees worldwide
• Solutions for full Application Lifecycle Management
• Market Leader in Requirement Management Solutions
• Fastest Growing MDD Supplier
• Strong Professional services team
• 500.000+ users for Requirements and Modeling Solutions
7
© Telelogic 1999-2007 Open WorkShop RiCpp 7.1 - Version May 2007
© Telelogic AB
8. Telelogic I-Logix Leader in MDD
MDD DriverEstablished in 1983/1988
Modeling Experts since start-up
Major contributors to UML Standard
Public Company (Telelogic)
Technology
Leader
Behavioral Modeling and Validation
Design Level Debugging
Production Quality Code Generation
UML 2.0 – Realtime Focus
Design-for-Testability
1st choice in Embedded Market
Rhapsody growth 60% from 04 to 05
From small to large scale projects
Global operations, services, and
support
Market
Leader
8
© Telelogic 1999-2007 Open WorkShop RiCpp 7.1 - Version May 2007
© Telelogic AB
9. Embedded Software Development Efficiency
Specificationmodeling
Effort of
Embedded
Software
Development
Hand-written
application
Hand-written
application
Hand-written
application
Hand-written
application
MDD
with
Simulation,
Code
Generation
& Test
Hand-written
application
Commercial
RTOS
Yesterday
9
IDE/
Component
Middleware
IDE/
Component
Middleware
IDE/
Component
Middleware
Commercial
RTOS
Commercial
RTOS
Commercial
RTOS
Time
© Telelogic 1999-2007 Open WorkShop RiCpp 7.1 - Version May 2007
Today
© Telelogic AB
Integrated
MDD,
Component
Middleware
&
Test
Commercial
RTOS
10. Conceptual Collaboration in Text
Developer 1:“Ok. That’s what we need to do.
Thread A will pass event X to thread B and that will change B’s state
to Running from what it was before which was Idle. When B changes
to Running it will send back an event Y to A and then wait for 2
second and then go back to Idle. Thread A will have started in Idle
also and will go to Run after B sends back event Z which happens
after the 2 seconds before going to Idle. All this should happen in
less then 5 seconds.”
Developer 2:
“Huh ?”
10
© Telelogic 1999-2007 Open WorkShop RiCpp 7.1 - Version May 2007
© Telelogic AB
11. Conceptual Collaboration in MDD
Developer 1:“Here look at this
Sequence Diagram.”
Developer 2:
“Ahhh, now I see!”
11
© Telelogic 1999-2007 Open WorkShop RiCpp 7.1 - Version May 2007
© Telelogic AB
12.
Blank Page12
© Telelogic 1999-2007 Open WorkShop RiCpp 7.1 - Version May 2007
© Telelogic AB
13.
MDD using UML and Rhapsody13
© Telelogic 1999-2007 Open WorkShop RiCpp 7.1 - Version May 2007
© Telelogic AB
14. UML 2.0
UML2 - a common graphical language enabling conceptual collaborationClass
Diagrams
Structure
Diagrams
Package
Diagrams
Activity
Diagrams
Behavioral
Diagrams
Object
Diagrams
Structural
Diagrams
Deployment
Diagrams
Functional
Diagrams
Interaction
Diagrams
Component
Diagrams
Communication
Diagrams
14
Statechart
Diagrams
Sequence
Diagrams
Data Flow
Diagrams
Use Case
Diagrams
Timing
Diagrams
Interaction
Overview
Diagrams
© Telelogic 1999-2007 Open WorkShop RiCpp 7.1 - Version May 2007
© Telelogic AB
15. Class Diagram
Class diagrams show classes and relations between them.15
© Telelogic 1999-2007 Open WorkShop RiCpp 7.1 - Version May 2007
© Telelogic AB
16. Sequence Diagram
Sequence Diagrams show how instances communicate over time.16
© Telelogic 1999-2007 Open WorkShop RiCpp 7.1 - Version May 2007
© Telelogic AB
17. State Machine Diagram
State machines are used when we need to wait untilsomething happens before going to a different state.
17
© Telelogic 1999-2007 Open WorkShop RiCpp 7.1 - Version May 2007
© Telelogic AB
18. Diagrams to focus on
• The diagrams just shown are the ones focused on during thispresentation and demo.
• They are enough to develop complete programs but for your
understanding of the other UML diagrams some of them have been
added in the next couple of slides.
18
© Telelogic 1999-2007 Open WorkShop RiCpp 7.1 - Version May 2007
© Telelogic AB
19. Use Case Diagram
This diagram shows what the system does and who uses it.19
© Telelogic 1999-2007 Open WorkShop RiCpp 7.1 - Version May 2007
© Telelogic AB
20. Structure Diagram
This diagram shows the internal structure of classes.20
© Telelogic 1999-2007 Open WorkShop RiCpp 7.1 - Version May 2007
© Telelogic AB
21. Activity Diagram
Activity diagrams are used to describe behaviour for operations,classes or use cases. As soon as one activity finishes the next one
starts.
21
© Telelogic 1999-2007 Open WorkShop RiCpp 7.1 - Version May 2007
© Telelogic AB
22. Package Diagram
A package is similar to a folder and is used to organise theUML model elements.
22
© Telelogic 1999-2007 Open WorkShop RiCpp 7.1 - Version May 2007
© Telelogic AB
23. Component Diagram
A component diagram shows how components such as .exe’s,.dll’s, .lib’s, etc are interconnected.
23
© Telelogic 1999-2007 Open WorkShop RiCpp 7.1 - Version May 2007
© Telelogic AB
24. Deployment Diagram
A Deployment Diagram shows how UML artefacts aredeployed onto hardware nodes.
24
© Telelogic 1999-2007 Open WorkShop RiCpp 7.1 - Version May 2007
© Telelogic AB
25. Rhapsody’s key enabler
Fully functionalCode Generation
Seamless Reuse
Of IP
Real-Time
Framework
25
Model
Execution
Model
Driven
Development
with UML
Dynamic
Model-Code
Associativity
© Telelogic 1999-2007 Open WorkShop RiCpp 7.1 - Version May 2007
© Telelogic AB
26. Executable Models
You can’t test what you can’t execute!• The best way to avoid having bugs is to not introduce
them to the system
• Rapid execution at the design level
– incrementally construct your system
– remove bugs easily and quickly in each phase
• Automate Testing using your Standard UML
Requirements Artifacts
– Use Analysis scenarios to drive
execution and validate results
26
© Telelogic 1999-2007 Open WorkShop RiCpp 7.1 - Version May 2007
© Telelogic AB
27. Dynamic Model-Code Associativity
Code is another view of the
model
Dynamic bi-directional
synchronization of model & code
Model & code always in sync
• Direct reflection of model
domain into the code
• Flexibility without separation
of model & code
27
Increases productivity
© Telelogic 1999-2007 Open WorkShop RiCpp 7.1 - Version May 2007
© Telelogic AB
28. Real-Time Frameworks
Rhapsody provides an executable real-time framework• Most applications are over 50% “housekeeping code” which is
redeveloped every time you create a system
• A framework is a partially completed application
– you customize and specialize for your application
• A real-time framework is an
– integrated set of design patterns
– optimized for embedded applications
Legacy
Code
Generated Code
Generated Code
Real-Time Framework
Windows
RTOS
VxWorks
Nucleus
IDF
CPU
28
© Telelogic 1999-2007 Open WorkShop RiCpp 7.1 - Version May 2007
© Telelogic AB
29. Seamless Reuse of Existing IP
Rhapsody can incorporate code developed outside of the toolas part of the modeled application
• Such code can be:
– Viewed externally (code visualization)
• Provides easy referencing from the model
• Automatically allows graphical visualization of your IP
• Seamless workflow between model and hand-written code
– Automatically reverse engineered to become part of the model!
Legacy
Code
Generated Code
Real-Time Framework
RTOS
29
© Telelogic 1999-2007 Open WorkShop RiCpp 7.1 - Version May 2007
© Telelogic AB
30. DFT - Model Execution
• Execute the model tovalidate that code is
correct . . . on both the
host and the target
• Rapid execution to
incrementally construct
system and validate it as
it’s built
– Reduces errors &
therefore reduces
development cost
30
© Telelogic 1999-2007 Open WorkShop RiCpp 7.1 - Version May 2007
© Telelogic AB
31. Open Solution
Test• Configuration Management
– Any SCC compliant tool
• Requirements Traceability
– DOORS
• RTOS IDEs
- RequisitePRO
– MULTI (Green Hills)
– Tornado (WindRiver)
Documentation
HMI
- pRISM (WindRiver)
- Visual Studio
• Operating Systems (Sample)
• Documentation
– Word/Framemaker/HTML/rtf/plain text/PowerPoint
• Test
– Cantata (IPL)
– TestBed (LDRA)
• Real Time Analysis
– RapidRMA (Tri-Pacific)
• Continuous Modeling
– Simulink (Mathworks)
31
Rhapsody
Requirements Analysis
VxWorks
- WindowsCE
OSE Delta
- LynxOS
QNX Neutrino - Solaris
Red Hat
- MontaVista
INTEGRITY
- No Operating System
Configuration Management
–
–
–
–
–
Compilers
OSs
- Labview (NI)
Pushbutton
CORBA and COM
support
COM
© Telelogic 1999-2007 Open WorkShop RiCpp 7.1 - Version May 2007
CORBA
© Telelogic AB
32. Storyboard
• Rhapsody has been installed, now let’s start with our WorkShop …– Exercise 1: Testing the environment with a simple Hello World
– Exercise 2: Building a StopWatch:
• Architecture
• Statecharts
• Flowcharts
• Design Level Debugging
• Object Collaboration (Relations, Sequence Diagrams etc)
• Webify-Toolkit
• Threads
• ReporterPLUS
32
© Telelogic 1999-2007 Open WorkShop RiCpp 7.1 - Version May 2007
© Telelogic AB
33.
Testing the Environment“Hello World”
33
© Telelogic 1999-2007 Open WorkShop RiCpp 7.1 - Version May 2007
© Telelogic AB
34. Creating a Project
• Start up Rhapsody in C++ (development edition)• Within Rhapsody use the icon or file->new to create a new
project called HelloWorld in the directory C:\Work
• Click OK then Yes to save project
Make sure that the project is saved into the subdirectory
with the same name “HelloWorld” in directory C:\Work
34
© Telelogic 1999-2007 Open WorkShop RiCpp 7.1 - Version May 2007
© Telelogic AB
35. The Browser
BrowserObject
Model
Diagram
Output Window
The browser shows us everything that is in the model.
Note that Rhapsody creates an Object Model Diagram
35
© Telelogic 1999-2007 Open WorkShop RiCpp 7.1 - Version May 2007
© Telelogic AB
36. Renaming our OMD
• Expand the Object Model Diagrams in the browser.• Right-click on “Model1” and open the Diagrams feature dialog
• Use the features dialog to rename the diagram from Model1 to
“Overview”
36
© Telelogic 1999-2007 Open WorkShop RiCpp 7.1 - Version May 2007
© Telelogic AB
37. Drawing a Class
• In this Object Model Diagram, use the class iconto draw a class
named World
Expand the browser to see that the class “World” also
appears in the browser
37
© Telelogic 1999-2007 Open WorkShop RiCpp 7.1 - Version May 2007
© Telelogic AB
38. Remove from View / Delete from Model
• There are two ways of deleting a class, wecan either remove the class from the view
(this is what the “delete” key does) or we
can delete the class from the model.
• If we use the delete key or the menu
“Remove from View” then the class World
is just removed from this diagram, but
remains in the browser.
• If we select “Delete from Model” then we
must confirm with “Yes” in order to remove
the class from the entire model.
38
© Telelogic 1999-2007 Open WorkShop RiCpp 7.1 - Version May 2007
© Telelogic AB
39. Adding a Constructor
• The simplest way to add a constructor is toright click on our class and choose “New
Constructor”.
• We don’t need any constructor arguments,
so click “OK” to the following menu.
Constructors may also be added by going through the features
“Operations” tab. Just click on <New> and select “Constructor”.
39
© Telelogic 1999-2007 Open WorkShop RiCpp 7.1 - Version May 2007
© Telelogic AB
40. World Constructor
• We should be able to see that the constructor is now shown in boththe browser and the OMD (Object Model Diagram)
Constructor
40
© Telelogic 1999-2007 Open WorkShop RiCpp 7.1 - Version May 2007
© Telelogic AB
41. Adding an Implementation
• Select the World constructor in the browser and double-click to openthe features window.
• Select the implementation tab and enter the following:
cout << “Hello World” << endl;
If you want to
close the window by clicking
on the
then make sure
that you “Apply” the
changes first.
41
© Telelogic 1999-2007 Open WorkShop RiCpp 7.1 - Version May 2007
© Telelogic AB
42. #include <iostream>
#include <iostream>• Since we have used “cout”, we must
do an include of the “iostream”
header in our World class.
• In the browser, select the World
class and double-click to bring up the
features.
• Select the Properties tab (ensure
that the “Common” filter is selected
and enter <iostream> into the
“ImpIncludes” property.
“ImpIncludes” is an abbreviation for Implementation Includes
42
© Telelogic 1999-2007 Open WorkShop RiCpp 7.1 - Version May 2007
© Telelogic AB
43. Renaming a Component
• In order to generate code, we must first create a component.• Expand the components in the browser and rename the existing
component called DefaultComponent to Test.
Executable
43
© Telelogic 1999-2007 Open WorkShop RiCpp 7.1 - Version May 2007
© Telelogic AB
44. The Test Component
• Now expand the “Configurations” and rename the DefaultConfig toRelease
44
© Telelogic 1999-2007 Open WorkShop RiCpp 7.1 - Version May 2007
© Telelogic AB
45. Initial Instance
• Select the Initializationtab, expand the Default
package and select the
World class.
• This means that the
main will now create an
initial instance of the
World class.
45
© Telelogic 1999-2007 Open WorkShop RiCpp 7.1 - Version May 2007
© Telelogic AB
46. Setting
• Configure your model to use theappropriate compiler
• We need to select an
environment so that Rhapsody
knows how to create an
appropriate Make file and how
to compile the application
• Select the Settings tab
• Select QNX63_x86 as
environment
We’ll explain the many other settings later
46
© Telelogic 1999-2007 Open WorkShop RiCpp 7.1 - Version May 2007
© Telelogic AB
47. Generating Code
• We’re now ready to generate code and run theapplication.
Make sure that your target is running
• Save the model
• Select Generate/Make/Run
• Answer Yes to the question:
If there was a compilation
error during compilation, then
simply double-click on the error and
Rhapsody will indicate where in the
model the error occurred.
47
© Telelogic 1999-2007 Open WorkShop RiCpp 7.1 - Version May 2007
© Telelogic AB
48. Hello World
• After build a CMD window opensautomtically showing that the application
is transfered to the target.
• In the virtual Neutrino target you should
see the following message appearing in a
Terminal window
• Before continuing make sure that you stop the executable by closing
the Terminal window on the target
48
© Telelogic 1999-2007 Open WorkShop RiCpp 7.1 - Version May 2007
© Telelogic AB
49. The Generated Files
• The generated files will be located in the following directory:Display class
Main
Makefile
Executable
49
© Telelogic 1999-2007 Open WorkShop RiCpp 7.1 - Version May 2007
© Telelogic AB
50. Editing the Code
• We can edit the generated files from withinRhapsody.
• Select the World class, right-click and select
“Edit Code”.
• Both the implementation (.cpp) and specification (.h) are shown in
tabbed windows.
50
© Telelogic 1999-2007 Open WorkShop RiCpp 7.1 - Version May 2007
© Telelogic AB
51. Modifying the Code
• We can modify the generated code:• In the World.cpp file, change the implementation to print out
“Constructed” instead of “Hello World”
• Transfer the focus back to another window to roundtrip the
modifications back into the model
• Note that the model has been updated automatically
In general, the roundtriping works very well, but beware not
everything can be roundtriped!
51
© Telelogic 1999-2007 Open WorkShop RiCpp 7.1 - Version May 2007
© Telelogic AB
52. Displaying the Main and Make
• The Main and Make file can be displayed from withinRhapsody by simply double clicking on the hyperlinks
underneath the release configuration.
52
© Telelogic 1999-2007 Open WorkShop RiCpp 7.1 - Version May 2007
© Telelogic AB
53. Project Files
AutoSaveThe model
Generated code
Rhapsody Workspace
Visual Basic Macros
53
© Telelogic 1999-2007 Open WorkShop RiCpp 7.1 - Version May 2007
© Telelogic AB
54. Adding Helper Application to Rhapsody Menu
• We can customise Rhapsody to allow us to get quick access to thelocation of current project
• Select “Customize…” in the Tools menu
54
© Telelogic 1999-2007 Open WorkShop RiCpp 7.1 - Version May 2007
© Telelogic AB
55. Customize Menu Content
• Use the iconto enter
a new entry “Explore” to
the Tools menu.
• Set the Command to
“explorer.exe”
• Set Arguments to “.”
• Click “OK”
55
© Telelogic 1999-2007 Open WorkShop RiCpp 7.1 - Version May 2007
© Telelogic AB
56. Launch Tool
• Now go to the “Tools” menu and select the new entry “Explore”• You’re automatically placed into your working directory
56
© Telelogic 1999-2007 Open WorkShop RiCpp 7.1 - Version May 2007
© Telelogic AB
57.
Building a StopWatch57
© Telelogic 1999-2007 Open WorkShop RiCpp 7.1 - Version May 2007
© Telelogic AB
58. Stopwatch Requirements
• To get familiar with the fundamentals of Rhapsody we will build asimple StopWatch model which is part of a Radio-Stop Watch
System:
– The Stop Watch has a single button to start and stop and a display. The
stopwatch displays minutes and seconds
– Every time the button is pressed and released within two seconds then
the stopwatch is started/stopped
– However if the button is held pressed for longer than two seconds then
the stopwatch is reset to 0 and stopped
58
© Telelogic 1999-2007 Open WorkShop RiCpp 7.1 - Version May 2007
© Telelogic AB
59. Copying a Project
• We will reuse our HelloWorld Project for this:• In Rhapsody select “File->Save As”
• Press to select the work folder
• Press to create a new folder
• Rename “New Folder” to “StopWatch”
• Double click the new folder “StopWatch”
• Save the project as StopWatch.rpy
• The new StopWatch project is opened in Rhapsody with the previous
workspace preserved
Each time there is auto-save,
Rhapsody will only save just what has
changed since the last auto-save.
59
© Telelogic 1999-2007 Open WorkShop RiCpp 7.1 - Version May 2007
© Telelogic AB
60.
Blank Page60
© Telelogic 1999-2007 Open WorkShop RiCpp 7.1 - Version May 2007
© Telelogic AB
61. Designing the StopWatch
Designing the StopWatch61
© Telelogic 1999-2007 Open WorkShop RiCpp 7.1 - Version May 2007
© Telelogic AB
62. Adding Attributes minutes and seconds
• Rename the World Class to Timer• To add an attribute double-click on the Timer class to bring up the
features and select the “Attributes” tab
• Click on <New> to add an attribute minutes and seconds of type int
• Set the initial value to 0
62
© Telelogic 1999-2007 Open WorkShop RiCpp 7.1 - Version May 2007
© Telelogic AB
63. Adding Operations
• Using the features for the Timer class, select the operations tab andadd a new “Primitive Operation” called tick and timerReset
63
© Telelogic 1999-2007 Open WorkShop RiCpp 7.1 - Version May 2007
© Telelogic AB
64. Display Options
• We would expect to see the Attributes andOperations shown on the class on our Object Model
Diagram.
• We can control what gets displayed on this view of
the class using the “Display Options”.
• Right-click on the Timer class and select “Display
Options”, set the options to display “All” attributes
and “All” operations.
64
© Telelogic 1999-2007 Open WorkShop RiCpp 7.1 - Version May 2007
© Telelogic AB
65. Timer Initializer
• We should be able to see that the operations and attributes are nowshown in both the browser and the OMD (Object Model Diagram)
65
© Telelogic 1999-2007 Open WorkShop RiCpp 7.1 - Version May 2007
© Telelogic AB
66. Adding an Implementation
• Select the Timer timerReset() operation in the browser and doubleclick to open the features window• Select the implementation tab and enter the following:
minutes=0;
seconds=0;
If you want to
close the window by clicking
on the
then make sure
that you “Apply” the
changes first.
66
© Telelogic 1999-2007 Open WorkShop RiCpp 7.1 - Version May 2007
© Telelogic AB
67. Using Active Code Viewer
• Choose View->Active Code View (or press ALT + 2) and a littlewindow will appear down in the bottom left corner.
• In the browser click on the minutes attribute and you will see that the
window shows the code for it
• This is a code editor that tracks your movements and shows code
whenever appropriate for both the C++ and header files.
Active Code View
67
© Telelogic 1999-2007 Open WorkShop RiCpp 7.1 - Version May 2007
© Telelogic AB
68. Active Code View #2
• Select the Timer.cpp file• To get line numbers right click in the code window and choose Properties.
• Under Line Numbering in the “Misc” tab choose Decimal and 1
68
© Telelogic 1999-2007 Open WorkShop RiCpp 7.1 - Version May 2007
© Telelogic AB
69. Adding Code to the tick() operation
• We want to add the code below to the tick operation.• We will do this directly in the code window rather than the feature dialog like we
did earlier.
• Type in s and then hit Ctrl-Space. This brings up our IntelliVisor with options of
model elements you can select - choose seconds (Select with Tab or mouse
click)
• After this, type in the rest of the code as it is listed below.
• Then press Ctrl-S to save this source file.
• Make sure to add this code between the lines with the //#
69
© Telelogic 1999-2007 Open WorkShop RiCpp 7.1 - Version May 2007
© Telelogic AB
70. Roundtripping
• Whenever you click somewhere outside the editor window, this codenow gets dynamically brought back into the Rhapsody Model
70
© Telelogic 1999-2007 Open WorkShop RiCpp 7.1 - Version May 2007
© Telelogic AB
71. Adding a New Operation show
• In Active Code View click Timer.hto open the specification file
• Underneath the operation timerReset() type void show(); in the code to
add a new operation show() and press CTRL+S
• The new operation show gets dynamically brought
into the model
71
© Telelogic 1999-2007 Open WorkShop RiCpp 7.1 - Version May 2007
© Telelogic AB
72. Implement show() Operation
• Select the show operation in the browser and double-click to openthe features window.
• Select the implementation tab and enter the following:
Or you type the code
into the implementation file
72
© Telelogic 1999-2007 Open WorkShop RiCpp 7.1 - Version May 2007
© Telelogic AB
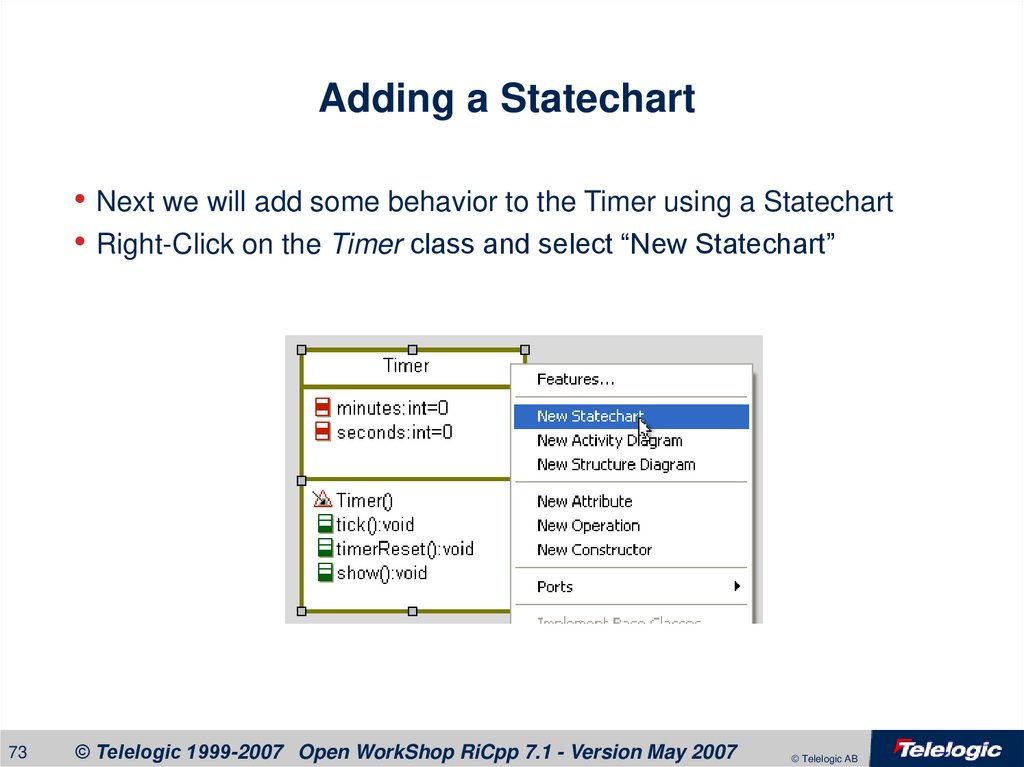
73. Adding a Statechart
• Next we will add some behavior to the Timer using a Statechart• Right-Click on the Timer class and select “New Statechart”
73
© Telelogic 1999-2007 Open WorkShop RiCpp 7.1 - Version May 2007
© Telelogic AB
74. Very Simple Statechart
• Draw the following Statechart:actions
default transition
timeout
state
transition
You will find more information about how to type the
transition text on the next slide
74
© Telelogic 1999-2007 Open WorkShop RiCpp 7.1 - Version May 2007
© Telelogic AB
75. Transitions
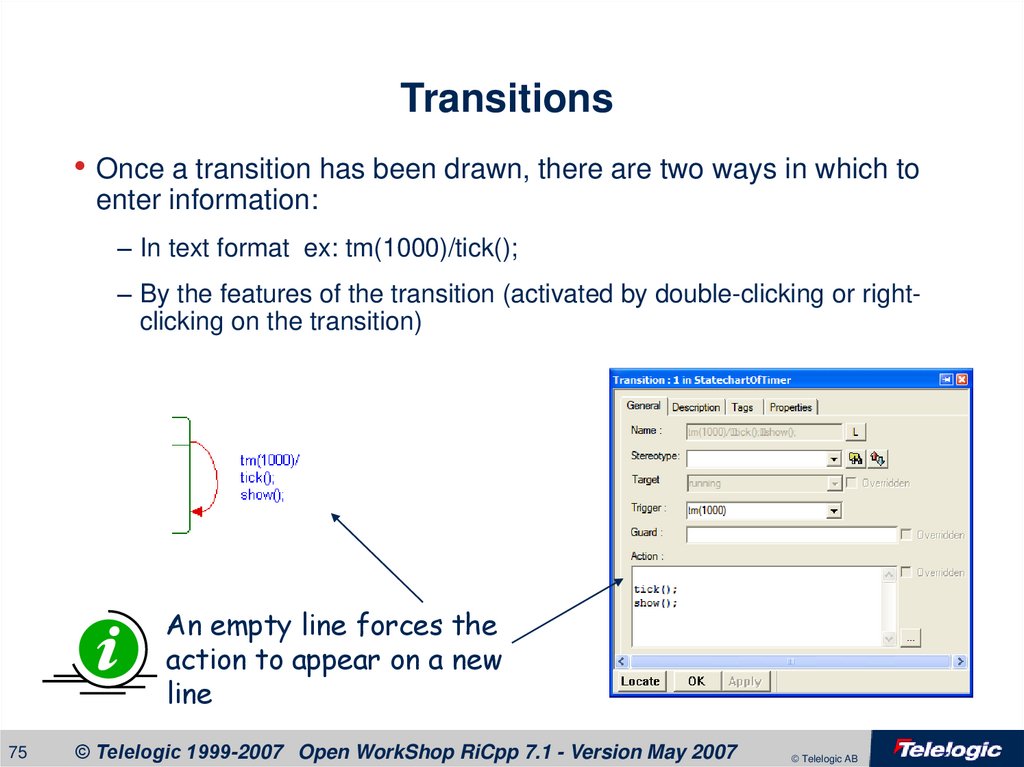
• Once a transition has been drawn, there are two ways in which toenter information:
– In text format ex: tm(1000)/tick();
– By the features of the transition (activated by double-clicking or rightclicking on the transition)
An empty line forces the
action to appear on a new
line
75
© Telelogic 1999-2007 Open WorkShop RiCpp 7.1 - Version May 2007
© Telelogic AB
76. The Timer Mechanism
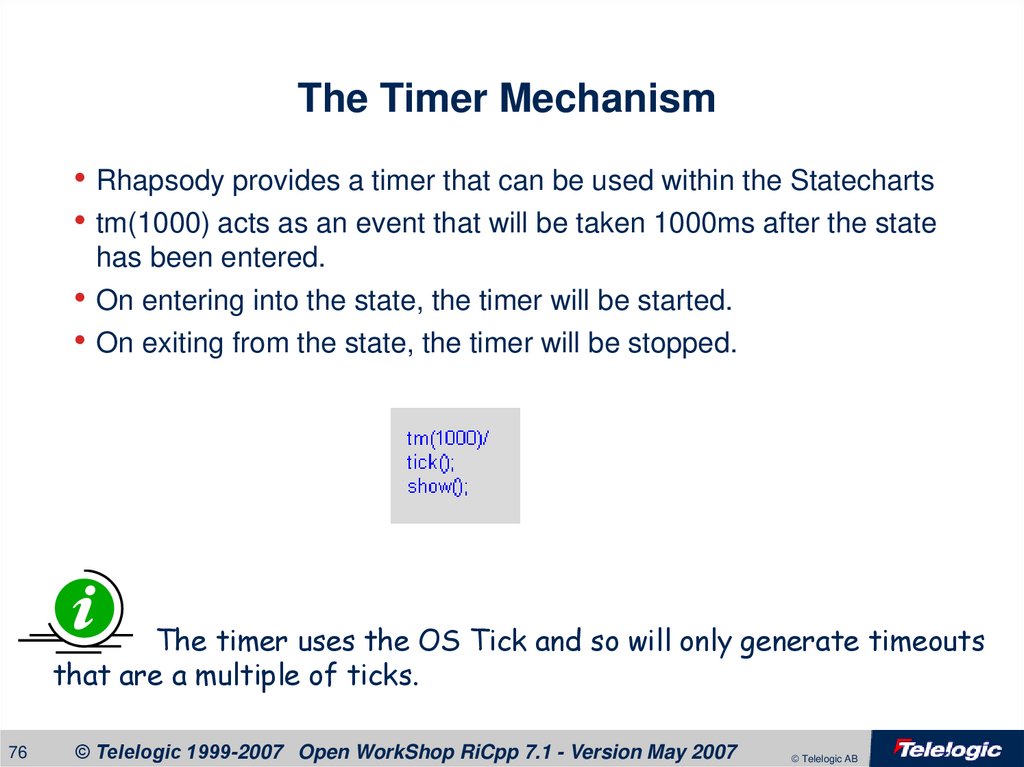
• Rhapsody provides a timer that can be used within the Statecharts• tm(1000) acts as an event that will be taken 1000ms after the state
has been entered.
• On entering into the state, the timer will be started.
• On exiting from the state, the timer will be stopped.
The timer uses the OS Tick and so will only generate timeouts
that are a multiple of ticks.
76
© Telelogic 1999-2007 Open WorkShop RiCpp 7.1 - Version May 2007
© Telelogic AB
77. Statechart Symbol
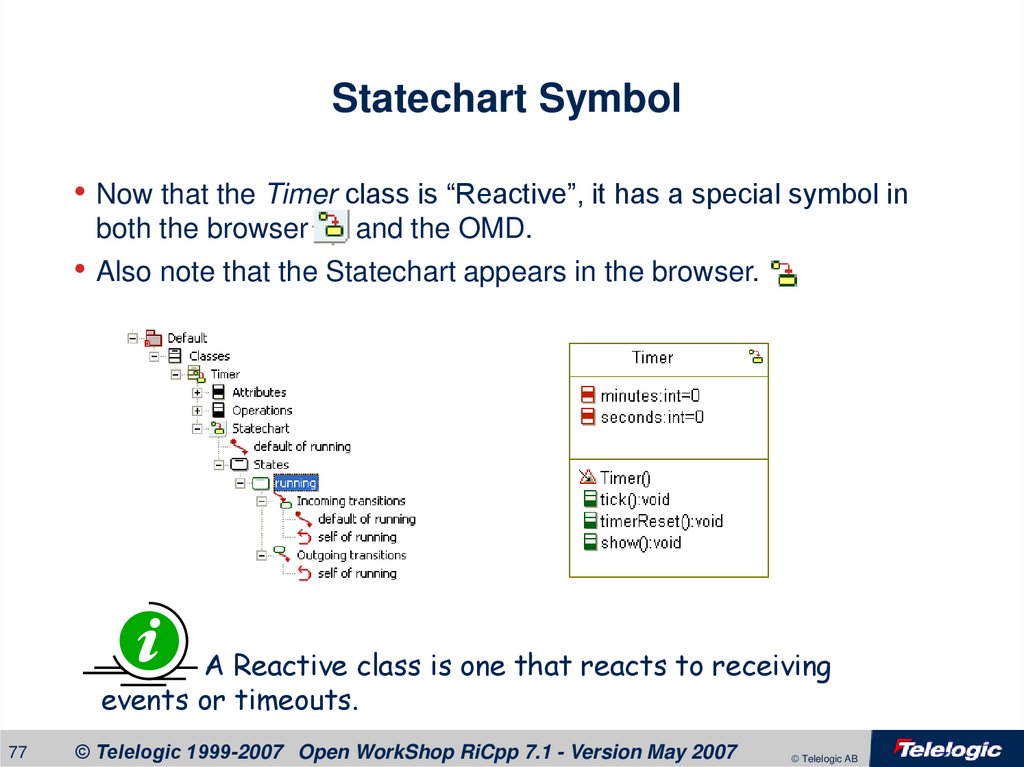
• Now that the Timer class is “Reactive”, it has a special symbol inboth the browser
and the OMD.
• Also note that the Statechart appears in the browser.
A Reactive class is one that reacts to receiving
events or timeouts.
77
© Telelogic 1999-2007 Open WorkShop RiCpp 7.1 - Version May 2007
© Telelogic AB
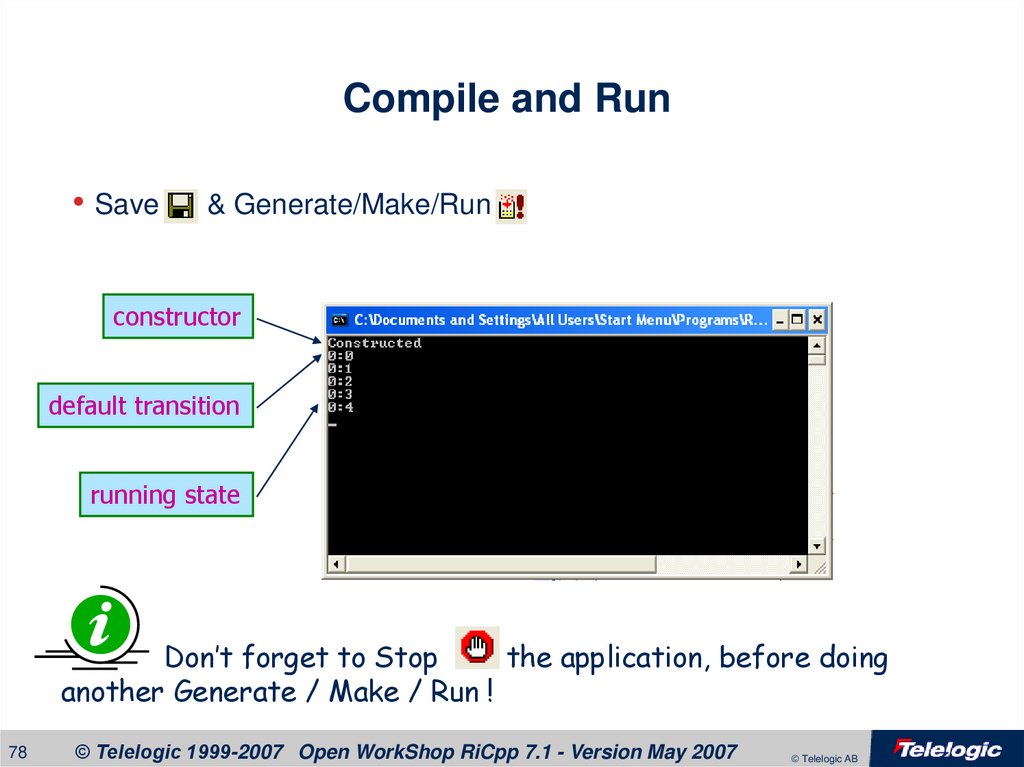
78. Compile and Run
• Save& Generate/Make/Run
constructor
default transition
running state
Don’t forget to Stop
the application, before doing
another Generate / Make / Run !
78
© Telelogic 1999-2007 Open WorkShop RiCpp 7.1 - Version May 2007
© Telelogic AB
79. Extending the Statechart
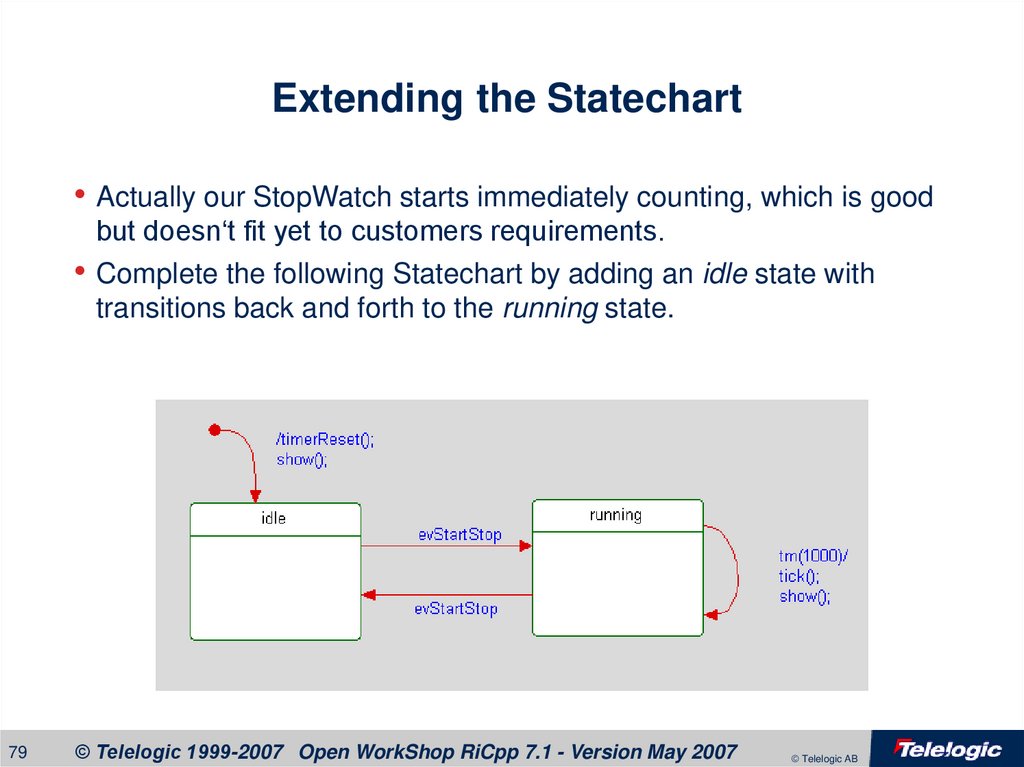
• Actually our StopWatch starts immediately counting, which is goodbut doesn‘t fit yet to customers requirements.
• Complete the following Statechart by adding an idle state with
transitions back and forth to the running state.
79
© Telelogic 1999-2007 Open WorkShop RiCpp 7.1 - Version May 2007
© Telelogic AB
80. Extended Exercise: Flowcharts
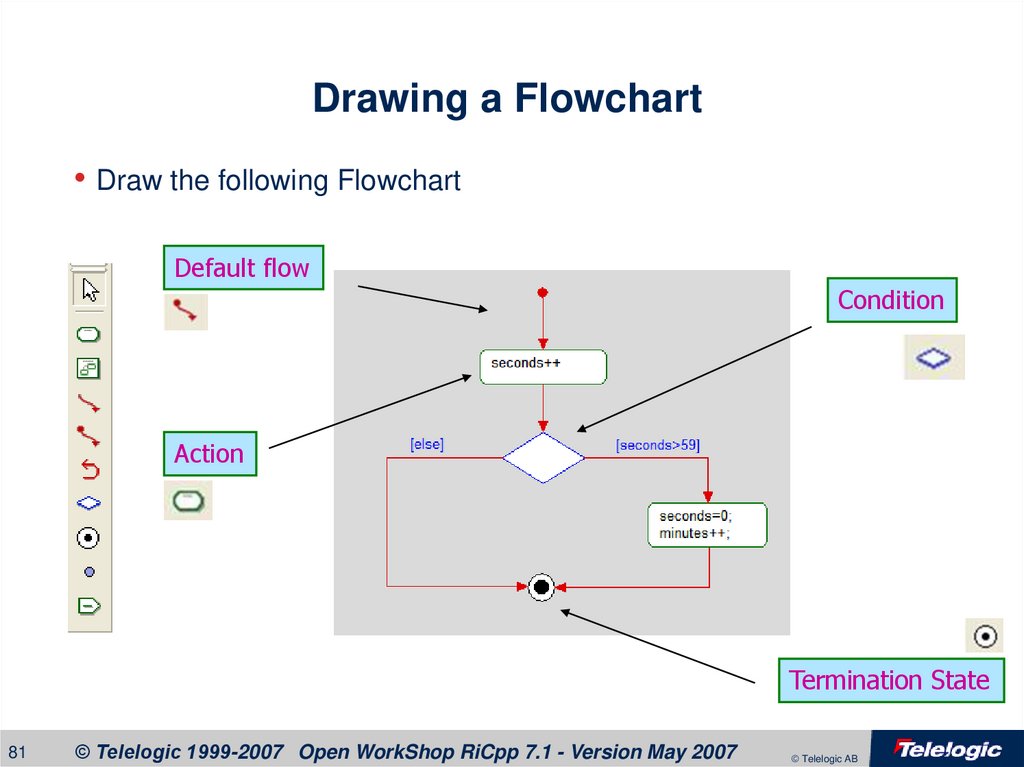
• A flowchart is the classic way programmers draw a schematicrepresentation of an algorithm or a process.
• In UML/Rhapsody flowcharts can be seen as a subset of activity
diagrams defined on methods and functions.
• Instead of typing this algorithm, we
could also represent it as a
flowchart:
seconds++;
if (seconds>59)
seconds=0;
minutes++;
{
}
• Right click on the operation tick() in the Timer Class and add a
Flowchart.
80
© Telelogic 1999-2007 Open WorkShop RiCpp 7.1 - Version May 2007
© Telelogic AB
81. Drawing a Flowchart
• Draw the following FlowchartDefault flow
Condition
Action
Termination State
81
© Telelogic 1999-2007 Open WorkShop RiCpp 7.1 - Version May 2007
© Telelogic AB
82. Generated Code
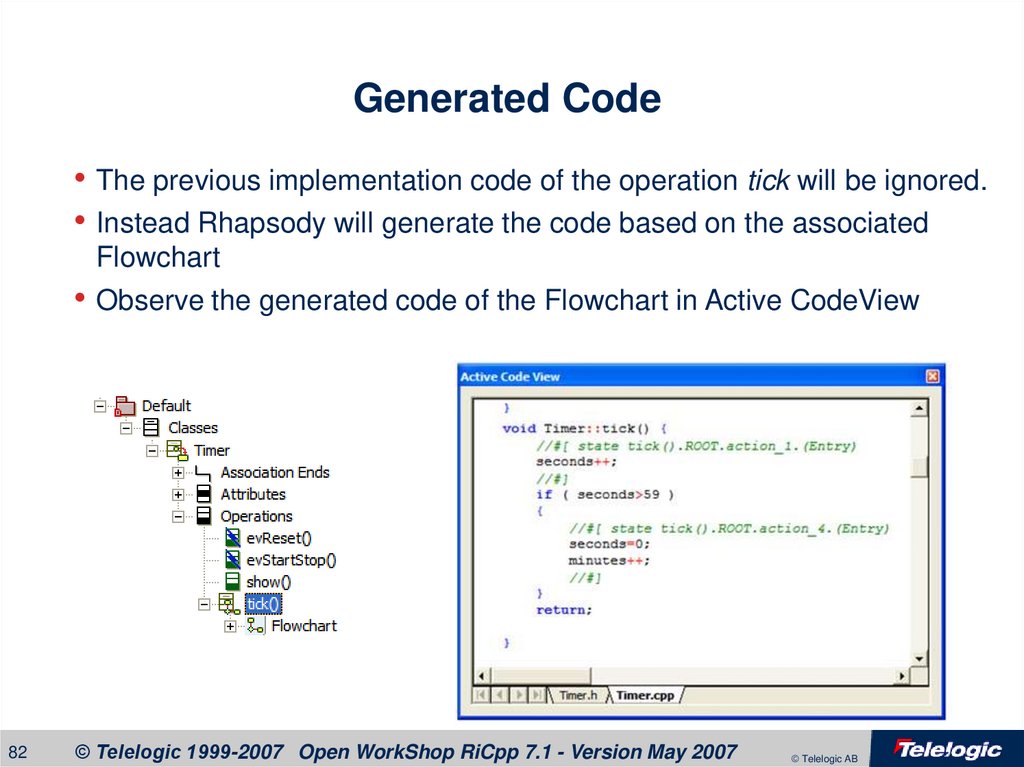
• The previous implementation code of the operation tick will be ignored.• Instead Rhapsody will generate the code based on the associated
Flowchart
• Observe the generated code of the Flowchart in Active CodeView
82
© Telelogic 1999-2007 Open WorkShop RiCpp 7.1 - Version May 2007
© Telelogic AB
83.
Design Level Debugging83
© Telelogic 1999-2007 Open WorkShop RiCpp 7.1 - Version May 2007
© Telelogic AB
84. Design Level Debugging
• Up to now we have generated code and executed it, hoping that itworks! However as the model gets more and more complicated we
need to validate the model
• From now on we are going to validate our model by doing design
level debugging, this is known as “Animation”
84
© Telelogic 1999-2007 Open WorkShop RiCpp 7.1 - Version May 2007
© Telelogic AB
85. Animation
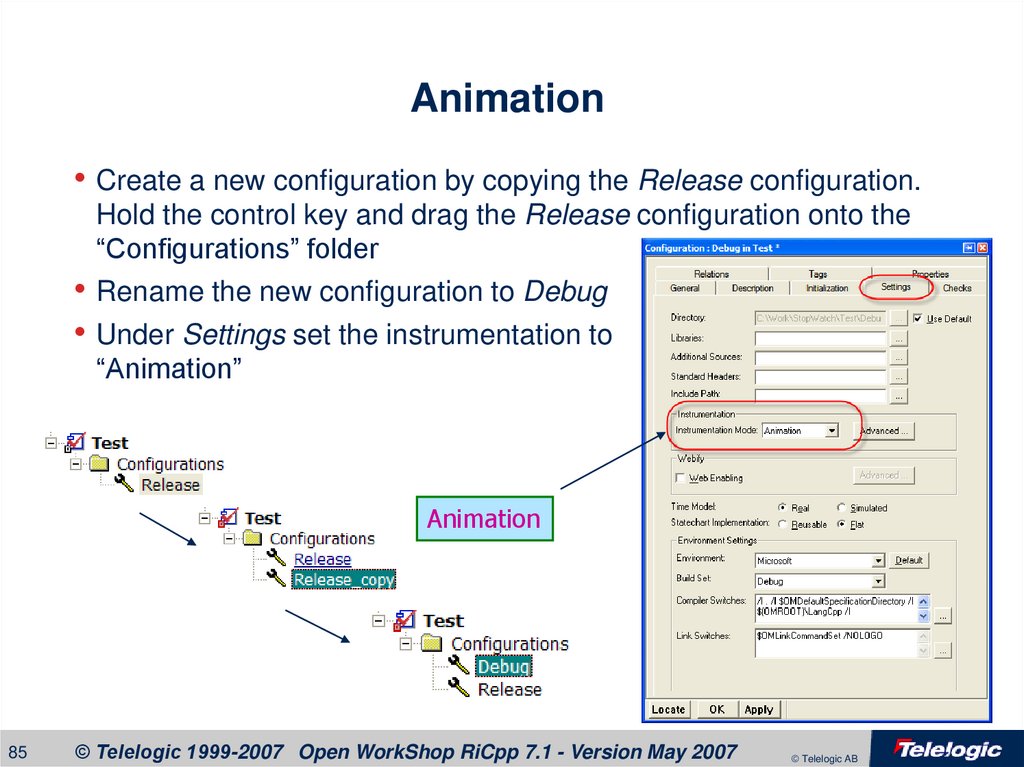
• Create a new configuration by copying the Release configuration.Hold the control key and drag the Release configuration onto the
“Configurations” folder
• Rename the new configuration to Debug
• Under Settings set the instrumentation to
“Animation”
Animation
85
© Telelogic 1999-2007 Open WorkShop RiCpp 7.1 - Version May 2007
© Telelogic AB
86. Multiple Configurations
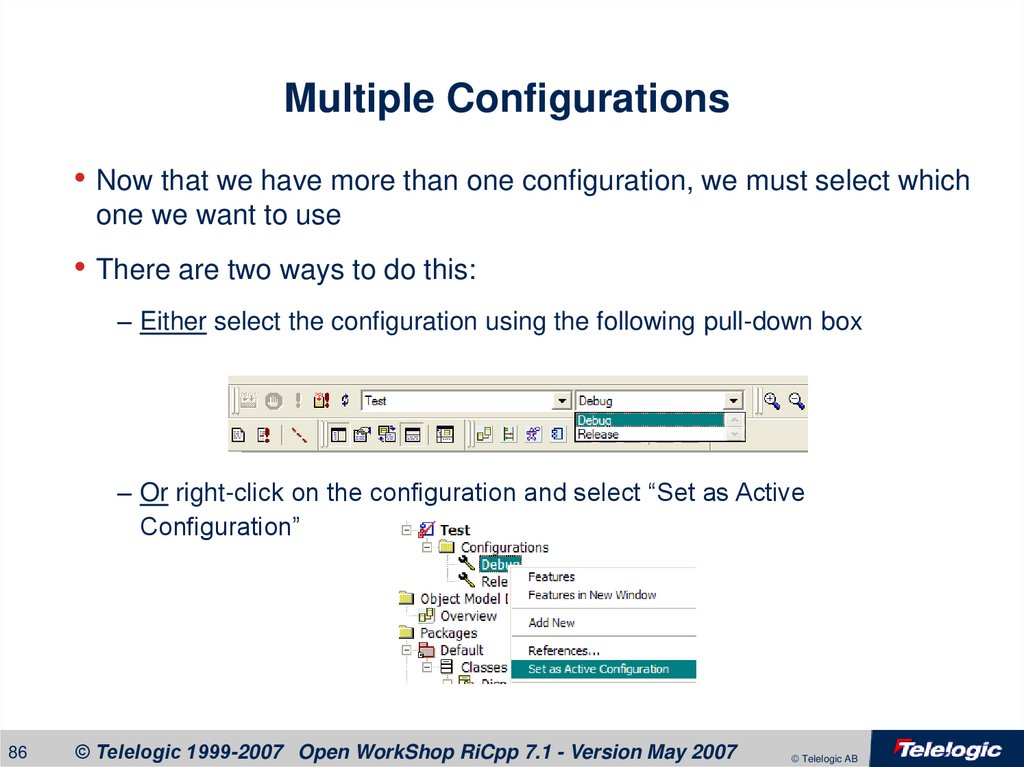
• Now that we have more than one configuration, we must select whichone we want to use
• There are two ways to do this:
– Either select the configuration using the following pull-down box
– Or right-click on the configuration and select “Set as Active
Configuration”
86
© Telelogic 1999-2007 Open WorkShop RiCpp 7.1 - Version May 2007
© Telelogic AB
87. Animating
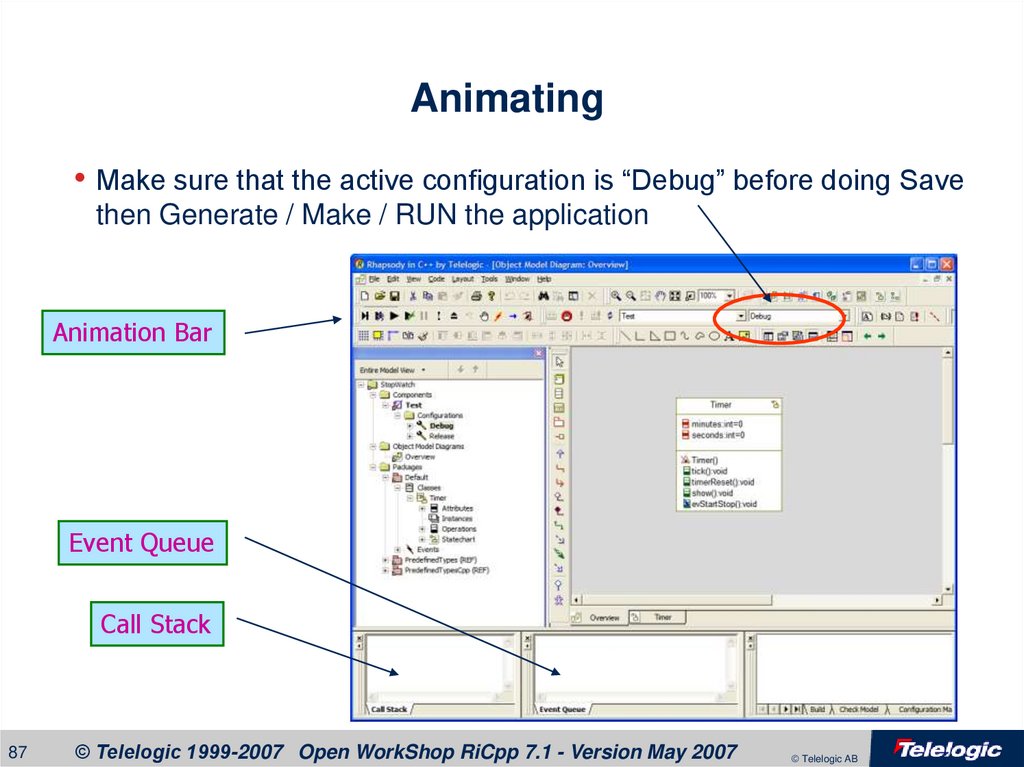
• Make sure that the active configuration is “Debug” before doing Savethen Generate / Make / RUN the application
Animation Bar
Event Queue
Call Stack
87
© Telelogic 1999-2007 Open WorkShop RiCpp 7.1 - Version May 2007
© Telelogic AB
88. Animation Tool Bar
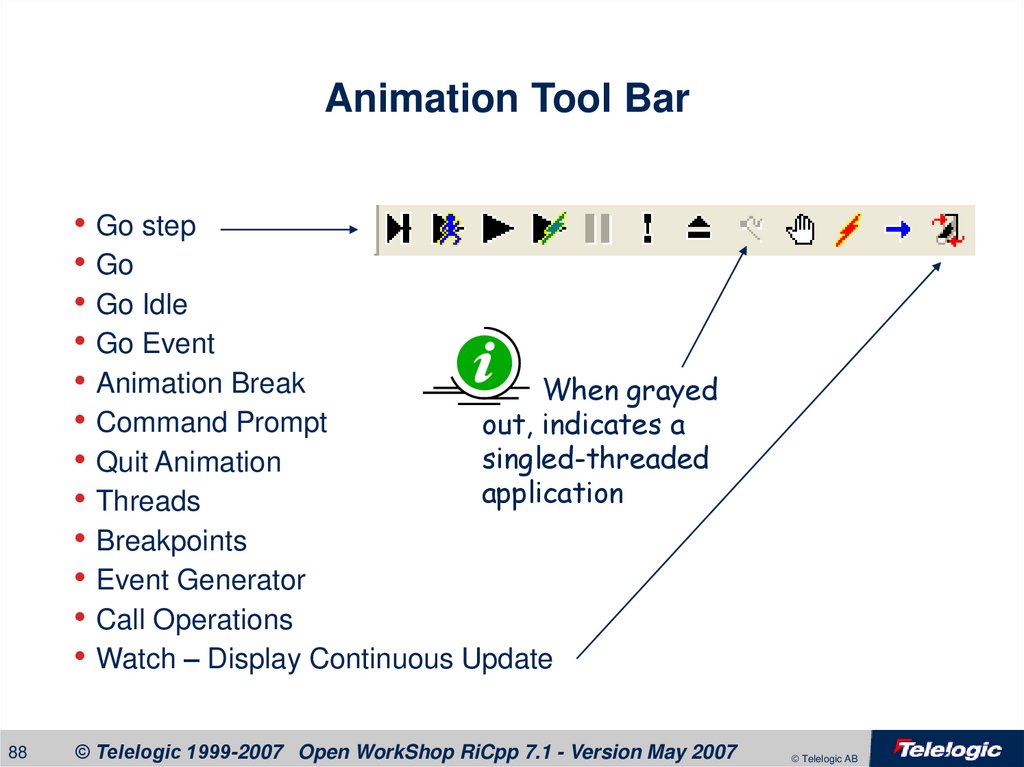
• Go step• Go
• Go Idle
• Go Event
• Animation Break
When grayed
• Command Prompt
out, indicates a
singled-threaded
• Quit Animation
application
• Threads
• Breakpoints
• Event Generator
• Call Operations
• Watch – Display Continuous Update
88
© Telelogic 1999-2007 Open WorkShop RiCpp 7.1 - Version May 2007
© Telelogic AB
89. Animated Browser
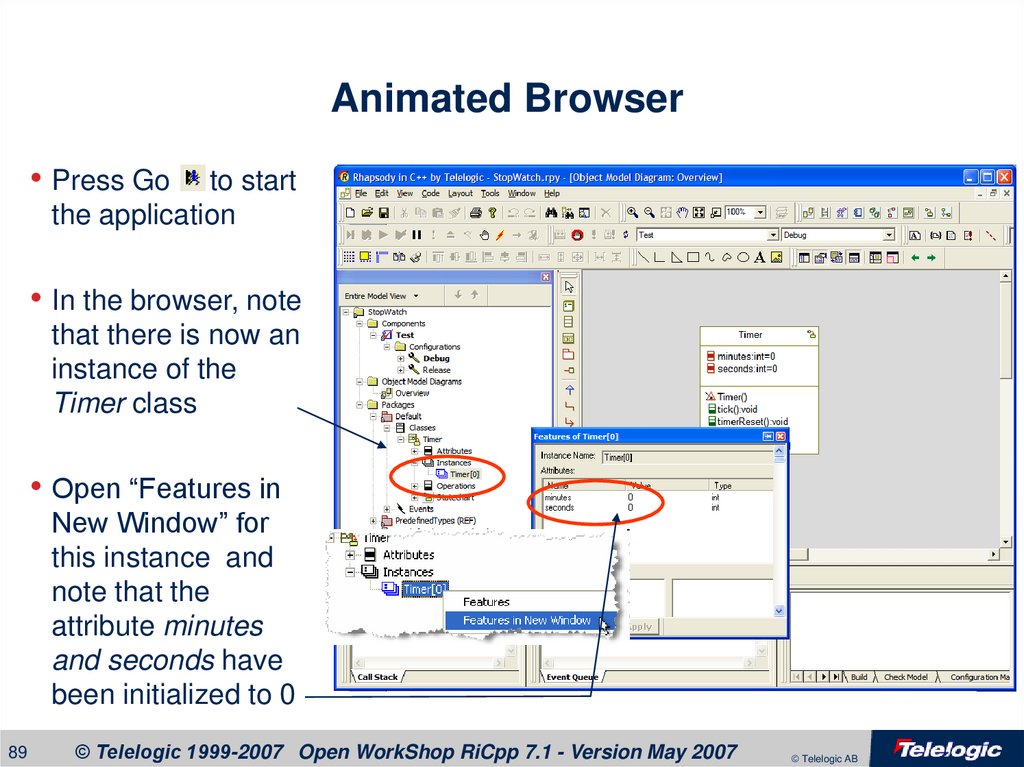
• Press Goto start
the application
• In the browser, note
that there is now an
instance of the
Timer class
• Open “Features in
New Window” for
this instance and
note that the
attribute minutes
and seconds have
been initialized to 0
89
© Telelogic 1999-2007 Open WorkShop RiCpp 7.1 - Version May 2007
© Telelogic AB
90. Animated Statechart
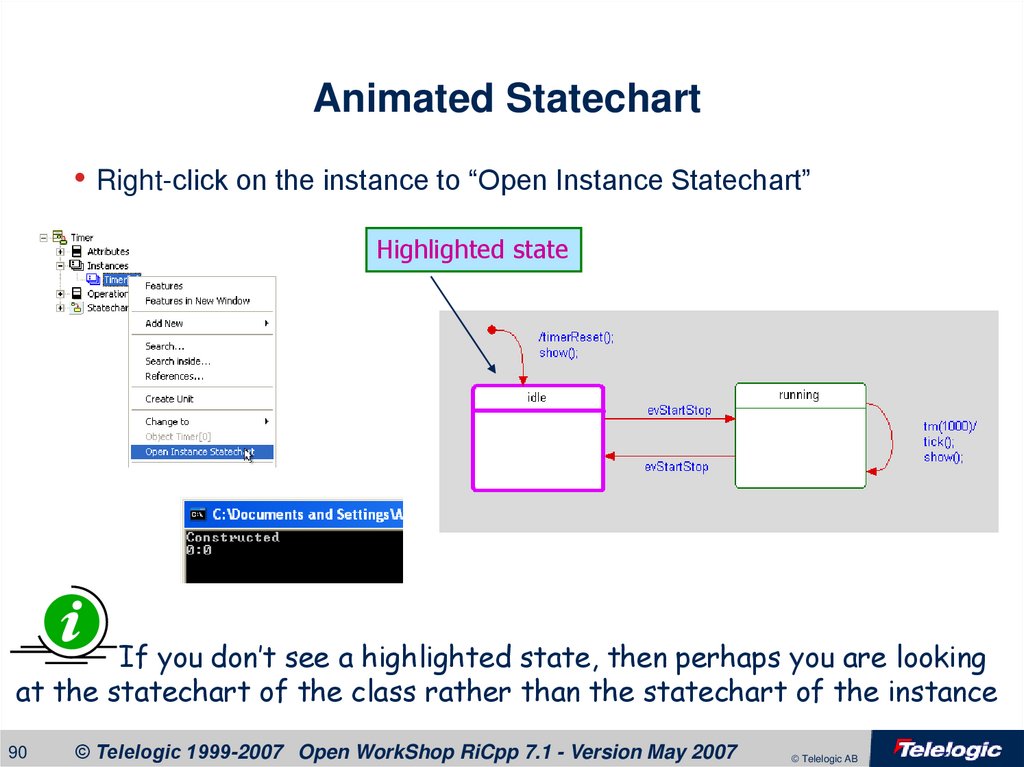
• Right-click on the instance to “Open Instance Statechart”Highlighted state
If you don’t see a highlighted state, then perhaps you are looking
at the statechart of the class rather than the statechart of the instance
90
© Telelogic 1999-2007 Open WorkShop RiCpp 7.1 - Version May 2007
© Telelogic AB
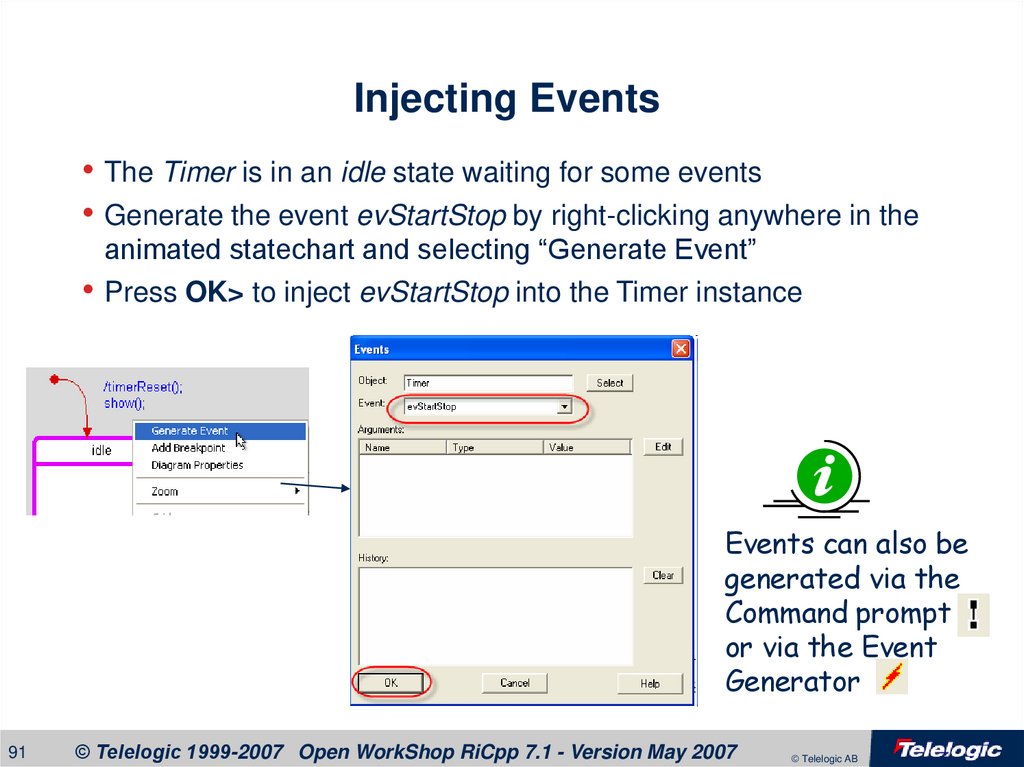
91. Injecting Events
• The Timer is in an idle state waiting for some events• Generate the event evStartStop by right-clicking anywhere in the
animated statechart and selecting “Generate Event”
• Press OK> to inject evStartStop into the Timer instance
Events can also be
generated via the
Command prompt
or via the Event
Generator
91
© Telelogic 1999-2007 Open WorkShop RiCpp 7.1 - Version May 2007
© Telelogic AB
92. Go Idle / Go
• Watch how the state changes and that the Timer starts countingNote that the
value of the attribute
minutes and seconds also
changes and that the
transition taken in the
statechart is highlighted
92
© Telelogic 1999-2007 Open WorkShop RiCpp 7.1 - Version May 2007
© Telelogic AB
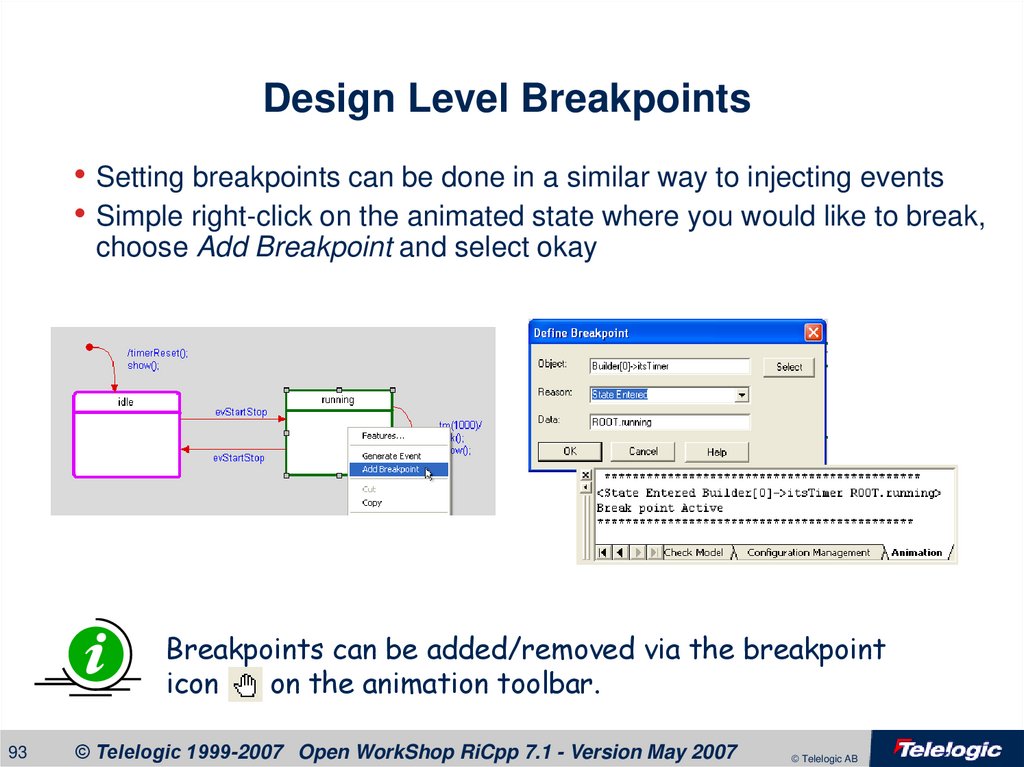
93. Design Level Breakpoints
• Setting breakpoints can be done in a similar way to injecting events• Simple right-click on the animated state where you would like to break,
choose Add Breakpoint and select okay
Breakpoints can be added/removed via the breakpoint
icon
on the animation toolbar.
93
© Telelogic 1999-2007 Open WorkShop RiCpp 7.1 - Version May 2007
© Telelogic AB
94.
Blank Page94
© Telelogic 1999-2007 Open WorkShop RiCpp 7.1 - Version May 2007
© Telelogic AB
95.
Collaboration95
© Telelogic 1999-2007 Open WorkShop RiCpp 7.1 - Version May 2007
© Telelogic AB
96. Association
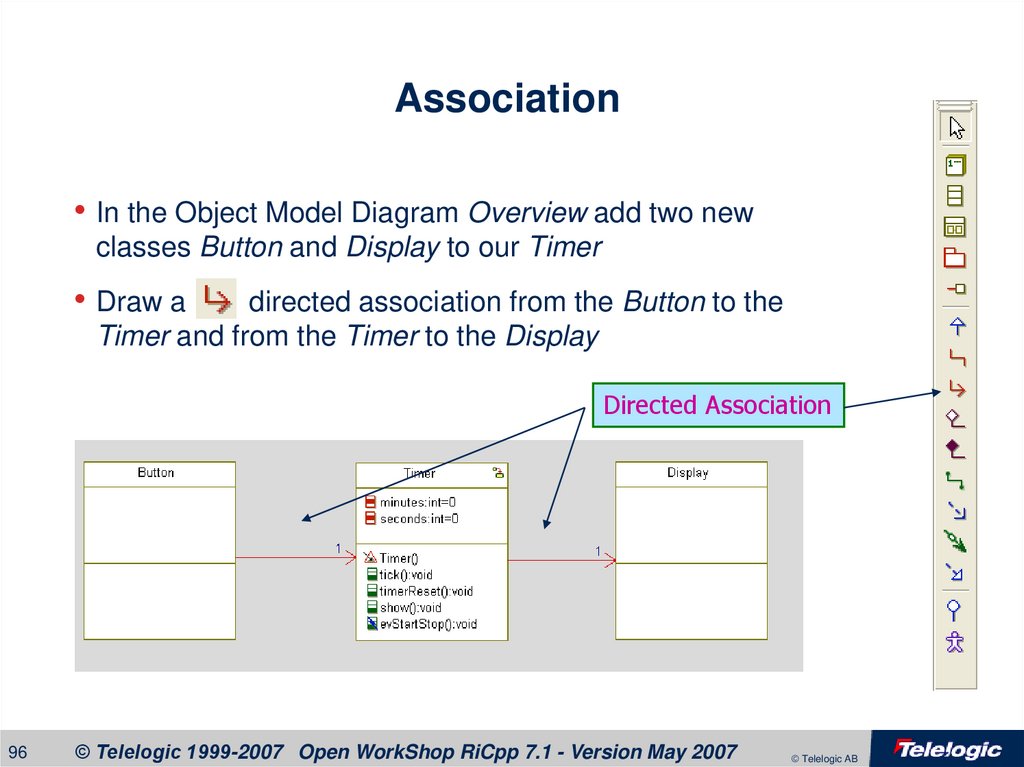
• In the Object Model Diagram Overview add two newclasses Button and Display to our Timer
• Draw a
directed association from the Button to the
Timer and from the Timer to the Display
Directed Association
96
© Telelogic 1999-2007 Open WorkShop RiCpp 7.1 - Version May 2007
© Telelogic AB
97. Role Names
• Using the “Display Options”, display the role names (Name) for bothassociations
The role name ex: itsDisplay is the name by which the Timer
knows the Display. This name will appear in the generated code. The
association name however is rarely used and for association
itsDisplay, might be set to something such as “displays” instead
97
© Telelogic 1999-2007 Open WorkShop RiCpp 7.1 - Version May 2007
© Telelogic AB
98. itsDisplay
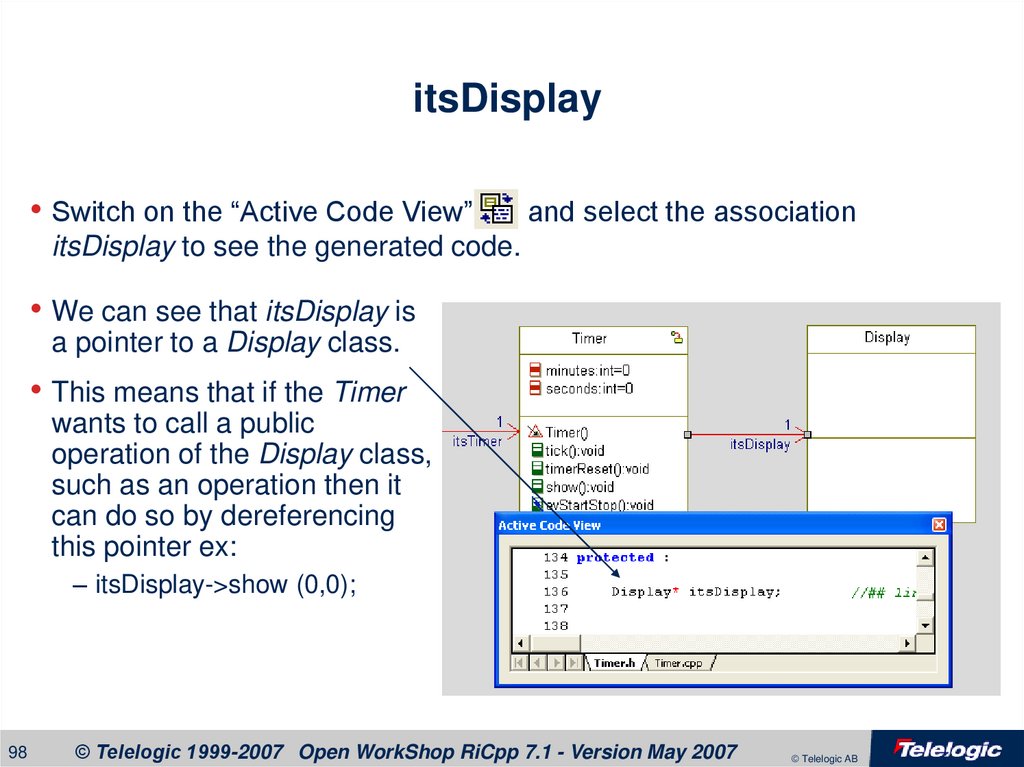
• Switch on the “Active Code View”and select the association
itsDisplay to see the generated code.
• We can see that itsDisplay is
a pointer to a Display class.
• This means that if the Timer
wants to call a public
operation of the Display class,
such as an operation then it
can do so by dereferencing
this pointer ex:
– itsDisplay->show (0,0);
98
© Telelogic 1999-2007 Open WorkShop RiCpp 7.1 - Version May 2007
© Telelogic AB
99. Scenarios
Let’s go into detail how the System shall collaborate.
For example we could look at the following scenarios:
One very popular way to specify a system and the system
collaboration is by defining Scenarios with in a Sequence Diagram
1. Starting and stopping the StopWatch every time the button is pressed
and released within two seconds
2. Reset StopWatch to 0 if the button is held pressed for longer than two
seconds
99
© Telelogic 1999-2007 Open WorkShop RiCpp 7.1 - Version May 2007
© Telelogic AB
100. Scenario: Selecting products
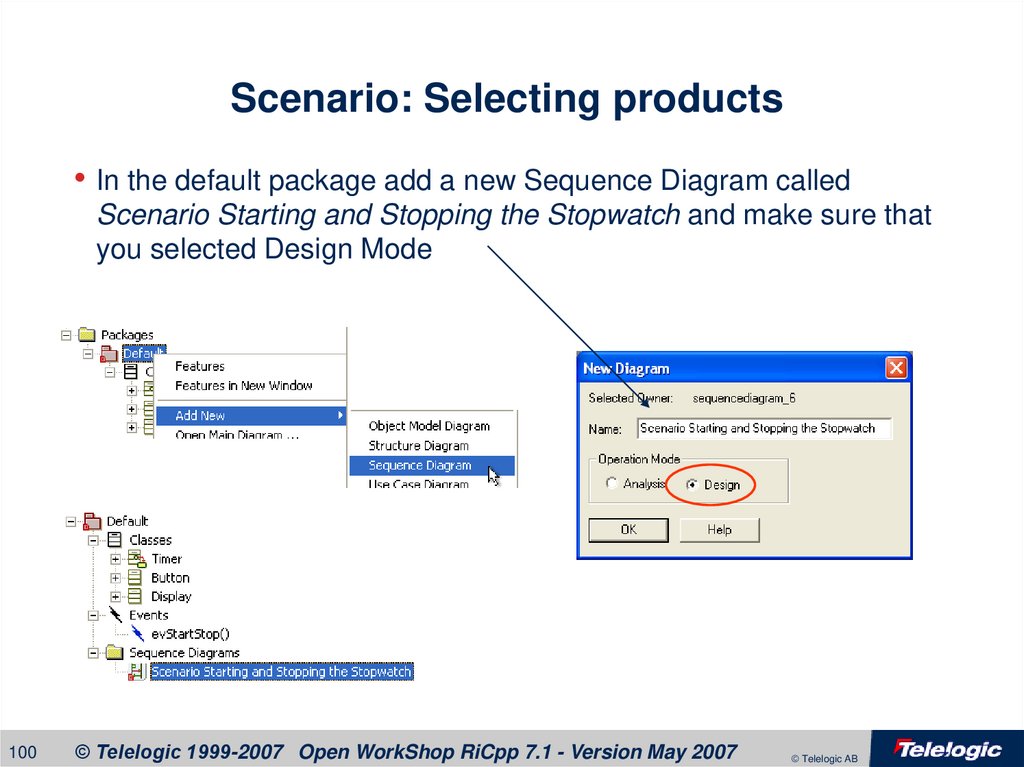
• In the default package add a new Sequence Diagram calledScenario Starting and Stopping the Stopwatch and make sure that
you selected Design Mode
100
© Telelogic 1999-2007 Open WorkShop RiCpp 7.1 - Version May 2007
© Telelogic AB
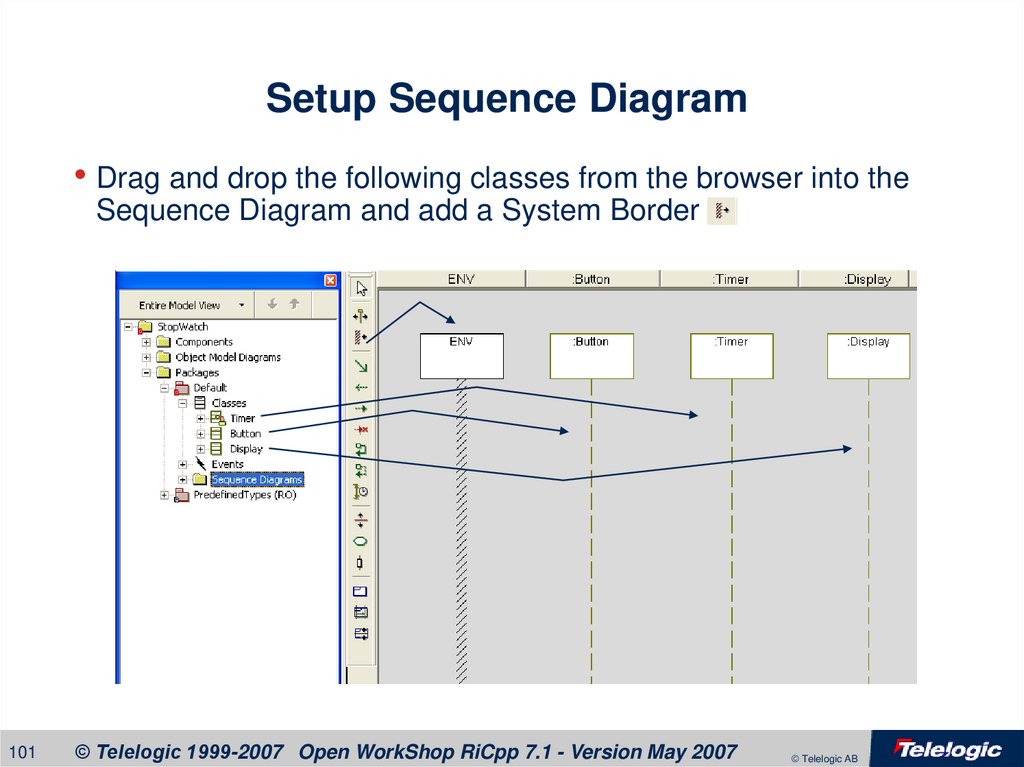
101. Setup Sequence Diagram
• Drag and drop the following classes from the browser into theSequence Diagram and add a System Border
101
© Telelogic 1999-2007 Open WorkShop RiCpp 7.1 - Version May 2007
© Telelogic AB
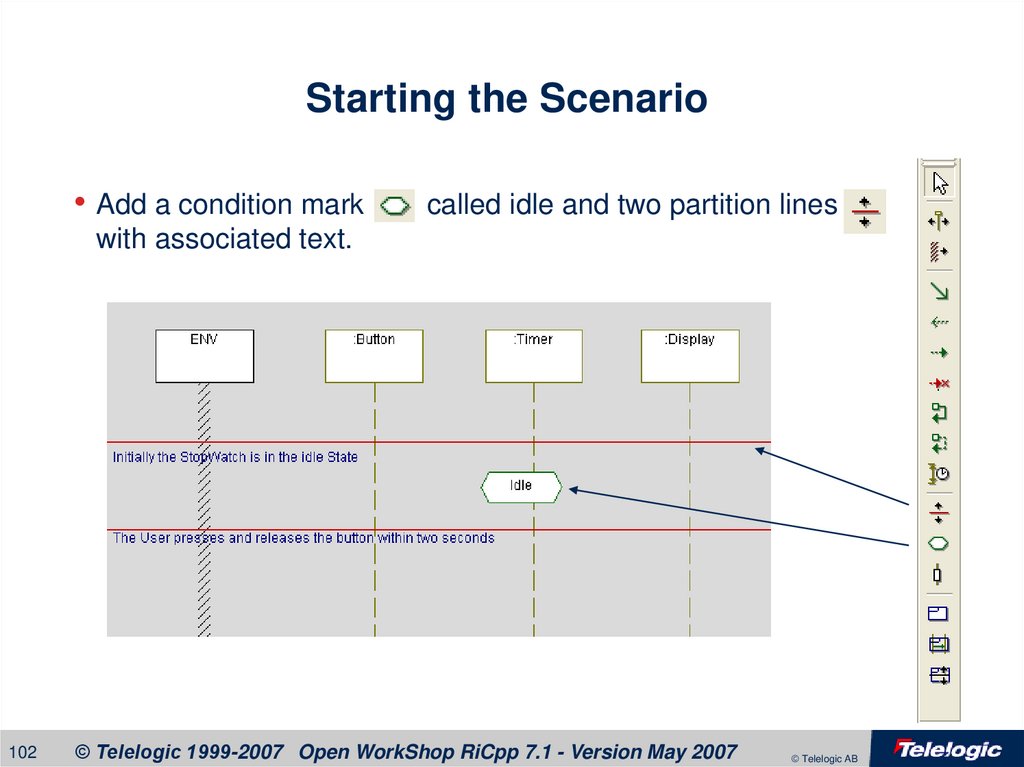
102. Starting the Scenario
• Add a condition markcalled idle and two partition lines
with associated text.
102
© Telelogic 1999-2007 Open WorkShop RiCpp 7.1 - Version May 2007
© Telelogic AB
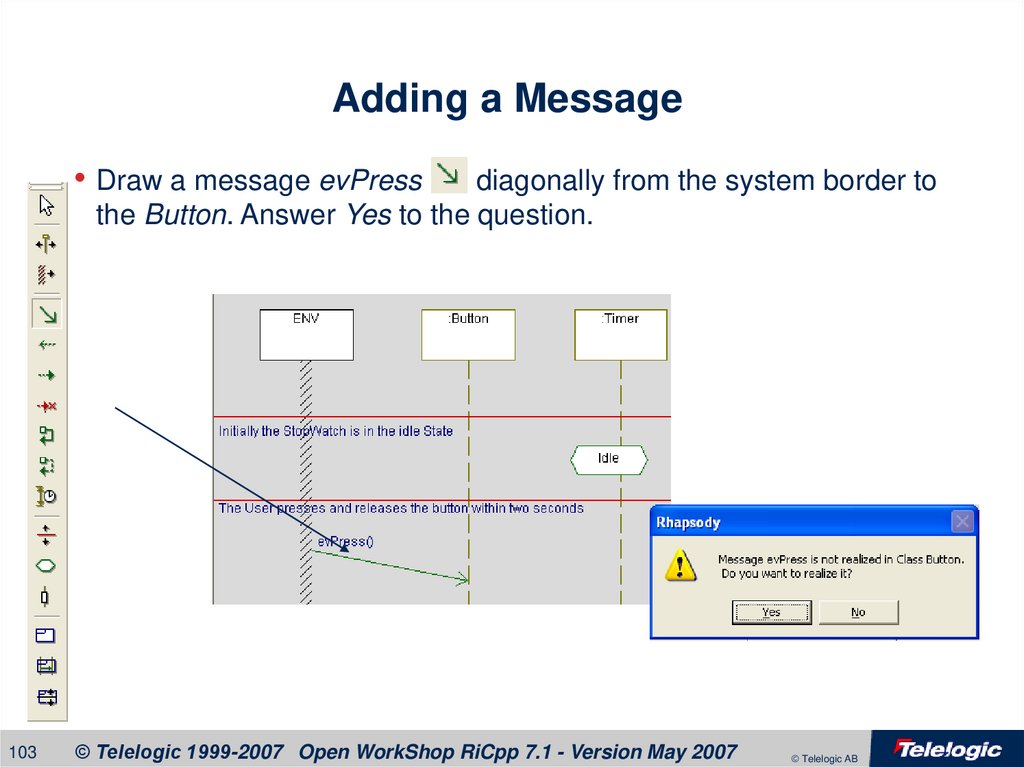
103. Adding a Message
• Draw a message evPressdiagonally from the system border to
the Button. Answer Yes to the question.
103
© Telelogic 1999-2007 Open WorkShop RiCpp 7.1 - Version May 2007
© Telelogic AB
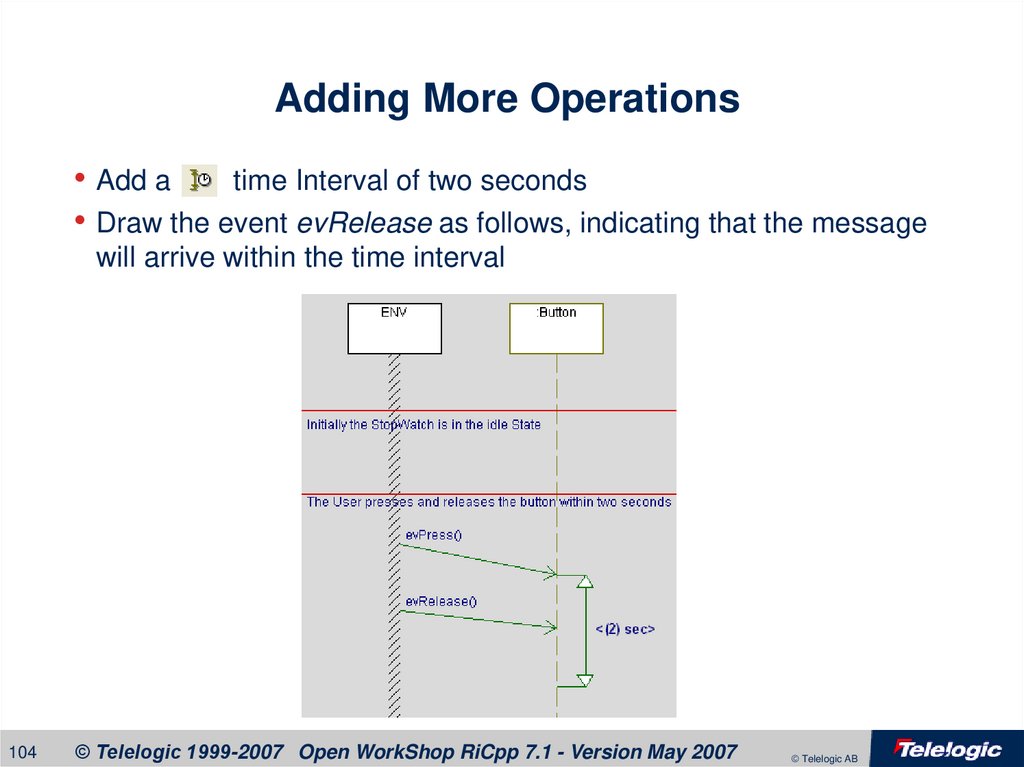
104. Adding More Operations
• Add atime Interval of two seconds
• Draw the event evRelease as follows, indicating that the message
will arrive within the time interval
104
© Telelogic 1999-2007 Open WorkShop RiCpp 7.1 - Version May 2007
© Telelogic AB
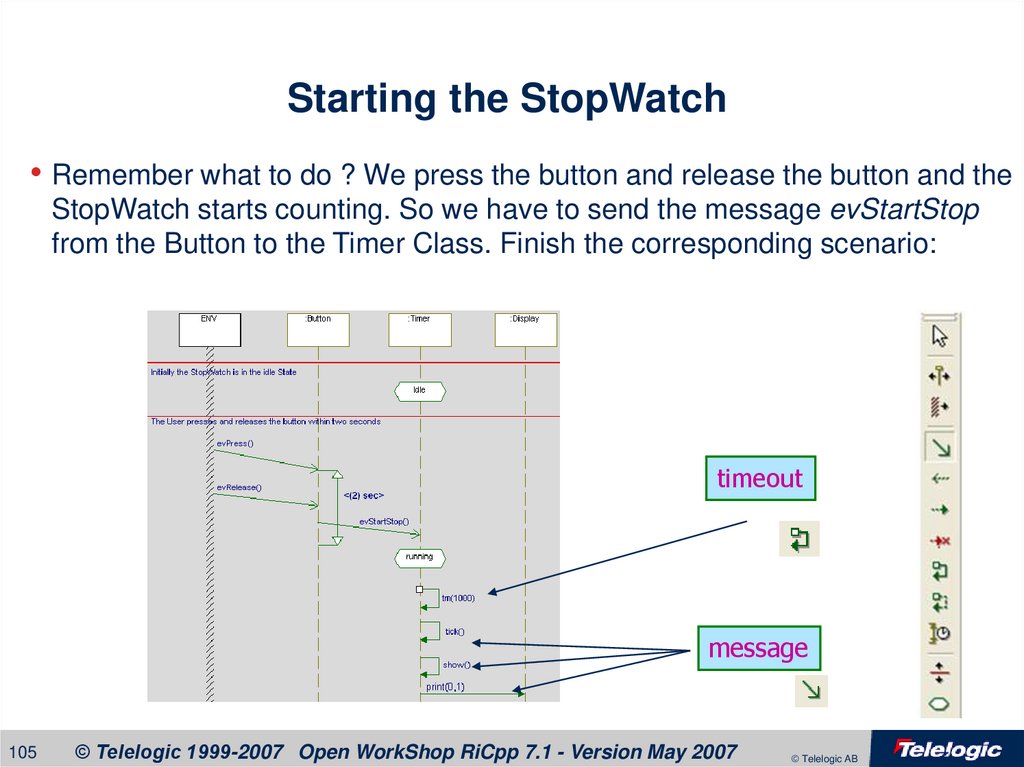
105. Starting the StopWatch
• Remember what to do ? We press the button and release the button and theStopWatch starts counting. So we have to send the message evStartStop
from the Button to the Timer Class. Finish the corresponding scenario:
timeout
message
105
© Telelogic 1999-2007 Open WorkShop RiCpp 7.1 - Version May 2007
© Telelogic AB
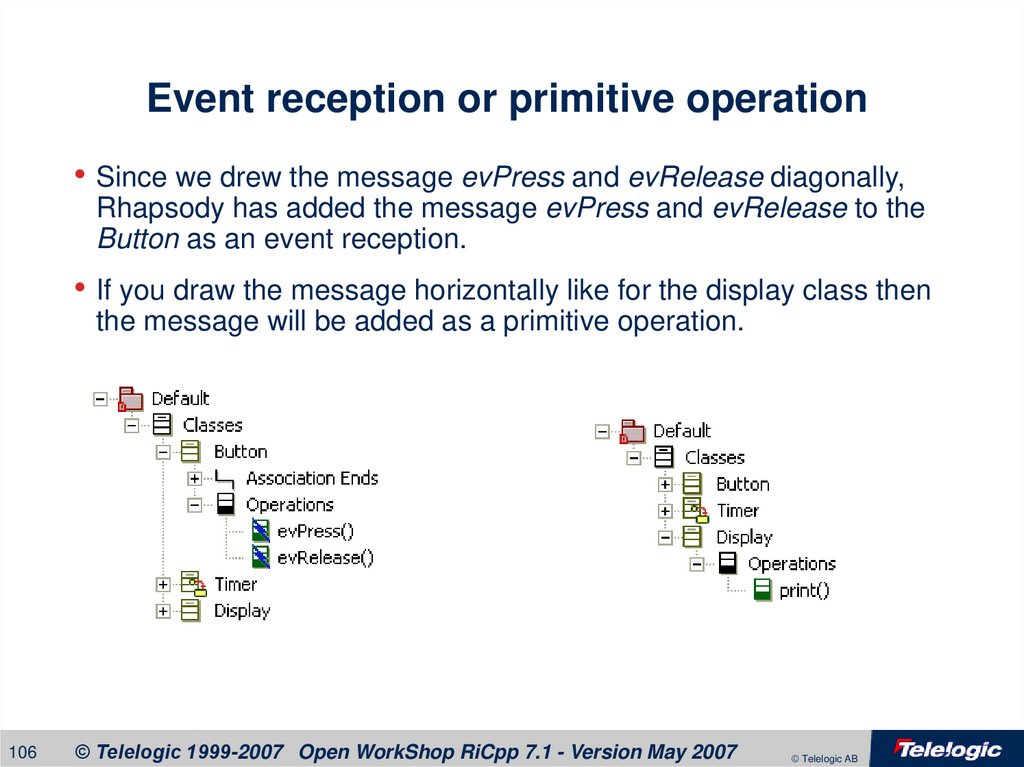
106. Event reception or primitive operation
• Since we drew the message evPress and evRelease diagonally,Rhapsody has added the message evPress and evRelease to the
Button as an event reception.
• If you draw the message horizontally like for the display class then
the message will be added as a primitive operation.
106
© Telelogic 1999-2007 Open WorkShop RiCpp 7.1 - Version May 2007
© Telelogic AB
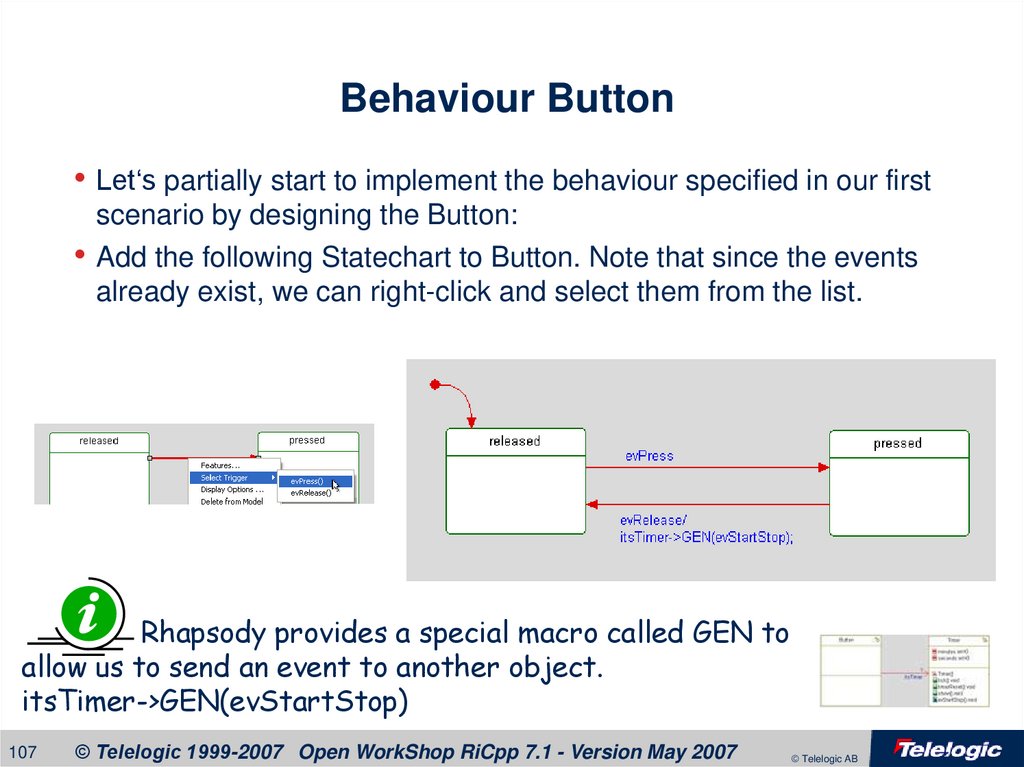
107. Behaviour Button
• Let‘s partially start to implement the behaviour specified in our firstscenario by designing the Button:
• Add the following Statechart to Button. Note that since the events
already exist, we can right-click and select them from the list.
Rhapsody provides a special macro called GEN to
allow us to send an event to another object.
itsTimer->GEN(evStartStop)
107
© Telelogic 1999-2007 Open WorkShop RiCpp 7.1 - Version May 2007
© Telelogic AB
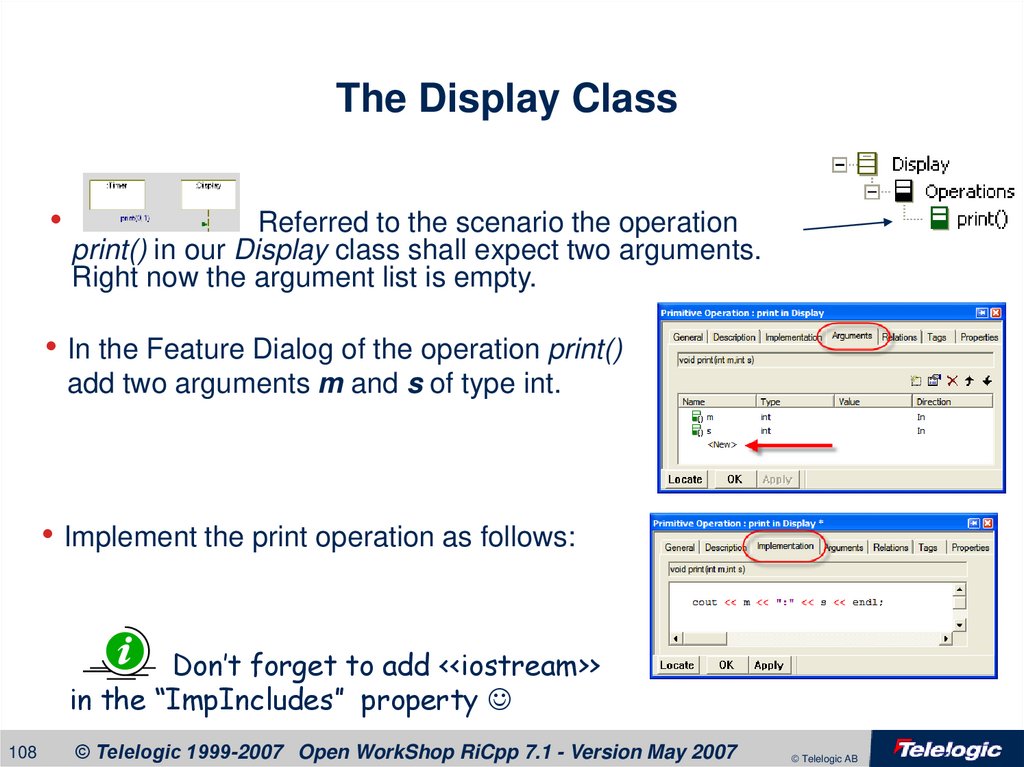
108. The Display Class
Referred to the scenario the operation
print() in our Display class shall expect two arguments.
Right now the argument list is empty.
• In the Feature Dialog of the operation print()
add two arguments m and s of type int.
• Implement the print operation as follows:
Don’t forget to add <<iostream>>
in the “ImpIncludes” property
108
© Telelogic 1999-2007 Open WorkShop RiCpp 7.1 - Version May 2007
© Telelogic AB
109.
Building a Runtime and get theRelations initialized
109
© Telelogic 1999-2007 Open WorkShop RiCpp 7.1 - Version May 2007
© Telelogic AB
110. Instances
• There are many ways in which we could create instances of ourclasses.
– We could create initial instances of all our classes.
– We could create global instances of all our classes.
– We could create an initial instance of just the Timer and then get
it to create the other instances.
– We could use an additional class to create the instances for us.
• We’ll look at each of these solutions individually, but no matter which
solution we take, we must ensure that the relations get initialized. If
we don’t, then the relations will be NULL pointers and the generated
executable will crash
110
© Telelogic 1999-2007 Open WorkShop RiCpp 7.1 - Version May 2007
© Telelogic AB
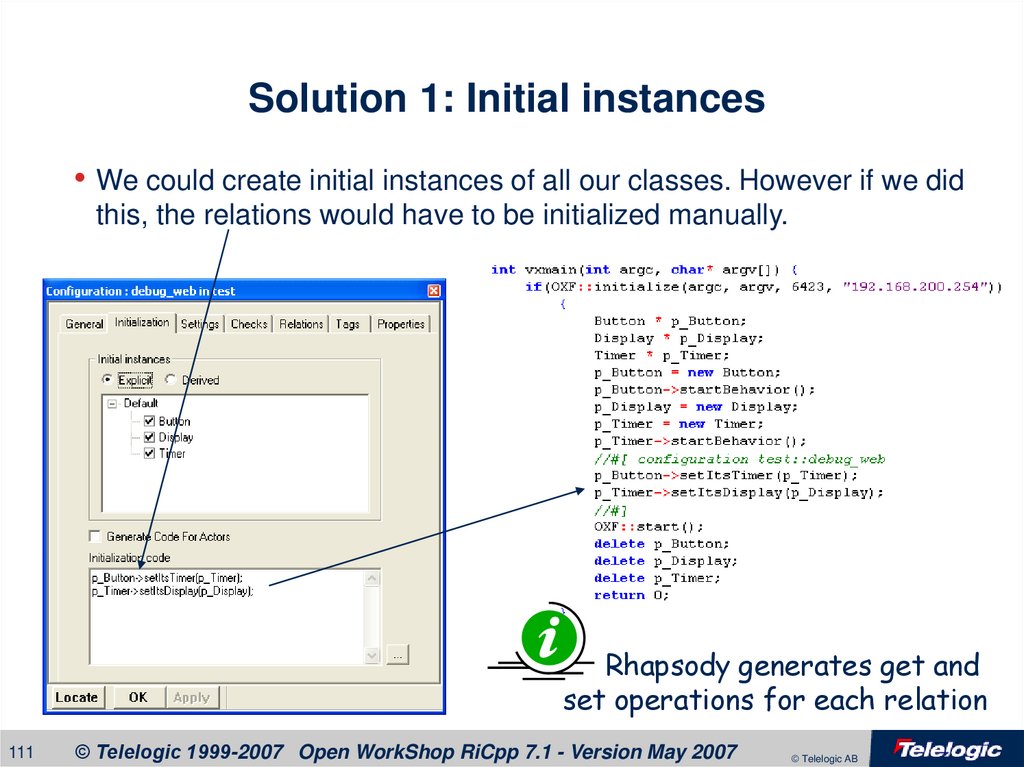
111. Solution 1: Initial instances
• We could create initial instances of all our classes. However if we didthis, the relations would have to be initialized manually.
Rhapsody generates get and
set operations for each relation
111
© Telelogic 1999-2007 Open WorkShop RiCpp 7.1 - Version May 2007
© Telelogic AB
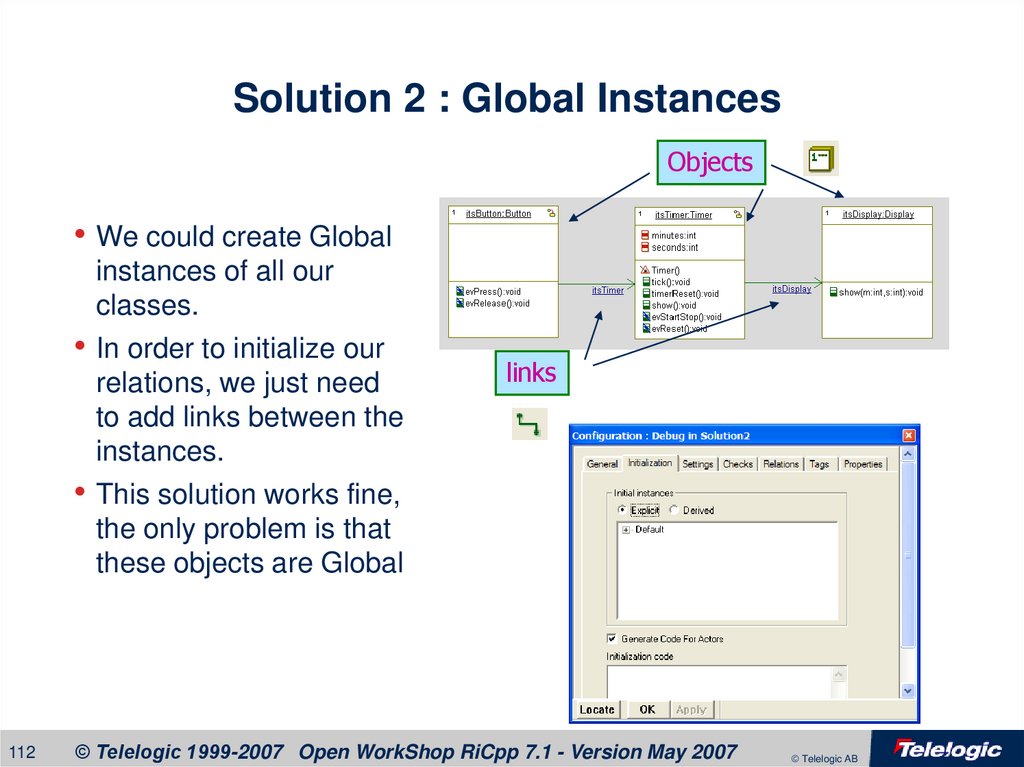
112. Solution 2 : Global Instances
Objects• We could create Global
instances of all our
classes.
• In order to initialize our
relations, we just need
to add links between the
instances.
• This solution works fine,
the only problem is that
these objects are Global
112
links
© Telelogic 1999-2007 Open WorkShop RiCpp 7.1 - Version May 2007
© Telelogic AB
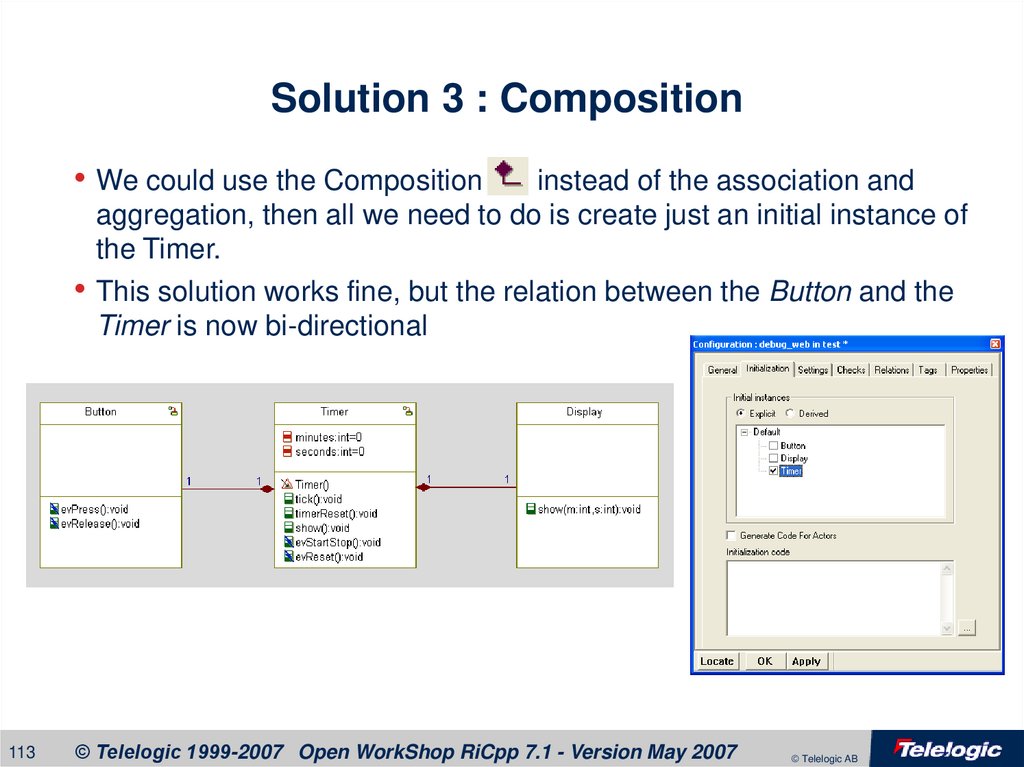
113. Solution 3 : Composition
• We could use the Compositioninstead of the association and
aggregation, then all we need to do is create just an initial instance of
the Timer.
• This solution works fine, but the relation between the Button and the
Timer is now bi-directional
113
© Telelogic 1999-2007 Open WorkShop RiCpp 7.1 - Version May 2007
© Telelogic AB
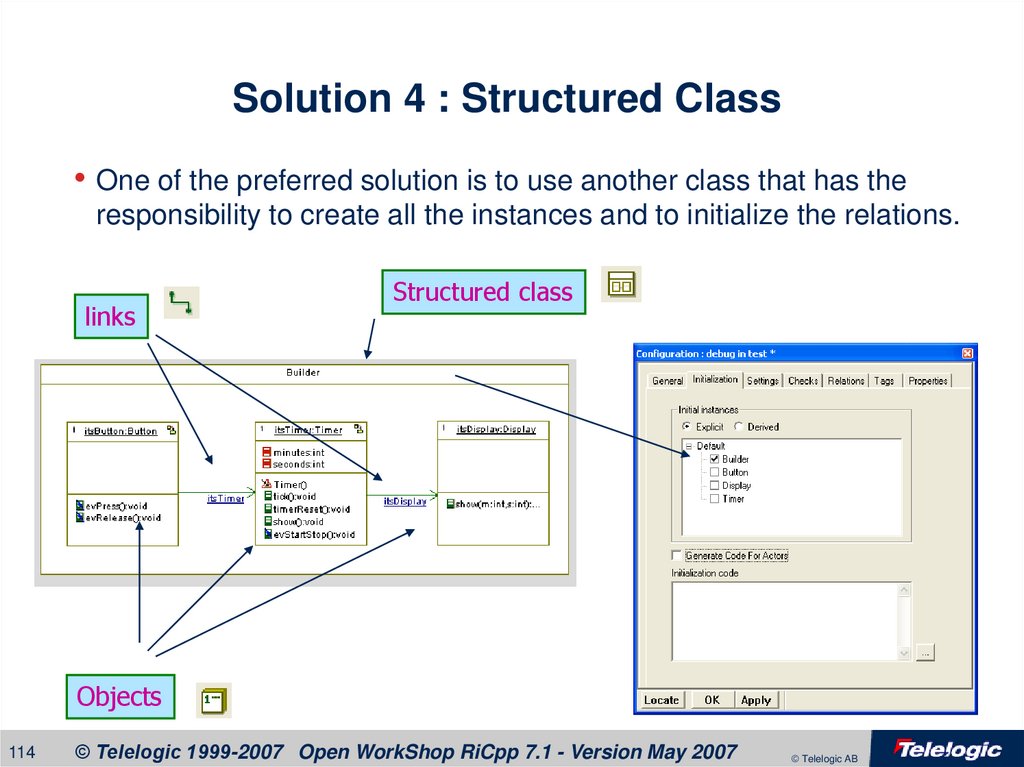
114. Solution 4 : Structured Class
• One of the preferred solution is to use another class that has theresponsibility to create all the instances and to initialize the relations.
links
Structured class
Objects
114
© Telelogic 1999-2007 Open WorkShop RiCpp 7.1 - Version May 2007
© Telelogic AB
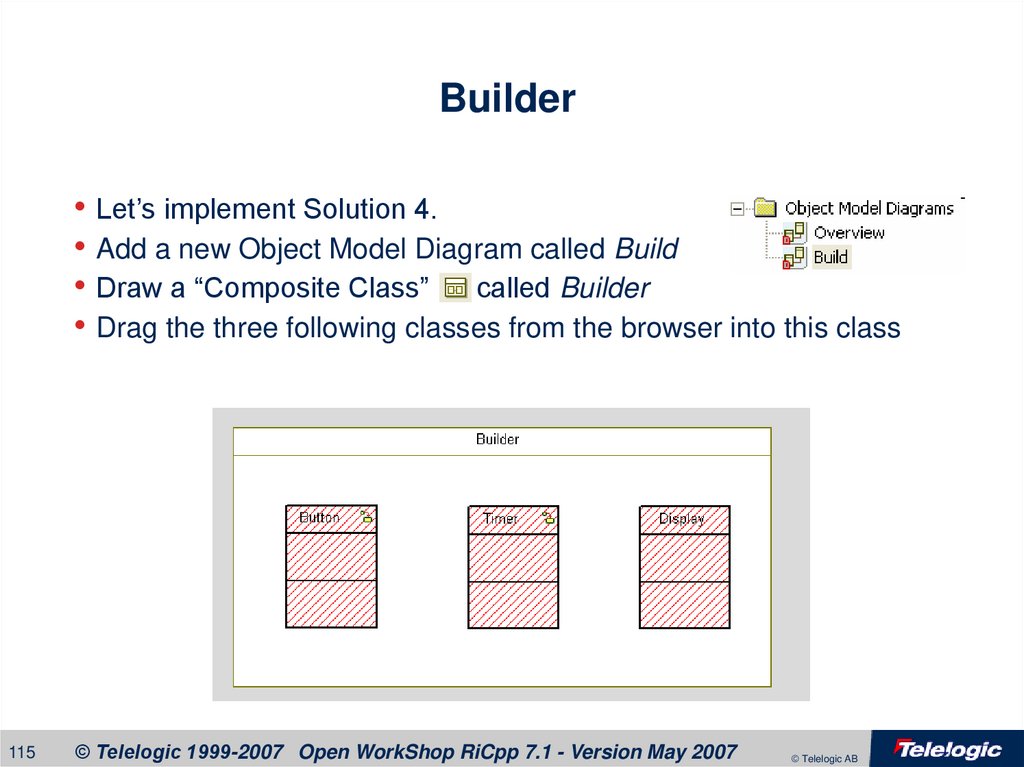
115. Builder
• Let’s implement Solution 4.• Add a new Object Model Diagram called Build
• Draw a “Composite Class” called Builder
• Drag the three following classes from the browser into this class
115
© Telelogic 1999-2007 Open WorkShop RiCpp 7.1 - Version May 2007
© Telelogic AB
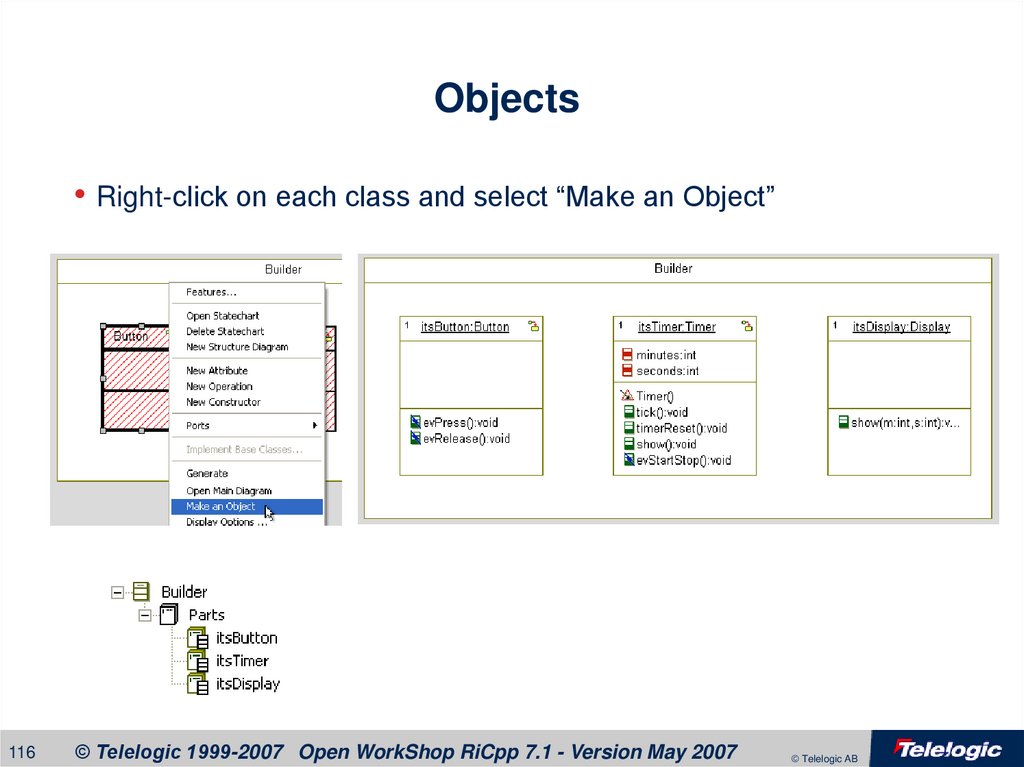
116. Objects
• Right-click on each class and select “Make an Object”116
© Telelogic 1999-2007 Open WorkShop RiCpp 7.1 - Version May 2007
© Telelogic AB
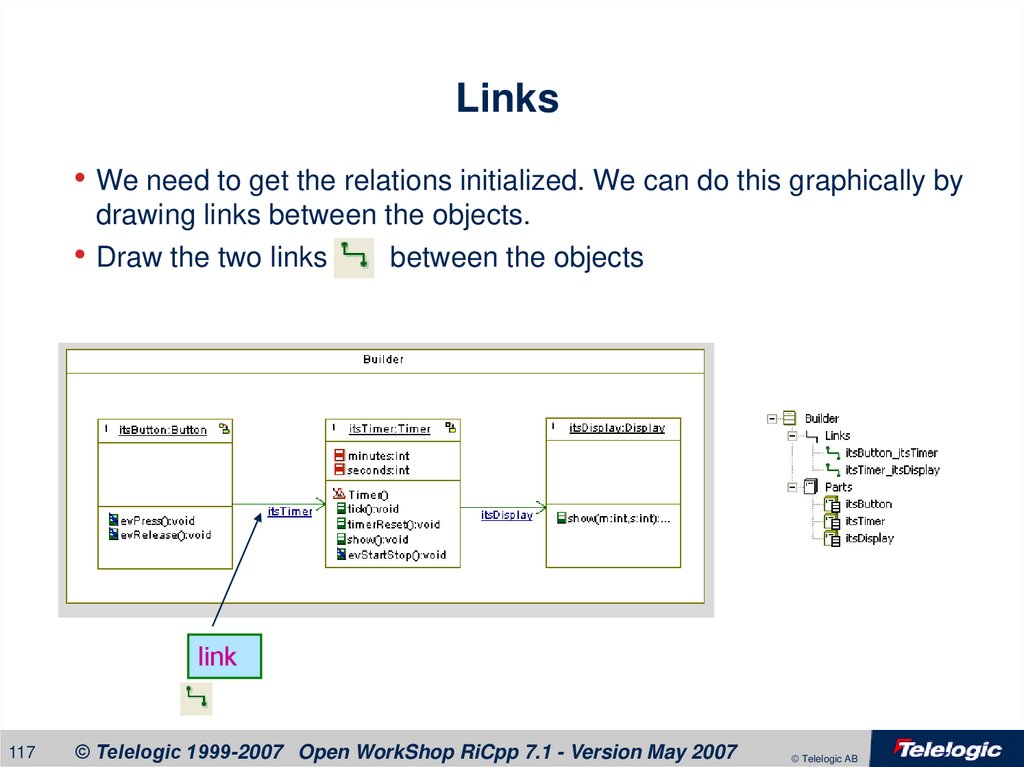
117. Links
• We need to get the relations initialized. We can do this graphically bydrawing links between the objects.
• Draw the two links
between the objects
link
117
© Telelogic 1999-2007 Open WorkShop RiCpp 7.1 - Version May 2007
© Telelogic AB
118. Component
• Now all we need is to create an initial instance of the Builder. TheBuilder will then create all the objects and initialize the relations
between them.
• Modify the Debug configuration of the Test component
118
© Telelogic 1999-2007 Open WorkShop RiCpp 7.1 - Version May 2007
© Telelogic AB
119. Generating Code
• We’re now again ready to generate code. Close all diagrams (especiallythe sequence diagrams)
• Save the model
• Open Scenario Starting and Stopping the Stopwatch
• Generate/Make/Run and Go the application
• Check that all the Instances have been created and that all the relations
have been initialized:
119
© Telelogic 1999-2007 Open WorkShop RiCpp 7.1 - Version May 2007
© Telelogic AB
120. Animated Sequence Diagram
• Rhapsody will automatically open an animated version of ourSequence Diagram
• Right click on the Button Lifeline and generate evPress and
evRelease. Observe the message exchange between the Lifelines
120
© Telelogic 1999-2007 Open WorkShop RiCpp 7.1 - Version May 2007
© Telelogic AB
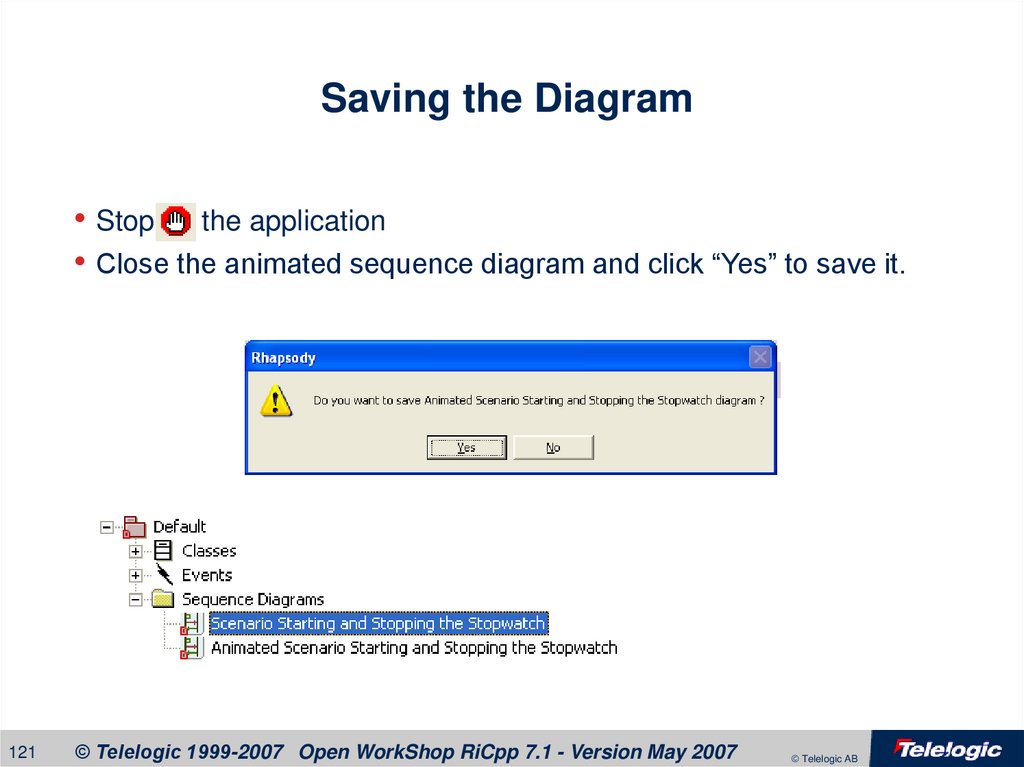
121. Saving the Diagram
• Stop the application• Close the animated sequence diagram and click “Yes” to save it.
121
© Telelogic 1999-2007 Open WorkShop RiCpp 7.1 - Version May 2007
© Telelogic AB
122. Comparing Sequence Diagrams
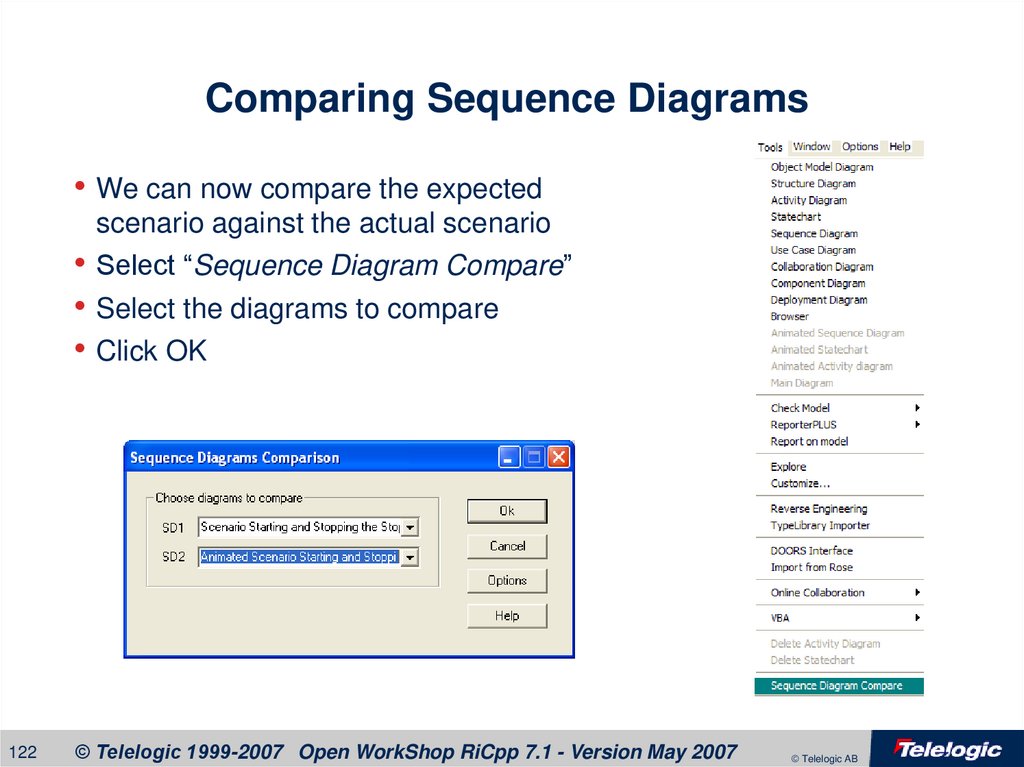
• We can now compare the expectedscenario against the actual scenario
• Select “Sequence Diagram Compare”
• Select the diagrams to compare
• Click OK
122
© Telelogic 1999-2007 Open WorkShop RiCpp 7.1 - Version May 2007
© Telelogic AB
123. The comparison
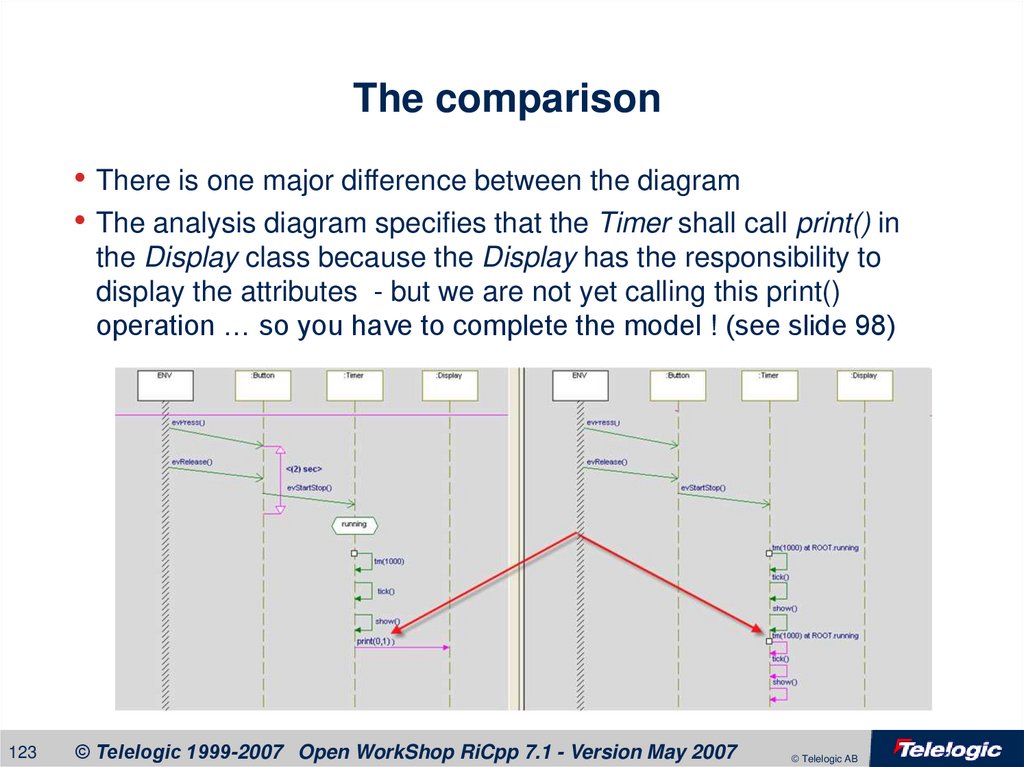
• There is one major difference between the diagram• The analysis diagram specifies that the Timer shall call print() in
the Display class because the Display has the responsibility to
display the attributes - but we are not yet calling this print()
operation … so you have to complete the model ! (see slide 98)
123
© Telelogic 1999-2007 Open WorkShop RiCpp 7.1 - Version May 2007
© Telelogic AB
124.
Blank Page124
© Telelogic 1999-2007 Open WorkShop RiCpp 7.1 - Version May 2007
© Telelogic AB
125.
Completing the Model125
© Telelogic 1999-2007 Open WorkShop RiCpp 7.1 - Version May 2007
© Telelogic AB
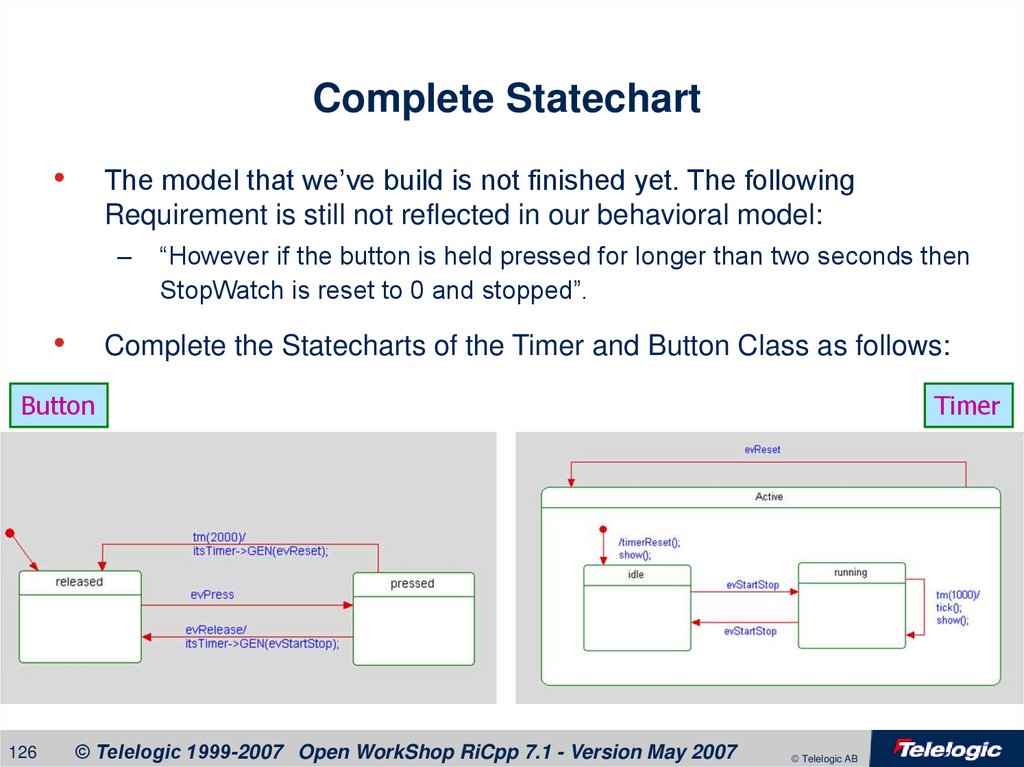
126. Complete Statechart
The model that we’ve build is not finished yet. The following
Requirement is still not reflected in our behavioral model:
–
“However if the button is held pressed for longer than two seconds then
StopWatch is reset to 0 and stopped”.
Complete the Statecharts of the Timer and Button Class as follows:
Button
126
© Telelogic 1999-2007 Open WorkShop RiCpp 7.1 - Version May 2007
Timer
© Telelogic AB
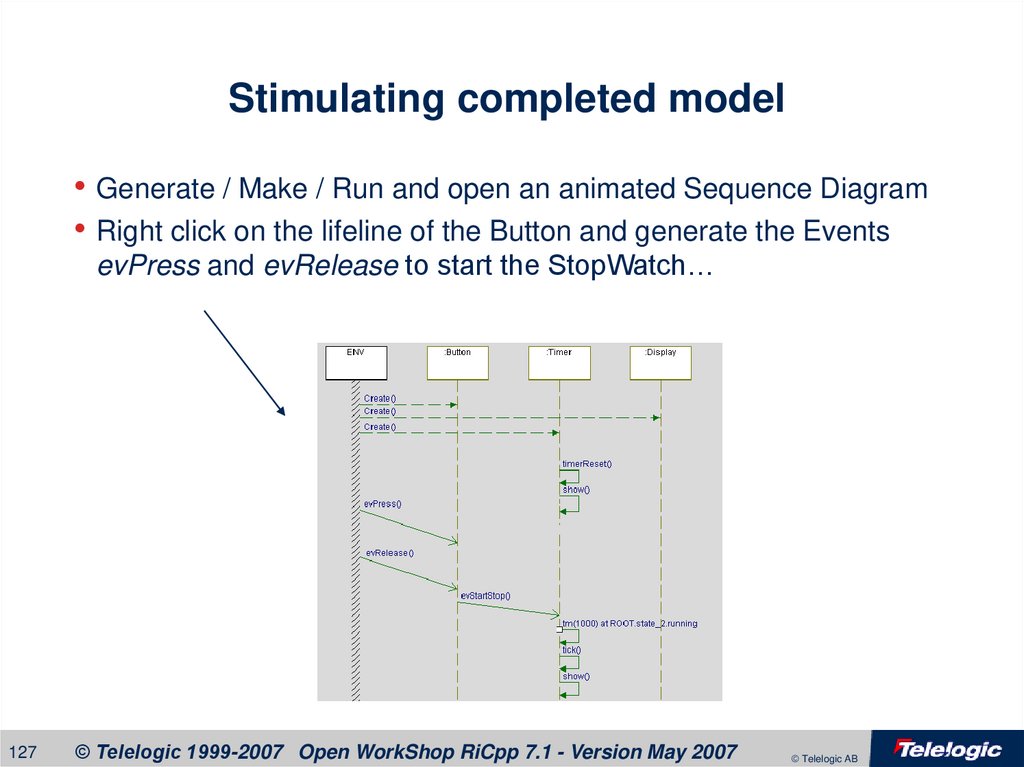
127. Stimulating completed model
• Generate / Make / Run and open an animated Sequence Diagram• Right click on the lifeline of the Button and generate the Events
evPress and evRelease to start the StopWatch…
127
© Telelogic 1999-2007 Open WorkShop RiCpp 7.1 - Version May 2007
© Telelogic AB
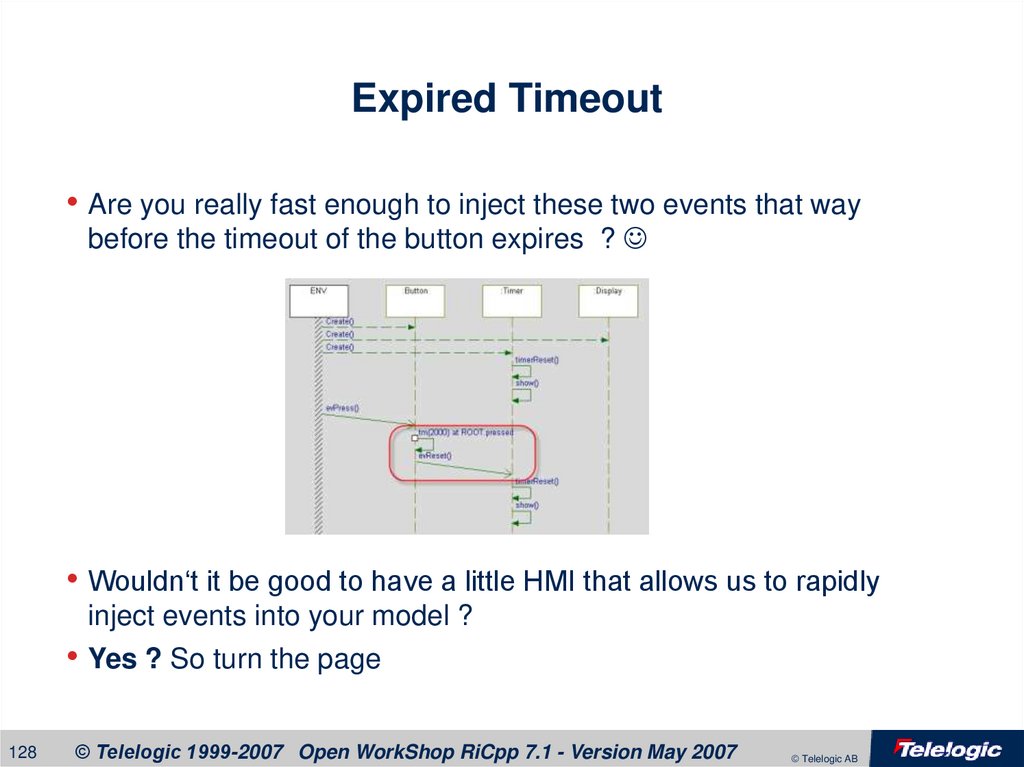
128. Expired Timeout
• Are you really fast enough to inject these two events that waybefore the timeout of the button expires ?
• Wouldn‘t it be good to have a little HMI that allows us to rapidly
inject events into your model ?
• Yes ? So turn the page
128
© Telelogic 1999-2007 Open WorkShop RiCpp 7.1 - Version May 2007
© Telelogic AB
129.
Webify Toolkit129
© Telelogic 1999-2007 Open WorkShop RiCpp 7.1 - Version May 2007
© Telelogic AB
130. Webify Toolkit
• As our model grows, selecting the right event becomes more andmore “annoying”. To make it more convenient for us let’s build a little
GUI in order to stimulate the model .
• Create a new configuration by copying the Debug configuration. Hold
the CTRL key and drag the Debug configuration onto the
“Configurations” folder. Rename the new configuration to
Debug_web
• Select Web Enabling
Web Enabling
130
© Telelogic 1999-2007 Open WorkShop RiCpp 7.1 - Version May 2007
© Telelogic AB
131. Stereotype Webify
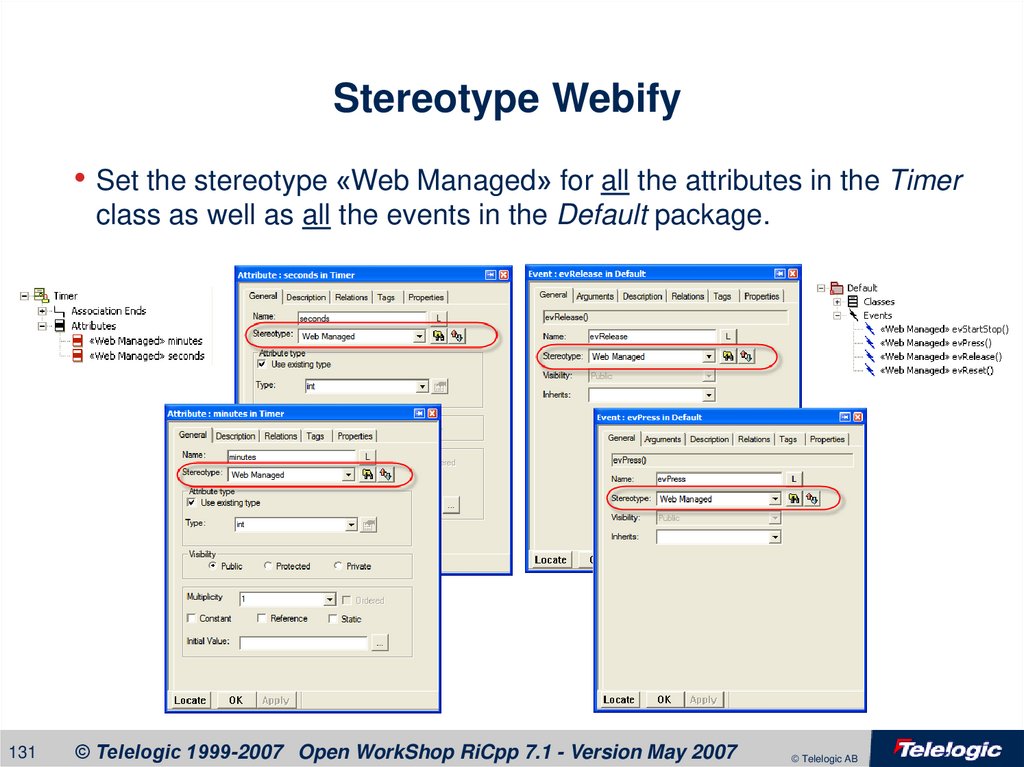
• Set the stereotype «Web Managed» for all the attributes in the Timerclass as well as all the events in the Default package.
131
© Telelogic 1999-2007 Open WorkShop RiCpp 7.1 - Version May 2007
© Telelogic AB
132. Hyperlink
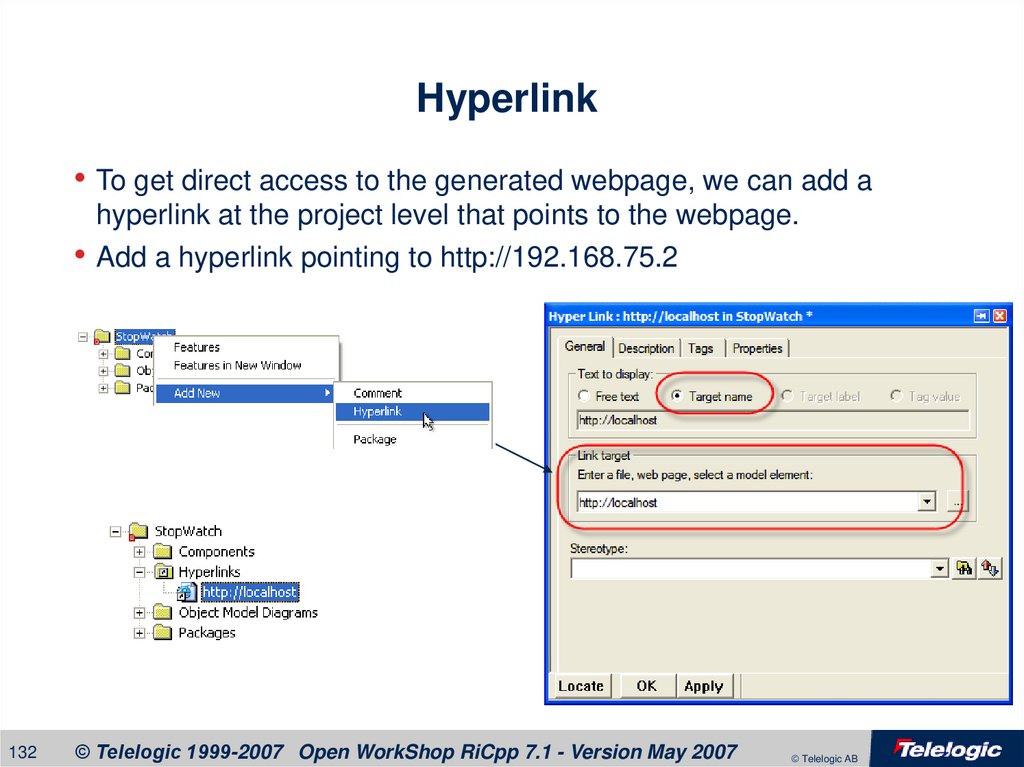
• To get direct access to the generated webpage, we can add ahyperlink at the project level that points to the webpage.
• Add a hyperlink pointing to http://192.168.75.2
132
© Telelogic 1999-2007 Open WorkShop RiCpp 7.1 - Version May 2007
© Telelogic AB
133. http://192.168.75.2
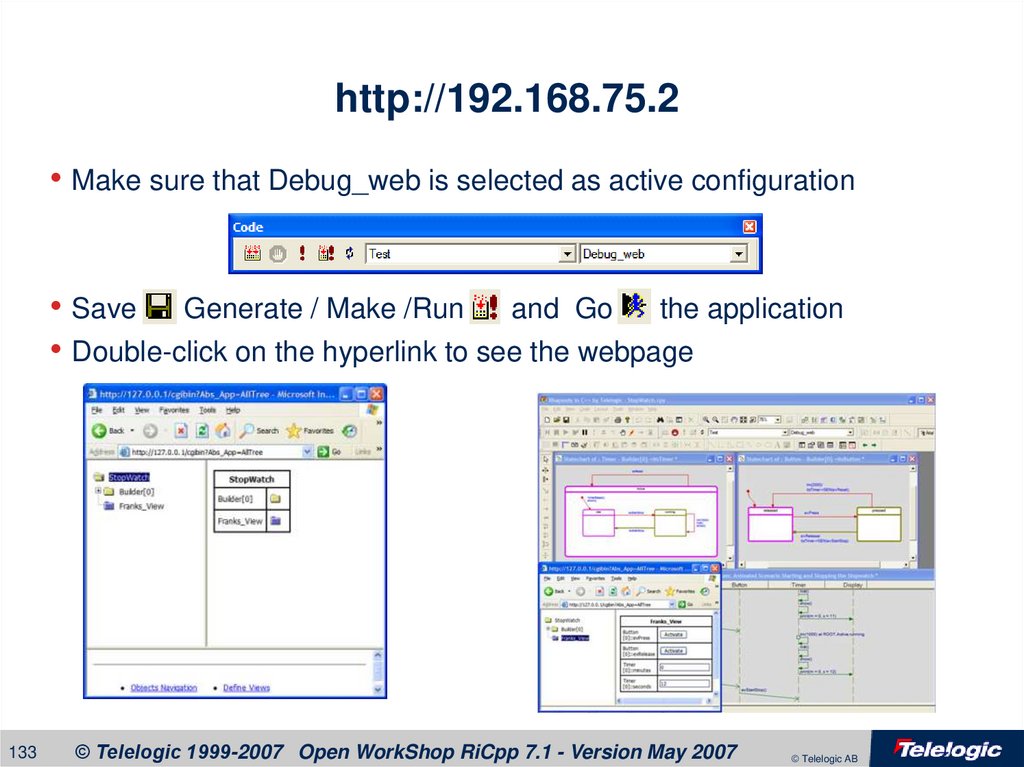
• Make sure that Debug_web is selected as active configuration• Save Generate / Make /Run and Go the application
• Double-click on the hyperlink to see the webpage
133
© Telelogic 1999-2007 Open WorkShop RiCpp 7.1 - Version May 2007
© Telelogic AB
134.
Threads134
© Telelogic 1999-2007 Open WorkShop RiCpp 7.1 - Version May 2007
© Telelogic AB
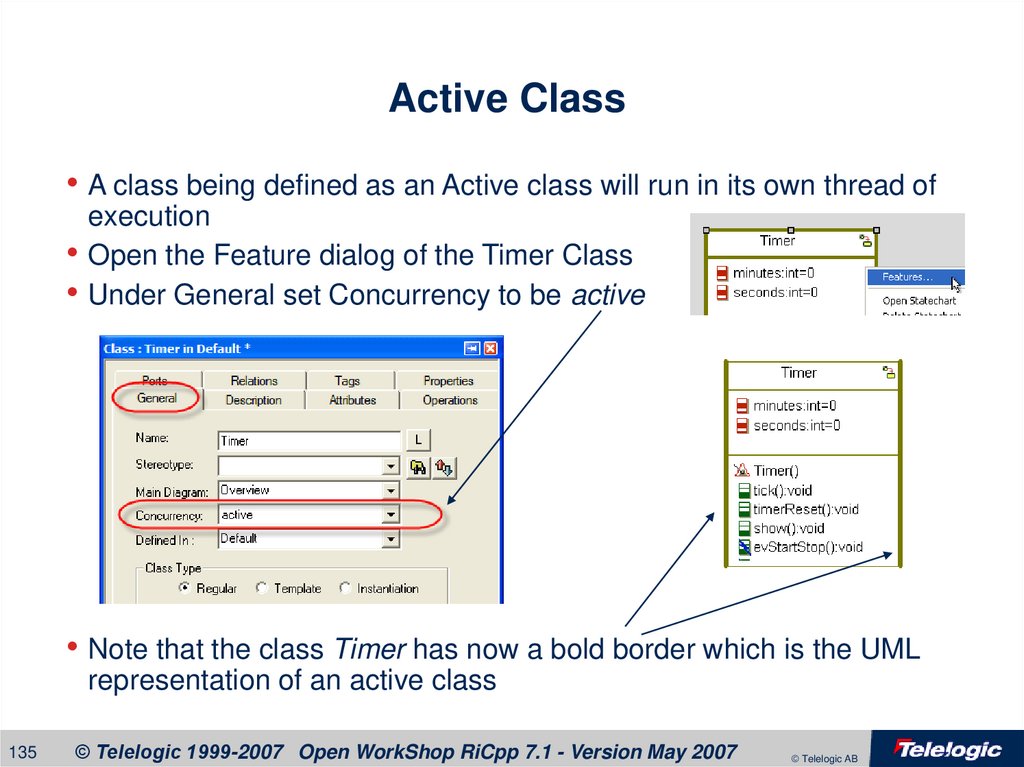
135. Active Class
• A class being defined as an Active class will run in its own thread ofexecution
• Open the Feature dialog of the Timer Class
• Under General set Concurrency to be active
• Note that the class Timer has now a bold border which is the UML
representation of an active class
135
© Telelogic 1999-2007 Open WorkShop RiCpp 7.1 - Version May 2007
© Telelogic AB
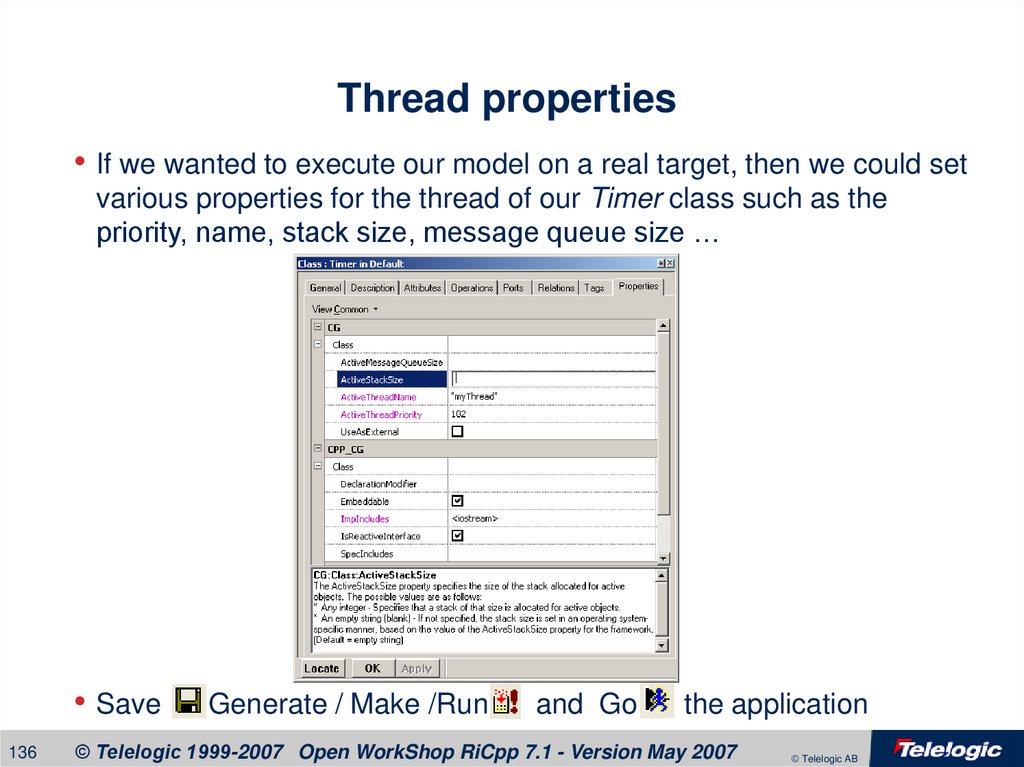
136. Thread properties
• If we wanted to execute our model on a real target, then we could setvarious properties for the thread of our Timer class such as the
priority, name, stack size, message queue size …
• Save
136
Generate / Make /Run
and Go
the application
© Telelogic 1999-2007 Open WorkShop RiCpp 7.1 - Version May 2007
© Telelogic AB
137. Threads
• Now that we have an active class we can use the thread buttonto inspect the threads.
• We can set the focus of the call stack and event queue to any one
thread.
Set Focus
The animation must
be paused
to get
access to the thread
button.
The call stack shows the actions and the event queue
shows the pending events just for the current thread.
137
© Telelogic 1999-2007 Open WorkShop RiCpp 7.1 - Version May 2007
© Telelogic AB
138.
Blank Page138
© Telelogic 1999-2007 Open WorkShop RiCpp 7.1 - Version May 2007
© Telelogic AB
139.
ReporterPLUS139
© Telelogic 1999-2007 Open WorkShop RiCpp 7.1 - Version May 2007
© Telelogic AB
140. ReporterPLUS
• In order to generate a report on the model we have created thus far, goto Tools->ReporterPLUS->Report on all model elements…
140
© Telelogic 1999-2007 Open WorkShop RiCpp 7.1 - Version May 2007
© Telelogic AB
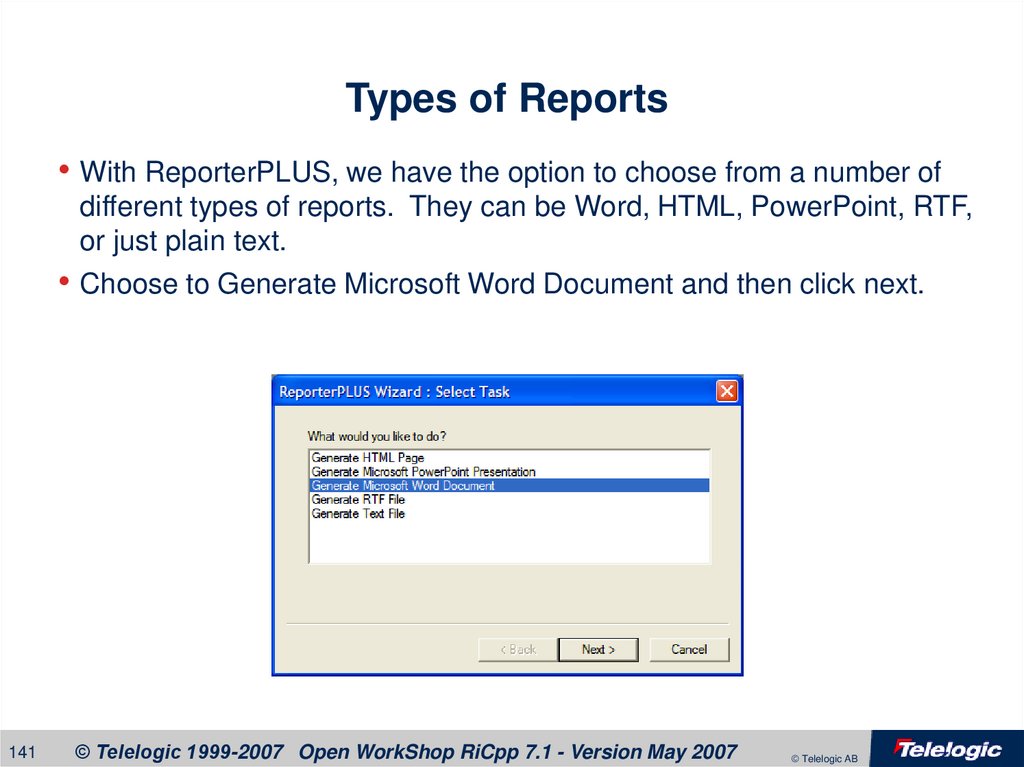
141. Types of Reports
• With ReporterPLUS, we have the option to choose from a number ofdifferent types of reports. They can be Word, HTML, PowerPoint, RTF,
or just plain text.
• Choose to Generate Microsoft Word Document and then click next.
141
© Telelogic 1999-2007 Open WorkShop RiCpp 7.1 - Version May 2007
© Telelogic AB
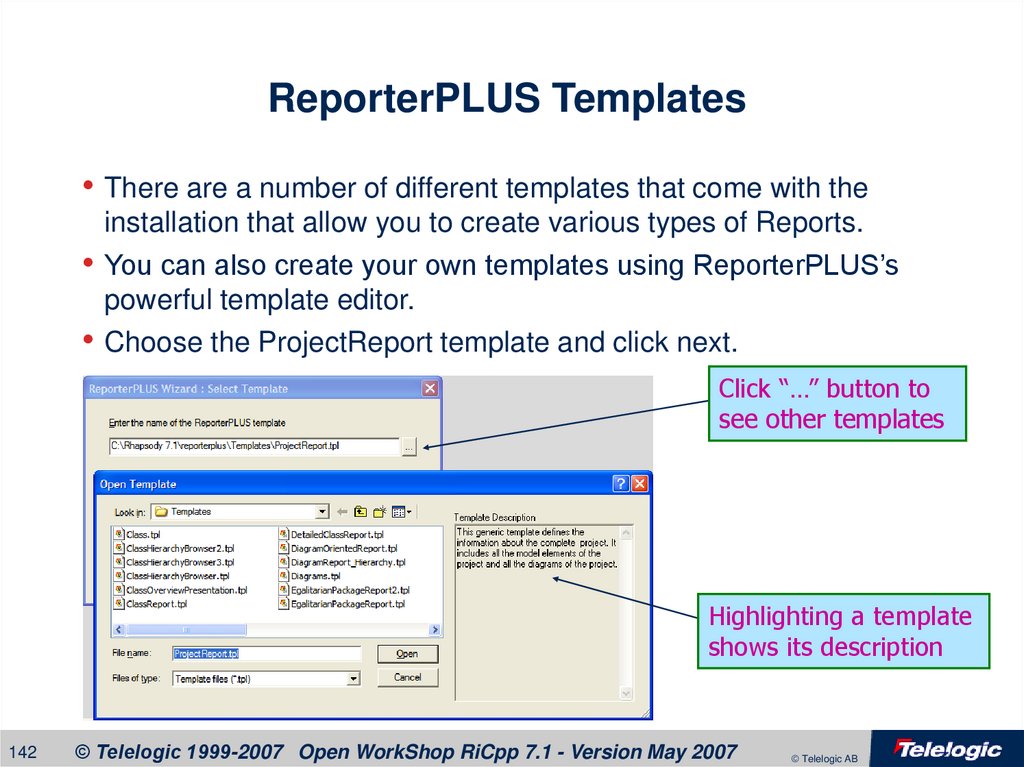
142. ReporterPLUS Templates
• There are a number of different templates that come with theinstallation that allow you to create various types of Reports.
• You can also create your own templates using ReporterPLUS’s
powerful template editor.
• Choose the ProjectReport template and click next.
Click “…” button to
see other templates
Highlighting a template
shows its description
142
© Telelogic 1999-2007 Open WorkShop RiCpp 7.1 - Version May 2007
© Telelogic AB
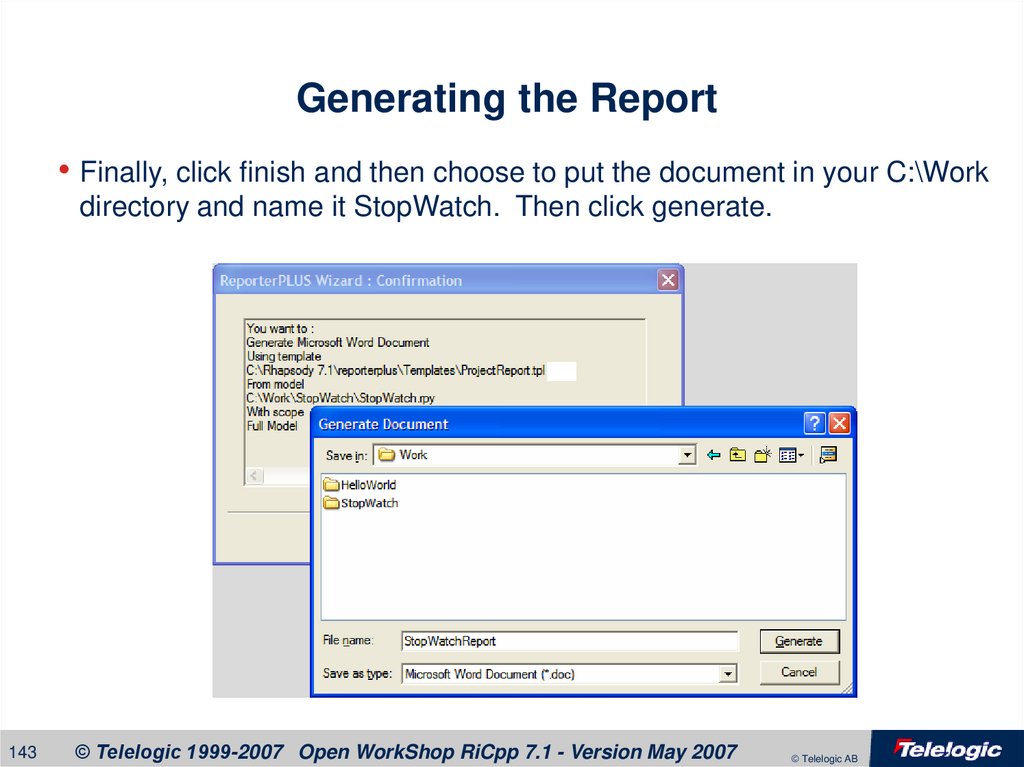
143. Generating the Report
• Finally, click finish and then choose to put the document in your C:\Workdirectory and name it StopWatch. Then click generate.
143
© Telelogic 1999-2007 Open WorkShop RiCpp 7.1 - Version May 2007
© Telelogic AB
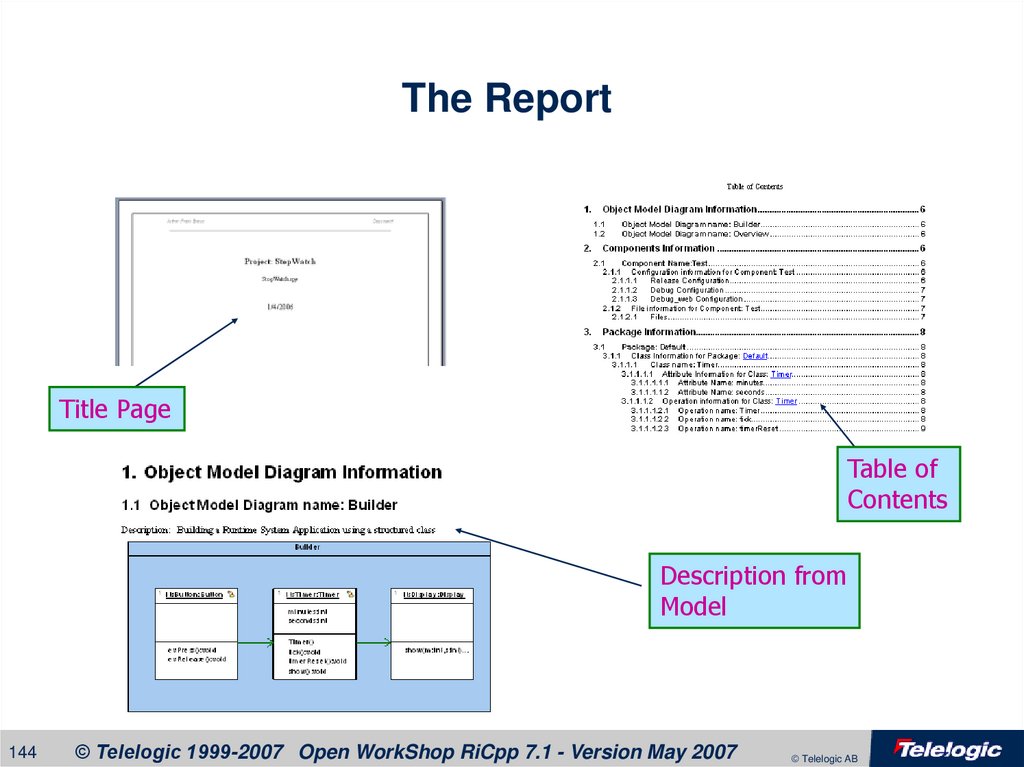
144. The Report
Title PageTable of
Contents
Description from
Model
144
© Telelogic 1999-2007 Open WorkShop RiCpp 7.1 - Version May 2007
© Telelogic AB
145. You did it …
• We could continue and do so many other cool things withRhapsody… but unfortunately
we’re finished for today … ooohhhh.
145
© Telelogic 1999-2007 Open WorkShop RiCpp 7.1 - Version May 2007
© Telelogic AB
146. Summary
• UML and Model-Driven Development• Applied first steps of MDD to Real-time Embedded Applications
• Creation and Execution of/on target platforms
• Design Level debugging
• Benefits of Productivity and Quality
• Next steps:
– Play around with the environment. You still have a license for a few days !!
– Visit our web sites for white papers, more info, downloads.
– Contact our sales representatives.
146
© Telelogic 1999-2007 Open WorkShop RiCpp 7.1 - Version May 2007
© Telelogic AB
147.
147© Telelogic 1999-2007 Open WorkShop RiCpp 7.1 - Version May 2007
© Telelogic AB













 programming


